
Все способы:
- Запуск «Локальных пользователей и групп»
- «Пользователи»
- «Группы»
- Добавление нового пользователя
- Присоединение пользователя к группе
- Вопросы и ответы: 15
В системных оснастках Windows 10 присутствует средство для управления учётными записями, сохранёнными на текущем компьютере, которая называется «Локальные пользователи и группы». Давайте разберёмся, что это за инструмент.
Важно! Рассматриваемая оснастка присутствует только в редакциях Pro и Enterprise!
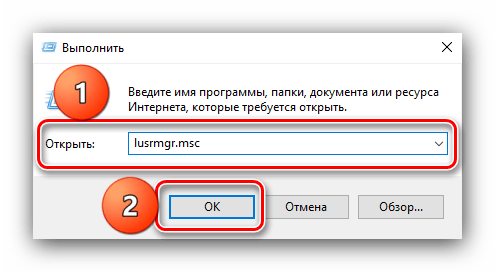
Запуск «Локальных пользователей и групп»
Доступ к рассматриваемому элементу можно получить следующим образом:
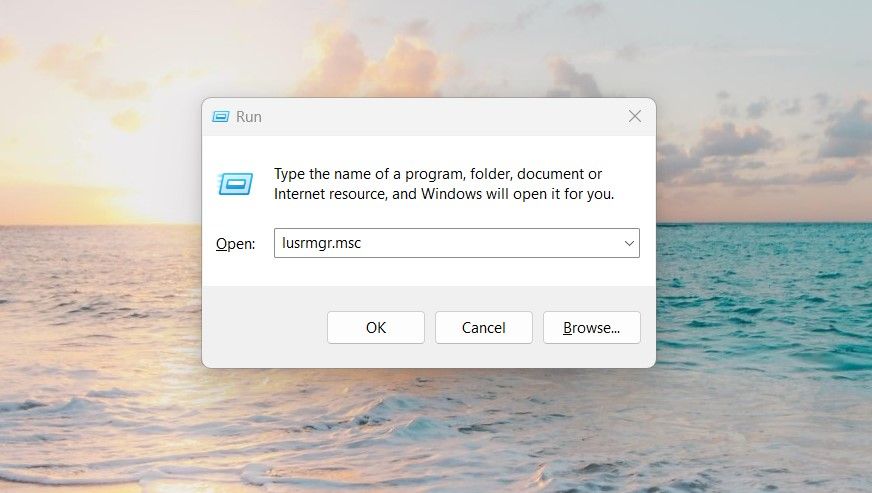
- Вызовите инструмент «Выполнить» сочетанием клавиш Win+R, введите в нём запрос
lusrmgr.mscи щёлкните «ОК». - Запустится нужный инструмент.
Теперь взглянем подробнее на особенности приложения.
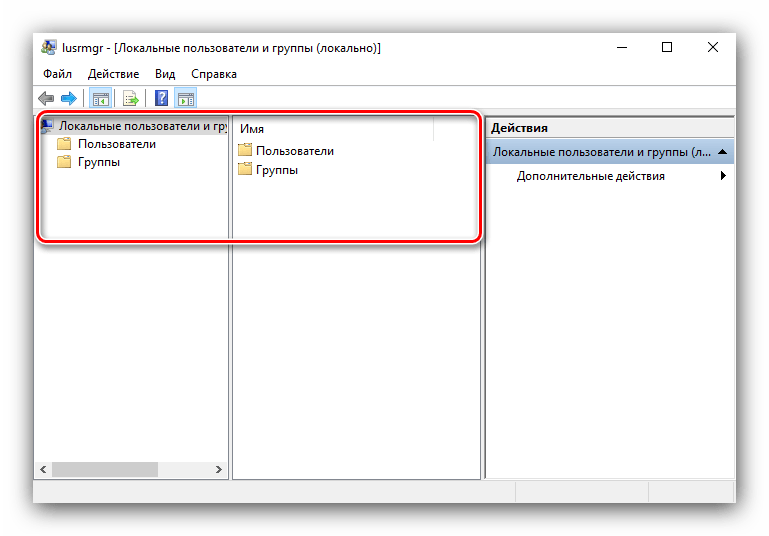
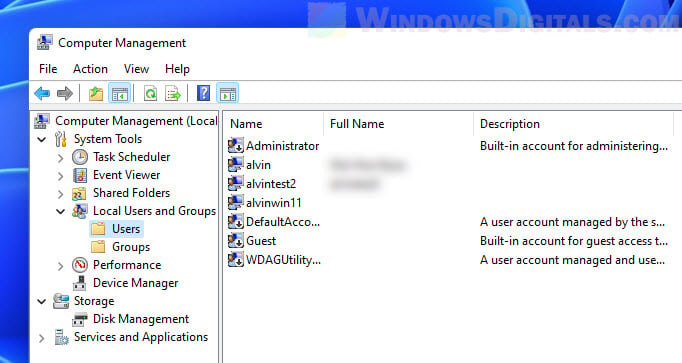
«Пользователи»
В данном каталоге присутствуют такие категории:
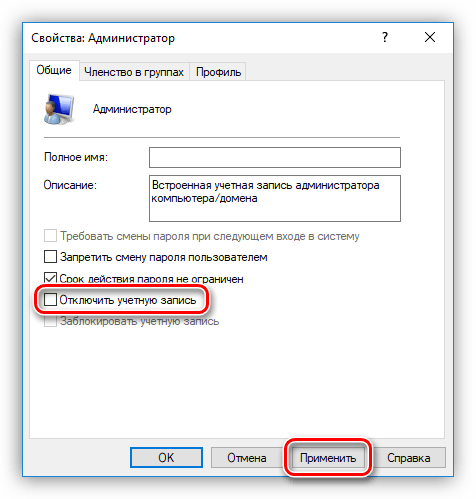
- «Администратор» – встроенный аккаунт, который используется в процессе инсталляции ОС перед тем, как юзер создаст свой собственный. Полномочия данной учётки весьма обширны, плюс её нельзя никаким образом удалить. Она пригодится в случае, когда в систему необходимо внести серьёзные изменения, но обычного пользователя-администратора для этой цели недостаточно.

Читайте также: Использование встроенной учётной записи администратора Windows 10
- «Гость» — второй аккаунт по умолчанию, присутствующий в указанном каталоге. Из названия элемента ясно, каково его предназначение – это гостевая учётка, ограниченная в правах. Данный аккаунт задействуется для разового использования, и по умолчанию отключен из-за возможной угрозы безопасности.
- «WDAGUtilityAccount» — это запись, используемая Защитником Windows при открытии небезопасных сайтов или приложений, чтобы не подвергать опасности основное пространство. Если вы не совершали никаких манипуляций со встроенным в «десятку» антивирусом, WDAGUtilityAccount активен и задействуется.

Читайте также: Отключение Защитника в Windows 10
- «Пользователь» — учётка, созданная при первичной настройке системы.
- «HelpAssistant» — временная запись, которая используется для создания сеанса удаленной помощи. Ею управляет служба Remote Desktop Help Session Manager.
«Группы»
В каталоге «Группы» записей намного больше – они обозначают категории, разграниченные в правах и выполняемых функциях. В этой директории обычно присутствуют следующие элементы:
- «Администраторы» – основная группа, члены которой имеют полный доступ к управлению операционной системой, соответственно, добавлять к ней новые учётки стоит с осторожностью.
- «Администраторы Hyper-V» – здесь находятся записи, которым разрешен доступ к виртуальной машине Hyper-V.
Читайте также: Виртуальная машина в Windows 10
- «Владельцы устройства» – аккаунты из этой категории по своим полномочиям дублируют вариант «Администраторы».
- «Гости» – название говорит само за себя: сюда входят гостевые учётные записи.
- «Криптографические операторы» – пользовательские аккаунты из этого раздела способны выполнять связанные с криптографией действия, например, с цифровыми подписями.
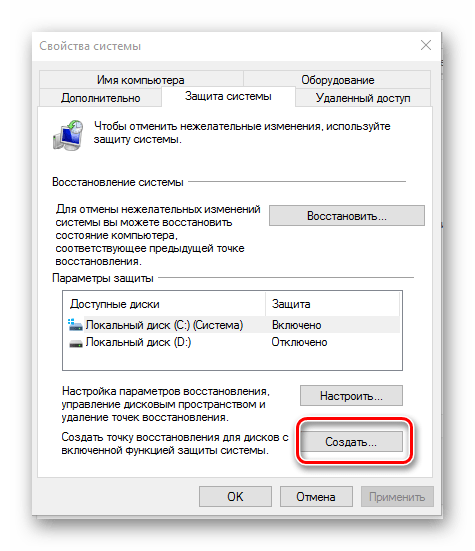
- «Операторы архива» – интересная категория, поскольку записи, которые в неё входят, способны обходить системные ограничения доступа, но только в целях создания точек восстановления или резервного копирования.

Читайте также: Создание точек восстановления Windows 10
- «Операторы настройки сети» – записям из этой категории разрешено управлять подключениями к сетям.
- «Опытные пользователи» – специфичный вариант, который существует для обеспечения совместимости. Дело в том, что эта категория в предыдущих версиях Виндовс обладала ограниченными административными правами для работы с некоторыми приложениями. В десятой редакции, в целях безопасности, редактирование этой группы запрещено, однако учётки в неё помещаются автоматически, если используется одно из тех самых специфичных приложений.
- «Пользователи» – самый большой раздел, в который входят все пользовательские учётные записи.
Остальные позиции представляют собой системные категории, с которыми рядовой юзер навряд ли столкнётся.
Добавление нового пользователя
Посредством рассматриваемой оснастки можно добавить новую учётную запись. Процедура описана одним из наших авторов, рекомендуем прочитать статью по ссылке далее.
Подробнее: Добавление нового пользователя в Windows 10
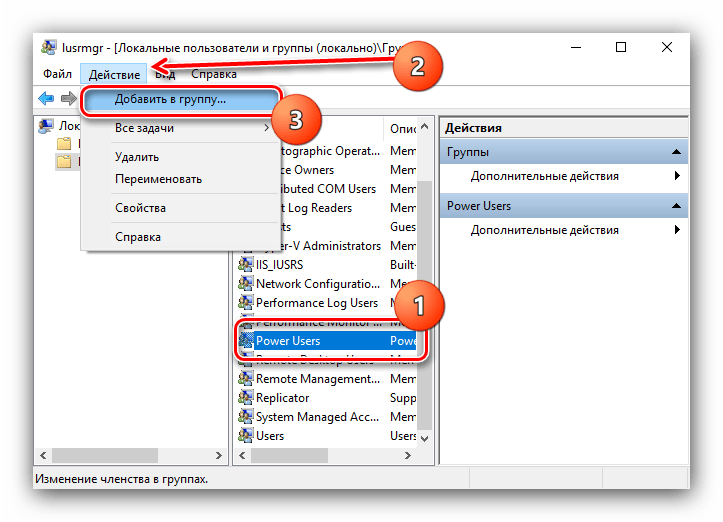
Присоединение пользователя к группе
Редактирование группы происходит по похожему алгоритму:
- Выделите одиночным кликом ЛКМ категорию, после чего воспользуйтесь вариантами «Действие» – «Добавить пользователя в группу».
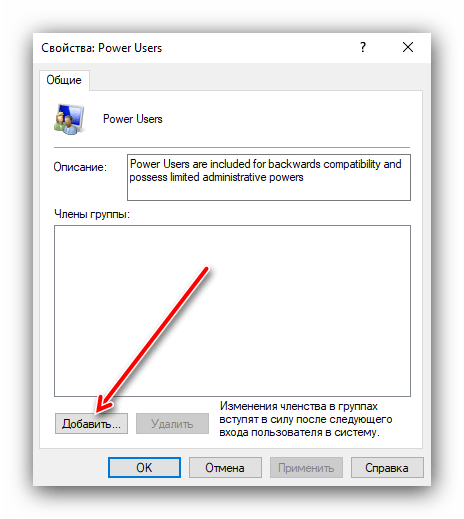
- В окне свойств группы кликните по кнопке «Добавить».
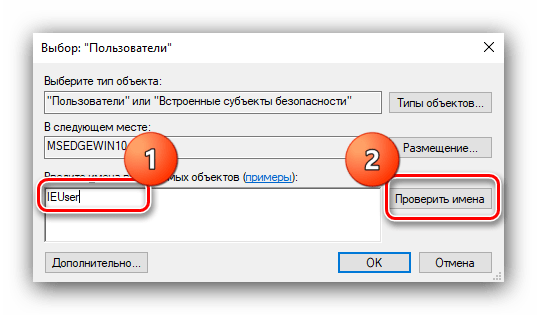
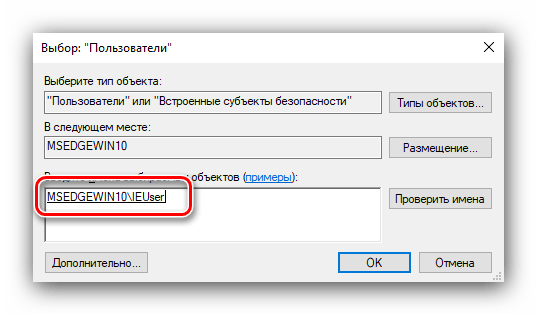
- Укажите имя аккаунта в блоке «Введите имена выбираемых объектов», после чего щёлкните «Проверить имена».

Под названием должно появиться подчёркивание – это означает, что объект распознан и будет присоединён.
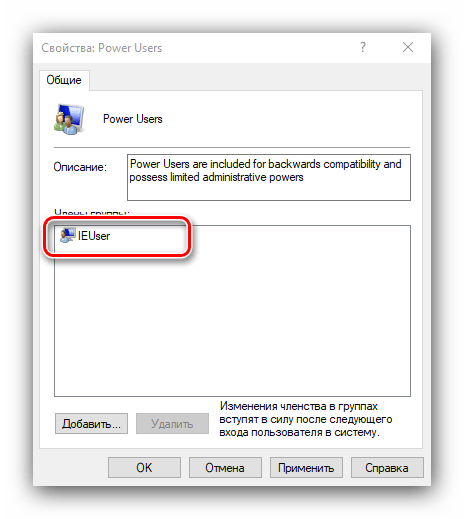
- По возвращении в окно свойств вы увидите имя добавленной учётки.
Как видим, действительно ничего сложного.
Теперь вам известно, что собой представляет оснастка «Локальные пользователи и группы» в Windows 10.
Наша группа в TelegramПолезные советы и помощь
on September 4, 2010
On Windows OS we can find the list of local user groups created on a system from Contorl Panel -> User Accounts. This information can be obtained from command line also using net command. Syntax is shown below.
net localgroup
Example: Running this command shows the following local groups on my system.
C:\>net localgroup
Aliases for \\techblogger-pc
----------------------------------------------------------------------------
*Administrators
*Backup Operators
*Debugger Users
*Guests
*Network Configuration Operators
*Power Users
*Remote Desktop Users
*Replicator
*Users
The command completed successfully.
How to list the users in a local group?
Use the below command to know the list of members of a group from command line.
net localgroup groupName
For example to get the list of all remote desktop users on a system we can run the below command.
net localgroup "Remote Desktop users"
How to find the list of all groups a user is member of?
You can run the below command to list the groups a user is member of. This command prints the details of the given user account. You can find the group membership information in the last two line of this command output.
net user userName
Example:
H:\>net user John
User name                   John
Full Name
Comment
User's comment
Country code                 000 (System Default)
Account active               Yes
Account expires              Never
Password last set            12/2/2010 11:00 PM
Password expires             4/1/2011 11:00 PM
Password changeable          12/2/2010 11:00 PM
Password required            Yes
User may change password     Yes
Workstations allowed         All
Logon script
User profile
Home directory
Last logon
Logon hours allowed          All
Local Group Memberships      *Debugger Users       *Users
Global Group memberships     *None
Related Posts:
Add user to group from windows command line
Remove user from group using windows command prompt
Local Users and Groups Management, also often referred to as lusrmgr.msc, is an administration console that allows you to manage advanced settings for users and groups that you would not normally see in the Settings application. This guide will show you how to access the local users and groups management in Windows 11 Home (requires third-party tool) or Pro (the normal ways) edition.
Also see: How to Create Local Admin Account Without Password on Windows 11
Access Local Users and Groups in Windows 11 Pro
Since the Local Users and Groups Management Snap-in is part of the included features in Windows 11 Pro edition, you can easily open the management console using one of the following methods. If you are using Windows 11 Home edition, please go to the next section of this guide.
Computer Management
You can quickly access the Local Users and Groups management in Windows 11 via the Computer Management application – a collection of Windows administrative tools you can use to manage a local or remote computer.
- Open Start menu.
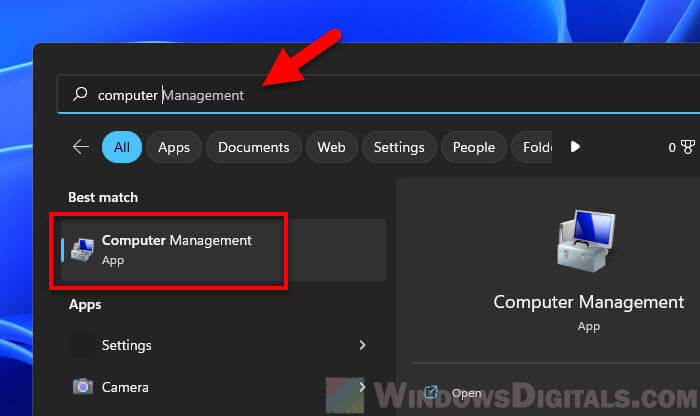
- Search for “Computer Management” and open it.

- In the Computer Management window, select and expand “Local Users and Groups” on the left pane.

- From there, you can select the Users or Groups folder to view and manage the settings.
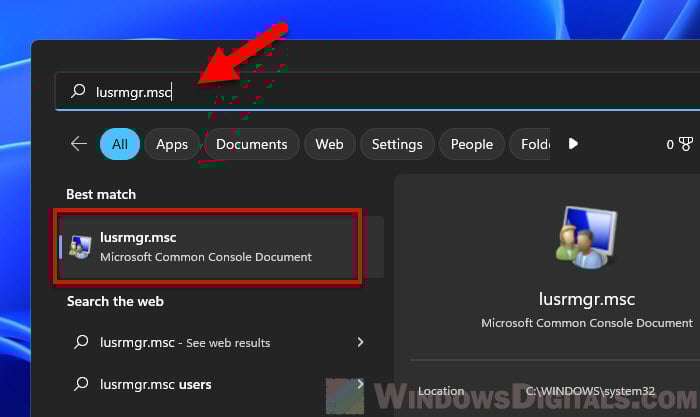
Open lusrmgr.msc
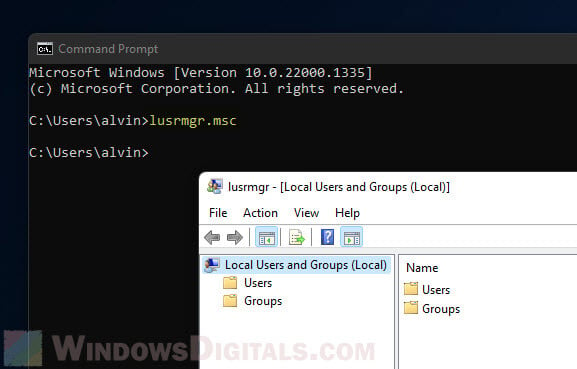
Alternatively, you can open the lusrmgr.msc process directly via Start, Run dialog box, Command Prompt or PowerShell.
- Open Start menu.
- Type
lusrmgr.mscand select the first result to open it.
- You will then see two folders on the left pane: Users and Groups. Select the folder you want to manage.

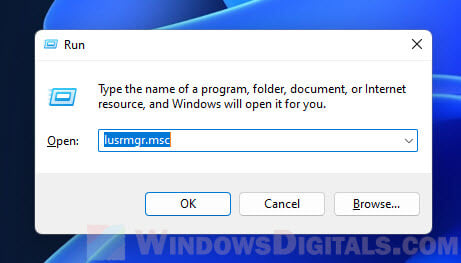
Run dialog box
You can open the Run dialog box by pressing the Win + R key. In the Run window, type lusrmgr.msc in the “Open” text field and press Enter to open it.
Command Prompt
If you do not have access to the Start menu nor the Run dialog box (when you are running into problem where you can only access the CMD), you can open the local users and groups management console by typing lusrmgr.msc as a command line and press Enter to run it.
As for PowerShell or Windows Terminal, you can enter lusrmgr without the .msc extension to open the management console.
Why can’t I see local users and groups in Windows 11?
In most cases, if you don’t see Local Users and Groups in the Computer Management window, or if you can’t open the lusrmgr.msc console at all, it is probably because your version of Windows 11 is Home edition, which doesn’t include this feature. To manage local users and groups in Windows 11 Home edition, follow the guide below.
Open Local Users and Groups in Windows 11 Home
Similar to the Group Policy Editor, the Local Users and Groups Management Console is also one of the power features that is not included in Windows 11 Home edition. If you are using Windows 11 Home, you will not be able to access the management console whether you access it through the computer management app, launch lusrmgr.msc directly, or via command prompt.
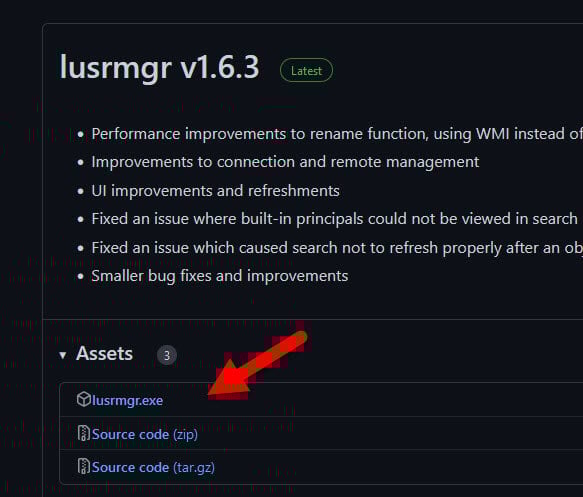
However, you can use a third-party tool as an alternative to enable the local users and groups management in Windows 11 Home. This third-party tool is open source and can be downloaded for free from GitHub. It has the same functionalities as the built-in lusrmgr.msc snap-in in Windows.
- Go to the lusrmgr releases page on GitHub.
- Click lusrmgr.exe under Assets in the latest release thread to download it.

- Once downloaded, run the executable file to open the app.
- It is normal for UAC to prompt you with a warning when you first run the application. Click Yes to acknowledge it.

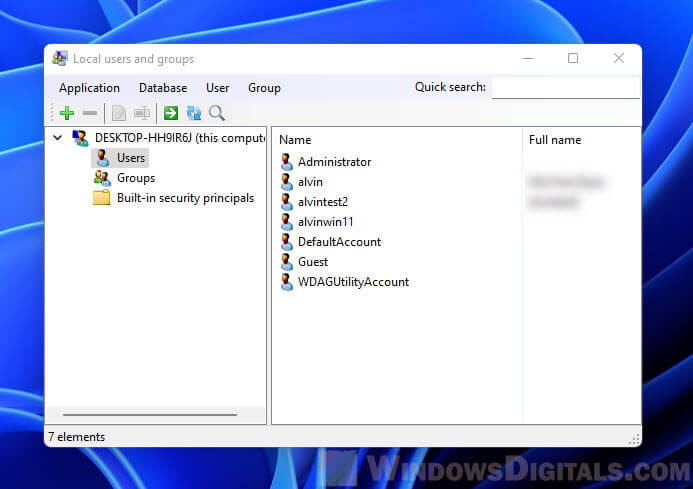
The settings for local users and groups in this third-party tool are essentially the same as the built-in lusrmgr.msc in Windows 11 Pro. You can view and change the settings just like you would on a Windows 11 Pro computer.
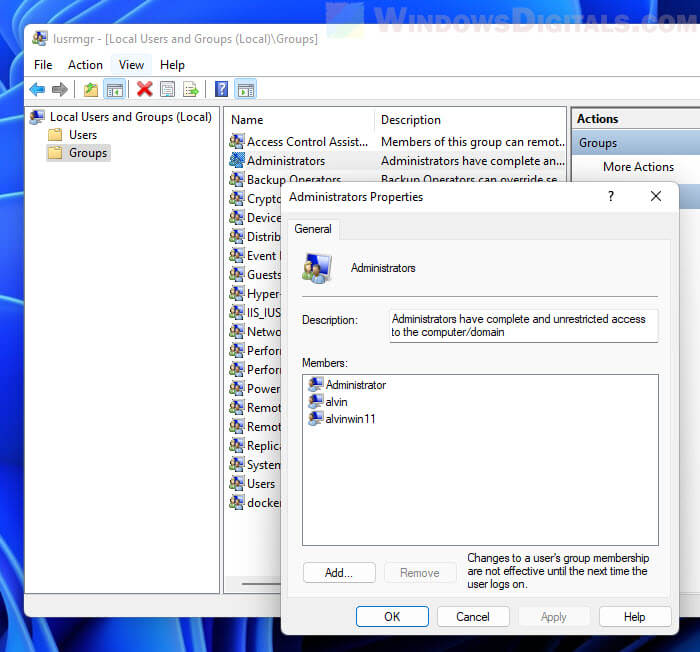
Add or remove a user from the Administrators group
For example, to use the lusrmgr program to add or remove a user from the Administrators group, first open the program by running the executable file you downloaded from GitHub. In the program window, select Groups from the left pane. On the right, right-click Administrator and select Edit.
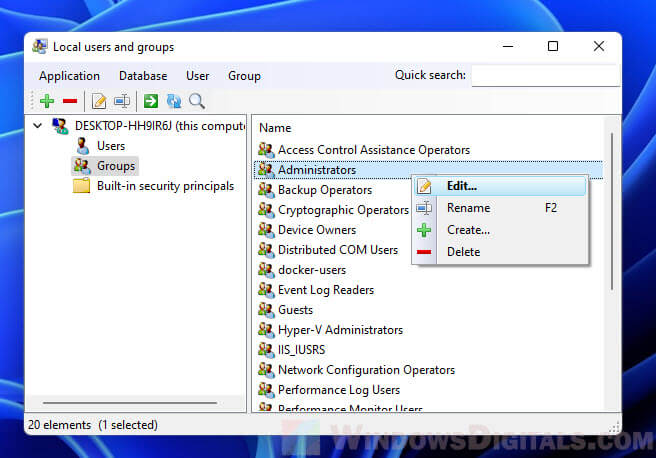
To add an existing user to the administrators group, click the plus (+) button. Select a user from the list of existing users and then click Select to add it to the group. If the user you want to add hasn’t been created yet, you need to create it via the local Users category instead.
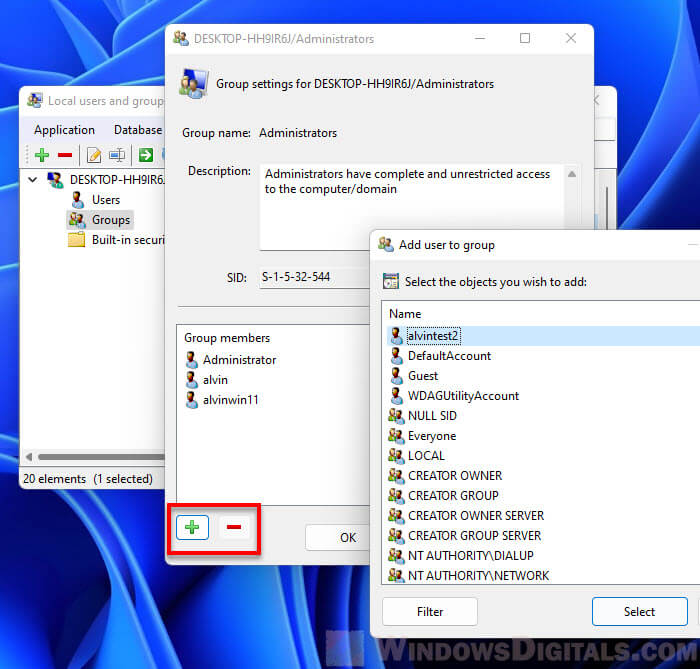
To remove a user from the group, select the user under Group members and click the minus (-) button to remove it from the group.
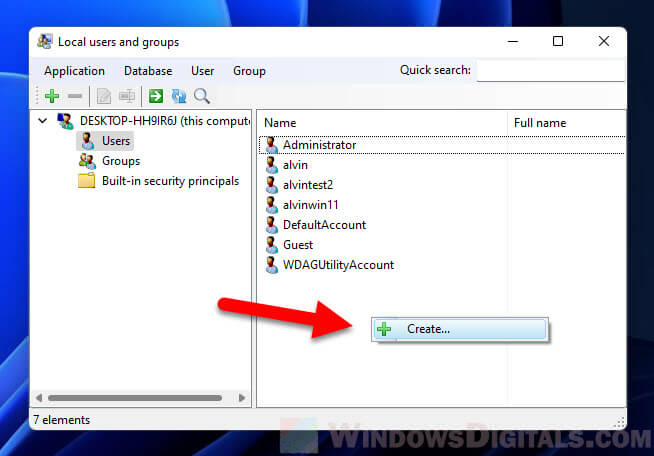
Create a new user using lusrmgr
To create a new user using the lusrmgr tool, open the tool and select Users from the left pane. Then, right-click any empty space in the right pane and select Create.
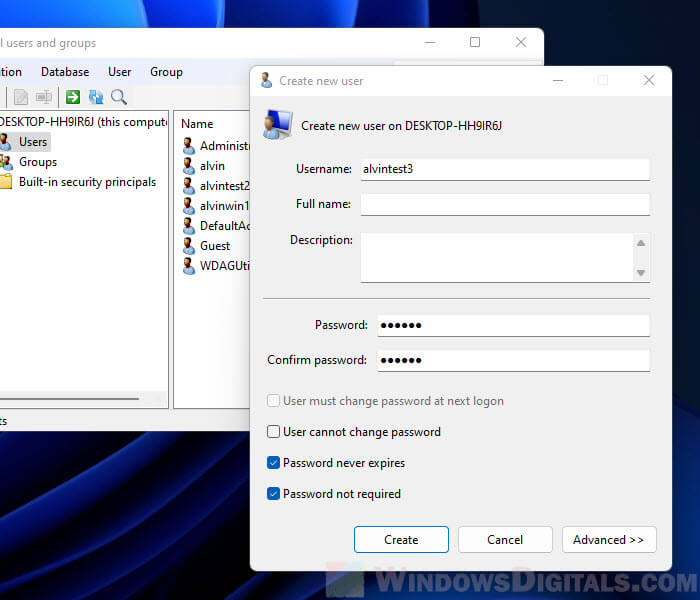
In the “Create new user” window, enter the details for the new user account, such as username and password. Optionally, you may consider enabling some useful settings for the user, such as “password not required”, “password never expires” and “user cannot change password”.
Local Users and Groups is a Microsoft Management Console snap-in that provides a graphical user interface for managing users and groups on a local computer. You can use this tool to create new users and groups, add members, and more.
In this article, we’ll show you seven different ways of opening Local Users and Groups on Windows 11.
1. How to Open Local Users and Groups Via Run Command
The Run command is one of the most useful tools on Windows, allowing you to quickly launch programs and open folders. But did you know that you can also use it to open Local Users and Groups? To do this, follow these steps:
- Press Win + R on your keyboard to open the Run Command dialog box.
-
Type «lusrmgr.msc» into the search box and hit Enter.

You’ll see a list of all the users on your computer, as well as their group membership. From here, you can add or remove users, change passwords, create new groups, and more.
The search tool on Windows can be a great way to find apps and programs installed on your computer. To access local users and groups, type it into the Search box and then click on the result.
Here is how to do this:
- Press Win + Q on your keyboard to open the Windows Search tool (see how to find Windows Search for more methods).
- Type «Local Users and Groups» into the search bar.
- You can then select the top result from the list.
This will open the Local Users and Groups application on your computer screen.
3. How to Open Local Users and Groups Via Task Manager
Task Manager is a great tool for managing your computer’s resources and processes. You can use it to view and end tasks, set priorities, view performance information, and open apps and programs on your computer.
To open local users and groups using Task Manager, follow these steps:
- Press the Ctrl + Alt + Del key combination and select Task Manager from the menu list.
- Once you’re in the Task Manager, click on «More details» if necessary.
-
At the top of the page, click on Run new task.

- Type «lusrmgr.msc» in the text box and click OK.
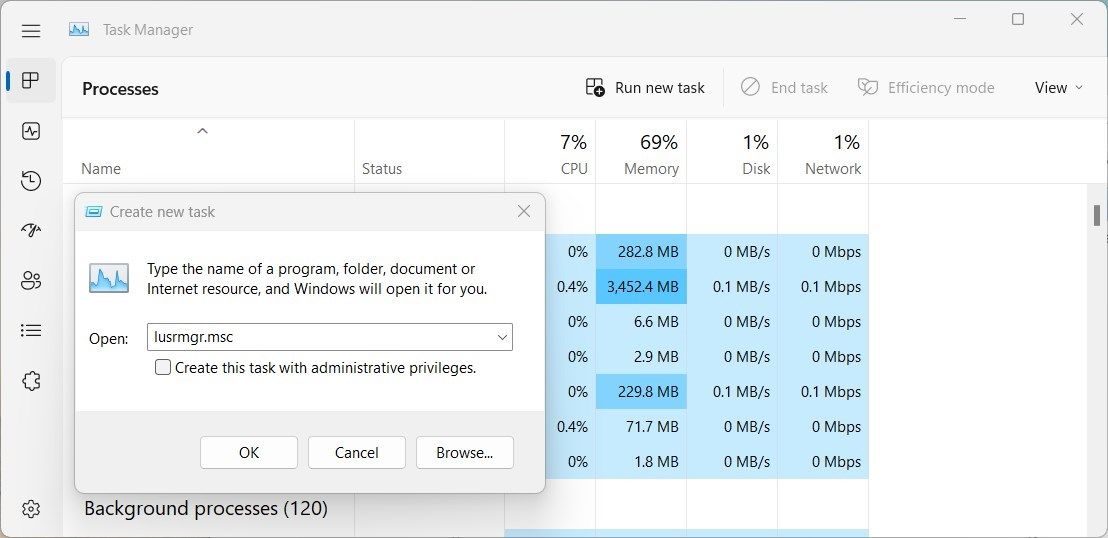
Local Users and Groups should now be open and ready to use!
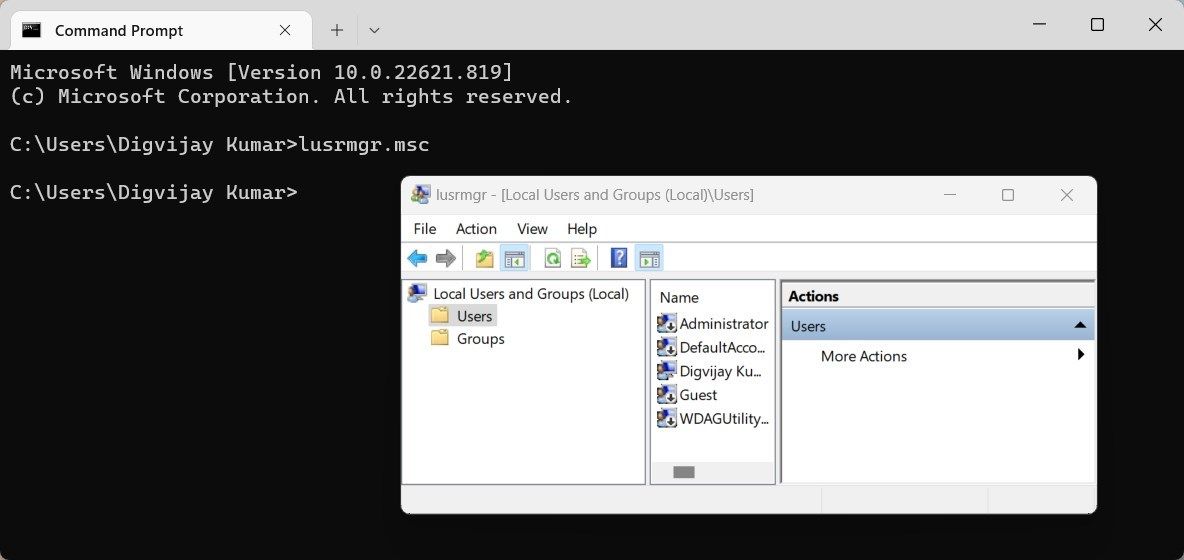
4. How to Open Local Users and Groups With Command Prompt or PowerShell
If you prefer to use a command line interface, you can open Local Users and Groups on Windows using either Command Prompt or Windows PowerShell.
To open Local Users and Groups using the command prompt, follow these steps:
- Open Command Prompt on your computer. To do this, you can click Start or press the Win key on your keyboard. Then search for «Command Prompt» and select the top result.
-
In the Command Prompt, type «lusrmgr.msc» and press Enter. This will open the Local Users and Groups window.

If you want to use Windows PowerShell instead, follow these steps:
- Press the Win + R keyboard shortcut.
- Type PowerShell in the text box and press Enter. This will open Windows PowerShell.
- Once you’re in, type «lusrmgr.msc» and press Enter to launch the Local Users and Groups window.
5. How to Open Local Users and Groups From File Explorer
File Explorer is a tool on Windows that allows you to access your hard drive and the folders/files stored on it. This utility allows you to access, create, and delete files, but it’s not limited to just that. You can also use it to open apps and programs installed on your computer.
To open Local Users and Groups from File Explorer, follow these steps:
- Press the Win + S shortcut on your keyboard.
- In the search bar, type «File Explorer,» and then press Enter. This is one of the many ways to open the Windows File Explorer.
- When you’re in File Explorer, go to the following location: C:\Windows\System32.
- Then, on the next page, type «lusrmgr.msc» into the search bar and press Enter.
- Click on the executable file to start the application.
Another option is to create a custom shortcut on your PC. To do so, right-click on your desktop and then choose New from the context menu. After that, click Shortcut.
Now type «lusrmgr.msc» into the «Create Shortcut» window and click Next. Give the shortcut a name and click Finish. Once the shortcut is created, double-click it to open Local Users and Groups.
6. How to Open Local Users and Groups With a Desktop Shortcut
Alternatively, you can create a shortcut on your desktop to quickly access Local Users and Groups. A shortcut is basically an icon on your desktop that represents a link to a program, file, or folder. When you double-click on it, the item it represents opens.
Creating shortcuts lets you access the items you use most often quickly and easily. If so, follow these steps:
- Press Win + E on your keyboard to open Windows File Explorer.
- Browse to the location: C:/Windows/System32.
- Next, type «lusrmgr.msc» in the search field and hit Enter.
-
Right-click on the search result, and select Show more options > Create shortcut.

- When Windows asks for your approval, click Yes.

You’ll find a shortcut on your desktop; double-click on it to launch the tool. This can be a helpful tool if you need to frequently access or modify user accounts on your computer.
7. How to Open Local Users and Groups Using the Computer Management Utility
You can also access Local Users and Groups through the Computer Management tool. To do this, follow these steps:
- Right-click on Start and select Computer Management from the menu list to open the Computer Management tool on Windows.
-
When you’re in, navigate to:
Computer Management > System Tools > Local Users and Groups -
Double-click on Local Users and Groups to expand it.

- In this section, you will find all modules related to Users and Groups.
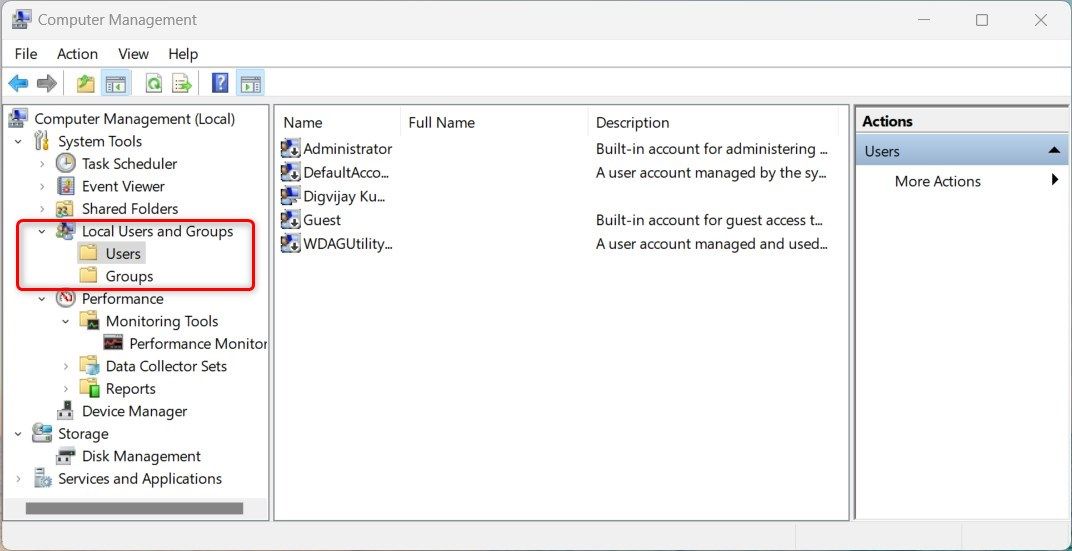
From here, you can manage local users and groups as needed.
Get Easy Access to Local Users and Groups on Windows
Are you looking for a feature that lets you manage users and groups on your local computer? If so, you can use Local Users and Groups. Now you know some of the quickest ways to access this tool on Windows.
We use the command net localgroup to display and manage groups from the command prompt (CMD or PowerShell) in the Windows operating system.
Administrators can perform the following tasks using the net localgroup command:
- Add new groups to the local computer or domain.
- Remove existing groups from the local computer or domain.
- Add users and groups to the Windows groups.
- Remove users and groups from Windows groups.
Command options
| GroupName | Name of the group to be added or modified. If the group name includes spaces, enclose it in quotation marks. |
| /domain | Use this command switch to execute the net localgroup command on the Active Directory domain controller rather than on the local computer. |
| /add | Use this option to add new groups to the Windows system or add users to existing groups. |
| /delete | Use this option to delete groups or remove members from groups. |
| /comment:»text» | Adds a description to a Windows group. |
Notes
When operating in an Active Directory domain environment, always use the /domain command switch.
There is another Windows command, the net group, which has the same syntax as the net localgroup. The net group command creates global groups; the net localgroup command creates local groups.
In the CMD, you can get help by running the net help localgroup command.
Next, we will learn more about the net localgroup command by looking at several examples.
Display Information on Existing Windows Groups

We can use the net localgroup command to list groups and view detailed information about a particular group.
To get a list of groups on the local computer, type net localgroup and press Enter:
net localgroupTo do the same thing on an Active Directory domain controller, use the /domain command switch:
net localgroup /domainTo get detailed information about a group, type net localgroup followed by the group name. For example, to view the Administrators group, you will run the following command:
net localgroup Administrators
net localgroup /domain Administrators
The command lists the users in the Administrators group.

Add/Delete Groups
To add a new local group, use the following syntax, where GroupName is the name of the new group:
net localgroup /add GroupNameFor example, to create a group called sales, you will run the following command:
net localgroup /add salesTo remove a group from Windows, use the /delete option. For example, to remove an existing group called sales, you will run the following command:
net localgroup /delete salesAdd a description while creating the group:
net localgroup /add sales /comment:"This is Sales Group"Add a description to the existing group:
net localgroup sales /comment:"Sales group"Add (or Remove) User to the Groups
To add a user to a group, use the following syntax:
net localgroup /add GroupName UserNameThe following command adds user user1 to the sales group:
net localgroup /add sales user1You can add multiple users to a group at once:
net localgroup /add sales user1 user2To remove a user from a group, use the /delete option:
net localgroup /delete sales user1
net localgroup /delete sales user1 user2
Examples
List all the local groups:
net localgroupAdd a new local group called sales:
net localgroup /add salesDelete sales group:
net localgroup /delete salesThis command lists the users in the Remote Desktop Users group:
net localgroup "Remote Desktop Users"The following command adds user user1 to the Remote Desktop Users group:
net localgroup /add "Remote Desktop Users" user1The following command removes user1 from the Remote Desktop Users group:
net localgroup /delete "Remote Desktop Users" user1What Next?
That brings the end to this tutorial. Next, you can learn the net user command, which is used to manage Windows users from the command prompt.