
Estimated reading: 3 minutes
1829 views
As a sysadmin, I’ve become really proficient with Windows operating systems, Powershell, Hyper-V, PFsense, etc, so I figured moving to a known OS would simplify things for me in the long run. However, I soon learned that there are a few things I wasn’t aware of on Server 2019. In particular, one of the things I learned was that the default “photo viewer” is set to Paint.
Fortunately, this was a quick fix. Follow the steps below if you’ve ran into the same issue.
How to Enable Photo Viewer in Windows Server 2019
By default, Photo Viewer isn’t installed or active. The first thing we need to do is check whether or not the DLL’s exist on the server.
Step 1: Check if Photo Viewer DLL’s Exist
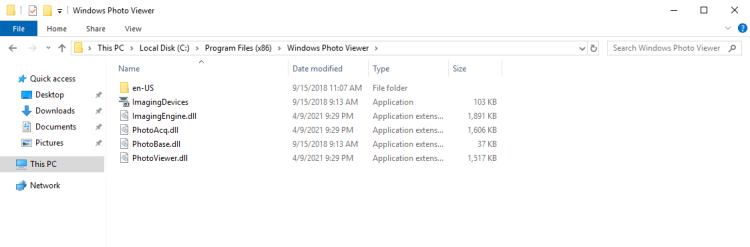
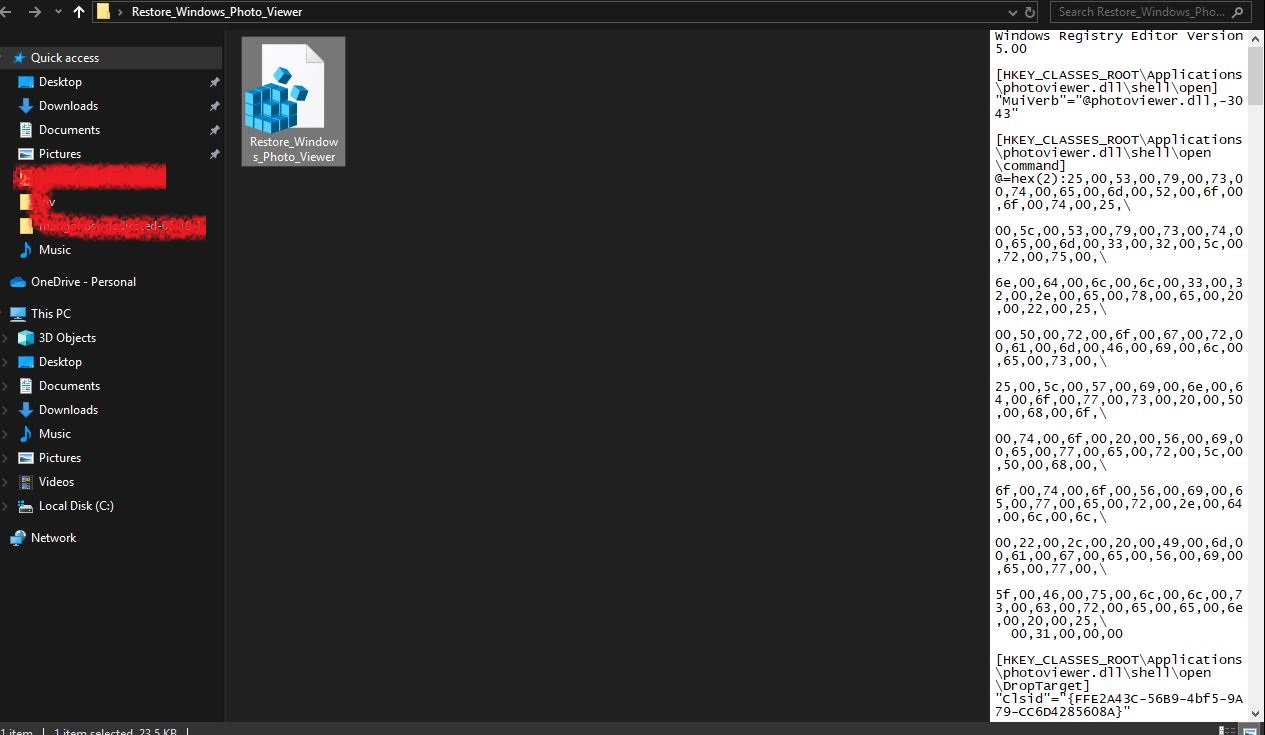
Browse to C:Program Files (x86)Windows Photo Viewer on the server. If you see .dll files there, that means the files exist but aren’t registered. It should look like this:
If you don’t see those files, simply browse to the path above from a Windows PC & copy the folder contents to the same path on your server.
Step 2: Register the DLL’s
Now that we know the necessary files are present, we need to register them.
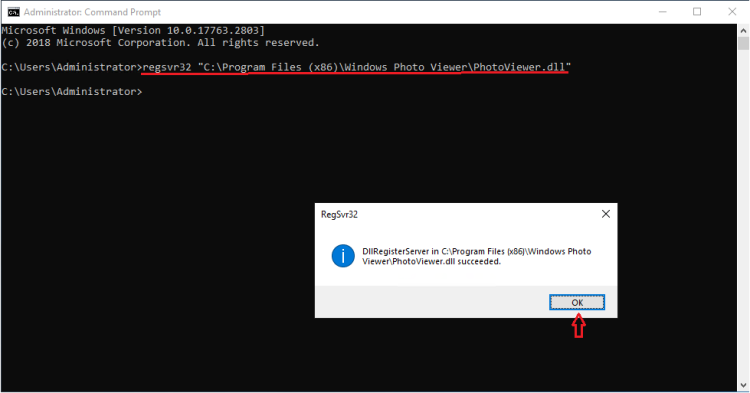
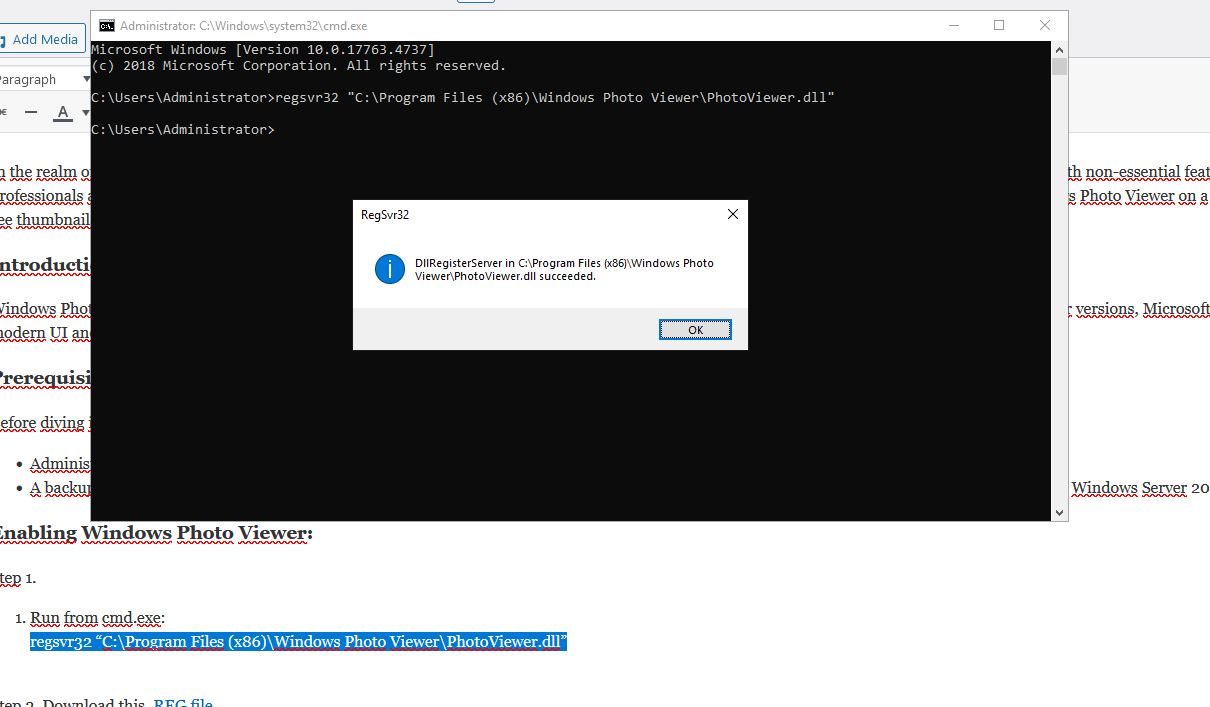
Open Command Prompt (type CMD into Start) and right-click to Run as Administrator. Then copy and paste the following code:
regsvr32 “C:Program Files (x86)Windows Photo ViewerPhotoViewer.dll”
Step 3: Download PhotoViewer Registry Keys
Now that the .dll’s are registered, we need to import the registry keys. This allows us to “Open With…” from File Explorer and choose Windows Photo Viewer, as well as set default file associations for various file types, such as .jpg, .jpe, or .jpeg.
Download registry files from here: MS Photoviewer Registry Files.zip
Once downloaded, right-click the .zip file and extract it to a temporary location.
Step 4: Import Registry Keys
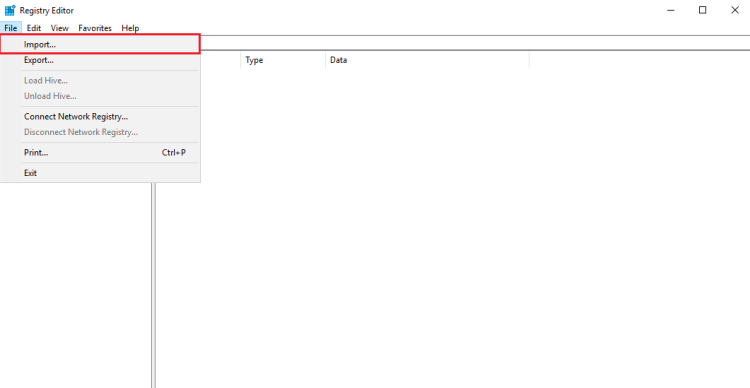
From Start, open Regedit.
File > Import > browse to the location you extracted the 4 registry files. You will need to import all 4 of them.
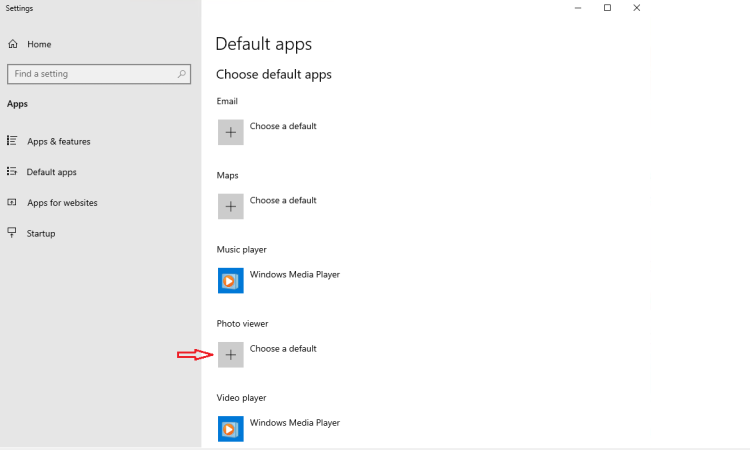
Step 5: Set Photo Viewer as Default App
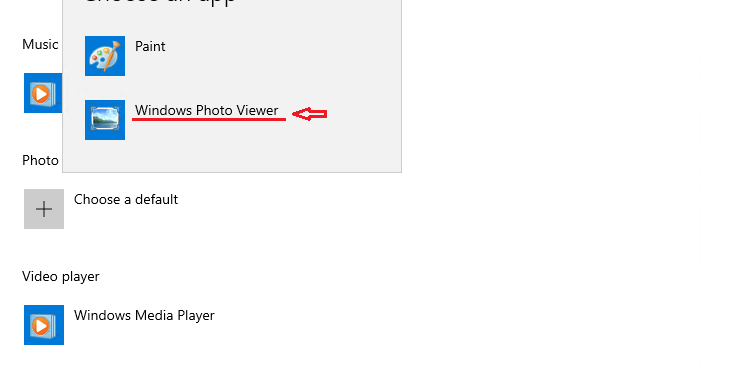
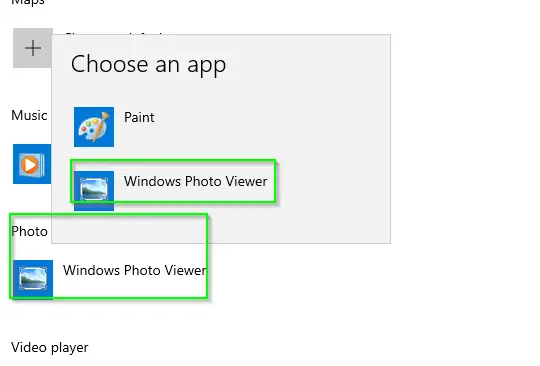
If you’d like to make Photo Viewer your default photo viewing application, search Windows for “Default Apps” and then change Photos to Windows Photo Viewer.
Step 6: Allow Images in Thumbnails
This step is optional, but if you’d like to see a preview of the images from File Explorer (instead of just icons), you can do that by changing the File Explorer options.
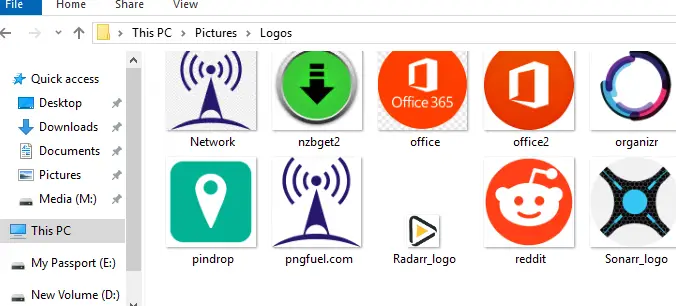
Search Windows for Folder Options. Change to the View tab and uncheck “Always show icons, never thumbnails”.
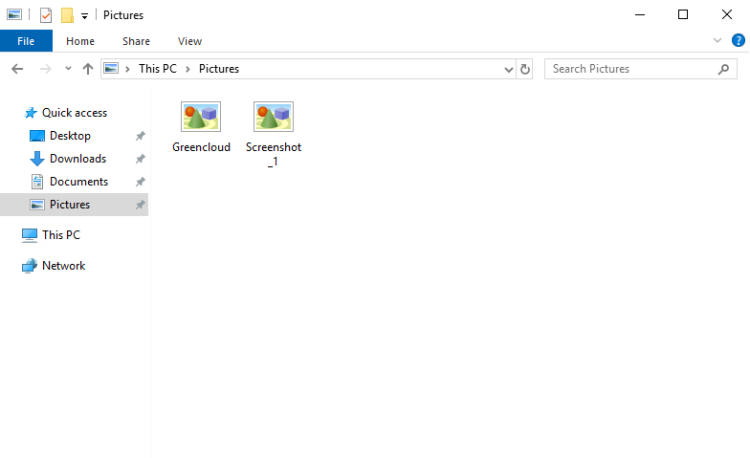
That will change it from looking like this:
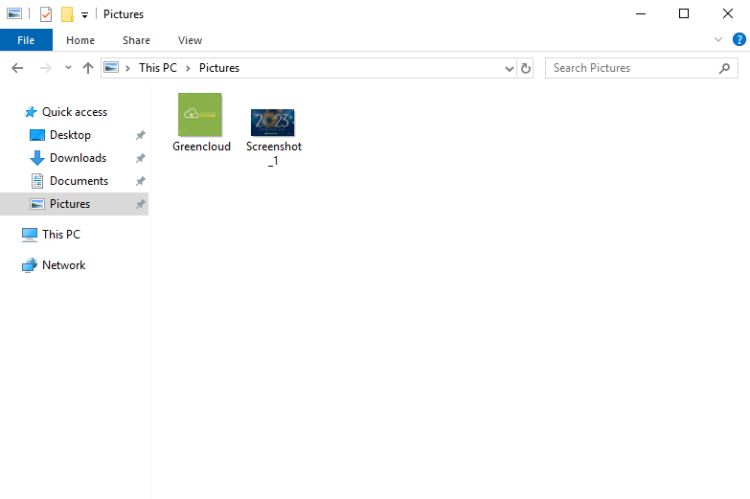
to looking like this:
That’s all there is to it! Hopefully this guide helped you out.
Good Luck!

I’m in the middle of migrating my Plex media server from my daily driver Windows 10 PC to Server 2019 Standard. I ran out of space (and hard drive bays) inside my desktop, so the time has come to migrate to a different OS. I purchased all the components with the intention of turning my server into a TrueNAS nas server, but after running TrueNAS for a week, I decided the time invested in learning/migrating to an unfamiliar operating system was more than I wanted to tackle at this point in time. I ultimately ended up purchasing a Fractal Design Node 804 case because of how many storage bays it has.

We earn a commission if you make a purchase, at no additional cost to you.
As a sysadmin, I’ve become really proficient with Windows operating systems, Powershell, Hyper-V, PFsense, etc, so I figured moving to a known OS would simplify things for me in the long run. However, I soon learned that there are a few things I wasn’t aware of on Server 2019. In particular, one of the things I learned was that the default “photo viewer” is set to Paint.
Fortunately, this was a quick fix. Follow the steps below if you’ve ran into the same issue.
If you’re curious about my server build, I am using
- (Case) Fractal Design Node 804
- (Harddrives x4) 8TB Seagate Barracuda
- Cooler Master Hyper 212 CPU Fan
- Gigabyte B450M DS3H AM4 motherboard
By default, Photo Viewer isn’t installed or active. The first thing we need to do is check whether or not the DLL’s exist on the server.
Step 1: Check if Photo Viewer DLL’s Exist
Browse to C:\Program Files (x86)\Windows Photo Viewer on the server. If you see .dll files there, that means the files exist but aren’t registered. It should look like this:

If you don’t see those files, simply browse to the path above from a Windows 10 PC & copy the folder contents to the same path on your server.
Step 2: Register the DLL’s
Now that we know the necessary files are present, we need to register them.
Open Command Prompt (type CMD into Start) and right-click to Run as Administrator. Then copy and paste the following code:
regsvr32 “C:\Program Files (x86)\Windows Photo Viewer\PhotoViewer.dll”Step 3: Download PhotoViewer Registry Keys
Now that the .dll’s are registered, we need to import the registry keys. This allows us to “Open With…” from File Explorer and choose Windows Photo Viewer, as well as set default file associations for various file types, such as .jpg, .jpe, or .jpeg.
Download registry files from here: MS Photoviewer Registry Files.zip
Once downloaded, right-click the .zip file and extract it to a temporary location.
Step 4: Import Registry Keys
From Start, open Regedit.
File > Import > browse to the location you extracted the 4 registry files. You will need to import all 4 of them.
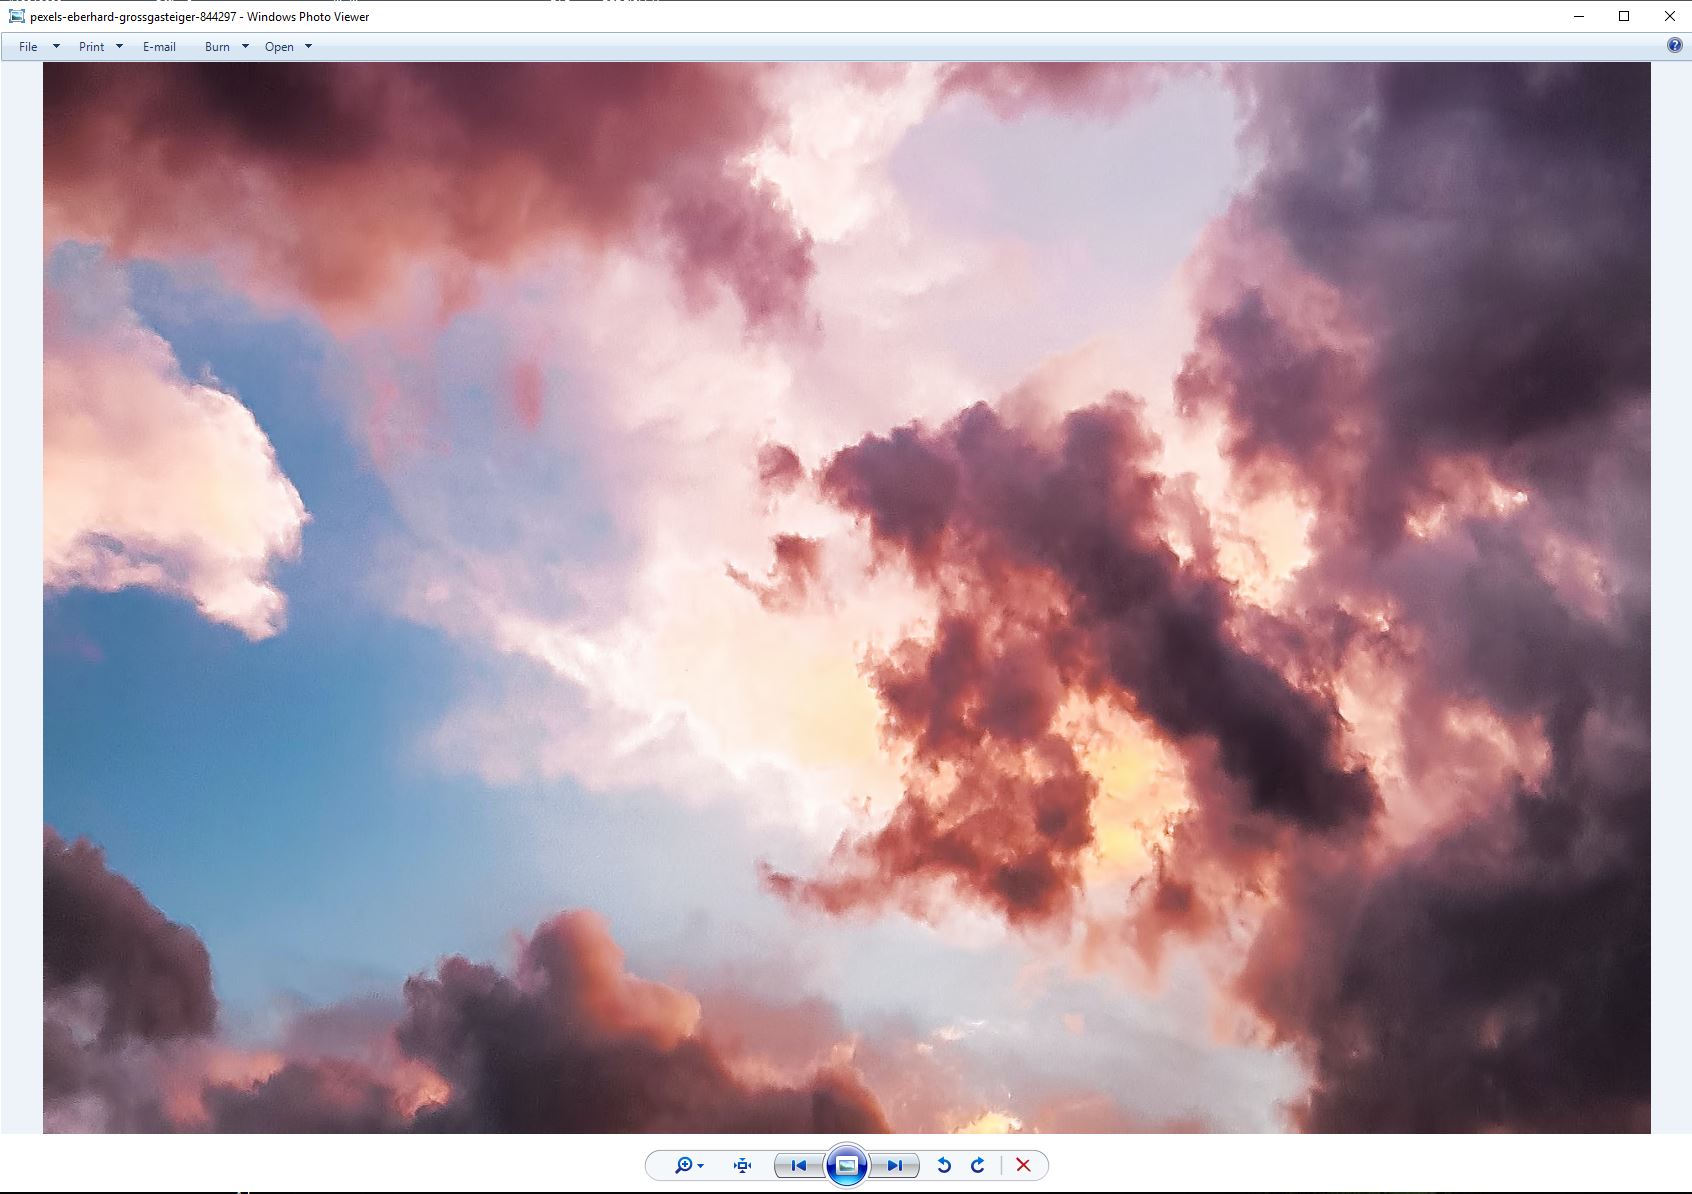
You should now be able to right-click an image file and Open With Windows Photo Viewer!
Step 5: Set Photo Viewer as Default App
If you’d like to make Photo Viewer your default photo viewing application, search Windows for “Default Apps” and then change Photos to Windows Photo Viewer.
Step 6: Allow Images in Thumbnails
This step is optional, but if you’d like to see a preview of the images from File Explorer (instead of just icons), you can do that by changing the File Explorer options.
Search Windows for Folder Options. Change to the View tab and uncheck “Always show icons, never thumbnails”.
That will change it from looking like this:
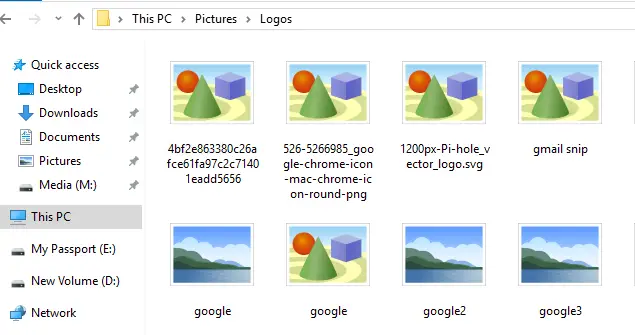
to looking like this:
That’s all there is to it! Hopefully this guide helped you out.
My Homelab Equipment
Here is some of the gear I use in my Homelab. I highly recommend each of them.
- Server 2019 w/ Hyper-V
- Case: Fractal Design Node 804
- Graphics Card: NVIDEA Quadro K600
- CPU: AMD Ryzen 7 2700
The full list of server components I use can be found on my Equipment List page.
Hey there! I’m Danny, owner and writer of Smart Home Pursuits. I’ve worked as an IT Manager for 8 years and enjoy using my knowledge to make my smart home «smarter».
In the realm of Windows Server 2016 and 2019 operating systems, many of the features and functionalities are streamlined for security and efficiency, with non-essential features often disabled or hidden by default. One such feature is the nostalgic Windows Photo Viewer. Many IT professionals and administrators are fond of this tool due to its simplicity and responsiveness. If you’re one of them and you’re looking to enable Windows Photo Viewer on a Windows Server OS, this article will guide you through the steps. By default, browsing through folders, you don’t see thumbnails (for a faster image view). Moreover, JPG, TIF, BMP, PNG images are opened in Microsoft Paint – which is useless.
Introduction:
Windows Photo Viewer was the default image viewer for Windows 7 and earlier versions. However, with the advent of Windows 10 and subsequent server versions, Microsoft introduced the Photos app, relegating Windows Photo Viewer to the background. While the Photos app offers a modern UI and additional functionalities, the simplicity and reliability of the Windows Photo Viewer still appeal to many.
Prerequisites:
Before diving into the steps, ensure you have:
- Administrative rights on the Windows Server.
- A backup or system restore point. This is always a good practice when making changes to the system registry. Actions from this article was successfully tested on Windows Server 2016 and Windows Server 2019 editions without any issues.
Enabling Windows Photo Viewer:
Step 1. Run from cmd.exe:
regsvr32 “C:\Program Files (x86)\Windows Photo Viewer\PhotoViewer.dll”
Step 2. Download this .REG file.
Step 3. Double click “Restore_Windows_Photo_Viewer.reg” and accept any User Account Control prompts ( if you are not logged as Administrator). Confirm you wish to import the settings
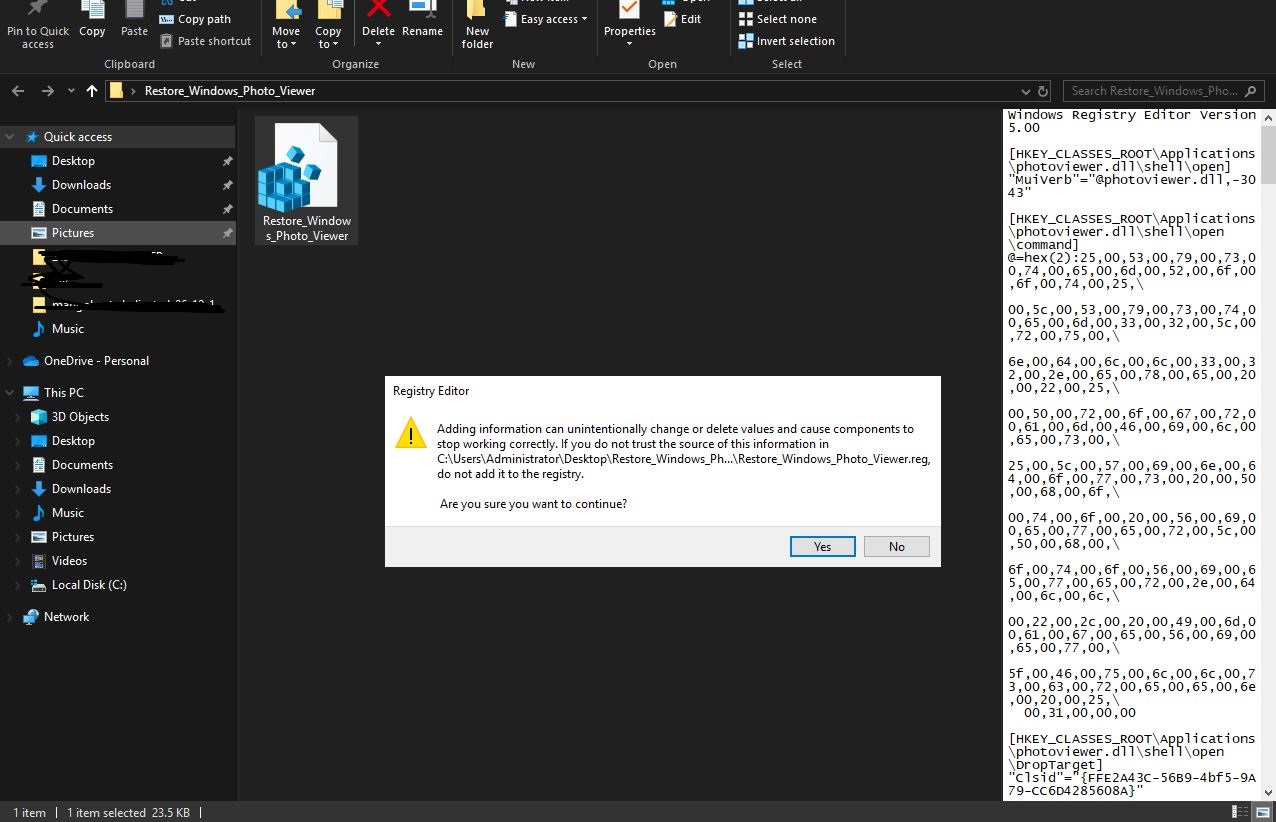
Caution: Editing the Windows Registry can be risky. Always backup your registry settings before making any changes.

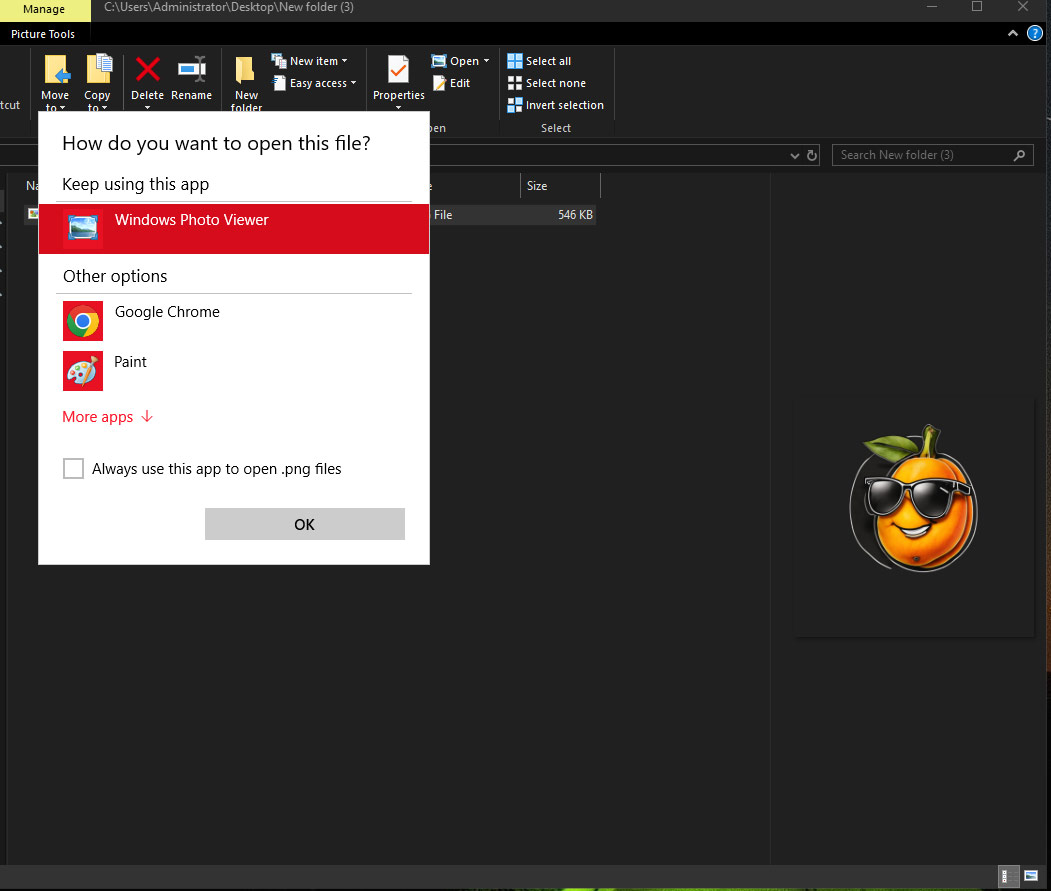
Now when you double click a picture type for the first time; you will be asked which application you want to open it with in the future by default (double-click). Select “Windows Photo Viewer” and check the “Always use this app to open … files” box:
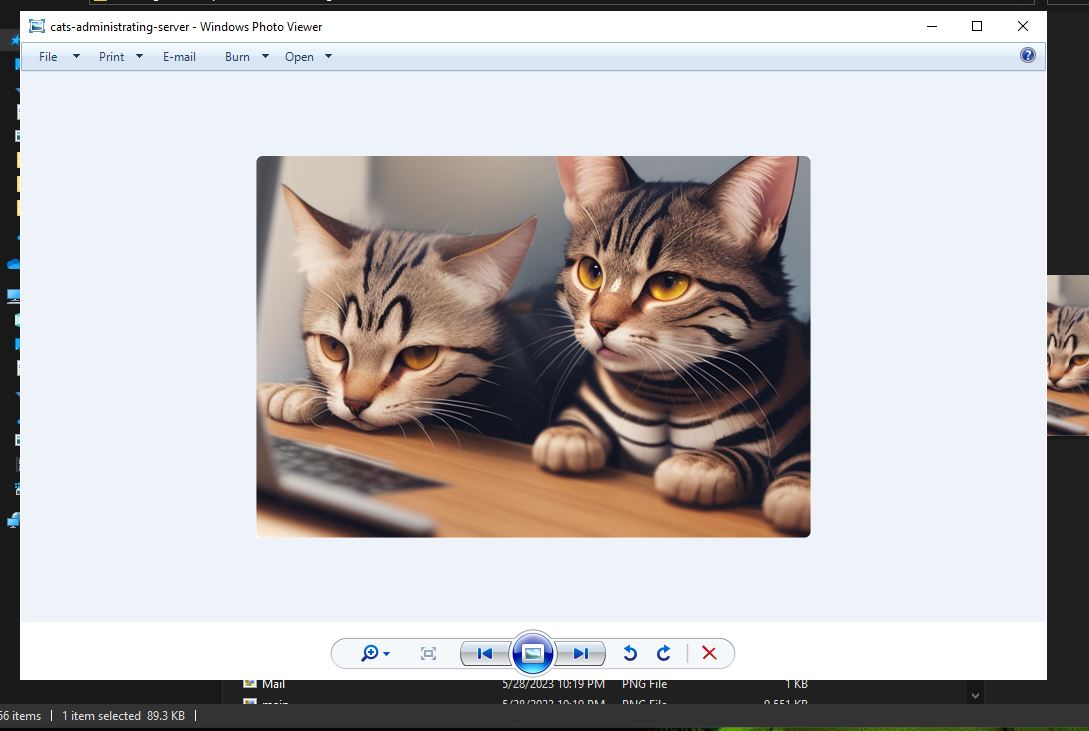
Step 4 (final). And we have it, a very grainy photo of some AI-generated cats opened in Windows Photo Viewer:
By following the above steps, you should now have successfully enabled and set the Windows Photo Viewer as the default viewer for your desired image file types on your Windows Server OS. This can be a boon for those who miss the older, more straightforward tool or for those who find it better suited to their needs on a server environment. Regardless of your reasons, enjoy the seamless experience of viewing images with the classic viewer!

This article incorporates information and material from various online sources. We acknowledge and appreciate the work of all original authors, publishers, and websites. While every effort has been made to appropriately credit the source material, any unintentional oversight or omission does not constitute a copyright infringement. All trademarks, logos, and images mentioned are the property of their respective owners. If you believe that any content used in this article infringes upon your copyright, please contact us immediately for review and prompt action.
This article is intended for informational and educational purposes only and does not infringe on the rights of the copyright owners. If any copyrighted material has been used without proper credit or in violation of copyright laws, it is unintentional and we will rectify it promptly upon notification.
Please note that the republishing, redistribution, or reproduction of part or all of the contents in any form is prohibited without express written permission from the author and website owner. For permissions or further inquiries, please contact us.
На чтение 12 мин Просмотров 1.6к. Обновлено
Содержание
- Возможности рабочего стола в Windows Server 2019
- Как вернуть Photo Viewer в Windows Server 2019/2016
- Как сделать Photo Viewer программой по умолчанию через групповую политику
- Как сделать Photo Viewer программой по умолчанию в Windows Server 2022 или Windows 12
Добрый день! Уважаемые читатели и гости одного из крупнейших IT блогов в рунете Pyatilistnik.org. В прошлый раз мы с вами разобрали, как изменить формат файла в Windows системах. Движемся дальше и сегодня я вас научу возвращать в видимый состав Windows Server 2016 или Windows Server 2019, такого компонента Photo Viewer ( средство просмотра фотографий Windows). Он как выяснилось отсутствует в системе есть, но воспользоваться вы им не можете пока не произведете некоторые манипуляции, в очередной раз удивляюсь для чело Microsoft опять все усложнило.
Возможности рабочего стола в Windows Server 2019
Сразу оговорюсь, что все описанные действия актуальны и для Windows Server 2016.
Ранее мы с вами устанавливали Windows Server 2012 R2, это хорошая операционная система, которая после инсталляции имеет минимальный функционал, который можно расширять за счет ролей и компонентов. Когда вы установите роль удаленных рабочих cтолов и запустите пользователей на ваш RDS сервер, то первое на что они пожалуются, это будет отсутствие компонента средства просмотра фотографий, к которому они привыкли на клиентских версиях. И это нормально, кому удобно открывать файлы формата jpeg, png, bmp и другие через встроенный, классический paint.
Для решения данной проблемы мы устанавливали компонент «Возможности рабочего стола (Desktop Experience)«. Возможности рабочего стола возвращал в систему:
- Photo Viewer ( средство просмотра фотографий Windows)
- Средство очистки диска (Disk Cleanup)
- Проигрыватель Media Player
- Темы оформления
Все это великолепно, до тех пор когда вы не установите службу удаленных рабочих столов на Windows Server 2019, посмотрев список компонентов, вы не обнаружите «Возможности рабочего стола (Desktop Experience)», по простой причине, что он якобы уже устанавливается во время установки Windows с графическим режимом. Но вы же понимаете, что пользователям по барабану на вашу ситуацию, им нужна комфортная работа на хостах RDSH, и тут у вас два выхода, либо поставить сторонний софт, что не очень хорошо, дополнительная сущность для обновления, и второй вариант раскопать внутренности Windows Server 2019 и попытаться найти там встроенный, но спрятанный PhotoViewer. Я пошел по второму варианту.
Как вернуть Photo Viewer в Windows Server 2019/2016
По умолчанию в Windows Server 2019 не зарегистрирована специальная библиотека отвечающая за работу компонента «Средство просмотра фотографий Windows«. Перейдите в:
C:\Program Files (x86)\Windows Photo Viewer
Тут есть библиотека PhotoViewer.dll, которая и отвечает за «Средство просмотра фотографий Windows». Чтобы ее зарегистрировать, вам нужно открыть командную строку от имени администратора и ввести:
regsvr32 “C:\Program Files (x86)\Windows Photo Viewer\PhotoViewer.dll”
Теперь, когда мы зарегистрировали необходимую .dll, нам нужно импортировать ключи реестра, которые добавят Windows Photo Viewer в меню «Открыть с помощью» и установить ассоциации файлов по умолчанию для .jpg, .jpeg и .jpe файлы. Кстати так же отдельно зарегистрировать библиотеку PhotoViewer.dll вы можете и с помощью моего ключа реестра, который будет в составе пакета, описанного ниже. Вот его содержимое:
Windows Registry Editor Version 5.00
[HKEY_CLASSES_ROOT\Applications\photoviewer.dll]
[HKEY_CLASSES_ROOT\Applications\photoviewer.dll\shell]
[HKEY_CLASSES_ROOT\Applications\photoviewer.dll\shell\open]
«MuiVerb»=»@photoviewer.dll,-3043»
[HKEY_CLASSES_ROOT\Applications \photoviewer.dll\shell\open\command]
@=hex(2):25,00,53,00,79,00,73, 00,74,00,65,00,6d,00,52,00,6f,00,6f,00,74,00,25,\
00,5c,00,53,00,79,00,73,00,74,00, 65,00,6d,00,33,00,32,00,5c,00,72,00,75,00,\
6e,00,64,00,6c,00,6c,00,33,00,32, 00,2e,00,65,00,78,00,65,00,20,00,22,00,25,\
00,50,00,72,00,6f,00,67,00,72,00, 61,00,6d,00,46,00,69,00,6c,00,65,00,73,00,\
25,00,5c,00,57,00,69,00,6e,00,64, 00,6f,00,77,00,73,00,20,00,50,00,68,00,6f,\
00,74,00,6f,00,20,00,56,00,69,00, 65,00,77,00,65,00,72,00,5c,00,50,00,68,00,\
6f,00,74,00,6f,00,56,00,69,00,65, 00,77,00,65,00,72,00,2e,00,64,00,6c,00,6c,\
00,22,00,2c,00,20,00,49,00,6d,00, 61,00,67,00,65,00,56,00,69,00,65,00,77,00,\
5f,00,46,00,75,00,6c,00,6c,00,73, 00,63,00,72,00,65,00,65,00,6e,00,20,00,25,\
00,31,00,00,00
[HKEY_CLASSES_ROOT\Applications \photoviewer.dll\shell\open\DropTarget]
«Clsid»=»{FFE2A43C-56B9-4bf5-9A79-CC6D4285608A}»
[HKEY_CLASSES_ROOT\Applications\photoviewer.dll\shell\print]
[HKEY_CLASSES_ROOT\Applications \photoviewer.dll\shell\print\command]
@=hex(2):25,00,53,00,79,00,73,00, 74,00,65,00,6d,00,52,00,6f,00,6f,00,74,00,25,\
00,5c,00,53,00,79,00,73,00,74,00, 65,00,6d,00,33,00,32,00,5c,00,72,00,75,00,\
6e,00,64,00,6c,00,6c,00,33,00,32, 00,2e,00,65,00,78,00,65,00,20,00,22,00,25,\
00,50,00,72,00,6f,00,67,00,72,00, 61,00,6d,00,46,00,69,00,6c,00,65,00,73,00,\
25,00,5c,00,57,00,69,00,6e,00,64, 00,6f,00,77,00,73,00,20,00,50,00,68,00,6f,\
00,74,00,6f,00,20,00,56,00,69,00, 65,00,77,00,65,00,72,00,5c,00,50,00,68,00,\
6f,00,74,00,6f,00,56,00,69,00,65, 00,77,00,65,00,72,00,2e,00,64,00,6c,00,6c,\
00,22,00,2c,00,20,00,49,00,6d,00, 61,00,67,00,65,00,56,00,69,00,65,00,77,00,\
5f,00,46,00,75,00,6c,00,6c,00,73, 00,63,00,72,00,65,00,65,00,6e,00,20,00,25,\
00,31,00,00,00
[HKEY_CLASSES_ROOT\Applications \photoviewer.dll\shell\print\DropTarget]
«Clsid»=»{60fd46de-f830-4894-a628-6fa81bc0190d}»
Чуть не забыл для любителей PowerShell, есть возможность подключить библиотеки и с его помощью. Создайте скрипт с таким содержимым, только не забудьте отключить защиту запуска неподписанных скриптов или же откройте PowerShell ISE в режиме администратора и введите:
If ( -Not ( Test-Path «Registry::HKEY_CLASSES_ROOT\Applications\photoviewer.dll»)){New-Item -Path «Registry::HKEY_CLASSES_ROOT\Applications\photoviewer.dll» -ItemType RegistryKey -Force}
If ( -Not ( Test-Path «Registry::HKEY_CLASSES_ROOT\Applications\photoviewer.dll\shell»)){New-Item -Path «Registry::HKEY_CLASSES_ROOT\Applications\photoviewer.dll\shell» -ItemType RegistryKey -Force}
If ( -Not ( Test-Path «Registry::HKEY_CLASSES_ROOT\Applications\photoviewer.dll\shell\open»)){New-Item -Path «Registry::HKEY_CLASSES_ROOT\Applications\photoviewer.dll\shell\open» -ItemType RegistryKey -Force}
Set-ItemProperty -path «Registry::HKEY_CLASSES_ROOT\Applications\photoviewer.dll\shell\open» -Name «MuiVerb» -Type «String» -Value «@photoviewer.dll,-3043»
If ( -Not ( Test-Path «Registry::HKEY_CLASSES_ROOT\Applications\photoviewer.dll\shell\open\command»)){New-Item -Path «Registry::HKEY_CLASSES_ROOT\Applications\photoviewer.dll\shell\open\command» -ItemType RegistryKey -Force}
Set-ItemProperty -path «Registry::HKEY_CLASSES_ROOT\Applications\photoviewer.dll\shell\open\command» -Name «(Default)» -Type «ExpandString» -Value «%SystemRoot%\System32\rundll32.exe `»%ProgramFiles%\Windows Photo Viewer\PhotoViewer.dll`», ImageView_Fullscreen %1″
If ( -Not ( Test-Path «Registry::HKEY_CLASSES_ROOT\Applications\photoviewer.dll\shell\open\DropTarget»)){New-Item -Path «Registry::HKEY_CLASSES_ROOT\Applications\photoviewer.dll\shell\open\DropTarget» -ItemType RegistryKey -Force}
Set-ItemProperty -path «Registry::HKEY_CLASSES_ROOT\Applications\photoviewer.dll\shell\open\DropTarget» -Name «Clsid» -Type «String» -Value «{FFE2A43C-56B9-4bf5-9A79-CC6D4285608A}»
If ( -Not ( Test-Path «Registry::HKEY_CLASSES_ROOT\Applications\photoviewer.dll\shell\print»)){New-Item -Path «Registry::HKEY_CLASSES_ROOT\Applications\photoviewer.dll\shell\print» -ItemType RegistryKey -Force}
If ( -Not ( Test-Path «Registry::HKEY_CLASSES_ROOT\Applications\photoviewer.dll\shell\print\command»)){New-Item -Path «Registry::HKEY_CLASSES_ROOT\Applications\photoviewer.dll\shell\print\command» -ItemType RegistryKey -Force}
Set-ItemProperty -path «Registry::HKEY_CLASSES_ROOT\Applications\photoviewer.dll\shell\print\command» -Name «(Default)» -Type «ExpandString» -Value «%SystemRoot%\System32\rundll32.exe `»%ProgramFiles%\Windows Photo Viewer\PhotoViewer.dll`», ImageView_Fullscreen %1″
If ( -Not ( Test-Path «Registry::HKEY_CLASSES_ROOT\Applications\photoviewer.dll\shell\print\DropTarget»)){New-Item -Path «Registry::HKEY_CLASSES_ROOT\Applications\photoviewer.dll\shell\print\DropTarget» -ItemType RegistryKey -Force}
Set-ItemProperty -path «Registry::HKEY_CLASSES_ROOT\Applications\photoviewer.dll\shell\print\DropTarget» -Name «Clsid» -Type «String» -Value «{60fd46de-f830-4894-a628-6fa81bc0190d}»
Теперь в контекстном меню у вас уже будет доступен пункт «Открыть с помощью — Просмотр фотографий Windows»
После скачивания вам нужно распаковать архив, в итоге у вас будет вот такой состав.
- ON_Windows_2016_2019_Photo_Viewer.reg — Добавляет нужные ключи реестра для ассоциации, запускается первым.
- PhotoViewer.all.reg — сопоставляет ассоциации для bmp, jpe, jpeg, jpg, png, tif, tiff со средством просмотра фотографий Windows (Применяется сразу и не требует перезагрузку сервера, применяется для всех пользователей)
- PhotoViewer.bmp.reg — сопоставляет ассоциации для bmp (Применяется сразу и не требует перезагрузку сервера, применяется для всех пользователей)
- PhotoViewer.jpe.reg — сопоставляет ассоциации для jpe (Применяется сразу и не требует перезагрузку сервера, применяется для всех пользователей)
- PhotoViewer.jpeg.reg — сопоставляет ассоциации для jpeg (Применяется сразу и не требует перезагрузку сервера, применяется для всех пользователей)
- PhotoViewer.jpg.reg — сопоставляет ассоциации для jpg (Применяется сразу и не требует перезагрузку сервера, применяется для всех пользователей)
- PhotoViewer.png.reg — сопоставляет ассоциации для png (Применяется сразу и не требует перезагрузку сервера, применяется для всех пользователей)
- PhotoViewer.tif.reg — сопоставляет ассоциации для tif (Применяется сразу и не требует перезагрузку сервера, применяется для всех пользователей)
- PhotoViewer.tiff.reg — сопоставляет ассоциации для tiff (Применяется сразу и не требует перезагрузку сервера, применяется для всех пользователей)
- Register_Only_PhotoViewer.dll.reg — регистрирует библиотеку PhotoViewer.dll
Для того, чтобы ваша Windows Server 2019 могла правильно использовать средство просмотра фотографий в Windows, вам нужно добавить ключи реестра отвечающие за эти ассоциации. Сама ветка реестра находится по пути:
HKEY_LOCAL_MACHINE\SOFTWARE\Microsoft\Windows Photo Viewer\Capabilities\FileAssociations
По умолчанию, там есть два ключа отвечающие за tif и tiff.
По их аналогии я создаю ключи для:
- «.jpg»=»PhotoViewer.FileAssoc.Jpeg»
- «.wdp»=»PhotoViewer.FileAssoc.Wdp»
- «.jfif»=»PhotoViewer.FileAssoc.JFIF»
- «.dib»=»PhotoViewer.FileAssoc.Bitmap»
- «.png»=»PhotoViewer.FileAssoc.Png»
- «.tiff»=»PhotoViewer.FileAssoc.Tiff»
- «.jxr»=»PhotoViewer.FileAssoc.Wdp»
- «.bmp»=»PhotoViewer.FileAssoc.Bitmap»
- «.jpe»=»PhotoViewer.FileAssoc.Jpeg»
- «.jpeg»=»PhotoViewer.FileAssoc.Jpeg»
- «.gif»=»PhotoViewer.FileAssoc.Gif»
- «.tif»=»PhotoViewer.FileAssoc.Tiff»
Запустите файл «ON_Windows_2016_2019_Photo_Viewer.reg«. Подтвердите добавление ключа реестра.
В результате чего у вас прибавится ключей реестра.
Далее вы можете уже запускать файлы под свои форматы, или же запустить PhotoViewer.all.reg, который сопоставит ассоциации для bmp, jpe, jpeg, jpg, png, tif, tiff со средством просмотра фотографий Windows (Применяется сразу и не требует перезагрузку сервера, применяется для всех пользователей). В результате файлы данных форматов будут открываться для пользователей в привычном режиме.
Как сделать Photo Viewer программой по умолчанию через групповую политику
Еще можно сделать отдельную политику, которая будет делать ассоциацию файлов jpeg, jpg, png, bmp, tif, tiff со средством просмотра фотографий через GPO.
Единственный момент, что данный метод будет действовать исключительно на новых пользователей RDS фермы, так сделала Microsoft и не забываем, что вы так же должны активировать библиотеку PhotoViewer.dll
Суть метода в использовании XML файла (DefAppAssoc.xml) в котором будут прописаны все ассоциации. Данный файл будет импортироваться пользователю при входе в систему. Сам метод я подробно описывал, вот пример такого файла.
Как дополнительный вариант, вы можете через PowerShell или ту же групповую политику импортировать мои reg файлы, которые так же установят ассоциации графических файлов со средством просмотра фотографий.
Как сделать Photo Viewer программой по умолчанию в Windows Server 2022 или Windows 12
В Windows Server 2022 и Windows 12, перестали работать описанные ранее ключи реестра, и файл XML ассоциаций, так же не работает для старых профилей если у них уже были выставлены ассоциации. Но я уже стрелянный воробей и нашел прекрасное решение:
- Вы должны зарегистрировать библиотеку средства просмотра, это я показывал выше
- Далее вы должны взять мой скрипт и сопоставить для нужных вам раширений использование Windows Photo Viewer
- Ну и иметь список серверов на которых вы хотите это сделать, но можете и локально.
Давайте посмотрим с чем у меня связан формат PNG, который я ранее просил операционную систему Windows Server 2022 открывать через средство просмотра фотографий.
Видим, что это pngfile, не понятное какое-то приложение😅. Давайте тперь поймем с кем связана запись pngfile.
В результате видно, что за это отвечает приложение:
ftype pngfile=%SystemRoot%\System32\rundll32.exe «%ProgramFiles%\Windows Photo Viewer\PhotoViewer.dll«, ImageView_Fullscreen %1
Зная это выполним вы можете этим управлять, например сделать для формата .jpeg то же приложение, для этого пишем:
ftype jpegfile=%SystemRoot%\System32\rundll32.exe «%ProgramFiles%\Windows Photo Viewer\PhotoViewer.dll», ImageView_Fullscreen %1
Для массового исправления, например на RDS ферме используем мой скрипт PowerShell:
#Скрипт с сайта https://pyatilistnik.org/ разработал Иван Сёмин, разрешается его копировать на другие сайты только с указанием активной ссылки на источник
$Servers = Get-Content «C:\Temp\RDS\servers.txt«
#Для png
ForEach ($Server in $Servers) {
Invoke-Command -ComputerName $Server -ScriptBlock {
cmd /c ftype pngfile=%SystemRoot%\System32\rundll32.exe «%ProgramFiles%\Windows Photo Viewer\PhotoViewer.dll», ImageView_Fullscreen %1
}
}
#Для jpeg
ForEach ($Server in $Servers) {
Invoke-Command -ComputerName $Server -ScriptBlock {
cmd /c ftype jpegfile=%SystemRoot%\System32\rundll32.exe «%ProgramFiles%\Windows Photo Viewer\PhotoViewer.dll», ImageView_Fullscreen %1
}
}
#Для gif
ForEach ($Server in $Servers) {
Invoke-Command -ComputerName $Server -ScriptBlock {
cmd /c ftype giffile=%SystemRoot%\System32\rundll32.exe «%ProgramFiles%\Windows Photo Viewer\PhotoViewer.dll», ImageView_Fullscreen %1
}
}
Для того, чтобы массово проверить, текущие настройки на списке удаленных серверов, можете использовать вот такой PowerSherll скрипт:
$Servers = Get-Content «C:\Temp\RDS\servers-test.txt»
#Для png
ForEach ($Server in $Servers) {
Write-Host «Server $Server»
Invoke-Command -ComputerName $Server -ScriptBlock {
cmd /c ftype pngfile
}
}
#Для jpeg
ForEach ($Server in $Servers) {
Write-Host «Server $Server»
Invoke-Command -ComputerName $Server -ScriptBlock {
cmd /c ftype jpegfile
}
}
#Для gif
ForEach ($Server in $Servers) {
Write-Host «Server $Server»
Invoke-Command -ComputerName $Server -ScriptBlock {
cmd /c ftype giffile
}
}
На этом у меня все, с вами был Иван Семин, автор и создатель IT портала Pyatilistnik.org.
Home > Windows > Windows Server 2019 > Enabling photo viewer in Windows Server 2019
Home > VMWare platform > VMWare Horizon > Enabling photo viewer in Windows Server 2019
In case of Server 2019 machine being used as Desktop (eg RDSH VDI scenario), it might be useful to change default photo application from paint to photo viewer using:
- Go to ‘C:\Program Files (x86)\Windows Photo Viewer’ and look for DLLs related to photo viewer. If they are not there, copy them from the same path from a Windows 10 machine.
- Register the DLLs using Administrator CMD:
-
- regsvr32 “C:\Program Files (x86)\Windows Photo Viewer\PhotoViewer.dll”
-
- Download the registry keys from https://smarthomepursuits.com/download/2844/ (Reference for these steps. Download is only 9.4KB in size)
- Import the registry keys using ‘regedit’. File > Import > browse to the location where four extracted registry files are present. All four need to be imported.
- Chnage default photo app to «Photo viewer» by searching Windows for “Default Apps” and then changing Photos app to Windows Photo Viewer.
- Search Windows for folder options. In folder Options. Change to the View tab and uncheck “Always show icons, never thumbnails”.
Refer:
- https://smarthomepursuits.com/enable-photo-viewer-on-server-2016-or-2019/
Home > Windows > Windows Server 2019 > Enabling photo viewer in Windows Server 2019
Home > VMWare platform > VMWare Horizon > Enabling photo viewer in Windows Server 2019