
Introduction
Like Linux, Windows does have a netstat command and it can come handy when you are in need of network-related monitoring and troubleshooting.
Consider you have any of the following requirement
- How to find who or which process owns the port in Windows Server
- To see how many HTTP/DB connections opened by IIS/Any other App server runs on windows.
- To make sure the port is open and listening for incoming calls in Windows Server
- How many connections are open from IIS to Database in WIndows server
- How many Connections are open from Application Server like Tomcat running on Windows Server
- Connection leaks to the database from windows server etc
Netstat command windows have the following syntax and options support.

using this various options given in the preceding picture you can derive many useful commands to help you in your endeavour
- Find all the ESTABLISHED and WAITING TCP connections
- Get Detailed info of TCP and UDP connections
- List of Connections and Ports open with Process information – Find Who Owns the port
- Find Who owns the port with Process ID and Process Name
- Get Fully Qualified remote address on the open connections
- How to Grep for a Specific port with windows netstat command
- Execute Windows Netstat commands in interval
Here we have given some of the most used and quick netstat command snippets. You can choose one or you can frame one using the options shown in the preceding picture
To find all the Established and Waiting for TCP connections.
This is a Simple Netstat command it would result the simple list of TCP connections Established on the server
netstat

To get Detailed info on Ports Open, Ports Listening, Connections Established for TCP/UDP connections
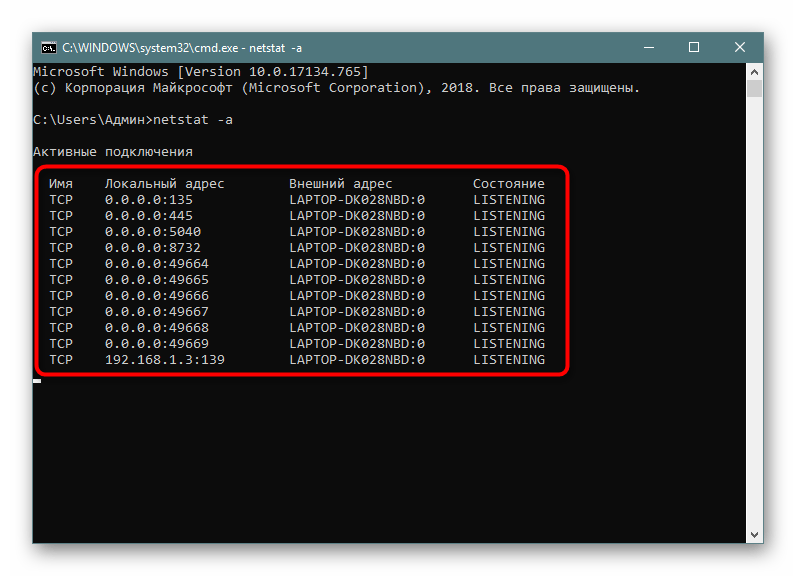
netstat -a command would give the extended result of ports opened on the server and established connections and their current state for both TCP and UDP connections.
this command can be used to check if your application server (Tomcat,Weblogic,IIS) or any process running on the windows server has opened and listening on a certain port.
netstat -a

You can also use the netstat -an command to get faster results as netstat -a would take longer time in the name resolution of the remote foreign address
netstat -an

So, What is the Difference between netstat -a and netstat -an why the latter one is faster
Simply put,
netstat -ancommand would only show the remote server IP addresses wherenetstat -awould try to resolve the name for that IP address. Thusnetstat -anwould be faster than thenetstat -a
How to get the Process name [service name] along with connections – Who owns the port
Consider that you have any of the tomcat ,weblogic, websphere, Apache HTTPD, IIS, MSSQL server, Oracle DB product running on the windows server
During issues, It might be necessary for you to validate which process owns which port. or would have wanted to know how many connections are currently open or established.
In Such cases, you can use the following command which would result in the great detailed info along with the process name (or) the binary name which opened the port or the connection.
You have to run the command prompt as Administrator [ Run as Administrator ] before running this command
netstat -ab
If you do not want the the Domain Name be displayed in the Foreign Address and OK with the numeric IP information. You can use netstat -anb as said earlier, adding an -n option makes the command faster

Get the Process ID and Process Name of the Ports and Connections Open
In the previous example, with netstat -ab we were only getting the Process name who owns the port. not the Process ID.
Getting a Process ID of the process who owns the port would also be helpful in most of the cases.
To get the PID information you need to use -o option along with -ab
netstat -abo

Using -f option to get Fully Qualified Domain Names (FQDN) or Remote Address
With any preceding command, you can use the -f option to get the Fully Qualified Domain Names (FQDN) of the remote address
netstat -afb
You cannot use -n with -f is for FQDN where -n is for only numeric.

Look for a Specific Port or Process ID using FINDSTR [ equivalent to grep ]
How to make sure a Specific port is listening in windows
The windows netstat command output is so large and if you are looking for a precise port or process or PID. you can use findstr , a windows equivalent for Linux grep command
netstat -afb |findstr 8080

in the preceding snapshot you can see that findstr was used to check if port 8080 is open and tomcat is listening
Using Netstat in Script with Sleep interval. Monitor a Port status with Netstat
Let’s suppose you want to monitor if a port is listening at a constant interval. Windows netstat command can accept sleep interval.
You can use any netstat command with a specific interval. The command will run in a loop with a Specified interval and it can be stopped with CTRL+C
netstat -abo 5|findstr 8080
here the interval is 5 seconds,
The netstat -abo command would run every 5 seconds until interrupted or stopped with CTRL+C

Various other Windows Netstat commands and their usage
netstat has more to offer and here I have listed some of the command snippets and their usage as quick gist.
Display Routing table
netstat -r
Display only UDP connections
netstat -abp udp -ab
Display only TCP connections
netstat -abp tcp -ab
Display Detailed Ethernet and Connection Usage Statistics
netstat -es
Hope it helps
Thanks
Rumen Lishkov
Follow us onFacebook orTwitter
For more practical videos and tutorials. Subscribe to our channel
Find me on Linkedin My Profile
For any Consultation or to hire us [email protected]
If you like this article. Show your Support! Buy me a Coffee.
Signup for Exclusive «Subscriber-only» Content
Все способы:
- Используем команду netstat для просмотра открытых портов
- Отображение всех подключений и ожидающих портов
- Постраничное отображение открытых портов
- Запись результатов в текстовый файл
- Поиск по содержимому
- Вопросы и ответы: 2
Netstat — одна из встроенных команд операционной системы Windows. В ее функциональность входит отображение состояния сети со всеми требуемыми деталями. Пользователь задействует встроенный синтаксис, чтобы отфильтровать результаты или задать дополнительные действия для этой утилиты. В рамках сегодняшнего материала мы бы хотели рассказать о доступных методах просмотра открытых портов с помощью этого стандартного инструмента.
Используем команду netstat для просмотра открытых портов
Портами называют натуральные числа, которые записываются в заголовках протоколов передачи данных (TCP, UDP и так далее). Они определяют процесс получения и передачи информации в рамках одного хоста и в большинстве случаев используются онлайн-программами для установки соединения. Просмотр открытых портов может понадобиться в случае определения работоспособности приложений или при стандартном мониторинге сети. Лучше всего с этим справится команда netstat, а ее активация доступна с применением разных аргументов.
Отображение всех подключений и ожидающих портов
Самый простой аргумент, применяемый к утилите netstat, имеет обозначение -a, и отвечает за вывод сведений обо всех активных подключениях их портов, которые ожидают соединения. Такая информация доступна к просмотру без применения прав администратора и выводится на экран следующим образом:
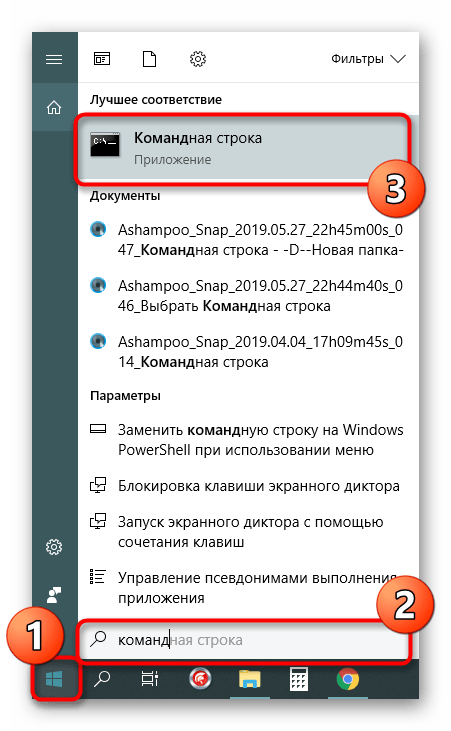
- Поскольку рассматриваемая команда является консольной, потребуется запустить приложение, чтобы ее выполнить. Откройте меню «Пуск», найдите там «Командную строку» и запустите ее. О других методах перехода в консоль читайте в другом нашем материале по следующей ссылке.
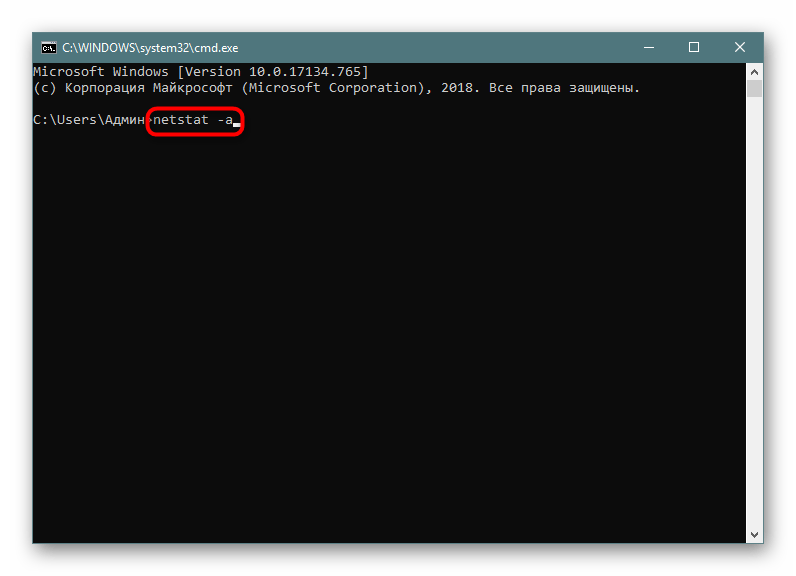
- В поле ввода напечатайте
netstat -a, а затем нажмите на клавишу Enter. - На экране тут же начнет появляться список с доступными адресами.
Подробнее: Открытие командной строки в Windows 10
Мониторинг производится в режиме реального времени, поэтому не все результаты будут доступны к просмотру сразу. Придется подождать немного времени, чтобы все они могли прогрузиться. Во время этого не закрывайте консоль, если не хотите прервать процесс, ведь при повторном запуске команды все начнется заново.
Постраничное отображение открытых портов
К сожалению, приведенный выше вариант отображает не все необходимые данные об открытых портах, поскольку выводит он только те параметры, которые на текущий момент находятся в состоянии LISTENING. К тому же там не указывались уникальные идентификаторы процессов (PID), что тоже играет важную роль во время определенного мониторинга. Потому советуем обратить внимание немного на другие аргументы.
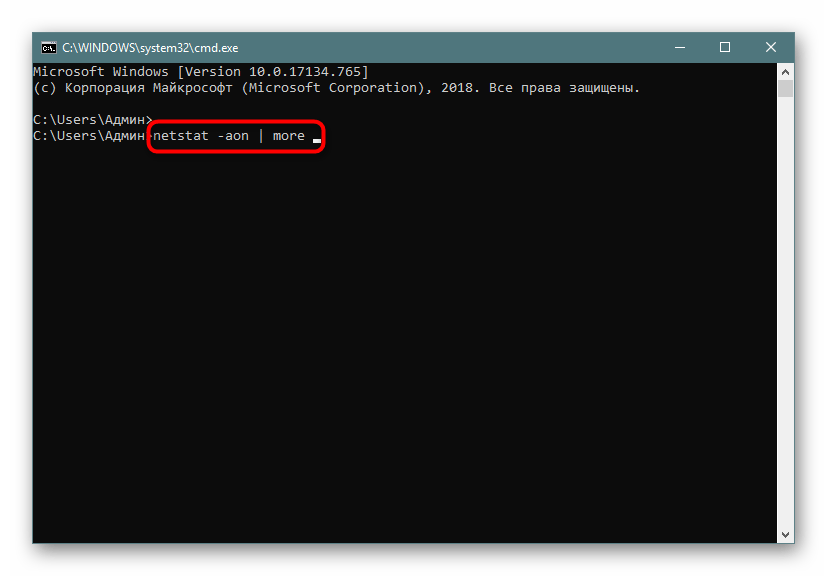
- В консоли пропишите
netstat -aon | moreи нажмите на Enter. - Здесь сразу же появится вся важная информация о портах, которые находятся в разных состояниях. В пятой колонке обозначаются идентификаторы.
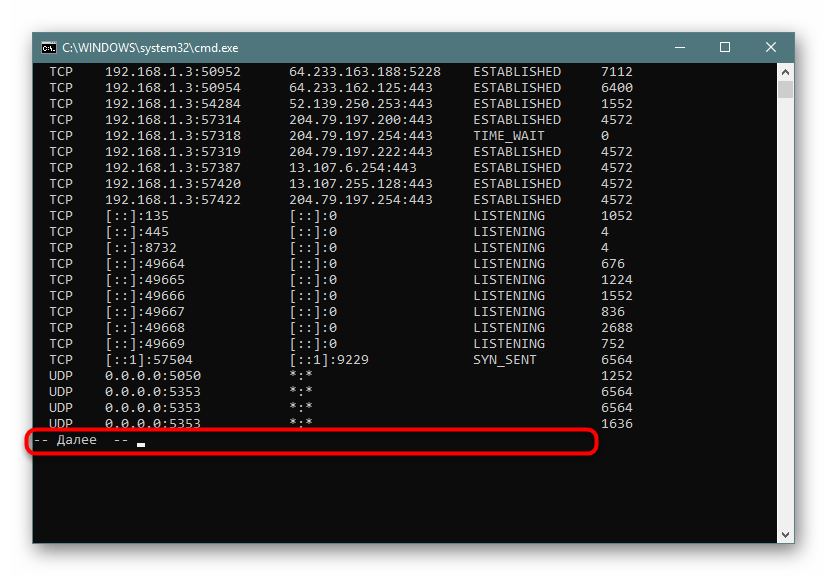
- Не все порты выводятся сразу, поэтому нужно жать на Enter, чтобы каждый раз отображать еще по одной строке.
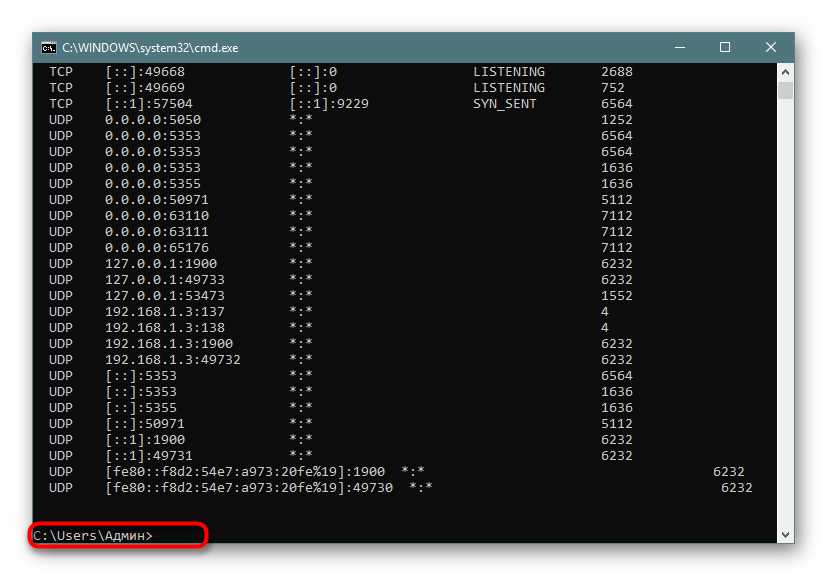
- Если вы увидите поле ввода, значит все страницы были успешно выведены на экран.
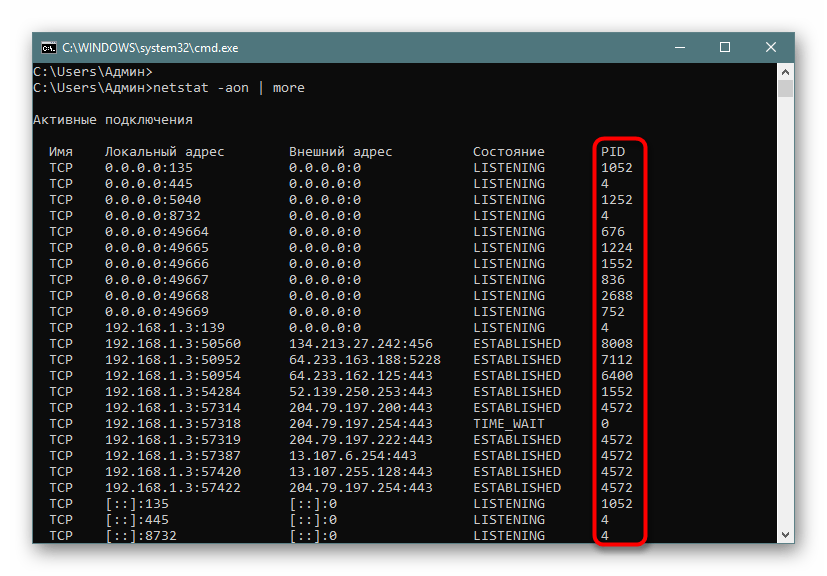
Теперь хотелось бы поговорить про используемые аргументы и значение увиденных параметров. Давайте сначала затронем знакомые буквы синтаксиса:
| Аргумент | Описание |
|---|---|
| -a | Отображает сведения обо всех подключениях |
| -o | Отвечает за включение колонки с идентификатором каждого адреса |
| -n | Переводит адреса портов и их номера в числовой формат |
| more | Постраничный вывод элементов |
Важно также уточнить и состояние портов, поскольку они могут являться открытыми, но на этот момент не использоваться или ожидать своего подключения. В колонке «Состояние» могут отображаться такие показатели:
| Показатель | Описание |
|---|---|
| CLOSE_WAIT | Подключение ожидает своего закрытия |
| CLOSED | Подключение было успешно закрыто |
| ESTABLISHED | Активная работа соединения |
| LISTENING | Ожидается соединение или еще говорят: «Слушается порт» |
| TIME_WAIT | Время ответа было превышено |
Эти объяснения должны разобраться помочь не только с составлением запросов для netstat, но и без проблем разобраться с полученной информацией.
Запись результатов в текстовый файл
Иногда требуется сохранить готовые результаты мониторинга в текстовый файл, чтобы выполнить дальнейшие действия, ведь копировать информацию прямо из консоли не всегда удобно, да и займет это намного больше времени, нежели просто указать дополнительный аргумент при вводе команды.
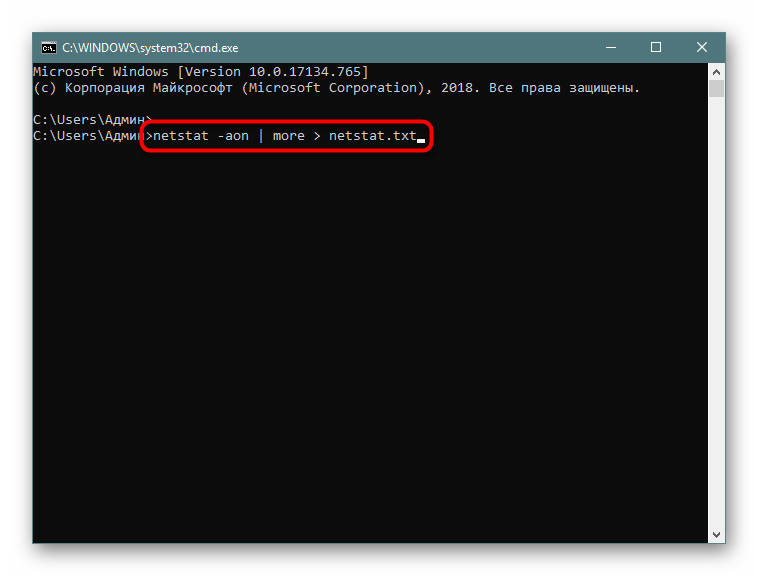
- Напишите, например,
netstat -aon | moreилиnetstat - a, а затем добавьте> netstat.txt, что означает запись результатов в указанный файл (он будет создан в пользовательской папке). После ввода нажмите на Enter. - Запустите файл, введя его название и формат в консоли.
- Теперь вы можете управлять содержимым и сохранить его в любом другом удобном месте.

Поиск по содержимому
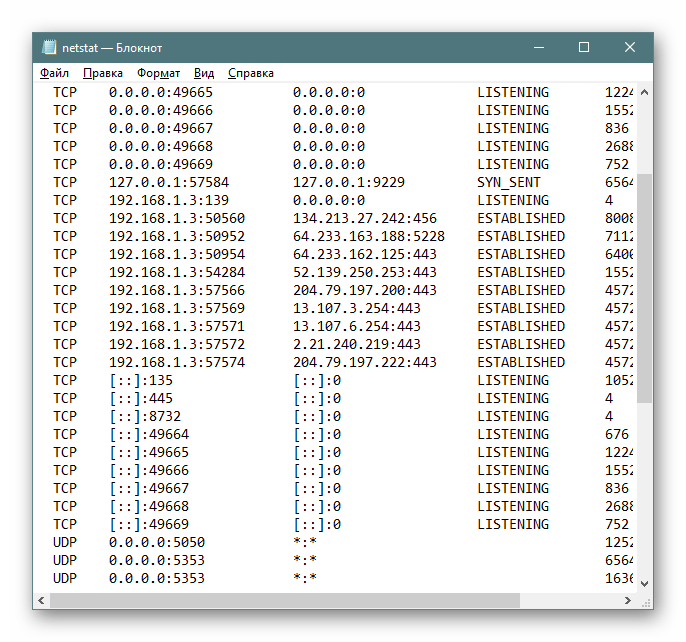
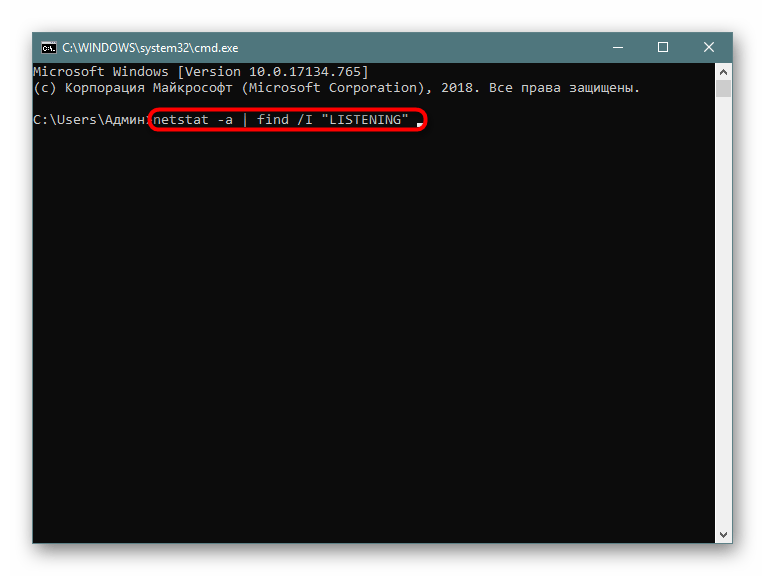
В случае необходимости отображения только подключений с определенными параметрами или адресами лучше всего использовать дополнительную команду find, которая перед выводом сведений произведет фильтрацию данных, и это освободит вас от надобности вручную искать каждый соответствующий пункт. Тогда полная консольная команда приобретает следующий вид:
- Введите
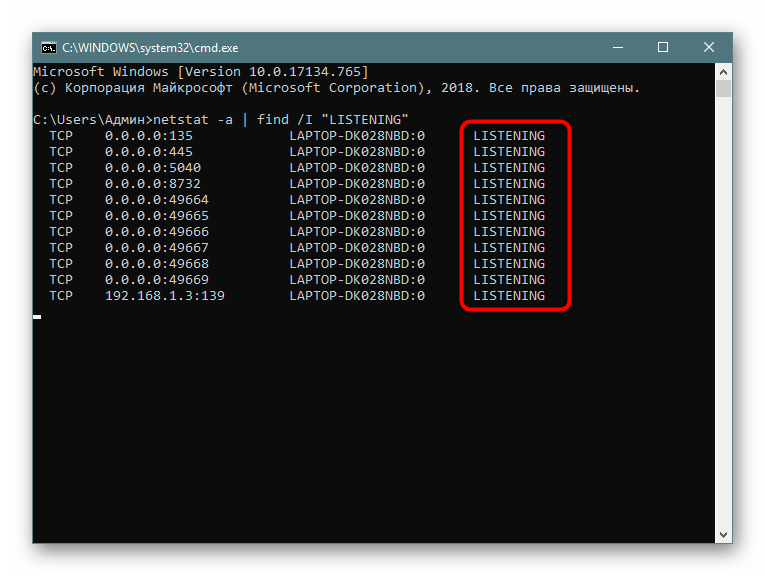
netstat -a | find /I "LISTENING", что задаст параметр отображения только портов с состоянием LISTENING, аргумент /I при этом используется для отмены учета регистра символов. - В результатах отобразится только подходящая информация.
Выше вы узнали о методах определения открытых портов через встроенную команду netstat. После этого можете приступить к работе с программами или пробросу других портов в случае необходимости. К слову, этой теме посвящен отдельный материал на нашем сайте. Перейдите по указанным ниже ссылкам, чтобы ознакомиться с подробными инструкциями.
Читайте также:
Открываем порты на роутере
Открываем порты в брандмауэре Windows 10
Команда netstat всегда показывает правильные результаты, однако если хотите убедиться в открытости порта другим путем, рекомендуем задействовать специальные онлайн-сервисы, позволяющие справиться с поставленной задачей.
Читайте также: Сканирование портов онлайн
Наша группа в TelegramПолезные советы и помощь
Разумеется, составить полный список всех ненужных служб невозможно. Набор запущенных по умолчанию служб различается от системы к системе и даже между двумя версиями MS Windows XP с разными пакетами обновлений. А если вам приходится укреплять безопасность системы, настроенной кем-то другим, набор запущенных служб, без сомнения, отличается от списка по умолчанию. Что еще хуже, время от времени появляются новые службы, расширяя количество служб, которые могут быть запущены на каждом конкретном компьютере.
В Microsoft Windows существует команда терминала netstat, которая позволяет получить список открытых портов. Функциональность стандартной версии netstat для MS Windows несколько ограничена по сравнению с аналогичной командой для систем Unix, но она все же предусматривает использование суффиксов для получения списка служб, прослушивающих порты:
netstat -a | find "LISTENING"Результат выполнения этой команды должен выглядеть примерно так:
TCP    hostname:epmap           hostname:0               LISTENING
TCP    hostname:microsoft-ds    hostname:0               LISTENING
TCP    hostname:10110             hostname:0               LISTENING
TCP    hostname:netbios-ssn      hostname:0               LISTENING
… где вместо «hostname», разумеется, стоит имя хоста данной системы.
Теперь вы знаете, как…
…а знать – это уже полдела. Разумеется, для решения проблемы необходимо применить эти знания на практике. В статье Настройка межсетевого экрана (брандмауэра) в Windows XP Professional SP2 есть несколько полезных советов на эту тему.
Теперь, когда вы знаете, как получить список открытых в системе портов и выяснить, какие из ненужных служб на данный момент запущены, вы сможете остановить эти службы и закрыть порты. Поскольку конкретный порядок действий для выполнения этой задачи различается от системы к системе и обычно оказывается несколько более сложным, чем получение информации об открытых портах, подробную инструкцию я опубликую в другой раз.
Автор: Chad Perrin
Оцените статью: Голосов
Quick Links
-
Use Built-In Tools to See What Is Listening on a Port
-
Use NirSoft CurrPorts to View What is Listening on a Port
Summary
- Run the command «netstat -ab» in an elevated Command Prompt, PowerShell, or Terminal window to see a list of applications and their associated ports. This works in Windows 11 too.
- Checking open ports can be done using built-in tools like Command Prompt or PowerShell, which list active ports and the associated process names or identifiers.
- The freeware application CurrPorts by NirSoft provides an easier way to view what is listening on a port, displaying detailed information about the process and allowing for better management of ports.
Whenever an application wants to make itself accessible over the network, it claims a TCP/IP port, which means that port can’t be used by anything else. So how do you check open ports to see what application is already using it?
We’ve tested this process and confirmed that all of the steps are up-to-date, and that they all work in Windows 11, too.
How Do Ports Work?
An IP address specifies a computer — or other network device — on a network. When one device sends traffic to another, the IP address is used to route that traffic to the appropriate place. Once the traffic reaches the right place, the device needs to know which app or service to send the traffic on to. That’s where ports come in.
If the IP address is akin to a street address on a piece of mail, the port is something like the name of the person at that residence who gets the mail. For the most part, you don’t need to worry about ports. But once in a while, you might encounter an app that’s set to listen for traffic on the same port that another app already has in use. In that case, you’ll need to identify the app that already has that port in use.
There are a number of ways to tell what application has a port locked, but we’re going to walk you through a couple of built-in ways that use the Command Prompt, PowerShell, or the Terminal, and then show you a great freeware application that makes it even easier. All these methods should work no matter which version of Windows you use.
We’ve got two commands to show you. The first lists active ports along with the name of the process that’s using them. Most of the time, that command will work fine. Sometimes, though, the process name won’t help you identify what app or service actually has a port tied up. For those times, you’ll need to list active ports along with their process identifier numbers and then look those processes up in Task Manager.
Option One: View Port Use Along with Process Names
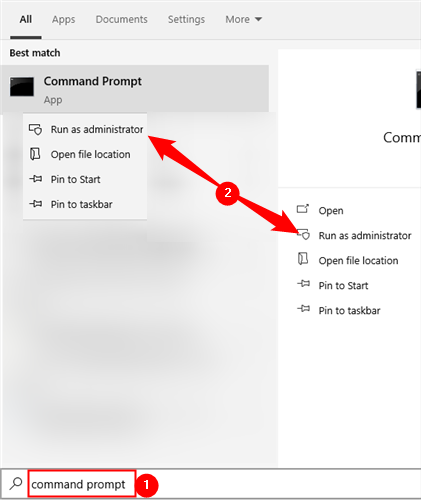
First, you’ll need to open the Command Prompt in administrator mode. Hit Start, and then type «command» into the search box. When you see «Command Prompt» appear in the results, right-click it and choose «Run as administrator,» or click «Run as Administrator» on the right.
You can also use PowerShell or Terminal for this.
At the Command Prompt, type the following text and then hit Enter:
netstat -ab
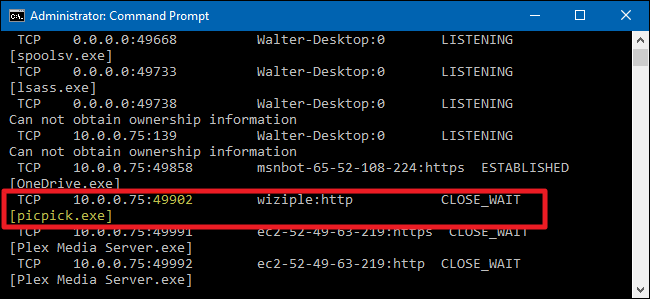
After you hit Enter, the results may take a minute or two to fully display, so be patient. Scroll through the list to find the port (which is listed after the colon to the right of the local IP address), and you’ll see the process name listed under that line. If you’d like to make things a little easier, remember that you can also pipe the results of the command to a text file. You could then just search the text file for the port number you’re after.
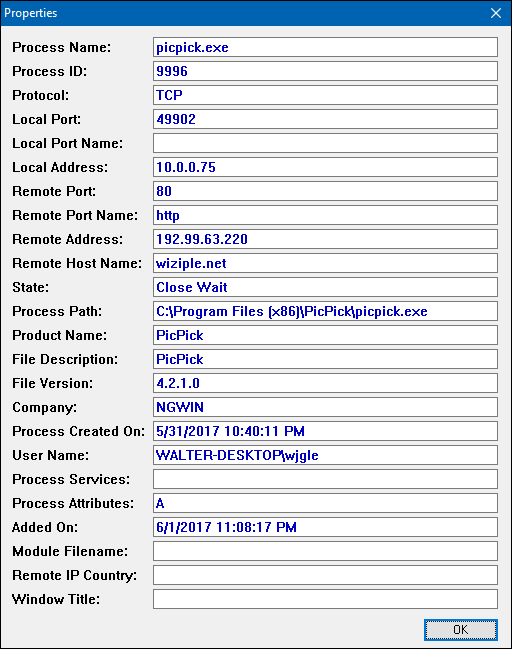
Here, for example, you can see that port 49902 is tied up by a process named picpick.exe. PicPick is an image editor on our system, so we can assume the port is actually tied up by the process that regularly checks for updates to the app.
Option Two: View Port Use Along with Process Identifiers
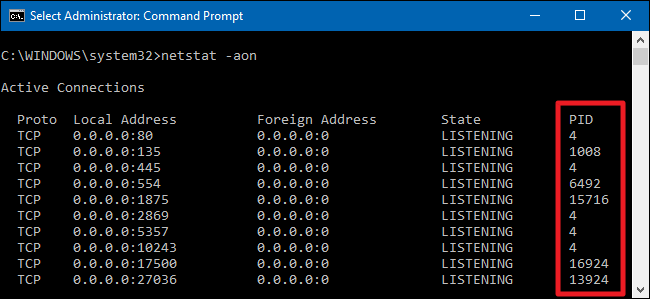
If the name of the process for the port number you’re looking up makes it difficult to tell what the related app is, you can try a version of the command that shows process identifiers (PIDs) rather than names. Type the following text at the Command Prompt, and then hit Enter:
netstat -aon
The column at the far right lists PIDs, so just find the one that’s bound to the port that you’re trying to troubleshoot.
Next, open up Task Manager by right-clicking any open space on your taskbar and choosing «Task Manager.» You can also hit Ctrl+Shift+Esc.

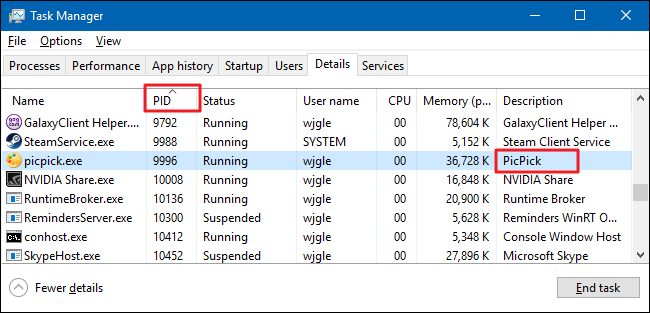
If you’re using Windows 8, 10, or 11 switch to the «Details» tab in Task Manager.
In older versions of Windows, you’ll see this information on the «Processes» tab. Sort the list of process by the «PID» column and find the PID associated with the port you’re investigating. You might be able to tell more about what app or service has the port tied up by looking at the «Description» column.
If not, right-click the process and choose «Open file location.» The location of the file will likely give you clues as to what app is involved.
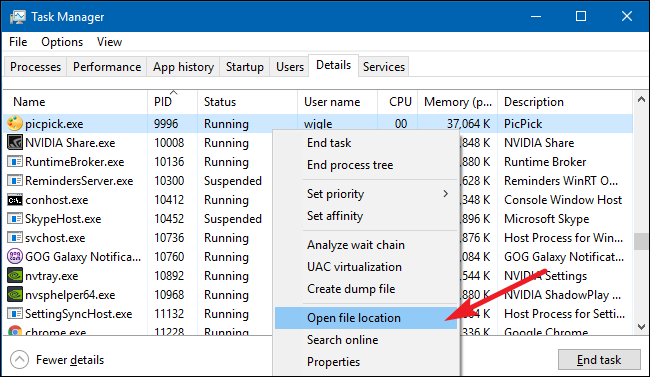
When Once you’re there, you can use the End Process, Open File Location, or Go to Service(s) options to control the process or stop it.
Use NirSoft CurrPorts to View What is Listening on a Port
If you aren’t really the Command Prompt type — or you’d rather just use a simple utility to do all this in one step — we recommend the excellent freeware CurrPorts utility by NirSoft. Go ahead and download the tool. Just make sure you get the right version (the regular version is for 32-bit Windows and the x64 version is for 64-bit Windows). It’s a portable app, so you won’t need to install it. Just unzip the download folder and run executable.
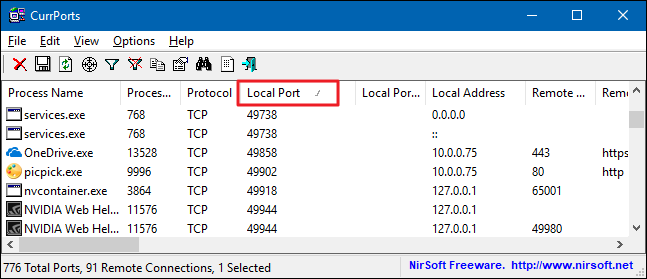
In the CurrPorts window, sort by the «Local Port» column, find the port you’re investigating, and you can see everything — the process name, PID, port, the full path to the process, and so on.
To make it even easier, double-click on any process to see every single detail in one window.
When you’ve determined what app or service has the port you’re investigating tied up, it’s up to you how to handle it. If it’s an app, you may have the option to specify a different port number. If it’s a service — or you don’t have the option to specify a different port number — you’ll likely have to stop the service or remove the app.
Checking open TCP/IP ports on your Windows computer is crucial for managing network security and ensuring smooth connectivity. Certain apps and processes in Windows may face issues due to closed or misconfigured ports, often caused by firewalls or private IP addresses. This guide will walk you through step-by-step methods to check whether a TCP port is open or closed using built-in tools and third-party utilities.
Why You Should Check TCP/IP Ports?
Here are some common scenarios where checking ports is necessary:
- Troubleshooting connectivity issues for applications or services.
- Configuring firewalls to ensure necessary connections are allowed.
- Detecting suspicious activity that might indicate a security breach.
Methods to Check Open TCP/IP Ports
There are several ways to check open TCP/IP ports in Windows. Here are a few options:
Method 1. Using Telnet Client
Step 1: Check whether the telnet client feature is ON or not. In order to check, open the Turn Windows feature on or off settings from the search bar. OR press the ‘window’ key and type ‘windows’ features. Then press on “Turn Windows features on or off”.
-660.png)
A new prompt will be opened. Search for “Telnet Client” and check the box in front of ‘telnet Client’.

Step 2: Open the command prompt. Press the ‘windows’ key and type ‘cmd’. Press “Command Prompt”.
-660.png)
Step 3: On the command prompt, type the command “telnet + IP address or hostname + port number” and check the status of the provided TCP port.
-660.png)
Step 4: If only the blinking cursor is visible, then the port is open.
-660.png)
Step 5: If you get the message “connection failed” then the port is closed.
-660.png)
Method 2: Using built-in netstat command-line utility:
Step 1: Open the command prompt.
Step 2: Run the following command:
netstat -an

Method 3. Using TcpView
Another option is to use the TcpView utility from Microsoft’s Sysinternals suite of tools. This utility provides a more user-friendly interface for viewing active TCP/IP connections, along with additional information such as the process ID and process name for each connection. Steps to be followed:
Step 1: Download the TcpView utility from the Microsoft Sysinternals website. You can find the download link on the TcpView page of the Sysinternals website.
-660.png)
Step 2: Extract the downloaded file and run the TcpView.exe file to launch the TcpView utility. This will open the TcpView window, which shows a list of all active TCP/IP connections on your machine.

Step 3: Open the tcpview.exe (application).
By default, TcpView will display the following columns in the list of connections:
Protocol: Shows the protocol being used for the connection (TCP or UDP)
Local Address: Shows the local address and port being used for the connection
Remote Address: Shows the remote address and port being connected to
State: Shows the current state of the connection (e.g. Established, Listen, etc.)
You can use the “Local Address” and “Remote Address” columns to see which ports are being used by which applications. For example, if you see a connection with a local address of “127.0.0.1:80”, this means that the local application is using port 80 for outgoing connections.
Method 4. Using Windows PowerShell
You can also use Windows PowerShell to check open TCP/IP ports. To do this, use the Get-NetTCPConnection cmdlet, which allows you to view a list of active TCP/IP connections and the local and remote addresses and ports being used. For example, you can run the following command to view a list of all active TCP/IP connections:
Get-NetTCPConnection |
Select-Object LocalAddress,
LocalPort, RemoteAddress, RemotePort

Method 5. Using Nmap
To install Nmap in the Windows command line, follow these steps:
Step 1: Download the latest version of Nmap from the Nmap website. You can find the download link on the Nmap download page:
https://nmap.org/download.html
Step 2: Extract the downloaded file to a location on your computer. This will create a new folder containing the Nmap files.
Step 3: Open a command prompt and navigate to the directory where you extracted the Nmap files. For example, if you extracted the files to the C:\nmap directory, you would run the following command:
cd C:\nmap
Step 4: Once you are in the Nmap directory, you can install Nmap by running the nmap.exe file. To do this, run the following command:
nmap.exe -V
This will display the version number of Nmap, indicating that it has been installed successfully.
Step 5: To use nmap to scan for open TCP/IP ports, run the “nmap -sT” command, followed by the IP address or hostname of the machine you want to scan.
nmap -sT localhost

This will scan the specified host or IP address and display the results. You can also use the -h option to view a list of available options and arguments for the nmap command. Overall, installing Nmap in the Windows command line is a straightforward process. You can download the latest version of Nmap from the Nmap website, extract the files, and then run the nmap.exe file to install it. Once it is installed, you can use the nmap command to scan hosts and IP addresses and view the results.
Common Issues That Close Ports
- Applications not functioning as expected.
- Misconfigured firewall rules blocking connections.
- IP addresses improperly set as private.
Troubleshooting Common Issues
Here are some common issues that may occur during opening TCP/IP Ports in Windows:
- Telnet Not Listed in Features: Ensure your system version supports Telnet or enable it via PowerShell.
- Firewall Blocking Ports: Temporarily disable the firewall to test port connectivity.
- Command Not Recognized: Verify tool installation and environment variables.
Conclusion
Checking open TCP/IP ports on your Windows computer is an important step for maintaining your system’s security and efficiency. By regularly monitoring these ports, you can identify any unwanted or suspicious connections that might put your computer at risk. Windows provides several simple tools, like Command Prompt and PowerShell, which make it easy to see which ports are open and what applications are using them. Taking the time to check your open ports helps ensure that your computer runs smoothly and stays protected from potential threats. Staying proactive about monitoring your network connections is a key part of keeping your digital environment safe and reliable.