
Загрузить PDF
Загрузить PDF
Из этой статьи вы узнаете, как обновить BIOS на компьютере под управлением Windows. Имейте в виду, что BIOS нужно обновлять в редких случаях, а неправильное обновление может привести к полной поломке материнской платы. На компьютерах Mac BIOS нет.
-

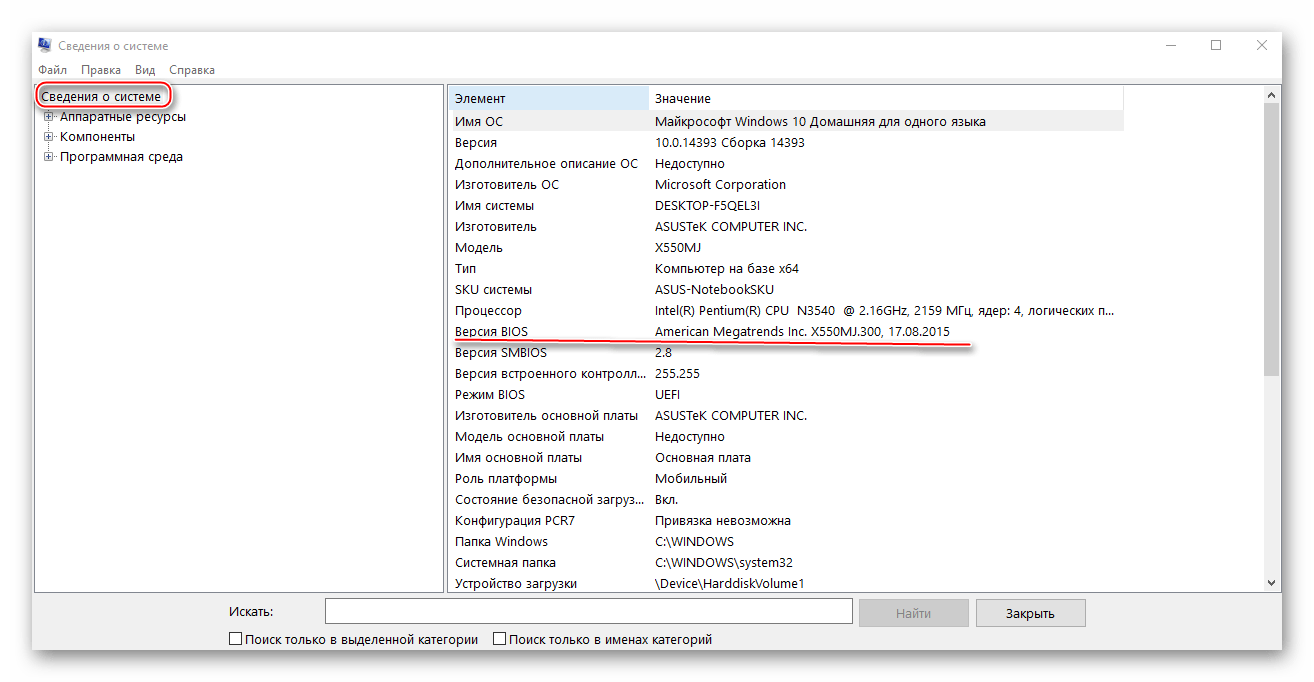
Нажмите на логотип Windows в нижнем левом углу экрана.
-
Введите сведения в меню «Пуск», а затем нажмите «Сведения о системе» в верхней части меню «Пуск».
-
В строке «Модель» вы найдете ряд цифр и букв — это модель компьютера. Эта информация понадобится, чтобы найти файл обновления BIOS.
- Пропустите этот шаг, если ваш компьютер собран на заказ.
-
В строке «Версия BIOS» вы увидите название компании-производителя BIOS, модель компьютера и версию BIOS (модель компьютера и версия BIOS разделены точкой).
- Например, если модель компьютера «Q553UB», а версия BIOS «202», в строке «Версия BIOS» отобразится «Q553UB.202».
- Если ваш компьютер собран на заказ, определите модель своей материнской платы, а не модель компьютера.
-
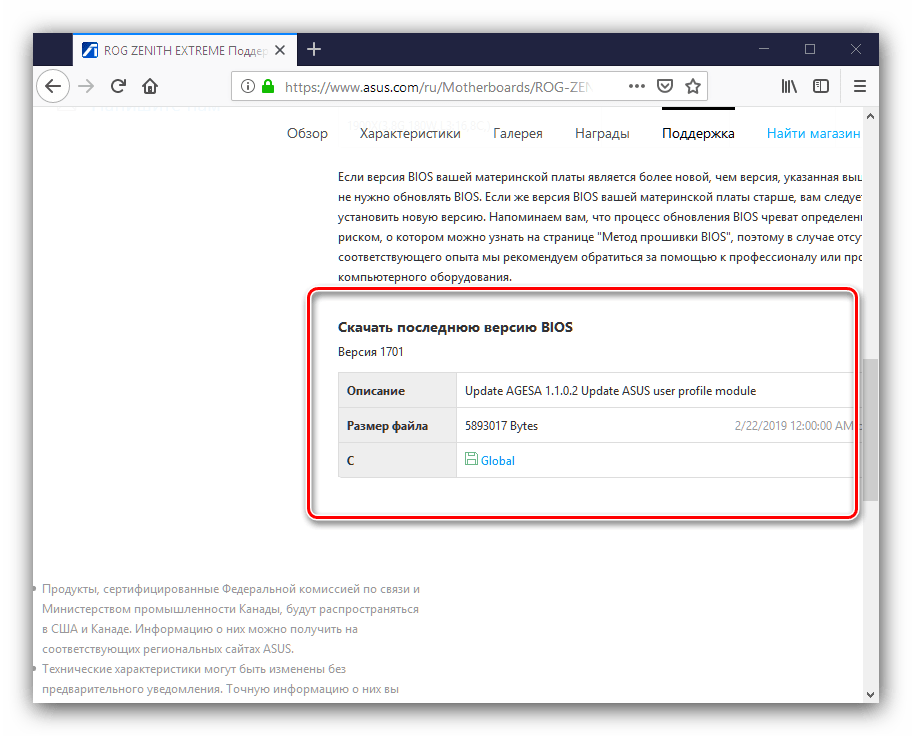
Для этого в поисковой системе («Яндекс» или Google) введите имя производителя компьютера, модель компьютера, а затем слово «драйверы» или «BIOS» (без кавычек). В зависимости от производителя компьютера вам, возможно, придется перейти по нескольким ссылкам, прежде чем вы найдете нужную страницу.
- Если ваш компьютер собран на заказ, в поисковике введите имя производителя материнской платы, а затем слова «обновить BIOS» (без кавычек). Потом откройте сайт производителя BIOS.
-
В зависимости от веб-сайта откройте раздел «Updates» (Обновления), «Support» (Поддержка), «Downloads» (Загрузка) или щелкните по заголовку «BIOS».
- Процесс поиска файла обновления может включать метод проб и ошибок.
СОВЕТ СПЕЦИАЛИСТА
Mobile Kangaroo — ремонтная мастерская с центральным офисом в Маунтин-Вью, Калифорния, которая оказывает полный спектр услуг и является авторизованным сервисным центром Apple. Ремонтирует электронные устройства, такие как компьютеры, телефоны и планшеты, более 16 лет. Имеет представительства более чем в 20 городах.
Mobile Kangaroo
Специалисты по ремонту компьютеров и телефоновБезопасно ли обновлять BIOS непосредственно в Windows? Джозеф Александер, специалист по ремонту компьютеров, объясняет: «Как правило, делать это безопасно. Главное — скачать файл обновления с сайта производителя и внимательно следовать всем инструкциям».
-
В имени файла отобразится версия BIOS. Если эта версия новее версии вашего BIOS, скачайте файл обновления.
- Если версия файла обновления такая же, как версия вашего BIOS, BIOS обновлять не нужно.
- Если версия вашего BIOS представлена целым числом (например, 301), а версия файла обновления десятичной дробью (например, 301.1), версия файла обновления новее версии вашего BIOS.
-
Нажмите «Download» (Скачать). Когда файл обновления BIOS скачается на компьютер, можно приступить к обновлению BIOS.
- В некоторых случаях щелкните по имени файла, чтобы скачать его.
- Большинство файлов обновления BIOS скачаются в виде архива (ZIP-файла).
Реклама


-
Если компьютер выключится во время обновления BIOS, материнская плата выйдет из строя.
- Если вы пользуетесь ноутбуком, зарядите его аккумулятор и подключите к электророзетке.
-
Для этого:
- дважды щелкните по ZIP-файлу, чтобы открыть его;
- перейдите на вкладку «Извлечь» в верхней части окна;
- нажмите «Извлечь все»;
- когда появится запрос, нажмите «Извлечь»;
- подождите, пока откроется извлеченная папка.
-
Дважды щелкните по этому файлу, чтобы открыть его, а затем внимательно прочитайте его содержимое.
- Если инструкции в файле «README» противоречат инструкциям, данным в этой статье, следуете инструкциям файла «README».
-

В процессе обновления BIOS не сможет получить доступ к файлам компьютера, поэтому файл обновления нужно записать на пустой USB-накопитель.
-
Щелкните по файлу обновления BIOS, нажмите Ctrl+C, чтобы скопировать его, откройте окно USB-накопителя, а затем нажмите Ctrl+V, чтобы вставить скопированный файл.
- Не отключайте накопитель во время обновления BIOS.
-
Войдите в BIOS. Нажмите «Пуск»

> «Питание»
> «Перезагрузить», а затем несколько раз нажмите клавишу для входа в BIOS. Если вы не смогли войти в BIOS, перезагрузите компьютер и попробуйте нажать другую клавишу.
- На большинстве компьютеров нажмите одну из F-клавиш (например, F12), хотя на некоторых компьютерах нужно нажать клавишу Del или Esc.
- Если вы не знаете, какую клавишу нажать, в поисковике введите имя производителя компьютера или материнской платы, номер модели и слова «клавиша для входа в BIOS».
-
Если на главной странице BIOS есть опция «Backup» (Резервное копирование) или «Save» (Сохранить) или если в верхней части экрана вы видите вкладку «Backup» (Резервное копирование), нажмите на эту опцию или вкладку и следуйте инструкциям на экране. Так вы сможете восстановить BIOS, если после обновления компьютер будет работать не так, как нужно.
- Возможно, вам будет предложено создать резервную копию BIOS, когда вы запустите процесс обновления.
- Не все версии BIOS позволяют создавать свои резервные копии.
-
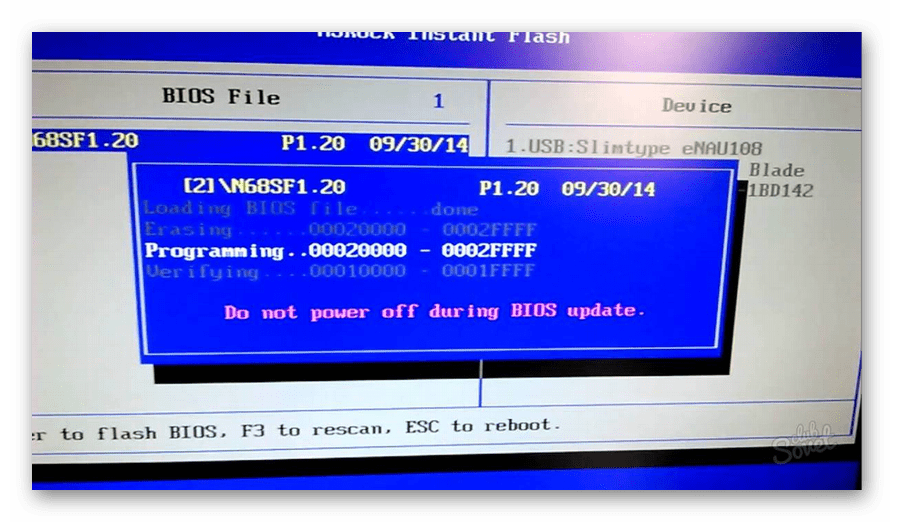
Процесс обновления зависит от версии BIOS, поэтому откройте сайт производителя BIOS и найдите на нем информацию о том, как обновить BIOS.
- Во многих случаях нужно перейти на вкладку «Boot» (Загрузка), найдите подключенный USB-накопитель, сделайте резервную копию BIOS (если возможно), перейдите на вкладку «Advanced» (Дополнительные) и нажмите «Start Flash» (Начать обновление).[1]
- Иногда, если подключить к компьютеру USB-накопитель и нажать на клавишу для входа в BIOS, открывается меню, в котором нужно нажать «Update» (Обновить) и следовать инструкциям на экране. Это часто встречается на компьютерах Dell.[2]
- Во многих случаях нужно перейти на вкладку «Boot» (Загрузка), найдите подключенный USB-накопитель, сделайте резервную копию BIOS (если возможно), перейдите на вкладку «Advanced» (Дополнительные) и нажмите «Start Flash» (Начать обновление).[1]
-
Этот процесс может занять от нескольких минут до часа в зависимости от компьютера и сложности обновления BIOS. Когда процесс обновления завершится, компьютер перезагрузится (возможно, вам придется подтвердить это).
- Не выключайте компьютер во время обновления BIOS. Это может привести к повреждению BIOS — в этом случае компьютер не сможет запуститься или завершить установку BIOS, или вообще перестанет работать.
Реклама


Советы
- На современных компьютерах BIOS называется UEFI.
- Обновления BIOS выпускаются для того, чтобы исправить существующие ошибки, добавить поддержку нового оборудования и стандартов или добавить функциональность. Если обновления доступны, прочитайте примечания или другую документацию к обновлениям, чтобы выяснить, нужно ли обновлять свой BIOS.
- В случае неполадок с BIOS восстановите BIOS.
Реклама
Предупреждения
- Не обновляйте BIOS, если не знаете, что делаете. Несоблюдение указаний производителя и мер предосторожности может привести к повреждению BIOS.
- Никогда не скачивайте обновления BIOS со сторонних сайтов (делайте это только на сайте производителя BIOS), потому что файл обновления BIOS может содержать вредоносной код.
Реклама
Об этой статье
Эту страницу просматривали 103 849 раз.
Была ли эта статья полезной?
Many motherboard and computer manufacturers have made the BIOS updating process much easier nowadays, so to update BIOS on Windows 11 is not as daunting as it seems. Before we actually do the BIOS update, you will first need to decide whether a BIOS update is really necessary for you. If you’ve decided that a BIOS update is what you need at this point, let’s move on and see the details on how to do it right.
When should you update your BIOS?
The first thing you should know is that a BIOS update generally doesn’t boost or unlock extra PC performance, but it can fix bugs related to specific hardware or add compatibility for new devices, which can be told from the BIOS update release note. In other words, if your computer is working normally, and you just want to fix a certain software problem, a BIOS update is not recommended.
This is because if accidents like power loss or a crash happen during the BIOS update, your computer could be bricked. And if you’ve previously changed certain values in your BIOS, an update could reset such settings to the default, and therefore affect your system stability.
As such, unless you’re sure that the BIOS update released by your computer manufacturer guarantees or ensures compatibility expansion or bugs fixed with your existing hardware, don’t attempt to do a BIOS update.
When you’ve decided that a BIOS update is what you need, please move on to see how you can update BIOS on Windows 11.
How to update BIOS on Windows 11
To update the BIOS on Windows 11, you’ll first need to know your motherboard model and the current BIOS version (for comparison). To check your BIOS and motherboard information:
- On your keyboard, press the Windows key and the R key at the same time. Type msinfo32 and hit Enter.

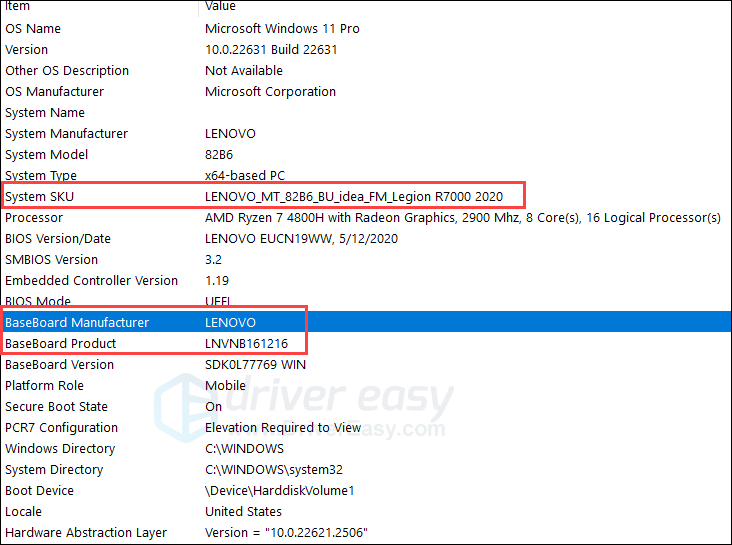
- Pay extra attention to the System SKU, the BaseBoaed Manufacturer, and BaesBoard Product entries, as you’ll need such information to search for the correct BIOS update files for your computer.

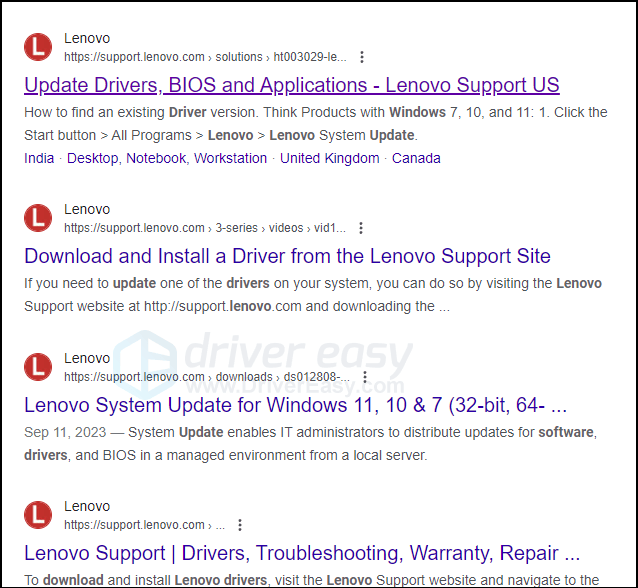
- On Google search, use the combination of the “System SKU driver update“, or “BaseBoaed Manufacturer + BaesBoard Product driver update” to find the correct driver download page for your product. For instance, I should search for “LENOVO MT 82B6 BU idea FM Legion R7000 2020 driver update“, or “LENOVO LNVNB161216 driver update” to find the correct download page.

- When on the driver download page, find the category named BIOS or BIOS/UEFI, and then you should see the updated BIOS files there.
- Download the file and read through the updated instructions to make sure that you fully understand them. The exact updating process is different for different motherboard manufacturers, so you should read the update instructions first before the BIOS update.
- When you’re ready for an update, keep a backup of your computer on the cloud or on a different computer, just in case any unwanted events happen.
- Then follow the instructions given to update the BIOS.
This tutorial focuses on how to update computer’s BIOS in Windows 10 ASUS, HP, Dell, Lenovo, Acer, and other PCs. It also tells how to check BIOS version.If you meet problem when updating BIOS, MiniTool Power Data Recovery can help you recover data from PC even if the PC can’t boot. MiniTool also offers MiniTool ShadowMaker to help you backup system & data before conducting a BIOS update.
- How to update BIOS in my Windows 10 ASUS computer?
- Should you update your BIOS?
- How to check BIOS version in Windows 10?
What Is a BIOS?
BIOS, short for Basic Input / Output System, controls your computer boot process. When you start your computer boot, BIOS starts the power-on self-test (POST) and passes the control over to the boot loader that boots your computer OS.
BIOS is a low-level system software and it is stored on a chip on your motherboard, unlike the operating system which is stored on computer hard drive.
Some newer computers come with UEFI firmware instead of the tradition BIOS. Its function is the same as BIOS, and it is also a low-level system software.
Also read: Discover the essential steps for successful hard drive recovery in this informative article.
BIOS Update – Do You Need to Update Your Computer’s BIOS?
Generally you shouldn’t update BIOS of your Windows 10 computer, but sometimes you may update it.
When You Shouldn’t Update BIOS
Normally BIOS updates are small updates. They may fix a bug or add support for a new model of CPU or graphics card. If your computer works well, you probably don’t need to update your BIOS and won’t see any difference after a BIOS update.
In some circumstances, updating BIOS may even bring more new problems to your computer. So it’s advised you go to your computer manufacturer site to find your computer model and check carefully the update details of new BIOS versions, thus, to determine if there is a need to update your computer BIOS.
Besides, updating BIOS is a risky practice. Be careful with BIOS update, it may cause your computer freeze, crash or lose power in the update process, and the BIOS/UEFI firmware may be corrupted. This may lead to your computer unbootable (Related: Solve PC Not Booting after BIOS Update)
When You Can Update BIOS Windows 10
We don’t know for sure whether updating BIOS can make your computer faster and run better, e.g. reduce boot time, improve computer overall performance, fix compatibility issues. In some cases, a BIOS update may fix a motherboard issue for your computer and make your computer perform better than before, but it’s not always the case.
If you are experiencing bugs in your computer that are fixed in a newer version of the BIOS after you check the BIOS update log from the manufacturer website, you may choose to update BIOS to fix those bugs. In addition, if you contact a professional tech support from your manufacturer, and they also advise you to do a BIOS update to repair Windows 10 problems, you may have a try.
In short, it’s not advised to update your BIOS/UEFI firmware unless you do find something specific you need in the newer versions of BIOS updates.
If you decide to perform a BIOS update, you have some ways to go, we’ll cover them below. If you don’t know your current BIOS version yet, you can also follow the guide below to check BIOS version at first.
One-stop Way to Back up Your Computer System, Files and Folders before BIOS Update
As stated above, updating BIOS is a risking task since it may cause your computer unable to boot or run abnormally.
Therefore, it’s highly suggested that you back up your Windows computer system and important data/files on your PC before you learn how to update BIOS in Windows 10. This can help keep your data safe, and easily restore your Windows 10 system if you meet problems in BIOS update.
To back up Windows system, files and folders, partition or disk, MiniTool ShadowMaker is professional and easy-to-use.
Key Features of MiniTool ShadowMaker:
1. Backup and restore Windows OS: Enable you to easily back up Windows 10 system to USB drive, external hard drive, etc. And restore your system to a previous healthy state from USB or external hard drive by using a previous system image backup.
2. Backup individual files and folders on PC: This free Windows backup and recovery tool also allows you to freely choose individual files and folders to back up to USB or external hard drive at fast speed.
3. Backup partition or disk: If you’d like to back up a specific partition or the whole hard disk, MiniTool ShadowMaker also allows you to do it by selecting a partition to back up, or choose the Clone Disk function under Tools tab.
4. File sync: It is also a file sync program, allowing you to sync files to other locations on local computer, other computers, external USB or hard drive, network drive, etc.
5. Advanced backup features: Schedule automatic backup, incremental backup scheme, and more.
6. Bootable media builder: Allow you to create a bootable USB/disk drive to boot your Windows computer into WinPE, and use MiniTool ShadowMaker in WinPE to backup data without booting or perform a system restore.
Free download and install this professional PC backup software – MiniTool ShadowMaker – on your Windows 10/8/7 computer, and follow the steps below to back up your system or files before you update BIOS. (MiniTool ShadowMaker Editions Comparison)
MiniTool ShadowMaker TrialClick to Download100%Clean & Safe
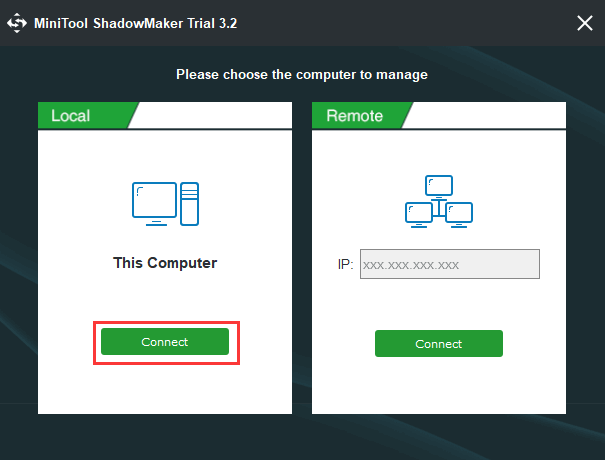
Step 1. Enter into main UI of MiniTool ShadowMaker
You can launch MiniTool ShadowMaker, and click Keep Trial button to use the Trial Edition.
After you see the screen below, you can click Connect button under This Computer, and this will bring you to the main interface of MiniTool ShadowMaker.
Step 2. Choose the backup mode
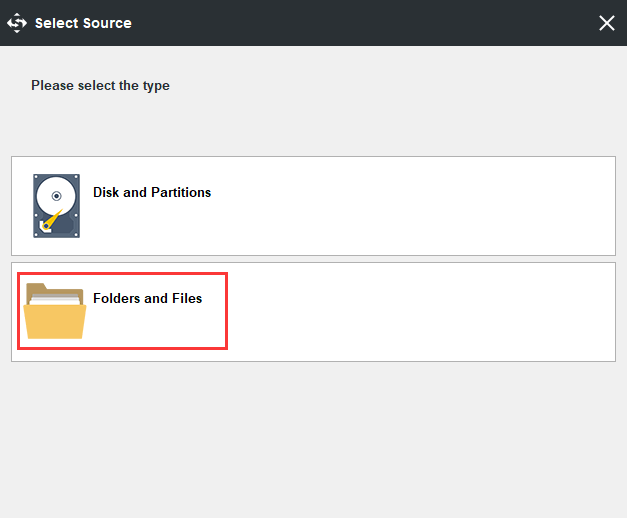
Next you can click Backup icon at the toolbar. This software has chosen the system and boot partitions as the backup resource. If you want to back up Windows 10 system, you can just leave it.
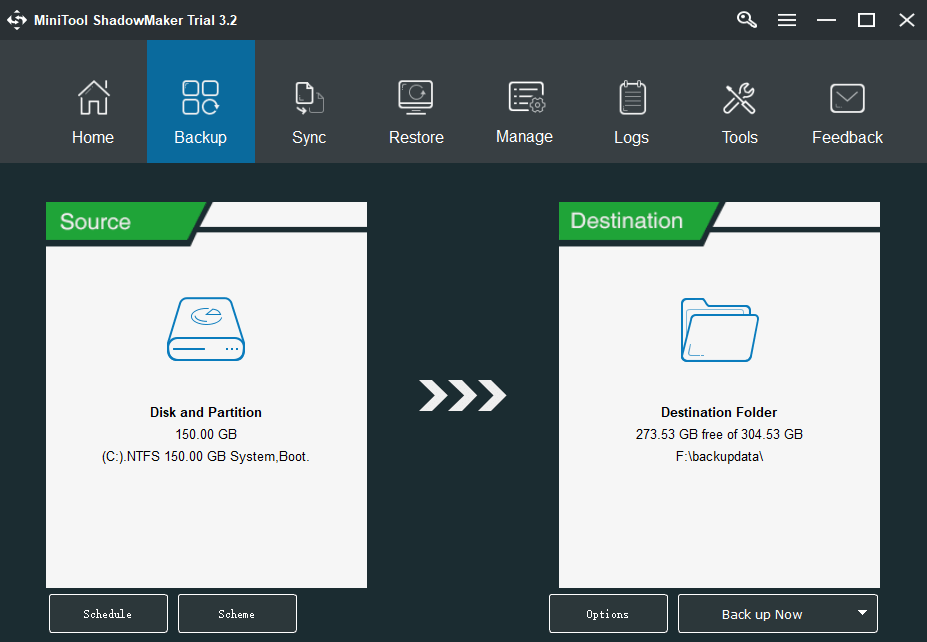
However, if you want to back up files and folders, you can click Source section, and click Folders and Files option.
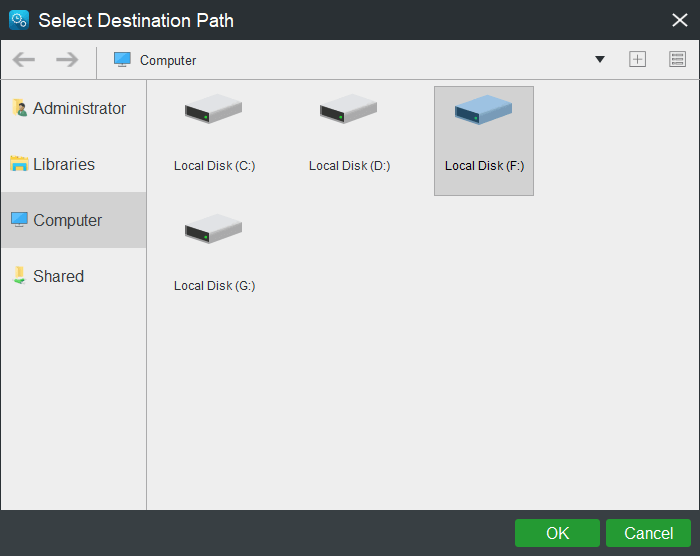
Step 3. Choose destination path
After you’ve selected the source data and files, you can click Destination section on the main UI to select a destination path to store the backup data and files.
The destination path could be other locations of computer, external USB flash drive or hard drive, etc.
Note: Since we don’t know whether the following BIOS update could be successful or not, worse still, a failed BIOS update may cause computer crash and unbootable. So here it’s advised that you back up your Windows system and important files to a safe external USB or hard drive. You can connect a USB or external hard drive to your computer and select it as the destination.
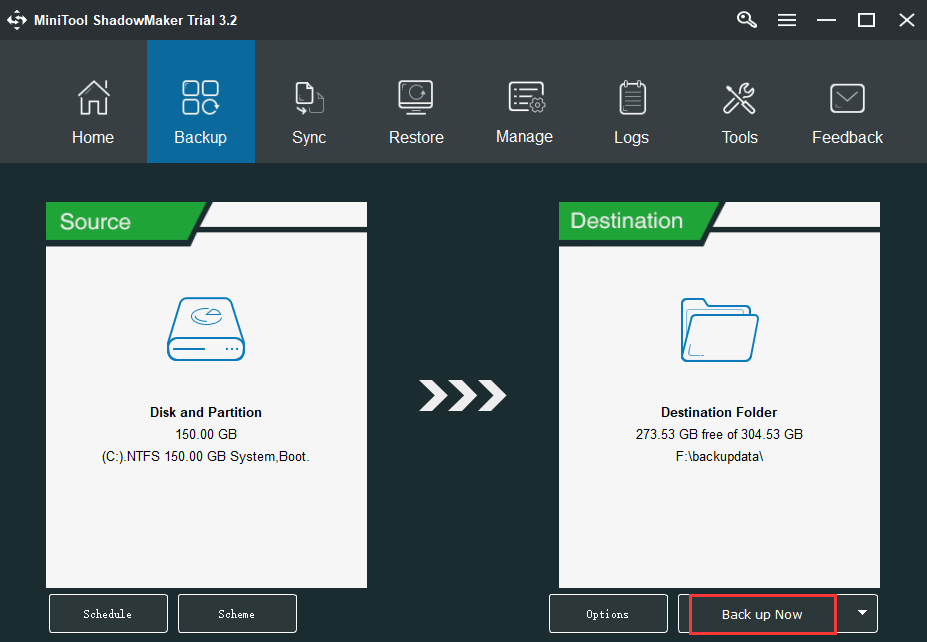
Step 4. Start to back up system or files
When everything is done, you can click Back up Now button on the main UI to start to back up Windows 10 OS, or backup files and folders at fast speed.
MiniTool ShadowMaker TrialClick to Download100%Clean & Safe
Now you have created a system image of your Windows 10 computer system and backed up needed files and folders, you can continue to check how to update BIOS now.
How to Check BIOS Version Windows 10?
Before you update BIOS in your Windows 10 ASUS, HP, Dell, Lenovo, Acer or other computers, you need to check the current BIOS version of your computer to see if it is already the latest version.
To identify the current version of the BIOS on Windows 10, you can check the 4 ways below.
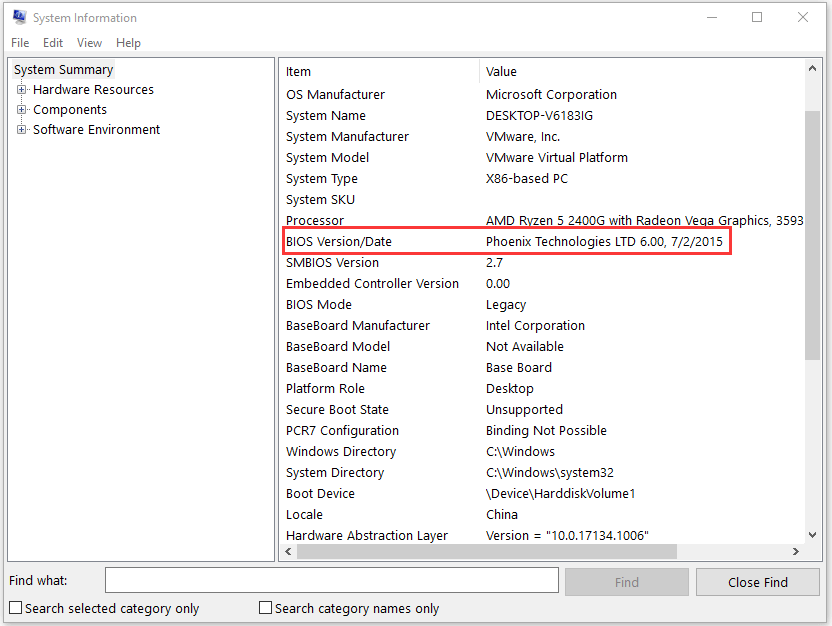
Way 1. Check BIOS Version from System Information
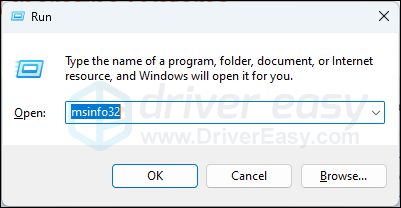
Step 1. You can press Windows + R to open Windows Run dialog, type msinfo32, and hit Enter button to open Windows System Information window.
Step 2. Next you can scroll down to find BIOS Version/Date item under System Summary. Check and note down your computer current BIOS version.
Click to tweet
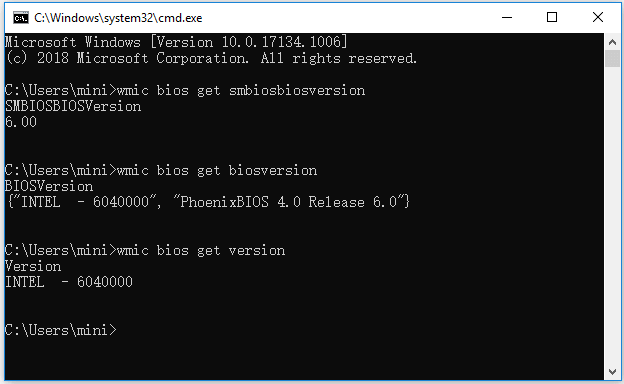
Way 2. How to Check BIOS Version with CMD
You can also check BIOS version using Windows Command Prompt.
Step 1. You can also press Windows + R simultaneously to open Run window, type cmd, and hit Enter to open Command Prompt Windows 10.
Step 2. In Command Prompt window, you can type the following command line to get the BIOS version of your computer.
- wmic bios get smbiosbiosversion
- wmic bios get biosversion (this command line can get the detailed information of your current BIOS incl. BIOS version and date)
- wmic bios get version
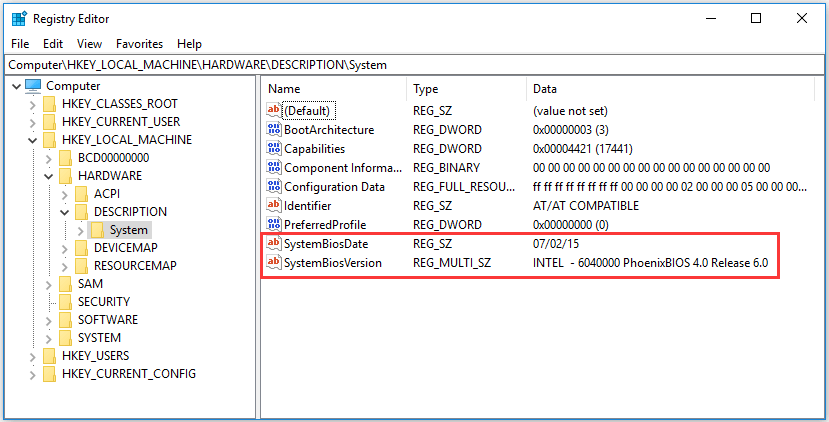
Way 3. How to Check BIOS Version from Windows Registry
You can also find your current BIOS version in Windows Registry.
Step 1. You can press Windows + R, type regedit in Run box to open Registry Editor window.
Step 2. Next you can click as follows in Registry window to find the following key:
HKEY_LOCAL_MACHINE -> HARDWARE -> DESCRIPTION -> System
Step 3. After you click System, you can find the SystemBiosDate and SystemBiosVersion keys. You can note down your computer system BIOS version.
Way 4. Check BIOS Version from Startup
Step 1. You can enter BIOS in Windows 10 by pressing F12, DEL, F10 or any other required hotkey on Windows startup screen.
Step 2. Navigate in the BIOS setup window to find if there is BIOS version information.
How to Update BIOS Windows 10
- Check Your Computer’s Model Name
- Find the Latest BIOS Update from Manufacturer Website
- Download and Unzip the BIOS File
- Copy the BIOS File to a USB Flash Drive
- Restart Your Computer to Boot into BIOS Screen
- Back up Your Computer’s Current BIOS File
- Update BIOS in Windows 10
How to Update Your Computer’s BIOS (ASUS, HP, etc.) in Windows 10
After you know the current BIOS version of your computer, you can compare it to the newest version available on your motherboard’s support page, on your computer manufacturer website.
If you decide to update BIOS of your Windows 10 ASUS/HP/Dell/Lenovo computer, check how to update BIOS below.
Step 1. Check Your Computer’s Model Name
Aside from the current BIOS version, you need to know the computer model name or the motherboard model.
You can press Windows + R, type msinfo32, and hit Enter to open System Information window.
You can find your System Model in the right window. You should record it since you will need it to search for the BIOS update file later.
If you are using an assembled computer, you need to find the motherboard model.
Step 2. Find the Latest BIOS Update from Manufacturer Website
Next, you can open your computer manufacturer official website, and find the Downloads or Support page for your specific computer model.
You should see a list of available BIOS versions incl. release date, archive zip file size, download button, and update description.
Tip: If you don’t know where to find the BIOS download page on manufacturer website, you can directly type your computer manufacturer name, your computer model or motherboard name, and BIOS into Google search box, and select a proper link to easily enter into right BIOS page.
Step 3. Download and Unzip the BIOS File
Then you can check the description of BIOS update versions to determine which one you want to download. It’s probable that you may want to download the latest BIOS version.
Download the BIOS update file to your computer. Most of the BIOS update files are Zip folders. You can unzip and extract the Zip file on Windows 10 with WinZip/WinRAR/7-Zip.
After you successfully extract the zip folder, you should see a readme.txt file in it. Read this file carefully before you continue to update BIOS since it offers detailed instructions for updating your BIOS.
Step 4. Copy the BIOS File to a USB Flash Drive
Then you need to plug in a blank USB to your computer and transfer the BIOS update file to the USB flash drive, since your BIOS can’t access your computer files.
Leave the USB plugged into your computer for later BIOS update operation.
Step 5. Restart Your Computer to Boot into BIOS Screen
Next you can click Start -> Power -> Restart to reboot your computer, and press the required key in startup process, to access the BIOS or UEFI screen.
Step 6. Back up Your Computer’s Current BIOS File
In case something goes wrong in BIOS update process, you can tap Main tab, and click the Backup or Save option to back up current BIOS settings. You can plug in another blank USB to your computer and back up BIOS to the USB flash drive. This can help you restore your BIOS settings if the BIOS update fails.
Note: Not all BIOS screens lets you back up the BIOS settings. The BIOS screen may be different in different computers.
Step 7. Update BIOS in Windows 10
At last, you can launch the BIOS/UEFI firmware update or flashing tool, and select the new BIOS update file you copied to the USB flash drive to start the BIOS update process.
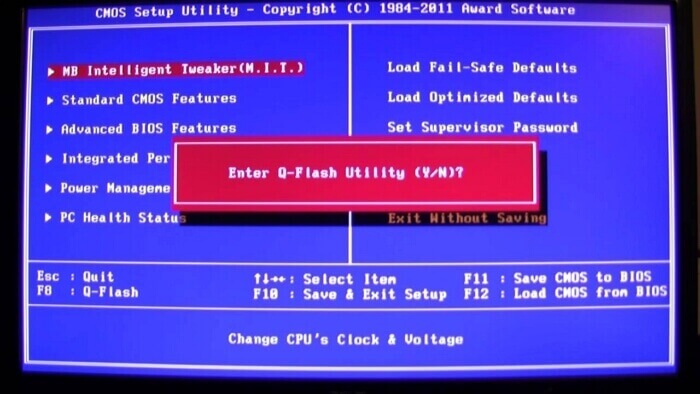
To run the BIOS update tool, normally you can select Boot tab (use the arrow buttons on the keyboard to choose it), enable any “Flash” options in the menu, and select Start Flash in Advanced tab to start to update BIOS in Windows 10.
After the BIOS update process is finished, your computer will automatically restart with the new BIOS firmware version.
Tip: If the new BIOS firmware has problems, you may be able to go back to the previous or older version of BIOS from the motherboard manufacturer website by following the same guide above.
How to Recover Data After a BIOS Update Failure in Windows 10
In case you may lose some data on your Windows 10 computer because of the BIOS update, here we provide an easy way to help you recover lost data from Windows 10 computer. It works even if your Windows 10 computer won’t boot after BIOS update.
MiniTool Power Data Recovery, best data recovery software for Windows, enables you to recover lost data or deleted files from computer hard drive, external hard drive, SSD, USB drive (pen drive data recovery), SD card, etc. Extremely easy-to-use and 100% clean.
This program is also capable of recover data when PC won’t boot. You can use its Bootable Media Builder function to create a bootable drive to boot your computer and open MiniTool Power Data Recovery in WinPE to recover data from the unbootable PC. Please be noted that this function is only for advanced versions. (MiniTool Power Data Recovery Editions Comparison)
Get MiniTool Power Data Recovery and install it on your Windows 10 computer (also support Windows 8/8.1/7/Vista), and check the steps below to help you recover lost data on PC.
MiniTool Power Data Recovery TrialClick to Download100%Clean & Safe
Step 1 (Optional). If your computer can’t boot because of the BIOS update, you can download MiniTool Power Data Recovery on a normal-working computer to use it to create a bootable USB drive at first. Then you can plug in the bootable USB to your computer and boot computer from the bootable USB and launch MiniTool Power Data Recovery.
Step 2. After you launch MiniTool Power Data Recovery, you can choose a partition under Logical Drives and click Scan button to start scanning data on your PC. Or you can click Devices tab and select the whole disk to scan.
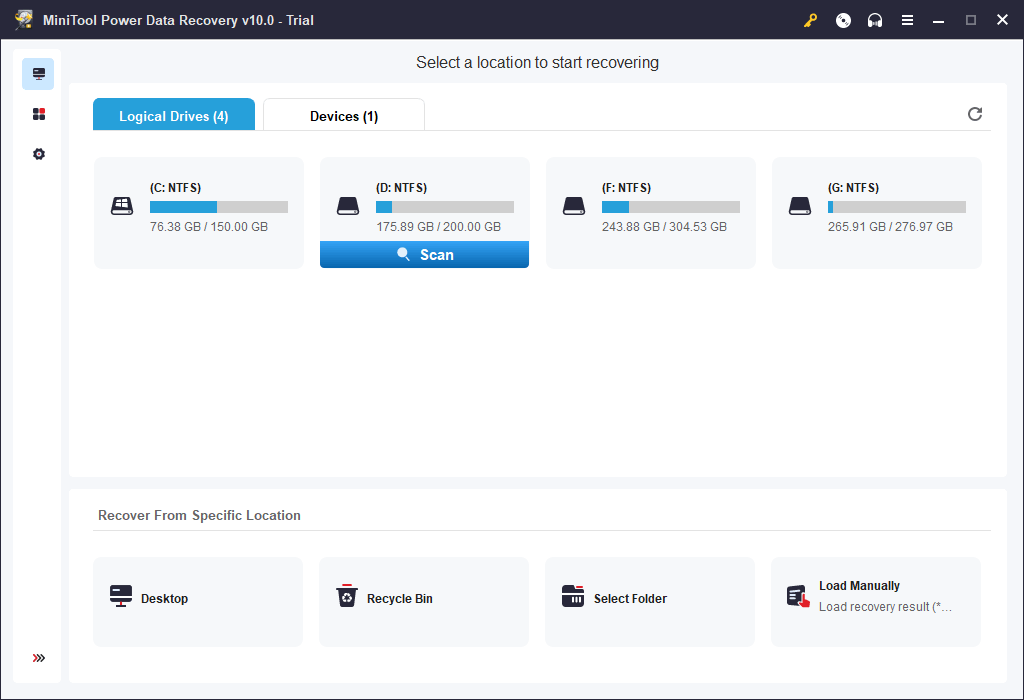
Step 3. After the scan process is finished, you can check the scan result to find needed files and folders, and click Save button to specify a new destination path to store the recovered files.
Click to tweet
Conclusion
To sum up, it’s not necessary to update BIOS unless you really have to. If you really need to update BIOS in Windows 10 ASUS, HP, Dell, Lenovo, Acer computers, hope this tutorial gives you some clues.
Besides, it’s highly recommended that you make a backup of your Windows 10 system, files and folders before you perform a BIOS update. If you lost some important data after a BIOS update, you should use professional data recovery tools to immediately recover the lost data to avoid data overwriting and cause permanent data loss.
Still have problems with how to use MiniTool ShadowMaker and MiniTool Power Data Recovery, please contact [email protected].
How to Update BIOS FAQ
How do I update my BIOS in Windows 10?
Generally you should not update BIOS, but if you really need update your BIOS in Windows 10, you can check the part “How to Update Your Computer’s BIOS (ASUS, HP, etc.) in Windows 10” in this tutorial, it gives a detailed guide.
Can you upgrade BIOS without an OS?
You can upgrade your BIOS without an OS installed, however, you need to be able to access another computer with internet connection. You can use one of the 4 ways in this post to check the correct BIOS version of your computer, and then download the BIOS update on another computer and copy it to a removable flash drive. Then you can insert the media with the BIOS update to your computer to upgrade your BIOS without an OS.
Will updating BIOS delete my files?
Updating BIOS will not delete your files since updating BIOS has no relation with the hard drive data. However, if the installing of new version of BIOS fails, it might damage your computer and cause some data loss. This is why it’s highly recommended that you make a backup of your computer important files and system with a professional PC system and data backup software like MiniTool ShadowMaker. If you hard drive fails and lose some files, you can use MiniTool Power Data Recovery to recover lost files with ease. The data backup and data recovery guide are introduced in the tutorial above.
Is BIOS update safe?
To be frank, if you don’t know much about BIOS update, it’s not safe. The Basic Input / Output System (BIOS) is sit on a chip on your computer motherboard, and it is the first code to run when booting the computer. Updating BIOS is more dangerous than updating other components/software on your computer.
Все способы:
- Как прошить BIOS
- Подготовка к перепрошивке
- Узнаём версию BIOS
- Загружаем новое ПО
- Способы перепрошивки
- Способ 1: Утилиты для операционной системы
- Способ 2: Обновление с флешки
- Способ 3: Варианты для некоторых производителей
- Способ 4: Аппаратная перепрошивка
- Заключение
- Вопросы и ответы: 2
BIOS (или его более современный вариант UEFI) представляет собой низкоуровневую программу базового управления компьютером, зашитую в специальной микросхеме на материнской плате. Однако перепрошить содержимое этой микросхемы на большинстве плат можно без особого труда, и сегодня мы хотим ознакомить вас с методами совершения этой процедуры.
Как прошить BIOS
Для начала скажем несколько слов о том, когда стоит прошивать БИОС и стоит ли вообще. Прошивка однозначно требуется только для исправления багов, включения поддержки обновлённых аппаратных компонентов (памяти, процессора, видеокарты) или добавления нового функционала (например, поддержки виртуализации). В иных ситуациях следует руководствоваться принципом «работает – не трогай», так как потенциальный риск превышает возможные преимущества.
Непосредственно методы прошивки можно разделить на три группы: прошивка из-под операционной системы (преимущественно семейства Windows), обновление с флешки посредством DOS-оболочки или средствами самого BIOS.
Перед описанием возможных вариантов предупреждаем – все дальнейшие действия вы совершаете на свой страх и риск, и мы не несём ответственности за возможные проблемы, которые могут возникнуть в процессе выполнения процедур!
Подготовка к перепрошивке
Перед процедурами нужно подготовиться: узнать текущую версию BIOS и загрузить подходящий вариант ПО с сайта производителя материнской платы.
Узнаём версию BIOS
Для того чтобы загрузить подходящий комплект ПО, следует определить версию текущего варианта прошивки. Сделать это можно несколькими способами – как посредством сторонних приложений, так и ОС Windows.
Подробнее: Как узнать версию BIOS
Загружаем новое ПО
Для загрузки подходящей микропрограммы следует посетить сайт производителя вашей материнской платы и перейти к разделу поддержки, в котором найти страницу конкретной модели «материнки» и скачать оттуда один из доступных комплектов прошивки.
Внимание! Качайте прошивки только с официальных сайтов вендора материнской платы, поскольку работа самосборных вариантов не гарантируется, а их установка может вывести плату из строя!
Способы перепрошивки
После проведения подготовки можно переходить к выбору способа установки новой версии микропрограммы.
Способ 1: Утилиты для операционной системы
Самый простой вариант – прошить BIOS из-под операционной системы с помощью специального программного обеспечения. Как правило, крупнейшие поставщики материнских плат (Gigabyte, ASUS и ASRock) предоставляют нужные утилиты.
Подробнее: Программы для обновления БИОСа
Пользоваться такими решениями достаточно просто: по желанию делаете резервную копию текущего кода микропрограммы, затем загружаете в утилиту файл с новой прошивкой и в несколько кликов мышью устанавливаете его. Единственное требование – компьютер должен быть подключён к источнику бесперебойного питания, так как если процесс прошивки будет завершен некорректно, плата «окирпичится» и вам придётся нести её в сервисный центр.
Способ 2: Обновление с флешки
Чуть более сложный, но и более надёжный метод заключается в записи файлов кода на флешку и прошивке уже с неё посредством DOS-оболочки или же встроенного в сам БИОС апдейтера. Сама по себе процедура не слишком трудоёмкая – мы уже рассматривали её в отдельном материале, с которым рекомендуем ознакомиться.
Урок: Инструкция по обновлению BIOS c флешки
Способ 3: Варианты для некоторых производителей
Многие крупные производители материнских плат предлагают свои методы прошивки BIOS, характерные только для моделей того или иного бренда. В первую очередь это касается лэптопов, но характерно в том числе и для некоторых десктопных решений, в частности, линеек для геймеров, предполагающих расширенные возможности.
Подробнее: Прошивка BIOS на устройствах ASUS, Gigabyte, Lenovo, HP, MSI
Способ 4: Аппаратная перепрошивка
Самый технический сложный вариант (и единственный доступный для некоторых вариантов «материнок») – прошивка аппаратным средством с помощью специального программатора. В большинстве случаев это означает выпаивание микросхемы БИОС с платы, установку «флешки» в программатор и прошивку сервисным ROM-файлом. Этот вариант рассчитан на опытного пользователя, поэтому если не уверены в своих силах, лучше доверьтесь специалисту. Пример аппаратной прошивки вы можете найти по ссылке далее.
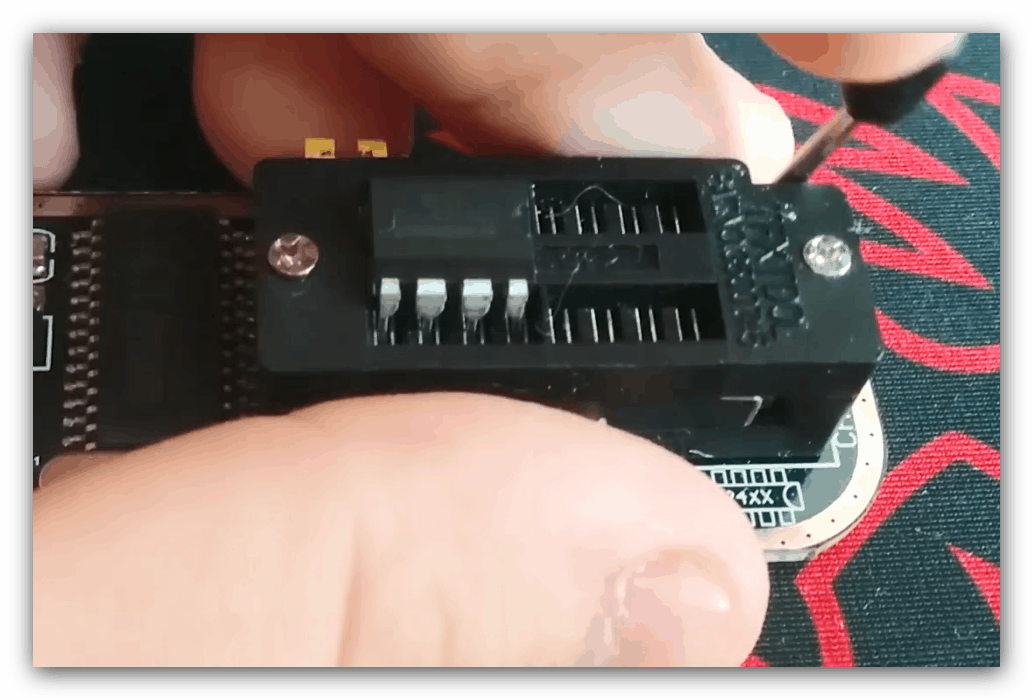
Подробнее: Откат BIOS на предыдущую версию
Заключение
Прошивка BIOS – довольно специфическая процедура, которую вряд ли придётся выполнять рядовому пользователю. Тем не менее производители материнских плат учитывают такую возможность, и потому разработали соответствующий инструментарий.
Наша группа в TelegramПолезные советы и помощь
| Page Navigation | Article Content |
|---|---|
| Is BIOS Update Necessary? | Then when should you update the BIOS…Full steps |
| How to Update Your Computer’s BIOS | Follow the steps to update BIOS…Full steps |
| Is it Safe to Update BIOS? | It is safe to update BIOS but you should also make backups…Full steps |
What is BIOS? If you have changed your computer’s boot order, you might think this jargon is familiar. BIOS is short for Basic Input Output System, it is pre-installed on your computer’s motherboard, and is the first piece of software that is loaded when your computer starts up.
Is BIOS Update Necessary?
For most individual users, there is no need to update the BIOS in most cases because you can barely feel anything after the update, and improper updates would cause additional problems. Then when should you update the BIOS? Basically, if you meet one of the following three situations, you will need to update the BIOS.
-
Security Update
Most of the BIOS updates are related to security updates. By updating the BIOS, you can not only meltdown security breaches but also protect your privacy from leaking. After all, your data and information are precious.
-
Bug Fixing
Some bugs on the motherboard need to be fixed regularly. Some CPU bugs may require microcode updates. And some chipset bugs may also require an update.
-
Adding Function
The motherboard needs to support higher frequency DIMMs or support CPU refresh.
How to Update Your Computer’s BIOS
There are mainly two ways to update BIOS. One is obtained before the OS boots from the BIOS interface. The other is using the BIOS flash utility provided by the motherboard manufacturer. In recent days, after the continuous efforts of motherboard manufacturers, the steps of updating the BIOS have been greatly simplified. Even the novice of the novice can easily do it. Let’s take a look!
Preparation:
Check your BIOS version and the model of your motherboard on the manufacturer’s website. Make sure there is an available BIOS update in the download center.
Step 1. Download the BIOS update file to an empty USB flash drive. The file system of the USB you prepare should be FAT32.
*How to Check and Format USB to FAT32
Step 2. Connect the USB drive to your computer. Reboot the computer, and press F2/F10/F12/DEL to enter BIOS.
Step 3. Here you could see the BIOS page, choose the BIOS update option. You should know that different motherboards would have different BIOS options. Here we take two motherboards as examples to show you how to update.
- ASUS: Select Tool > ASUS EZ Flash Utility > press the Enter button > select via Storage Device > find the download update file > press Enter again and start the update.
- Gigabyte: Select Q-Flash, the update BIOS option is Q-Flash. Go to Update BIOS from Drive > Flash Disk, select the USB drive you have connected. Then follow the on-screen wizard to finish the updating process.
Notice: During the updating process, do not interrupt the process, either by powering off or pressing the reset button.
Is it Safe to Update BIOS?
To be honest, you shouldn’t update BIOS that often. Because for individual users, it is not necessary to do so, and it will not affect the normal use of the computer if it is not updated. To answer the question, it is safe to update the BIOS on the premise that the update file has been downloaded correctly and the steps to update the BIOS have been followed correctly.
However, taking precautions is a wise choice. No matter you want to update BIOS, upgrade the system, or just want to make a safe copy of important files, making a backup is always the best choice. The «backup» we mentioned here is not only the file backup but also means a system backup.
All in all, there are plenty of ways to backup files, like sync to cloud drive, copy the content to an online document, but there is no good way to back up the system.
Making a system backup protects your C drive and the boot partition. In other words, it protects all the program files, configuration files, and App data of your computer. And all you need to prepare is a large enough external drive and the free software — EaseUS Todo Backup.
Download the software from the button below, and see how to backup and protect your system with it.
Step 1. Launch EaseUS Todo Backup and choose «Create Backup» on the home page, click «Select backup contents«.

Step 2. Among the four available categories, click «OS» to start back up.

Step 3. The system partition will be automatically selected, you only need to select the location.

Step 4. Local Drive, Cloud, and NAS are available for you to save the backup file. You can also connect an external hard drive to preserve the system backup files.

Step 5. You can customize the settings in «Options» at the left bottom. After that, click «Backup Now«, and the process will begin.
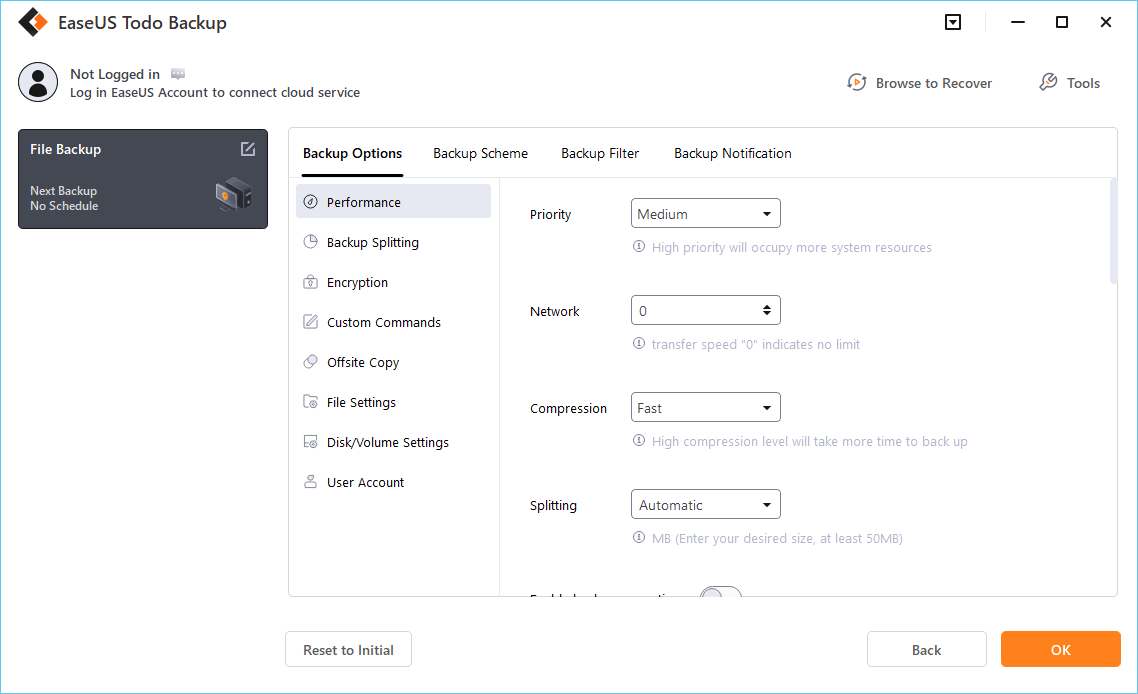
*After finishing the backup process, you can check the backup status, recover, open, or delete the backup by right-clicking the backup task on the left.