
Если вы удалили или заменили один, или несколько системных шрифтов в Windows, вы можете воспользоваться восстановления стандартных шрифтов и их настроек. Если в системных (и не только) диалоговых окнах вместо нормальных символов отображаются что-то непонятное или вообще нечитаемые символы (в нашем примере, это иероглифы и квадратики), скорее всего в Windows отсутствуют какие-то файлы системных шрифтов. Такая проблема может возникнуть после деинсталляции стороннего приложения, которое при удалении вместе с собой удалило несколько файлов системных шрифтов (вплоть до полной очистки каталога со шрифтами C:\Windows\Fonts). Также проблема с шрифтами может встречаться, когда некая программа при установке заменила один из стандартных шрифтов своим собственным файлов.
В этой статье мы разберем методику, позволяющую восстановить стандартные системные шрифты Windows 10 или Windows 11 к состоянию чистой системы.

Содержание:
- Встроенное средство восстановления шрифтов Windows
- Как извлечь файлы стандартных системных шрифтов из установочного образа Windows 10 или 11?
- Сброс кэша шрифтов Windows
- Готовые архивы со стандартными шрифтами для Windows 10, 11 и 8.1
Встроенное средство восстановления шрифтов Windows
В первую очередь стоит попробовать восстановить стандартные шрифты Windows 10/8.1 с помощью встроенного функционала. Для этого:
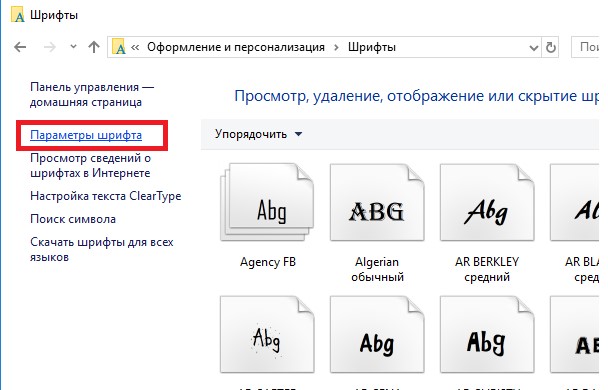
- Откройте Панель управления и перейдите в раздел Оформление и персонализация –> Шрифты (Control Panel -> Appearance and Personalization -> Fonts). Эту панель можно открыть, выполнив команду:
control fonts
; - В левой панели выберите пункт Параметры шрифта (Font settings);

- В открывшемся окне нажмите кнопку Восстановить параметры шрифтов по умолчанию (Restore default font settings);

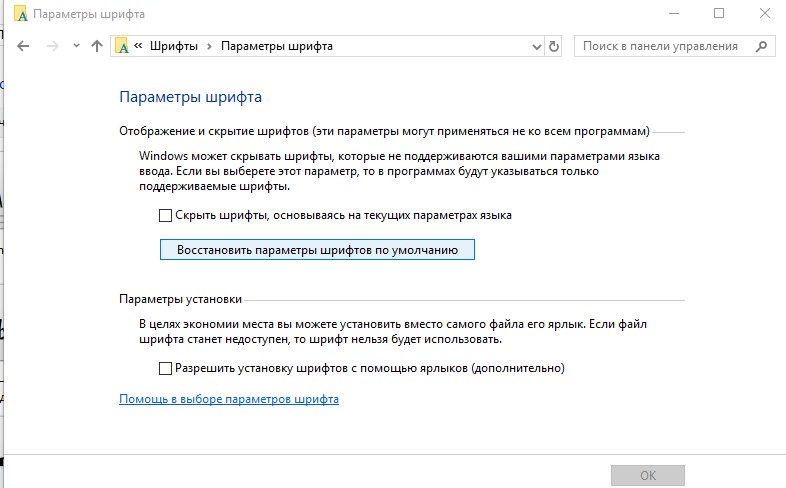
Данная опция позволяет удалить все сторонние шрифты, оставив только стандартные шрифты, поставляемые в дистрибутиве Windows. Однако, если файл нужного шрифта (*.fon или *.ttf) был удален или заменен, функция сброса не поможет.
В современных версиях Windows для отображения системного интерфейса по умолчанию используется шрифт Segoe UI. Убедитесь, что он есть в списке шрифтов в панели управления.
Чтобы вернуть нужный шрифт можно скопировать нужный файл из дистрибутива Windows (или с другого компьютера), скачав и установив файл шрифта вручную или через GPO (обратите внимание, что в Windows 10 есть функция блокировки установки сторонних шрифтов, которая может мешать установке новых шрифтов).
Совет. Установка большого количества шрифтов в Windows может привести к проблемам с производительностью системы и некоторых приложений (как правило, связанных с графикой и версткой).
Как извлечь файлы стандартных системных шрифтов из установочного образа Windows 10 или 11?
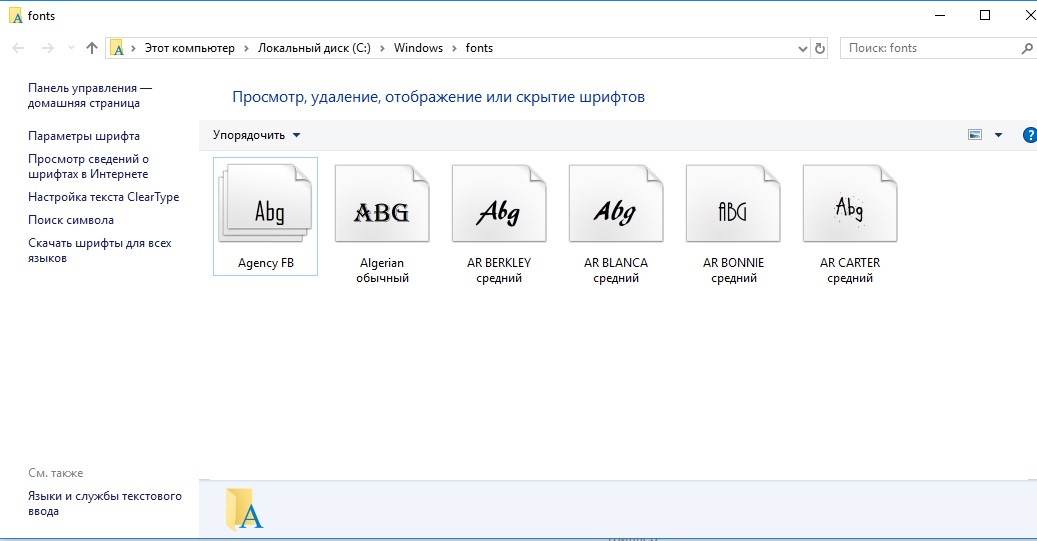
В Windows файлы шрифтов хранятся в каталоге C:\Windows\fonts. Попробуйте открыть ее в Проводнике File Explorer. Если в этом каталоге вы увидите только несколько файлов шрифтов с расширениями *.fon и *.ttf, значит, стандартные файлы шрифтов были удалены и их сброс встроенными средствами (как описано выше) не поможет.
Недостающие файлы шрифтов можно скопировать с любого компьютера с той же версией ОС, либо извлечь их из установочного диска или ISO/WIM образа Windows 10 (11). Рассмотрим второй случай.
Для этого нам понадобится установочный диск с Windows 10. Проще всего создать установочный ISO образ Windows с помощью утилиты Media CreationTool. Смонтируйте ISO образ в виртуальный привод (допустим, ему назначена буква диска H:).
Откройте командную строку PowerShell с административными правами и скопируйте файл H:\sources\install.wim или H:\sources\install.esd (подробнее про esd формат образа здесь) в каталог C:\Distr\.
Copy-Item D:\sources\install.wim C:\Distr\
Совет. Если в вашем дистрибутиве Windows есть только файл install.esd (подробнее про esd формат образа здесь), вы можете переконвертировать ESD файл в формат WIM с помощью команды:
dism /export-image /SourceImageFile:c:\distr\install.esd /SourceIndex:4 /DestinationImageFile: c:\distr\install.wim /Compress:max /CheckIntegrity
Смонтируйте файл установочного образа Windows 10 install.wim в каталог C:\Distr\wim:
dism /mount-wim /wimfile:C:\Distr\install.wim /index:1 /mountdir:C:\Distr\wim

Совет. Если команда DISM возвращает ошибку Error: 0xc1510111: You do not have permissions to mount and modify this image (
Ошибка: 0xc1510111: Отсутствуют разрешения на подключение и изменение образа
), проверьте, что в свойствах файла install.wim не установлен атрибут Read-Only.
Скопируйте оригинальные файлы шрифтов из каталога C:\Distr\wim\Windows\Fonts в системную папку C:\Windows\Fonts с заменой файлов в целевом каталоге. Воспользуйтесь такой командой PowerShell:
Copy-Item -path C:\Distr\wim\Windows\Fonts -Destination C:\Windows -recurse –container -force
Файлы шрифтов будут заменены оригинальными. Часть системных шрифтов, которые используются в текущий момент, заменить не удастся, об этом будет свидетельствовать ряд ошибок в окне консоли.
Теперь можно отключить WIM образ:
dism /unmount-wim /mountdir:C:\Distr\wim /discard
Перезагрузите компьютер и проверьте, исчезла ли проблема со шрифтами.
Сброс кэша шрифтов Windows
В Windows по-умолчанию включено кэширование шрифтов в каталоге
%WinDir%\ServiceProfiles\LocalService\AppData\Local\FontCache
(по аналогии с кэшем иконок). Это позволяет ускорить загрузку шрифтов в диалоговых окнах и приложения. Если кэш шрифтов поврежден, это также может вызвать проблемы с отображением шрифтов в Windows. Рекомендуем вручную сбросить текущий кэш шрифтов Windows.
Для этого нужно:
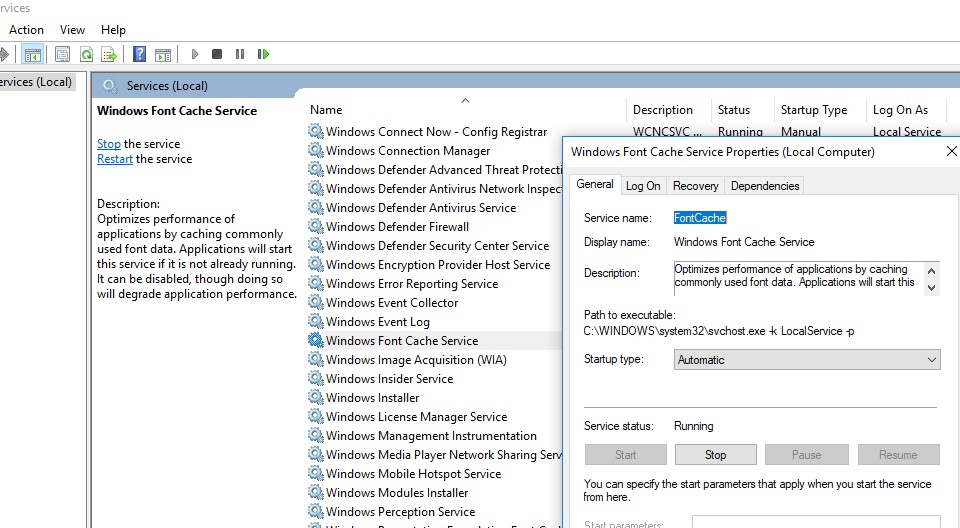
- Запустите консоль управления службами (
services.msc
); - Остановите службу Служба кэша шрифтов Windows (Windows Font Cache Service) в консоли или с помощью команды PowerShell:
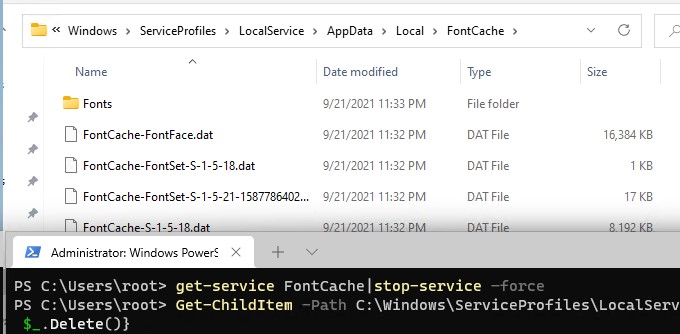
get-service FontCache|stop-service –force
- Очистите каталог %WinDir%\ServiceProfiles\LocalService\AppData\Local\FontCache:
Get-ChildItem -Path C:\Windows\ServiceProfiles\LocalService\AppData\Local\FontCache -File | foreach { $_.Delete()}; - Удалите файл C:\Windows\System32\FNTCACHE.DAT: C:\Windows\System32\FNTCACHE.DAT:
Remove-Item c:\Windows\System32\FNTCACHE.DAT

- Запустите службу FontCache и перезагрузите компьютер.
Готовые архивы со стандартными шрифтами для Windows 10, 11 и 8.1
Для тех, у кого под рукой нет дистрибутива Windows 10 (Windows 11 b Windows 8.1), можно скопировать каталог с оригинальными шрифтами с другого компьютера с той же версий ОС, либо воспользоваться готовыми архивами со шрифтами. Вы можете скачать архивы по ссылкам ниже:
- Оригинальные шрифты для Windows 8.1 — OrigFontsWin8-1.zip (263 Мб);
- Оригинальные шрифты для Windows 10 21H1 (подойдет и для других билдов Windows 10) —OrigFonts-win10-21h1.zip (189 Мб)
- Оригинальные шрифты для Windows 11 — OrigFonts-win11.zip (190 Мб)
Скачайте и распакуйте архив для вашей версии Windows. Скопируйте содержимое архива в каталог C:\Windows\Fonts с заменой файлов.
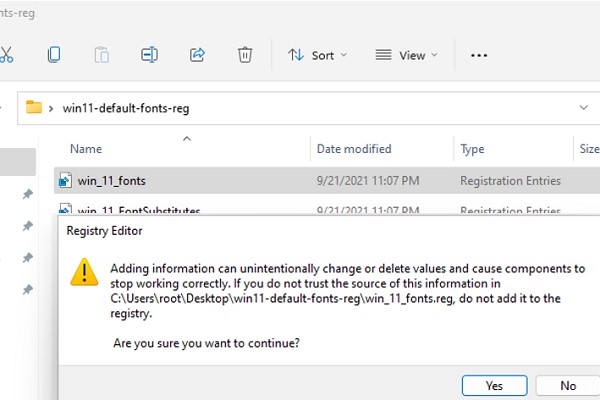
Затем скачайте и примените reg файлы со стандартными настройками шрифтов в реестре для вашей версии Windows:
- Windows 10 — win10-default-fonts-reg.zip
- Windows 11 — win11-default-fonts-reg.zip
Каждый архив содержит три файла:
- win_10_fonts.reg содержит список стандартных шрифтов, зарегистрированных в реестре (HKLM\SOFTWARE\Microsoft\Windows NT\CurrentVersion\Fonts);
- win_10_FontSubstitutes.reg файл с настройками ассоциаций шрифтов (HKLM \SOFTWARE\Microsoft\Windows NT\CurrentVersion\FontSubstitutes);
- win_restore_default_user_font_settings.reg – восстанавливает стандартные настройки шрифтов в пользовательской ветке реестра (HKCU\Software\Microsoft\Windows NT\CurrentVersion\Font Management).
Распакуйте архив и примените (дважды щелкните) по каждому reg файлу.
Перезагрузите компьютер, проблема со шрифтами должна пропасть!
Совет. Если проблема со шрифтами вызвана установкой нового шрифта, содержимое C:\Windows\Fonts перед заменой можно предварительно сбросить (используемые шрифты удалить не получится). Эта операция выполняется кнопкой в панели управления, о которой мы говорили выше.
Если ничего не помогает и шрифты отображаются некорректно, попробуйте проверить целостность вашего образа Windows с помощью команд:
sfc /scannow
DISM /Online /Cleanup-Image /RestoreHealth
Applies ToWindows 10
Symptoms
Fonts that you installed by using the Install as shortcut option on a computer that is running Windows 10 Creators Update, Version 1703, are no longer available after a system restart. When this problem occurs, the missing fonts are not visible in the Fonts item in Control Panel or in the font picker list in Windows applications.
The list of missing fonts can include fonts that were installed before or after the computer was upgraded to Windows 10 Creators Update.
Cause
This problem occurs because of an issue in the Windows font cache.
Status
We are aware of this problem and are working to resolve it in a future update of Windows.
Workaround
Important
Follow the steps in this section carefully. Serious problems might occur if you modify the registry incorrectly. Before you modify it, back up the registry for restoration in case problems occur.
To work around this problem, use one of the following workarounds.
Note These workarounds can cause Windows 10 to take slightly longer to start up.
Workaround 1: Disable the font boot cache
-
Open Registry Editor.
-
Locate the following registry subkey:
HKEY_LOCAL_MACHINE\SOFTWARE\Microsoft\Windows NT\CurrentVersion\GRE_Initialize
-
Create a DWORD (32-bit) registry entry.
-
Name the new entry DisableFontBootCache.
-
Set the value of the new entry to 1.
Workaround 2: Delete the FNTCACHE.DAT file before system logoff
The FNTCACHE.DAT file is located in the %WINDIR%\System32 folder. To avoid this problem, you can delete this file.
The FNTCACHE.DAT file is automatically rebuilt at system restart. Therefore, to use this workaround, you must delete this file before every system logoff. You may want to create a script that automatically runs at system logoff to delete the file.
More Information
Side effects of disabling the font cache
If the font cache is disabled, all the installed fonts are read two times at system start: One time for session 0, and a second time for session 1. Because the size of the default font cache is around 370 MB, this behavior causes an additional 740 MB of IO during system start. The effect of this additional IO varies based on several factors, including the following:
-
Group policy settings
-
Logon scripts
-
Tasks to run at system start
-
Disk throughput:
-
Disk interface: SATA versus IDE
-
Disk speed: 5400 RPM or 7200 RPM versus SSD
-
Need more help?
Want more options?
Explore subscription benefits, browse training courses, learn how to secure your device, and more.
- Home
- Windows Tips
- Fix installed fonts not showing on windows 10
Installing a font on Windows 10 is easy; it takes little more than copying a file to the right folder. Fonts can also be installed directly from a font file. All you have to do is right-click the file, and select the install option in the context menu.
A font is installed system-wide which means that every single app will have access to it unless of course, it’s a font type that the app doesn’t support. For example, you cannot use all types of fonts in the Command Prompt. Only a specific type is accepted by the app.
1. Restart app
When you install a font, it is automatically detected by all apps. The font selection tool in an app will list it however if you don’t see the font there, close and open the app again and then check the font tool. The newly installed font will show up.
2. Check other apps
It’s possible that the font you’ve installed isn’t compatible with the app you want to use it in. To check if a font has installed correctly, see if it shows up in other apps.
- Open the Start Menu and go to the Apps list.
- Expand Windows Accessories.
- Open WordPad.
- Open the font selection tool, and check if the newly installed font appears.
- If the font is listed, it is possible the app you’re trying to use it in doesn’t support it. Check the app’s font specifications and try a different font.
3. Reinstall font
Fonts are easy to install but that doesn’t mean the installation can’t go wrong. If it does, the simplest thing to do is to just uninstall the font and install it again.
- Open File Explorer and navigate to the following folder.
C:\Windows\Fonts
- Copy and paste the font file in the above folder.
- If you see a prompt asking if you want to replace a file, allow it to be replaced.
- You can also delete the font from the above location, and then copy it again.
4. Check font file
Check if the font file is corrupted or not. It’s possible that some of the characters, or all of them, are somehow corrupt. This happens when the font file is being rendered by whoever developed it.
- Download and install IrfanView.
- Open the font file in IrfanView.
- If the app is able to preview the font without any errors, the file is not corrupt.
- If the file does not open, or it opens but some characters do not render, there is a problem with the file. Try downloading it again, or using a different font.
5. Check font type
Font files aren’t all the same format. There are three popular font formats that are used; OpenType, TrueType, and Web Open Font Format. All three are supported on Windows 10. If your font is a different type of font, or you’ve used an online tool to convert a font to one of the supported types, it is highly likely that it won’t be detected. You will have to use a different font.
To check the font type, look at the extension of a font file.
OTF: OpenType Font
TTF: TrueType Font
WOFF: Web Open Font Format
All Google fonts are compatible with Windows 10.
6. Try a different font
The definitive way to find why a font isn’t showing up on Windows 10 is to install a new, different one. If the font you install shows up in an app, then it is highly likely that the one you installed and meant to use originally is the problem.
Conclusion
Fonts come in all sorts of variations and there are thousands to choose from. If the font you want to use isn’t working in a particular app, or you can’t find a version of the font file that isn’t’ corrupt, you can always find an alternative or near alternative to it.

Fatima Wahab
Fatima has been writing for AddictiveTips for six years. She began as a junior writer and has been working as the Editor in Chief since 2014.
Fatima gets an adrenaline rush from figuring out how technology works, and how to manipulate it. A well-designed app, something that solves a common everyday problem and looks
10 декабря 2020 г.
Ранее мы рассказали, как добавлять свои шрифты в проект EasyBuilder Pro. Но иногда на Windows 10 возникает ситуация, когда шрифты, имеющиеся в системе, не отображаются в EasyBuilder Pro вообще. Вот 7 шагов для решения этой проблемы:
- Запустите regedit.exe (для этого введите в строке поиска regedit). Перейдите в каталог, где хранятся шрифты:HKEY_LOCAL_MACHINE\SOFTWARE\MICROSOFT\Windows NT\ CurrentVersion\Fonts
- Проверьте, чтобы название файла шрифта, включая начертания, было только на английском языке
- Если файла нужного вам шрифта там нет, откройте файловый проводник и перейдите в C:\Windows\Fonts и найдите файл для нужного шрифта
- Кликните правой кнопкой мыши и откройте свойства файла. Проверьте каталог установки файла. В данной ситуации он может выглядеть как «%userprofile%\AppData\Local\Microsoft\Windows\Fonts»
- Удалите файл шрифта
- Установите шрифт снова, но на этот раз кликнув правой кнопкой мыши и выбрав «Установить для всех пользователей»
- Повторите шаги 3 и 4. Теперь путь к файлу должен быть C:\Windows\Fonts
- Перезапустите EasyBuilder Pro. Теперь шрифт должен быть доступен в менеджере шрифтов