
Is your Windows device not showing thumbnails for your files? This issue usually occurs when you accidentally turn off thumbnails and instruct your device to always display icons. Other potential causes include making the icon size too small, changing the view style, running out of disk space, issues with File Explorer, and interference caused by third-party apps and the thumbnail cache.
If you don’t see thumbnails on Windows 11, don’t worry. We will cover possible solutions and checks that you can apply to restore thumbnails.
1. Allow Thumbnails to Load Properly
Thumbnails don’t require a lot of processing power to load. However, if you open a folder with thousands of files, thumbnails may take some time to load. If you open a file from that folder before the thumbnails have rendered correctly, it could affect other files in the folder whose thumbnails have not yet loaded.
Because of that, if thumbnails fail to load in a folder containing many files or if you’ve opened files in the middle of the thumbnail loading process, which could have affected thumbnails for some files, you should close that folder and reopen it. This time, wait until the thumbnails load successfully.
2. Ensure Thumbnails Are Enabled
Windows lets users permanently disable thumbnails and replace them with icons. This is sometimes the default setting in some Windows devices. If you have recently reset the File Explorer settings to default or suspect the thumbnails might be disabled, follow these steps to enable them:
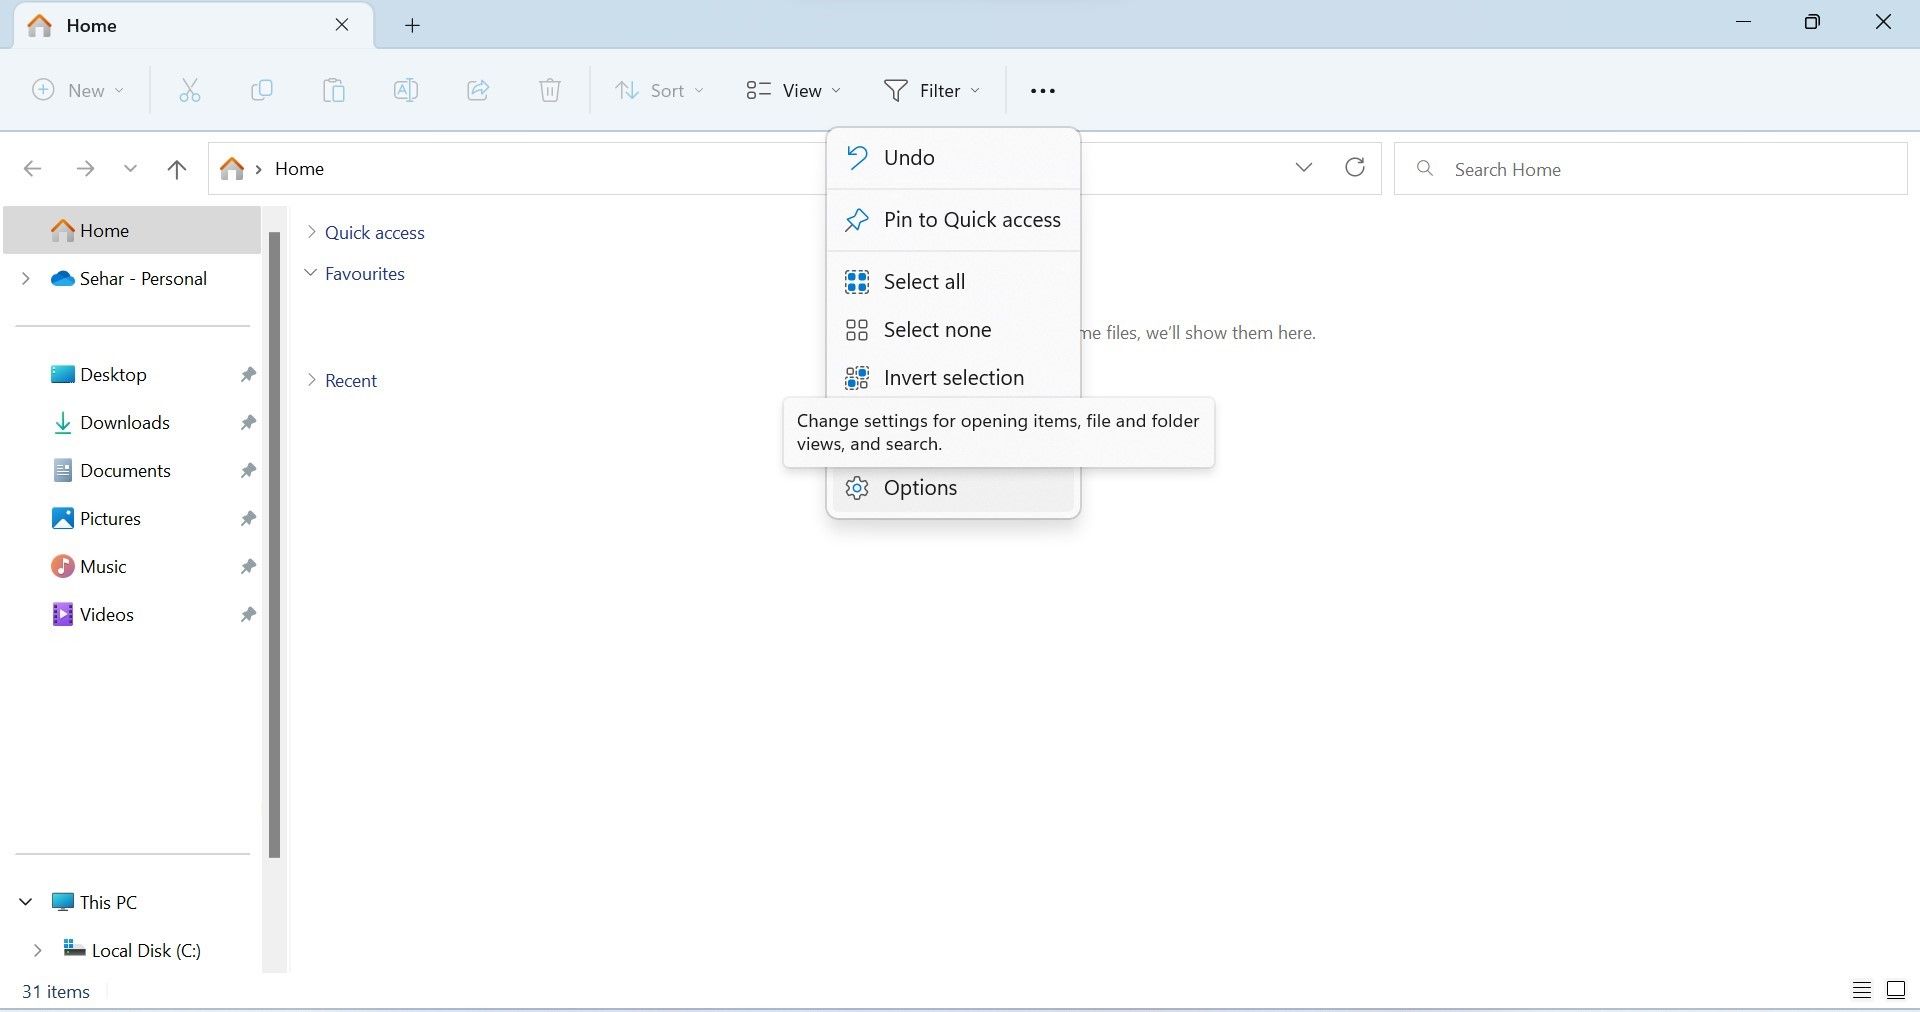
- Open File Explorer.
-
Click on three horizontal dots at the right end of the ribbon tabs and then choose Options from the menu.

- In the Folder Options window, uncheck the box beside Always show icons, never thumbnails (if it’s checked).
-
Click Apply and hit Ok.

3. Change Icon Size and View Style
If thumbnails are enabled in the Folder Options settings, check the icon size and view style of your files and folders. When the icon size is set to small or if you change the view style to lists or details, Windows does not show thumbnails.
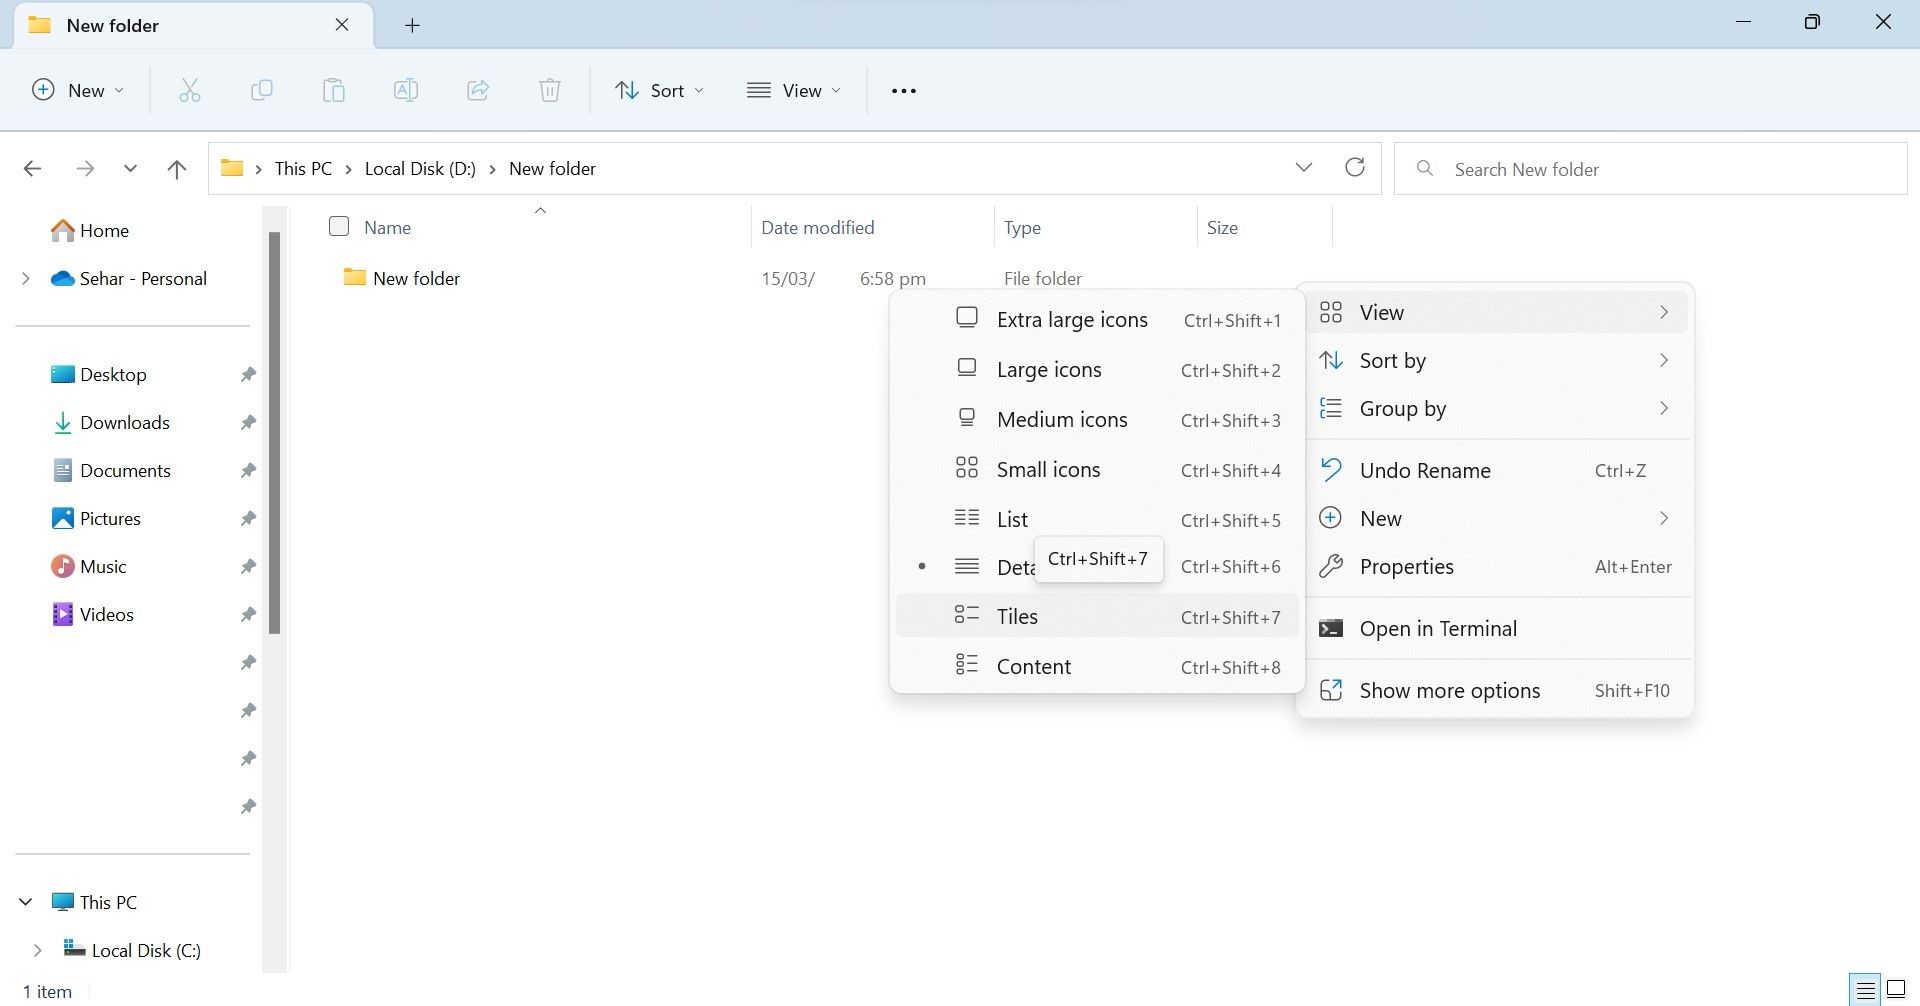
To change the icon size, right-click in the folder where thumbnails aren’t showing up, navigate to View, and select any size other than Small icons.
If changing the icon size doesn’t make a difference, change the view style by right-clicking in the same folder, navigating to View, and selecting Tiles or Content.
4. Check for Files or Format Specific Issues
There are some file types and image file formats for which Windows does not display thumbnails by default. For instance, Windows doesn’t show thumbnails for files in the Photoshop Document (PSD) format, a format used for images created with Adobe Photoshop, which is a graphics design and image editing software.
If you are unable to see thumbnails of files in a specific format, check whether Windows can display thumbnail previews for files in that format or not. You can explore that on the official website of the software you use to create these files. If the website says that Windows OS cannot display thumbnail previews for this software’s files, there isn’t much you can do.
Sometimes, users have to manually enable thumbnail previews in the software settings. Check if the software you use offers such a feature, and if it does, enable it, and you’ll begin to see thumbnails for that software’s files. However, if the software does not offer this feature, you will have to use third-party file managers to see thumbnails for its files.
5. Close Interfering Apps
Using third-party apps lets users preview thumbnails for file formats that Windows don’t natively support. However, these third-party apps can interfere with the basic functionality of Windows’ features, causing many of them to stop working.
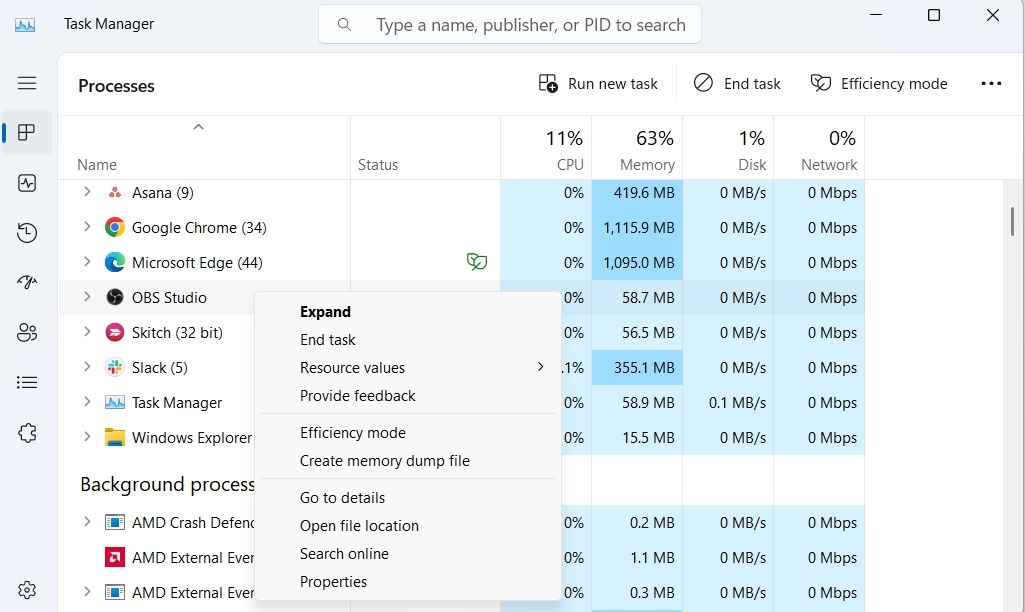
If you have started experiencing thumbnail issues after installing such an app, you should disable it. Closing the app alone will not be enough; you will also have to close its associated background processes from the Task Manager.
To close such an app and all associated processes, right-click the Start button and open Task Manager. Look for processes that seem to be relevant to that app. When you find them, right-click on each of them and click End task.
6. Rebuild the Thumbnail Cache
By using the thumbnail cache, Windows displays thumbnail images of files so that you can visually identify them. If cache files become corrupted, thumbnails can get affected. Clearing the thumbnail cache instructs Windows to rebuild the cache, which usually resolves thumbnail issues.
So, if you haven’t cleared it yet, clear the thumbnail cache and restart your device so Windows can rebuild it.
7. Restart File Explorer
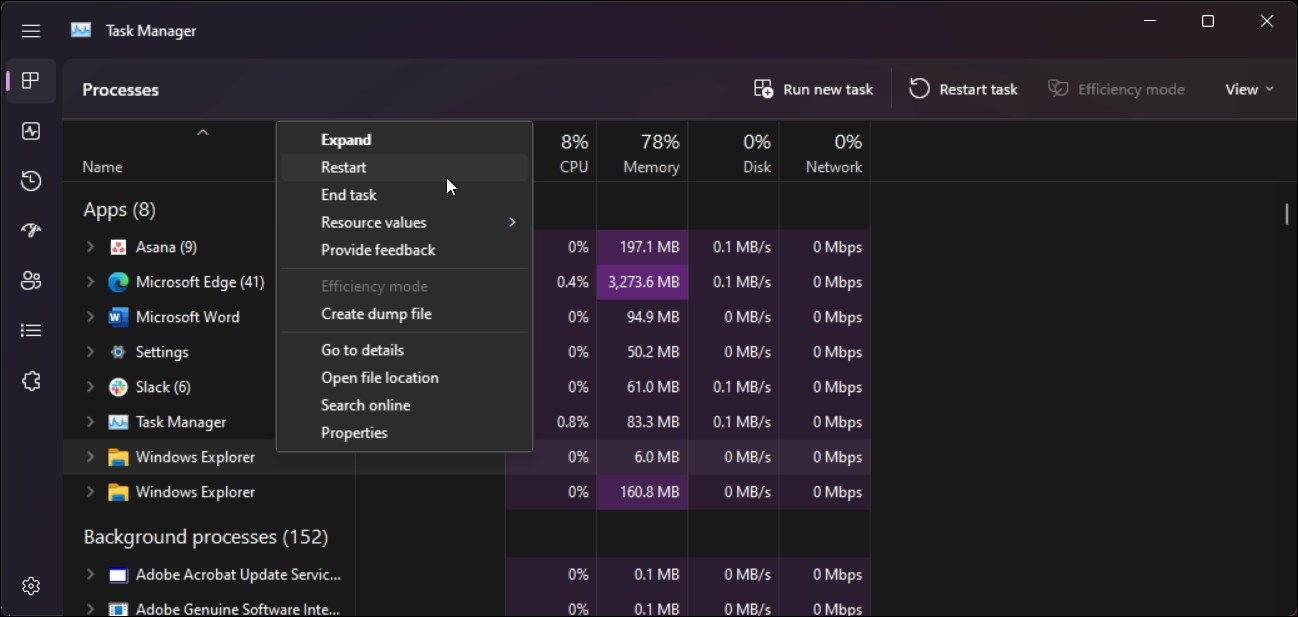
Restarting File Explorer is usually enough to fix most issues with icons, navigation panes, ribbons, tabs, and everything related. If you have not restarted File Explorer yet, you should; it may help you resolve the thumbnail issue. To restart File Explorer, open Task Manager, locate the File Explorer (or Windows Explorer) process, right-click on it, and click Restart.
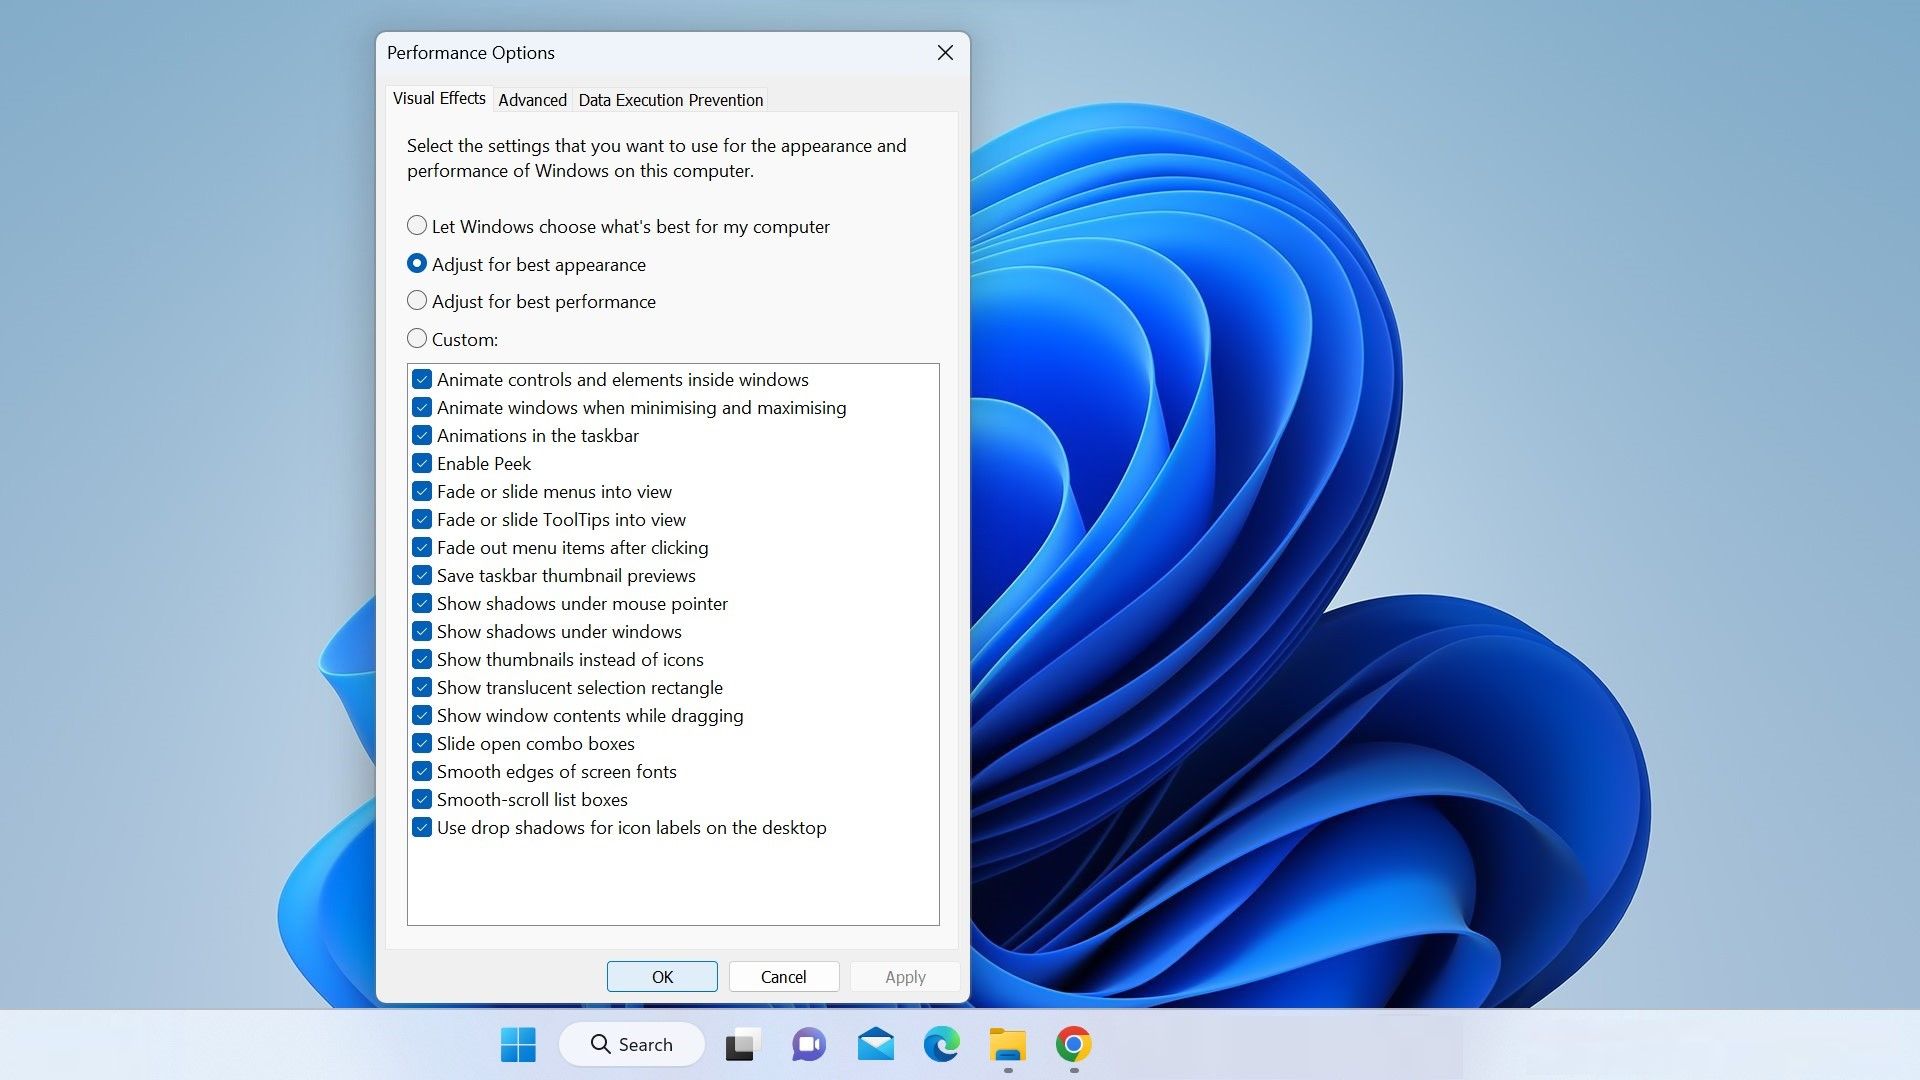
8. Enable Thumbnail Preview From Visual Effects
Visual effects help you customize the appearance of your device’s display and optimize it to get the best performance. You can also choose to have Windows adjust the visual effects based on your preference.
If you opt to have Windows optimize the visual effects for the best performance, it may disable some of these effects. If it disables thumbnail previews from these visual effects, you won’t see them. To ensure that’s not the case, follow these steps:
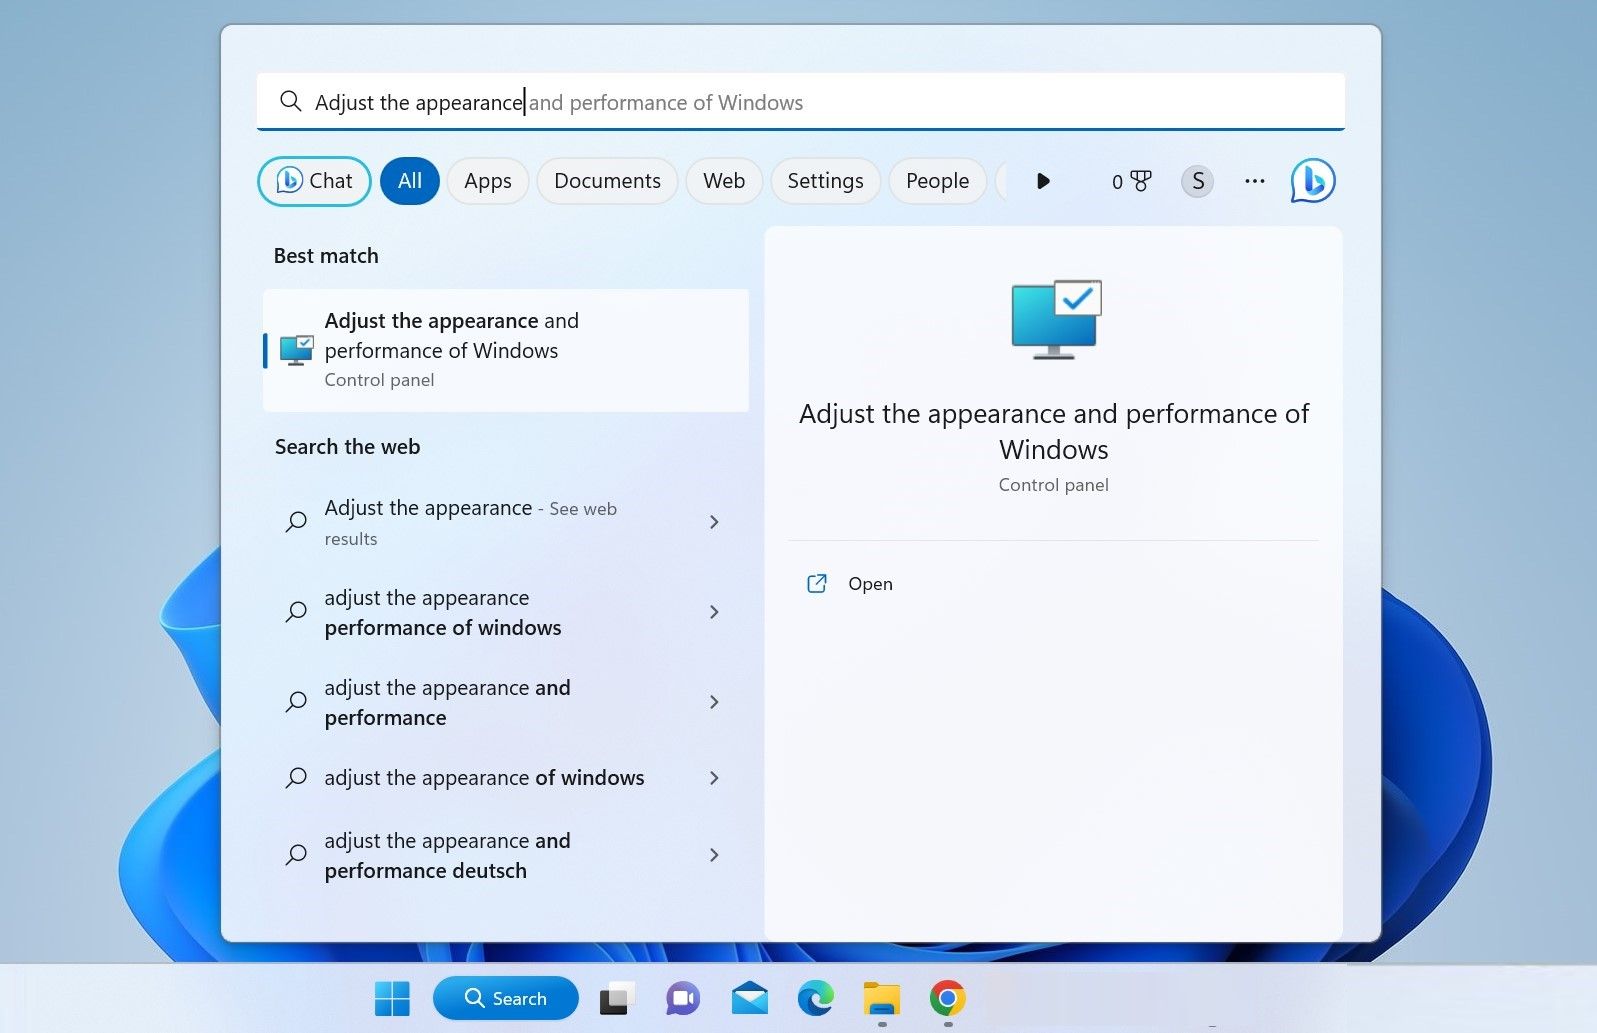
-
In Windows Search, type «Adjust the appearance» and click on Adjust the appearance and performance of Windows.

- Check the circle beside Adjust for best appearance in the Performance Options window.
-
Then, ensure the box beside Show thumbnails instead of icons is checked.

9. Apply Generic Windows 11 Fixes
Hopefully, one of the fixes listed above will resolve your issue, but if they don’t, try these:
- Ensure that the drive where you are experiencing this issue has enough free storage space. Consider freeing up the storage space if it’s running low.
- Change the default app in Windows 11 for files that don’t have thumbnails.
- Install any pending Windows updates.
Quickly Find Relevant Files Using Thumbnails on Windows 11
When a folder contains hundreds of images without proper names, finding the desired ones without seeing thumbnails can be difficult. Hopefully, the above fixes will resolve the issue and restore thumbnails, making finding files more manageable. If you still have trouble viewing thumbnails, try any File Explorer alternatives for better file management.
Очень удобно смотреть содержимое фотографии, когда отображаются эскизы, чтобы заранее узнать, что внутри. Но, что делать, когда вместо эскизов отображаются только иконки в проводнике Windows 11? Как решить данную проблему? Предлагаю несколько проверенных способов для восстановления эскизов фото.
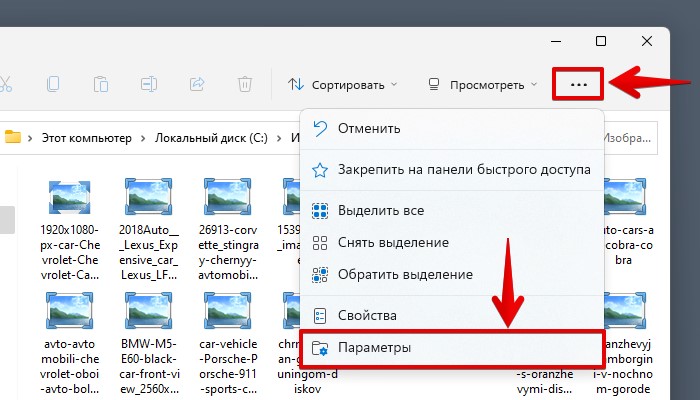
Способ 1. Настройка параметров папок
Проблему могут вызывать настройки проводника в Windows 11. В окне проводника щелкаем по кнопке с тремя точками в правой части окна и во всплывающем меню нажимаем на пункт «Параметры».
Когда откроется окно «Параметры папок» переходим во вкладку «Вид». В разделе «Дополнительные параметры» находим настройку «Файлы и папки» и снимаем флажок с настройки «Всегда отображать значки, а не эскизы».
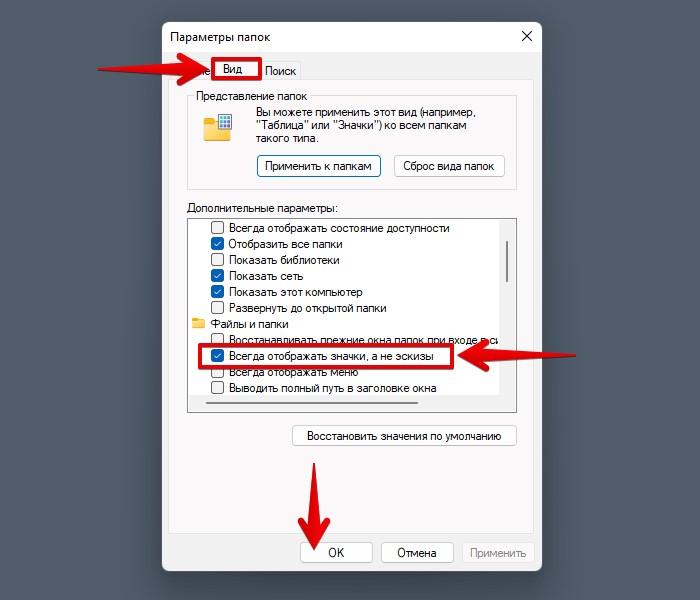
Нажимаем «ОК», чтобы применить настройку и возвращаемся в каталог, где лежат изображения.
Проверяем, решилась ли проблема.
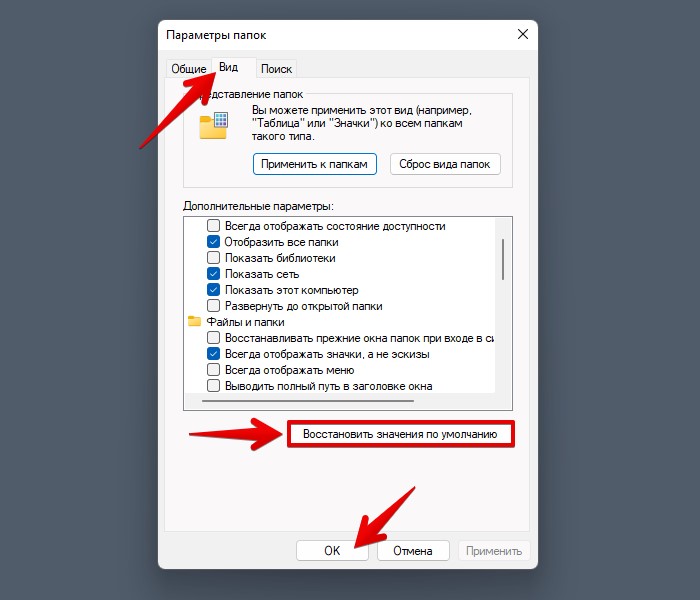
Способ 2. Восстановление параметров папок
Данным способом можно попытаться сбросить настройки проводника. Для этого переходим в окно «Параметры папок» во вкладку «Вид» и нажимаем на кнопку «Восстановить значения по умолчанию».
Если этот способ не помог, переходим к следующему способу.
Способ 3. Очитка диска (эскизов)
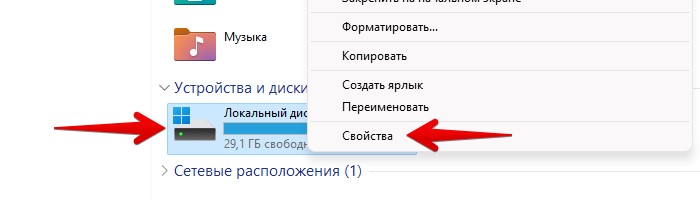
Одна из причин, по которой миниатюры все еще могут не отображаться — забитый или поврежденный кэш. Чтобы удалить кэш, переходим в свойства диска, на котором лежат проблемные фото (щелкаем правой кнопкой мыши по диску и выбираем пункт «Свойства»).
В появившемся окне «Свойства: Локальный диск» щелкаем по кнопке «Очистка диска». Откроется новое окно «Очистка диска», прокручиваем список в разделе «Удалить следующие файлы» и отмечаем флажком пункт «Эскизы».
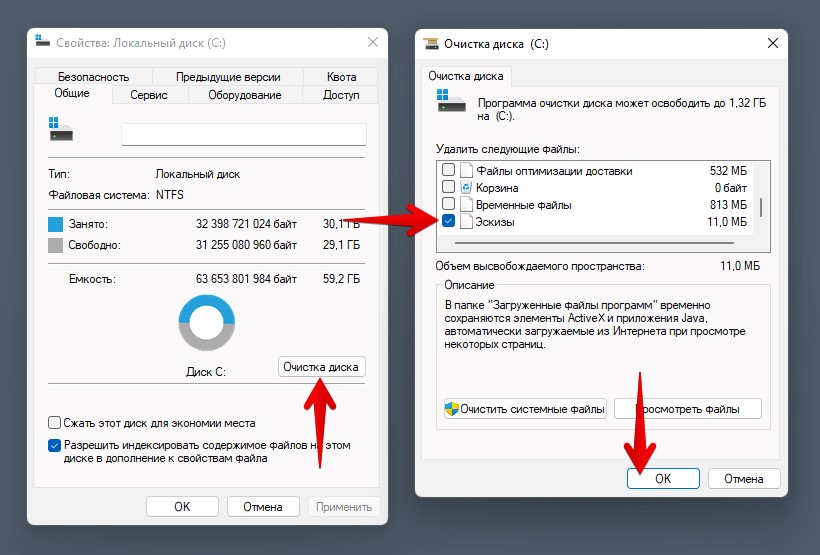
Нажимаем кнопку «ОК», чтобы начать очистку. Перед очисткой система запросит подтверждение на удаление файлов, соглашаемся.
Однако, если по прежнему проблема остается актуальной, тогда переходим к следующему методу.
Способ 4. Настройка визуальных эффектов
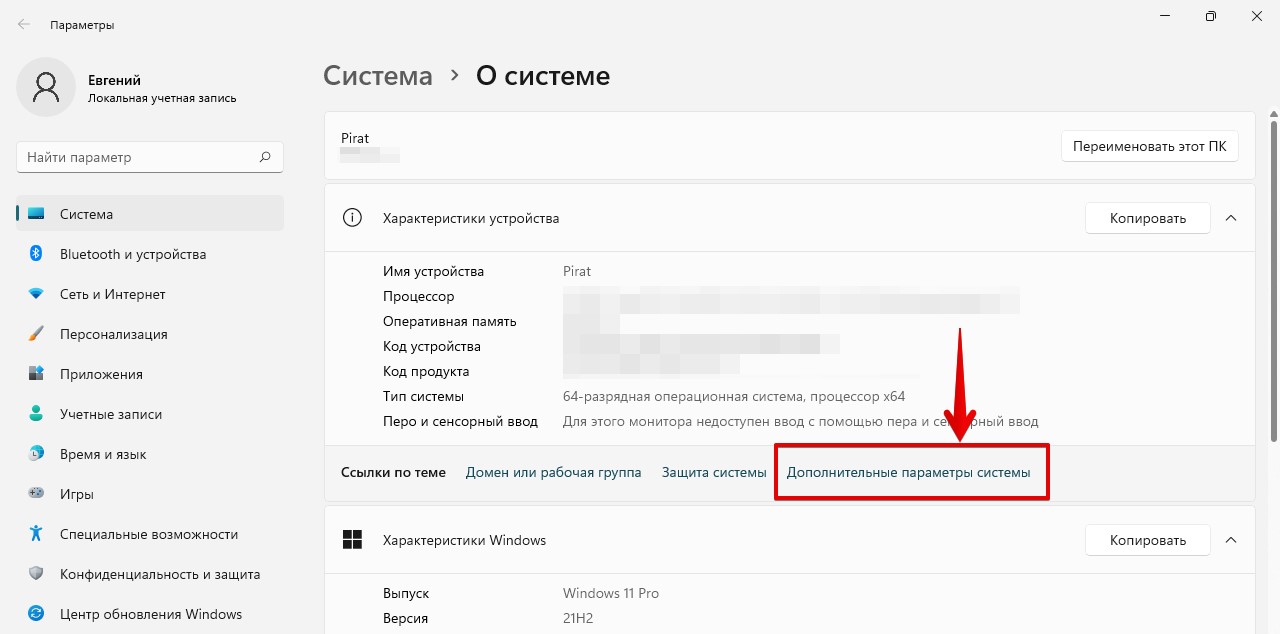
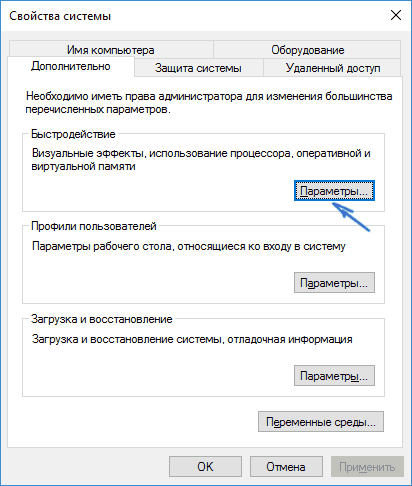
Стоит проверить настройки визуальных эффектов Windows 11. Для начала переходим в «Параметры», для этого нажимаем на клавиатуре клавиши «Win+I». Затем щелкаем по ссылке «Дополнительные параметры системы».
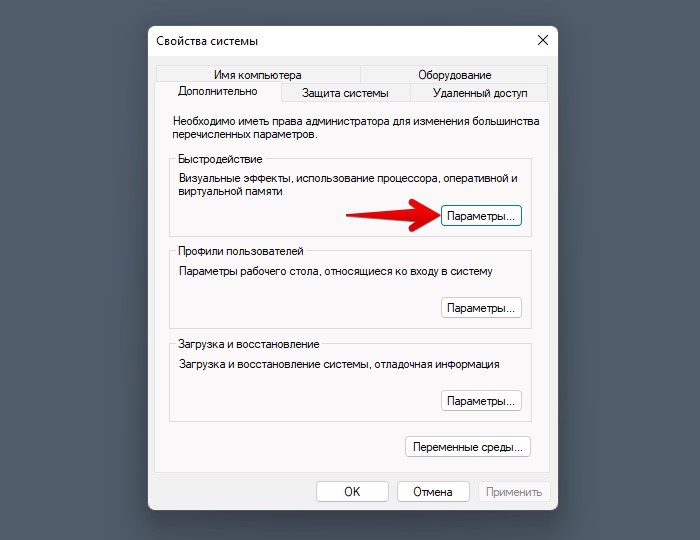
Должно появится окно «Свойства системы». Во вкладке «Дополнительно» и в разделе «Быстродействие» нажимаем на кнопку «Параметры», чтобы продолжить.
Переходим во вкладку «Визуальные эффекты» и проверяем, чтобы были установлены флажки на двух пунктах — «Вывод эскизов вместо значков» и «Сохранение вида эскизов панели задач».
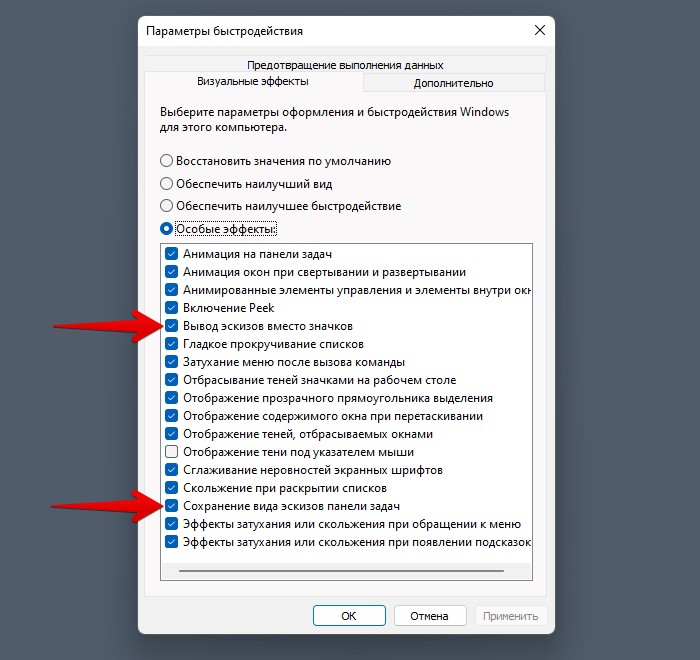
Если флажки не установлены, то устанавливаем и нажимаем на кнопку «ОК», чтобы сохранить изменения.
Одна из распространенных проблем пользователей Windows 10 — не показываются эскизы или миниатюры изображений (фото и картинок), а также видео в папках проводника, или же вместо них показываются черные квадраты.
В этой инструкции — способы исправить эту проблему и вернуть показ миниатюр (эскизов) для предварительного просмотра в проводнике Windows 10 вместо иконок файлов или тех самых черных квадратов.
- Включение показа эскизов в настройках
- Сброс кэша эскизов Windows 10
- Дополнительные способы включить показ миниатюр
- Видео инструкция
Примечание: отображение миниатюр не доступно, если в параметрах папки (правый клик в пустом месте внутри папки — Вид) включены «Мелкие значки», отображение в виде списка или таблицы. Также миниатюры могут не отображаться для специфичных форматов изображений, не поддерживаемых самой ОС и для видео, для которого не установлены кодеки в системе (также подобное случается, если установленный вами плеер устанавливает свои иконки на видео файлы).
Включение показа миниатюр (эскизов) вместо значков в настройках
В большинстве случаев, для того чтобы включить отображение картинок вместо иконок в папках, достаточно просто изменить соответствующие настройки в Windows 10 (они присутствуют в двух местах). Сделать это просто. Примечание: если какие-то из указанных ниже опций оказались недоступны или не меняются, обратите внимание на последний раздел этого руководства.
Для начала проверьте, включен ли показ миниатюр в параметрах проводника.
- Откройте проводник, нажмите в меню «Файл» — «Изменить параметры папок и поиска» (также можно зайти через панель управления — параметры проводника).
- На вкладке «Вид» посмотрите, не включен ли пункт «Всегда отображать значки, а не эскизы».
- Если включен, снимите отметку с него и примените настройки.
Также настройки отображения эскизов картинок присутствуют в параметрах быстродействия системы. Добраться до них можно следующим образом.
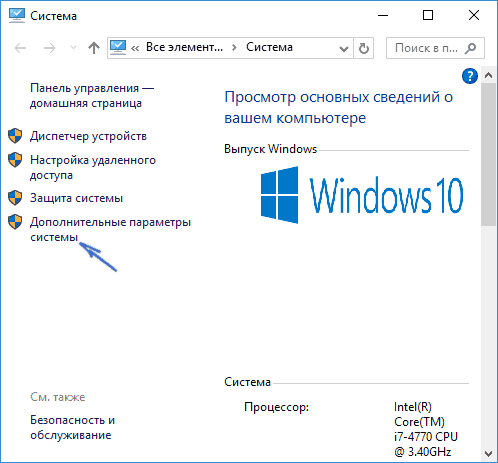
- Кликните правой кнопкой мыши по кнопке «Пуск» и выберите пункт меню «Система».
- Слева выберите «Дополнительные параметры системы»

- На вкладке «Дополнительно» в разделе «Быстродействие» нажмите «Параметры».

- На вкладке «Визуальные эффекты» отметьте пункт «Вывод эскизов вместо значков». И примените настройки.


Примените сделанные настройки и проверьте, была ли решена проблема с отображением миниатюр.
Сброс кэша эскизов в Windows 10
Этот способ может помочь, если вместо миниатюр в проводнике стали отображаться черные квадраты или что-то еще, не типичное. Здесь можно попробовать сначала удалить кэш эскизов с тем, чтобы Windows 10 создала его заново.
Для очистки эскизов выполните следующие действия:
- Нажмите клавиши Win+R на клавиатуре (Win — клавиша с эмблемой ОС).
- В окно «Выполнить» введите cleanmgr и нажмите Enter.
- Если появится выбор диска, выберите ваш системный диск.
- В окне очистки диска, внизу, отметьте пункт «Эскизы».
- Нажмите «Ок» и дождитесь, когда будет завершена очистка эскизов.
После этого можете проверить, стали ли отображаться миниатюры (они будут созданы заново).
Дополнительные способы включить показ миниатюр
Если в вашем случае не отображаются миниатюры только в случае, если в параметрах «Вид» вы устанавливаете крупные или огромные значки, проверьте, чтобы в разделе реестра
HKEY_LOCAL_MACHINE\SOFTWARE\Microsoft\Windows NT\CurrentVersion\Windows
Были следующие параметры со следующими значениями, при их отсутствии или отличающихся значениях, измените их:
"IconServiceLib"="IconCodecService.dll"
"DdeSendTimeout"=dword:00000000
"DesktopHeapLogging"=dword:00000001
"GDIProcessHandleQuota"=dword:00002710
"ShutdownWarningDialogTimeout"=dword:ffffffff
"USERNestedWindowLimit"=dword:00000032
"USERPostMessageLimit"=dword:00002710
"USERProcessHandleQuota"=dword:00002710
@="mnmsrvc"
"DeviceNotSelectedTimeout"="15"
"Spooler"="yes"
"TransmissionRetryTimeout"="90"
А в разделе реестра
HKEY_LOCAL_MACHINE\SOFTWARE\Wow6432Node\Microsoft\Windows NT\CurrentVersion\Windows
следующие параметры
"IconServiceLib"="IconCodecService.dll"
"DdeSendTimeout"=dword:00000000
"DesktopHeapLogging"=dword:00000001
"GDIProcessHandleQuota"=dword:00002710
"ShutdownWarningDialogTimeout"=dword:ffffffff
"USERNestedWindowLimit"=dword:00000032
"USERPostMessageLimit"=dword:00002710
"USERProcessHandleQuota"=dword:00002710
@="mnmsrvc"
"DeviceNotSelectedTimeout"="15"
"Spooler"="yes"
"TransmissionRetryTimeout"="90"
А если в этих разделах есть параметры LoadAppInit_DLLs и AppInit_DLLs то первый должен быть равен 0, а второй — пустым.
И на всякий случай еще два способа включить отображение миниатюр в проводнике — с помощью редактора реестра и редактора локальной групповой политики Windows 10. По сути, это один способ, только разные его реализации.
Для включения миниатюр в редакторе реестра, проделайте следующее:
- Откройте редактор реестра: Win+R и ввести regedit
- Зайдите в раздел (папки слева)
HKEY_CURRENT_USER\SOFTWARE\Microsoft\Windows\CurrentVersion\Policies\Explorer
- Если в правой части вы увидите значение с именем DisableThumbnails, кликните по нему дважды и установите значение 0 (ноль), чтобы включить показ иконок.
- Если такого значение нет, можно его создать (правый клик в пустой области справа — создать — DWORD32, даже для систем x64) и установить для него значение 0.
- Повторите шаги 2-4 для раздела
HKEY_LOCAL_MACHINE\SOFTWARE\Microsoft\Windows\CurrentVersion\Policies\Explorer
Закройте редактор реестра. Изменения должны вступить в силу сразу после изменений, но если этого не произошло — попробуйте перезапустить explorer.exe или перезагрузить компьютер.
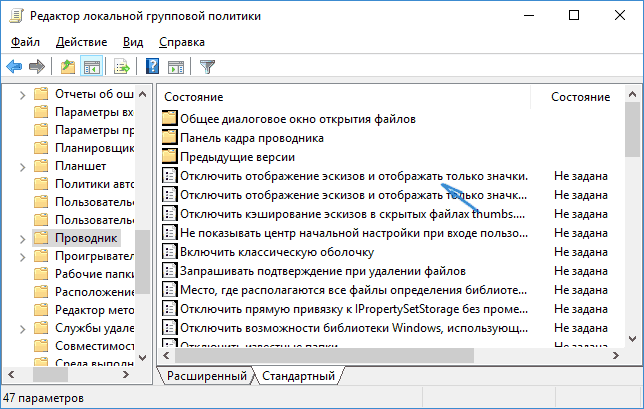
То же самое с помощью редактора локальной групповой политики (доступно только в Windows 10 Pro и выше):
- Нажать Win+R, ввести gpedit.msc
- Перейдите к разделу «Конфигурация пользователя» — «Административные шаблоны» — «Компоненты Windows» — «Проводник»
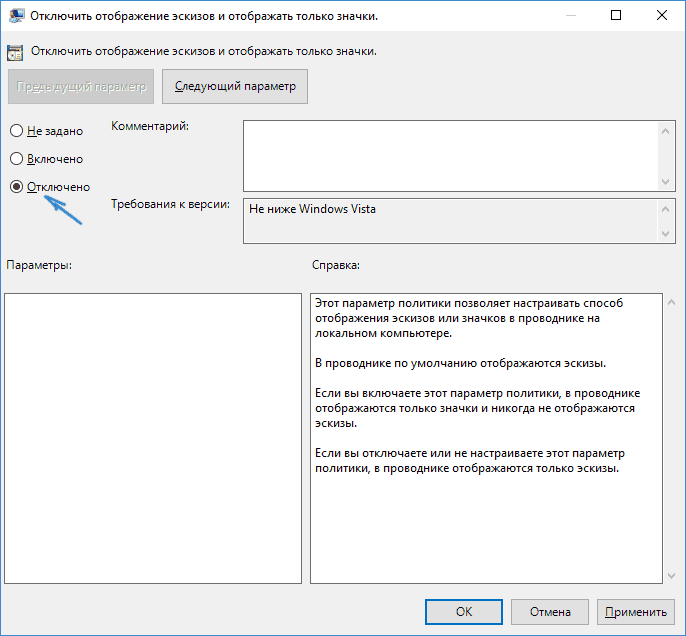
- Дважды кликните по значению «Отключить отображение эскизов и отображать только значки».

- Установите для него «Отключено» и примените настройки.

После этого изображения предварительного просмотра в проводнике должны будут показываться. Также обратите внимание: если проблема появилась недавно, а у вас есть точки восстановления системы, они могут помочь. Также существует бесплатная программа Icaros, специально предназначенная для показа эскизов разных типов файлов в Windows.
Что делать, если не отображаются эскизы в Windows 10 — видео инструкция
Ну а если ни один из описанных вариантов не сработал или же проблема со значками отличается от описанной — задавайте вопросы, постараюсь помочь. При этом учитывайте, что если речь идет не о стандартных форматах файлов, которые Windows 10 поддерживает по умолчанию, включить отображение миниатюр описанными методами не получится, однако, после установки соответствующих просмотрщиков (например: Лучшие бесплатные программы для просмотра фото и изображений), редакторов или проигрывателей, миниатюры для этих форматов могут появляться.
Одним из самых разочаровывающих изменений в Windows 11 стал отказ от иконок папок в «Проводнике», отображающих превью содержимого в них. Вероятно, Microsoft отказалась от этой полезной опции в угоду новому дизайнерскому стилю. Как бы там ни было, энтузиаст разработал собственную утилиту Windows Thumbnail Generator с открытым исходным кодом, которая исправляют эту проблему.
- В тему: Всё о Windows 11 — секреты, инструкции, лайфхаки и полезные статьи
Написанная на C# программа использует ImageMagick (библиотека Magick.NET) для генерирования ярлыков с миниатюрами файлов, находящихся в папке. На данный момент утилита ограничена только мультимедийными форматами (JPG, PNG, MP4, MOV и прочими), поскольку другие типы файлов (документы, таблицы и подобные) имеют вертикальное отображение — оно не подходит под текущую реализацию.

Windows Thumbnail Generator работает крайне просто: пользователю нужно лишь открыть утилиту, выбрать нужную папку, указать порядок (обычный или обратный) и нажать на «Старт». Программа автоматически сгенерирует ярлык папки с миниатюрами и заменит исходную иконку на новую. Разработчик отметил, что изначально он создал эту утилиту для себя, но решил поделиться со всеми — он рассчитывает только на конструктивную критику.
Thumbnails play a crucial role in recognizing an image or video beforehand playing it. Almost all users prefer using thumbnails over displaying images as icons. So, when thumbnail previews stop showing or not displaying, it is quite worrisome to all. In this post, we will look into the reasons behind this problem along with eight potential fixes.
Thumbnails appear blank mostly when there are some internal issues within the File Explorer settings. Configuring folder view options or restoring Explorer to its default resolves this issue. In rare cases, where you transfer images from an iPhone to Windows, the thumbnail previews also fail. This is primarily because of the fact Windows doesn’t support the HEIC file format. Download and install the right codec and this problem will be resolved on your computer.
Though there is a lesser possibility of this, this could also be the work of infected files and folders (malware attack). Run your default antivirus and get rid of this possibility first.
Thumbnail Previews Not showing, what causes this?
Thumbnails give a fair idea of what an image or video is really about. When a picture is not showing its thumbnail, this could be because of the following reasons –
- Relevant codecs are not installed in Windows.
- File Explorer has corrupted somehow.
- The default photo viewing application is corrupt or outdated.
- Issues within the folder containing the images.
There could be a few other reasons as well which we have explained while outlining the right fixes to this problem.
Fix the Thumbnail Preview Not Showing in Windows 11
If thumbnail previews are not appearing inside Windows 11, attempt the below fixes and get this problem resolved.
1. Install the Supporting Codecs
Windows 11 doesn’t support certain file formats of images like HEIC photos taken from iPhone. This is because the supporting codecs are not installed on Windows by default. Right-click on an image and select Properties. Check what’s written next to “Type of file”. If this file format is not supported on Windows 11, you need to download and install the relevant codecs.
To view HEIC photos in Windows, you need to install HEIC Image Extensions from Microsoft Store. Similarly, if you can see video previews, get the supporting codecs of that particular video format.
2. Check Folder View Options
You face this problem mostly when viewing photos or videos inside File Explorer. Well, there’s a way by which you can check and modify Folder View Options. Follow the below instructions and make Thumbnails appear on your Windows 11 PC –
- Press Win + S and type “File Explorer options” in the search bar.
- Click on the top result to enter the “File Explorer options” window.
- Go to the View tab, and uncheck the box – “Always show icons, never thumbnails“.
- Click Apply and then OK to confirm the recent changes.
Go back to the folder where thumbnail previews were not appearing. You must be able to see the thumbnails now on your Windows 11 PC.
3. Restore File Explorer to its default settings
If you are still not seeing the thumbnail previews inside a folder, reset File Explorer to its default settings. Restoring the default settings on Windows Explorer will get rid of any internal glitches or issues. And, thus you can preview images or videos correctly on your Windows PC. Here’s how to perform this task –
- In the Search window, type “File Explorer Options”.
- Click on the well-matching result.
- When it launches, go to the View tab, and click Restore defaults. See the Snapshot below –
- Click Apply > OK to confirm this action of yours.
Now, check if can see images or video thumbnails inside your folder.
4. Change the default App opening Photos
“Photos” is the default application in Windows 11 to view any images, pictures, or screenshots saved on your PC. When this system app gets corrupted somehow, this may also stop previewing images or videos inside a folder. Change this default app to something like “Paint” or an app downloaded from the Microsoft Store, and you will find thumbnails showing again.
To change the default photo viewing application on Windows 11, do the following –
- Right-click on any image and choose the option – “Open with“.
- Select Paint or any other app downloaded from the Microsoft Store.
- If an application that you would like to make the default app is not appearing in the context menu, select Choose another app.
- You will see a few more apps that can open images.
- Select your preferred application, and tick the box – “Always use this app to open .png files“.
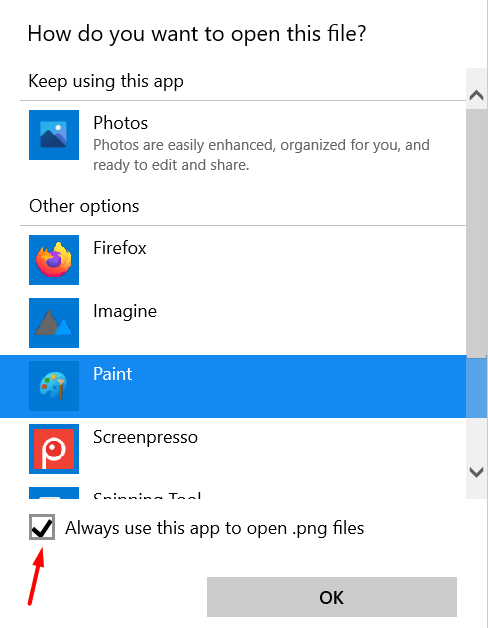
- Finally, click OK to confirm the recent changes on your computer.
- From now onward, whenever you double-click on an image, the image will open in the chosen application.
Note: Doing this will only change the default image viewing app for pictures bearing .png file format. All other images that vary in file extension will continue to open with the default app i.e. “Photos”. If you want all images open in your preferred app, you need to repeat the above process for all image file formats like JPEG, JPG, etc.
5. Get rid of the Thumbnail Cache
Thumbnails may also stop appearing inside a folder when the thumbnail cache grows in size and reaches its maximum permissible limit. Even in cases where it isn’t that huge, getting thumbnails of a huge database can sometimes be tricky and hence the problem arises.
Delete the stored thumbnail cache on your computer, and you will all other images and videos’ thumbnails showing just fine. Here’s how to get rid of the stored thumbnail cache on Windows 11 –
- Press Win + I to launch the Settings app.
- Go to System > Storage and click on Temporary Files.
- Tick the box left of “Thumbnails”, and hit Remove files.

- The system will take some time to delete the stored thumbnails, depending on how big is the stored cache.
After you see the thumbnails revert to 0 MB in size, restart your PC. From the next logon, the system will generate the thumbnails automatically.
Where does Windows store the thumbnail cache?
Starting from Windows Vista, Windows keeps all the thumbnail image data at a specific location. It is because of this cache, you see thumbnails of images regardless of which folder you open. Keeping things this way, your operating system indeed works a little faster.
6. Restart Windows Explorer
The “thumbnails not showing” issue might also appear when the file explorer has been corrupted somehow. Since you can never be sure of that, force-restart Windows Explorer and check if the thumbnails start appearing next. Here’s how to perform this task –
- Use Ctrl + Shift + Esc to launch Task Manager.
- Click More Details, if the task manager doesn’t open fully.
- Go to the Processes tab and scroll down to Windows Explorer.
- If File Explorer is running, you will find it under Apps, otherwise the same will appear under Windows processes (at the end).
- Right-click on Windows Explorer and select the Restart button.
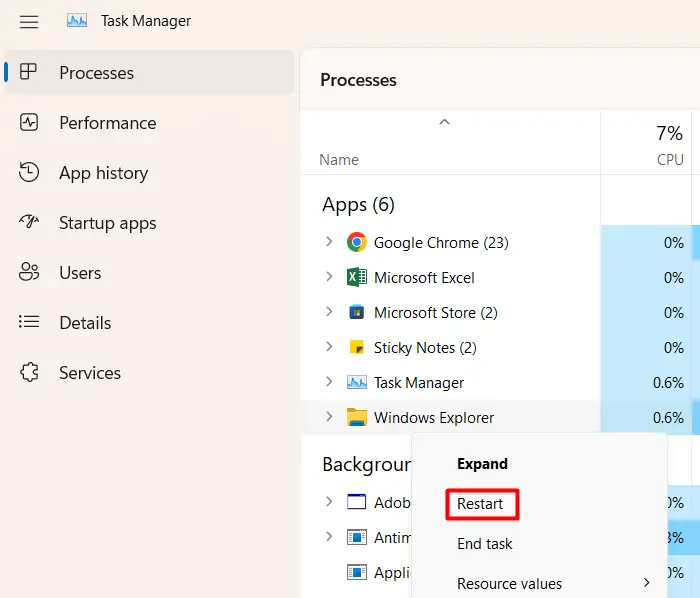
- File Explorer is associated with the taskbar and a few other processes. So, while it is restarting, you won’t be able to do anything on your PC. Wait for a few seconds, and you will get back the Windows Explorer.
- Close the task manager window and check if you can now see the image or video thumbnails on your PC.
In case you are still not seeing any thumbnails, follow the next set of solutions discussed below.
7. Update the Graphics Drivers
If you haven’t updated the graphics drivers for a long time, this may cause unwarranted issues like Thumbnail previews not showing. Update the graphics drivers on your PC by following the below steps and check if the problem resolves this way.
- Press Win + X, and choose Device Manager.
- When Device Manager opens up, click the “>” icon left of Display adapters.
- Right-click on the graphic driver present inside and select Update device.

- Click “Search automatically for drivers online” and wait for some time.
- These days, it is very rare to get driver updates this way. In most cases, you will be asked to visit Windows Update and check for updates again.
- Click on the available prompt and you will be redirected to Windows Update.
- Wait for a few minutes while the system is checking for driver updates online.
- If the system does get any graphic driver updates, you will see a link to optional updates.
- Click on this link, tick all the checkboxes, and hit Download & Install.

After the optional updates are installed, restart your PC. When Windows 11 reloads, check if the image thumbnails start appearing inside your folder.
8. Perform a Full Scan using Windows Security
The presence of viruses or malware inside your system might also result in non-displaying thumbnails. Since this problem has not yet been resolved, perform a full scan on your Windows PC using the default antivirus. If you are using some third-party antivirus, you may use that as well.
In the event of your antivirus finding some trojan files or other viruses, you should also run the System File Checker tool. This is an in-built tool on Windows developed to automatically scan and repair missing or damaged system files on your PC. Here’s how to initiate an SFC scan –
- Right-click on the Windows icon and select Windows Terminal (Admin).
- When the UAC window prompts, hit Yes to authorize opening the terminal.
- Type the following inside the terminal and press Enter –
sfc /scannow
- Wait for the next 10-15 minutes as the scanning/repairing process takes around this much time.
- Once it is over, run the DISM command as provided below –
DISM /Online /Cleanup-Image /RestoreHealth

- The DISM command will check and resolve any corruption inside the system image.
- After you run both these tools successfully, restart your PC.
Sign back into your device and check if the thumbnails are appearing as they normally do. I hope the images and video thumbnails are back to normal after applying the above fixes. The thumbnail gives a fair idea of what an image or a video is really about, so it is worth solving this problem on a Windows PC.