
If you notice that the built-in Calculator app in Windows 11 or Windows 10 has suddenly gone missing or stops working, especially after a recent Windows update, it might seem like a complicated and confusing issue but it’s easy to bring it back and fix any issues it has.
In this guide, we will show you some workarounds and solutions you can try to restore the Calculator app and fix any problems with it on Windows 11 or 10.
How to fix Calculator app missing or not working
The Microsoft Calculator app comes pre-installed with your Windows 10 or 11 installation. You can open it by simply searching for it in the Start menu. You can also pin it to your taskbar or create a shortcut on your desktop so that you can quickly open it.
If the app suddenly disappears from all these places and you can’t even find it with Cortana, it could mean that it was accidentally uninstalled or it has become corrupted perhaps due to recent changes in your Windows system. Below are some methods to bring back the Calculator app and to fix any issues it might have.
Reset Calculator app in Windows 11 or 10
The first thing to try is to reset the Calculator app in Windows 10 or 11 entirely. By resetting the app, all of its settings will be reverted to its factory default, which may solve your Calculator app not working issue. Here’s how to reset it:
- Press Win+i to open the Settings app.
- Select Apps.
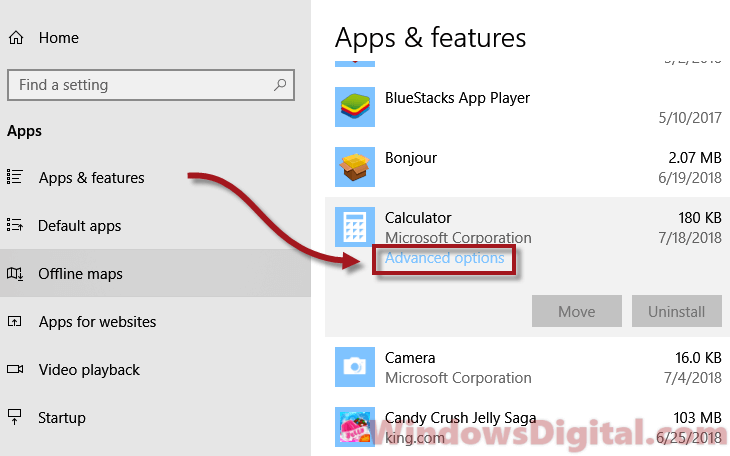
- From the left pane, select Apps & features.
- Now, on the right pane, scroll down and look for Calculator from the list of apps.
- Select it, then click on Advanced options.

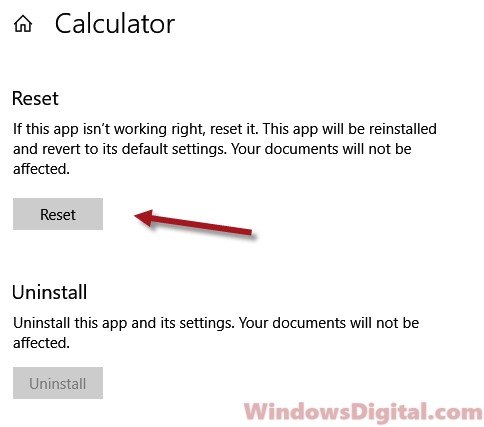
- In the Calculator settings window, under Reset, click on the Reset button.

- Restart your PC.
After rebooting your computer, retry launching the Calculator app in Windows 10 or 11 again and see if your problem is fixed.
Reinstall Calculator app in Windows
If you can’t see the Calculator app from the list of apps or the above method doesn’t work to solve your Windows 10 or 11 Calculator app not working or missing issue, try reinstalling the Calculator app using Windows PowerShell. Here’s how to do it:
- Go to the Start menu or Cortana and search for Windows PowerShell. Right-click it and select Run as administrator.
- In PowerShell, type the following command:
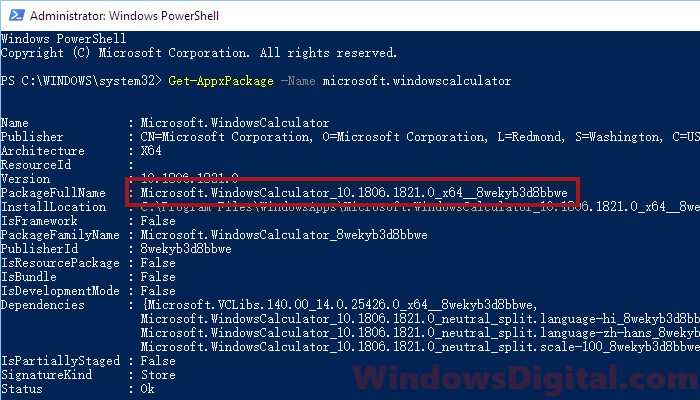
Get-AppxPackage -Name Microsoft.WindowsCalculator
This command is to show the Windows 10 or 11 Calculator app package info. We need the package full name in order to remove the Calculator app. From what you see in PowerShell, copy the entire line of PackageFullName.

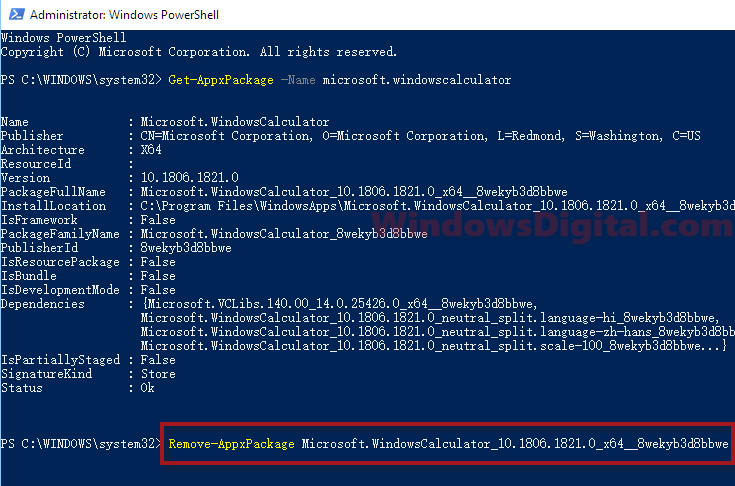
- Next, type the following command with your version of PackageFullName. Do not copy the following command. Only use the Remove-AppxPackage command with the package full name you copied earlier:
Remove-AppxPackage Microsoft.WindowsCalculator_10.1806.1821.0_x64__8wekyb3d8bbwe

After executing the command, the Windows 10 or 11 Calculator app should be uninstalled and removed from your PC entirely. Now, you will have to install it again from the Microsoft Store.
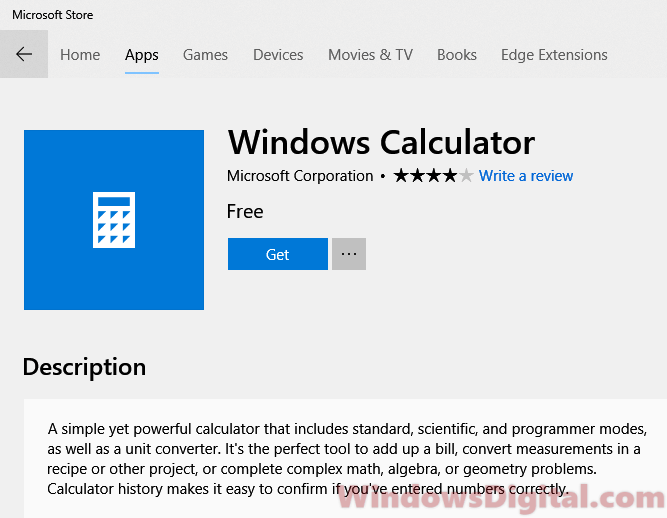
- Go to the Start menu. Search for Microsoft Store and open it.
- In the store, search for Windows Calculator. Select it and then click on the Get button to install the Windows 10 or 11 Calculator app. Alternatively, you can also try other Calculator apps developed by third parties by searching for “calculator” in the Microsoft Store.
This method should solve any issue with the Windows 10 or 11 Calculator app not working or missing problem.
Linked issue: Get-AppxPackage is Not Recognized or Access is Denied
Reinstall all Windows default apps
We do not recommend this method as it will also wipe all other default apps in Windows 10 or 11 and reinstall them. If you can’t get the PackageFullName to remove only the Calculator app as guided above, or the command above just doesn’t work, here’s a universal command to reinstall all default apps in Windows 10 or 11 at once.
Open Windows PowerShell with admin privileges as outlined above, and then enter the following command:
Get-AppXPackage | Foreach {Add-AppxPackage -DisableDevelopmentMode -Register "$($_.InstallLocation)\AppXManifest.xml"}
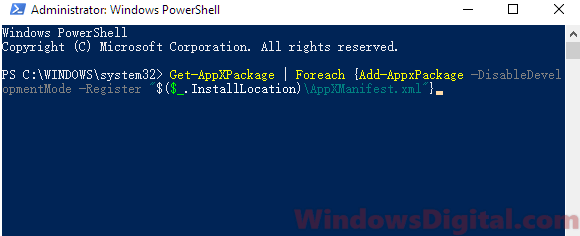
The above command will reinstall all default apps, including the Calculator app, in Windows 10 or 11 for the current user account. If you want to reinstall all Windows apps for all accounts on your PC, run the following command instead:
Get-AppXPackage -AllUsers | Foreach {Add-AppxPackage -DisableDevelopmentMode -Register "$($_.InstallLocation)\AppXManifest.xml"}
This method is known to be the most widely-used “fix all” option when users have issues with their Windows 10 or 11 default apps, such as the Calculator app not working or missing problem.
Calculator app is more than an utility in Windows. If the Calculator app is missing from your Windows 11 system, there are a few possible reasons for this. The app might got corrupted, or get removed from the system after some update or due to use of some third-party software. With the help of this article, we can fix this issue easily.

Page Contents
Here are some troubleshooting steps you can try to resolve the issue.
Fix 1: Reinstall the Calculator app
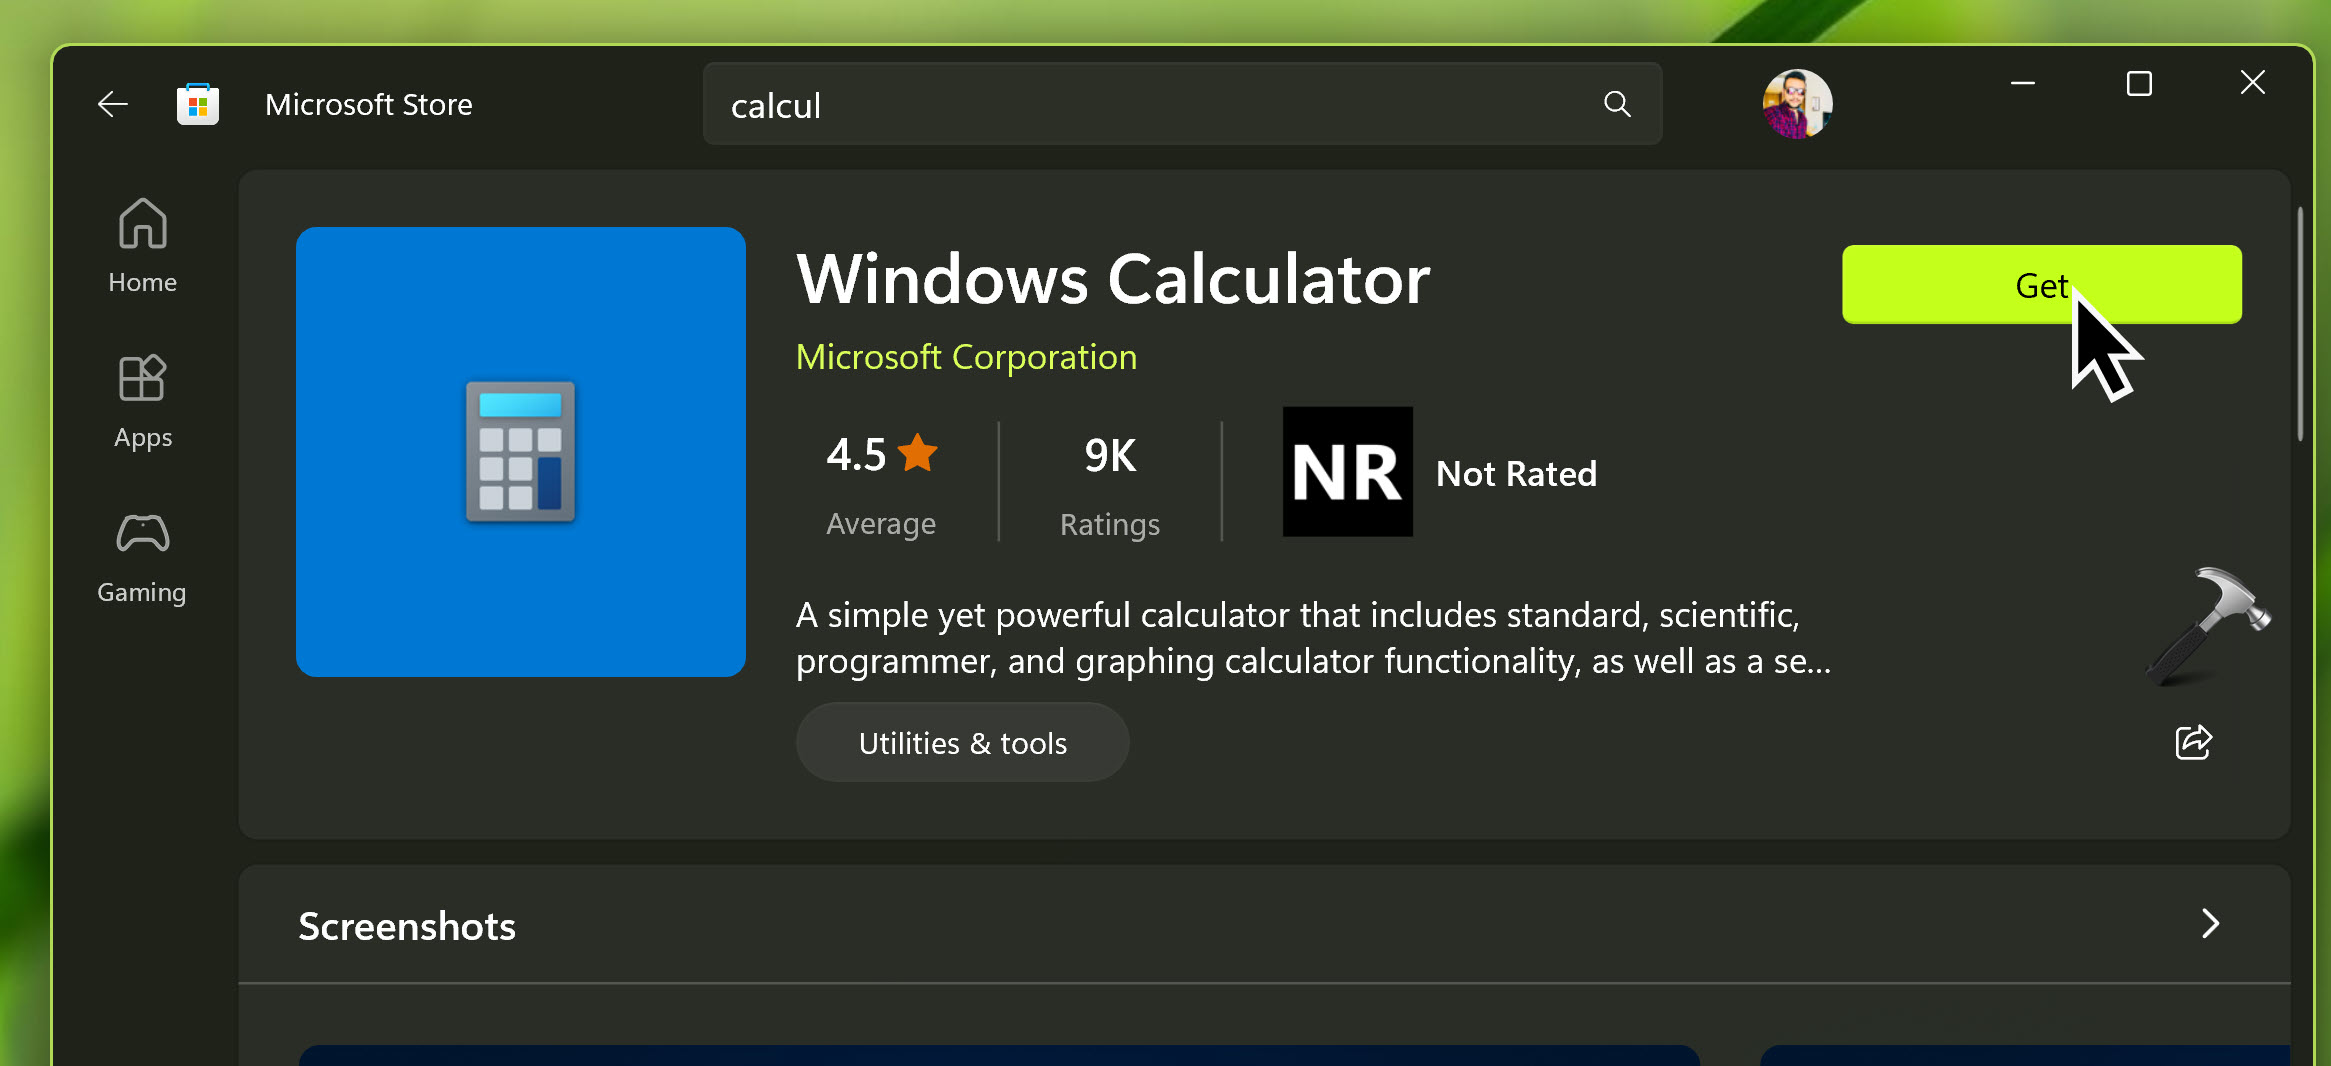
- Open the Microsoft Store app on your Windows computer.
- Search for “Calculator” in the store’s search bar.
- Locate the “Windows Calculator” app and click on it.
- Click on the “Install” or “Get” button to reinstall the app.
Fix 2: Reset the Calculator app
- Open the “Settings” app on your computer (press Windows key + I to quickly open Settings).
- Click on “Apps” or “Apps & features.”
- In the Apps & features settings, locate and click on the “Windows Calculator” app.
- Click on the “Advanced options” link.
- Scroll down and click on the “Reset” button.
Restart your computer and check if the Calculator app is available.
Fix 3: Check if the app is hidden
- Right-click on the Windows Start button and select “Apps and Features” from the context menu.
- In the Apps & features settings, click on “Optional features.”
- Look for “Calculator” in the list of optional features. If it’s listed, click on it and select “Uninstall.” Then restart your computer and go back to the Optional features section to reinstall it.
Fix 4: Run the Windows Store troubleshooter
- Open the “Settings” app on your computer.
- Go to “Update & Security” and click on “Troubleshoot” in the left-hand menu.
- Scroll down and click on “Windows Store Apps” or “Windows Store Apps troubleshooter.”
- Follow the on-screen instructions to run the troubleshooter and see if it detects any issues.
Fix 5: Re-register Calculator app
Make sure Calculator app is not running and then try below steps:
- Right click Start button, select Terminal (Admin).
- In PowerShell tab, paste following command and press Enter key:
Get-AppXPackage -AllUsers -Name Microsoft.WindowsCalculator | Foreach {Add-AppxPackage -DisableDevelopmentMode -Register "$($_.InstallLocation)\AppXManifest.xml" -Verbose}
Once command executed successfully, close Terminal app.
Hope this helps!
RELATED ARTICLES
Have you ever found yourself in a situation where you needed to quickly make some calculations on your Windows computer only to realize that your Calculator app is missing? But where has the Windows Calculator disappeared? Whether you are on Windows 10 or 11, getting back your Calculator won’t take much time.
So, read on to find out why your Calculator is missing in Windows 10 or 11 and more importantly how to retrieve/reactivate it.
Windows 11 Calculator Missing? Check out the Reasons Behind it!
However, before we look for the solution let’s first know why yours might be missing;
- Uninstalled by Mistake: It is possible that you or someone else accidentally deleted the Calculator app.
- System Updates: Some particular system updates can often cause issues with the Calculator app.
- Damaged/Corrupted Files: Sometimes the built-in apps like the Calculator can be affected by corrupted or damaged system files
- User Account Issues: There can be availability issues with the application due to problems within your user account.
Now that we know some potential reasons behind the issue, let’s move on to the solutions.
Windows Calculator Disappeared? Here’s How to Get it Back
Method 1: Run the Windows App Troubleshooter
This step is only for Windows 10 users –
Step 1: Open Windows Settings and click on the Update & Security option from the left-hand side.
Step 2: Now again from the left-hand side click on the Troubleshoot option.
Step 3: Then from the right-hand side, click on the Run the Troubleshooter option under the Windows Store Apps option.

Step 4: After this, restart your PC and check if the Calculator app is back.
Read Also: How To Fix Windows Update Troubleshooter Not Working
Method 2: Update the Windows
Microsoft regularly releases updates for Windows to fix general issues and bugs on your computer. It is a good practice to check for any updates regularly. Here is how to do it:
In Windows 10 –
Step 1: Open Windows Settings by pressing the Windows + I keys together.
Step 2: Now from the left-hand side, click on the Update and Security option.
Step 3: Then click on the Check for updates button from the right-hand side of the screen.

Step 4: If you find any pending updates there, click on the Download button.
Step 5: Now restart your computer and check whether the Calculator app is back or not.
In Windows 11 –
Step 1: Open Windows Settings by pressing the Windows + I keys together.
Step 2: Now from the left-hand side at the bottom, click on the Windows Update option.

Step 3: Then click on the Check for updates button from the right-hand side of the screen.
Step 4: If you find any pending updates there, click on the Download & Install button.

Step 5: Now restart your computer and check whether the Calculator app is back or not.
After updating any pending OS updates, it is wise to also check the Microsoft Store for any pending updates.
Read Also: How to Automatically Update Windows Drivers in 2024
Method 3: Reset the Calculator Application
If troubleshooting doesn’t fix the issue, try resetting the Calculator app. Here is how to fix the Calculator is not working in Windows 10 issue:
For Windows 10 users –
Step 1: Open Windows Settings by pressing the Windows + I keys together.
Step 2: Now from the bottom left-hand side, click on the Apps option.
Step 3: A list of all apps will appear, find and click on the Calculator app > click on Advanced options.

Step 4: Here you will see a Reset button, click on it.

Step 5: Restart your PC to make the changes you have just done.
For Windows 11 users –
If your Windows 11 calculator not working properly just follow the steps below:
Step 1: Press the Windows key and type the ‘calculator’ in the search bar.
Step 2: Now right-click on the Calculator icon and choose App settings.

Step 3: Now you can either choose Reset or Repair the Calculator app.

Method 4: Reinstall the Calculator App Using Windows Powershell
The steps included in this method will remain the same in both Windows 10 and 11 computers. So, let’s find out how to get back the Windows 11/10 Calculator app –
Step 1: Click on the Windows key and type Windows Powershell. Now click on Run as Administrator to open the app.

Step 2: Now, type this exact command and press the Enter key: get-appxpackage *Microsoft.WindowsCalculator* | remove-appxpackage

Step 3: Now go to the Microsoft Store and search for the Windows Calculator app. Click on the Download button.
Step 4: Once the installation is finished, run the Calculator app and see if there are any hiccups or not.
Read Also: Difference Between PowerShell & CMD in Windows 10
Method 5: Perform SFC Scan
Step 1: Click on the Windows key and type the command prompt. Now click on Run as Administrator to open the app.

Step 2: Now, type this exact command and press the Enter key: sfc /scannow

It will now check for any damaged or corrupted files related to your system apps and repair or replace them.
Read Also: How to Search & Open Files in Windows 10 With Command Prompt
Method 6: Pin it to Your Taskbar
Step 1: Press the Windows key and type the ‘calculator’ in the search bar.
Step 2: Now right-click on the Calculator icon and choose Pin to taskbar.

Read Also: How To Fix Windows 11 Taskbar Not Working?
Conclusion
So, this is how you can get your Calculator app back on Windows 10 and 11 computers. We hope this guide has helped you to fix the Calculator missing in Windows 10 and 11 problems.
If you do find this guide helpful, share it with your friends who are also facing the same issue. And if you have any other method or fix that we might have missed, let us know in the comments below.
Quick Reaction:
Microsoft has replaced most of its legacy apps with modern apps in Windows 10 and Windows 11. This includes the Calculator app. Sometimes the Calculator app goes missing or is mistakenly uninstalled from the operating system.
It may also be possible that the files required to run the app are present on your PC, but the app itself doesn’t show up.
In this article, we will discuss how to fix Windows 10 calculator missing or how to install it again using different methods.
Table of Contents
Install Calculator App on Windows
If your computer does not have the Calculator or has accidentally been deleted, there are multiple ways you can fix it. It can be reinstalled, or the current installation can be restored.
From Microsoft Store
You can download and install the application from the Microsoft Store. Note that you must be signed in to your profile using a Microsoft account to install the app.
Follow these steps to install the Calculator app from Microsoft Store:
-
Open the Windows Calculator app page in Microsoft Store and click Get in Store app.

Get in Microsoft Store -
You will now be prompted to open the Microsoft Store app. Click Open Microsoft Store.
Open in Store -
The Store app will now open showing the Windows Calculator page. Click Get to install the app.

Get the Windows Calculator app The app will now begin downloading and installing.
-
When the installation is finalized, click Open.
Open Windows Calculator


The Calculator app should now be installed on your PC.
Using Windows PowerShell
Alternatively, you can also install the Windows Calculator app through Windows PowerShell using a single cmdlet.
Simply run the following cmdlet in an elevated PowerShell instance to install Windows Calculator:
Get-AppXPackage *WindowsCalculator* -AllUsers | Foreach {Add-AppxPackage -DisableDevelopmentMode -Register "$($_.InstallLocation)\AppXManifest.xml"}
After the app is installed, it can be accessed by searching for it from the Start menu or the search box in the taskbar. Alternatively, you can also type in calc in the Run Command box to launch the Windows Calculator app.
However, if this method did not work for you and it shows that the app is already installed but not showing up in your search results, then there are other methods to fix the problem.
Fix Calculator App Not Working
Uninstall and Reinstall Calculator App
Some users have reported that the Windows Calculator has somehow gone missing on their computers. However, upon trying to reinstall it using the method shared above, they are prompted with “The app is already installed.”
This is the perfect example of the installation packages remaining on the system, but the application is either removed or corrupted.
If you are in a similar situation, follow these steps to mitigate the issue and reinstall Windows Calculator:
-
Open Windows PowerShell with elevated privileges and run the following cmdlet:
get-appxpackage *Microsoft.WindowsCalculator* | remove-appxpackage
Uninstall Windows Calculator from PowerShell This will remove all traces of the Calculator app from your PC.
-
Now, run the following cmdlet to reinstall the Windows Calculator app:
Get-AppXPackage *WindowsCalculator* -AllUsers | Foreach {Add-AppxPackage -DisableDevelopmentMode -Register "$($_.InstallLocation)\AppXManifest.xml"}

Once the Calculator app is reinstalled, check to see if you can run it. This method usually solves the issues.
However, if you find that the method has failed, you can try the given solutions discussed below.
Run Windows Store Troubleshooter
The Windows operating system comes with built-in troubleshooters for different components. It also has a combined troubleshooter for all Microsoft Store applications. If you find that the Calculator app is installed but not running, you can run the Windows Store troubleshooter. Here is how:
-
Navigate to the following:
Settings app >> Update & security >> Troubleshoot >> Additional Troubleshooters
-
Here, scroll down and click “Windows Store Apps” to expand it, and then click Run the Troubleshooter.
Run Windows Store applications troubleshooter The troubleshooting wizard will now run. As it does, it will automatically scan and detect any problems with any of the apps.
-
Once this scan is complete (takes only a few seconds), it will recommend some actions to take or perform the less complex actions automatically to mitigate any detected issues. Follow the on-screen instructions and perform the necessary actions to fix the problem.
Once done, close the wizard.

Now check to see if the problem has been solved and if you are able to run the Windows Calculator app.
Check for Updates
The first approach should be to check for any pending updates, both in Windows Updates as well as the Microsoft Store. Any pending updates can cause an application to malfunction.
-
Open Microsoft Store and click on the Pending updates button in the top-right corner of the app.
If you do not see this button, it means your applications are already up to date.
-
Now click on Update all to begin updates for all Microsoft applications on your computer.

Install Store updates

Once all the applications have been updated, including Windows Calculator, relaunch the application and check if the error is resolved.
Run the System File Checker (SFC)
The System File Checker (SFC) is a preinstalled Command Prompt tool in Windows that attempts to repair corrupted system files by replacing them with redundant files. However, this also requires that the system image is healthy, so it can perform a successful repair.
SFC is a mechanism of the Windows File Protection feature.
Simply run the following cmdlet in an elevated Command Prompt and the tool will do the rest:
sfc /scannow
The command will take a while to execute completely. When done, recheck if the Windows Calculator is functional now.
Reset the Windows Calculator App
If the method above did not work for you, try resetting the Calculator app. This will bring the app back to its default state.
-
Navigate to the following:
Settings app >> Apps
-
Here, search for “calculator” in the text field.
Search for Calculator -
Now click on the Calculator app below and then click Advanced Options.
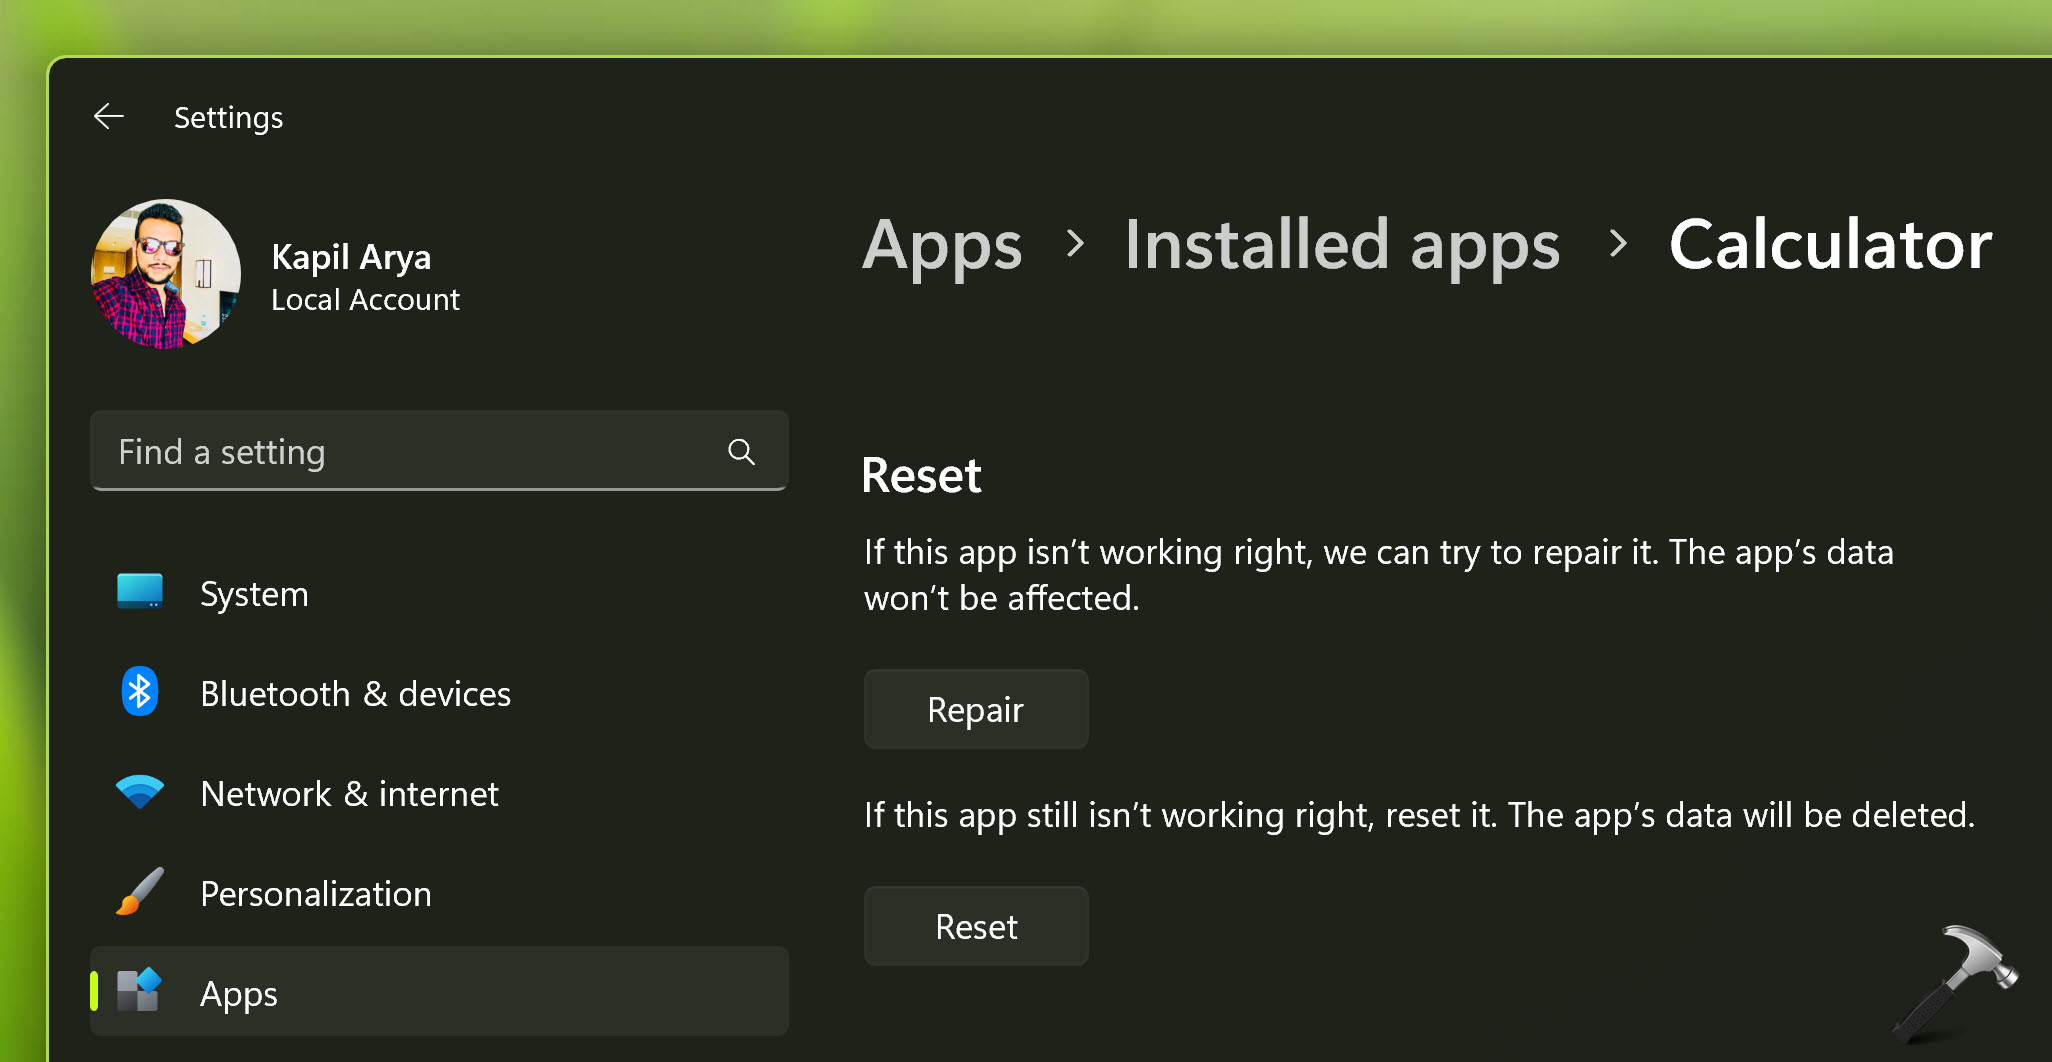
Open advanced Calculator options -
On the next screen, scroll down and click Reset.
Reset the Calculator app -
When asked for confirmation, click Reset again.
Confirm reset The app will now reset to its default settings, removing all data and cache.


After the Windows Calculator app has reset, check to see if you are able to run it.
Update Windows OS
If none of these solutions have worked so far, then try updating your Windows 10 operating system through Windows Updates, since Microsoft often publishes app updates through the Windows Update as well.
Install any pending updates using these steps:
-
Navigate to the following
Settings app >> Update & Security >> Windows Update
-
Now click Check for updates.
Check for pending updates -
If any updates show up, we suggest that you install them.
-
Once installed, restart the computer and check to see if it resolved the Windows Calculator app problem.

The given solutions ought to fix any issues with the Calculator app. Let us now move on to other useful tips for the app.
Create Shortcut and Assign Shortcut Keys to Calculator App
Using shortcut keys to perform simple tasks has always been our favorite in Windows 10. However, by default, there are no shortcut keys assigned to the Windows Calculator app. We can assign a combination of keys using which we can open the Calculator app from anywhere.
The method shared below will create a Calculator shortcut on your desktop and assign shortcut keys to it.
-
Right-click on a blank space on the desktop, expand New from the context menu, and then click Shortcut.

Create new shortcut -
Now enter the following path in the location text field inside the Create Shortcut wizard, and then click Next.
C:\Windows\System32\calc.exe

Enter path to Calculator app -
On the next screen, enter a name for the shortcut and click Finish.
Assign a name to the shortcut -
You will now see a Calculator icon on your desktop. Right-click it and then click Properties from the context menu.
Open shortcut properties -
In the Properties window, click on the text field in front of the Shortcut Key under the Shortcut tab, and then press the shortcut keys which you wish to set.
In this example, we have set it to set Ctrl + Shift + C.
Assign shortcut keys When done, click Apply and Ok.


Now you can access the Windows Calculator simply by pressing the shortcut keys from anywhere within Windows, or through the shortcut icon on your desktop.
What Windows Calculator Offers
Unlike our physical calculators, the Windows Calculator consists of various other features that can be used for the user’s convenience. Let us see what some of these handy features are.
Upon launching the application, you will see a window such as the one shown below.
Apart from the basic calculations which can be performed from the keypad, the top bar consists of various features.
You can check the old calculations performed by clicking the clock-like icon on the top-right, or clicking on the middle button to keep the calculator always on top of other applications.
The Standard indicates that the calculator is currently in Standard mode, which can be changed by clicking on the three bars left of it.
Upon clicking the three bars, you are presented with a list of options to choose from. The calculator can be converted into the Scientific mode for more complex calculations, or into Graphical mode to plot graphs from equations. The Programmer mode can be used to convert values between decimals, hexadecimal, octanes, or binary.
Going further down the menu, the calculator also offers a range of different conversions for instant results.
These features indicate that this application can be extremely useful even when performing daily regular tasks.
If you do not like the Windows Calculator app, you can try these alternatives instead.
Closing words
The Windows Calculator is a handy application when it comes to solving complex mathematical equations and conversions. Rather than switching between devices for calculations, Microsoft offers a list of features within its application.
Windows Calculator can also be added to hotkeys for quick access from anywhere within Windows. If the application is missing or malfunctioning on your device, this article offers various fixes on different levels for you to troubleshoot.
How often do you use the calculator on your computer?
Windows 11 calculator is creating many problems such as the app surprisingly crashes, opens then immediately closes, or not performs as expected. Some people complain that the built-in Microsoft Store application does not work after they have received an update. Don’t worry, this post covers the methods for how to fix all calculator issues in windows 11 Laptop/PC.
Commonly, Calculator not working in Windows 11 occurs because of a buggy update your system might have installed recently. Furthermore, corrupted system files, incorrect registry entry, user account, Windows Firewall may also be reasons for the problem. Sometimes, a simple trick works like a wonder to fix the calculator app; we will also put this forward in the following part.
How to Fix Calculator not working in Windows 11
Here is how to fix Calculator not working in Windows 11 –
Way-1: Update Calculator
Windows calculator is a simple app yet pretty much useful in Standard, Scientific, Graphing, or programmer mode. The program often receives updates being a Store app. Calculator not working in Windows 11 may occur if you don’t update the app. In order to fix this issue, try to update calculator app from Microsoft Store. Follow the below guidelines –
- Click the Start icon in the Taskbar.
- When the Start menu opens, click Microsoft Store icon.
- Once on the Store app, click the lined Library on the left pane.
- Click – Get updates.
- In a while, downloading and installing the update for the Calculator app will be completed.
- Now open Windows Calculator from the list in the Store library. You can also open from Start.
- Check if it is running normally now.
Way-2: Remove problematic Windows Update
Many times, you may notice Windows 11 calculator not working after update issue. This problem occurs mostly because of bugs. The Tech giant delivers updates for the operating system quite regularly with modifications, security improvements, and built-in tools. Some of these updates might not support a few programs including Windows calculator.
Windows 11 has an easier method to uninstall a troublesome patch without making even the slightest change to the machine. Therefore, in order to fix calculator not working in Windows 11 issue follow the steps –
- Press – Windows+R.
- Type appwiz.cpl in the Run dialog box.
- Press Enter key to open up Program and Features window.
- From the left side pane, click View installed updates link.
- Look for the last installed patch and right-click on it.
- Select “Uninstall”.
- Click Yes from the pop-up again.
Way-3: Run Store app troubleshooter
Calculator is a default Store app in Windows 11 and it comes pre-installed in the system. For such programs, running Store troubleshooter will be the easiest solution to fix this glitch.
Windows 11 has a bunch of necessary tools and troubleshooters to fix an issue using built-in resources. However, we will now run the Microsoft Store app troubleshooter to fix the calculator issue. Follow the below steps to accomplish this task –
- Press Windows key and I at once.
- From the Settings app, select System located on the left.
- On the right, click – Troubleshoot.
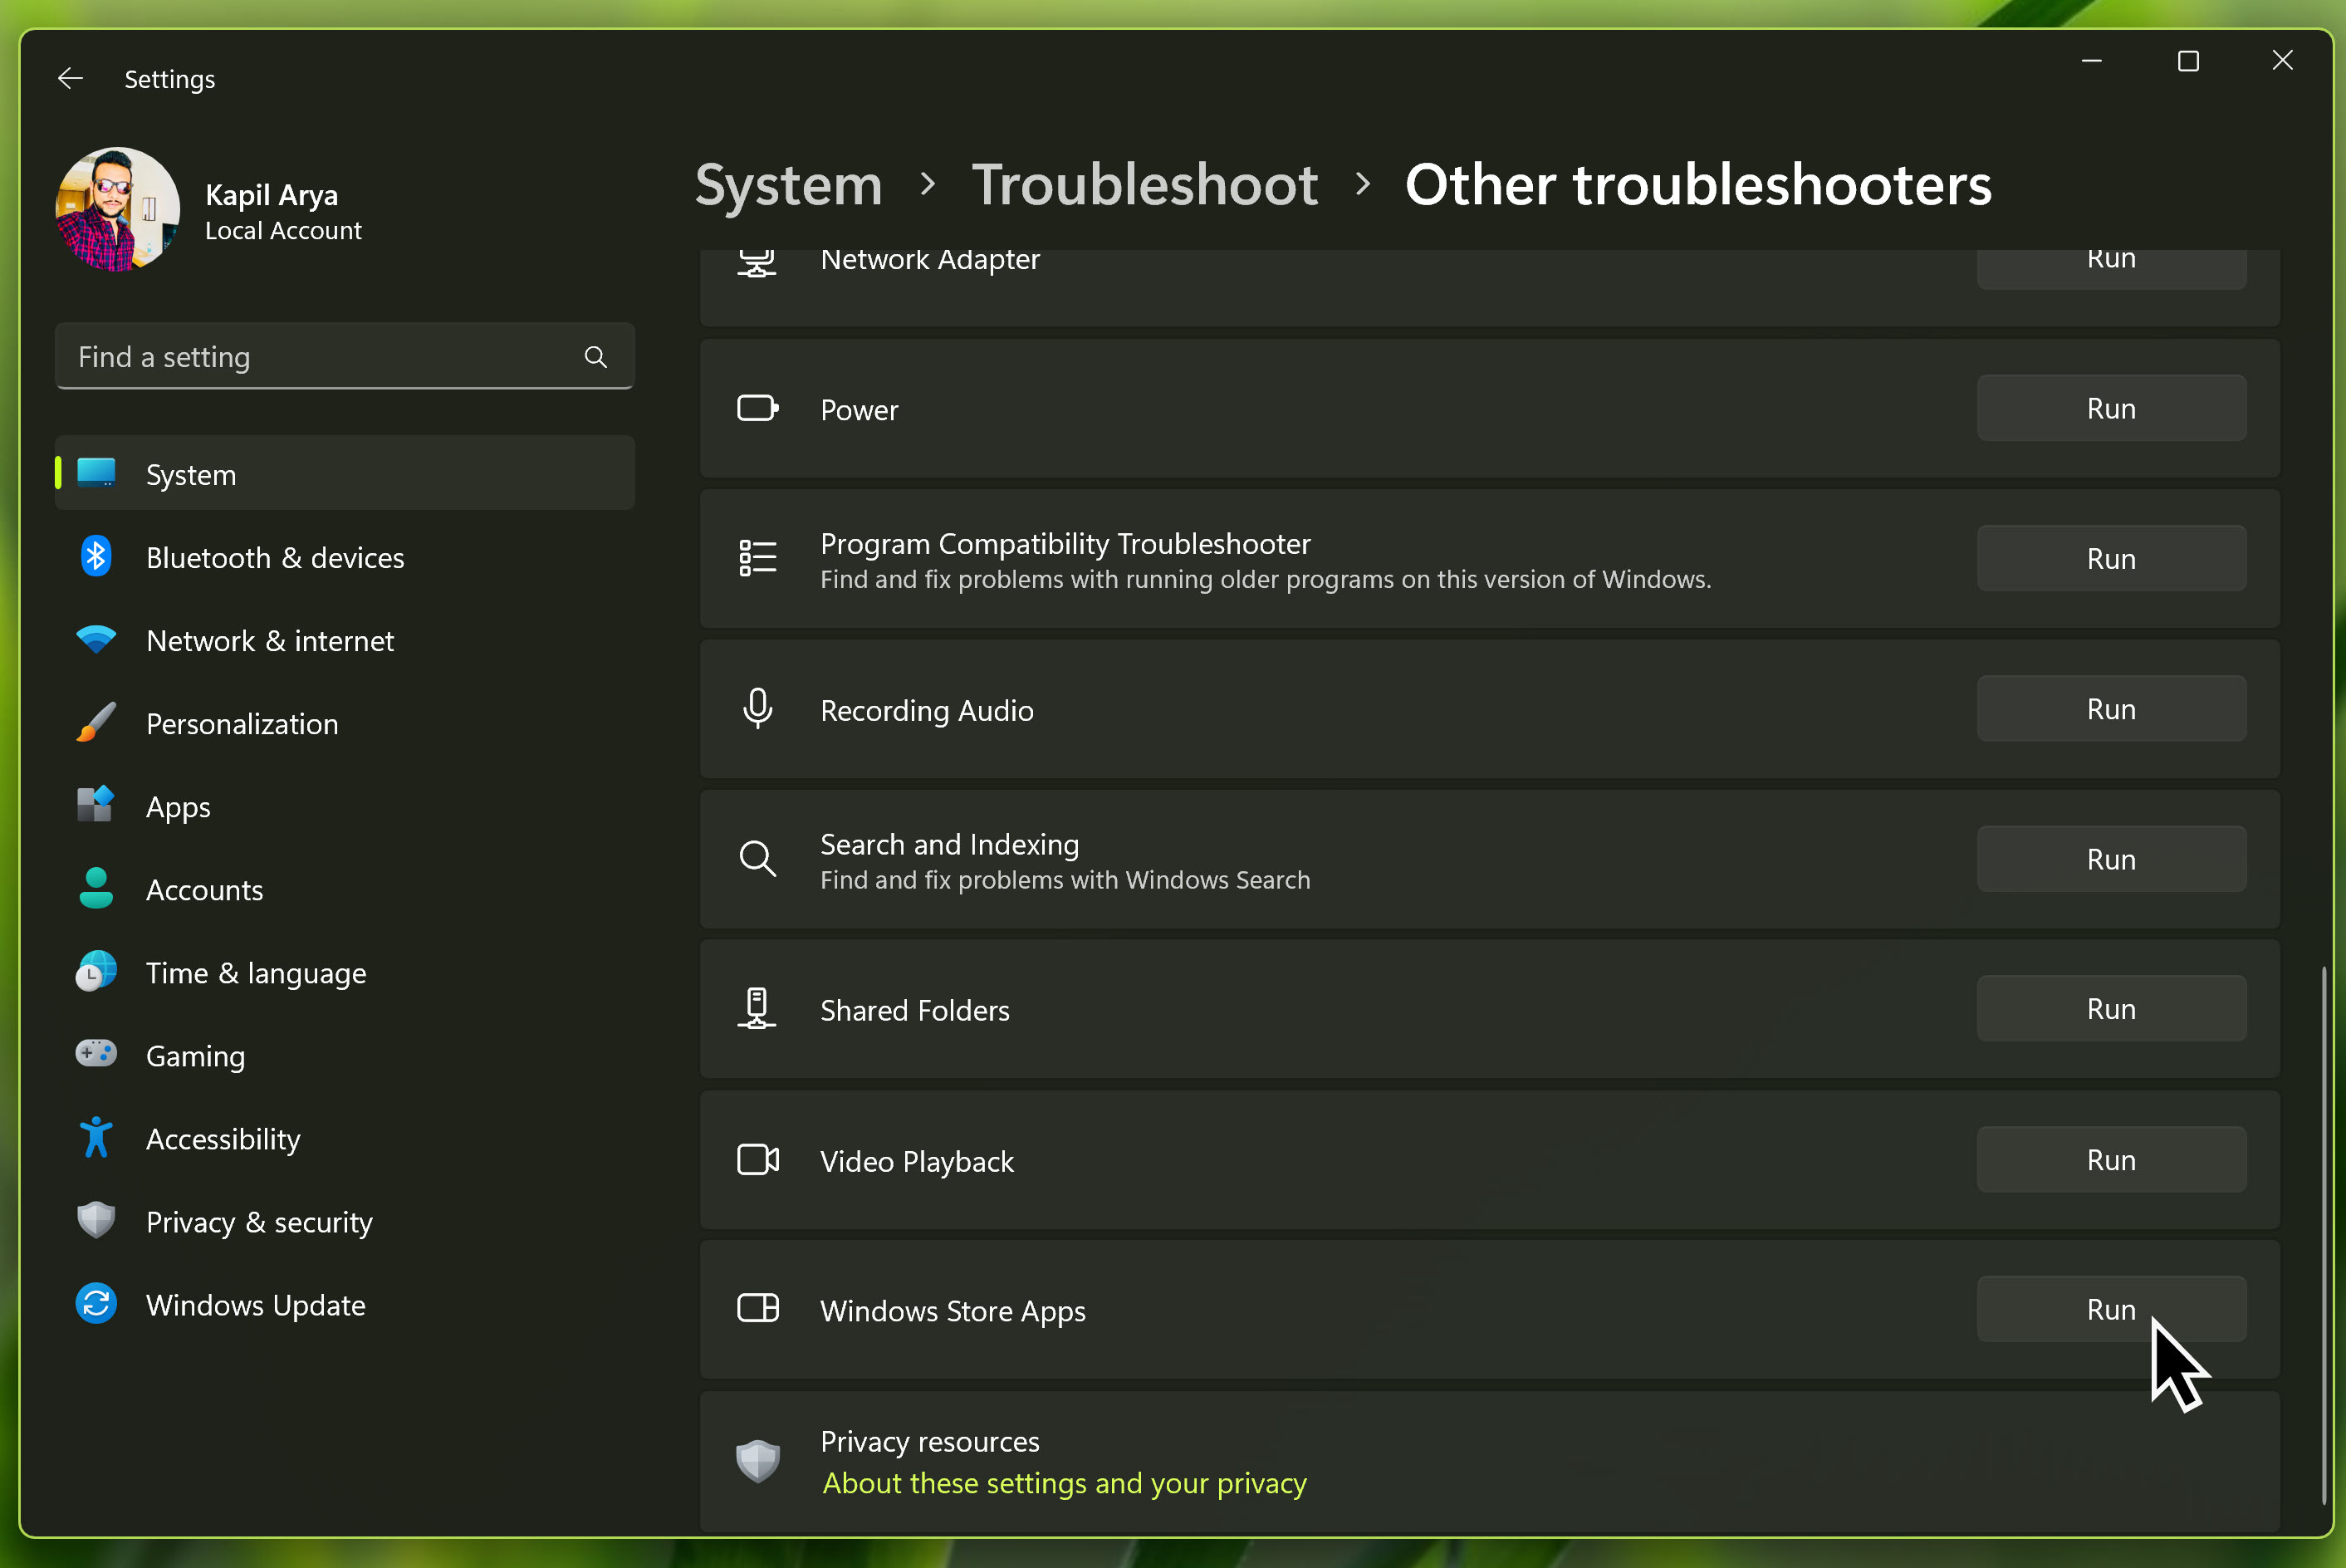
- Upon opening the additional settings page, click – Other troubleshooters.
- Go down to Others section on the following page and find Windows Store Apps.
- Click on Run.
- The troubleshooter will start detecting trouble and will fix it automatically.
- Check if the Calculator issue doesn’t persist.
Way-4: End the RuntimeBroker.exe Process to fix Windows 11 Calculator problem
Oftentimes, a few applications don’t run in Windows because some of the background processes don’t allow them to start. RuntimeBroker.exe is one such process that may prevent Calculator app from opening and you get the not working issue in the end.
In order to fix this trouble, you have to end this process immediately after coming across.
- Press Ctrl + Shift + Esc.
- When the Task Manager opens, find the – Runtime Broker.
- Right click on the process and select End task.
- After the process is ended, try reopening the Calculator app and check if it behaves in good way.
Way-5: Reset Calculator app
Windows 11 has a specialized feature to reset an app and this is advantageous when it is causing trouble in opening or operation. If you are having issues with the calculator app, try resetting it.
Windows 11 calculator settings will back to the original state after you reset it. To perform this task, follow the below instructions –
- Click the – Start.
- On the Start menu and click Gear icon which indicates Settings.
- When the Settings app opens, click Apps from left side pane.
- Click Apps & features from the right.
- In the Search bar under App list, type calculator.
- Click on three-dotted menu when the app appears.
- Choose Advanced options from the context.
- After being guided to the next page, move down to the “Reset” area.
- Click Reset.
- Again select the ‘Reset’ when asked in the popup.
- Restart the Window 11.
- Check if the calculator is working without a problem now.
Way-6: Reinstall Calculator app
Reinstalling the application is yet another great idea to fix calculator not working in Windows 11 issue. In the above workaround, you have performed resetting the Windows app which actually deletes all the user data and makes it like it was never been used. In case that resolution fails to fix the malfunction of the program, you can always uninstall it. Later on, install the same from Microsoft Store to start it afresh in the system.
To re-install an application in Windows 11, here are the guidelines –
- Open Settings.
- Click – Apps.
- From the right pane, click – Apps & features.
- When on the next page find – Calculator.
- Click on the 3-dots menu.
- Select – Uninstall.
- Confirm the selection by clicking “Uninstall” on popup.
- Once the process ends, Restart Windows 11.
- Calculator Windows 11 download and install from Microsoft Store.
Furthermore, you can see How to Get Offline Installer for Store App in Windows 10 to download Windows calculator manually and install it.
Way-7: Windows 11 calculator registry fix
If you are having calculator not working in Windows 11 issue, try deleting certain keys in Windows Registry. For that, follow the below guidelines –
- Press – Windows.
- Type – regedit.
- Hit – Enter.
- Navigate to the below path –
HKEY_LOCAL_MACHINE\SOFTWARE\Microsoft\Windows\CurrentVersion\AppModel\StateChange\PackageList- Expand the PackageList path and delete all the keys under it.
- Restart your computer calculator issue will no longer occur.
Way-8: Create a local account
Sometimes, calculator not working in Windows 11 when logging in with administrator account. If the issue occurs just after starting a new computer, it might be a problem related to User Account. In order to fix this trouble, you to add a local account and log into it.
- Press Window + X.
- Choose Settings.
- Select Accounts from the left column.
- Move to the right-hand side and click Family & other users.
- Click Add account present for Add other user.
- In the next prompt, select – I don’t have this person’s sign-in information.
- On the next pop up, click on – Add a user without a Microsoft account.
- Follow further on-screen instructions to complete the process.
- Once done, reboot Windows 11.
- When the system powers up, login with the new user account.
Way-9: Enable User Account Control
User Account Control aka UAC in Windows 11 is a basic component in order to control overall security in the machine. Commonly, the functionality is enabled by default in Windows. Before making any changes to the computer, a popup arises asking permission from the admin to proceed. This is annoying often especially when you are in a hurry to complete a task on Windows. Therefore, some users disable the security feature for the time being and forgot to turn back On.
However, Calculator issue in Windows 11 can also happen in your system if the UAC is not enabled. Therefore, enable this by following below steps –
- Press – Windows key
- Type control panel.
- Hit – Enter.
- From the Control panel, click User Accounts.
- From the following window, click the Change User Account Control settings link.
- When a popup opens, move the slider to Always notify.
- Click Ok from below.
- When UAC prompts for permission, click Yes to proceed.
- Open the Calculator app now and check if it is working well.
Way-10: Check for Windows Update to fix Windows 11 calculator problem
Windows Update is an essential task in Operating System to keep it running smoothly and in healthy condition. On the contrary, outdated Operating System renders a lot of troubles, causes unexpected lags and malfunction in the programs. It may too happen that, Calculator not working in Windows 11 is occurring as you haven’t installed the pending updates.
Therefore, carry out a check for updates from the Settings app by following the steps –
- Press Windows key and I together.
- In the Settings app, click Windows Update from the left pane.
- Click – Check for updates.
- Windows Will carry out a scan for pending update files.
- Downloading followed by installing the updates will take place automatically.
- Click Restart now once you are asked.
Way-11: Run SFC Scan
System components are very much sensitive and prone to get corrupted by malware infection. Some other reasons like sudden power surge, power outage, Windows updating error make them damaged too. System files may also go missing along with .dll files quite often. In many cases, Windows 11 calculator opens then immediately closes. This crashing might occur because of corruption in system files.
This way you can say that corrupted and missing system files are responsible for calculator problem Windows 11 issue. Running SFC scan will detect the broken components and recover the missing ones. You have to run command line tool in Elevated Command Prompt for performing this scan. Here are the steps –
- Press – Windows key.
- Type – cmd.
- When Command Prompt appears in the result, right-click on it.
- Select – Run as Administrator.
- Click – Yes after the UAC pops out for permission.
- On the Elevated Command Prompt, type –
Sfc /scannow. - Press – Enter.
- Windows will run the System File Checker. At the end of the process, all the missing files will be recovered and fixed.
- Restart Windows 11 once the process ends.
Way-12: Fix Calculator not working in Windows 11 using PowerShell
Reinstalling the Calculator app is one of the most useful fixes we have found out to fix the not working issue. Dissimilar to Way-6, we can also re-install the program using PowerShell commands.
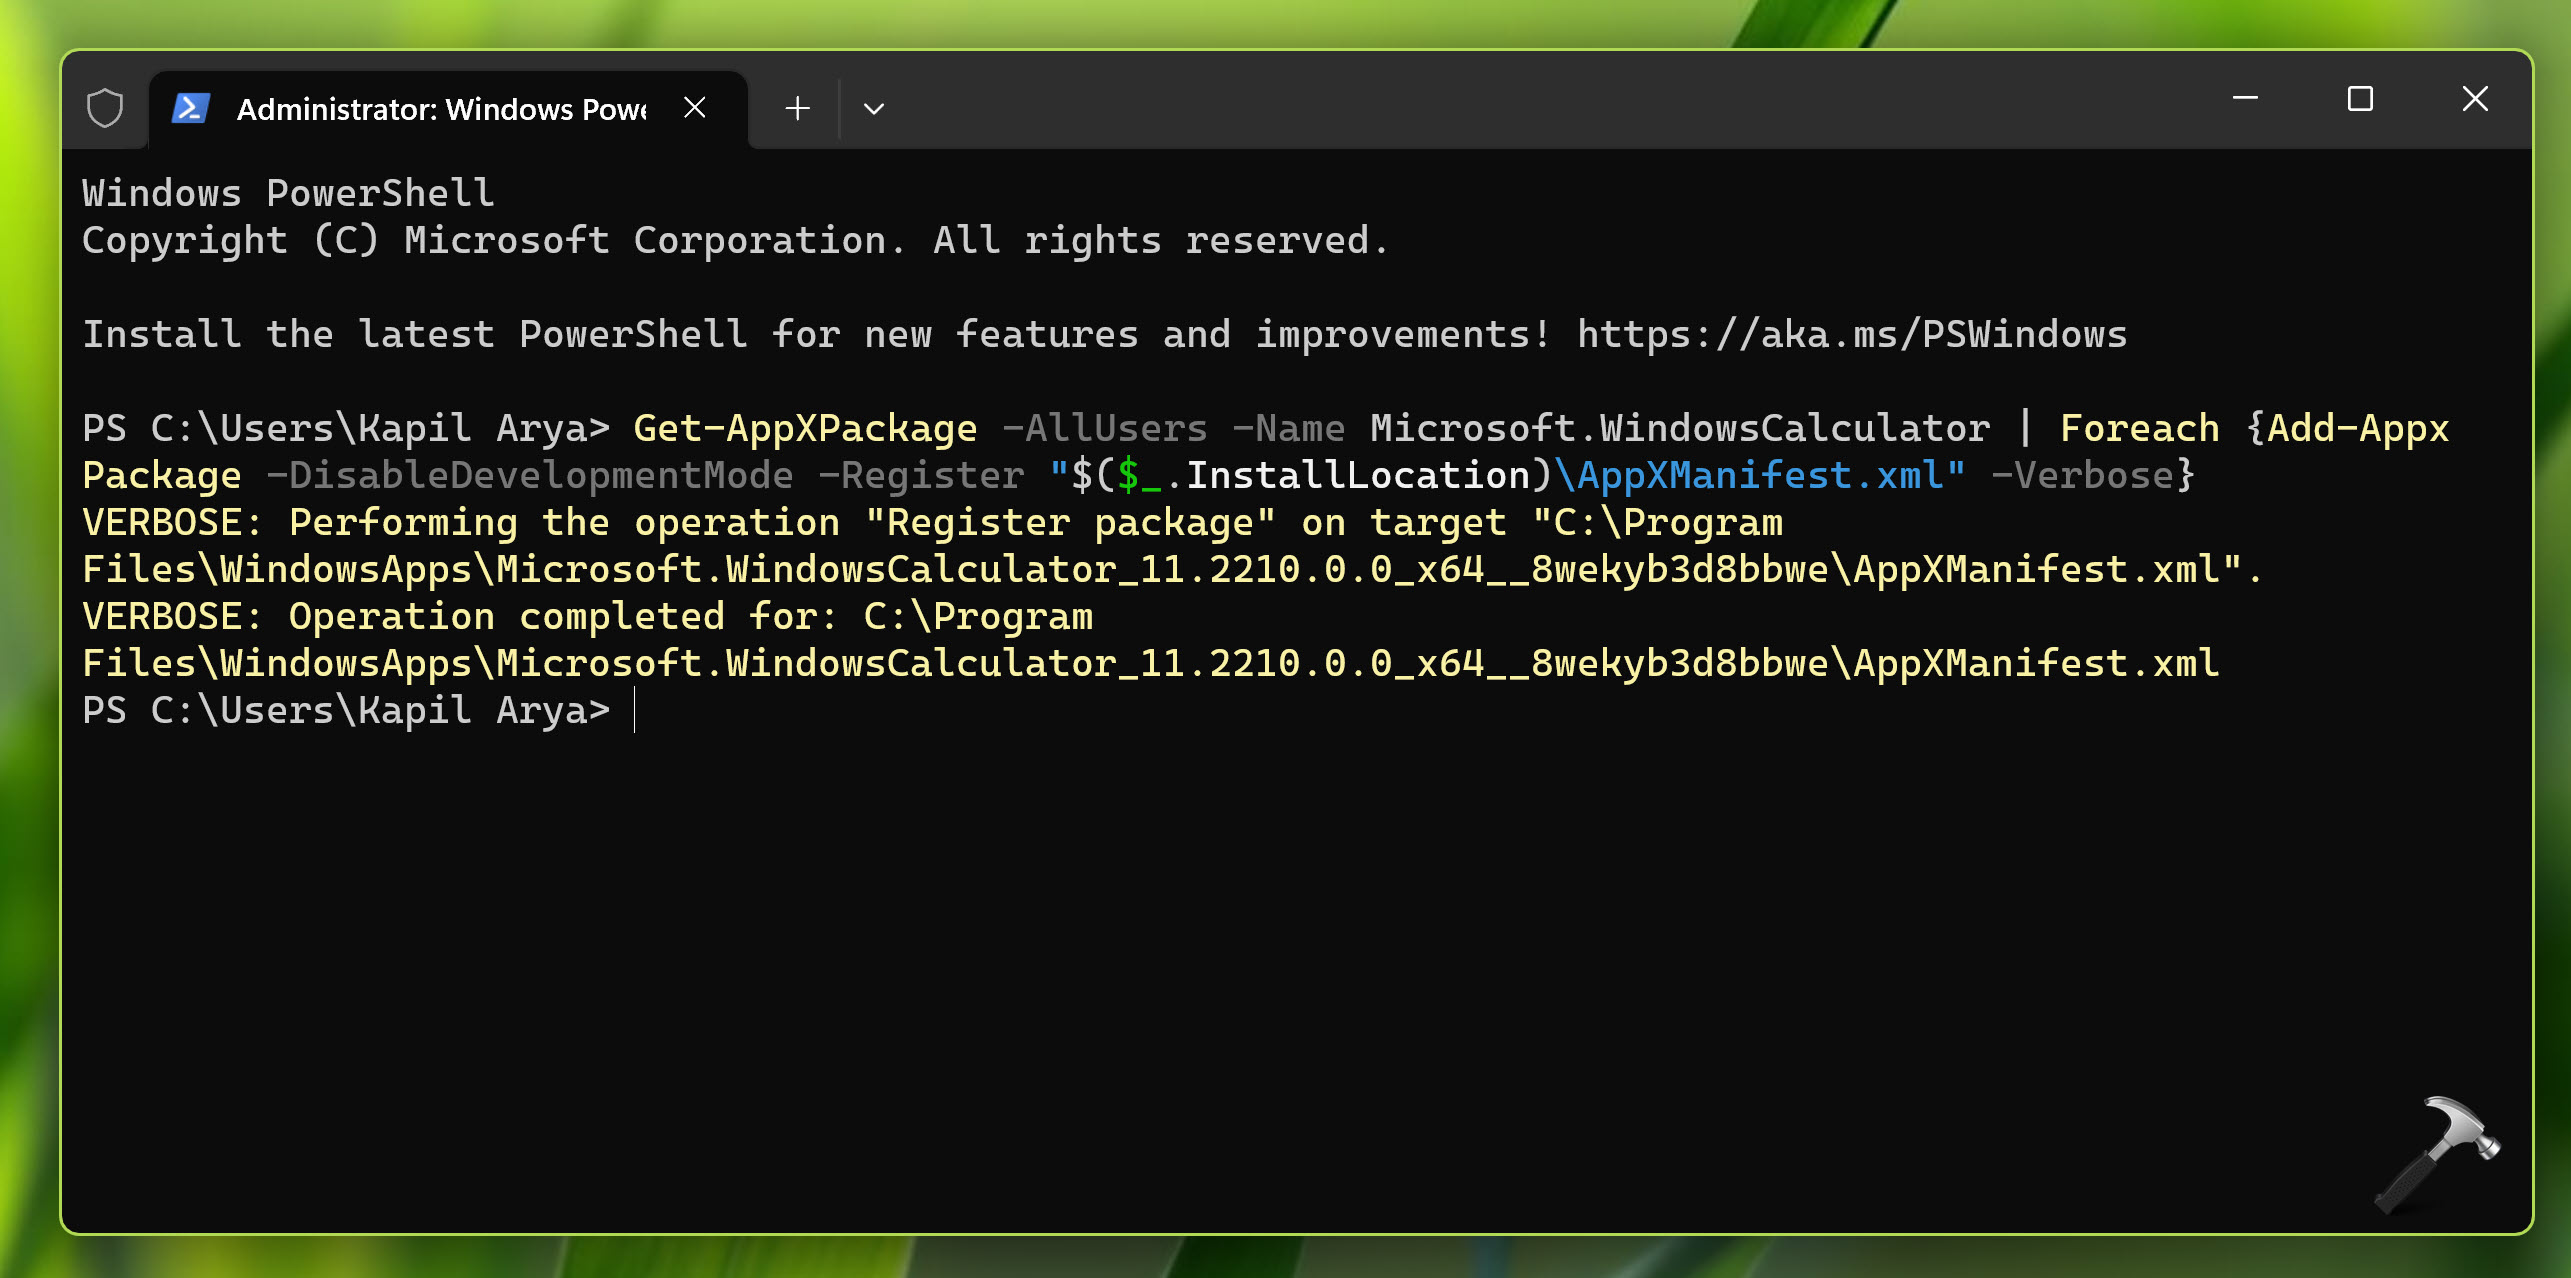
- Right-click on Start.
- Select – Windows Terminal (Admin).
- Click Yes when UAC prompts up for permission.
- When the PowerShell window rolls out, copy-paste the below command –
get-appxpackage *Microsoft.WindowsCalculator* | remove-appxpackage
- Press Enter key and the system will uninstall Windows Calculator app.
- Once the removal ends, Restart Windows.
- Install Calculator app and check if it is working fine.
Way-13: Run DISM scan
We have got to know that missing system components and corrupted Windows files can also cause calculator not working in Windows 11 issue. However, Windows image files are named behind the problem too once these components are found in corrupted condition.
DISM scan stands for Deployment Image Servicing and Management is an administrative tool intended to rectify corrupted Windows image files. We will now try running this tool in order to fix the calculator app error. For that, you have to manage to enter the Elevated Command Prompt first.
- Open Command Prompt as administrator.
- Type in the below command –
DISM /Online /Cleanup-Image /RestoreHealth
- Press – Enter key.
- When the scanning ends, the utility will rectify corrupted Windows image files if detected automatically.
- Restarting the machine and see the condition of the Calculator app.
Way-14: Disable Windows Firewall temporarily
Windows Firewall is a feature built to decontaminate the incoming data to your system from internet. The functionality will block potentially harmful programs and websites if found suspicious. The application has a tendency to preclude most of the apps coming across it unless allowed by the user in a list.
However, Windows Firewall may also block the calculator app suspecting it as harmful. In the end, you will get a calculator not working in Windows 11 issue. Though it is not always recommended to disable Windows Firewall for security reasons, we urge you to do it temporally.
- Press Windows key and R together.
- In the Run dialog box, type control panel.
- Click on the OK.
- Next, click – Windows Defender Firewall.
- When the following page opens up, select – Turn Windows Defender Firewall on or off from the left pane.
- From the next window, click the radio button set for Turn off Windows Defender Firewall (not recommended).
- Click OK to save the changes.
Methods list:
Way-1: Update Calculator
Way-2: Remove problematic Windows Update
Way-3: Run Store app troubleshooter
Way-4: End the RuntimeBroker.exe Process
Way-5: Reset Calculator app
Way-6: Reinstall Calculator app
Way-7: Tweak Windows Registry and delete certain keys
Way-8: Create a new user account and log in
Way-9: Enable User Account Control
Way-10: Check for Windows Update
Way-11: Run SFC Scan
Way-12: Re-install Calculator app using PowerShell
Way-13: Run DISM scan
Way-14: Disable Windows Firewall temporarily
That’s all!!