
If you’re a Windows 10 user, encountering network adapter issues can be frustrating, especially when your adapter goes missing from the Device Manager. This problem often disrupts internet connectivity, making it difficult to perform essential online tasks. Fortunately, there are several effective methods to resolve this issue.
We will walk you through various troubleshooting steps to help you restore your missing network adapter on Windows 10.
8 Methods to Fix Windows 10 Network Adapter Missing
Network adapters are crucial for connecting your PC to the internet, but sometimes, they might disappear due to system glitches, outdated drivers, or other software conflicts. Before diving into more complex solutions, try these straightforward methods to address the missing network adapter issue on Windows 10.
Restart PC and Connection
A simple restart often resolves various system glitches, including a missing network adapter. Restarting your PC resets the system and can refresh network configurations that might have failed to load correctly during the initial boot.
Steps:
- Click on the Start menu and select Power.
- Choose Restart and wait for the system to reboot.
- Check if the network adapter is now visible in the Device Manager.
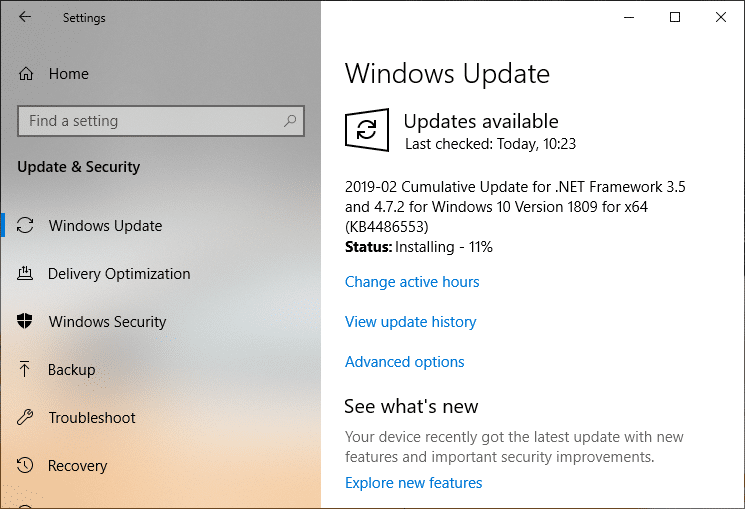
Check for Any Windows Updates
Windows updates often include fixes for bugs and issues that might affect your system’s hardware, including network adapters. Ensuring your system is up-to-date can automatically resolve the missing network adapter problem.
Steps:
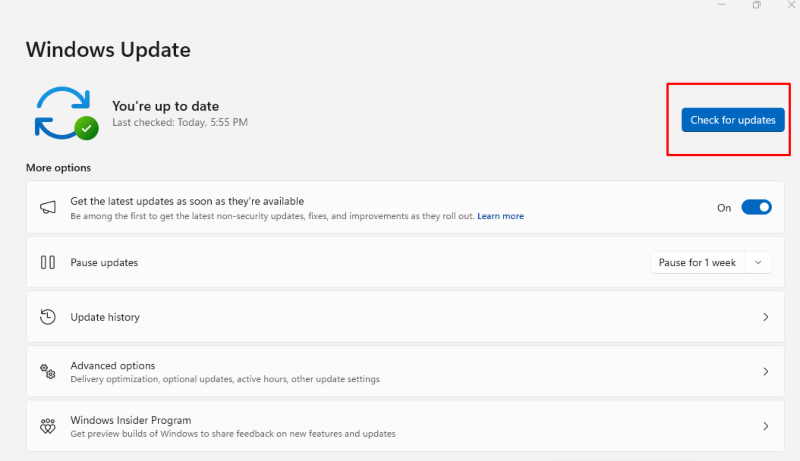
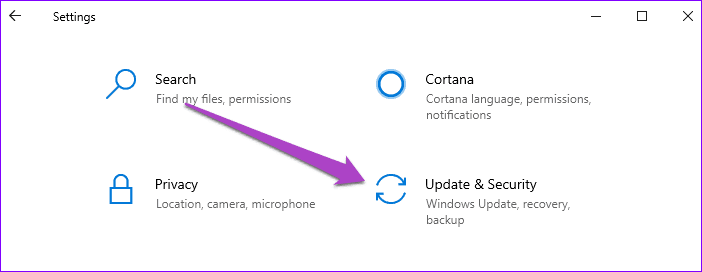
- Go to Settings > Update & Security > Windows Update.
- Click Check for updates and let Windows install any available updates.
- Restart your PC and see if the network adapter appears.
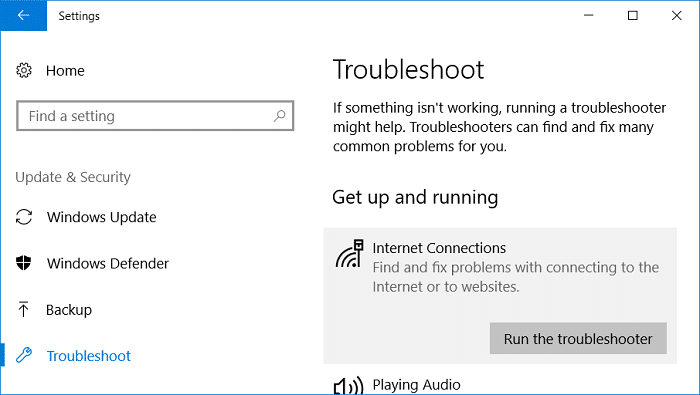
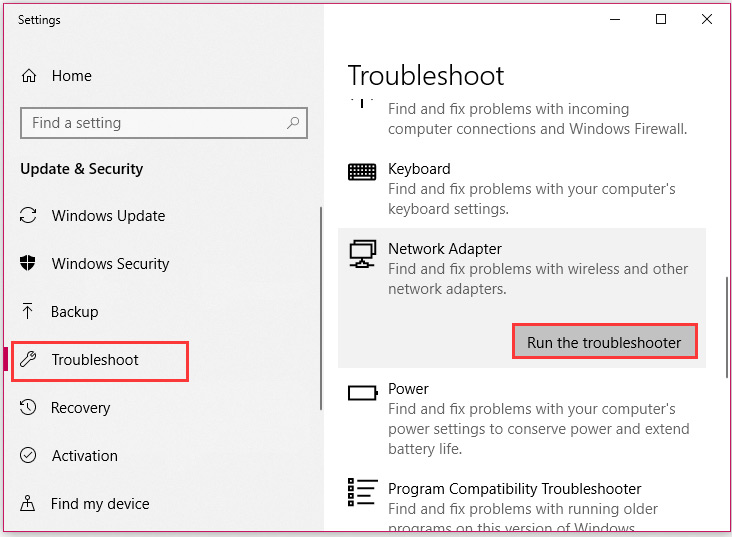
Run Built-in Network Troubleshooter in Windows 10
Windows 10 includes a built-in network troubleshooter that can automatically diagnose and fix network-related issues. This tool can help you identify and resolve problems with your network adapter.
Steps:
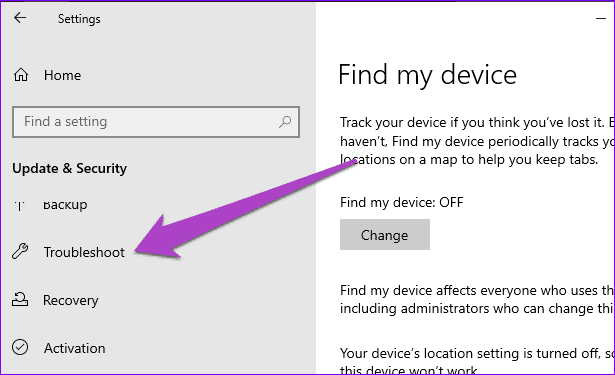
- Open Settings and go to Update & Security.
- Click on Troubleshoot > Additional troubleshooters.
- Select Network Adapter and click Run the troubleshooter.
- Follow the prompts to identify and fix the issue.
Show Hidden Network Adapter in Device Manager
Sometimes, network adapters might be hidden in the Device Manager due to specific settings or conflicts. Showing hidden devices can reveal the missing adapter and allow you to re-enable it.
Steps:
- Press Win + X and select Device Manager.
- Click on View in the menu and choose Show Hidden Devices.
- Look for the network adapter under Network adapters and right-click to Enable it if it’s disabled.
Reset the Winsock Data
Winsock settings can become corrupted and lead to network issues, including a missing adapter. Resetting Winsock data can restore default settings and potentially fix the problem.
Steps:
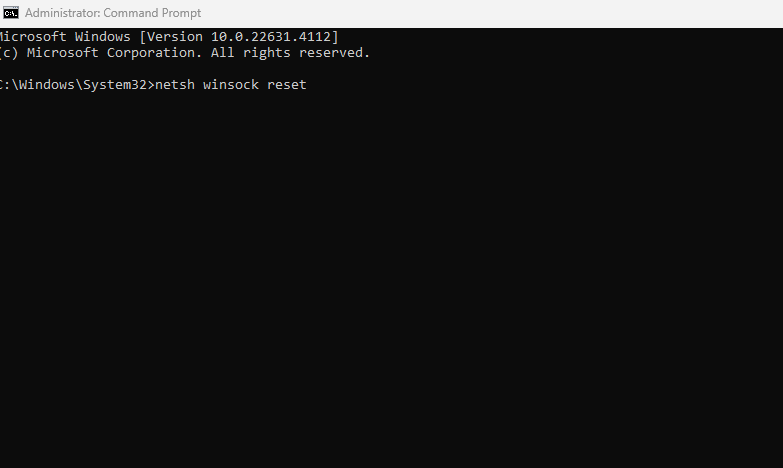
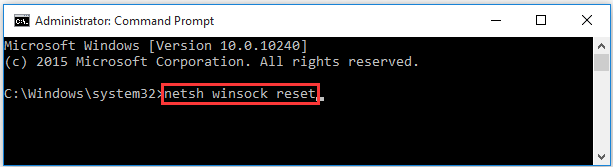
- Type cmd in the Windows search bar, right-click Command Prompt and select Run as administrator.
- In the Command Prompt window, type netsh winsock reset and press Enter.
- Restart your computer to apply the changes.
Uninstall or Rollback the Network Driver
If a recent driver update caused the network adapter to go missing, rolling back or uninstalling the driver can help. This action reinstalls the default driver that was previously working fine.
Steps:
- Open Device Manager and expand Network adapters.
- Right-click the missing network adapter and select Uninstall device.
- Confirm the uninstallation and restart your PC. Windows should reinstall the default driver.
- If the problem started after a driver update, right-click the network adapter, select Properties, go to the Driver tab, and choose Roll Back Driver.
Update the Driver for Wireless Network Adapter
An outdated or corrupted driver could cause the network adapter to disappear. Updating to the latest driver version can resolve compatibility issues and restore the adapter.
Steps:
- Open Device Manager and locate your network adapter under Network Adapters.
- Right-click the adapter and select Update driver.
- Choose Search automatically for updated driver software and follow the prompts.
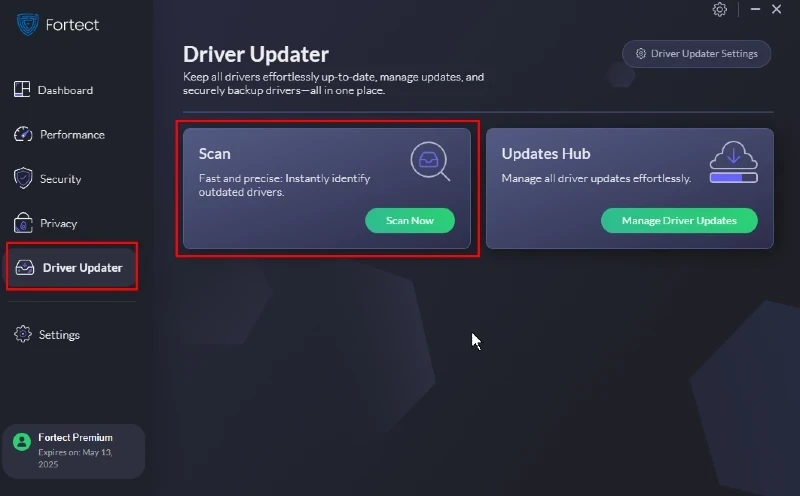
For a hassle-free way to keep your drivers up to date, consider using PC optimization software with a built-in driver updater, such as Fortect. Fortect Premium offers an automated driver updater that scans your Windows PC for all installed drivers, identifies outdated ones, notifies you in real-time, and updates them automatically from a secure source.
Download and install Fortect now.
Perform a System Restore
If all else fails, a system restore can revert your computer to a previous state when the network adapter works correctly. This step should be a last resort if other troubleshooting methods do not work.
Steps:
- Type Create a restore point in the Windows search bar and select it.
- Click on System Restore and follow the prompts to restore your system to a previous date.
- After completing the restoration, check if the network adapter is visible.
Conclusion
Troubleshooting a missing network adapter on Windows 10 can be straightforward if you follow the correct steps. From simple restarts to advanced system restores, these methods cover a range of solutions to address the issue. Remember always to keep your system and drivers updated to prevent such problems in the future.
If you continue to experience issues, it might be worth consulting a professional technician to diagnose the problem further.
Well, if you are seeing that your network adapter missing on your computer, then one of the reasons may be that you are using an older network card driver installed on your computer. But you don’t need to take worry as the fixes are available to solve this problem.
However, if the problem is happening for the first time on your computer then try rebooting it and then discover the network adapter on your computer. Many of us have faced the issue of the mischievous network adapter. Since the adapter is missing then one cannot be able to connect with the internet.
Here are some of the major issues that you will face when it comes to missing Network Adapters on Windows 10:
1: Sometimes Wi-Fi doesn’t show up under the network connections.
2: Network Adapter refuses to get detected or shows not found issue.
3: Wireless Adapter gets missing from the Device Manager.
As such there are many more reasons that why Windows 10 Network Adapter gets missing, but one possible reason for this issue is incompatible or outdated network drivers. Usually, this can happen when you have recently updated your system or your PC is running corrupted programming data.
How to Fix Network Adapter Missing on Windows 10?
In this article, we will discuss some general troubleshooting steps to restore the Network Adapter Missing error on Windows 10. Following these steps, you can efficiently resolve this issue on Windows 10.
Solution 1: Restart your PC to Fix Network Adapter Missing Error:
Follow these steps in order to restart your PC:
1: Firstly, you need to press and hold the power button on the front of the computer.
2: Now, here it will display the three options:
3: Here you will need to click on the Restart option and thus the PC will get restarted.
Solution 2: Update Network Driver to Fix Network Adapter Missing:
In order to update Network Driver settings, you need to follow these given steps:
1: First, you need to open Settings.
2: Now, click Network and Internet.

3: Click on Status.
4: Now, under the “Advanced network Settings” you need to click the Change adapter options link.

5: Next, right-click the Wi-Fi or Ethernet adapter and then select the Enable option.

6: Once you have completed the steps, then the adapter will enable and reconfigure it automatically.
Solution 3 – Activate and Deactivate Network Adapter:
Follow these steps to activate and deactivate the Network adapter:
1: Firstly, you need to open the Settings.
2: Now, select Network and internet and then click on Status.
3: Next, under the “Advanced network settings” on the right, you will need to find the Change adapter options.
4: Next, you need to choose the network adapter or Ethernet port of your Windows PC.
5: Right-click on it and then select Disable.
6: Now, for activation, you need to right-click on the network adapter or Ethernet port and then select Activate.
Solution 4 – Change Adapter Settings:
Follow these steps to change Adapter settings:
1: Open the Windows Settings.
2: Now, select Network and Internet and then click on Ethernet.
3: Next, you need to look for a wireless adapter that is currently working.
4: Right-click on it and then select Properties.

5: Now, search for the internet protocol Version 6.
6: Uncheck IPv6 in order to disable it and then click on Ok.
7: Restart your PC.
Solution 5 – Update your Windows:
To update your Windows 10 look for the following steps:
1: Firstly, select the Start button and then select Settings>Update and Security>Windows update.
2: However, if you want to check for your updates manually, then you need to select Check for updates.

3: Now, select Advanced Options and then under Choose how updates are installed, you need to select Automatic.
Solution 6 – Use Network Troubleshooter:
Refer to these given steps to use Network Troubleshooter:
1: First, you need to open the Windows Settings.
2: Now, go to Update and Security and then select Troubleshoot then click Additional Troubleshooter.

3: Next, click on Internet Connections.
4: Go to the Run The Troubleshooter.

5: Follow the on-screen instructions and let the process finish.
6: Now, Restart your PC.
Solution 7 – Uninstall the Network Adapter:
Refer to these given steps to uninstall the network adapter:
1: First, you need to click the Windows icon in the bottom left corner of the screen and then type Device Manager into the search bar.
2: Here the Device Manager should appear.
3: Now, right-click the Network Adapter and then click Uninstall.

4: Here the program will confirm the uninstallation process.
5: Once it finishes the uninstalling driver then you need to Restart your computer.
Solution 8 – Perform a System Restore:
On Windows 10, the system restore feature is not turned on by default but you must enable it manually using Control Panel. Thus, to enable System restore, you need to use these steps:
1: Open Start.
2: Now, search for Create a restore point and then click the top result to open the System properties page.
3: Next, under the “Protection Settings” you need to select the main “System Drive”.
4: Now, click the configure button.
5: Next, select the Turn on System protection option.
6: Click the Apply button.
7: Next, click the Ok button.

8: Once you completed these steps, then Windows 10 will automatically create a restore point when applying a new update or when the specific system changes have been made.
Solution 9 – Using an Elevated Command Prompt:
Here has been listed some steps to use an Elevated command prompt:
1: First, click Start.
2: In the search box you need to type cmd.
3: Now, you need to right-click cmd.exe and then select Run as Administrator and if it is done properly then the user account control window below opens.

4: Next, click yes to the Windows Command Prompt as Administrator.
Solution 10 – Reset Winsock Component:
To reset the Winsock component, follow these steps carefully:
1: Firstly, you need to type cmd in the Start search box and then right-click cmd.exe
2: Now, click Run as Administrator and then press continue.
3: Next, you need to type netsh winsock reset at the command prompt and then press Enter.
4: Now, type exit and then press Enter.

Solution 11 – Show Hidden Devices in Device Manager:
Perform these following steps to show hidden devices in Device Manager:
1: First, click Start> Run.
2: Type cmd in the text box and then click OK.
3: Type set devmgr_show_nonpresent_devices and press Enter.
4: Now, type cd\ windows\system32 and hit enter.
5: Next, you need to type devmgmt.msc and then hit Enter.
6: When the device manager gets open then you need to click the View menu.
7: Now, click and show the hidden devices.
Solution 12 – Check Power Management Settings:
To check the power management settings, perform these following steps:
1: Firstly, click on Start.
2: Now, click Control Panel.
3: Next, you need to click Power options.

4: Click and change the battery settings.
5: Now, select the power profile you desire.
Solution 13 – Automate WWAN Auto Configuration:
Here is how you can automate WWAN auto-configuration into the following given steps:
1: Firstly, you need to press Windows key + S and then begin type “Services”.
2: Now, click on the services in the search result.
3: In the WWAN Auto-Configuration properties window, you need to check the Service status if it is running.

4: Now, click the drop-down menu next to the option “Startup type “and then select Automatic.
5: Next, click on the Apply button and then press ok to save the changes on your computer.

6: Close Services Window and then Restart your computer.
7: Once you reboot your computer then check if you can discover the missing adapter on your computer.
Solution 14 – Pull computer in Sleep Mode:
In order to make your PC in sleep mode, you need to follow these given steps:
1: First select the Start button.
2: Then select Settings.
3: Now, go to the System and then power and sleep mode.
4: Next, select PC into the safe mode.
Solution 15 – Disable VPN and Antivirus:
Follow these steps to disable VPN and Antivirus settings:
1: First, you need to open the Windows Defender Security Center.

2: Now, go to Virus and Threat protection settings.

3: Next, select Exclusions.
4: Now, select Add or remove exclusions.
5: Finally, select add exclusion and then add your VPN client software.
Solution 16 – Check Physical Network Button:
To check the physical network button, learn these given steps:
1: In the command prompt, you need to type ipconfig and then press Enter key.

2: Here the network address is given as the physical address.
Note: You need to remember that if your computer has more than one network card and wireless network card then you may get the two entries.
Solution 17 – Remove Battery:
To remove the battery in your laptop, learn the following given steps:
1: If you see that your laptop is plugged in, then you need to either unplug it or disconnect it from the power cable.
2: Now, turn your laptop over so the bottom is facing up.
3: Next, you need to locate the battery latch on the bottom of the Laptop.
4: Now, to remove the battery, you need to slide the latch switch to the opposite side and then hold it and open until the battery is released.
5: There are some laptops whose battery pops out its own and on some others; you need to pull the battery out gently with the tip of your fingers.
Solution 18 –Rollback Network Adapter Driver update:
If you see that the network adapter driver was not working well before the recent updates to your driver then it may be the reason that why your network adapter on your computer doesn’t work. Thus, rolling back the last network adapter driver can help in solving the problem that you are facing.
Follow these given steps to rollback the faulty update of your network adapter driver:
1: Firstly, you need to right-click on the Windows icon on the left-side corner of your computer screen.
2: Now, click on Device Manager.
3: Here the Device Manager utility will open.
4: Next, in the Device Manager window, you need to find Network Adapters from the list and then click on it.
5: Now, from the drop-down menu, you need to double click on the driver that you are currently using.
6: Here the Properties windows will get open.

7: Now, in the properties window, visit the Driver Tab.
8: Next, click on Roll Back Driver and then click on Ok.

9: Finally, the driver will be roll-backed.
Solution 19: Troubleshoot network problems:
If none of the steps work then you can troubleshoot the problem with the help of a Windows troubleshooter. However, the troubleshooter will not only detect the problem of your network adapter but will also attempt to fix those problems.
Follow the below-given steps to troubleshoot your network adapter driver problem:
1: Firstly, you need to type the Troubleshoot Network in the search dialog box i.e next to the Windows icon.
2: Now, you need to click on Troubleshoot network.
3: Next, you need to click on network troubleshooter.
4: Here you need to follow the on-screen instructions and this will automatically attempt to fix your problem.
5: Once the process gets completed you need to click on Close.
6: Finally, you need to reboot your computer and then check if you can find your network adapter driver on your computer. You need to also check that whether your problem has been resolved or not.
Solution 20: Restart Network:
Have a look of how you can restart your network:
1: First, open Settings app.
2: Now, select Network and Internet.

3: Next, keep status selected in the left pane.
4: Now, scroll down in the right pane to find and click Network Reset.

5: Click Reset now button and then confirm your selection.
Frequently Asked Questions (FAQ’s)
Q1: How you can fix the missing network adapter?
Ans: Follow these steps to fix the missing network adapter:
1: Firstly, right-click “My Computer” and then click Properties.
2: Now, you need to click the Hardware tab and then click Device Manager.
3: Here you will see a list of installed network adapters and then expand Network adapters.
4: Now, restart the computer and then let the system automatically detect and install network adapter drivers.
Q2: How you can reinstall the Windows network adapter?
Ans: In order to re-install the Windows network adapter, learn the following given steps:
1: Firstly, you need to press Windows Key + X and then select the Device Manager.
2: Now, expand the Network adapter.
3: Next, you need to right-click on the driver and then uninstall it.
4: Now, restart the computer and then check the functionality.
Q3: How you can enable a Network adapter?
Ans: To enable network adapter settings, learn these following given steps:
1: First, you need to open Settings.
2: Now, you need to click on Network and Security.
3: Next, click on Status.
4: Click on Change adapter options.
5: Now, right-click the network adapter and then select the enable option.
Q4: How you can fix wireless adapter windows 10?
Ans: Refer to these given steps to fix wireless adapter windows 10:
1: Press Windows + X and then click on device manager.
2: Now, right-click on the network adapter and then choose Uninstall.
3: Next, you need to click on Delete the driver software for the device.
4: Now, reboot the system and the windows and this will automatically reinstall the drivers.
Q5: How you can install a wireless adapter on a PC?
Ans: In order to install the wireless adapter on PC, learn these given steps:
1: Firstly, you need to insert the adapter onto your computer.
2: Now, right-click the computer and then click Manage.
3: Open, the device manager.
4: Next, you need to pick from a list of device drivers on my computer.
5: Highlight and show all devices and then click Next.
6: Click “Have a disk”.
7: Now, point the inf file into the drive folder and then click open.
8: Click Next.
9: Click and install the driver software.
10: Now, click close.
Q6: How you can fix the wireless adapter problem?
Ans: To fix the wireless adapter problem, try to follow these steps:
1: Firstly, update the wireless drivers.
2: Now, switch to the wired connection.
3: Next, you need to remove the antivirus.
4: Now, delete your wireless profile.
5: Check if your password is correct.
6: Next, you can use some command prompt solutions.
7: Check if your wireless adapter has been disabled or not.
8: Now, change the name and password for your Wi-Fi connection.
Final words
In this article, we have defined all the basic steps in order to resolve the issue of Network Adapter missing. You can go through this article and check the above troubleshooting steps for resolving this problem.
However, if these solutions won’t work accurately then you can contact our experienced team of technicians and get help from them. You can communicate or contact us via chat and we assure you that we try to deliver the best possible solutions to fix this problem. We are available all time so, feel free to contact us.
We have covered the best possible solutions to fix the disabled network adapter. So, if you have any questions or queries regarding this article then feel free to share your doubts via the comment section below. We would love to hear your queries and thanks for being with us.
If you don’t see Wireless Adapter under Network Connections neither there is a Network adapter tab under device manager then it seems like your Network Adapter is missing or not detected on your Windows 10 which is a serious issue because you won’t be able to access the Internet until the issue is resolved. In short, when you click on the Wireless icon on the system tray there won’t be any device listed in order to connect to the Internet and if you open Device Manager then you won’t see the Network Adapter tab.

These are the reasons behind the Network Adapter missing issue:
- Network adapter missing in Device manager
- No Network Adapters showing in Device Manager
- Network Adapter Not Detected
- Network Adapter Not Found Windows 10
- No Network Adapter In Device Manager
The main cause of this issue seems to be outdated, incompatible or corrupted Network Adapter drivers. If you have recently upgraded from previous versions of Windows then it’s possible that the old drivers will not work with the new Windows and hence the issue. So without wasting any time let’s see how to actually Fix Network Adapter Missing in Windows 10 issue with the below-listed troubleshooting steps.
Note: Just make sure to uninstall any VPN software on your PC before continuing.
Table of Contents
Make sure to create a restore point just in case something goes wrong.
Method 1: Reboot your Computer
Most of us know about this very basic trick. Rebooting your computer can sometimes fix any software conflict by giving it a fresh start. So if you are someone who would rather put their computer on sleep, restarting your computer is a good idea.
1. Click on the Start menu and then click on the Power button available at the bottom left corner.

2. Next, click on the Restart option and your computer will restart itself.
After the computer restarts, check if your problem is resolved or not.
Method 2: Flush DNS and Reset Winsock Components
1. Open elevated Command Prompt.
2. Now type the following command and press Enter after each one:
ipconfig /release
ipconfig /flushdns
ipconfig /renew
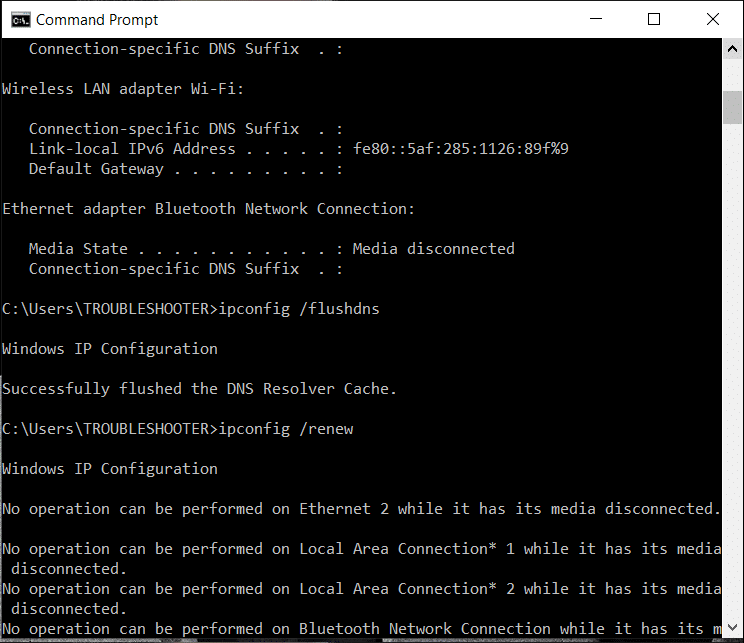
3. Again open Command Prompt and type the following command one by one and hit enter after each one:
ipconfig /flushdns
nbtstat –r
netsh int ip reset
netsh winsock reset


4. Reboot to apply changes. Flushing DNS seems to Fix Network Adapter Driver Issues on Windows 10.
Method 3: Run WWAN AutoConfig Service
1. Press Windows Key + R then type services.msc and hit Enter.
2. Find WWAN AutoConfig Service in the list (press W to reach to the end of the list quickly).
3. Double-click on WWAN AutoConfig Service.

4. If the service is already running then click on Stop, then from the Startup type drop-down select Automatic.

5. Click Apply followed by OK.
6. Right-click on the WWAN AutoConfig Service and select Start.
Method 4: Update Network Adapter Drivers
1. Press Windows key + R and type “devmgmt.msc” in Run dialogue box to open device manager.

2. Expand Network adapters, then right-click on your Wi-Fi controller (for example Broadcom or Intel) and select Update Driver Software.

3. Now select “Search for automatically for updated driver software“.

4. Now Windows will automatically search for the Network driver update and if new update is found, it will automatically download and install it.
5. Once finished, close everything and reboot your PC.
6. If you’re still facing the Network Adapter Missing in Windows 10 issue, then again right-click on your WiFi controller and select Update driver in Device Manager.
7. Now, in the Update Driver Software Windows, select “Browse my computer for driver software.“

8. Now select “Let me pick from a list of available drivers on my computer.“

9. Try to update drivers from the listed versions (make sure to checkmark compatible hardware).
10. If the above didn’t work then go to the manufacturer’s website to update drivers.

11. Download and install the latest driver from the manufacturer’s website then restart your PC.
Method 5: Uninstall Network Adapter Drivers
1. Press Windows Key + R then type “devmgmt.msc” and hit Enter to open Device Manager.
2. Expand Network Adapters and find your network adapter name.
3. Make sure you note down the adapter name just in case something goes wrong.
4. Right-click on your network adapter and uninstall it.

5. It will ask for confirmation select Yes.
6. Restart your PC and Windows will automatically install the network adapter drivers again.
7. If the drivers are not installed automatically then again open the Device Manager.
8. From the Device Manager menu, click on Action then click on “Scan for hardware changes“.

Method 6: Make sure Windows is up to date
1. Press Windows Key + I to open Settings then click on Update & Security.
2. From the left-hand side, menu click on Windows Update.
3. Now click on the “Check for updates” button to check for any available updates.

4. If any updates are pending then click on Download & Install updates.
5. Once the updates are downloaded, install them and your Windows will become up-to-date.
6. After the updates are installed reboot your PC to save changes.
Method 7: Run Network Adapter Troubleshooter
1. Press Windows Key + I to open Settings then click on Update & Security.
2. From the left-hand menu select Troubleshoot.
3. Under Troubleshoot click on Internet Connections and then click Run the troubleshooter.
4. Follow further on-screen instructions to run the troubleshooter.
5. If the above didn’t fix the issue then from the Troubleshoot window, click on Network Adapter and then click on Run the troubleshooter.

5. Reboot your PC to save changes and see if you’re able to fix the Network Adapter Missing issue.
Method 8: Install Intel PROSet/Wireless Software
Sometimes the problem is caused due to outdated Intel PROSet Software, hence updating it seems to fix Network Adapter Missing in Windows 10 issue. Therefore, go here and download the latest version of PROSet/Wireless Software and install it. This is a third party software which manages your WiFi connection instead of Windows and if PROset/Wireless Software is outdated is can cause drivers issue in Wireless Network Adapter. Hence, read How to Update Network Adapter Drivers on Windows 10.
Method 9: Reset Network Connection
1. Press Windows Key + I to open Settings then click on Network & Internet.
2. From the left-hand menu select Status.
3. Now scroll down and click on Network reset at the bottom.

4. Again click on “Reset now” under Network reset section.

5. This will successfully reset your network adapter and once it is complete the system will be restarted.
Method 10: Perform a System Restore
System Restore always works in resolving the error, therefore System Restore can definitely help you in fixing this error. So without wasting any time run system restore in order to resolve Network Adapter Missing issue.

Method 11: Using elevated Command Prompt
1. Press Windows Key + X then select Command Prompt (Admin).
2. Type the following command into cmd and hit Enter:
netcfg –s n

3. This will display a list of networking protocols and in that list find DNI_DNE.
4. If DNI_DNE is listed then type the following command into cmd:
reg delete HKCR\CLSID\{988248f3-a1ad-49bf-9170-676cbbc36ba3} /va /f
netcfg -v -u dni_dne

5. If you don’t see DNI_DNE listed then only run the command netcfg -v -u dni_dne.
6. Now if you receive the error 0x80004002 after trying to run the above command then you need to delete the above key manually.
7. Press Windows Key + R then type regedit and hit Enter.
8. Navigate to the following Registry Key:
HKEY_CLASSES_ROOT\CLSID\{988248f3-a1ad-49bf-9170-676cbbc36ba3}
9. Delete this key and then again type netcfg -v -u dni_dne command in cmd.
10. Reboot your PC to save changes.
Recommended for you:
- Fix Mail, Calendar, and People Apps not working
- How to Fix Chrome err_spdy_protocol_error
- Fix losing internet connection after installing Windows 10
- Fix Working on updates 100% complete Don’t turn off your computer
That’s it you have successfully Fix Network Adapter Missing in Windows 10 but if you still have any questions regarding this post then feel free to ask them in the comment’s section.
-
Home
-
Clone Disk
- Top 5 Methods to Fix Windows 10 Network Adapter Missing
By Ariel | Follow |
Last Updated
Many users report the Windows 10 network adapter missing from the Network Connections. What causes this vexing issue? How to fix it? Now, you can try the following top 5 troubleshooting methods from MiniTool.
Here are 3 major situations below when it comes to the Windows 10 network adapter missing issue:
- Windows 10 Wi-Fi not showing up under Network Connections
- Wireless adapter missing in Device Manager
- Network adapter not detected or not found in Windows 10
Why Windows 10 network adapter missing happen? The outdated or incompatible network drivers are mainly responsible for the problem. In addition, the current system updates or corrupted programming data can also lead to the wireless adapter missing issue.
Many people reported that they fixed the issue by simply restarting the computer. Perhaps you may have a try. If a simple restart fails to work, you can take the following measures.
Method 1. Run Built-in Network Troubleshooter in Windows 10
The network troubleshooter is the most commonly used tool to handle various network issues such as no secured Wi-Fi connection error, IPv6 no network access, wireless adapter missing Windows 10, etc. Here you can follow the guide below to run the troubleshooter.
Step 1. Type troubleshooting in the search box and select the Troubleshoot option from the context menu.
Step 2. In the pop-up window, scroll down the right sidebar to the Network Adapter section, double click it and click on Run the troubleshooter.
Then this tool will detect the issues with the network adapter automatically. You need to wait a moment for this tool to complete this operation. If this method can’t help you fix the Windows 10 wireless adapter missing issue, move on to the next ways.
Method 2. Update the Driver for Wireless Network Adapter
If the network adapter drivers get outdated or corrupted, the wireless adapter missing Windows 10 may also happen. Follow the steps below to update the driver for the wireless network adapter.
Step 1. Right-click the Start menu and select Device Manager from the context menu.
Step 2. Expand the Network adapters section, right-click the wireless adapter (here we take the Intel for example) and select the Update Driver Software option.
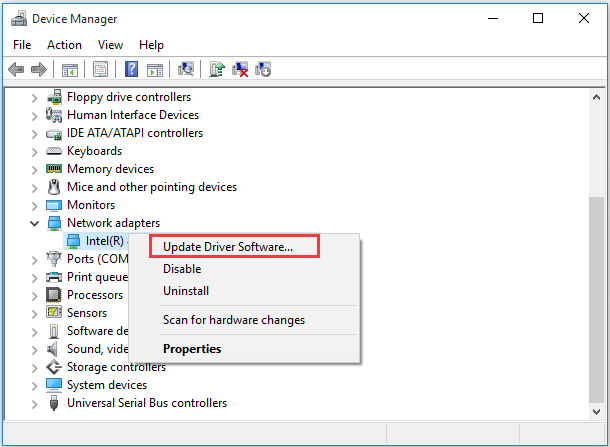
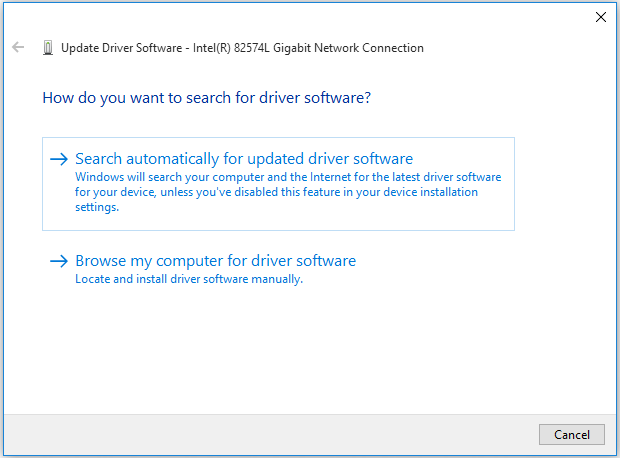
Step 3. In the pop-up window, you can select an update the network adapter driver automatically or manually based on your demands. After selecting the way to update the driver, follow the on-screen prompts to complete the update.
This method should help you fix the outdated network driver issue. If it still fails to resolve the Windows 10 Wi-Fi not showing up issue. Don’t worry. Here are 3 methods to try.
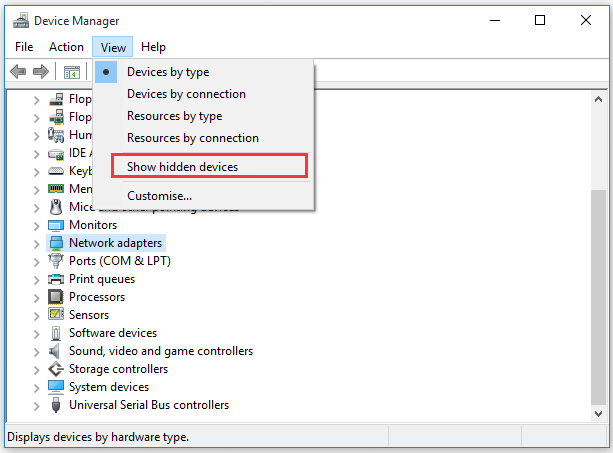
In addition to the above reasons mentioned, the wireless network adapter may be hidden in Device Manager. The hidden devices can also cause the Windows 10 Wi-Fi adapter missing issue. Here’s how to show the hidden devices in Device Manager.
Step 1. Open the Device Manager window, click the View tab on the top and select the Show hidden devices option from the drop-down menu.
Step 2. Then navigate to the Network adapters section, and click the Action on the top and click on Scan for hardware changes option from the drop-down menu.
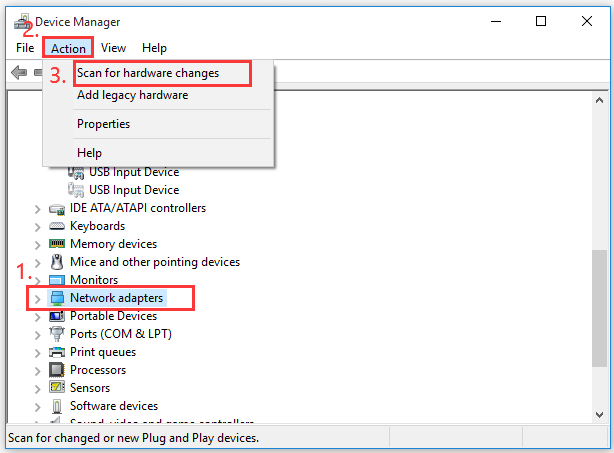
Step 3. Then the hardware changes will be scanned automatically. Once the scan completes, expand the Network adapters and check if the wireless network adapter appears on this list.
If the wireless network adapter not showing up among the list, please continue the following methods.
Method 4. Reset the Winsock Data
Winsock plays an important role in supporting your Windows network software to access network service. It is a supporting program in the Windows operations system as well as a programming interface. Once its data get corrupted, the network issue may occur.
Here you can try resetting the Winsock data to fix the Windows 10 network adapter missing. For that:
Step 1. Press Win + R keys to open the Run dialog box, and then type cmd in it and press the Ctrl + Shift + Enter keys simultaneously to open an elevated command prompt.
Step 2. Type netsh winsock reset command in the elevated command prompt and hit Enter.
Step 3. Restart your computer to take the operation into effect.
After that, you can check if the Windows 10 wireless adapter missing issue still persists.
Method 5. Perform a System Restore
If you find the wireless adapter missing issue just occurs after you install the Windows 10 updates, you can perform a system restore to undo these changes. To restores your Windows system, the system restores point is commonly used. Alternatively, you can use other free tools to restore your system.
To know more detailed steps, you can refer to this post “how to perform s system restore from command prompt”. If there is no system restore point in your Windows system, just click here to get an instruction. After restoring the system, you can check if this issue is fixed.
About The Author
Position: Columnist
Ariel has been working as a highly professional computer-relevant technology editor at MiniTool for many years. She has a strong passion for researching all knowledge related to the computer’s disk, partition, and Windows OS. Up till now, she has finished thousands of articles covering a broad range of topics and helped lots of users fix various problems. She focuses on the fields of disk management, OS backup, and PDF editing and provides her readers with insightful and informative content.
On Windows 10 computers, both wired and wireless connections come with their respective problems. However, compared to Wi-Fi, ethernet connection is a lot more stable and less prone to malfunctions. But the possibility does exist. If your computer’s ethernet connection keeps disconnecting and reconnecting at intervals, we’ve compiled a list of solutions that’ll help put an end to the disruption.
The cause of this network disruption is quite numerous and may vary from device to device. However, we’re certain that at least one of the troubleshooting methods below will work the magic for you. Let’s get to it.
1. Replace Ethernet Cable
If, by chance, your computer has multiple ethernet ports, try the ethernet cable with other ports and see if you get a stable connection. Similarly, you could use a different ethernet cable if you have a spare. Using a broken, damaged, and counterfeit ethernet cable could affect the connection performance. If you suspect that your PC’s ethernet port has gone bad, we recommend using a USB-to-Ethernet adapter.

Additionally, you should also check that the computer’s ethernet port is dirt-free. Alien material like dust, debris, etc. could cause connection interference. One last thing: use the ethernet cable on a different computer. If the connection is stable on the test device, the issue is most likely software-bound. In that case, check out subsequent solutions in the section below.
2. Run Network Troubleshooter
Windows has a built-in tool that automatically diagnoses network-related issues and recommends troubleshooting solutions. If you aren’t making headway with getting a stable Ethernet connection, let the Network Troubleshooter help you find the problem (and solution).
Step 1: Launch the Windows Settings menu and select ‘Update & Security.’
Step 2: Navigate to the Troubleshoot section.
Step 3: Scroll to the ‘Find and fix other problems’ section and click Network Adapter.
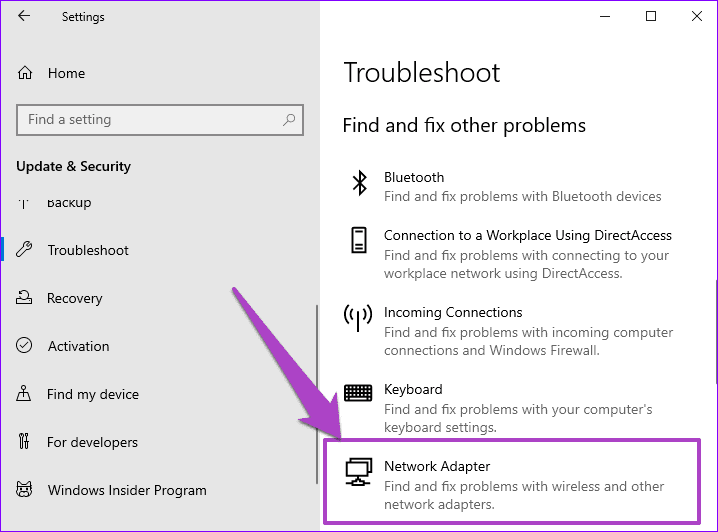
Step 4: Tap the ‘Run the troubleshooter’ button.
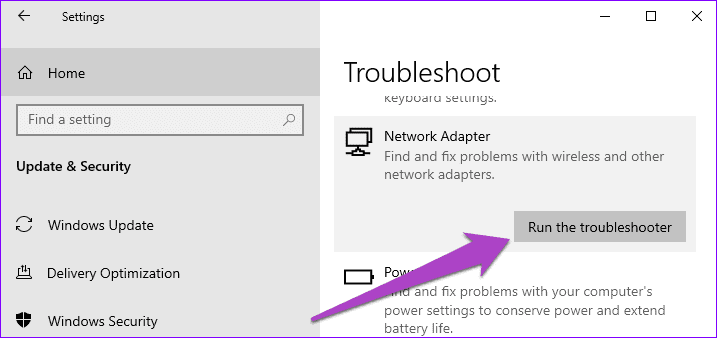
That will launch the Windows Network Adapter troubleshooter and scan your computer for glitches responsible for the faltering ethernet connection.
Note: Make sure the ethernet cable is plugged to your computer before running the Network Adapter troubleshooter. Likewise, ensure that the other end of the ethernet cable is also properly plugged into the router.
Step 5: Select Ethernet from the list of network adapters to diagnose and tap Next to proceed.
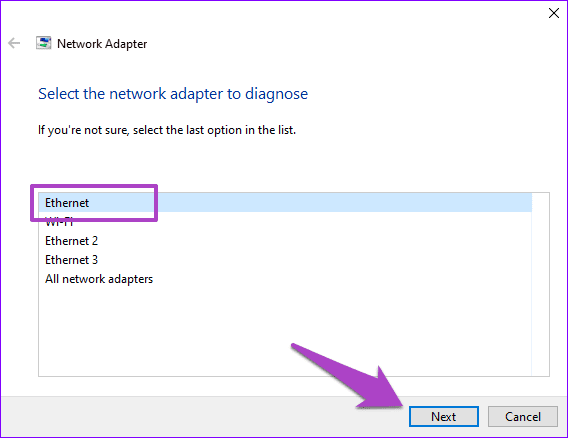
The troubleshooter will diagnose your computer’s ethernet connection (this might take a while) and reveal the problems detected.

Follow the recommended solutions that the troubleshooter proposes, and your ethernet connection should be up and running in no time.
3. Modify Power Management Settings
In a bid to conserve power, your computer could temporarily disable some device functionalities. This is common practice with the Windows OS, particularly on battery-powered laptops. This also happens when Battery Saver is enabled.
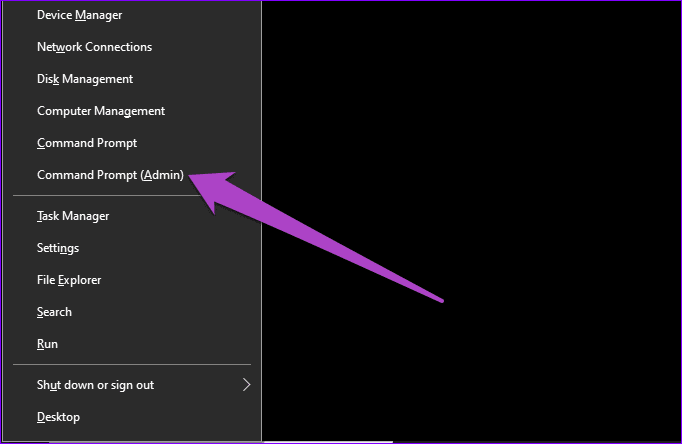
Step 1: Launch the Windows Quick Access Menu (Windows key + X) and select Device Manager.
Step 2: In the Network adapters menu, right-click your PC’s ethernet adapter and select Properties.

Step 3: Navigate to the Power Management tab.
Step 4: Uncheck the ‘Allow the computer to turn off this device to save power’ and tap OK.
Restart your PC and check if the ethernet connection is now stable.
4. Disable Static IP for Ethernet
Using a static/fixed IP address on your PC comes with its benefits. However, having the wrong static IP configuration/information on your ethernet network might result in connection problems. Try disabling static IP for ethernet connections on your computer and see if that helps with this issue.
Step 1: Launch the Settings menu and select ‘Network & Internet.’
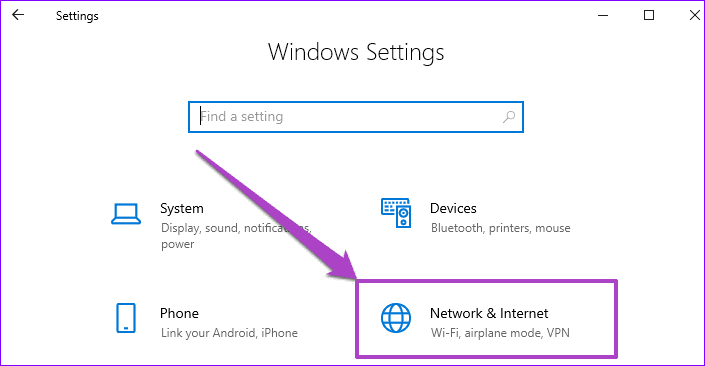
Step 2: Next, go to the Ethernet menu and tap Ethernet.
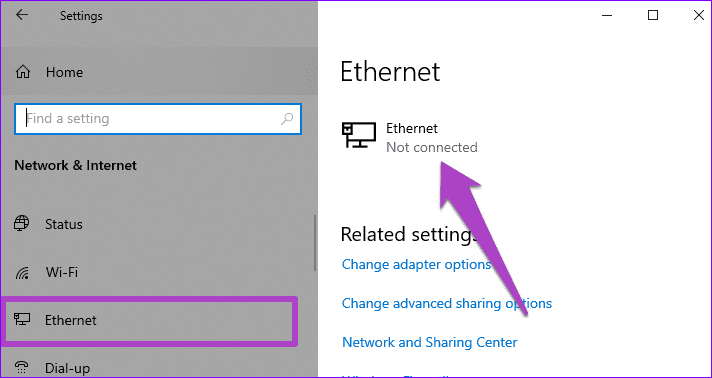
Step 3: Scroll to the IP settings section and make sure the IP assignment is set to Automatic (DHCP).

Step 4: If otherwise (Manual IP assignment), this means you’re using a fixed/static IP address. Tap the Edit button to modify your PC’s ethernet IP configuration.
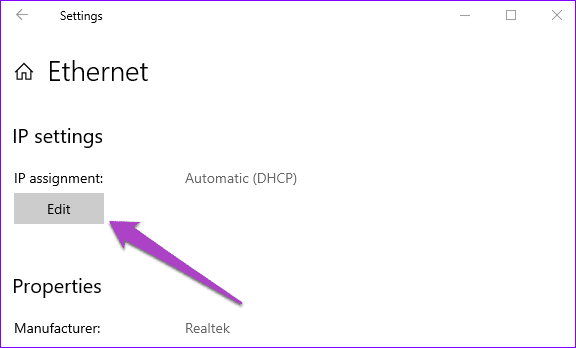
Step 5: Tap the Manual drop-down option.

Step 6: Select Automatic (DHCP) and save the changes.

5. Update Ethernet Driver
You should expect to run into connectivity issues if your ethernet driver is missing, corrupt, or outdated. Follow the steps to update your computer’s ethernet driver.
Step 1: Launch the Windows Quick Access Menu (Windows key + X shortcut) and select Device Manager.

Step 2: In the Network adapters menu, right-click your PC’s ethernet adapter and select Update driver.
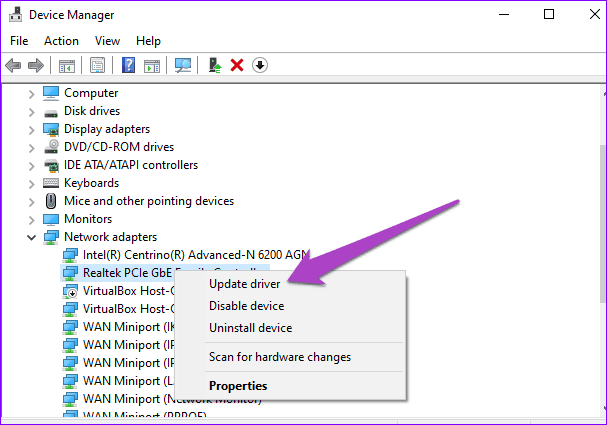
Step 3: Next, select ‘Search automatically for updated driver software.’
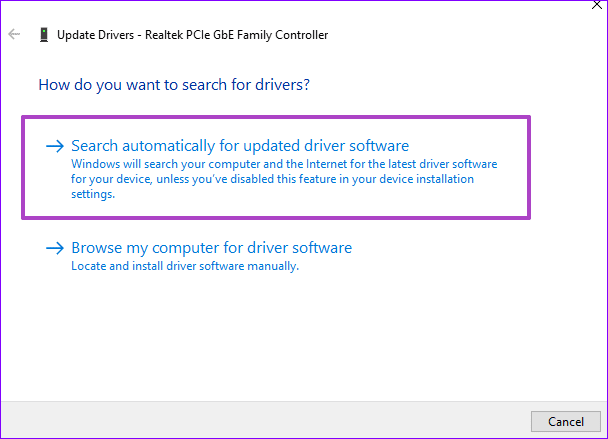
The Device Manager will scan the internet to check if there’s an updated version of your computer’s ethernet adapter. You’ll be prompted to download any available updates found after the scan is completed. Install the new driver, restart your computer and check if the intermittent connection disruption persists when connected to an ethernet cable.
If your ethernet driver is up-to-date or the issue persists even with the updated driver, try the next troubleshooting solution
6. Disable LAN Proxy Settings
Step 1: Launch the Run dialog box (Windows key + R), enter inetcpl.cpl into the dialog box and click OK.
Step 2: Navigate to the Connections section and click LAN settings.
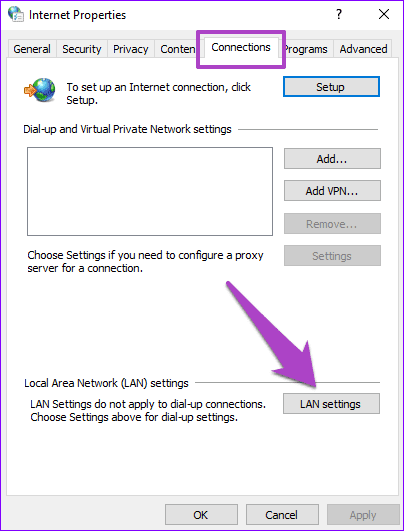
Step 3: In the Proxy server section, uncheck the ‘Use a proxy server for your LAN’ option and tap OK.
You can re-enable the proxy settings if the ethernet connection still keeps disconnecting.
7. Check Router’s DHCP Settings
Thanks to the Dynamic Host Configuration Protocol (DHCP), your router can assign individual IP addresses to connected devices on-the-fly automatically. You might encounter difficulties connecting your PC via ethernet if the router’s DHCP server settings are disabled.
Go through your router’s settings menu and make sure the DHCP server is enabled or set to automatic.
8. Update Router Firmware
Sometimes, the problem isn’t your computer or the ethernet cable, but rather the ethernet router. Some Windows 10 users whose ethernet kept disconnecting could fix the issue by updating their router’s firmware.

You should try it too. Go to your router’s control panel or settings menu and check for available firmware updates.
Stabilize the Connection
If the ethernet network keeps disconnecting after trying all the solutions above, there’s also a possibility that the router is bad. Try using a different port on the router and see if it stabilizes the connection. If that doesn’t yield any results either, we recommend contacting the router manufacturer or an experienced technician to check it out.
Next up: Check out 5 ways to solve the “Unidentified network – no internet access” error that pops-up when connecting to the internet on your Windows 10 PC.
Was this helpful?
Thanks for your feedback!
The article above may contain affiliate links which help support Guiding Tech. The content remains unbiased and authentic and will never affect our editorial integrity.