

Are you facing difficulty with your Prolific USB serial adapter and encountering the PL2303 phased-out error/pl2303hxa phased-out error? Luckily, you are reading the right post that will help fix the issue and will make the yellow exclamation mark disappear.
What is Prolific PL2303?
A USB-to Serial adapter cable connects your PC to the devices with serial ports, like PLC (Programmable Logic Controller). When a device is connected to the computer, Windows automatically installs corresponding drivers. These drivers help Windows read the device and communicate with it. In some cases, Windows fails to install the compatible drivers, and you face issues like PL2303 phased-out error. This article focuses on fixing it.
Causes for PL2303 Windows Driver Error
- Outdated USB drivers
- Corrupt Universal Serial Port driver
- Missing USB driver
While the exact reason is unknown, you can try the solutions below to fix the issue.
Must Read: Fix “MTP USB Device Driver Failed” Problem for Windows 11, 10, 8, 7
Ways to Fix the Prolific PL2303 Driver Error – Windows 11/10
Fix 1 – Roll Back The Prolific USB driver
Keeping drivers updated is recommended to ensure the connected device works with maximum functionality and without any. However, sometimes driver updates can also cause problems. You must roll back drivers and install the compatible update in such cases. With that being said, after upgrading the PC to the latest version of the Prolific USB driver, if you are facing issues, follow these steps to roll back the driver and re-install the driver.
Note : Unplug the serial adapter and re-plug after following the steps explained below.
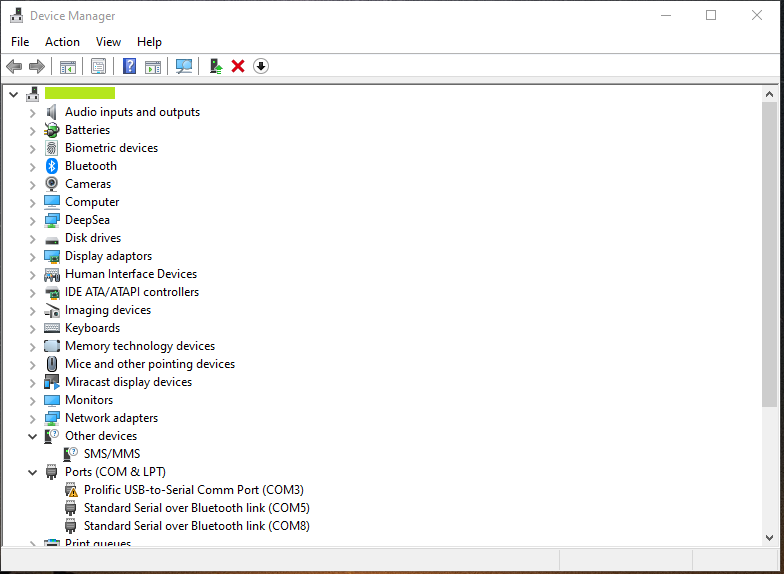
1. Right the Start button > select Device Manager from the context menu.
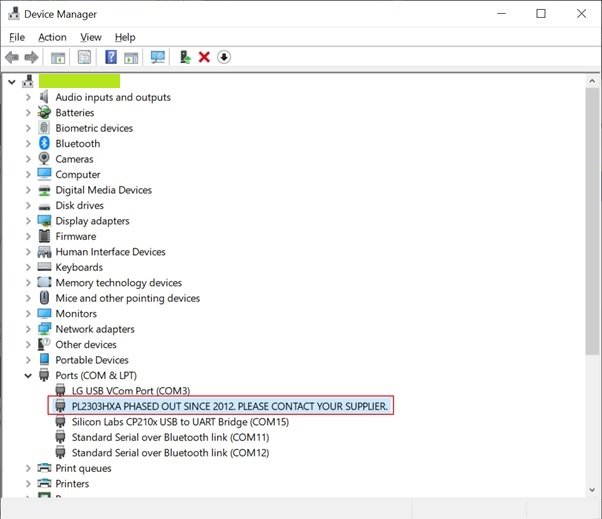
2. Double click Ports (COM & LPT) > select PL2303HXA PHASED OUT SINCE 2012, PLEASE CONTACT YOUR SUPPLIER
> right-click > select Update driver.

3. Select Browse my computer for drivers.

4. Choose Let me pick from a list of available drivers on my computer.

5. Select previous version > Next.

6. This will automatically install the selected driver.
7. Reconnect the driver once the process is finished to see how things go.
Must Read: Solve The “Wi-Fi connected but no internet” Problem in Windows PC?
Fix 2: Troubleshoot the Driver Was Not Successfully Installed
Different error codes explain the problem. The driver was not successfully installed, which explains the chip is counterfeit. To stop piracy, the manufacturer shows this error message. Protect yourself and your PC from this error code and ensure the update is compatible with the Windows (32-bit or 64-bit you are running. Below we explain different ways to fix the issue.
Fix for Windows 64-bit
To fix the issue with Prolific pl2303 USB to Serial Adapter on Windows, follow these steps:
- Download PL2303_64bit_Installer.exe from the official website and save it.
- Detach all the connected USB to Serial adapter > double click the setup file.
- Follow the instructions you see on the screen.
- Restart your computer and get the USB up and running.
Even after following the steps above, if the problem persists, go to Device Manager and check the version and date of the driver.
1. Press Ctrl + X > Device Manager.
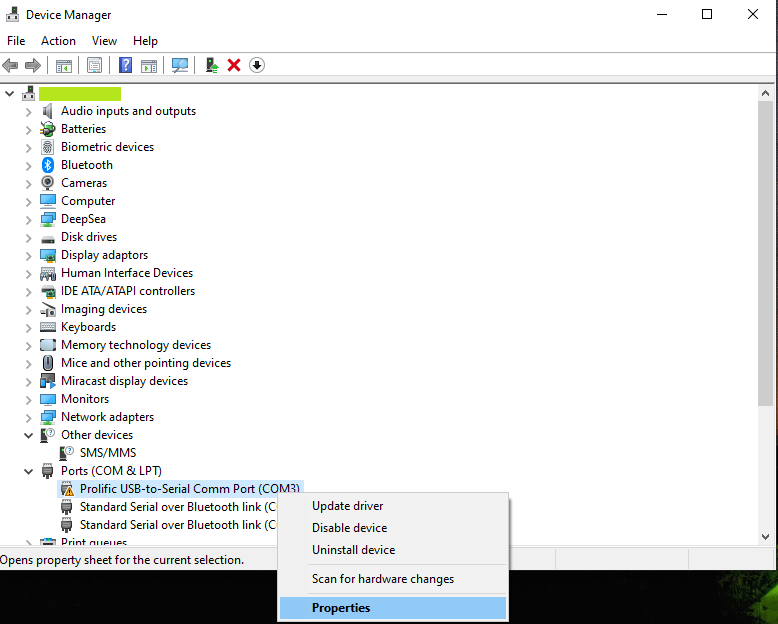
2. Double click Port (LPT COM) category > right-click Prolific USB to Serial > Properties.
3. Click the Driver tab here; the version should be 3.3.2.102 with a date. If you are running a 32-bit version of Windows, it should be 2.0.2.8.
4. If the date is incorrect, you must update the driver. To do so, you can use the third-party driver updater software – Advanced Driver Updater.
Automatic Way to Update Prolific PL2303 driver
If time or technical skills are your constraints, you can automatically update Prolific USB to the serial driver with Advanced Driver Updater. The tool will automatically read your PC details and find the compatible driver updater for the PL2303 driver. To use it, follow these instructions:
- Download and install Advanced Driver Updater.
- Launch the tool and click the Start Scan Now button to scan the PC for outdated drivers.

- The scan will take depending on the number of connected devices.


- To manually install the updated version of the Prolific driver, click the Update driver link – for the Free version) However, if you are a registered user, things are simple; by clicking the Update All to update all outdated driver, you can get the job done instantly.


- Restart the PC when done.
- Now try connecting the device should not face any problem.
Must Read: How To Solve the “Device Cannot Start (Code 10)” Error in Windows
With the help of the above solutions, you can update the driver and fix the Prolific USB to Serial driver not working on Windows 11/10. The manual steps might be a bit overwhelming and confuse you. But there’s nothing to worry about. Just follow the step-by-step instructions. Also, you can use Advanced Driver Updater, the driver updating tool for Windows will help resolve the issue.
Related:
Fix ASUS Bluetooth Driver Not Working
Update Realtek Bluetooth Driver – Windows 11,10
Fix AMD Ryzen Master Driver Not Installed Properly
Realtek Audio Console in Windows 11, 10, 8, 7
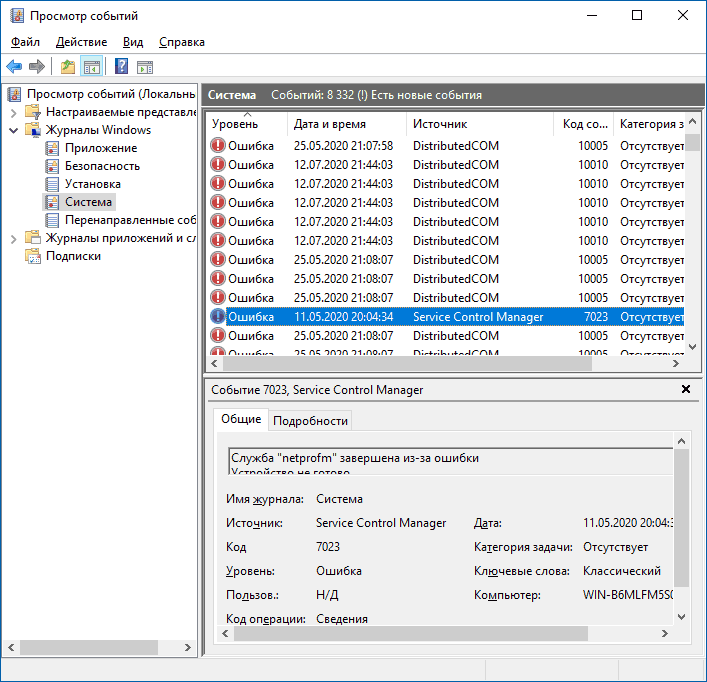
Если вы из тех пользователей, которые заглядывают в просмотр событий Windows 10 (Win+R — eventvwr.msc) для анализа ошибок, с большой вероятностью вы там обнаружите ошибки, имеющих код события 7000, 7001, 7009, 7011, 7023, 7031, 7034, а возможно и некоторыми другими похожими. Сообщения об ошибках могут быть разными, но всегда связаны со службами Windows, например:
- 7000 Служба не ответила на запрос своевременно
- 7001 Служба является зависимой от службы, которую не удалось запустить из-за ошибки Не удалось запустить дочернюю службу
- 7001 Служба является зависимой от службы, которую не удалось запустить из-за ошибки Присоединенное к системе устройство не работает
- 7011 Превышение времени ожидания (60000 мс) при ожидании ответа транзакции от службы
- 7023 Служба завершена из-за ошибки Устройство не готово
- 7031 Служба была неожиданно завершена. Это произошло (раз): 1
- 7034 Служба неожиданно прервана. Это произошло (раз): 1
- 7043 Служба не завершила работу должным образом после получения управления для выполнения предзавершающих операций
В этой инструкции подробно о том, что может вызывать такие ошибки в Windows 10, как исправить ошибки с указанными кодами от источника Service Control Manager в Windows 10, стоит ли это делать и дополнительная информация, которая может оказаться полезной.
Ошибки с источником Service Control Manager — причины, необходимость исправления
Прежде чем вы решите переживать и пытаться исправить ошибки с кодами события 7000, 7001, 7009, 7011, 7023, 7031, 7034, 7043 и источником Service Control Manager, учитывайте следующий важный момент: такие ошибки вы встретите на любой, даже самой чистой и беспроблемной системе Windows 10. Если в просмотре событий эти ошибки появляются время от времени, а не ежедневно при включении компьютера, работе и завершении работы, причинами могут быть обычные процессы работы Windows 10 связанные с:
- Установкой обновлений (при этом некоторые службы могут завершаться, а другие, зависимые от них, вызывать ошибку).
- Установкой новых версий драйверов (в том числе и самой Windows 10, в этих случаях мы можем получить ошибки, связанных с тем, что устройство не готово или не работает).
- Установкой сторонних программ, взаимодействующих со службами (иногда лишь временно, для успешного выполнения установки).
- Автоматическим обслуживанием системы (редко).
Во всех случаях появление ошибок возможно не при самом процессе, а после повторного включения компьютера или ноутбука, так как многие процессы установки завершаются лишь после перезагрузки.
В случае же если у вас эти ошибки возникают ежедневно, причины могут быть самыми разными, среди них:
- Ручное вмешательство в тип запуска служб, отключение служб, использование различных программ «для оптимизации», «ускорения» и «отключения слежки» Windows Получить представление о том, как отключение одних служб может влиять на работу других можно получить из статьи Не удалось запустить дочернюю службу — как исправить.
- В случае, если ошибок нет после перезагрузки компьютера или ноутбука, но присутствуют после завершения работы и последующего включения (особенно по прошествии некоторого времени), можно попробовать отключить быстрый запуск Windows 10. Желательно также вручную установить все оригинальные драйверы чипсета с сайта производителя ноутбука или материнской платы, в случае если у вас ПК.
- Нестабильная работа каких-либо устройств (плохое подключение, неисправности). Иногда — проблемы при задействовании устройства после перехода в режим энергосбережения. Можно попробовать отключить экономию энергию для устройств в дополнительных параметрах схемы электропитания в панели управления и в свойствах устройства в диспетчере устройств на вкладке «Управление электропитанием» (присутствует не для всех устройств). Особенно часто это касается USB устройств, сетевых и Wi-Fi адаптеров.
- Иногда ошибки могут появляться при завершении работы, если какие-то сторонние программы (например, клиенты для загрузки файлов из Интернета) мешают завершиться какой-либо сетевой службе.
Также при регулярном появлении указанных ошибок стоит проверить, а появляются ли они, если выполнить чистую загрузку Windows 10 — если нет, можно предположить, что правильному запуску служб мешают какие-то сторонние программы или антивирусы. Также может оказаться, что эти программы инициируют запуск служб, которые не могут быть запущены из-за отключенных дочерних служб.
Если проблема появилась недавно, вам могут помочь точки восстановления системы на дату, предшествующую появлению ошибок.
Увеличение времени ожидания запуска служб для ошибок с кодами 7000, 7009 и 7011
Ошибки типа «Превышение времени ожидания» или «Не ответила на запрос своевременно» при запуске служб c кодами события 7000, 7009 и 7011 могут появляться на медленных компьютерах и ноутбуках с HDD. В таких ситуациях мы можем увеличить время ожидания запуска службы:
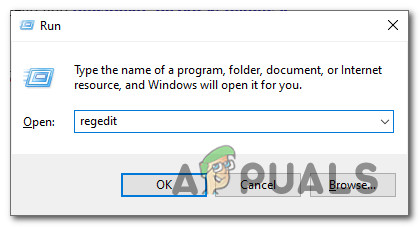
- Запустите редактор реестра, для этого нажмите клавиши Win+R на клавиатуре, введите regedit и нажмите Enter.
- Перейдите в раздел реестра
HKEY_LOCAL_MACHINE\SYSTEM\CurrentControlSet\Control
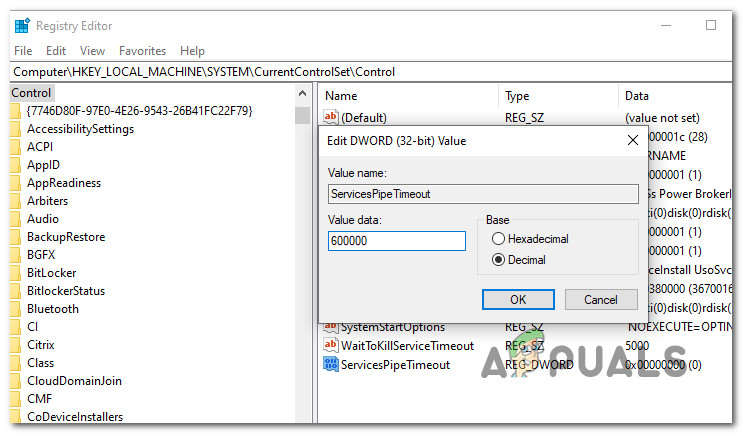
- В правой панели редактора реестра найдите параметр с именем ServicesPipeTimeout. Если такой параметр отсутствует, нажмите правой кнопкой мыши в пустом месте панели справа, выберите «Создать» — «Параметр DWORD» и задайте имя ServicesPipeTimeout для этого параметра.
- Дважды нажмите по параметру ServicesPipeTimeout, выберите «Десятичный» и задайте значение 60000.
- Нажмите Ок, закройте редактор реестра и перезагрузите компьютер.
Указанные действия установят время ожидания для запуска службы равным 60 секунд. Если этого окажется недостаточно, можно попробовать увеличить значение.
Надеюсь, предложенный материал поможет разобраться с ошибками Service Control Manager в просмотре событий Windows 10 и предпринять действия для исправления ситуации при необходимости.
-
admin
- Site Admin
- Сообщения: 5
- Зарегистрирован: Пн июл 15, 2024 4:27 pm
Правильная установка драйвера PL2303 в Windows 10/11
1. Установите драйвер PL2303-Prolific-DriverInstaller-v1.5.0.zip
2. Откройте диспетчер устройств:

Сейчас установлен драйвер по умолчанию системы — он не работает.
Кликаем на нём правой кнопкой — обновить драйвер — и выбираем наш свежеустановленный драйвер:

Теперь мы установили работающий драйвер:

3. Осталось запретить системе автоматически обновлять его на неработающую версию. Для этого распаковываем архив с программой WuMgr, запускаем её и кликаем по порядку, как на изображении:

Всё готово! Теперь система не будет обновлять Ваш работающий драйвер.
Some Windows 10 users are reporting that their Event Viewer is filled with Event ID 7009 errors (A timeout was reached while waiting for the Lights-Out connect). Normally, these error events will start occurring immediately after the startup is complete.
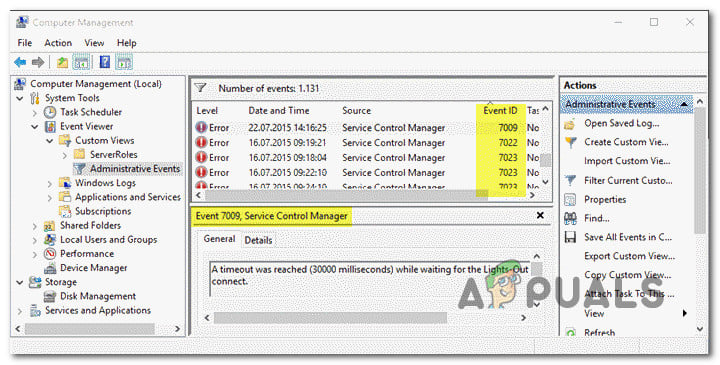
After investigating this particular issue thoroughly, it turns out that there are several different underlying causes that might cause these types of Event ID errors. Here’s a list of potential culprits:
- Traps service is Disabled -If you have the Traps Endpoint Security Manager installed on the affected PC, chances are the issue is occurring because the main Traps service is not configured to start automatically. To resolve this particular issue, you’ll need to use the Services screen to change the default behavior of the main Traps service.
- The issue is caused by a Windows-native service – As it turns out, this particular issue can also be caused by a couple of native Windows services that have a tendency to stall their dependencies on low-end computers. In this case, you’ll need to modify the default behavior of these services and ensure that they start at every system startup.
- Windows Trace Session Manager doesn’t have enough time to start – According to a lot of affected users, you can expect to see this error in an instance where you’re using a low-end PC that is not strong enough to start all required services within the allocated time-spawn (60 seconds). To rectify this, you’ll need to reconfigure the behavior of the Windows Trase Session Manager by establishing a custom Registry Editor rule.
- A major System change interfered with the service startup behavior – An important update, driver installation or even some kind of 3rd party interference can also result in this particular Event Viewer error. Since there’s no definitive culprit list, your best chance at resolving the issue is to restore your OS back to a healthy state by using the System Restore utility.
Now that you are familiar with every potential event that might trigger the Event 7009 errors, here’s a list of methods that other affected users have successfully used to get to the bottom of the issue and prevent new instances of this error from populating the Event Viewer:
1. Re-configure the Traps service to Automatic (if applicable)
If you’re always seeing the 7009 error when booting up your computer and you have the Traps Endpoint Security Manager installed, most often than not the problem is caused by the Traps service not being started automatically.
According to Microsoft technicians, this issue is facilitated when multiple applications are launching at the same time during startup and attempting to grab system resources to launch their respective services. If your computer is not strong enough to supply every application with the required processing power, some services will eventually time out causing this error.
And since Traps Endpoint Security Manager is not priorities by default, it’s a prime candidate for getting timeouts.
Fortunately, you can prevent this issue from occurring by modifying the default behavior of the Traps service and set it to Automatic in order to be prioritized.
If you want step by step instructions guiding you through the entire process of reconfiguring the Traps service, follow the guide below:
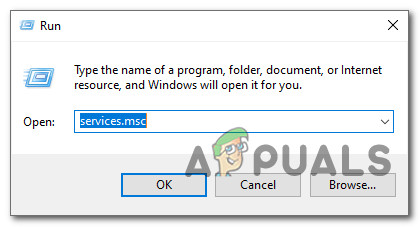
- Press Windows key + R to open up a Run dialog box. Next, type ‘services.msc’ inside the text box and press Enter to open up the Services screen. When you see the UAC (User Account Control) prompt, click Yes to grant admin access.

Accessing the Services screen - Once you’re inside the Services screen, scroll down through the list of services and locate the Traps service.
- When you see it, right-click on it and choose Properties from the context menu.
Accessing the Traps Properties screen - Once you’re inside the Services screen, access the General tab from the context menu that just appeared.
- Next, use the Startup type drop-down menu to change the default behavior to Automatic before clicking on Apply to save the changes.
- Restart your computer and monitor the Event Viewer utility to see if new instances of the 7009 error are still appearing.
If the problem is still not resolved, move down to the next potential fix below.
2. Verify the most likely culprits
If the first method was not applicable as you don’t have the Traps Endpoint Security Manager installed on your computer, the next troubleshooting step should be to ensure that every Windows-native service that is known to cause this issue is enabled and configured to start at every systems startup.
Here are the services that you need to take a closer look at:
- DCOM Server Process Launcher
- RPC Endpoint Mapper
- Remote Procedure Call (RPC)
- Security Accounts Manager
- Server
Several affected users have confirmed that that new instances of the Event ID 7009 error have stopped occurring after they utilized the Services screen to ensure that every relevant service is properly configured.
Follow the instructions below to ensure that every culprit service starts at every system startup:
- Press Windows key + R to open up a Run dialog box. Next, type ‘services.msc’ inside the text box and press Enter to open up the Services screen. When you see the UAC (User Account Control) prompt, click Yes to grant admin access.
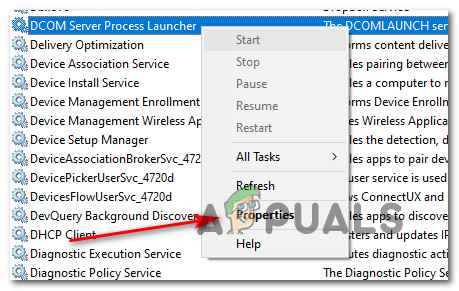
Accessing the Services screen - Once you’re inside the services screen, scroll down through the list of services and locate the DCOM Server Process Launcher service.
- When you see it, right-click on it and choose Properties from the context menu that just appeared.

Accessing the Properties screen - Inside the Properties screen of the DCOM Server Process Launcher service, access the General tab and change the Startup type to Automatic, then click on the Start button to start it.
- Next, repeat step 3 and step 4 with the remaining services until each one is configured to Automatic startup type and actively running:
RPC Endpoint Mapper
Remote Procedure Call (RPC)
Security Accounts Manager
Server
- Once you’ve ensured that every relevant service is started, take a look at your Event Viewer and see if the problem is now fixed.
If you’re still seeing new instances of the Event ID 7009 error appearing inside your Event Viewer, move down to the next potential fix below.
3. Reconfigure the Windows Trace Session Manager
If the two fixes above didn’t resolve the issue in your case, you should start considering the fact that the default time-out value (60 seconds) is not enough to allow the Service Control Manager to start.
Note: The Service Control Manager is configured by default to wait for the specified time (60 seconds) by the ServicePipeTimeout entry before logging 7009 events.
The problem most likely occurs because the Windows Trace Session Manager might require more than 60 seconds to start on low-end computer configurations.
If this is the main cause triggering the 7009 errors, increasing the value of the ServicePipeTimout registry value will give all dependent services enough time to start properly.
Here’s a quick step by step guide that will walk you to the process of modifying the value of ServicePipeTimeout in order to resolve the 7009 error:
Note: To avoid any unpleasantries, we recommend taking the time to backup your Registry cluster, just in case something goes wrong during this operation.
- Press Windows key + R to open up a Run dialog box. Next, type ‘regedit’ inside the text box and press Ctrl + Shift + Enter to open up the Registry Editor with admin access.
Opening the Registry Editor with admin access Note: When you see the UAC (User Account Control), click Yes to grant admin access.
- Once you’re inside the main screen of the Registry Editor, use the menu on the left-hand side to access the following location:
HKEY_LOCAL_MACHINE\SYSTEM\CurrentControlSet\Control
Note: You can either navigate to this location manually or you can paste the location directly into the navigation bar and press Enter to get there instantly.
- With the Control registry folder selected on the left-hand side, move over to the right-hand section and double-click on ServicesPipeTimeout.
- Next, inside the Properties of ServicesPipeTimeout value, set the Base to Decimal, then type 600000 under Value Data before clicking Ok to save the changes.

Configuring the ServicesPipeTimeout Note: If the ServicesPipeTimout entry doesn’t exist in your case, you need to create it yourself. To do this, click on the Edit menu (or right-click on an empty space) and then choose New > DWORD (32-bit) Value and name it SerivesPipeTimeout before pressing Enter.
- Once the modifications have been successfully enforced, close the elevated Registry Editor and reboot your computer.
- After your computer boots back up, check the Event Viewer to see if you can spot any new instances of the error.
If the issue is still not resolved, move down to the final potential fix below.
4. Perform a System Restore
If none of the methods above have been successful in your case, you can conclude that this particular issue started to occur after a major system change like the installation of an important update, driver installation, or an unexpected machine shutdown created this scenario where the 7009 error occurs at every startup.
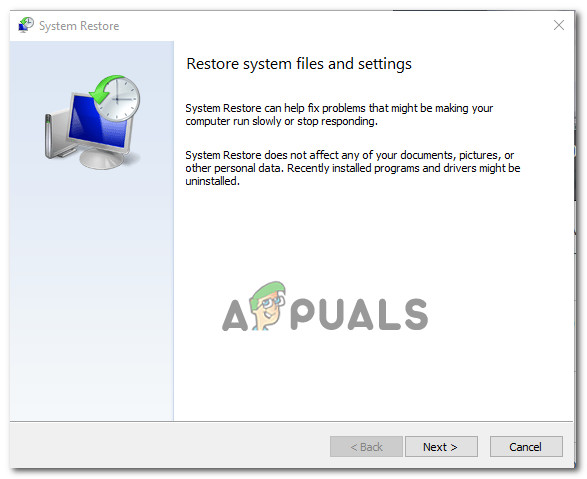
Since it’s virtually impossible to list out every potential culprit that might be causing this error, one quick way to revert every system change that might cause this issue is to use System Restore.
System Restore allows you to restore your machine state back to a healthy state when the circumstances that are causing the current Event Viewer errors where not being met.
Note: Keep in mind that by default, System Restore is configured to regularly save restore snapshots right before important system events (driver installations, Critical WU updates, etc.). Unless you modified the default behavior, it’s very likely that your computer has already created a snapshot right before the apparition of this issue.
Go ahead and identify the best restore snapshot and using it via System Restore and you’ll be able to revert your computer back to a previous point in time where this problem was not occurring.
Note: Keep in mind that once you go through with the operation, every change you made since your OS created that restore snapshot will be lost.
Kamil Anwar
Kamil is a certified MCITP, CCNA (W), CCNA (S) and a former British Computer Society Member with over 9 years of experience Configuring, Deploying and Managing Switches, Firewalls and Domain Controllers also an old-school still active on FreeNode.

Solution: Prolific PL2303 Phased Out Since 2012. The Device Cannot Start (Code 10).
Did windows just kill your Favourite USB connector drivers?
We work with a lot of electronics on the side. While onto one of our projects, we had to update our machine to a new Windows 10 and snap, our favourite USB connector cable gave upon us. The message was even sadder than the wait for the update to finish and to get back to working with our tools.
“Prolific PL2303 Phased out since 2012. Please contact your supplier”, or more to be precise “THE PL2303HXA” was the message being yelled at us from our monitor display. At first, we were clueless as to what happened to the cable. Did the cable break? or did Windows 10 gave upon the drivers. Will we be ever able to get back to our work?
We started our research on this and No, it’s not from windows but seems to be more from the Prolific Team itself behind the message.

We Solved it, and its an easy fix.
The message was clear, it said it has been phased out in 2012 while we see this message in 2020. Where we all sleeping from the past 8 years (apart from 2020 where we all had good sleep I guess).
More on our research pointed out there are several versions or look-alikes / copy cats / counterfeit (use as per your liking) of PL2303 are flooded out in the market, and Prolific just wanted to give us all a warning shot. Saying “Hey you are using Illegal stuff. Please buy the original cables only from us“.
We just went ahead, Right clicked on the Port and clicked on “Uninstall device”. Then we unplugged the device and Put it right back and let windows install the drivers automatically.
Hurray! the message disappeared. But the issue was far from over. Now we have got a strange warning sign in from of the port number. Everything with the proper name and port number but still with the warning sign. Is it trying to warn us again about the device still being illegal and fake.
We right clicked on the Port again and this time we drilled down inside of the properties window, to get to the depth of our research.
Now we saw that the error was a different one and displayed us, “This device cannot start. (Code 10) A device which does not exist was specified”. This error message was a strange one as it had found the device but seemed unspecified hardware and was unable to start up.
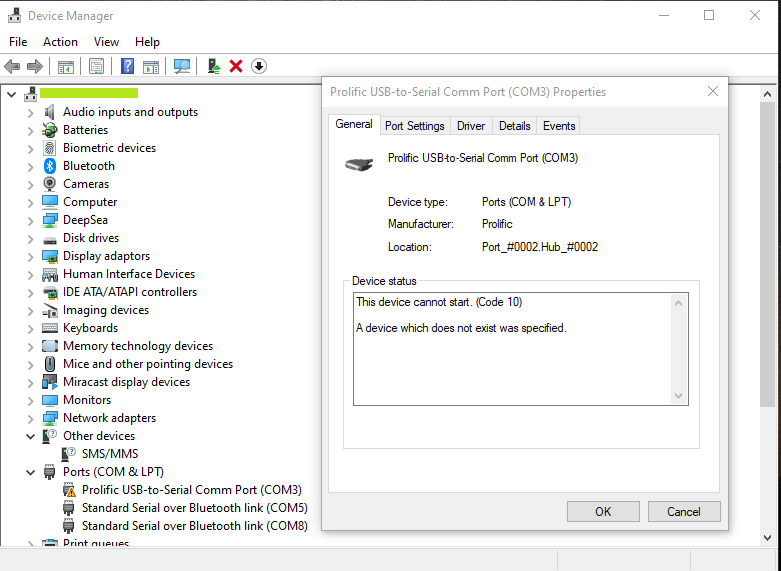
Upon further research, it became more clear that the main cause of this issue is the device you own contains a counterfeit “Prolific” chip (Chinese clones). We are sure the Original Chips guys wont be reading this further.
The counterfeit chip uses the same Vendor ID (VID_067B) and Product ID (PID_2303) and is just the replica of the Prolific chips.
So Prolific cleverly seems to come out and try to solve this intellectual infringement issue. They modified their newest drivers to render the counterfeit adapters unusable.
This decision in turn also renders all earlier adapters inoperative displaying the above-said messages and error codes.
The latest Prolific 64-bit drivers that Microsoft supplies via Windows Update, Versions 3.4.67.325, 3.4.25.218, 2.1.51.238, 3.4.62.293, 3.3.5.122, 3.3.11.152, 3.3.17.203, 3.4.25.218, 3.4.31.231, 3.4.36.247 3.4.48.272, 3.4.62.293
3.4.67.325, 3.4.67.333, 3.6.78.350, 3.6.81.357, 3.8.3.0, 3.81.10.0, 3.8.12.0 and thereon will not work with most adapters old as well as new and therefore shows the generic “Code 10” error.
Some excerpts mentioned on the Prolific website is as below.
Warning Notice:
Please be warned that counterfeit (fake) PL-2303HX (Chip Rev A) USB to Serial Controller ICs using Prolific’s trademark logo, brand name, and device drivers, were being sold in the China market. Counterfeit IC products show exactly the same outside chip markings but generally are of poor quality and causes Windows driver compatibility issues (Yellow Mark Error Code 10 in Device Manager). We issue this warning to all our customers and consumers to avoid confusion and false purchase.
Please be warned that selling counterfeit products are illegal and punishable by civil and criminal courts according to the trademark, copyright, and intellectual properties laws and regulations. Prolific will take proper and severe actions to cease and confiscate these counterfeit products. Prolific also prohibits the distribution of any PL-2303 drivers (including download links) without written permission from Prolific.
Prolific advises end-users to only purchase vendor branded cable products with company name contact information for service and support. Prolific does not sell cables with Prolific brand and packaging. In case you suspect a counterfeit chip inside, you may also contact Prolific to provide the vendor information.
But our journey does not stop over here. Still, there is hope at the end of the tunnel, stay Tuned.
There might be chances that your machine may not be showing any specific error, everything will be normal, But the Prolific USB cable may not be working at all. In this case if your cable was working perfectly before the updates, You can try to do a rollback of your Updates and work for the time being. This solution may work for some for a little time period as you cannot be out of your updates for a long period of time. Below we have a permanent solution, which fixed our issue and will fix yours too.
- This fix can be applied to the below mentioned Prolific devices.
- Prolific USB to Serial Adapter OR Prolific Compatible devices.
- Prolific Chipset :
- PL-2303 H
- PL-2303 HX
- PL-2303 HXA
- PL-2303 HXD
- PL-2303 X
- PL-2303 XA
- PL-2303 EA
- PL-2303 RA
- PL-2303 SA
- PL-2303 TA
- PL-2303 TD
- Driver Version: 3.3.2.102 and above
- Supported device ID and product strings: . VID_067B&PID_2303 for “Prolific USB-to-Serial Com Port”
The Final Step towards Success.
Download the specific driver installer below for your machine. Complete the installation with administrator privileges. To make things easier, We have all the 64 Bit, 32 Bit and 32 Bit Direct Install bundled together into a zip file.
If you need to check what exact specs your machine has you can read our blog post here.
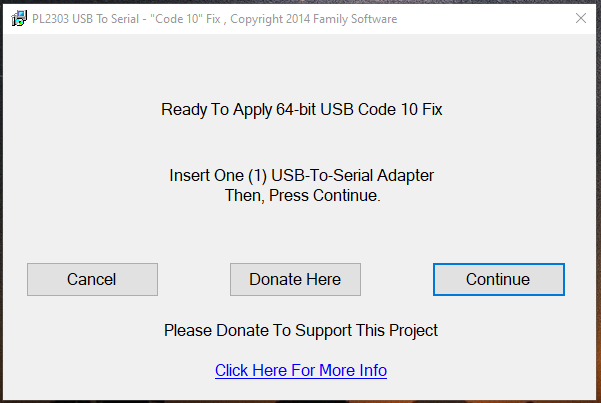
Remove any plugged in Prolific USB Cables connected to your computer.
Click on the Continue Button.
This is it, it will set everything in proper order for your cables to work.
Reboot your computer once after all this and you should be good to go.
Success at last!

So let us finish this blog on a happier note and hope that your issue has been resolved to the fullest. Please let us know in the comments section if it worked out for you. If you found out a different solution please let us know and we will add it over here with your due credits.