
Last Updated :
17 May, 2024
PATH is an environment variable that is used by Operating System to locate the exe files (.exe) or java binaries ( java or javac command). The path once it is set, cannot be overridden. The PATH variable prevents us from having to write out the entire path to a program on the Command Line Interface every time we run it. Moreover, the path is just a variable that stores a bunch of shortcuts.
To execute Java console-based programs in Windows or Linux environments, we have to use Java and javac commands. The commands java and javac are not known to the operating system as we don’t specify where the executables reside. Hence, we need to specify the path where the executables are located. This is the reason we set the path and specify the path of the bin folder because the bin contains all binary executable files. After setting the path, it can load all necessary items in the program including the compiler or interpreter itself.
Below is the procedure for how to set Java Path in both Windows and Linux?
To Set Java Path in Windows
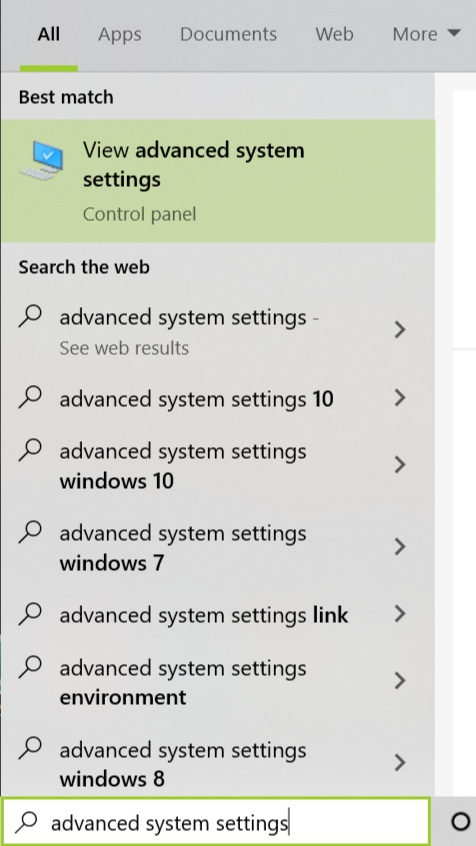
Step 1: Go to the Search box and type Advanced System settings in it. Now click on the View Advanced System settings.
Step 2: Select the Advanced tab and then click environment variables.
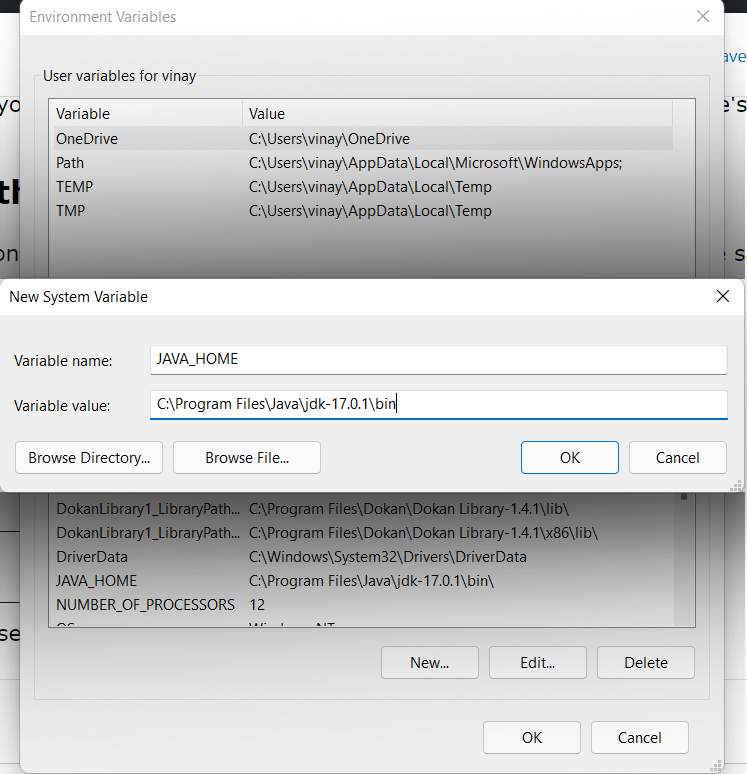
Step 3: In the system, variables click the New button. Now in the edit System variable, type variable name as JAVA_HOME and variable path as the path where the JDK folder is saved and click on OK button Usually the path of the JDK file will be C:\Program Files\Java\jdk1.8.0_60.
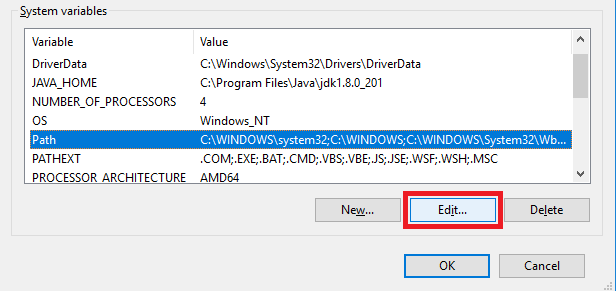
Step 4: Now in the system variables go to the path and click the Edit button.
Step 5: Click the New button.
Step 6: Now add the following path: %JAVA_HOME%\bin
To Find Java Path in Windows:
Here are the simple steps to find your Java path in Windows:
Step 1: Open a Command Prompt window.
Type the following command and press Enter:
where java
Step 2: You should see the path to your Java installation printed in the Command Prompt. It will typically look something like this:
C:\Program Files\Java\jdk1.8.0_291\bin\java.exe
That’s it! You’ve found your Java path in Windows.
To Set Java Path in Linux
Follow the given steps to set Java Path in Linux —
- Open the terminal and enter the following command:
sudo nano /etc/environment.
- A file will be opened and add the following command to that file:
JAVA_HOME = "YOUR_PATH".
- Replace YOUR_PATH with the JDK bin file path.
- Now restart your computer or virtual machine that you are using (or) reload the file: source /etc/environment
- You can test the path by executing
echo $JAVA_HOME
- If you get the output without any error, then you’ve set the path correctly.
- If you get any errors, try repeating the procedure again.
To Find Java Path in Linux:
Here are the steps to find Java Path in Linux System —
Step 1: Open a Terminal window.
Step 2: Type the following command and press Enter:
which java
Step 3: You should see the path to your Java installation printed on the terminal. It will typically look something like this:
/usr/bin/java
That’s it! You’ve found your Java path in Linux.
Conclusion
So, this was all about how you can find and set Java path in Windows and Linux. If you also have other queries regarding setting Java Path, Java_Home variable and default Java path, You can also refer to the following frequently asked questions.
Note: If you already set the Java Path, but it’s showing an ERROR: JAVA_HOME is set to an invalid directory, then scroll to the bottom for answer.
To run Java from any directory, you need to set the Java path in environment variables, and here’s how you can do it.
Windows 11 is the latest upgrade to Windows 10, but setting the Java Path in Windows 11 is still the same.
First, download and install the JAVA from the oracle official website (recommended JDK over JRE)
After the successful installation, navigate to the folder where you installed the Java.
C:\Program Files\Java or C:\Program Files (x86)\Java
From the Java folder, navigate to the \bin directory and copy the path.

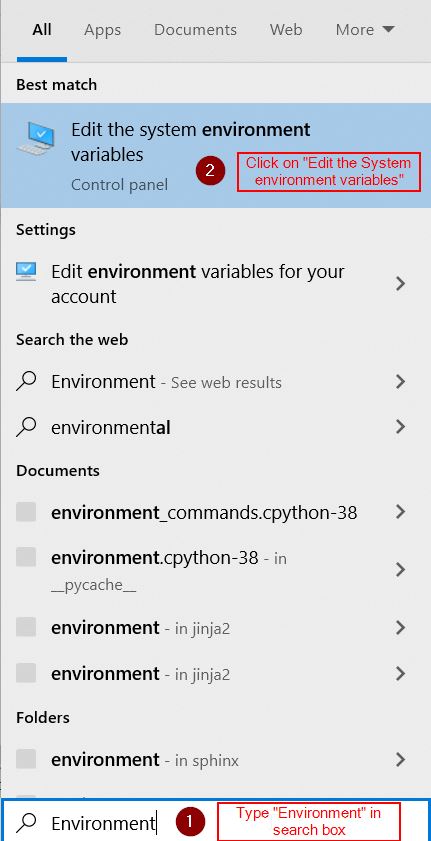
Click on Start and search for environment variables.
Select Edit the system environment variables from the search results.

Click on the Environment Variables at the bottom right corner.

Later a new Window will appear where you will see two sections, User variables, and System variables. Click on the New button under the System variables section.

Now, you’ll see two text fields, Variable name, and Variable value.
- The Variable name should be JAVA_HOME, and in the Variable value field, paste the Java bin directory path that you copied earlier.
Now, the Java path is set on your Windows 11, and restart your PC once.
Even after setting the environment variables if you are getting errors while running Java, here’s what to do.
ERROR: JAVA_HOME is set to an invalid directory
Two main reasons led to this error.
- Either you have entered an invalid directory or Java is not installed properly
If you entered your Java_home Directory as C:\Program Files\Java\bin and if it isn’t working, then try removing the bin and make sure to restart the terminal. You can change the JAVA_HOME directory by following the steps explained at the beginning.
C:\Program Files\Java\Even after removing the bin, if you are getting the same error, then try reinstalling Java. It might be an installation failure that is throwing the error.

Perform a clean installation
- Uninstall the existing version of JAVA
- Restart the PC
- Once again newly Download the JAVA from the official website and perform the installation
In this post, we will see about how to set java path in windows 10 using cmd. To set java path, you need to first understand about JAVA_HOME and how to set JAVA_HOME in windows 10.
Let’s first understand about JAVA_HOME and then we will see how to set JAVA_HOME in windows 10.
What is JAVA_HOME?
JAVA_HOME is environment variable which contains installation directory of Java development kit(JDK) or Java Runtime environment(JRE). This environment variable is setup at operating system level.
|
JAVA_HOME=C:\Program Files\Java\jdk—11.0.9 |
Why do you need JAVA_HOME?
JAVA_HOME environment variable points to directory where java is installed on your system, so many java based applications such as TOMCAT use JAVA_HOME environment variable to locate java executables.
How to set JAVA_HOME in Windows 10?
- Locate JDK on your machine.
- If you are using 64-bit java, then it will be in
C:\Program Files\Java\ - If you are using 32-bit java, then it will be in
C:\Program Files (x86)\Java\
- If you are using 64-bit java, then it will be in
- Open windows search, type
environmentand click onEdit the system environment variables.
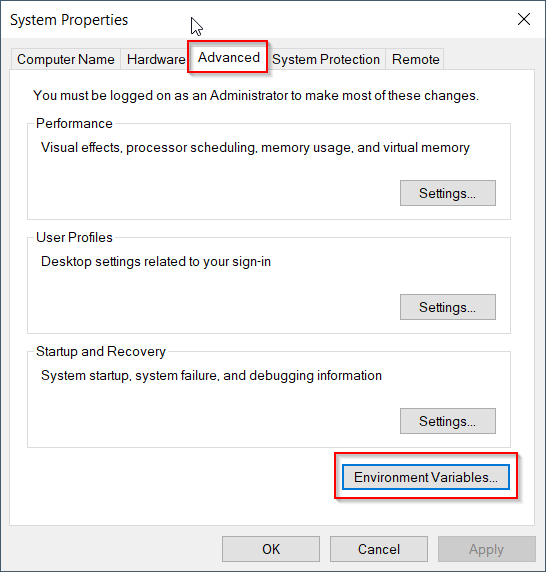
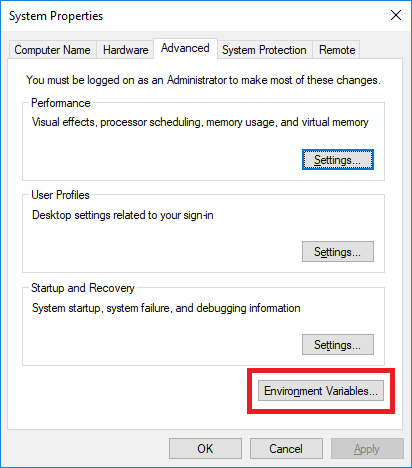
- In System properties dialog, go to Advanced tab and click on button
Enviroment Variables.
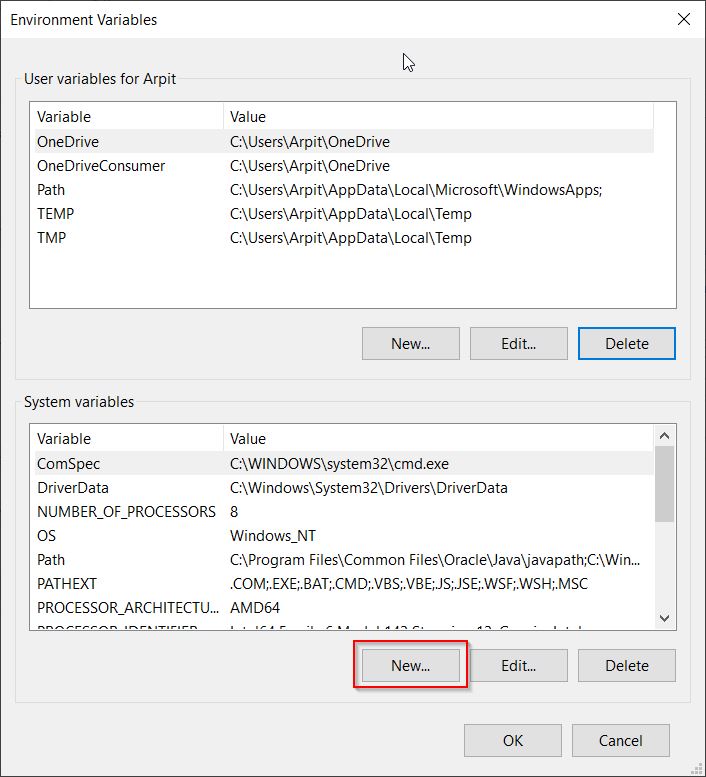
- In System variables, click
NEW...button to add JAVA_HOME environment variable.
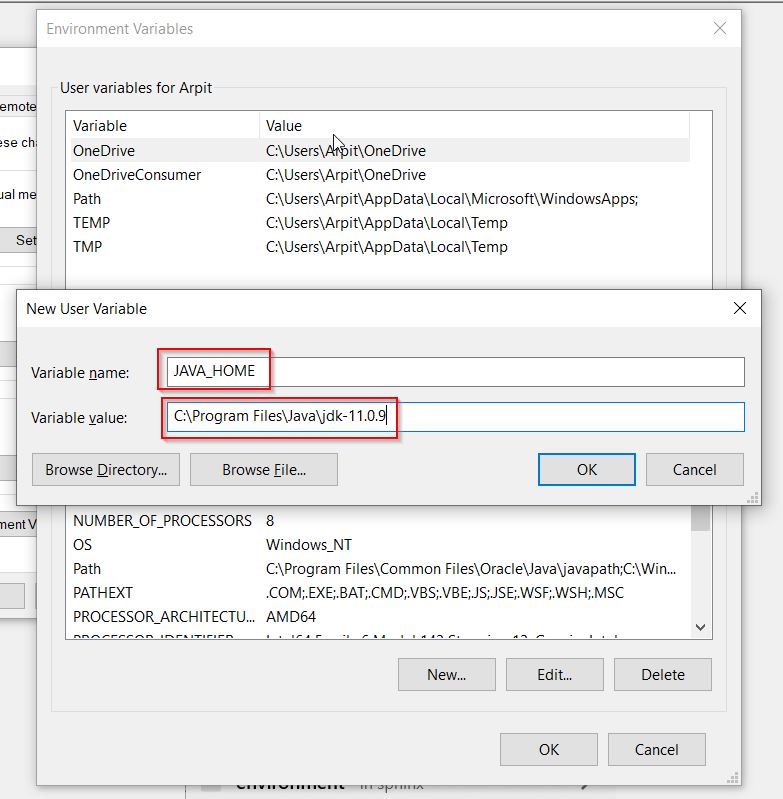
- Provide variable name as
JAVA_HOMEand value as Java installation directory.
Now let’s see how to set java in path environment variable in windows 10.
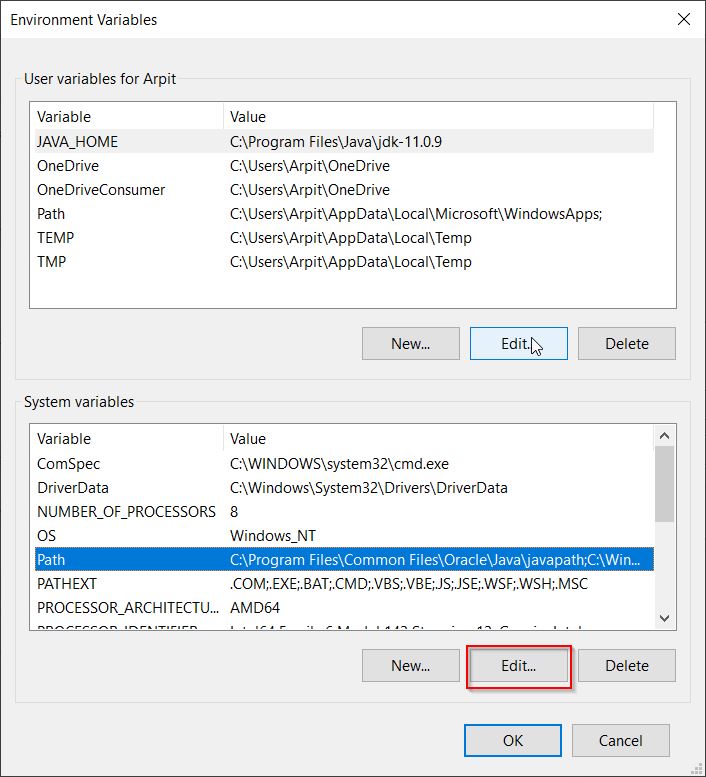
- In System variable window, locate
Pathand click onEdit....
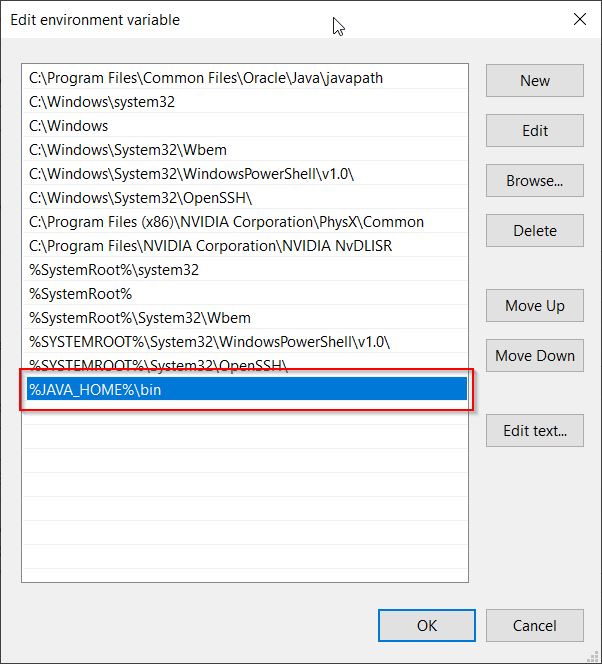
- Double click on the empty row and add
%JAVA_HOME%\bin.
Here,
%symbol is used to locate JAVA_HOME environemt variable and\binprovides location forjava.exeand h=javac.exe - Close the command prompt and launch again.
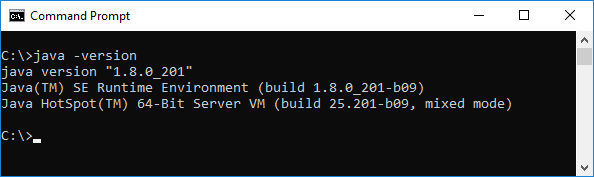
- Check java version as below:
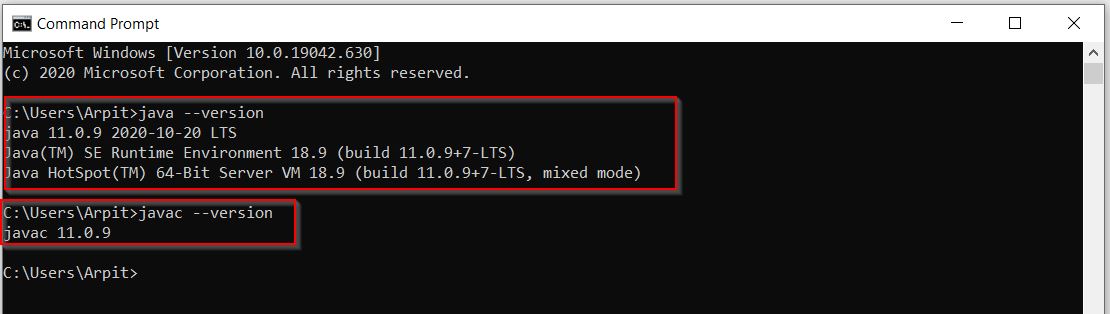
That’s all about How to set java path in windows 10.
Setting up the Java path in Windows 11 is crucial for running Java applications smoothly. You need to configure the system environment variables to include the path to your Java Development Kit (JDK). This guide will walk you through the process step-by-step, so you can get your Java environment working like a charm.
Setting the Java path in Windows 11 involves updating the system environment variables so that your computer knows where to find the Java commands. Here are the steps you’ll need to follow.
Step 1: Locate the Java Installation Directory
First, you need to find where Java is installed on your system.
Look for the folder where your JDK is installed. Typically, it’s in a directory like C:Program FilesJavajdk-17.
Step 2: Open System Properties
Next, you need to access the System Properties to edit environment variables.
Right-click on ‘This PC’ or ‘My Computer’ on your desktop and select ‘Properties’. Then, click on ‘Advanced system settings’ on the left side.
Step 3: Access Environment Variables
Now, you need to open the Environment Variables window.
In the System Properties window, click on the ‘Environment Variables’ button near the bottom.
Step 4: Edit the Path Variable
Locate the ‘Path’ variable in the list of System variables and edit it.
Select the ‘Path’ variable from the list and click ‘Edit’. This opens another window where you can add new paths.
Step 5: Add Java Path
Add the path to your JDK’s bin directory in the Path variable.
Click ‘New’ and paste the path to the bin folder of your JDK. For example, C:Program FilesJavajdk-17bin.
Step 6: Confirm the Changes
Finally, save and confirm all changes.
Click ‘OK’ on all windows to save the changes.
Upon completing these steps, your system should recognize Java commands, allowing you to run Java programs from the command line with ease.
Tips for Setting Java Path in Windows 11
- Always double-check the JDK installation path to avoid errors.
- Use the correct version of JDK compatible with your development requirements.
- Ensure no typos when adding the path; even a small mistake can cause issues.
- Restart your computer if the changes don’t seem to take effect immediately.
- Validate the setup by running
java -versionin the command prompt.
Frequently Asked Questions
Do I need to install the JDK before setting the Java path?
Yes, you must install the JDK before you can set the Java path. The path points to the installed JDK directory.
What happens if I set the wrong Java path?
If the path is incorrect, Java commands won’t work. You’ll get an error message saying that Java is not recognized.
Can I set the Java path for a specific user?
Yes, you can set user-specific environment variables instead of system-wide ones by editing the ‘User variables’ section.
How do I verify the Java path is set correctly?
Open the command prompt and type java -version. If the path is set correctly, it will display the installed Java version.
Is it necessary to restart the computer after setting the Java path?
Usually, it’s not necessary, but if you encounter issues, a restart can help apply the changes.
Summary
- Locate the Java installation directory.
- Open System Properties.
- Access Environment Variables.
- Edit the Path variable.
- Add Java path.
- Confirm the changes.
Conclusion
Setting the Java path in Windows 11 is a straightforward process that ensures your Java applications run smoothly. By following the steps outlined in this guide, you can easily configure your environment variables. Whether you’re a beginner or a seasoned developer, understanding how to set the Java path is essential. This setup allows your system to recognize Java commands and execute your Java programs efficiently. So go ahead, follow these steps, and get your Java environment up and running! If you want to learn more, check out additional resources and tutorials on Java development to further enhance your skills. Remember, a properly configured environment is the first step towards successful Java programming. Happy coding!
Kermit Matthews is a freelance writer based in Philadelphia, Pennsylvania with more than a decade of experience writing technology guides. He has a Bachelor’s and Master’s degree in Computer Science and has spent much of his professional career in IT management.
He specializes in writing content about iPhones, Android devices, Microsoft Office, and many other popular applications and devices.
Read his full bio here.
- Details
- Written by
- Last Updated on 27 April 2019 | Print Email
In this article, you will understand the details about JAVA_HOME environment variable and how to set it on Windows 10.
What is JAVA_HOME?
By convention, JAVA_HOME is the name of an environment variable on the operating system that points to the installation directory of JDK (Java Development Kit) or JRE (Java Runtime Environment) – thus the name Java Home. For example:
JAVA_HOME = c:\Program Files\Java\jdk1.8.0_201
Why is JAVA_HOME needed?
To develop Java applications, you need to update the PATH environment variable of the operating system so development tools like Eclipse, NetBeans, Tomcat… can be executed because these programs need JDK/JRE to function. So the PATH environment variable should include JAVA_HOME:
PATH = Other Paths + JAVA_HOME
Other paths are set by various programs installed in the operating system. If the PATH environment variable doesn’t contain a path to JRE/JDK, a Java-based program might not be able to run. For example, typing java in the command prompt showing this error:
'java' is not recognized as an internal or external command, operable program or batch file.

Or Eclipse will fail to launch:
How to set JAVA_HOME on Windows 10
Here are the visual steps to properly set value for the JAVA_HOME and update the PATH environment variables in order to setup Java development environment on your computer:
1. Firstly, you need to identify the Java home directory, which is typically under C:\Program Files\Java directory. Open My Computer and navigate to this directory, you will see:
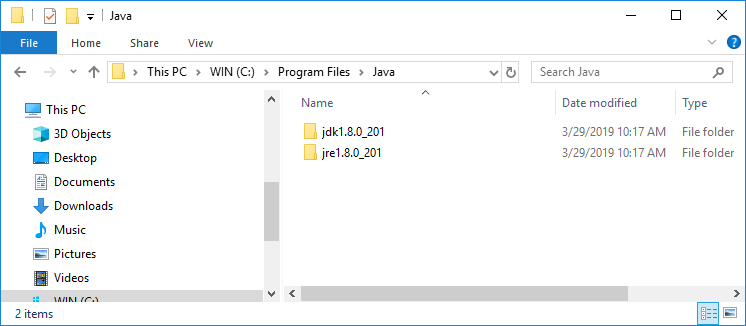
Here, the home of JDK is under C:\Program Files\Java\jdk1.80_201. The version number may vary, depending on the JDK you installed.
2. Open the System Environment Variables dialog by typing environment in the search area on Start menu. Click the suggested item Edit the system environment variables:
The System Properties dialog appears, click the button Environment Variables.
Then you will see this dialog:

3.Create the JAVA_HOME environment variable by clicking the New button at the bottom. In the New System Variable form, enter the name and value as follows:
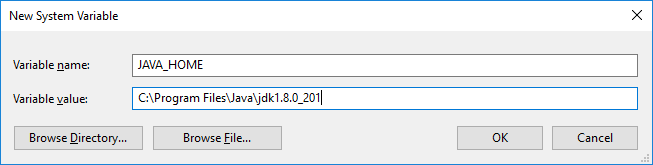
Click OK, and you will see the JAVA_HOME variable is added to the list.
4.Update the PATH system variable. In the Environment Variables dialog, select the Path variable and click Edit:
Then in the Edit environment variable dialog, double click on the empty row just below the last text line, and enter %JAVA_HOME%\bin as follows:
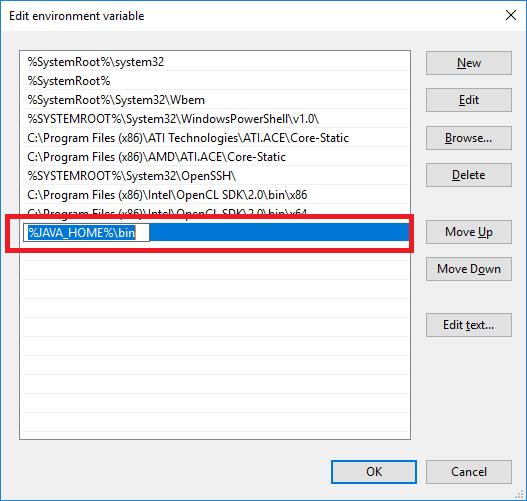
The percent signs tell Windows that it refers to a variable – JAVA_HOME, and the \bin specifies the location of java.exe and javac.exe programs which are used to run and compile Java programs, as well as other tools in the JDK.
Click OK button to close all the dialogs, and you’re all set. Now you can open Eclipse or NetBeans to verify. Or open a command prompt and type in javac –version, you should see:
NOTES:
You can add the path to the bin directory of Java home directly into the PATH variable. But it’s strongly recommend to follow the above steps to setup a JAVA_HOME variable because many Java programs depend on it.
When you installed a JDK, you might not need to update the system variable because the installer already did it for you.
Learn more:
- How to set environment variables for Java using command line
- How to write, compile and run a hello world Java program for beginners
- What are JVM, JRE and JDK
- How to check Java version
About the Author:
Nam Ha Minh is certified Java programmer (SCJP and SCWCD). He began programming with Java back in the days of Java 1.4 and has been passionate about it ever since. You can connect with him on Facebook and watch his Java videos on YouTube.