
The installations of a new Windows 10 update or setup offer multiple benefits but may also become troublesome with error 0x80190001, restricting the user from downloading files. This is a usual problem faced by users due to incompatibility and safety issues with the drivers.
With this error code, you may see the following error message – Something went wrong or An unexpected error was encountered while attempting to download files required for the upgrade. This article covers some effective workarounds that will help you to solve this error code. The step-by-step error correction procedures are guided below.

To fix Error Code 0X80190001, follow the below methods:
1] Clear Junk files and Temporary files
Windows 10 update is a new generation software with an automated setup of removing junk & temp. files. The procedure may also be taken up manually by the user for better Windows performance. The manual procedure is as under:
- Open Taskbar search using Windows+S keys.
- Type
cleanmgrand press Enter.
- Choose the root drive (C:) then click OK.
- Select the Clean-up system files option.
- Choose C: drive again then hit the OK button.
- Mark all the check-boxes except Download and click OK.
- Click Delete files to confirm the clean-up.
2] Run Windows Update Troubleshooter
There is an option of an inbuilt troubleshooter for self-error correction in Windows update. It is not necessary that the problem may be fixed every time using this option, but it can be useful in various scenarios. The following are the steps of using a troubleshooter:
- Right-click on the Start button and select the Settings option.
- In the Settings app, click Update & Security > Troubleshoot > Additional troubleshooters.
- Select the Windows Store Apps, and then hit Run the troubleshooter.
- Now follow the on-screen guidelines to complete the process.
Once you perform the above steps, restart your computer and try updating your Windows again.
3] Turn off Antivirus and Firewall
Firewall & Antivirus in a few cases can become a hindrance while installing Windows 10 update and may generate the error code 0x80190001. In such cases, the firewall & Antivirus can be uninstalled while updating Windows 10 and then reinstall them after updating the operating system. Here is how to do it:
- Open Windows Settings using Windows+I keys.
- Go to Update & Security > Windows Security > Virus & threat protection.
- On the next page, scroll down and click on the Manage settings link.

- Now turn off the toggle button of Real-time protection and Cloud-delivered protection.
- Close all the windows and see if the error 0x80190001 is solved now.
4] Remove the external peripherals to fix 0X80190001
Sometimes big problems can be solved with small inputs. It is suggested to remove all the peripherals except the essential device like your mouse and keyboard. Once you did, try to install the update again and see if it works.
5] Delete the Software Distribution Folder
The operating system of Windows 10 consists of a folder called Software Distribution. The folder is used by the system to secure files that are temporary and not required after a time. Such files can corrupt the system and must be cleaned regularly. Following are the steps:
- Open an elevated Command Prompt.
- In the elevated window, type the commands given below and hit Enter after each.
net stop wuauserv
net stop bits
- After running the above commands, open File Explorer (Windows+E) and browse to the following:
C:\Windows\SoftwareDistribution folder.
- Select all the files and folders (Ctrl+A) and delete them.
- After deleting the SoftwareDistribution folder, open the command prompt and run the following commands:
net start wuauserv
net start bits
- This will restart the Windows Update-related Services.
6] Check Date & Time
The inaccuracy of Date & Time can incur error code 0x80190001. So, the accurate Date & Time shall be ensured, and correction can be done through the following process:
- Click on the Start button, type “Date & time settings”, and select the same from the list.
- Go to the right side and disable the Set time automatically option.
- Under the Set the date and time manually section, click on the Change button.
- Adjust the date and time manually and then click on the Change button to apply the changes.
- Restart your system and try updating your Windows again.
7] Perform a clean boot
Another method here you can try to fix Error 0x80190001 is to clean boot Windows 10. Follow the steps given below:
- Click on Start and type
msconfig. - Select the System Configuration option from the list.
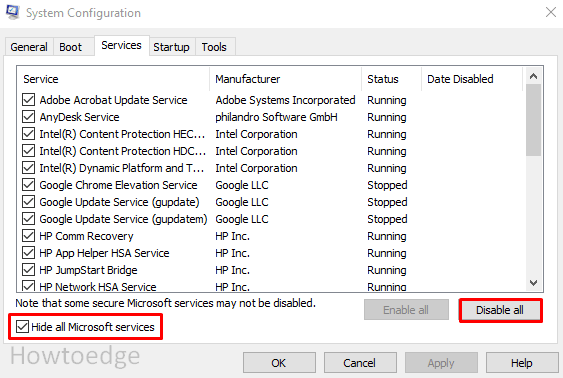
- Go to the Services tab and then check the Hide all Microsoft Services checkbox.
- Click on the Disable all button.
- Now switch to the Startup tab and select Open Task Manager.
- On the Startup tab, select each item and Disable them one by one.
- Close the Task Manager window and click OK to save the changes.
Restart your system and check if the error is resolved.
8] Download Windows 11/10 ISO image and install it
Windows is a new generation system that must be understood before adding changes to it. The up-gradation is the common procedure that must be carried out before opting for any update. The Media Creation Tool can be installed and used for correcting error code 0x80190001. Such foreign download may cause loss of data files, therefore backup may be ensured before installing Media Creation Tool. Take the below steps:
- At first, download the Media Creation file.
- Go to the downloaded location and double-click on the downloaded file to launch it.
- If UAC prompts, click the Yes button.

- Click the Accept button to accept the license terms and conditions.

- Select Upgrade this PC now option and then click the Next button. Wait for a while until Windows prepares to install the important files.
- Then select the Keep your personal files and apps option and then click Next.
- Finally, hit the Install button to start the upgrade process.
Once you get the latest version of your Windows, the problem should be resolved. Let us know which methods you find useful.
While installing the feature update (or upgrade), many users are confronting an Error Code 0x80190001 which eventually terminates the install process. This specific error appears after a long wait for the download to start and it affects almost every version of Windows. As a matter of fact, this issue also seems to block the Update installation.
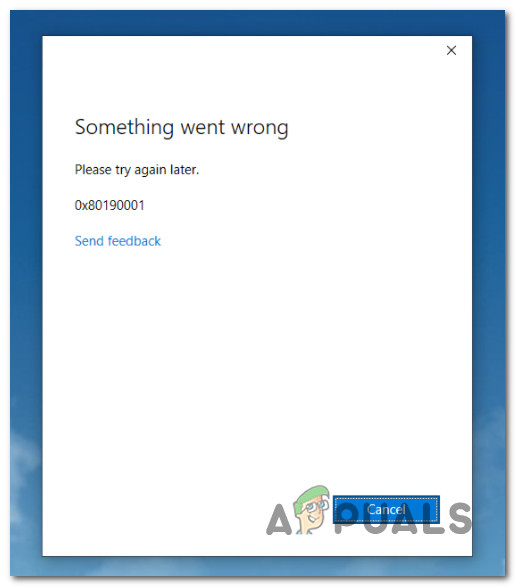
This error appears with a message to check the network settings.
Something went wrong
Couldn’t download Windows 10, please check your network settings and try again. You can contact Microsoft support for help with this error. Here is the error code 0x80190001.
According to some users, they are actually receiving Error Code 0x80190001 while upgrading to Windows 11 or 10. Experts are with a view that it is the MDM (or Mobile Device Management) registration error. Another probable cause may be the communication problem between Windows client and Microsoft update server.
However, a deep analysis also reveals that the Error Code 0x80190001 can be triggered by the presence of antivirus solutions. In addition to this, another possible cause may be installing Windows 11 or 10 from an unauthorized source rather than the genuine ISO files. So, here, we present you with certain promising solutions that can help you to bypass 0x80190001 Windows Update error.
Let us walk towards the workarounds one by one and see which works best for you.
Error Code 0x80190001 Windows Update in Windows 11 and 10 Workarounds
There are two different ways in order to resolve this error. We will be discussing them in bellow description:
Workaround 1: Run Windows Update Troubleshooter
A good number of users got rid of this nagging Error Code 0x80190001 by running the Windows Update troubleshooter. So, give an attempt at it and see if this works for you also.
For Windows 10 –
Step 1 – Open Settings by pressing Winkey + I.
Step 2 – Find and select Update & security.
Step 3 – On the left sidebar of the next page, click Troubleshoot. Shift to its right pane and click on – Additional troubleshooters.
Step 4 – Select Windows Update and click the button Run the troubleshooter as indicated in the below screenshot.
Step 5 – Follow the guidelines on the wizard and let the troubleshooter scan for the faults. In the end, it repairs the problem and hopefully, you should not get Error Code 0x80190001 anymore.
For Windows 11 –
- Press Windows key and I.
- Select Troubleshoot from the right pane of the Settings app.
- On the next page, click Other troubleshooters.
- Select Run in the Windows update section.
Though for many, troubleshooting Windows Update hardly bought any relief. But few of them have reported in the forums that this specific update error got resolved with the troubleshooter.
Workaround 2: Use Windows Media Creation Tool
The safest and most recommended resolution process in this regard is to upgrade the computer to latest Windows edition using the “Windows Media Creation Tool“. We will show you the way to use this and here are the steps for you.
Step 1 – Visit the website of Windows 10 download or Windows 11 download by Microsoft and grab the installation media tool. To do so, click Download tool now (see screenshot).
Step 2 – Once you downloaded the tool, open the Downloads folder and double-click the file MediaCreationTool.exe.
Step 3 – Accept the License terms and move ahead by selecting the option Upgrade this PC now. Afterward hit the button Next.
Step 4 – Proceeding forward, select the option Keep personal files and apps in order to leave the apps, files, and settings untouched.
Step 5 – Finally, click on the option Install to start the upgrading process.
Workaround 3 – Configure Internet Time Settings
Many a time, when there is a conflict between your time and internet server time, there are possible chances for various errors to show up during the update. So, configure the Internet time settings and check if it is in sync with the server.
For Windows 10 –
Step 1 – Press Windows + I.
Step 2 – Here, select Time & Language tab as shown in the given image.
Step 3 – On the right pane of the following page, click the option Add clocks for different time zones. This immediately opens a small window of Date & Time on the PC screen.
Step 4 – Switch to the Internet Time tab and make a click on the button namely Change settings.
Step 5 – Now, ensure to check mark the box “Synchronize with an Internet time server“. Finally, click Update now button on the dialog.
Step 6 – Close all the windows and this should bypass the Windows Update errors.
For Windows 11 –
- Hit – Winkey+I.
- Select – Time & language.
- Click – Date & time.
- Move down and click on – Additional clocks.
- Now follow from Step 4 in the above method.
Workaround 4 – Disconnect Internet Connection
If you are using the ISO file, ensure to disconnect the internet connection during the setup phase to avoid the occurrence of any errors. So, during setup, the computer should not have any internet connectivity.
Furthermore, if you are updating through Windows Update, then remove the internet connection once the download reaches out 100%. For many, this solution worked like a charm and they did not encounter any further errors in the upgrade process.
Workaround 5 – Diable Antivirus
Before upgrading the machine, conduct a full PC scan using your antivirus solution. Once you complete the scan, disable the antivirus program. This is important to perform because experts reviewed that presence of antivirus is also a cause of this Error Code 0x80190001. After disabling the program, try installing the updates.
You may like to read How to Disable / Enable Virus & Threat Protection in Windows 10.
Workaround 6 – Disconnect External Peripherals
Disconnect all external connections like USB drives, game controllers, Printer, External Hard disk and other peripherals from the PC. Moreover, also check whether any non-essential device is connected to the computer or not. If you find any, detach it from the computer and then start the install process.
After performing these, go for upgrading the Windows.
Conclusion
Error Code 0x80190001 Windows update is indeed an annoying error since it keeps you on hold a long time while updating. Besides, it also blocks the upgrading process. As a result, if you come across this error and the message, you need to take steps soonest possible in order to fix this. We have discussed the resolution process in simple language to make you understand easily. Read the instructions carefully and apply keenly and eventually, you can update flawlessly.
There’s an ongoing issue that’s currently affecting both Windows and Xbox console users. When opening certain native Windows applications, some users end up with the 0x8019001 error. On Xbox consoles, this problem appears when users attempt to sign in with their Xbox accounts. On PC, this problem is mainly encountered with Outlook and Microsoft Edge.
Update: In some cases, this error is also reported to occur on PC during the upgrading process to Windows 11.
As it turns out, there are several different reasons why you can expect this error to occur on Windows 10 and Windows 11. Here’s a shortlist of culprits that might be the root cause of this issue in this case:
- Generic native app inconsistency – As it turns out, this issue on Windows is often associated with a common inconsistency that’s affecting the allocation of system resources. Several users dealing with this problem have confirmed that the problem was finally resolved after they ran the Windows Apps Troubleshooter and applied the recommended fix.
- Corrupted Windows Store Cache – Windows Store cache corruption is another common scenario that might produce this error (especially on Windows 11). In this case, you should be able to fix the issue swiftly by resetting the Windows Store Cache via an elevated CMD command.
- Dependency WU service is stuck in a limbo state – Under certain circumstances, this problem can also be associated with a series of stuck service dependencies that Windows Update relied upon to update Store applications. In this case, you should try restarting every WU dependency service.
- Corrupted data on SoftwareDistribution folder – Corrupted data related to an upcoming native app update can also cause this error (especially after an unexpected interruption during the upgrade process). In this case, you can fix the issue by clearing the contents of the SoftwareDistribution folder.
- Corrupted system files – On top of the usual suspects, a larger corruption issue affecting your Windows files is also on the table. If you’re facing this issue, deploying SFC and DISM scans in quick succession should take care of the issue for you.
- Corrupted Windows profile – As it turns out, corruption affecting the Windows profile can also be the main driving force behind this consistent error code. If this scenario is applicable, creating a new Windows account should take care of the issue.
- 3rd party antivirus/firewall interference – If you’re using a 3rd party security suite, you should also troubleshoot against a potential interference produced by a false positive. In this case, try disabling or uninstalling the 3rd party suite that you suspect might be overprotective.
- Windows Update Agent glitch – If you’re experiencing this error code while using the Windows Upgrade agent in an attempt to get on Windows 11, you might be dealing with a notorious glitch that’s been active since Windows 11 came out. In this case, you should be able to bypass the error by using the Media Creation Tool instead.
- Corrupted Office installation – In the event that you’re dealing with this error while opening an application from the Office suite (Outlook, Word, Excel, etc.), chances are you’re dealing with a corrupted installation. In this case, perform an online Office repair and see if the problem is resolved afterward.
- Xbox Temporary Data issue – In case you’re experiencing this issue on an Xbox console (Xbox Series or Xbox One), chances are you’re dealing with a temporary data glitch. In this case, do a power-cycle procedure and attempt to sign in once again.
Now that we went over every potential cause of the 0x8019001 error, let’s go over every method that other users have successfully used to fix this problem on Windows 10 and Windows 11.
1. Run the Windows Apps Troubleshooter
You should know that the built-in troubleshooters available on Windows 11 are much more efficient than they were on previous versions of Windows.
With this in mind, you shouldn’t really dismiss this fix if you’re currently dealing with the 0x8019001 error when attempting to open a native Windows app.
The Windows Store Troubleshooter is capable of automatically resolving certain instances where the problem surfaces. We’ve already confirmed the effectiveness of this method out of other users that were experiencing this issue.
Note: The Windows Store Troubleshooter contains a selection of automated repair strategies. Most of these repair strategies can be applied with one click as the utility is capable of deploying if a recognizable malfunctioning scenario is found.
If you haven’t tried to fix this issue by running the Windows Apps Troubleshooter yet, here’s what you need to do:
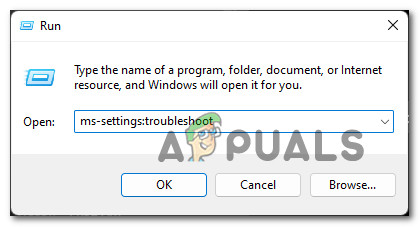
- Open up a Run dialog box by pressing Windows key + R.
- Next, inside the dialog box, type ‘ms-settings:troubleshoot‘, then press Enter to open up the Troubleshooting tab of the Settings app.

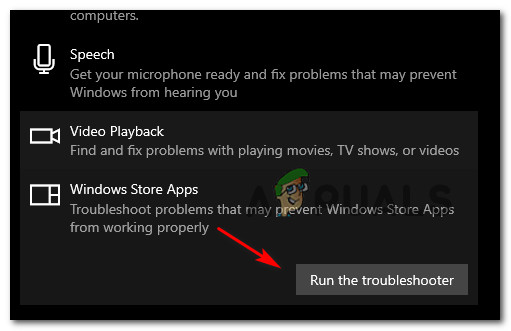
Accessing the troubleshooting tab - Inside the Troubleshoot tab, scroll down and click on Other troubleshooter from the bottom of the screen.
Accessing the Other Troubleshooters - From the Other Troubleshooters page, scroll down to the bottom of the screen and click on the Run button associated with Windows Apps Troubleshooter (under Others).

Running the Windows Store Apps troubleshooter - Wait until the operation is complete as the tool analyses the entire Windows Store component to figure out if any of the repair strategies included with the Windows Store Apps troubleshooter are applicable.

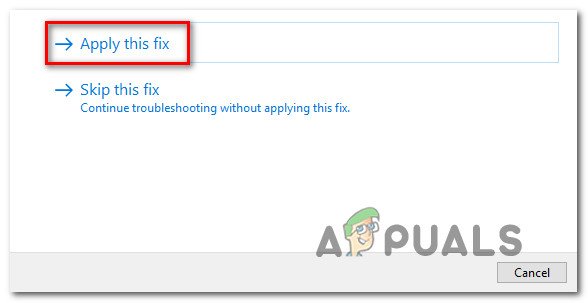
Scan for an Ongoing issue - If you’re presented with a choice, click on Apply this fix and wait until the repair strategy is applied.

Apply this fix Note: Certain repair strategies will require you to do some manual steps. Next, follow the on-screen instructions to enforce the recommended fix.
- After the recommended Windows Store Apps troubleshooter fix has been applied, reboot your Windows computer and see if the problem is now fixed.

In case you’re still seeing the 0x8019001 error when launching certain Windows apps, follow the next method below.
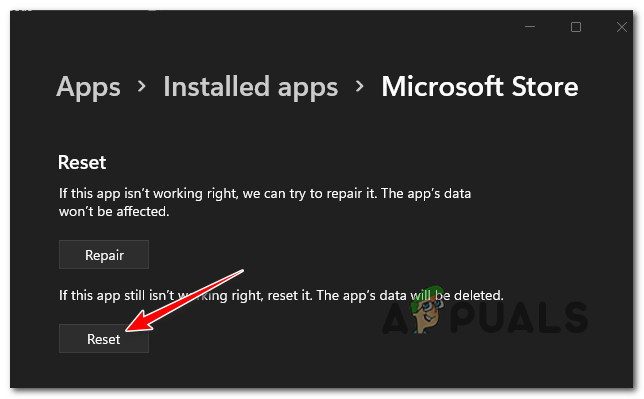
2. Repair or Reset the Windows Store Cache
According to some affected users, this particular issue can also be related to corrupted temporary files or dependencies that the Windows Store has been accumulating as you installed new native apps.
Inconsistencies, glitches, and malfunctions are to be expected as the store component of Windows 11 is still in preview mode.
Generally, if the root cause of the 0x8019001 error is caused by temporary file data or a corrupted dependency, the way to fix it is to repair the entire suite. If this fails, you should proceed with a reset procedure.
Step by step instructions on doing this are included below:
- Start by pressing Windows key + I to open up the Settings menu on Windows 11.
- Inside the root directory of the Settings menu, use the search function in the top-left corner to search for ‘apps’.
- Next, click on Add and Remove Programs from the auto-complete menu.
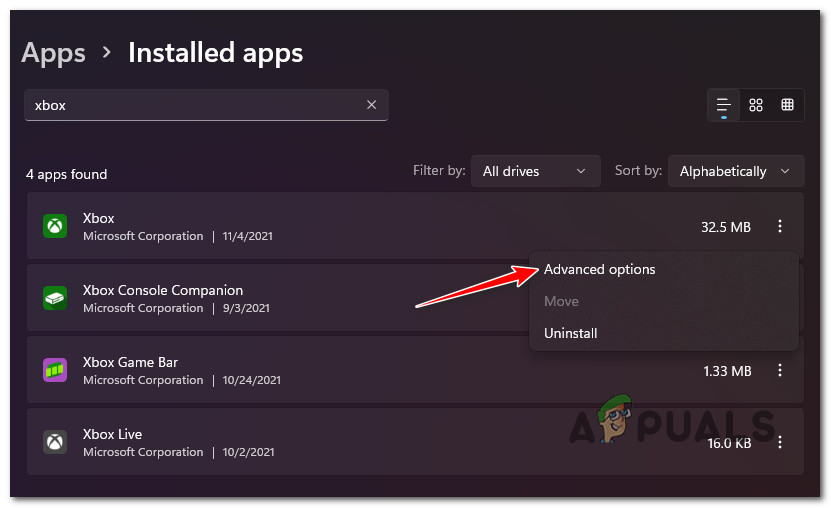
Add or Remove programs for Native apps - Next, move over to the right-hand side menu and use the search function (under App List) to search for ‘Microsoft Store’.
- From the list of results, click on the action button associated with Microsoft Store and select Advanced Settings from the context menu.

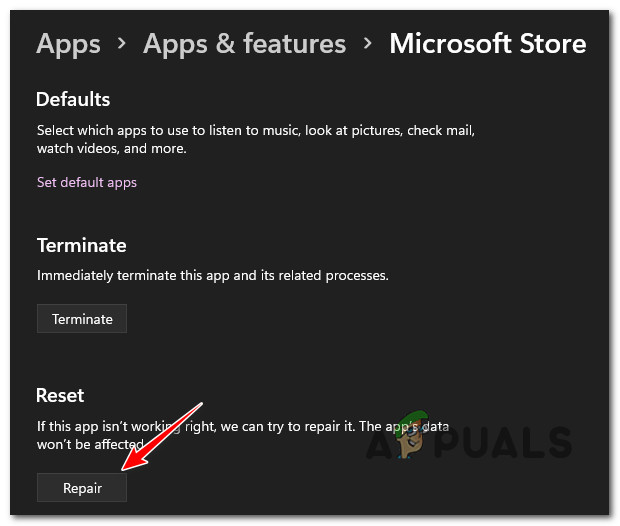
Access the Advanced Options menu - From the Advanced options menu, scroll down to the Reset section and click the Repair button. At the confirmation prompt, click on Repair once again.

Repair the Microsoft Store Note: This operation will scan all system files and dependencies belonging to the Microsoft Store component and figure out whether any replace any file corruption with healthy file equivalents.
- After the operation is complete, recreate the scenario in which you were previously seeing the 0x8019001 error and see if the problem is now fixed.
- If the problem is still ongoing, return to the Advanced Settings menu of Microsoft Store and click the Reset button.

Reset the Microsoft Store Note: Going through with this procedure will not make you lose any library item or any type of other data related to your account. This will clear every temp folder that the Windows Store uses.
- At the confirmation prompt, click Reset once again to initiate the reset procedure.
After the reset procedure is complete, reboot your computer and see if the problem is now resolved.
If the same 0x8019001 error is still occurring, move down to the next potential fix below.
3. Enable Windows Update dependency services
This particular issue can also occur in instances where some WU (Windows Update) services are prevented from running so some native Windows apps can’t make use of them. This can either be caused by manual user intervention or by some 3rd party applications that will try to reduce resource usage.
Fortunately, you can get this resolved by ensuring that every WU service used during the updating process is enabled.
Here’s how you can do this from an elevated Command Prompt:
- Start by pressing Windows key + R. Next, type “cmd” and press Ctrl + Shift + Enter to open up an elevated Command Prompt.
- At the User Account Control (UAC), click Yes at the window to grant administrative privileges.
Create a CMD prompt - After you arrive in the elevated Command Prompt, type the following commands in whichever order, but make sure to hit the Enter key after each command to set the Startup type of each service to Automatic:
SC config trustedinstaller start=auto
SC config bits start=auto
SC config cryptsvc start=auto
- Once you do these changes, perform a system reboot once again and repeat the action that was previously causing the error code at the next system startup.
If the 0x8019001 error is still ongoing, move down to the next potential fix below.
4. Clear the SoftwareDistribution folder
Some users have reported that they managed to resolve the issue by clearing the Software Distribution folder.
Note: This is the main folder that the WU (Windows Update) component is using to store the majority of Windows Update files.
This operation will force your operating system to download all updates that are pending to be installed. This ends up resolving all those instances where the 0x8019001 error is triggered by an incomplete Windows update or by corrupted files inside the SoftwareDistribution folder.
Here’s what you need to do to clear the SoftwareDistribution folder:
Note: Before you can actually clear the SoftwareDistribution folder, you’ll first need to disable a selection of services first (Windows Update Service and Background Intelligence Transfer Service)
- Press Windows key + R to open up a Run dialog box.
- In the run box, type ‘cmd’ and press Ctrl + Shift + Enter to open up an elevated Command Prompt window.
Access the CMD interface Note: Deleting the SoftwareDistribution folder will not be possible unless you disable these two services.
- Inside the elevated Command Prompt, type the following command and hit Enter after each one to stop the two services:
net stop wuauserv
net stop bits
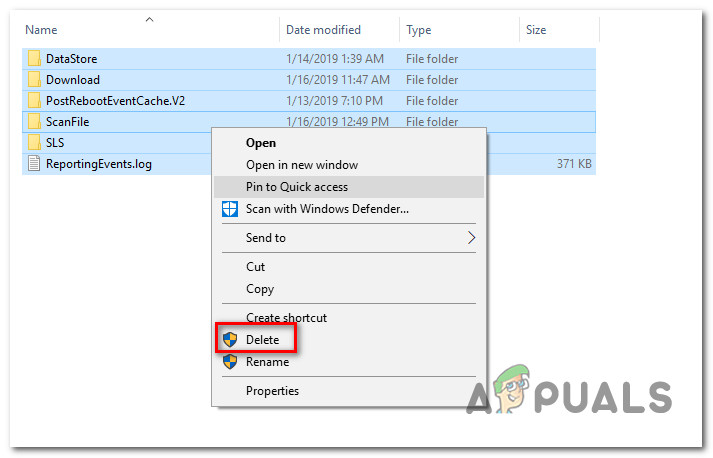
- Next, minimize the CMD prompt and open File Explorer. Once you’re inside, navigate to the following location:
C:\Windows\SoftwareDistribution
- Once you’re finally inside the Software Distribution folder, select all contents of that folder, right-click and choose Delete from the context menu.

Delete the Software Distribution folder - Next, return to the elevated CMD prompt and type the following commands (press Enter after each one) to re-enable the same services that we previously stopped:
net start wuauserv
net start bits
- Reboot your computer and see if the issue is still occurring once the next startup sequence is complete.
If you’re still prevented from launching certain native games via the 0x8019001 error, move down to the next troubleshooting guide below.
5. Deploy SFC and DISM scans
If none of the methods above have worked, chances are you’re dealing with some kind of system file corruption that is somehow affecting the functionality of the native apps that you have installed.
The Store component on Windows 11 is interconnected with the fleet of native apps, so there are a lot of dependencies that might be indirectly causing the 0x8019001 error.
Because of this, you should also take the time to run a couple of built-in utilities capable of scanning for corrupted system files and replacing them with healthy equivalents.
We recommend SFC (System File Checker) and DISM (Deployment Image Servicing and Management).
The ideal way to approach this is to start with an SFC scan performed from an elevated CMD prompt.
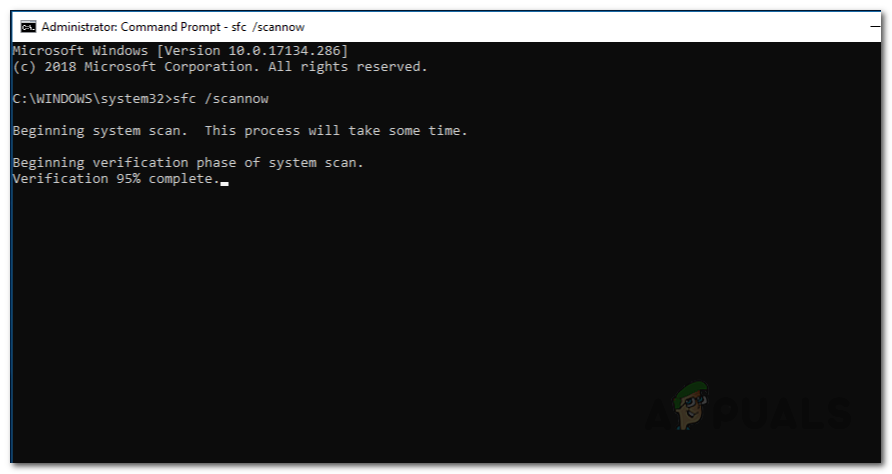
After the operation is finished, reboot your PC and wait for the next startup is complete.
Note: An SFC scan will scan your system for corrupted files and replace any corrupted file or dependency with a healthy equivalent using a locally stored cache.
Once your PC boots back up, move towards a DISM scan (even if you don’t see the error occurring again).
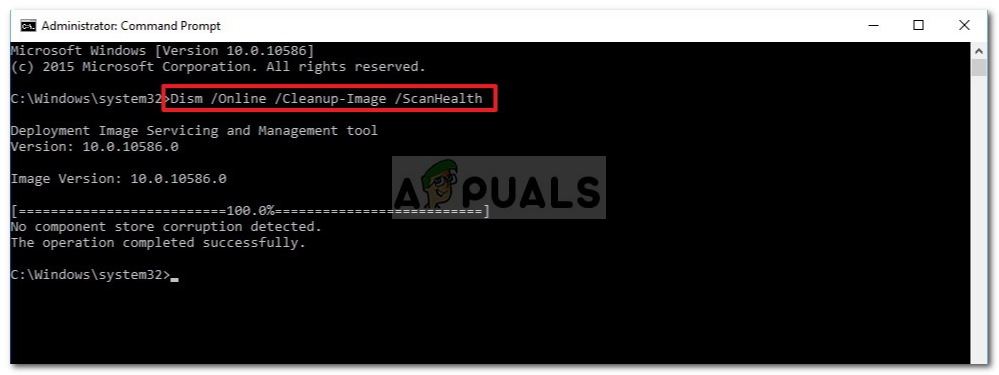
Note: Before you launch a DISM scan, ensure that you have a stable connection to the internet. This is mandatory because DISM is using a sub-component of Windows Update to download healthy files to replace the corrupted ones.
Once both scans are completed successfully, re-open the apps that were causing the 0x8019001 error and see if the problem is now fixed.
If the problem is still not fixed, move down to the next fix below.
6. Create a new Windows profile
As it turns out, the 0x8019001 error can also occur due to some type of corruption originating from your Windows profile.
Some users that were dealing with this problem when launching a native Windows app have confirmed that the issue was resolved after they’ve switched to a local Microsoft account.
Note: This method will end up clearing any corrupted dependencies that are currently tied to your current user profile.
Follow the steps below to create a new local user account for your Windows installation, then use it when launching a native Windows app:
- Start by pressing Windows key + R to open up a run dialog box.
- In the box that just appeared, type ‘ms-settings:otherusers‘ inside the text box and press Enter to open up the Family & other people tab of the Settings app.
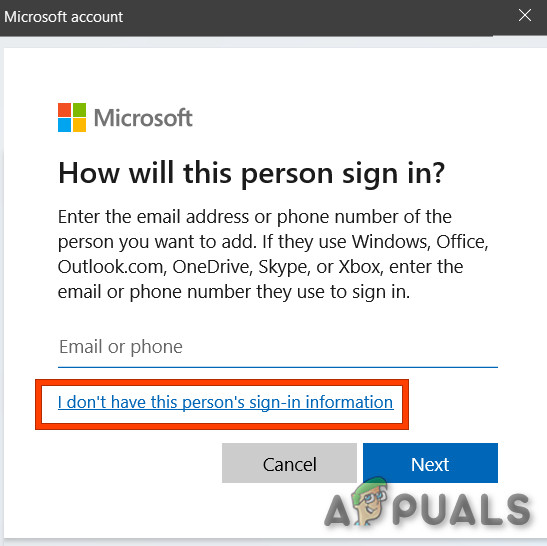
Access the Other Users tab - In the Family & other users tab, scroll down to the Other user’s tab and click on Add someone else to this PC.
- From the next menu, click on ‘I don’t have this person’s sign in information’ in order to create a local account.

I don’t have this person’s sign-in information - At the next screen, log in with your Microsoft account and click on Add a user without a Microsoft account.
- Set a username and password for the new account and assign a series of security questions.
- Next, restart your computer and sign in with the newly created account at the next startup.
- Launch the native Windows app that was previously failing with the 0x8019001 error and check if the problem is resolved.

If the problem is still not fixed, move down to the next potential fix below.
7. Turned Off Sync in Chrome (if applicable)
This might feel like a weird fix, but a lot of users have reported that they managed to get this issue resolved by disabling Chrome’s syncing functionality (oddly enough).
As it turns out, there’s currently an issue with how Chrome handle’s syncing on Windows 11 – under certain circumstances, it might interfere with certain Windows native apps.
Several affected users have turned off Chrome Syncing from settings and this ended up fixing the problem entirely.
Here’s how to do this:
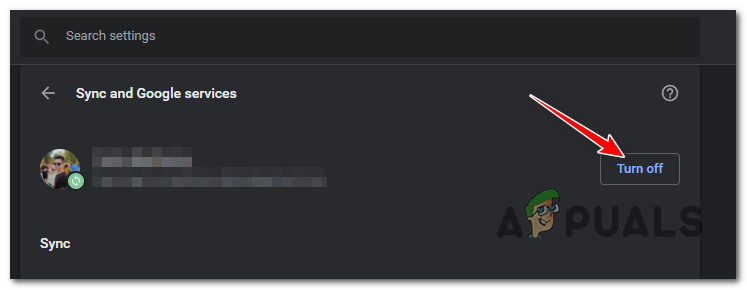
- Open Chrome and click on your account icon from the top-right section of the screen.
- From the context menu that just appeared, click on Sync is on.
Accessing the Syncing icons - Next, you’ll be transported directly into the Sync and Google services menu. Once you’re there, click on the Turn Off button associated with your account.

Disable Chrome Syncing - Once Chrome syncing has been disabled, reboot your PC and see if the error is now resolved.
In case you’re still experiencing the 0x8019001 error when opening Windows native apps, move down to the next method.
8. Disable or Uninstall 3rd party security suite
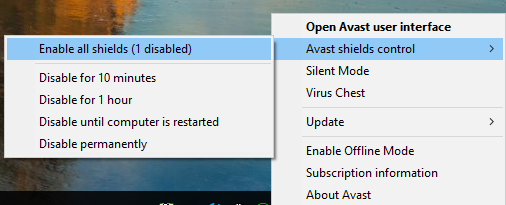
In some cases, the 0x8019001 error might be indirectly caused by an overprotective 3rd party security suite. There are several 3rd party AV suites (including Sophos, AVAST, and McAfee) that might stop the connection between the end-user computer and the Microsoft Store servers.
If this scenario is applicable, try disabling the real-time protection of their 3rd party suite or after they uninstalled it completely.
IMPORTANT: It’s important to note that Windows Defender doesn’t cause the same incompatibility issues with the activation process.
If you don’t want to get rid of your antivirus, you should start by disabling the real-time protection before checking if the problem is fixed.
This procedure will be different depending on the 3rd party security suite that you’re using.
Once you do this, retry the activation procedure and see if the process is now successful.
If you’re using a security suite that includes firewall protection, you should also try to uninstall the security program and ensure that you’re also removing any remnant files that might still enforce the same security rules.
To do this, here’s how to uninstall your 3rd party security suite and delete all remnant files.
If this method didn’t fix the issue or it wasn’t applicable to your scenario, try the next fix below.
9. Upgrade via Media Creation Tool (if applicable)
If you’re experiencing this issue while attempting to use the Windows Upgrade Assistant to get on Windows 11, chances are you can bypass the 0x8019001 error entirely by upgrading using the Media Creation tool instead.
Sure, the procedure is a little bit more tedious, but it will allow you to get the job done in case the Windows Upgrade Assistant couldn’t.
If you have no choice but to go this manual route, follow the instructions here to upgrade to Windows 11 via the Media Creation Tool.
In case this scenario was not applicable to you, move down to the next method below.
10. Repair the Office Installation
If none of the potential fixes above have worked for you, chances are you’re encountering the ‘0x8019001’ error due to some type of local corruption originating in the Office installation folder.
Typically, this problem will start occurring after an unexpected machine interruption or after an AV scan ended up quarantining files from the Office installation.
You should be able to fix the issue by repairing the Office installation in order to resolve any type of corruption that might be responsible for this error:
- Start by pressing Windows key + R to open up a Run dialog box.
- Next, type ‘appwiz.cpl’ inside the text box and press Enter to open up the Programs and Features menu.
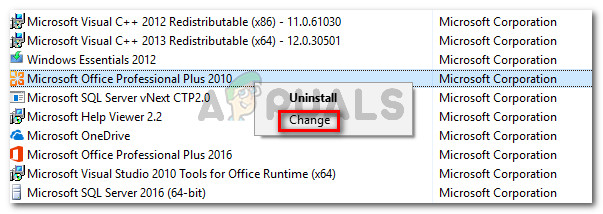
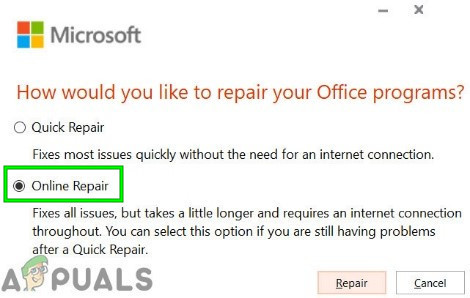
Open the Programs and Features menu - In the Programs and Features menu, move down through the list of installed applications and locate the Office installation. Once you locate it, right-click on the listing associated with Office and choose Change from the newly appeared context menu.

Change the Office installation - Next, click on the Online Repair option from the list of available options and wait for the operation to complete.
Important: You need a stable Internet connection in order to go for this repair strategy.
Perform an Online repair on the Office suite - After the operation is complete, reboot your machine and see if the problem is now fixed.
In case you’re encountering the 0x8019001 error on Xbox consoles, move down to the final fix below.
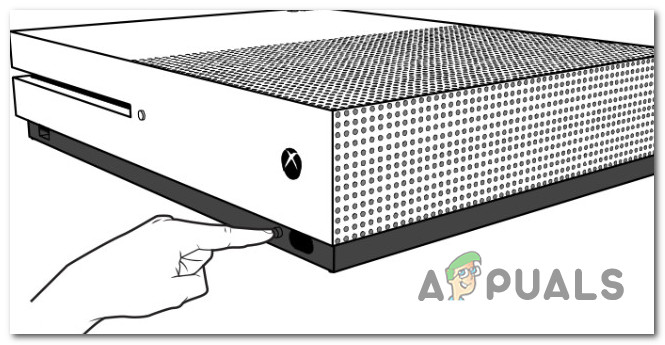
11. Power cycle your Xbox console (if applicable)
If you’re experiencing this issue while attempting to sign in with your Xbox account, chances are you’re dealing with a glitch facilitated by temporary data maintained by your Xbox One or Xbox Series X console.
To fix this, you’ll need to force the power capacitors to drain themselves by initiating a power-cycling procedure.
In case this is the scenario in which you’re experiencing the 0x8019001 error is applicable, here’s how to perform a power cycle on your Xbox console:
Note: The instructions below will work on both Xbox One and Xbox Series console models.
- Start by making sure your console is in idle mode, then press the Xbox button on your console.
- Keep the power button pressed for 10 seconds or until you see the front LED turning off.

Power cycle console - Once the Xbox One or Xbox Series S / X console is turned off, go ahead and disconnect the power cable and wait for one minute or so to allow the power capacitors time to discharge.

Power cycle Xbox console - Next, connect the power cable back, start up the console conventionally and see if the problem is now fixed.

What Is Error Code 0x80190001?
This type of error occurs when an update is not complete within Windows. It sometimes may pop up with messages like “Something went wrong: 0x80190001.” Permissions issues, corruption of some of the files, or bad hardware can be pinpointed as the root of the problem by a failure to complete an installation or an update.
Causes of Error Code 0x80190001
There are several reasons why you might encounter this error, including:
- Queued updates: Too many pending updates can cause the system to glitch.
- Insufficient disk space: When the drive doesn’t have enough room for new files, updates fail.
- Corrupted update files: The error can be provoked by files that are either damaged or incomplete.
- External Hardware: Devices connected to the computer can sometimes interrupt an update.
- Driver-related conflicts: Outdated drivers or ones that are not compatible might be what make an update not succeed.
- Malware infection: Infected malicious software can interrupt the process of updating.
Solutions to Fix Error Code 0x80190001
The Windows Update or Microsoft Store error 0x80190001 can show up in different ways, sometimes with the message “Something went wrong: 0x80190001.” No matter how it appears, it can be fixed.
Below are some simple methods to resolve the error. You don’t need to try them all—just follow the order provided, starting with the easiest fix.
Disclaimer: These steps involve changing system files and settings. Proceed carefully and at your own risk. We are not responsible for any potential damage or data loss. If you're unsure, consider seeking help from a professional.
1. Remove Temporary and Junk Files
Storage Sense can run in the settings for cleaning of temporary and junk files in Windows 10/11. It runs automatically, removing unneeded files like temporary internet files and older Recycle Bin content. A run will clear space to help with system performance. You can be sure to check the list of files before deletion just in case something is in there that shouldn’t be deleted.
2. Clear the SoftwareDistribution Folder
The SoftwareDistribution folder holds all of the temporary files used by Windows Update. These files in this folder can be one of the culprits of this error 0x80190001. Deleting these files may be a probable solution. Steps are as follows:
- Open Command Prompt as Administrator.
- Run
net stop wuauservcommand to stop the Windows Update service. - Run
net stop bitscommand to stop the Background Intelligent Transfer Service. - Press Win + R to open the Run dialog, type
C:\Windows\SoftwareDistribution, and press Enter. Select all contents of the folder and delete them. - Return to Command Prompt, type
net start wuauservto restart the Windows Update service. - Run
net start bitsto restart the Background Intelligent Transfer Service.
Once done, try reinstalling the update again.
3. Run the Windows Update Troubleshooter
But Windows has a troubleshooter that will detect the problem with the update and fix the same. To do so, go to Settings > Update & Security > Troubleshoot, select Windows Update and run the tool.
4. Disable Your Antivirus During the Windows Update Process
Sometimes, antivirus software can interfere with Windows updates. Temporarily disable any third-party antivirus software and attempt the update. If this works, consider replacing your antivirus solution with something less invasive, like Outbyte AVarmor.
5. Disable Your Internet Connection
Many users reported that the error can be fixed by disabling your internet connection. And, so is this one worth trying.
During the installation phase, disable your internet connection. After that, follow the on-screen prompts. Though this may not be the best solution out there, some say it works.
6. Unplug External Devices
There may be a conflict with external hardware such as a USB drive or printer that is causing the inability to update. First disconnect any and all peripheral devices that you do not need and try updating.
7. Update Device Drivers
Outdated or bad drivers could block updates. Run Outbyte Driver Updater to detect the missing or outdated drivers on your system and install the latest ones. It could resolve the conflicts linked to the error.
8. Repair Corrupted System Files
Corrupted system files might also be the cause for the error. In that case, you will have to run the System File Checker. Here is how you can do that:
- Press Win + X and open the WinX menu.
- Choose Command Prompt (Admin) or PowerShell (Admin).
- In the opening window, type
sfc /scannowand press Enter.
The System File Checker will scan your system for corrupted files, and then repair them. This may take up to 10 to 15 minutes to complete. When it is done, check to see if the issue has been fixed.
9. Use the Media Creation Tool
This step should serve as a last resort. Download the Windows Media Creation Tool directly from Microsoft’s official website. It can be used to bypass some update errors by manually upgrading your Windows installation.
Read about common Windows Errors:
How to Fix the Error Code 0xc000021a
Error Code 0x80080005
Fixing Windows Update Error Code 0x800705b4
How to Fix the 0x800F0831 Error Code
FAQs
What is error code 0x80190001?
This is an error in the Windows Update process; it occurs in case of some corrupted file or system permission.
Is malware a cause for error 0x80190001?
Yes, malware hijacks the update process and generates such types of error codes. It is advisable to run an anti-malware utility.
How to clear corrupted update files?
Enter Safe Mode and navigate to C:\\Windows\\SoftwareDistribution. This folder needs to be cleared and then rebooted. After that, try the update again.
Can external devices be the cause of Windows Update errors?
Sometimes, yes; these updates might get interfered with by being in the company of other USB drives or printers. Disconnect them and try again.
How can I avoid these update errors in the future?
Prevent the interruptions of updates by always keeping your system and drivers updated, never letting your free disk space be too low, and using a good antivirus tool.
Readers help support Windows Report. We may get a commission if you buy through our links.
Read our disclosure page to find out how can you help Windows Report sustain the editorial team. Read more
The Windows update error 0x80190001 is hindering Windows users from updating their PCs. This error affects every version of Windows and it’s usually due to connection issues, but it may also be caused by corrupted system files.
How do I fix the error code 0x80190001?
1. Run the Update Troubleshooter
- Press the Windows key + I to open the Settings app.
- Now go to the Update & Security section.

- Select Troubleshoot from the menu on the left.
- Choose the Additional troubleshooters option.
- Now, select Windows Update.

- Finally, click the Run the troubleshooter button.
- Follow the instructions on the screen to complete the process.


The Windows Update troubleshooter is one of the built-in tools to fix update errors like 0x80190001. Once the troubleshooter is finished, try to update Windows again and check if the problem is still there.
2. Repair your system files
- Press Windows key + X and choose Command Prompt (Admin) or Powershell (Admin).
- When Command Prompt starts, run the sfc /scannow command.

- SFC scan will now start. Remember that an SFC scan can take up to 10-15 minutes, so don’t interfere with it, and don’t run any other applications in the background.

Another cause for error 0x80190001 can be file corruption, and if your system files are damaged, you need to repair them using an SFC scan.
Once the SFC scan is finished, check if the problem is still there. If the issue persists or you could not run or complete the SFC scan, you need to use the DISM scan instead.

To do that, start Command Prompt as administrator and run the command below: DISM /Online /Cleanup-Image /RestoreHealth
This should fix the damaged files and solve any issue with the SFC scan
However, instead of going through the stress of repairing files manually, we recommend using a third-party repair application.
If your system files are faulty or missing, these tools can replace them, restore your registry, and even do a comprehensive hardware analysis of your Windows PC.
They repair and reverse damage on your Windows OS by replacing damaged and removed files with new Windows files and components from the constantly online databases.
3. Disable your Internet connection
According to users, you might be able to fix error 0x80190001 simply by disabling your Internet connection. Make sure that your update is downloaded and installed.
During the installation process, disable your Internet connection. After doing that, follow the instructions on the screen to complete the installation. Of course, this isn’t the best solution, but few users claim it works, so you might want to try it out.
4. Check your antivirus
The problem might be your antivirus software if you can’t update Windows due to error 0x80190001.
Although antivirus tools offer protection, they can often interfere with your system and cause various errors.
To fix this problem, many users suggest temporarily disabling some features or your antivirus. However, if removing the antivirus solves the issue, you should consider switching to a different antivirus solution.
There are many error-free antivirus options like the ESET NOD32 on the market. This software is your best bet to prevent future issues and keep your system running smoothly, as it is an antivirus with low CPU usage.
5. Disconnect all peripherals
If you have problems with error 0x80190001, the issue might be your USB devices. Sometimes USB devices can interfere with your system, leading to similar problems.
However, you might be able to fix the problem simply by disconnecting all USB devices before trying to install the update.
Disconnect all USB devices except for your mouse and keyboard. Once everything is disconnected, try to install the update again.
This isn’t the most efficient solution, but several users reported it works, so feel free to try it.
6. Download and install the update manually
- Find the KB number of the problematic update. You can do that from the Windows Update section or the Update History website.
- Once you get the KB number, go to Microsoft’s Update Catalog website and enter the KB number.
- A list of results will appear. Download the update that matches your system architecture and install it.


Several users reported successfully circumventing error 0x80190001 simply by manually downloading the update. However, we must mention that this isn’t a permanent solution, and the issue might reappear when you try to update your system.
7. Make sure your date and time are correct
- Right-click the clock in the bottom right corner and select Adjust the date/time.
- Toggle switch for the Set time automatically option backward to disable it.
- Wait for a few moments and then turn it back on again.


A couple of users reported that error 0x80190001 occurred due to incorrect date and time on their PC. Adjusting your time and date should fix the issue in this case.
After following the steps above, the date and time will be readjusted and synchronized. You can also click the Change button and manually adjust the date and time if you want.
- Fix Windows 10/11 error 0x800F0955 to proceed with updates
- Fix: Error code 0x0 during Windows 10 upgrade
- What to do if Windows 10/11 update deletes all your files
- FIX: Windows Installer Service could not be accessed
8. Perform a Clean boot
- Press Windows key + R, enter msconfig, and click OK.
- Click the Services tab.
- Check the box for Hide all Microsoft services.
- Now, click the Disable all button.

- Go to the Startup tab and click Open Task Manager.
- Right-click on each application there and choose Disable from the menu.

- Go back to the System Configuration window and click Apply, followed by OK, to save the changes.


This issue can sometimes occur due to third-party applications and services. However, you can fix that by performing a Clean boot. Then, make sure you restart your PC and check if the issue is resolved.
9. Perform an in-place upgrade
- Go to Microsoft’s Windows 10 upgrade website.
- Click the Download Now button under the Create Windows 10 Installation Media option.

- Now, click the downloaded tool and Accept the license terms.
- Then, select Upgrade this PC now and click Next.
- Check the Keep personal files and apps option to keep your apps, files, and settings.
- Click Install to launch the upgrade process.

According to users, sometimes you can fix this problem simply by performing an in-place upgrade. However, performing an in-place upgrade will force Windows 10 to update to the latest version.
Once the setup is finished, you’ll have the latest version of Windows installed, and the problem will be resolved.
How can I fix error code 0x80190001 on Windows 11?
The main reason you are experiencing the update error 0x90190001 on Windows 11 is interference from your antivirus. You can solve this by disabling your antivirus or obliterating it.
Another known cause of the issue is incorrect time and date. We have shown how to change this earlier in this guide. Finally, you can use our other solutions to fix this error, as the causes are similar on all Windows PC.
- Recent Windows 11 update lets you disable profanity filter in voice typing
- Windows 11 KB5055627 update makes File Explorer more fluid
- A few keyboard settings are moving from Control Panel to Settings app in Windows 11
- Microsoft finally launches the controversial Recall feature after a long delay
Why does the Windows Update error 0x80190001 appear?
As mentioned earlier, there are various versions of this error, each with varying causes. Below are some of the popular ones:
- Windows 10 upgrade failed – If your Windows 10 upgrade fails due to this error code, try some of our solutions and check if that solves the problem.
- 0x80190001 Creators Update, Windows 10 – Many users reported this error while trying to install Creators Update. Bear in mind that this issue can affect any Windows 10 update, but in most cases, you can solve this problem by disabling your antivirus.
How do I do a factory reset with Windows 10?
- Press the Windows key + I to open the Settings app.
- Choose the Update & Security option.
- Click Recovery in the left pane.
- Click the Get Started button under the Reset this PC option.
- Choose to keep your files or wipe everything and click the Next button.
- Now, follow the simple onscreen instructions to complete the process.
If you encounter this issue, the standard solutions listed above will assist you in resolving the Windows 10 update error code 0x80190001.
You should also verify the product key to determine if it is a valid version because this problem might occur even if you use a copy of Windows.
If you are facing other issues like the Windows 10 update error 0x800f0900, check our easy guide to fix it quickly. We also have provided fixes for Windows 10 update error 0x8007042B.
Feel free to let us know in the comments below if any of our fixes helped you solve the issue.