
Последнее обновление: 31.10.2015
TrackBar
TrackBar представляет собой элемент, который с помощью перемещения ползунка позволяет вводить числовые значения.
Некоторые важные свойства TrackBar:
-
Orientation: задает ориентацию ползунка — расположение по горизонтали или по вертикали
-
TickStyle: задает расположение делений на ползунке
-
TickFrequency: задает частоту делений на ползунке
-
Minimum: минимальное возможное значение на ползунке (по умолчанию 0)
-
Maximum: максимальное возможное значение на ползунке (по умолчанию 10)
-
Value: текущее значение ползунка. Должно находиться между Minimum и Maximum
Свойство TickStyle может принимать ряд значений:
-
None: деления отсутствуют -
Both: деления расположены по обеим сторонам ползунка -
BottomRight: у вертикального ползунка деления находятся справа, а у горизонтального — снизу -
TopLeft: у вертикального ползунка деления находятся слева, а у горизонтального — сверху (применяется по умолчанию)
К наиболее важным событиям элемента следует отнести событие Scroll, которое позволяет обработать перемещение
ползунка от одного деления к другому. Что может быть полезно, если нам надо, например, устанавливать соответствующую громкость звука в
зависимости от значения ползунка, либо какике-нибудь другие настройки:
public partial class Form1 : Form
{
    public Form1()
    {
        InitializeComponent();
		// установка обработчика события Scroll
        trackBar1.Scroll+=trackBar1_Scroll;
    }

    private void trackBar1_Scroll(object sender, EventArgs e)
    {
        label1.Text = String.Format("Текущее значение: {0}", trackBar1.Value);
    }
}
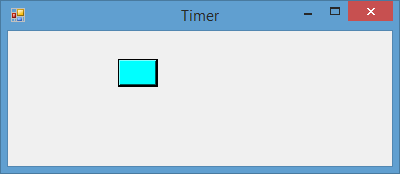
Timer
Timer является компонентом для запуска действий, повторяющихся через определенный промежуток времени. Хотя он не является
визуальным элементом, но его аткже можно перетащить с Панели Инструментов на форму:
Наиболее важные свойства и методы таймера:
-
Свойство Enabled: при значении true указывает, что таймер будет запускаться вместе с запуском формы
-
Свойство Interval: указывает интервал в миллисекундах, через который будет срабатывать обработчик события Tick, которое есть у таймера
-
Метод Start(): запускает таймер
-
Метод Stop(): останавливает таймер
Для примера определим простую форму, на которую добавим кнопку и таймер. В файле кода формы определим следующий код:
public partial class Form1 : Form
{
    int koef = 1;
    public Form1()
    {
        InitializeComponent();

        this.Width = 400;
        button1.Width = 40;
        button1.Left = 40;
        button1.Text = "";
        button1.BackColor = Color.Aqua;

        timer1.Interval = 500; // 500 миллисекунд
        timer1.Enabled = true;
        button1.Click += button1_Click;
        timer1.Tick += timer1_Tick;
    }
    // обработчик события Tick таймера
    void timer1_Tick(object sender, EventArgs e)
    {
        if (button1.Left == (this.Width-button1.Width-10))
        {
            koef=-1;
        }
        else if (button1.Left == 0)
        {
            koef = 1;
        }
        button1.Left += 10 *koef;
    }
    // обработчик нажатия на кнопку
    void button1_Click(object sender, EventArgs e)
    {
        if(timer1.Enabled==true)
        {
            timer1.Stop();
        }
        else
        {
            timer1.Start();
        }
    }
}
Здесь в конструкторе формы устанавливаются начальные значения для таймера, кнопки и формы.
Через каждый интервал таймера будет срабатывать обработчик timer1_Tick, в котором изменяется положение
кнопки по горизонтали с помощью свойства button1.Left. А с помощью дополнительной переменной koef
можно управлять направлением движения.
Кроме того, с помощью обраотчика нажатия кнопки button1_Click можно либо остановить таймер (и вместе с ним движение
кнопки), либо опять его запустить.
Индикатор прогресса ProgressBar
Элемент ProgressBar служит для того, чтобы дать пользователю информацию о ходе выполнения какой-либо задачи.
Наиболее важые свойства ProgressBar:
-
Minimum: минимальное возможное значение
-
Maximum: максимальное возможное значение
-
Value: текущее значение элемента
-
Step: шаг, на который изменится значение Value при вызове метода
PerformStep
Для имитации работы прогрессбара поместим на форму таймер и в коде формы определим следующий код:
public partial class Form1 : Form
{
    public Form1()
    {
        InitializeComponent();

        timer1.Interval = 500; // 500 миллисекунд
        timer1.Enabled = true;
        timer1.Tick += timer1_Tick;
    }
    // обработчик события Tick таймера
    void timer1_Tick(object sender, EventArgs e)
    {
        progressBar1.PerformStep();
    }
}
-
Create a Progress Bar in Windows Forms App (.NET Framework)
-
Create a Progress Bar Using the
BackgroundWorkerClass inC# -
Create a Progress Bar With Text in
C#
Lengthy file operations and calculations require indications of progress, and a progress bar is the best way to display progress information to the user during a long-running operation.
This tutorial will teach you how to create three different progress bars in C# using Visual Studio 2022.
A dynamic progress bar in C# features two properties to specify its range (Maximum and Minimum properties), mainly equivalent to the number of files to copy or processes to run. Furthermore, when a process is complete and to perform increment in the value of the progress bar, the Step property with the PerformStep method is used.
A pre-designed progress bar in C# can only be oriented horizontally; however, you can create a custom progress bar to suit your needs. A progress bar’s primary purpose is to alert the user about the progress of currently performing tasks by a C# application.
Create a Progress Bar in Windows Forms App (.NET Framework)
A progress bar acts as a user interface element that indicates the progress of an operation. A progress bar in C# supports two modes representing progress: indeterminate and continuous.
The indeterminate mode for the progress bar comes in handy when performing a task or operation you don’t know how long it will take. It is done by loading data asynchronously on a background thread (generally with the help of the BackgroundWorker class) while the C# application is still responsive to the user.
It’s a common design paradigm to display an indeterminate progress bar as data is loading and is set until actual progress begins. When creating a progress bar in WinForms, it’s important to set the progress bar’s Style property to Marquee.
However, a progress bar in WPM has the Isdeterminate property which is similar to Style, and its value as True works similar to Marquee.
// namespaces for C# windows application (.NET Framework)
using System;
using System.Windows.Forms;
namespace ProgressBarExp {
public partial class Form1 : Form {
public Form1() {
InitializeComponent();
}
// create a `progressBar1` progress bar in your C# project design
private void progressBar1_Click(object sender, EventArgs e) {}
// create a method that performs some calculations
// the progress bar will synch with this method and progress accordingly
private void Caluculate(int i) {
// perform a task
}
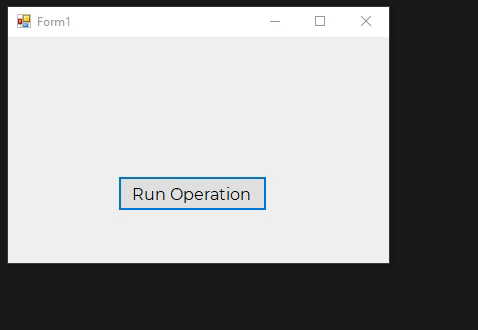
// create a `RunOperation` button to perform calculations or take action in your C# project
// design
private void RunOperation_Click(object sender, EventArgs e) {
// set the visibility of progress bar
progressBar1.Visible = true;
for (int j = 0; j < 10000001; j++) {
Caluculate(j);
if (j == 10000000) {
MessageBox.Show("Operation Complete!");
progressBar1.Visible = false;
}
}
}
private void Form1_Load(object sender, EventArgs e) {
// for indeterminate progress using .NET framework
progressBar1.Style = ProgressBarStyle.Marquee;
progressBar1.Visible = false;
}
}
}
Output:

A progress bar only serves its purpose correctly when it reports progress as your data is loaded. In C# applications, progress bars are popular for installing software, performing lengthy tasks, and startup, so the users know exactly how much time a process will take and how much progress is remaining.
To create a continuous progress bar in C#, remove the code from the RunOperation_Click event and replace it with the following code:
private void RunOperation_Click(object sender, EventArgs e) {
  progressBar1.Visible = true;
  progressBar1.Maximum = 10000000;
  progressBar1.Value = 1;

  for (int j = 0; j < 10000001; j++) {
    Caluculate(j);

    if (progressBar1.Value == 10000000) {
      MessageBox.Show("Operation Complete!");
      progressBar1.Visible = false;
      break;
    }

    // it will measure the progress of the task or operations and progress in regards to the
    // completion of a task It only requires if the progress bar style is not set to Marquee
    progressBar1.PerformStep();
  }
}
Output:
In the Form1_Load event, comment the progressBar1.Style = ProgressBarStyle.Marquee; line from C# code, and you will have a continuous progress bar according to the task completion percentage %.
Create a Progress Bar Using the BackgroundWorker Class in C#
It must be clear how straightforward it is to use a progress bar in C# applications. Now it’s time to study how a progress bar moves forwards by synching with some actual work and not just by a static value.
Where most of the new C# developers run into trouble is when they realize that you can’t perform a task and update a progress bar, at the same time, on the same thread. If you are performing a heavy task on the user interface thread of a C# application and trying to update the progress bar accordingly, you require the services of a BackgroundWorker class in C#.
Without the help of the BackgroundWorker class, which pretty much renders a progress bar useless. The progress bar won’t show any update to the progress before a task is completed successfully and requires a background worker to update both on a single thread simultaneously.
It is an ideal way to create a progress bar with a background working in C# to perform a task on a worker thread and then push the update to the user interface thread, which will instantly update the progress bar and show these updates.
using System;
using System.Windows;
using System.Threading;
using System.Windows.Forms;
using System.ComponentModel;

namespace ProgressBarExp {
  public partial class Form1 : Form {
    public Form1() {
      InitializeComponent();
    }

    // create a progress bar in your C# project's Form1.cs [Design]
    private void progressBar1_Click(object sender, EventArgs e) {}

    // a button to perform an operation synched with the `progressBar1`
    private void RunOperation_Click(object sender, EventArgs e) {
      BackgroundWorker taskSynch = new BackgroundWorker();
      taskSynch.WorkerReportsProgress = true;
      taskSynch.DoWork += taskSynch_DoWork;
      taskSynch.ProgressChanged += taskSynch_ProgressChanged;
      taskSynch.RunWorkerAsync();
    }

    // Form1 load event
    private void Form1_Load(object sender, EventArgs e) {}

    // create a method that connects `BackgroundWorker` with a task
    void taskSynch_DoWork(object sender, DoWorkEventArgs e) {
      for (int i = 0; i < 100; i++) {
        (sender as BackgroundWorker).ReportProgress(i);
        Thread.Sleep(100);
      }
    }

    // create a method that connects a task with the `progressBar1`
    void taskSynch_ProgressChanged(object sender, ProgressChangedEventArgs e) {
      progressBar1.Value = e.ProgressPercentage;
    }
  }
}
Output:
Create a Progress Bar With Text in C#
Generally, you can create a custom progress bar that gives you more control over its configuration. However, writing a C# code from scratch to create a progress bar is lengthy work; you can use NuGet packages like Syncfusion UI Control or ShellProgressBar to get ready-to-use progress bars with incredible designs.
The simplest way to create a progress bar with text is by using labels and changing their text according to the progression of a task. You can synch its progression with the progression of a task.
using System;
using System.Threading;
using System.Windows.Forms;
using System.ComponentModel;
using System.Drawing;

namespace ProgressBarExp {
  public partial class Form1 : Form {
    public Form1() {
      InitializeComponent();
    }

    private void RunOperation_Click(object sender, EventArgs e) {
      BackgroundWorker taskSynch = new BackgroundWorker();
      taskSynch.WorkerReportsProgress = true;
      taskSynch.DoWork += taskSynch_DoWork;
      taskSynch.ProgressChanged += taskSynch_ProgressChanged;
      taskSynch.RunWorkerAsync();
    }

    private void Form1_Load(object sender, EventArgs e) {
      // make the percentage label `backcolor` transparent
      label1.BackColor = Color.Transparent;
    }

    void taskSynch_DoWork(object sender, DoWorkEventArgs e) {
      for (int i = 0; i < 101; i++) {
        (sender as BackgroundWorker).ReportProgress(i);
        Thread.Sleep(100);

        // to support multi-threading for label1 and label 2
        if (label1.InvokeRequired) {
          label1.Invoke(new MethodInvoker(delegate {
            // shows the progression, it is syched with the task progression
            label1.Text = "Progress: " + i + "%";
          }));
        }

        if (label2.InvokeRequired) {
          label2.Invoke(new MethodInvoker(delegate {
            if (i < 25) {
              label2.Text = "Starting the task...";
            } else if (i > 25 && i < 50) {
              label2.Text = "Half way through...";
            } else if (i > 50 && i < 99) {
              label2.Text = "The wait will be over soon...";
            } else if (i == 100) {
              label2.Text = "Task is completed successfully!";
            }
          }));
        }
      }
    }

    void taskSynch_ProgressChanged(object sender, ProgressChangedEventArgs e) {
      // it will update the progress bar in real time depends on the progress of a task
      progressBar1.Value = e.ProgressPercentage;
    }
  }
}
Output:
You must create a progressBar1 progress bar, a Run Operation button, and label1 and label2 labels in Form1 [Design] of your C# project before running this C# code.
In this tutorial, you learned how to create different types of progress bars and synch them with the real progression of a task using the BackgroundWorker class in C#.
Enjoying our tutorials? Subscribe to DelftStack on YouTube to support us in creating more high-quality video guides. Subscribe
Всем привет. В данной статье мы с вами разберём, как работать с элементом ProgressBar в C# и напишем тестовое приложение, демонстрирующее его работу.
В статье не будет рассказано про запуск какого-либо процесса и отражение хода его выполнения с помощью элемента ProgressBar, равно как и не рассматривается взаимодействие ProgressBar с элементом BackgroundWorker. Для этой цели есть отдельная статья: Пишем на C# программу для поиска файлов, используя ProgressBar и BackgroundWorker. В рамках текущей статьи рассматриваются совсем базовые свойства элемента ProgressBar и синтетический пример заполнения его индикатора вручную.
Элемент ProgressBar доступен среди набора стандартных элементов, предоставляемых в Windows Forms. Как следует из названия этого элемента, он используется для индикации состояния прогресса выполнения какого-то процесса. Например, это может быть копирование файлов, установка программы, выполнение какой-то фоновой задачи и так далее — здесь всё зависит от решаемой задачи, для которой необходимо использовать ProgressBar.
В проекте для Windows Forms элемент будет доступен на панели элементов, он выглядит так:
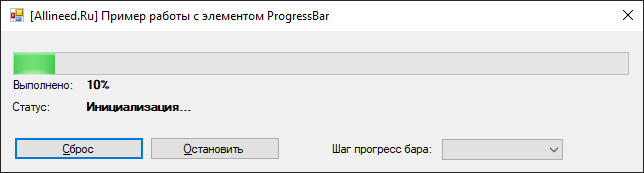
Мы напишем простое приложение для Windows Forms в среде разработки Microsoft Visual Studio, которое покажет основные возможности элемента ProgressBar. При старте нашего приложения будет происходить заполнение прогресса для какого-то абстрактного тестового процесса/задачи. Можно будет остановить процесс и вместе с ним заполнение прогресс бара, а также можно будет сбросить весь процесс и начать его сначала. Мы также будем выводить процент выполнения процесса и отображать некий текстовый статус в отдельных метках, чтобы пользователь программы понимал, что происходит с программой. Наконец, в поле «Шаг прогресс бара» мы сможем поменять шаг заполнения прогресс бара (шаг влияет на скорость продвижения индикатора прогресса). Выглядеть приложение будет следующим образом:
Начнём с создания нового проекта в среде разработки Microsoft Visual Studio. При прохождении шагов в мастере создания нового проекта выберем тип проекта «Приложение Windows Forms (.NET Framework)», а в качестве имени проекта выберем ProgressBarSample. Когда проект будет создан, выберем главную форму и в окне «Свойства» изменим её название со стандартного Form1 на FrmProgressBarSample:
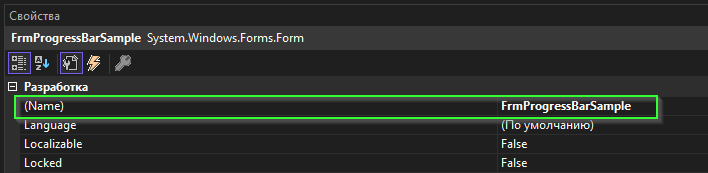
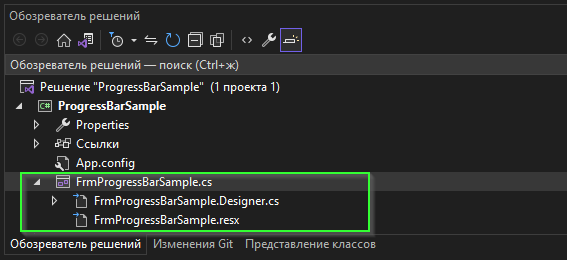
Также поменяем название файла формы в окне «Обозреватель решений» — с предлагаемого по умолчанию имени Form1.cs мы переименуем класс в FrmProgressBarSample.cs. Для этого выберем файл класса главной формы и нажмём F2 (либо в контекстном меню выберем пункт меню «Переименовать»), затем введём новое название класса FrmProgressBarSample.cs. В итоге у нас должно получиться следующее:
Выделим главную форму в режиме конструктора и зададим ей следующие свойства:
- StartPosition — CenterScreen
- Size — 658; 180
- FormBorderStyle — FixedSingle
- Text — [Allineed.Ru] Пример работы с элементом ProgressBar
- MaximizeBox — False
- MinimizeBox — False
Теперь настало время разместить на главной форме приложения необходимые элементы управления, включая и сам ProgressBar.
Перетаскиваем на главную форму следующие элементы из панели элементов:
- 1 элемент ProgressBar
- 5 элементов Label
- 2 элемента Button
- 1 элемент ComboBox
- 1 элемент Timer
Далее по очереди выберем каждый элемент, размещённый на форме и установим им следующие свойства:
элемент ProgressBar:
- Name — ProgressBarProcess
- Size — 616; 23
- Location — 12; 21
1-я метка (с текстом «Выполнено»):
- Name — LabelPercentComplete
- Location — 9; 47
- Text — Выполнено:
2-я метка (для отображения процента заполнения прогресс бара):
- Name — LabelPercentCompleteText
- Location — 82; 47
- Text — %
- Font — Microsoft Sans Serif; 8,25pt; style=Bold
3-я метка (с текстом «Статус»):
- Name — LabelStatus
- Location — 9; 69
- Text — Статус:
4-я метка (для отображения статуса выполнения задачи):
- Name — LabelStatusText
- Location — 82; 69
- Text — ?
- Font — Microsoft Sans Serif; 8,25pt; style=Bold
5-я метка (с текстом «Шаг прогресс бара»):
- Name — LabelProgressStep
- Location — 328; 111
- Text — Шаг прогресс бара:
1-я кнопка (с текстом «Сброс»):
- Name — ButtonReset
- Location — 13; 106
- Size — 130; 23
- Text — &Сброс
2-я кнопка (с текстом «Остановить»):
- Name — ButtonStop
- Location — 149; 106
- Size — 130; 23
- Text — &Остановить
элемент ComboBox:
- Name — ComboBoxProgressStep
- Location — 441; 108
- Size — 121; 21
- DropDownStyle — DropDownList
элемент Timer:
- Name — TimerForProgressBar
- Enabled — True
- Interval — 1000
Окно конструктора формы с расположенными на ней элементами теперь должно выглядеть следующим образом:

Теперь перейдем к программированию элементов формы.
Дважды кликнем на форме, в результате чего мы перейдем к коду формы, и для нас будет сгенерирован метод с именем FrmProgressBarSample_Load для обработки события загрузки формы.
При загрузке формы мы хотим инициализировать наш выпадающий список «Шаг прогресс бара» какими-то предопределёнными значениями. Давайте создадим небольшой внутренний класс с именем ProgressStep, который будет отвечать за хранение пары значений — процент продвижения прогресс бара и соответствующее ему целочисленной значение. Добавим следующее объявление класса ProgressStep внутри класса формы FrmProgressBarSample:
public partial class FrmProgressBarSample : Form {

        class ProgressStep {
            public string StepText { get; set; }
            public int StepValue { get; set; }

            public ProgressStep(string stepText, int stepValue) {
                StepText = stepText;
                StepValue = stepValue;
            }

            public override string ToString() {
                return StepText;
            }
        }

        private void FrmProgressBarSample_Load(object sender, EventArgs e) {

        }
}
Как видим, внутри класса ProgressStep у нас есть два поля StepText (тип string) и StepValue (тип int). Также мы добавили в класс конструктор с параметрами, с помощью которого мы сможем быстро создавать объекты класса, передавая нужные нам значения. Заметим и то, что с помощью ключевого слова override мы переопределяем метод ToString() в классе, возвращая значение поля StepText — это нам необходимо для того, чтобы любые объекты класса ProgressStep, помещённые в элемент ComboBox на форме с именем ComboBoxProgressStep автоматически «умели» себя привести к строковому значению и вывести в выпадающем списка строковые значения вида «10%», «20%» и так далее.
Теперь где-нибудь ниже сгенерированного метода FrmProgressBarSample_Load напишем новый метод, который добавит 5 предопределённых значений процента в ComboBox. Назовём новый метод FillProgressSteps():
        private void FillProgressSteps() {
            ComboBoxProgressStep.Items.Add(new ProgressStep("10%", 10));
            ComboBoxProgressStep.Items.Add(new ProgressStep("20%", 20));
            ComboBoxProgressStep.Items.Add(new ProgressStep("30%", 30));
            ComboBoxProgressStep.Items.Add(new ProgressStep("40%", 40));
            ComboBoxProgressStep.Items.Add(new ProgressStep("50%", 50));
        }
Этот метод по сути инициализирует доступные значения шага для нашего прогресс бара, которые легко можем поменять на форме.
Далее мы создадим ещё один метод UpdateProgressBarPercentComplete(), который будет обновлять текст в метке с именем LabelPercentCompleteText и будет выводить текущее значение процента выполнения. Значение текущего процента выполнения есть у нашего прогресс бара ProgressBarProcess, и оно хранится в специальном свойстве Value. Метод также будет проверять значение прогресса на попадание в определённые диапазоны значений и, в зависимости от этих диапазонов, будет менять текст в метке LabelStatusText, отражая статус текущего шага:
        private void UpdateProgressBarPercentComplete() {
            LabelPercentCompleteText.Text = ProgressBarProcess.Value + "%";
            if (ProgressBarProcess.Value >= 0 && ProgressBarProcess.Value < 20) {
                LabelStatusText.Text = "Инициализация...";
            } else if (ProgressBarProcess.Value >= 20 && ProgressBarProcess.Value < 40) {
                LabelStatusText.Text = "Подготовка примера...";
            } else if (ProgressBarProcess.Value >= 40 && ProgressBarProcess.Value < 60) {
                LabelStatusText.Text = "Выполнение задачи #1...";
            } else if (ProgressBarProcess.Value >= 60 && ProgressBarProcess.Value < 80) {
                LabelStatusText.Text = "Выполнение задачи #2...";
            } else if (ProgressBarProcess.Value >= 80 && ProgressBarProcess.Value < 100) {
                LabelStatusText.Text = "Почти готово, завершение...";
            } else {
                LabelStatusText.Text = "Выполнено.";
            }
        }
Теперь, когда методы готовы, мы вызовем их при загрузке нашей главной формы. Для этого просто добавим 2 строки кода в обработчик загрузки формы:
        private void FrmProgressBarSample_Load(object sender, EventArgs e) {
            UpdateProgressBarPercentComplete();
            FillProgressSteps();
        }
На этом этапе можем запустить форму и посмотреть на результат: мы увидим, что в выпадающем списке «Шаг прогресс бара» теперь доступны значения 10%, 20%, 30%, 40% и 50%, а напротив метки «Выполнено» увидим значение текущего прогресса — 0%.
Сделаем так, чтобы по при вызове события Tick таймера каждый раз выполнялся 1 шаг нашего прогресс бара. Для этого находим в конструкторе формы таймер TimerForProgressBar и дважды кликнем по нему. В результате в коде формы будет сгенерирован метод-обработчик TimerForProgressBar_Tick для таймера. Напишем в нём такой код:
        private void TimerForProgressBar_Tick(object sender, EventArgs e) {
            ProgressBarProcess.PerformStep();
            UpdateProgressBarPercentComplete();

            ButtonStop.Enabled = ProgressBarProcess.Value != 100;
            if (ProgressBarProcess.Value >= 100) {
                TimerForProgressBar.Stop();
            }
        }
С помощью вызова метода PerformStep() у прогресс бара выполняется увеличение на величину Step внутреннего значения прогресс бара, которое хранится в поле Value, а также производится отрисовка текущего прогресса.
Затем мы вызываем уже известный нам метод UpdateProgressBarPercentComplete(), который обновит процент выполненного прогресса и статус задачи.
Мы также регулируем доступность кнопки «&Остановить» — она доступна только тогда, когда значение прогресс бара не равно 100.
В последнем условии метода мы также проверяем поле ProgressBarProcess.Value — если оно больше или равно 100, то мы останавливаем сам таймер.
Теперь напишем код для наших кнопок «&Сброс» и «&Остановить». Дважды кликнем по каждой кнопке в конструкторе формы — будет сгенерированы методы ButtonStop_Click и ButtonReset_Click, которые наполним следующим кодом:
         private void ButtonStop_Click(object sender, EventArgs e) {
            if (TimerForProgressBar.Enabled) {
                TimerForProgressBar.Stop();
                ButtonStop.Text = "&Продолжить";
            } else {
                TimerForProgressBar.Start();
                ButtonStop.Text = "&Остановить";
            }
        }

        private void ButtonReset_Click(object sender, EventArgs e) {
            ProgressBarProcess.Value = 0;
            UpdateProgressBarPercentComplete();
            if (!TimerForProgressBar.Enabled) {
                TimerForProgressBar.Start();
            }
        }
Кнопка «&Остановить» и её метод-обработчик ButtonStop_Click проверяет текущее состояние таймера — если он включен, то таймер останавливаем и переименовываем название кнопки на «&Продолжить». И наоборот — если таймер выключен — запускаем его и переименовываем кнопку обратно в «&Остановить».
Кнопка «&Сброс» и её метод-обработчик ButtonReset_Click устанавливает значение прогресс бара в значение 0, а затем вызывает перерисовку процента выполнения и названия текущего шага — при помощи вызова метода UpdateProgressBarPercentComplete(). Также происходит проверка, что если таймер сейчас не включен, то мы его включаем для начала выполнения процесса.
Нам осталось последнее — при изменении индекса выбранного элемента в выпадающем ComboBox — получить выбранный элемент (это будет экземпляр нашего класса ProgressStep) и установить шаг для прогресс бара выбранным значением. Для этого на форме выберем ComboBox и дважды кликнем на нём. Сгенерируется метод-обработчик для события SelectedIndexChanged (оно происходит при смене индекса выбранного элемента), заполним его таким кодом:
        private void ComboBoxProgressStep_SelectedIndexChanged(object sender, EventArgs e) {
            if (ComboBoxProgressStep.SelectedItem != null) {
                ProgressStep step = (ProgressStep)ComboBoxProgressStep.SelectedItem;
                ProgressBarProcess.Step = step.StepValue;
            }
        }
На этом код нашего примера полностью готов. Запустим приложение и видим, как прогресс бар начинает постепенно заполняться, а напротив поля «Статус» изменяется текст с описанием выполняемого шага. Попробуем поиграть с формой — понажимаем кнопки «&Остановить» и «&Сброс» и посмотрим, как ведёт себя прогресс бар. Можем также изменять значение шага прогресса, чтобы ускорить/замедлить заполнение прогресс бара.
Проект с готовыми исходными кодами примера вы можете скачать в нашем каталоге по этой ссылке.
A ProgressBar control is used to represent the progress of a lengthy operation that takes time where a user must wait for the operation to be finished.
In this article, we will see how to create a ProgressBar control in a Windows Forms application using Visual Studio 2017. We will also discuss the properties and methods defined in the ProgressBar class.
Creating a ProgressBar
We can create a ProgressBar control using a Forms designer at design-time or using the ProgressBar class in code at run-time.
Design-time
To create a ProgressBar control at design-time, you simply drag a ProgressBar control from the Toolbox and drop onto a Form in Visual Studio. After you the drag and drop, a ProgressBar is created on the Form; for example the ProgressBar1 is added to the form and looks as in Figure 1.
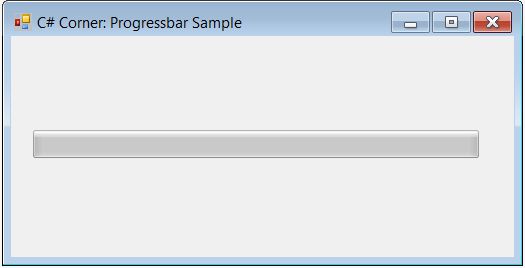
Figure 1
Run-time
Creating a ProgressBar control at run-time is merely a work of creating an instance of the ProgressBar class, set its properties and add the ProgressBar class to the Form controls.
The first step to create a dynamic ProgressBar is to create an instance of the ProgressBar class. The following code snippet creates a ProgressBar control object:
C# Code:
ProgressBar pBar = new ProgressBar(); VB.NET Code:
Dim pBar As New ProgressBar()In the next step, you may set the properties of the ProgressBar control. The following code snippet sets the Location, Name, Width, and Height properties of a ProgressBar.
C# Code:
pBar.Location = new System.Drawing.Point(20, 20);
pBar.Name = "progressBar1";
pBar.Width = 200;
pBar.Height = 30;
VB.NET Code:
pBar.Location = New System.Drawing.Point(20, 20)
pBar.Name = "progressBar1"
pBar.Width = 200
pBar.Height = 30
Once the ProgressBar control is ready with its properties, the next step is to add the ProgressBar to a Form. To do so, we need to add the ProgressBar control to the form using the Controls.Add method as in the following.
C# Code:
VB.NET Code:
Setting ProgressBar Properties
After you place a ProgressBar control on a Form, the next step is to set the properties.
The easiest way to set the properties is from the Properties Window. You can open the Properties window by pressing F4 or right-clicking on a control and selecting the «Properties» menu item. The Properties window looks as in Figure 2.
Figure 2
Name
The Name property represents a unique name of a ProgressBar control. It is used to access the control in the code. The following code snippet sets and gets the name and text of a ProgressBar control.
C# Code:
PBar.Name = "ProgresBar1"; VB.NET Code:
PBar.Name = "ProgresBar1" Positioning a ProgressBar
We can use the Location property to position a control. We can also dock a control using the Dock property.
Note: A ProgressBar can only be positioned horizontally.
The Dock property is used to set the position of a ProgressBar. It is of the type DockStyle that can have values Top, Bottom, Left, Right, and Fill. The following code snippet sets the Location, Width, and Height properties of a ProgressBar control.
C# Code:
pBar.Dock = DockStyle.Bottom; VB.NET Code:
PBar.Dock = DockStyle.Bottom Minimum, Maximum, and Value
The Minimum and Maximum properties define the range of a ProgressBar. The Value property represents the current value of a ProgressBar. The current value of the ProgressBar for the minimum value is the color green to show the progress of the control. We can also use the Value property to show the progress of an operation.
C# Code:
pBar.Minimum = 0;
pBar.Maximum = 100;
pBar.Value = 70;
PBar.Minimum = 0
PBar.Maximum = 100
PBar.Value = 70
A ProgressBar with a value looks as in Figure 3.
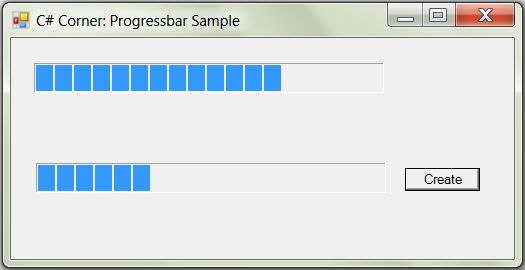
Figure 3 — ProgressBar created at Design and Run Time
RightToLeftLayout and MarqueeAnimationSpeed
The default progress of a ProgressBar is from left to right. But the ProgressBar control can also show the progress from right to left by setting RightToLeftLayout to true. The MarqueeAnimationSpeed property represents the time period, in milliseconds, that it takes the progress block to scroll across the progress bar.
Summary
In this article, we discussed how to create menus using the ProgressBar control. First we discussed how to create menus at design-time and run-time. After that we saw, how to set menus properties and click event handlers.
C#,Windows Form, WPF, LINQ, Entity Framework Examples and Codes
In this tutorial, we’ll learn How to use a ProgressBar in C# Form Application.
A ProgressBar control is used to represent the progress of a lengthy operation that takes time where a user must wait for the operation to be finished.
Creating a ProgressBar
We can create a ProgressBar control using a Forms designer at design-time or using the ProgressBar class in code at run-time.
Design-time
To create a ProgressBar control at design-time, you simply drag a ProgressBar control from the Toolbox and drop onto a Form in Visual Studio. After you the drag and drop, a ProgressBar is created on the Form; for example the ProgressBar1 is added to the form and looks as in Figure 1.
Run-time
Creating a ProgressBar control at run-time is merely a work of creating an instance of the ProgressBar class, set its properties and add the ProgressBar class to the Form controls.
The first step to create a dynamic ProgressBar is to create an instance of the ProgressBar class. The following code snippet creates a ProgressBar control object:
C# Code:
|
ProgressBar pBar = new ProgressBar(); |
In the next step, you may set the properties of the ProgressBar control. The following code snippet sets the Location, Name, Width, and Height properties of a ProgressBar.
C# Code:
|
pBar.Location = new System.Drawing.Point(20, 20); pBar.Name = «progressBar1»; pBar.Width = 200; pBar.Height = 30; |
Once the ProgressBar control is ready with its properties, the next step is to add the ProgressBar to a Form. To do so, we need to add the ProgressBar control to the form using the Controls.Add method as in the following.
C# Code:
Setting ProgressBar Properties
After you place a ProgressBar control on a Form, the next step is to set the properties.
The easiest way to set the properties is from the Properties Window. You can open the Properties window by pressing F4 or right-clicking on a control and selecting the “Properties” menu item. The Properties window looks as in Figure 2.
Minimum, Maximum, and Value
The Minimum and Maximum properties define the range of a ProgressBar. The Value property represents the current value of a ProgressBar. The current value of the ProgressBar for the minimum value is the color green to show the progress of the control. We can also use the Value property to show the progress of an operation.
|
pBar.Minimum = 0; pBar.Maximum = 100; pBar.Value = 85; |
RightToLeftLayout and MarqueeAnimationSpeed
The default progress of a ProgressBar is from left to right. But the ProgressBar control can also show the progress from right to left by setting RightToLeftLayout to true. The MarqueeAnimationSpeed property represents the time period, in milliseconds, that it takes the progress block to scroll across the progress bar.
Example : ProgressBar & Timer in C#
C# Code:
|
1 2 3 4 5 6 7 8 9 10 11 12 13 14 15 16 17 18 19 20 21 22 23 24 25 26 27 28 29 30 31 32 33 34 35 36 37 38 39 40 41 42 43 |
public partial class Form1 : Form { public Form1() { InitializeComponent(); } int counter = 0; private void Form1_Load(object sender, EventArgs e) { timer1.Interval = 100; progressBar1.Minimum = 0; progressBar1.Maximum = 100; } private void button1_Click(object sender, EventArgs e) { //Start Button timer1.Start(); } private void button2_Click(object sender, EventArgs e) { //Stop Button timer1.Stop(); } private void button3_Click(object sender, EventArgs e) { //Reset Button counter = 0; progressBar1.Value = 0; } private void timer1_Tick(object sender, EventArgs e) { counter++; progressBar1.Value = counter; if(counter == 100) { timer1.Stop(); } } } |
You may also like: Traffic Light Simulation in C#
Output: