
Общие сведения о зеркалировании дисков (RAID 1)
При использовании зеркального рейд-массива два идентичных тома располагаются на двух разных физических дисках. Любые данные, записанные в зеркальный том, фактически записываются на оба диска, чтобы в случае выхода из строя одного из диска, данные были доступны на втором. В отличие от «страйпа», когда за счет распределения одного логического тома на нескольких физических дисках и параллельной поблочной записи/чтения увеличивается скорость ввода-вывода, зеркалирование уменьшает производительность за счет того, что все транзакции записи данных дублируются на каждый диск в массиве.
Создание зеркала (RAID 1), используя «Disk Management»
Для создания зеркального дискового массива диски должны быть преобразованы из обычных в динамические. В этом разделе разберем возможность создания «зеркала» из двух одинаковых жестких дисков в Windows 2008.
Для этого следует запустить «Управление дисками». Это можно сделать из командной строки, выполнив команду compmgmt.msc или из «Пуска», выбрав Storage -> Disk Management.
В нашем примере система содержит 3 диска, пронумерованные как 0, 1 и 2 соответственно. Диск 0 является системным, диски 1 и 2 будет использованы для создания «зеркала».
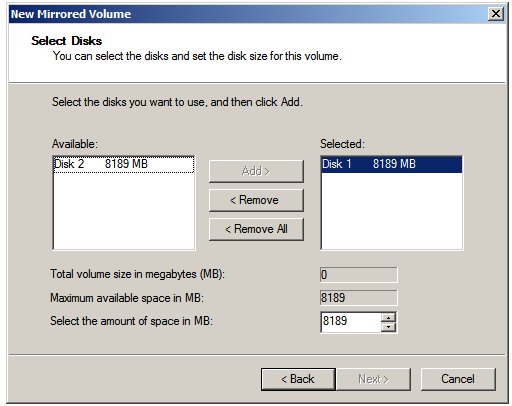
В «Управлении дисками» нажмите правой кнопкой на не размеченной области в графическом отображении первого диска, используемого для зеркального тома. Выберите «New Mirrored Volume…» для запуска мастера создания нового зеркального тома. Нажав «Далее» на приветственном экране, вы попадете в окно выбора дисков. Как говорилось ранее, зеркальный массив должен состоять из двух дисков. В столбце «Selected» мастер отобразит только текущий выбранный диск. Для продолжения требуется более одного диска. Чтобы добавить диск в зеркальный том, выберите второй диск из доступных дисков в левом столбце и нажмите «Добавить»:

После выбора дисков нажмите «Далее» для процедуры создания и назначения тому буквы диска или точки монтирования. Кнопка «Далее» выведет окно «Форматирование тома», где можно выбрать тип файловой системы и возможность сжатия. Для вывода итоговой информации о проделываемой операции нажмите «Далее». Для подтверждения операции нажмите «Закончить»; будет произведено форматирование томов и создание зеркального тома, готового к использованию.
В случае использования всего двух дисков можно получить следующую картину:

И чтобы избавиться от зарезервированной области, которая присутствует только на одном диске, произведем такие действия:
Запустите с административными привилегиями команду
bcdboot c:\windows /s c:
Эта команда создает системный раздел. Более подробная информация по использованию bcdboot есть на техническом сайте Microsoft.
После получения сообщения «Boot files successfully created.» перейдите в управление дисками и пометьте раздел C: как активный. После этого перезагрузитесь и удалите этот том с помощью «Управления дисками»
Создание зеркального (RAID 1) массива в командной строке
Зеркальный том можно создать так же и из командной строки с помощью приложения diskpart. Его можно запустить из открытого окна командной строки или из «Пуска», набрав в строке «diskpart». Появившееся приглашение DISKPART> покажет, что diskpart запущен и готов к работе.
В первую очередь узнаем, какие диски подключены к серверу. Эту информацию можно узнать с помощью команды «list disk»:
DISKPART> list disk

  Disk ###  Status      Size     Free     Dyn  Gpt
  --------  ----------  -------  -------  ---  ---
  Disk 0    Online        30 GB      0 B
  Disk 1    Online         8 GB  8189 MB
  Disk 2    Online         8 GB  8189 MB
В качестве примера объединим в зеркальный том диски 1 и 2. Для этого сначала создадим простой том на первом диске и добавим второй диск для зеркалирования.
Первый том создаем с помощью команды «create volume» и параметра «disk=». Размер тома можно задать дополнительным параметром «size=». Без этого параметра diskpart создаст том размером со все доступное дисковое пространства. Например:
DISKPART>create volume simple disk=1
Первый том создан и теперь добавляем в качестве зеркального тома диск 2. Для этого выполняется простая команда:
add disk=2
Для проверки новой конфигурации используйте команду «list volume»:
DISKPART> list volume

  Volume ###  Ltr  Label        Fs     Type        Size     Status     Info
  ----------  ---  -----------  -----  ----------  -------  ---------  --------
  Volume 0     C                NTFS   Partition     30 GB  Healthy    System
* Volume 1                      RAW    Mirror      8189 MB  Healthy
Как можно увидеть, новый том отображен как «Volume 1» с типом «Mirror». В качестве файловой системы указан «RAW» потому, что еще не произведено форматирование файловой системы. Это можно сделать с помощью того же приложения diskpart:
DISKPART> select volume 1
DISKPART> format fs=ntfs label="Mirrored Volume"

  100 percent completed

DiskPart successfully formatted the volume.
После окончания форматирования, назначьте тому буквенное значение или точку монтирования:
Назначить буквенное значение:
DISKPART> assign letter=E:

DiskPart successfully assigned the drive letter or mount point.
Назначить точку монтирования:
DISKPART> assign mount=\MIRROR

DiskPart successfully assigned the drive letter or mount point.
После успешного завершения всех операций, новый зеркальный том готов к использованию.
Добавление зеркального тома к существующему
Зеркальный рейд-массив можно создать, добавив том к уже существующему, используя управление дисками или diskpart из командной строки. При добавлении зеркала к существующему тому Windows создает второй том идентичного размера и типа файловой системы на втором диске и копирует (этот процесс еще называется синхронизацией) данные в зеркало.
Для зеркалирования существующего тома в управлении дисками нажмите правой кнопкой мыши на том и выберите «Add Mirror» для вызова диалога добавления зеркала:
Окно выше отображает доступные для зеркалирования диски. Выбираете нужный диск и нажимаете «Далее». Может появиться предупреждение, если потребуются дополнительные действия (например, конвертация обычного диска в динамический). Нажмите «Да». Начнется процесс синхронизации и состояние выполнения будет отображаться графически.
Чтобы сделать то же самое из командной строки, запустите diskpart и проверьте наличие требуемых томов командой:
DISKPART> list volume

  Volume ###  Ltr  Label        Fs     Type        Size     Status     Info
  ----------  ---  -----------  -----  ----------  -------  ---------  --------
  Volume 0     C                NTFS   Partition     30 GB  Healthy    System
  Volume 1     E   My Volume    NTFS   Partition   8189 MB  Healthy
Разберем возможность зеркалирования тома «Volume 1». Диск, куда будет настроено зеркалирование можно увидеть командой «list disk»:
DISKPART> list disk

  Disk ###  Status      Size     Free     Dyn  Gpt
  --------  ----------  -------  -------  ---  ---
  Disk 0    Online        30 GB      0 B
* Disk 1    Online         8 GB      0 B
  Disk 2    Online         8 GB  8189 MB
Выше было видно, что Volume 1 имеет размер 8ГБ. Таким образом, для его зеркалирования потребуется диск размером не менее 8ГБ. Заметьте, что если диски не динамические, их потребуется отконвертировать командами:
select disk 1
convert dynamic
select disk 2
convert dynamic
Далее, выбираем нужный том на диске 1:
DISKPART> select disk 1
DISKPART> select volume 2

Volume 2 is the selected volume.
И, наконец, зеркалируем их командой «add=», указав номер диска, используемый для этого (в нашем случае это диск 2):
DISKPART> add disk=2

DiskPart succeeded in adding a mirror to the volume.
После этого Windows Server 2008 начнет синхронизацию, время которой зависит от размера зеркалируемого тома. В процессе синхронизации в списке томов зеркалируемые (с типом Mirror) будут иметь состояние «Rebuild». После окончания — Healthy.
Разборка и удаление зеркального массива дисков
Windows Server 2008 включает в себя функции разборки зеркального рейд-массива (создаются два отдельных и независимых тома, содержащих идентичные данные) и удаления «зеркала» (в этом случае все данные на «зеркале» удаляются).
Чтобы разобрать дисковый массив с помощью «Управления дисками», нажмите правой кнопкой мыши на одном из томов и выберите «Break Mirrored Volume» в появившемся меню.
Из командной строки, в приложении diskpart, используйте команду «break» с указанием на один из двух дисков зеркального рейд-массива:
DISKPART>break disk=2
Для удаления зеркала из массива, удаления всех синхронизированных данных нажмите правой кнопкой мыши на зеркальном томе в «Управлении дисками» и выберите «Remove Mirror». В качестве альтернативы можно использовать команду«break» в diskpart с параметром NOKEEP:
DISKPART>break nokeep disk=2
Восстановление зеркального рейд-массива
Если один из дисков рейд-массива вышел из строя, то даже в этом случае есть хорошая новость — в отличии от «страйпа», все данные, актуальные на момент аварии, остались на втором диске. В этом случае важно заменить сбойный диск и пересобрать зеркало до того, как второй диск перестанет работать.
Нажмите правой кнопкой мыши на поврежденный том и выберите «Remove Mirror». Далее, подключите новый диск достаточного объема для создания зеркала. Правой кнопкой мыши нажмите на рабочем томе из текущего зеркала и выберите «Add Mirror» в появившимся меню, выберите новый диск и нажмите «Add Mirror». Windows пересоберет зеркальный рейд-массив, используя новый диск. Как упоминалось ранее, время пересборки и синхронизации данных зависит от производительности дисков и их объема.
Для управления хардами используем вкладку “Disk Management“, которая доступна в Server Manager и в консоли Computer Management (compmgmt.msc) (Управление дисками). Перед созданием RAID следует преобразовать диски в динамические. Выбираем значок диска в поле внизу и в контекстном меню пункт “Convert to Dynamic Disk” (Преобразовать в динамический диск). Далее отмечаем в появившемся окне “Disk 0” и в окне “Disk to Convert” подтверждаем свой выбор нажатием “Convert” и затем опять ОК. После преобразования диск “Disk Management” будет помечен как “Dynamic”. Эту операцию можно произвести в командной строке при помощи DISKPART.
Вызываем: > diskpart
Смотрим список дисков и некоторые их характеристики:
diskpart> list disk
Подключаем disk 0 и преобразуем его в динамический:
diskpart> select disk 0 Disk 0 is now the selected disk.
diskpart> convert dynamic
DiskPart successfully converted the selected disk to dynamic format.
Внимательно читайте сообщение после выполнения команды, в некоторых случаях выводится “You must reboot your computer to complete this operation“, это значит для завершения операции требуется перезагрузка системы.
C системным диском все. Подключаем второй диск. В том случае, когда статус диска в “Disk Management” показан как Offline, включаем его выбором пункта Online в контекстном меню или аналогичной командой diskpart. Если диск еще не размечен, эту операцию можно произвести при помощи самого “Disk Management” выбрав в меню пункт “Initialize Disk” и затем тип таблицы разделов MBR или GPT. Далее можно преобразовать его в динамический диск самостоятельно или поручить все операции мастерам. Выбираем первый диск и в контекстном меню пункт “Add Mirror”, отмечаем второй диск в появившемся окне, мастер предупредит о том, что он будет преобразован в Dynamic Disk, соглашаемся нажав ОК. Начнется процесс переноса данных на второй диск. По окончании в загрузчик будет добавлена возможность загрузки ОС со второго харда. В командной строке также все просто, правда в отличие от “Disk Management” здесь уже нет подстраховки, и ошибка может привести к потерям данных. Смотрим список томов: diskpart> list volume
Обычно загрузочный первый диск будет 0 томом, выбираем его.
diskpart> select volume 0
Volume 0 is the selected volume.
И создаем зеркало, указав в качестве параметра второй диск.
diskpart> add disk=1
DiskPart succeeded in adding a mirror to the volume.
В процессе создания зеркала поле Status команды “list volume” будет показывать значение “Resynching”, когда оно изменится на “Healthy” процесс закончен.
Software RAID1 Mirroring on Windows 2008
March 28, 2012
Microsoft, Windows
If you don’t have a RAID add-on card (or have RAID capabilities on your motherboard), but you would still like to have some level of redundancy due to hard disk failure, you can set up a software RAID1 array. RAID1, otherwise known as mirroring, simply duplicates all writes to one drive, to another. If one drive fails, you can simply recover using the other.
This is done at a low level, so you wont see two drive letters in windows. You will simply see the one drive letter, and all writes that are performed on that drive are automatically synced to the other.
This guide will outline how to set up RAID1 mirroring on Windows 2008 Server.
Configuring your drives
Make sure that you have a second hard disk the same size, or larger than the one you want to mirror.
Start by opening up “Computer Management” located under “Administrative Tools”.
Click on the “Disk Management” feature located under “Storage” on the tree menu.
If your disk is new/completely blank, there will be no partitions currently set up. If this is the case, you may automatically get asked to Initialize the disk, as per the image below.
If you don’t automatically get prompted, and your second drive says “Not Initialized”, right click the drive you want to mirror to, and select “Initialize disk”.
The Initialize disk screen should now appear.
Select the partition style you want. I tend to sick with the “MBR” format.
Hit “OK” to Initialize the disk.
You should now have the second disk coming up as “Online”.
You will also note in the above screen shot, that both drives are set to “Basic”. To set up mirroring, they need to be set to dynamic.
Right click either of the drives, and select “Convert to Dynamic Disk”.
You will then be asked which drives you want to convert to be dynamic.
Select all disks that you would like to convert. Since I only have two drives in this example, I will be ticking all available drives.
Select “OK” to bring up the confirmation screen.
Once you have verified that these are the ones you cant to convert, hit “Convert” to start the process.
You will get another confirmation screen.Read this one and make sure you understand what its doing. If your second disk is blank, there wont be a operating system on there anyway. If you are dual booting on your main OS drive, you may need to check if that will be effected.
Hit “Yes” to this second confirmation to proceed and actually do the conversion.
The disks should now appear to be both “Online” and “Dynamic”.
Now to actually create the mirror.
Creating the Mirror
Right click the drive/partition you would like to mirror, and select “Add Mirror”. In this example, I will be mirroring C: drive.
You will be asked where you would like to set up the destination for the mirror. Select your second disk (in my case, labeled “Disk 1”).
Press the “Add Mirror” button to start the mirror sync.
The two drives will now sync, and mirror everything from the source partition, to the second drive.
This can be seen by the “Resyncing” label on the partitions.
It should start to show the progress of the re-sync as a percentage as shown below.
This process may take awhile. It would be a good idea to do this while no one is using the system.
Once the re-sync completes, you should have two identical partitions on separate physical drives, constantly mirroring and keeping your data safe in the event of a hard drive failure.
Conclusion
While it is a simple process to create a mirrored volume, keep in mind that this (or any RAID technology) should not replace a good backup routine. If you delete any files on the mirrored drive, they will instantly be deleted on the other mirrored drive. Keep separate backups for these types of scenarios.
| Previous | Table of Contents | Next |
| Creating and Managing Windows Server 2008 Striped (RAID 0) Volumes | Mirroring Windows Server 2008 GBT and MBR Boot and System Disks |
| Purchase and download the full PDF and ePub versions of this eBook only $9.99 |
The focus of this chapter of Windows Server 2008 Essentials is the configuration of disk mirroring (RAID 1) on a Windows Server 2008 system. It is assumed in this chapter that the reader has a basic understanding of the difference between basic and dynamic disks within the context of Windows Server 2008. For information on this subject the chapter entitled Creating and Managing Simple and Spanned Volumes on Windows Server 2008 is recommended.
Note that the focus of this chapter is the mirroring of data disks. For details of mirroring system disks refer to Mirroring Windows Server 2008 System Disks.
Contents
Contents
|
||
An Overview of Disk Mirroring (RAID 1)
Disk mirroring consists of two identical volumes on two different physical disk drives. Any data is written to the mirrored volume is, in fact, written to both disk drives such that if one disk drive fails the data will still be available on the other disk. Unlike striping, which increases I/O performance, mirroring will actually reduce performance for the simple reason that all data write transactions have to be performed twice — once on each drive in the mirrored set.
Creating a Mirrored (RAID 1) Set using Disk Management
The remainder of this chapter assumes that the disks in question have been converted from basic disks to dynamic disks. For details on performing this task refer to the initial sections of the Creating and Managing Simple and Spanned Volumes on Windows Server 2008 chapter of this book.
In this section a mirrored set will be created using two similarly sized disk drives connected to a Windows Server 2008 system.
Begin the process by invoking the Disk Management snap-in. This can be achieved by typing compmgmt.msc at a command prompt window or Run dialog and selecting Storage -> Disk Management. The system used in this example contains three disks numbered 0, 1 and 2 respectively. Disk 0 is the system disk and disks 1 and 2 will be used to create a mirrored set.
Within the Disk Management tool right click on the unallocated space in the graphical view of the first disk to be used in the mirror set and select New Mirrored Volume… to invoke the New Mirrored Volume wizard. Click Next on the welcome screen to proceed to the disk selection screen. As mentioned previously, a mirrored set must be comprised of two disk drives. Initially, the wizard only lists the currently selected disk in the Selected column. In order to proceed, one more disk is required. To add a disk to the mirrored set, select a suitable disk from the available disks in the left hand column and click on Add to add it to the selected disks list:
With the necessary disks selected click Next to proceed and assign a drive letter or mount point for the volume. The Next button will then proceed to the Format Volume screen where the file system type and compression options may be selected. To view the summary screen, press the Next button. Assuming the summary is acceptable the Finish button will format the volumes and create the mirrored volume ready for use.
Creating a Mirrored (RAID 1) Volume from the Command Prompt
Windows Server 2008 Mirrored (RAID 1) volumes may also be created from the command prompt using the diskpart tool. This may be launched either from a command prompt window, or from the Run dialog simply by entering diskpart at the prompt. Once invoked the DISKPART> prompt will displayed, ready to receive commands.
The first step in creating a mirrored set using diskpart is to identify the disks to be used. This can be achieved using the list disk command:
DISKPART> list disk

  Disk ###  Status      Size     Free     Dyn  Gpt
  --------  ----------  -------  -------  ---  ---
  Disk 0    Online        30 GB      0 B
  Disk 1    Online         8 GB  8189 MB
  Disk 2    Online         8 GB  8189 MB
For the purposes of this tutorial we will be creating a mirrored volume based on a set consisting of disks 1 and 2. The mirrored volume is created by first creating a simple volume on the first disk and then adding a second disk to the mirrored set.
The first volume is created using the create volume command combined with the disk= directive. The size of the volume may also be specified using the size= directive. Omission of the size= option will cause diskpart to create volume which occupies all the available space on the designated disk. For example:
DISKPART>create volume simple disk=1
Having created the first volume on disk 1 the next step is to add the mirror volume on disk 2. This is achieved using the add command as follows:
add disk=2
The list volume command may be used to verify the new configuration:
DISKPART> list volume

  Volume ###  Ltr  Label        Fs     Type        Size     Status     Info
  ----------  ---  -----------  -----  ----------  -------  ---------  --------
  Volume 0     D                       DVD-ROM         0 B  No Media
  Volume 1     C                NTFS   Partition     30 GB  Healthy    System
* Volume 2                      RAW    Mirror      8189 MB  Healthy
As shown above the new volume is listed as volume 2 and shown as Mirror. The volume is also listed as RAW because it has not yet been formatted with a file system. This, too, can be achieved within the diskpart tool:
DISKPART> select volume 2
DISKPART> format fs=ntfs label="Mirrored Volume"

  100 percent completed

DiskPart successfully formatted the volume.
Once formatted, the last task is to assign either a drive letter or mount point to the volume by which it will be accessed:
To assign a drive letter:
DISKPART> assign letter=E:

DiskPart successfully assigned the drive letter or mount point.
To assign a mount point:
DISKPART> assign mount=\bigvol

DiskPart successfully assigned the drive letter or mount point.
Once assigned a drive letter or mount point, the new mirrored volume is ready for use.
Adding a Mirror to an Existing Volume
<google>WIN28BOX</google>
A mirror may be added to an existing volume using either the Disk Management snap-in, or from the command-prompt using the diskpart tool. When a mirror is added to an existing volume Windows creates a second volume equal in size and file system type on a second disk of your choice and copies (a process also known as resynching) the data on the existing volume to the mirror.
To mirror to an existing volume using Disk management, right click on the existing volume in the graphical view and select Add Mirror to invoke the Add Mirror dialog shown below:
The above dialog will list disks eligible to act as a mirror for the existing volume. Select the desired disk and click on Next. A warning dialog may appear notifying you of any additional changes that may be made as a result of the addition (such as converting basic disks to dynamic disks). Click Yes to proceed. The resynching process will now begin, the progress of which will be displayed in the graphical view.
To add a mirror to an existing volume from the command prompt, start diskpart and identify the existing volume using the list volume command:
DISKPART> list volume

  Volume ###  Ltr  Label        Fs     Type        Size     Status     Info
  ----------  ---  -----------  -----  ----------  -------  ---------  --------
  Volume 0     D                       DVD-ROM         0 B  No Media
  Volume 1     C                NTFS   Partition     30 GB  Healthy    System
  Volume 2     E   My Volume    NTFS   Partition   8189 MB  Healthy
The volume to be mirrored in this example is Volume 2. Having identified the volume, a disk to contain the mirror needs to be found using the list disk command:
DISKPART> list disk

  Disk ###  Status      Size     Free     Dyn  Gpt
  --------  ----------  -------  -------  ---  ---
  Disk 0    Online        30 GB      0 B
* Disk 1    Online         8 GB      0 B
  Disk 2    Online         8 GB  8189 MB
From the above information it is clear that Volume 2 is 8189 MB in size. In order to be able to mirror this volume, a disk with at least 8189 MB is required. Clearly, disk 2 meets this requirement. Therefore, all that needs to be done is to add disk 2 as the mirror disk for our volume using the add disk command. Note that if the disks are not dynamic disks they will need to be converted with the convert dynamic command:
select disk 1
convert dynamic
select disk 2
convert dynamic
The next step is to select the existing volume on disk 1:
DISKPART> select disk 1
DISKPART> select volume 2

Volume 2 is the selected volume.
Finally, the mirrored set can be created using the add= command, passing through the number of the disk to be used as the mirror (in this case disk 2):
DISKPART> add disk=2

DiskPart succeeded in adding a mirror to the volume.
At this point Windows Server 2008 will begin the resynching process which, depending on the size of the volume being mirrored may take some time. This fact is reported by the show volume command which lists the volume as being of type Mirror with a status of Rebuild. Once the resynching process is complete the status will be displayed as Healthy.
Breaking and Removing Mirrored Sets
A Windows Server 2008 mirror may be broken (which creates two separate and independent volumes containing identical data) or removed (which removes the data on the mirror leaving free space on the designated mirror disk).
To break a mirror from the Disk Management snap-in right click on one of the volumes in the set in graphical view and select Break Mirrored Volume from the pop-up menu.
To break a mirror set from the command line use the break command, specifying one of the two disks in the mirrored set:
DISKPART>break disk=2
To remove a mirror from a mirrored set, removing all mirrored data and leaving free space on the disk right click on the mirror volume to be removed in the Disk Management graphical view and select Remove Mirror. Alternatively, use the diskpart break command with the NOKEEP option:
DISKPART>break nokeep disk=2
Recovering a Mirrored Set
If one of the disks in a mirrored set fails the good news is that, unlike striped volumes, all the data is still present on the remaining healthy disk (this, after all is the whole point of disk mirroring). In this situation, however, it is important to replace the faulty disk and rebuild the mirror before the healthy drive also fails.
To achieve this right click on the failed volume and select Remove Mirror. Next, identify a suitable alternate or newly installed drive with sufficient space to act as a mirror. Right click on the existing, healthy volume from the original mirrored set, select Add Mirror from the resulting menu, select the new disk in the Add Mirror dialog and click on Add Mirror. Windows will now rebuild the mirror using space on the new disk. As noted above, this process can take some time depending on the size of the volume in question.
| Purchase and download the full PDF and ePub versions of this eBook only $9.99 |
A Redundant Array of Independent Disks (RAID) is a
special type of volume providing you with redundancy on your drives or
volumes. RAID is designed to provide you with protection from failures
of the drives on your sever. RAID does not replace the need to perform
regular backups of your systems; it offers an additional level of
protection to your system and is designed to work in conjunction with
regular backups. In most cases, RAID will tolerate a loss of one hard
drive, meaning you will not lose any data; however, the performance of
the RAID volume is reduced until you replace the failed drive. RAID is
designed to not only help protect your data but also to help improve the
performance of the overall drive system. RAID can be implemented either
via hardware or software. You will now see how Windows Server 2008 R2
implements RAID at the software level.
1. Understand RAID Levels
Essentially, RAID volumes (commonly called arrays)
create duplicates of the data and spread the data over the drives in
the volume. In the case of a RAID mirror, the data is completely
duplicated in a one-to-one fashion across two drives. However, in other
versions of RAID, a concept called a parity bit
is introduced. One of the keys to understanding how RAID works is
knowing how the parity bit works. The parity bit is the copy of the
data; however, the parity is spread evenly across the drives.
When you begin to work with
RAID, it is important to know what the implications are for the chosen
level of RAID for your server. Windows Server 2008 R2 supports only RAID
0, RAID 1, and RAID 5 at the software level. Several of the more common
RAID levels are listed in Table 1.
Table 1. RAID Levels
| RAID Level | Description |
|---|---|
| RAID 0 | RAID 0 is commonly known as striping. This is the only level of RAID that does not provide you any protection from a failed volume. That means if you lose one drive, you will lose all of the data across your volumes. Striping is designed to provide improved drive performance. |
| RAID 1 | RAID 1 is commonly known as mirroring. RAID 1 uses only two drives, and as you write to one drive, a duplicate copy is written to the second drive at the same time. If you lose one drive in the mirror, the second drive contains the backup, and you will not lose any data unless you lose the second drive. This is also the slowest version of RAID. |
| RAID 5 | RAID 5, commonly known as striping with parity, is a combination of performance and redundancy. RAID 5 requires three (or more) drives or volumes and provides protection if one of the drives fails. RAID 5 spreads the data and the parity (copy of the data) evenly across all three drives. If a RAID 5 volume loses a drive, the overall performance of the drive will be reduced until you replace the drive. Additionally, RAID 5 may cause a performance impact for your memory and I/O. This will occur with all writes, since the parity bit must be calculated and then written. |
| RAID 6 | RAID 6 is commonly known as striping with dual parity. It is nearly identical to RAID 5, but it creates an additional copy of the parity information. This provides you with the additional ability to lose up to two drives without losing your data. |
| RAID 10 | RAID 10, sometimes referred to as RAID 1+0, is a combination of striping and mirroring. RAID 10 is essentially a striped mirror, which offers a nice hardware-level version of RAID with performance and mirroring. |
Say, for example, you create a
RAID 5 volume with three hard drives of 100GB each. Your total available
hard drive space for the volume would be 200GB. The reduced space is
because of the parity bit, which is the copy of the data. When your data
is written to this volume, it will be spread evenly across the drives,
and during the write, a parity bit will be written to help maintain the
copy of the data in case a drive is lost.
Figure 1 shows an example of a RAID 5 volume. Additionally, if you look at Figure 2,
you will see the drive and how it appears in My Computer. It is
important to note the drive is only about 100GB even though three 50GB
drives were used to create the volume.
Figure 1. RAID 5 volume

Figure 2. RAID 5 drive size
2. Implement RAID
The number of drives or
volumes you have available to you will determine what level of RAID you
can implement. In this section, you will see how to create a RAID 5
volume with three drives in the Windows Server 2008 R2 software. If you
want to use a hardware solution to create RAID 5, please consult the
manufacturer of your system.
2.1. Create a RAID 1 or Mirrored Volume
Creating a mirrored volume
is similar to creating spanned and striped volumes. Additionally, like
with striped volumes, the partitions on the mirrored disks will be the
same size. Figure 3 shows an example of a mirrored volume.
-
Open Server Manager by selecting Start => Administrative Tools => Server Manager.
-
In the Server Manager tree, click Storage.
-
In Storage, click Disk Management.
Figure 3. Mirrored volume

-
Right-click the unallocated space in the bottom window of the middle pane you want to create the volume on.
-
Click New Mirrored Volume.
-
On the Welcome screen, review the message, and click Next.
-
On
the Select Disks screen, select the disks you want to use for the
mirrored volume, and click Add to place them in the selected option. -
Select the size you want to make the volume, and click Next.
-
Select
how you want mount the volume. You can choose to mount to a drive
letter, to mount a folder on an existing drive, or to not assign any
mount point. After you make your selection, click Next. -
Next, you can select how to format the drive. After you make your selection, click Next.
-
Review the summary screen, and click Finish.
-
You
will see a warning dialog box if the drives need to be converted to
dynamic drives for mirrored volumes. After you review the warning, click
Yes.

2.2. Repair a Mirrored Volume
If you lose a hard drive in a
mirror, the mirror has failed redundancy. You will need to replace the
failed drive, remove the existing mirror, and then re-create the mirror.
-
Open Server Manager by selecting Start => Administrative Tools => Server Manager.
-
In the Server Manager tree, click Storage.
-
In Storage, click Disk Management.
-
Right-click the half of the mirror in the bottom window of the middle pane that is still working.
-
Select Remove Mirror; you will a screen similar to Figure 4.
Figure 4. Removing a mirror
-
Select
the drive that has failed on your server to remove the mirror from.
When you remove the mirror for the drive, this will remove the mirror.
Then you are ready to re-create the mirror. -
To re-create the mirror, right-click and select Add Mirror.
-
In the Add Mirror dialog box, select the new volume you want to create the mirror on.
-
You
will see a warning dialog box if the drives need to be converted to
dynamic drives for mirrored volumes. After you review the warning, click
Yes. -
You will see the drive status of synching, and when the drive has completed the sync, you will see a status of Healthy.
2.3. Break a Mirror
You may choose to stop
using an existing mirror. Maybe you want to choose a different RAID
level or need to repurpose one of your disks for additional storage. You
can at any time break your mirror. You do not need to worry about seven
years’ bad luck. Also, unlike when a real mirror breaks, you will not
lose any data. In fact, you will have two copies of the data on two
separate volumes.
-
Open Server Manager by selecting Start => Administrative Tools => Server Manager.
-
In the Server Manager tree, click Storage.
-
In Storage, click Disk Management.
-
Right-click one of the volumes in the bottom window of the middle pane in the mirror.
-
Select Break Mirrored Volume.
-
Review
the warning about removing the fault tolerance from the drive.
Remember, you will not lose data, just the redundancy of the mirror.
Click Yes to break the mirror.
2.4. Create a RAID 5 or Striped Volume with Parity
After you have
determined which volumes you are going to use for your RAID 5 volume,
you will use Disk Management to create the RAID 5 volume:
-
Open Server Manager by selecting Start => Administrative Tools => Server Manager.
-
In the Server Manager tree, click Storage.
-
In Storage, click Disk Management.
-
Right-click the unallocated space in the bottom window of the middle pane you want to create the volume on.
-
Click New RAID-5 Volume.
-
On the Welcome screen, review the message, and click Next.
-
On
the Select Disks screen, select the disks you want to use for the RAID 5
volume, and click Add to place them in the selected option. Remember,
you need at least three drives. -
Select the amount of space to allocate on each disk selected, and click Next.
-
Select
how you want mount the volume. You can choose to mount to a drive
letter, to mount a folder on an existing drive, or to not assign any
mount point. After you make your selection, click Next. -
Next, you can select how to format the drive. After you make your selection, click Next.
-
Review the summary screen, and click Finish.
-
You
will see a warning dialog box if the drives need to be converted to
dynamic drives for striped volumes. After you review the warning, click
Yes.
2.5. Repair a RAID 5 Volume
If you lose a hard drive in a
RAID 5 volume, you will need to repair the volume. When you are working
with Disk Management and see a screen similar to Figure 5, with the words failed redundancy,
one of your hard drives may have failed. To fix the RAID 5 volume, you
need to replace the failed drive and then use Disk Management to repair
the volume and reestablish redundancy.
-
Open Server Manager by selecting Start => Administrative Tools => Server Manager.
-
In the Server Manager tree, click Storage.
-
In Storage, click Disk Management.
-
Right-click one of the volumes, in the bottom window of the middle pane, in the existing RAID 5 set.
-
Click Repair Volume.
-
You will see a screen similar to Figure 6, asking you which volume you want to use to repair the RAID 5 volume. Select the new hard drive, and click OK.
Figure 5. RAID 5 failure

Figure 6. Repairing RAID 5
-
You
will see a warning dialog box if the drives need to be converted to
dynamic drives for striped volumes. After you review the warning, click
Yes. -
Your
drives will begin the process of resynching. This process could take
several minutes. During the resync process, you will see a screen
similar to Figure 7.

Figure 7. Resynching RAID 5
