
Looking for alternatives to commercial router OS software products? Here are some open-source options to consider
Technology Advisor | Cybersecurity Evangelist
Updated: July 31, 2024
Expert in B2B Software and Experienced Privacy and Security Researcher
Updated: July 31, 2024
Open-source router OS software refers to router operating systems that are released under an open-source license, allowing users to freely use, modify, and distribute the software. These router OS software options are based on Linux or other open-source operating systems, and offer a range of features such as advanced networking configurations, security capabilities, and user-friendly interfaces. They are designed to provide a customizable, secure, and feature-rich networking experience while being cost-effective alternatives to commercial router OS software.
Here is our list of the best open-source router OS software for large or small networks:
- OpenWrt This open-source firmware can be installed on a long list of routers and wireless APs, including those produced by some of the major manufacturers of network equipment, such as Aruba, Barracuda, Belkin, Cisco, Huawei, and Linksys. The system is based on Linux and you can download it for free.
- RouterOS from MikroTik This proprietary firmware can be downloaded onto a Windows PC to convert it into a router.
- DD-WRT Originally created for use on the Linksys WRT54G, this free, Linux-based OS has always been independent and can be installed on WiFi routers.
- VyOS Based on Debian Linux, this software can be run as a virtual appliance to provide router and firewall functions.
- OPNsense Classed as a firewall, this free software based on OpenBSD can be used to form an SD-WAN.
- pfSense This firewall software runs as a virtual appliance on a computer, on AWS, or on Azure.
- IPFire Primarily a firewall system, this Linux-based software includes an intrusion prevention system.
Open-source router OS software can be a strong option to consider as an alternative to commercial products. Open-source router OS software can be customized to meet specific networking needs and can be more cost-effective than commercial products. These software options are often designed to be user-friendly and feature-rich, with advanced networking configurations and security capabilities. These routers’ OSs can be used in networks ranging from home networks, to small business networks, or even in large corporate environments. Additionally, the open-source nature of these products means that users can contribute to the development of the software and collaborate with other users to improve it over time.
In this article, we present the best open-source router OS software out there. Hopefully, this will help you in choosing the right one for your network.
The Best Open-source Router OS Software
1. OpenWrt

OpenWrt is an open-source router operating system (OS) that is designed to provide a customizable, secure, and feature-rich networking experience. It is based on the Linux kernel and offers a range of features and capabilities that make it a popular choice among network enthusiasts, developers, and IT professionals.
Key Features:
- Stability: Renowned for its stability and reliability in networking environments.
- Frequent Updates: Users benefit from timely updates that ensure compatibility with new devices, protocols, and security patches.
- Firewall Functions: Users can configure firewall rules to control incoming and outgoing traffic, protect against unauthorized access, and safeguard sensitive data.
- IPv6 Enabled: Supports the IPv6 protocol, addressing the modern networking requirements of expanding IP address space and improved network efficiency.
- Traffic Shaping: Offers traffic shaping capabilities, allowing users to prioritize network traffic based on user-defined rules.
One of the primary benefits of OpenWrt is its flexibility. OpenWrt allows users to customize and modify the software to meet their specific networking needs. This includes adding new features, removing unnecessary features, or configuring the software to work with specific hardware. This flexibility makes it an attractive option for advanced users who want more control over their networking equipment.
Another benefit of OpenWrt is its security capabilities. OpenWrt includes features such as firewalls, intrusion detection and prevention, and VPN support, which can help protect against security threats and attacks. Additionally, the software is updated frequently with security patches and bug fixes, ensuring that users have access to the latest security enhancements.
OpenWrt is also designed to be user-friendly. The software includes a web-based interface that allows users to configure their networking settings easily. The interface is responsive and can be accessed from any device with a web browser. OpenWrt also includes support for a wide range of hardware, including popular router models from companies such as TP-Link, Netgear, and Asus.
OpenWrt also offers a range of advanced networking configurations, including support for Quality of Service (QoS), network address translation (NAT), and virtual LAN (VLAN) tagging. These features make OpenWrt an attractive option for businesses and organizations that require more advanced networking capabilities. The open-source nature of OpenWrt means that users can contribute to the development of the software and collaborate with other users to improve it over time. This community-driven approach has led to the development of many useful plugins and packages that extend the functionality of the software.
OpenWrt is a powerful and flexible open-source router operating system that offers advanced networking capabilities, robust security features, and a user-friendly interface. Its customizable nature, support for a wide range of hardware, and active development community make it an attractive option for network enthusiasts and IT professionals alike.
Pros:
- Security: Known for its strong focus on security, OpenWrt provides regular security updates and patches to address vulnerabilities promptly.
- Community Support: This community-driven approach ensures ongoing improvement, troubleshooting assistance, and access to a wealth of resources.
- Advanced Features: Offers advanced networking features not typically found in stock firmware, such as QoS, VPN support, VLAN support, and more.
- Compatibility: Supports a wide range of hardware platforms, including routers, access points, and embedded devices, allowing users to repurpose existing hardware to run OpenWrt.
- Open-Source Philosophy: Being an open-source project, OpenWrt promotes transparency, collaboration, and innovation.
Cons:
- Complexity for Beginners: Can be complex for users who are not familiar with networking concepts and configurations.
- Limited Official Hardware Support: May have limited official hardware support compared to commercial router firmware.
2. RouterOS from MikroTik

MikroTik RouterOS is a proprietary operating system that MikroTik created for its routers. There are open-source elements in the operating system. For example, the component RouterBOOT unit, which is a firmware bootloader can be downloaded and adjusted. While MicroTik doesn’t ask the public for programming contributions and it doesn’t endorse an official team of volunteers, the company would probably be interested to hear about any bugs that members of the public discover in the code.
Key Features:
- Powerful Networking Functionality: Includes routing, switching, firewall, VPN, QoS, and dynamic routing protocols for building complex networks.
- User-Friendly Interface: Offers an intuitive GUI and CLI for easy management by users of all levels.
- Security: Features robust security measures like built-in firewall, IPsec/L2TP VPN support, ACLs, and regular security updates.
- Wireless Networking: Supports wireless access points, bridges, and mesh networks with encryption and roaming capabilities.
- Affordability: Provides powerful networking capabilities at a competitive price point.
The router software is based on Windows. It is possible to download it and run the software on a computer to turn it into a router. The software isn’t free to use but MikroTik offers a free trial. MikroTik operates an online demo router, which runs RouterOS. You can access that demo through your browser and get to know the menu system of RouterOS. Alternatively, download the RouterOS software and run it on Winbox to familiarize yourself with the operating system’s methods before actually running it live.
MicroTik also offers a cloud-based router system, called Cloud Hosted Router (CHR) that can be installed on AWS. Again, this is not free and you purchase it from the AWS Marketplace.
MikroTik RouterOS provides advanced networking configurations. The software includes support for Quality of Service (QoS), network address translation (NAT), and virtual private network (VPN) support, which can help optimize network performance and improve security. Additionally, the software includes support for advanced routing protocols such as OSPF, BGP, and VRRP, making it an ideal solution for complex network setups.
MikroTik RouterOS also offers a range of security features to protect against security threats and attacks. The software includes support for firewalls, intrusion detection, and prevention, and secure remote access.
MikroTik RouterOS is also designed to be user-friendly. The software includes a web-based interface that allows users to configure their networking settings easily. The interface is responsive and can be accessed from any device with a web browser.
Pros:
- Proprietary Operating System: Being proprietary can offer tighter integration and control over the software.
- Active Community: Access to a dedicated user community and resources for support and collaboration.
- Customization: Highly customizable to meet specific networking requirements.
- Extensibility: Allows integration of additional features and functionalities through third-party applications and plugins.
Cons:
- Learning Curve: RouterOS may have a learning curve for users not familiar with MikroTik’s interface and configurations.
- Limited Hardware Support: MikroTik’s RouterOS may have limited official hardware support compared to more mainstream router operating systems.
3. DD-WRT

DD-WRT is an open-source router OS software based on the Linux kernel that offers a highly customizable and feature-rich networking experience for both home and enterprise users. Its advanced networking features include Quality of Service (QoS), VPN support, and port forwarding. The software supports multiple wireless protocols, such as 802.11ac, 802.11n, and 802.11g, among others, and advanced routing protocols such as OSPF, BGP, and RIPv2.
Key Features:
- RADIUS Support: Includes support for RADIUS (Remote Authentication Dial-In User Service) for authentication and authorization.
- Access Control: Offers access control features to manage network permissions and restrictions.
- OpenVPN: Supports OpenVPN, an open-source VPN (Virtual Private Network) protocol, for secure remote access and communication.
DD-WRT includes multiple wireless SSIDs, which allows for the creation of multiple wireless networks with different access levels and security settings. Additionally, the software offers network storage capabilities, allowing users to share files across their network. DD-WRT is highly customizable, allowing users to tailor the software to their specific needs. Its user-friendly web-based interface makes it easy to configure network settings.
The software includes a range of security features, such as firewall support, WPA/WPA2 encryption, VPN and add-ons, and plugin support.
Other features and capabilities include:
- DD-WRT supports a wide range of routers and hardware, including older and newer devices.
- The software includes advanced networking features such as Quality of Service (QoS), VPN support, and port forwarding.
- DD-WRT offers support for multiple wireless protocols, including 802.11ac, 802.11n, and 802.11g, among others.
- The software includes support for advanced routing protocols such as OSPF, BGP, and RIPv2.
- DD-WRT supports multiple wireless SSIDs, which allows for the creation of multiple wireless networks with different access levels and security settings.
- The software includes a range of security features, including firewall support, WPA/WPA2 encryption, and VPN support.
- DD-WRT also supports network storage, allowing users to share files across their network.
- The software can be customized using add-ons and plugins, allowing users to add new features or modify existing ones.
Pros:
- Compatibility: Allows users to repurpose existing hardware or choose from various compatible devices to run DD-WRT.
- Community Support: This community-driven approach ensures ongoing improvement, troubleshooting assistance, and access to a wealth of resources.
- Learning Opportunity: Using DD-WRT provides users with an opportunity to learn about networking concepts, Linux-based systems, and software configuration.
- Customizability: DD-WRT provides extensive customization options, allowing users to tailor their firmware to their specific needs and preferences.
Cons:
- Complexity: Learning curve for users unfamiliar with advanced networking concepts and configurations.
- Limited Hardware Compatibility: Some routers may have limited compatibility with DD-WRT, requiring compatible hardware for installation.
- Potential Risks: Incorrect configuration or firmware flashing can lead to router malfunctions or vulnerabilities, requiring caution during setup and usage.
4. VyOS

VyOS is an open-source network operating system based on Debian GNU/Linux. It is designed to be used as a router, firewall, and VPN gateway, and it is well-suited for small to medium-sized businesses and enterprise-level networks. VyOS is a fork of the Vyatta project, which was discontinued in 2013. The software is actively maintained by the VyOS community and offers a range of advanced networking features.
Key Features:
- Virtual Appliance: Can be deployed as a virtual appliance, providing flexibility in network setups.
- NetFlow/sFlow Sensor: Includes support for NetFlow and sFlow protocols for network traffic monitoring and analysis.
- Stateful Load Balancing: Offers stateful load balancing capabilities to distribute network traffic efficiently.
One of the key features of VyOS is its flexibility. It can be installed on a range of hardware, including physical servers, virtual machines, and cloud platforms such as Amazon Web Services and Microsoft Azure. It can also be deployed as a virtual appliance, making it easy to test and evaluate the software. VyOS includes a wide range of networking features, including advanced routing protocols such as OSPF, BGP, and RIPv2. It also supports VPNs, including IPsec, OpenVPN, and L2TP. The software includes advanced firewall features, such as stateful packet inspection, NAT, and zone-based firewalling. Additionally, VyOS supports Quality of Service (QoS) and network address translation (NAT).
One of the strengths of VyOS is its command-line interface (CLI), which allows for detailed configuration of networking features. The CLI is similar to the Juniper Networks Junos CLI, making it a good choice for users familiar with that platform. Additionally, VyOS includes a web-based GUI for configuring basic networking settings. VyOS’s strengths also include its advanced networking features, flexibility, and ability to be deployed in a variety of environments. The software’s active development community and frequent software updates ensure that it remains up-to-date with the latest networking technologies. Additionally, VyOS’s CLI makes it a good choice for experienced network administrators who prefer to work with a command-line interface.
On the other hand, one potential weakness of VyOS is that it may be less user-friendly than other router OS software with a graphical user interface. Additionally, configuring advanced networking features may require a higher level of technical expertise. Nevertheless, VyOS is a powerful and flexible open-source router OS software that is well-suited for enterprise-level networks. Its advanced networking features and active development community make it an excellent choice for experienced network administrators who require advanced routing, firewalling, and VPN capabilities.
Pros:
- Powerful Routing Capabilities: VyOS offers robust routing features, including support for dynamic routing protocols such as BGP, OSPF, and RIP, as well as policy-based routing, VRF, and IPv6 routing.
- Virtualization and Cloud Support: VyOS can be deployed as a virtual appliance in hypervisor environments like VMware, Hyper-V, and KVM, making it suitable for virtualized and cloud-based deployments.
- Flexibility and Customization: VyOS is highly customizable, allowing users to configure and tailor their network infrastructure to meet specific requirements.
Cons:
- Complexity: Setting up and configuring VyOS requires some advanced networking knowledge and experience, making it less suitable for beginners.
- Limited Support: As an open-source project, official support may be limited compared to commercial solutions, although community support is available.
- Resource Intensive: Virtual deployment of VyOS may require adequate resources in terms of CPU, memory, and storage, especially in high-traffic environments.
5. OPNsense

OPNsense is an open-source router OS software that is based on FreeBSD. It is designed to be used as a firewall, router, and VPN gateway, and it includes a range of advanced networking features. OPNsense is a fork of the pfSense project, and it is actively maintained by the OPNsense community.
Key Features:
- Firewall Functions: Includes firewall functionalities for network security and traffic management.
- Based on pfSense: Built on the pfSense platform, known for its robust networking capabilities.
- NetFlow Exporter: Supports NetFlow exporting for network traffic monitoring and analysis.
One of the key features of OPNsense is its flexibility. It can be installed on a range of hardware, including physical servers, virtual machines, and cloud platforms such as Amazon Web Services and Microsoft Azure. It can also be deployed as a virtual appliance, making it easy to test and evaluate the software. Other features and capabilities include:
- Firewall OPNsense includes a powerful firewall with stateful packet inspection, which allows it to filter traffic based on packet contents, port numbers, and other criteria. This provides a high level of security for enterprise networks.
- Quality of Service (QoS) OPNsense supports Quality of Service (QoS) features, which allows network administrators to prioritize traffic based on its type, source, and destination. This helps to ensure that critical network traffic is given priority over less important traffic.
- Virtual Private Network (VPN) support OPNsense includes built-in support for Virtual Private Networks (VPNs), allowing users to securely connect to the network from remote locations.
- Web-based GUI OPNsense provides a web-based graphical user interface (GUI) for easy configuration and management. The GUI is user-friendly and includes a range of features, such as a dashboard, firewall rule editor, and package manager for installing additional features.
- Traffic shaping OPNsense includes advanced traffic shaping capabilities, which allows network administrators to control the flow of traffic on the network. This helps to optimize network performance and reduce congestion.
- Intrusion Detection and Prevention System (IDPS) OPNsense includes an Intrusion Detection and Prevention System (IDPS), which allows network administrators to detect and prevent network attacks.
As with most applications, OPNsense has its strengths and weaknesses. OPNsense’s strengths include its advanced networking features, flexibility, and ease of use. The software is actively maintained by the OPNsense community, which ensures that it remains up-to-date with the latest networking technologies. Additionally, the software’s web-based GUI makes it easy to configure networking settings, even for users without extensive technical expertise.
On the other hand, one of OPNsense’s weaknesses is that it may be less user-friendly than other router OS software with a graphical user interface. Additionally, configuring advanced networking features may require a higher level of technical expertise. Nonetheless, OPNsense is a powerful and flexible open-source router OS software that is well-suited for enterprise-level networks. Its advanced networking features, flexibility, and ease of use make it an excellent choice for both experienced network administrators and users with less technical expertise.
Pros:
- Robust Firewall Features: Inherits and extends the robust firewall features from pfSense, enhancing network security.
- Community Support: Being open-source, OPNsense benefits from community-driven development, updates, and support.
- NetFlow Exporting: Supports NetFlow exporting, allowing for detailed network traffic monitoring and analysis.
- User-Friendly Interface: OPNsense is known for its user-friendly interface, making it accessible for network administrators.
Cons:
- Resource Intensive: Running OPNsense with all features enabled may require adequate hardware resources, especially in high-traffic environments.
- Limited Commercial Support: While community support is strong, official commercial support options may be limited compared to proprietary solutions.
6. pfSense

pfSense is a free and open-source router and firewall operating system based on the FreeBSD operating system. It is designed to be used on standard x86 hardware and can be deployed as a virtual machine or on dedicated hardware. pfSense offers advanced features and capabilities that are typically found in commercial routers and firewalls, making it an ideal solution for small to medium-sized businesses, educational institutions, and other organizations that require robust network security and management.
Key Features:
- Firewall: Offers comprehensive firewall functionalities for network security and access control.
- Traffic Shaping: Includes traffic shaping capabilities to prioritize and manage network traffic effectively.
- VPN Support: Provides support for VPN technologies for secure remote access and communication.
pfSense provides a web-based graphical user interface (GUI) that allows users to configure and manage all aspects of their network. This includes setting up firewall rules, configuring virtual private networks (VPNs), managing DNS and DHCP services, and monitoring network activity. The GUI is highly customizable, allowing users to create dashboards and widgets that display real-time network information and statistics.
One of the key features of pfSense is its firewall capabilities. It offers advanced features such as stateful packet inspection, traffic shaping, and intrusion detection and prevention. These features allow administrators to block unwanted traffic and prevent malicious attacks on their networks. pfSense also supports VPN connections, allowing users to securely connect to their network from remote locations.
Another important feature of pfSense is its support for high availability (HA) and load balancing. With HA, administrators can set up redundant systems that automatically failover in the event of a hardware or software failure. Load balancing allows administrators to distribute network traffic across multiple servers or internet connections, improving performance and reducing downtime.
pfSense is highly flexible and can be customized to meet the specific needs of different organizations. It supports a wide range of third-party packages and plugins, including antivirus and anti-spam filters, content filtering, and intrusion detection and prevention systems. It also has an active community of developers and users who contribute to its ongoing development and support.
Pros:
- Community Support: Being open-source, pfSense benefits from a large community of users and developers, providing extensive documentation, forums, and support resources.
- Flexibility: Offers flexibility in deployment, allowing users to install pfSense on standard hardware or as a virtual appliance.
Cons:
- Complexity: Setting up and configuring pfSense may require technical expertise, especially for users unfamiliar with advanced networking concepts.
- Hardware Requirements: Running pfSense with all features enabled may require adequate hardware resources, especially in high-traffic environments.
7. IPFire

IPFire is a free and open-source router and firewall operating system based on the Linux kernel. It is designed to be used on standard x86 hardware and can be deployed as a virtual machine or on dedicated hardware. IPFire offers advanced features and capabilities for network security and management, making it an ideal solution for small to medium-sized businesses, educational institutions, and other organizations that require robust network protection.
Key Features:
- Firewall: Provides robust firewall functionalities for network security and access control.
- Intrusion Prevention System (IPS): Includes an intrusion prevention system to detect and block network threats.
- VPN Support: Offers support for Virtual Private Network (VPN) technologies for secure remote access and communication.
IPFire provides a web-based graphical user interface (GUI) that allows users to configure and manage all aspects of their network. This includes setting up firewall rules, configuring virtual private networks (VPNs), managing DNS and DHCP services, and monitoring network activity. The GUI is highly customizable, allowing users to create dashboards and widgets that display real-time network information and statistics.
One of the key features of IPFire is its firewall capabilities. It offers advanced features such as stateful packet inspection, traffic shaping, and intrusion detection and prevention. These features allow administrators to block unwanted traffic and prevent malicious attacks on their networks. IPFire also supports VPN connections, allowing users to securely connect to their network from remote locations. Another important feature of IPFire is its support for proxy servers, which can be used to filter web traffic and block unwanted content. It also supports content filtering, which allows administrators to block access to specific websites or types of content.
IPFire is highly flexible and can be customized to meet the specific needs of different organizations. It supports a wide range of third-party packages and plugins, including antivirus and anti-spam filters, content filtering, and intrusion detection and prevention systems. It also has an active community of developers and users who contribute to its ongoing development and support.
Pros:
- Modular Design: IPFire adopts a modular design approach, allowing users to customize their firewall and network infrastructure according to their specific requirements.
- Performance Optimization: IPFire is optimized for performance, offering efficient resource utilization and low overhead.
- User-Friendly Interface: IPFire is known for its user-friendly interface, making it accessible for network administrators and users.
- Open Source: IPFire is an open-source project, providing transparency, flexibility, and community-driven development.
Cons:
- Community Size: Compared to some other firewall solutions, IPFire may have a smaller user community and ecosystem.
- Resource Intensive: Running IPFire with all features enabled may require adequate hardware resources, especially in high-traffic environments.
- Limited Commercial Support: While community support is strong, official commercial support options may be limited compared to proprietary solutions.
RusRoute
для Windows
RusRoute firewall — программный IPv4 и IPv6 маршрутизатор, фаервол, межсетевой экран, Интернет-шлюз для организации выхода локальной сети LAN небольшой компании в Интернет.
Имеется подсчет и ограничение трафика пользователей, защита от сетевых, (D)DOS атак, с функциями NAT, redirect, динамические шейперы, VPN сервер/клиент, прокси, мост LAN в VPN, DHCP серверы, HTTP кэши, преобразователь HTTP в HTTP прокси, с функцией Captive Portal для автоматического приглашения ввода имени и пароля пользователя при первом выходе в Интернет, настройкой времени действия и разделителей потоков для правил, с дополнительными возможностями маршрутизации.
RusRoute состоит из двух модулей: драйвера, перехватывающего Ethernet и IP-пакеты (пакеты протокола Интернет версии 4) и передающего эти пакеты для обработки модулю фаервола.
Особенности приложения:
- маршрутизатор, фаервол
- прозрачная прокси
- многофункциональный NAT
- динамический TCP шейпер
- распределённые межсерверные VPN сети
- встроенные DHCP, HTTP серверы
- гибкий HTTP кеш, автоматическая авторизация “на лету”
- авторизация, аутентификация и аккаунтинг пользователей
ТОП-сегодня раздела «Firewalls»
Firewall App Blocker 1.9
Firewall App Blocker — удобная программа для управления параметрами Firewall запуска или блокирования приложений на Вашем ПК…
Fort Firewall 3.17.6
Бесплатный и простой в использовании файервол для Windows, основанный на Windows Filtering Platform (WFP). …
Отзывы о программе RusRoute
Admin
Отзывов о программе RusRoute 2.7.4 пока нет, можете добавить…
Меня часто спрашивают, неужели нет никакого программного маршрутизатора под Windows? Ведь не всегда есть возможность использовать отдельный комп под pfSense или zeroshell, зато есть какой-нибудь виндовый сервер, через который можно организовать централизованный доступ в интернет. Оказывается, есть решение и в этом случае. Сегодня речь пойдет о маршрутизаторе RusRoute, который разработан нашим соотечественником — Андреем Моисеенко. Для некоммерческого использования программа бесплатна с учетом одного ограничения — максимальное количество пользователей или IP-адресов в вашей сети не больше 15.
Этот программный роутер наделен внушительным набором функций. Роутинг, фаервол, проброс портов, VPN, учет пользователей, биллинг, Captive Portal и пр. Одним словом — круто!
Установка
Чтобы раздавать интернет в локальную сеть, вам понадобится собственно сам комп с Windows и одну или две сетевых карты в нем. Одну если у вас интернет приходит по какому-нибудь модему а-ля 3G и/или с соединением по PPPoE, две — если у вас интернет по выделенке. В моем обзоре будет комп с двумя сетевухами.
В винде надо отключить Брандмауэр Windows, чтобы он не мешался. Сделать это лучше и в его настройках и в системных службах. Установку роутера, конечно, лучше производить из учетной записи с правами администратора. Кстати, в мануале к программе об этом почему-то говорится только когда вы доберетесь до 11-го пункта.
Итак, заходим на официальный сайт проекта, скачиваем exe-файл и начинаем установку. На момент написания обзора была доступна версия 1.8.4. Нам рекомендуют устанавливать роутер в каталог C:RusRoute. Да пусть так и будет…
Жмем кнопку Install, после чего через пару мгновений перед нами появится новое окно с лицензионным согашением. В верхней части окна выбираем русский язык, затем принимаем само соглашение.
Затем перед нами появится вот такое сообщение:
Жмем Продолжить. Выскакивает следующее окно:

Жмем ОК. Затем появляется вот это окно:
Жмем Да и только после этого начинается процесс настройки. Многовато сообщений, однако.
Кстати, пока я делал скриншоты всех этих окон, установщик зачем-то два раза определял архитектуру моего процессора… То ли баг, то ли установщик действительно думает, что в процессе инсталляции я могу успеть сменить начинку ПК? 🙂

Во время установки перед вами появится еще несколько окон, которые будут то появляться, то исчезать и в конце-концов процесс будет завершен. Жмем кнопку Готово.
В системном трее появится вот такой значок:
Если по нему кликнуть, то развернется основное окно всех настроек, однако, если нажать по крестику в верхне-правом углу окна, то программа настройки закроется совсем. На мой взгляд этот момент не до конца продуман. Если нажимаем по крестику, то нас должны спросить: закрыть или свернуть. Ну да ладно, ведь сам роутер при этом будет продолжать работать, т.к. он в системе регистрируется как сервис. Запустить заново программу настройки можно из меню ПускПрограммы или через ярлык на рабочем столе.
Настройка
Итак, вот мы открыли основное окно…
Первое, что бросается в глаза это Demo-режим работы роутера, который скажет вам до свидания через 30 дней. Как заставить это дело работать в бесплатном некоммерческом режиме не совсем понятно, пришлось залезть в мануал к программе. Оказывается, надо по табличке нажать правой кнопкой мыши и выбрать нужный пункт. Во как!
Я нажал пункт «Опционально: переключиться в режим бесплатной версии» после чего вылезло окно, в котором нам сообщают, что максимальное число клиентов = 8.
Отвечаем Да. Затем нам отдельным окном сообщат, что мы можем не активировать бесплатную версию.
В итоге у нас должно получиться примерно вот это.

Тут пишется об ограничении = 15-и адресов. Не совсем понятно как именно они считаются, но по большому счету для нас это не столь важно.
Ладно. Итак, у меня в компе 2 сетевухи. Одна из них смотрит в интернет и получает IP-адрес и все остальное автоматически, а вторая смотрит в локальную сеть. На ней адрес настроен вручную. Еще RusRoute установил в моей системе виртуальный сетевой адаптер, правда, не знаю для чего. Итого три сетевухи. Как написано в мануале, нам нужно убедиться, что роутер правильно распознал наши сетевые адаптеры. Для этого идем в пункт Информация о сетиСетевые адаптеры. Тут нам нужно просто посмотреть что все так.
Далее нужно сходить в раздел правил файервола и как учит инструкция щелкнуть правой кнопкой мыши в каком-нибудь месте. В выпавшем меню нужно выбрать Мастер правил.
Вот так выглядит мастер. Здесь жмем Далее.
Первым делом надо указать, какая сетевуха у нас смотрит в локальную сеть. Почему-то в правом списке уже присутствует две позиции под названием «Some network» и «VPN».
Зачем они тут — непонятно. Я все это убрал и добавил только одну сетевую карту, которая у меня смотрит в локалку. После этого жмем Далее.
Теперь выбираем подключение к интернету. В правом списке уже присутствуют два пункта pppoe и dialup (я так понял, это на тот случай, если интернет приходит по модему) и я добавил туда одну сетевуху, которая у меня смотрит в интернет. Жмем Далее, после чего нам предложат выбрать сетевой адаптер для подключения через спутник. Мы таким не пользуемся поэтому смело кликаем Далее. Затем нас спросят про спутниковый pptp подключения. Я тоже это пропустил.
Следующий этап — определяем те сервисы, которым разрешен доступ из локальной сети в интернет. Нам будет уже предложен стандартный список разрешенных протоколов, но если промотать этот список до конца, то можно обнаружить небольшой прикол — ALL TCP и ALL UDP. Действительно, весь трафик будет пропускаться без ограничений, а перечисления остальных протоколов нужны, например, для подсвечивания в журнале.
Пока согласимся с настройками по умолчанию и продолжим. Теперь нас попросят определить все разрешенные сервисы для компа с RusRoute в интернет. Я просто нажал Далее. Потом нас спросят про разрешенные сервисы из локалки к роутеру. Тоже согласился с настройкам по умолчанию. И последнее — нужно определить разрешенные сервисы для доступа из интернета к роутеру. Жму Далее.
Следующий этап — «Отображение портов для внешних адресов в адреса и порты локальной сети». Бррр. Из этой фразы новичек точно ничего не поймет, а специалист подумает что за ересь. По-моему это называется форвардинг портов (port forwarding) или просто проброс портов. Мы ничего пробрасывать не будем. Жмем Далее.
Следующий пункт — «Сервисы для маршрутизации между локальными сетями и другими сетями». Просто жмем Далее.
Последним пунктом нас спросят про перенаправление CaptivePortal. Здесь остановлюсь чуть подробнее. Если вы хотите ограничить доступ в интернет с помощью паролей для отдельных пользователей, то галку Captive Portal снимать не нужно. Если нужно просто выпустить всю локальную сеть в интернет, то снимите галку. На IPTV multicast пока заострять внимание не будем.
Последнее диалоговое окно мастера порадовало, где сказано «нажми конец для установки правил..» и кнопка «Конец» внизу формы. 🙂 Как говорится, лучше ужасный конец, чем ужас без конца. На мой взгляд кнопка должна называться «Завершение», «Готово» или «Применить»! Я не видел ни одной программы, где мастер заканчивался бы кнопкой «Конец».
Теперь, когда основные правила фаервола созданы, необходимо нажать кнопку «Применить» в основном окне программы.
Если вы оставили включенной галку Captive Portal в мастере, то при попытке зайти на какой-нибудь сайт с любого компьютера сети у вас появится вот такая замечательная страница, которая снабжена двумя ссылками на вход и выход и кучей других не очень нужных ссылок.
Важное замечание: на компьютерах в сетевых настройках шлюз по умолчанию (gateway) и DNS сервер должен быть указан IP-адрес компа с RusRoute.
Простой доступ в интернет
Если мы хотим пользоваться только базовыми настройками роутера без всяких паролей на интернет, то во-первых, как я уже отмечал выше нам нужно снять галку Captive Portal в мастере, а во-вторых — отредактировать руками одно правило на фаерволе. Идем в раздел «Правила фаервола», находим в списке правило 6.1 и в колонке Пользователи нажимаем правой кнопкой мыши. В появившемся меню выбираем пункт Редактировать.
В появившемся окне выставляем все галки, как показано на скриншоте ниже, нажимаем ОК и в основном окне программы нажимаем Применить.
Всё, после этих действий вся наша локальная сеть получит беспрепятственный доступ в интернет.
Доступ в интернет по паролям
Для этого сценария в мастере должна быть установлена галка Captive Portal и всё что нам потребуется сделать — создать нужное количество пользователей с нужными параметрами. Идем в меню Пользователи. Где нибудь в пустом месте нажимаем правой кнопкой мыши и в меню выбираем «Добавить пользователя».
Появится окно добавления пользователя:
Здесь есть поля, которые не вызывают никаких вопросов, например, имя (это логин), пароль, комметарий. Но есть настройки, по которым хотелось бы получить некое пояснение. Было бы здорово, если при наведении курсора мыши на некоторые поля и галки появлялась всплывающая подсказка. Самое главное, добавьте «денег» на баланс пользователю, в противном случае интернет ему будет недоступен. Можно сделать вход пользователя без пароля, а по MAC-адресу сетевой карты в его компьютере. Тут есть поле для ввода MAC-адреса и галка «Автоматический вход». Главное, после создания пользователя не забудьте нажать кнопку Применить в основном окне программы.
В процессе изучения роутера нашел еще один ньанс. Созданного ранее универсального пользователя можно отключить только обнулив его баланс. Галка «Отключен» в его настройках почему-то не срабатывает.
Итог
По мере свободного времени мы расскажем об остальных функциях RusRoute, а пока подведем промежуточный итог.
Идея и функционал, надо сказать, выше всяческих похвал, но реализация именно по части удобства не самая лучшая. Это небольшой недостаток, если вы будете использовать RusRoute в самом простом режиме «настроил и забыл». Но если вы каждый день будете в него лазить по несколько раз, например, администрируя пользователей, то удобство управления имеет значение.
Спасибо Андрею за RusRoute. Надеюсь, что этот продукт будет совершенствоваться и дальше.
PS: После выхода обзора мы связались с Андреем и получили от него некоторые комментарии. Материал был существенно дополнен и отредактирован.
Редакция от 15.04.2012

Стабильность и эффективность бизнес-процессов современной организации во многом зависит от бесперебойного функционирования ИТ-инфраструктуры. Содержание ИТ-инфраструктуры во многих случаях обходится дорого, в особенности для малых и средних компаний.
С целью оптимизации расходов многие организации прибегают сегодня к практике ИТ-аутсорсинга: вместо того, чтобы приобретать оборудование, компания арендует его в стороннем дата-центре, а для его обслуживания привлекает сторонних специалистов.
Чтобы эта практика была выгодной с организационной и с финансовой точки зрения, нужно тщательно продумать техническую сторону вопроса.
Планируя перенос части ИТ-инфраструктуры в сторонний дата-центр, следует решить, каким именно образом все информационные ресурсы организации будут объединены в единую сеть. Решения от ведущих производителей (Juniper, Cisco и других) зачастую стоят дорого; компаниям небольшого и среднего размера они могут оказаться не по карману. В этой связи вполне закономерным и объяснимым является возросший интерес к бесплатным продуктам с открытым исходным кодом, многие из которых по возможностям не уступают платным аналогам, а иногда даже превосходят их.
Важным элементом корпоративной сети является маршрутизатор — специализированное сетевое устройство, предназначенное для объединения сегментов сети и пересылки пакетов между ними. Маршрутизаторы бывают как аппаратные, так и программные. В случае, когда необходимо выстроить ИТ-инфраструктуру с минимальными расходами, использование программного маршрутизатора может оказаться вполне подходящим вариантом.
В этой статье мы расскажем о маршрутизаторе VyOS — интересном и перспективном продукте, к тому же распространяемым по свободной лицензии совершенно бесплатно, и покажем, как его можно использовать для решения практических задач.
VyOS: общая информация
VyOS представляет собой форк известной сетевой операционной системы Vyatta. Его первый релиз под кодовым названием Hydrogen был представлен в декабре 2013 года.
Последний на сегодняшний день релиз — Helium — вышел в свет в сентябре 2014 года. Интерфейс командной строки (CLI) в VyOS похож на СLI устройств от Juniper Networks.
Возможности VyOS действительно широки. Вот далеко не полный список:
- межсетевой экран для IPv4 и IPv6, включая фильтрацию p2p-трафика;
трансляция сетевых адресов (NAT); - DHCP-сервер для IPv4 и IPv6;
- система обнаружения вторжений;
- балансировка нагрузки и резервирование канала;
- резервирование маршрутизаторов с синхронизацией таблицы состояний соединений;
- виртуальные частные сети (IPsec, L2TP/IPsec, PPTP, OpenVPN);
- учёт трафика (Netflow и sFlow);
- веб-прокси и фильтрация URL.
Как и Vyatta, VyOS основан на Debian. Это позволяет расширить функциональность путём установки дополнительных deb-пакетов.
Установка
Подробную инструкцию по установке VyOS мы приводить не будем, да в этом и нет нужды: всё детально расписано здесь. Существует два типа установки VyOS: install system и install image. Первый тип (install system) подразумевает стандартную установку ОС на диск. При установке с использованием install image каждая версия VyOS будет находиться в отдельной директории, что даёт возможность откатиться к предыдущему релизу в случае возникновения неполадок (рекомендуемый метод установки).
Итак: загружаемся с диска, входим в систему (логин — vyos, пароль — vyos), выполняем команду install image. Начнётся установка, в ходе которой нужно будет ответить на стандартные вопросы установщика Linux. По завершении выполним команду reboot и снова зайдём в систему и войдём в систему под логином и паролем, заданными во время установки.
Практический пример
Рассмотрим особенности работы VyOS на конкретном практическом примере. Условия задачи: организация состоит из трёх географически удалённых друг от друга подразделений: одно — в Москве, второе — в Санкт-Петербурге, третье — в Хабаровске. В Петербурге имеются четыре сервера, установленные в дата-центре. Нужно сделать так, чтобы только один из них должен быть подключен к Интернету напрямую. Остальные должны быть объединены в локальную сеть и выходить в Интернет через маршрутизатор. Мы будем использовать разные типы подключений для филиалов — L2TP/IPsec, PPTP и OpenVPN.
Наша сеть будет выглядеть следующим образом:
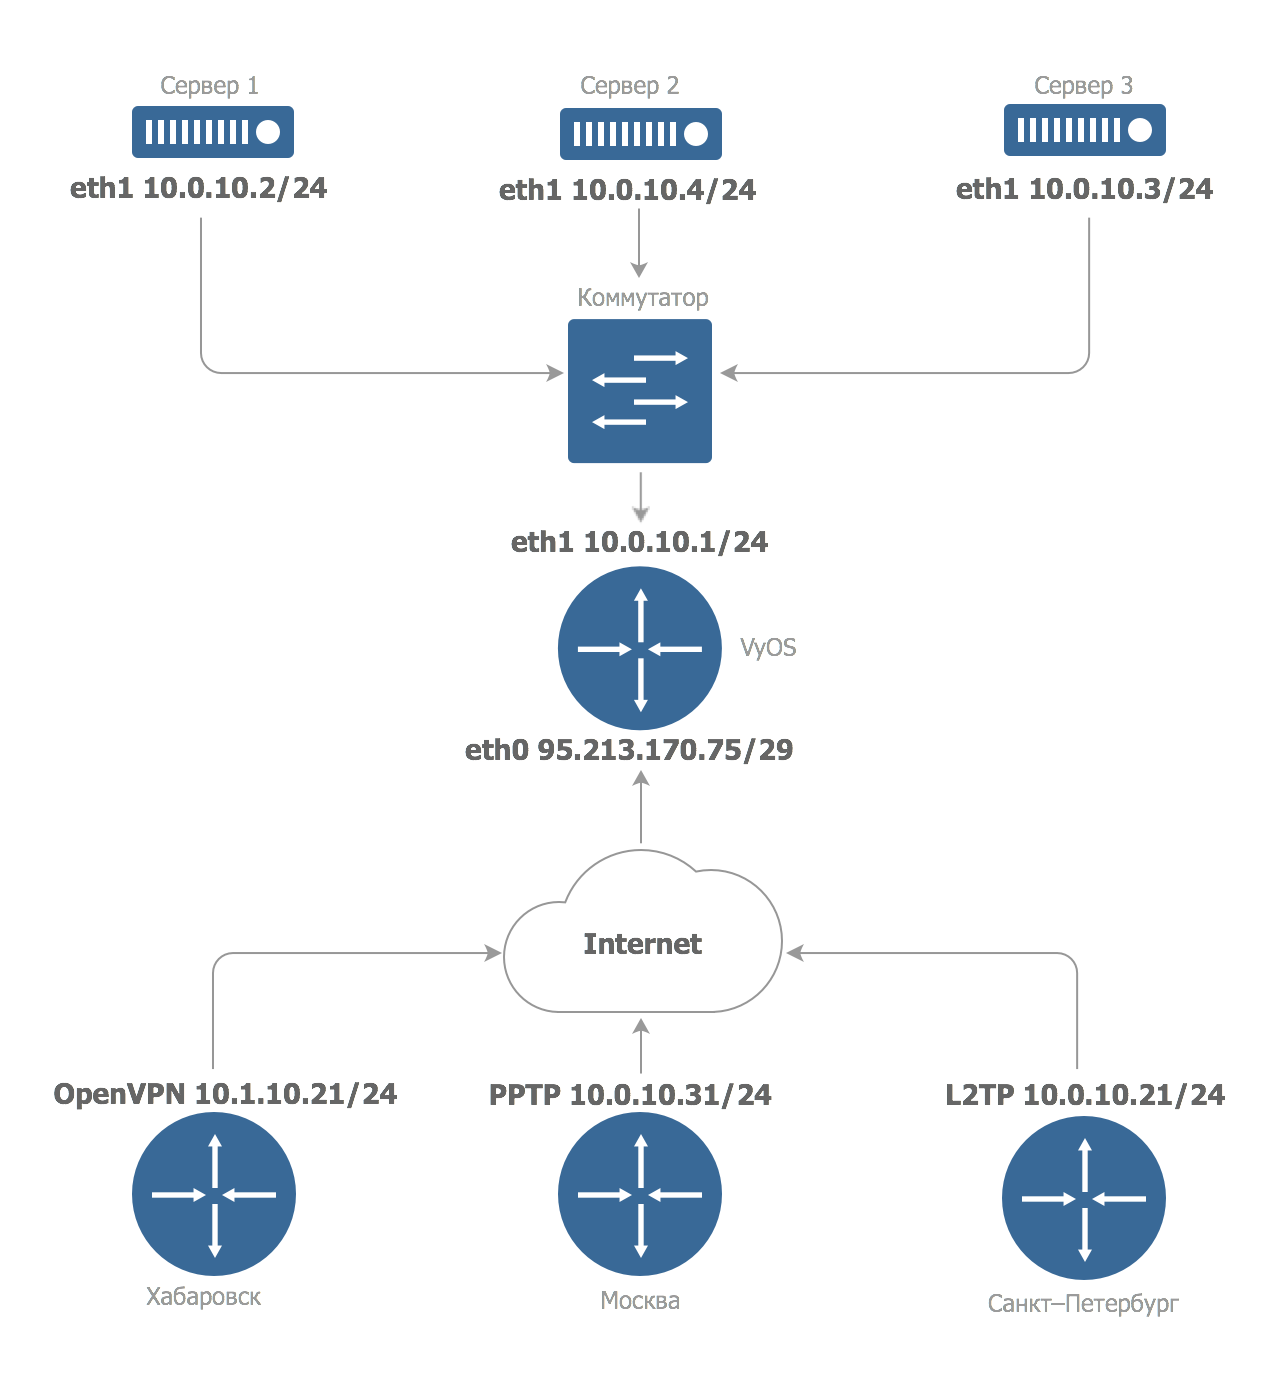
Конфигурация шлюза
После установки сети ещё нет, поэтому мы сначала настроим её через KVM-консоль.
Для начала настроим первый сетевой интерфейс (внешний), который будет иметь адрес 95.213.170.75. Переходим в режим настройки командой configure — да-да, все как у «старших» железных собратьев.
set interfaces ethernet eth0 address 95.213.170.75/29
set interfaces ethernet eth0 description "WAN"
В данном случае мы назначили интерфейсу eth0 адрес и указали описание порта, чтобы не запутаться в дальнейшем.
Также укажем адреса шлюза по умолчанию и DNS-сервер:
set system gateway-address 95.213.170.73
set system name-server 188.93.16.19
Здесь мы используем Санкт-Петербургский DNS-сервер Селектел, но вы, конечно же, можете указать любой другой.
Настроим сервис SSH, с помощью которого мы будем производить дальнейшее конфигурирование шлюза:
set service ssh port "22"
Логика работы VyOS почти такая же, как у устройств от Juniper Networks. Чтобы применить изменения, нужно выполнить команду commit. Чтобы изменения остались в силе после перезагрузки, их нужно сохранить с помощью команды save. Этой командой vyOS отличается в плане логики от JunOS: в сетевой ОС от Juniper после commit не нужно сохранять изменения.
Подключимся к маршрутизатору по SSH. Для входа в систему введём логин и пароль, заданные при установке. Затем настроим внутренний сетевой интерфейс eth1. Это локальный сетевой интерфейс, к которому подключены серверы в дата-центре. Присвоим ему адрес 10.0.10.1 с маской сети /24 и добавим описание:
set interfaces ethernet eth1 address 10.0.10.1/24
set interfaces ethernet eth1 description "LAN"
Чтобы наши машины могли распознавать имена сетевых ресурсов, нужно настроить DNS. Мы будем настраивать DNS-forwarder, который будет перенаправлять запросы на разрешение имён к серверам, заданным конфигурацией. Процедура настройки этого компонента проста:
set service dns forwarding cache-size "0"
set service dns forwarding listen-on "eth1"
set service dns forwarding name-server "188.93.16.19"
set service dns forwarding name-server "188.93.17.19"
В первой команде указывается размер кэша, который DNS-forwarder будет использовать для хранения записей. Мы выставили нулевой размер кэша, так как в нашем случае хранение DNS-записей не имеет особого смысла. Вторая команда задает интерфейс, на котором будет «слушать» запросы DNS-forwarder. Мы специально используем только внутренний интерфейс, на котором DNS-forwarder будет «слушать» запросы, чтобы не сделать DNS-forwarder, доступный всему интернету. В третьей и четвертой команде указываются адреса, куда будут пересылаться запросы. В нашем примере используются DNS-серверы Селектел, но вместо них, конечно же, можно указать любые другие.
Все компоненты, необходимые для функционирования локальной сети, готовы к работе. Переходим к настройке межсетевого экрана.
В VyOS мы можем использовать наборы правил межсетевого экрана (файерволла), называя их любыми именами. В нашем примере для внешней сети используется набор правил под именем OUTSIDE, для внутренней, соответственно, INSIDE.
Для внешнего интерфеса мы разрешим все соединения «изнутри наружу», для внутреннего интерфейса — все «изнутри наружу» и доступ к SSH.
Создадим правила для внешнего интерфейса:
set firewall name OUTSIDE default-action "drop"
set firewall name OUTSIDE rule 1 action "accept"
set firewall name OUTSIDE rule 1 state established "enable"
set firewall name OUTSIDE rule 1 state related "enable"
Вышеперечисленными командами мы разрешаем уже установленные ранее (established) и относящиеся к ним (related) соединения.
Затем зададим правила файерволла:
Посмотреть правила
set firewall name INSIDE default-action 'drop'
set firewall name INSIDE rule 1 action 'accept'
set firewall name INSIDE rule 1 state established 'enable'
set firewall name INSIDE rule 1 state related 'enable'
set firewall name INSIDE rule 2 action 'accept'
set firewall name INSIDE rule 2 icmp type-name 'echo-request'
set firewall name INSIDE rule 2 protocol 'icmp'
set firewall name INSIDE rule 2 state new 'enable'
set firewall name INSIDE rule 3 action 'drop'
set firewall name INSIDE rule 3 destination port '22'
set firewall name INSIDE rule 3 protocol 'tcp'
set firewall name INSIDE rule 3 recent count '4'
set firewall name INSIDE rule 3 recent time '60'
set firewall name INSIDE rule 3 state new 'enable'
set firewall name INSIDE rule 31 action 'accept'
set firewall name INSIDE rule 31 destination port '22'
set firewall name INSIDE rule 31 protocol 'tcp'
set firewall name INSIDE rule 31 state new 'enable'
В первом правиле мы задаем действие по умолчанию — в нашем случае это «drop» (все пакеты, которые не попадают под установленные правила будут отбрасываться файерволлом). Во втором мы разрешаем прохождение пакетов ICMP; прежде всего это нужно для того, чтобы в случае сбоя мы смогли «пропинговать» наш роутер. Третье правило отвечает за SSH-подключения: мы разрешаем TCP трафик приходящий на 22 порт.
Применим созданные правила к соответствующим интерфейсам — внешнему и локальному:
set interfaces ethernet eth0 firewall in name 'OUTSIDE'
set interfaces ethernet eth1 firewall out name 'INSIDE'
Стоит обратить внимание на параметры in и out — они задают тип трафика, входящий или исходящий относительно маршрутизатора, и не связаны с названиями наборов правил межсетевого экрана.
Не забываем применять и сохранять конфигурацию с помощью команд commit и save.
Настройка VPN
Как уже было сказано выше, в филиалах у нас будут использоваться разные типы VPN-соединений. Начнём с настройки L2TP/IPSec (подробнее см. здесь):
set vpn ipsec ipsec-interfaces interface eth0
set vpn ipsec nat-traversal enable
set vpn ipsec nat-networks allowed-network 0.0.0.0/0
set vpn l2tp remote-access outside-address 95.213.170.75
set vpn l2tp remote-access client-ip-pool start 10.0.10.20
set vpn l2tp remote-access client-ip-pool stop 10.0.10.30
set vpn l2tp remote-access ipsec-settings authentication mode pre-shared-secret
set vpn l2tp remote-access ipsec-settings authentication pre-shared-secret <пароль>
set vpn l2tp remote-access authentication mode local
set vpn l2tp remote-access authentication local-users username <пользователь> password <личный_пароль>
С помощью первых трёх мы задаем конфигурацию IPSec: указываем интерфейс, на который будут идти пакеты, включаем NAT traversal и разрешаем NAT для всех сетей. Далее идут команды отвечающие за L2TP. В целом по написанию команд нетрудно догадаться, за что они отвечают, обратим внимание лишь на некоторые параметры.
- outside-address — указывает внешний адрес VPN-сервера;
- pre-shared-secret <пароль> — задает пароль для подключения, который в дальнейшем будет использоваться для настройки VPN на клиентских устройствах;
- authentication mode local — задаёт тип аутентификации. В нашем примере используется аутентификация по локальной базе, но можно использовать и RADIUS-сервер для централизованного управления учётными записями.
В последней строке мы создаём пользователя и устанавливаем для него пароль.
После этого внесём коррективы в правила файерволла и разрешим трафик L2TP/IPSec.
Посмотреть правила
set firewall name INSIDE rule 4 action 'accept'
set firewall name INSIDE rule 4 protocol 'esp'
set firewall name INSIDE rule 41 action 'accept'
set firewall name INSIDE rule 41 destination port '500'
set firewall name INSIDE rule 41 protocol 'udp'
set firewall name INSIDE rule 42 action 'accept'
set firewall name INSIDE rule 42 destination port '4500'
set firewall name INSIDE rule 42 protocol 'udp'
set firewall name INSIDE rule 43 action 'accept'
set firewall name INSIDE rule 43 destination port '1701'
set firewall name INSIDE rule 43 ipsec 'match-ipsec'
set firewall name INSIDE rule 43 protocol 'udp'

commit
save
Правило 4 разрешает трафик протокола ESP, по которому работает установленный туннель IPSEC, 42 — NAT traversal, 43 — порт 1701, на котором работает L2TP.
Теперь перейдем к настройке второго типа VPN-подключения и «поднимем» OpenVPN-сервер.
Для начала скопируем файлы easy-rsa в директорию /config/easy-rsa2, чтобы не потерять их при обновлении системы:
cp -rv /usr/share/doc/openvpn/examples/easy-rsa/2.0/ /config/easy-rsa2
В случае необходимости можно изменить переменные, указанные по умолчанию в сертификатах, например:
nano /config/easy-rsa2/vars

export KEY_COUNTRY="RU"
export KEY_CITY="Saint-Petersburg"
export KEY_ORG="Selectel"
export KEY_EMAIL="t-rex@selectel.ru"
Эти данные будут указываться в полях сертификатов, которые мы будем генерировать. Перейдем в директорию /config/easy-rsa2/ и загрузим переменные:
cd /config/easy-rsa2/
source ./vars
Удалим все ключи:
./clean-all
Затем сгенерируем файлы центра сертификации:
./build-ca
./build-dh
и сертификат сервера:
./build-key-server t-rex-server
После этого скопируем ключи в соответствующие директории:
cp /config/easy-rsa2/keys/ca.crt /config/auth/
cp /config/easy-rsa2/keys/dh1024.pem /config/auth/
cp /config/easy-rsa2/keys/t-rex-server.key /config/auth/
cp /config/easy-rsa2/keys/t-rex-server.crt /config/auth/
Далее подготовим клиентские файлы для подключения к серверу:
./build-key branch-msk
и сразу же скопируем их в отдельную папку:
cd /config/easy-rsa2/keys
mkdir branch-msk
cp branch-msk* branch-msk/
cp ca.crt branch-msk/
Сгенерированные файлы понадобятся для подключения клиентов к серверу, поэтому их нужно будет передать на клиентскую сторону. Это можно сделать с помощью любого SCP-клиента: WinSCP для Windows или стандартного консольного клиента scp для Linux.
Далее переходим к настройке сервера:
set interfaces openvpn vtun0 mode 'server'
set interfaces openvpn vtun0 server name-server '10.0.10.1'
set interfaces openvpn vtun0 server push-route '10.0.10.0/24'
set interfaces openvpn vtun0 server subnet '10.1.10.0/24'
set interfaces openvpn vtun0 tls ca-cert-file '/config/auth/ca.crt'
set interfaces openvpn vtun0 tls cert-file '/config/auth/t-rex-server.crt'
set interfaces openvpn vtun0 tls dh-file '/config/auth/dh1024.pem'
set interfaces openvpn vtun0 tls key-file '/config/auth/t-rex-server.key'
set service dns forwarding listen-on vtun0

commit
save
Обратим внимание на последнюю команду: в ней мы перенаправляем запросы на разрешение имён на DNS-forwarder, настроенный ранее. Отметим также, что в случае с OpenVPN мы сначала использовали отдельную сеть для построения самого туннеля, а затем смаршрутизировали её на локальную сеть, где находятся наши серверы. Это объясняется особенностями протокола. Более подробно об этом мы расскажем в следующей публикации.
Настройка PPTP-сервера
Настроим последний тип VPN-подключения — PPTP. Конечно, протокол PPTP слабо защищён и поэтому вряд ли может быть использован для передачи конфиденциальной информации, но для обеспечения удаленного доступа он находит широкое применение. PPTP-клиент присутствует практически в любом устройстве, имеющем подключение к сети.
Из приведённого примера можно заметить, что PPTP настраивается почти таким же образом, как L2TP:
set vpn pptp remote-access authentication mode local
set vpn pptp remote-access authentication local-users username <имя_пользователя> password <пароль>
set vpn pptp remote-access client-ip-pool start 10.0.10.31
set vpn pptp remote-access client-ip-pool stop 10.0.10.40
set vpn pptp remote-access dns-server server-1 188.93.17.19
set vpn pptp remote-access outside-address 95.213.170.75
В первой команде мы задаем локальный режим аутентификации пользователей. Если у вас есть RADIUS-сервер, можно выбрать режим аутентификации radius: с его помощью управлять учётными записями пользователей гораздо удобнее.
Затем мы создаем локальных пользователей, указываем диапазон IP-адресов и данные серверов DNS, выдаваемых клиентам. Последняя команда задает адрес интерфейса, на котором будет «слушать» наш сервер.
Применим и сохраним настройки:
commit
save
Сервер готов к подключению клиентов.
Осталось только разрешить прохождение трафика из локальной сети во внешнюю. Таким образом мы обеспечим доступ в Интернет серверам, подключенным к локальной сети, а также пользователям, подключающимся к нашему роутеру из филиалов:
set nat source rule 1 outbound-interface 'eth0'
set nat source rule 1 source address '10.0.10.0/24'
set nat source rule 1 translation address masquerade
Заключение
Итак, готово: мы построили сеть в соответствии с условиями поставленной задачи. Один из серверов (расположенный в Санкт-Петербурге) выступает в качестве маршрутизатора, остальные три сервера подключены к нему по локальной сети. Маршрутизаторы в филиалах имеют доступ к ресурсам локальной сети через безопасные VPN-подключения.
В этом небольшом обзоре мы описали лишь основы построения малой корпоративной сети. В следующей публикации мы поговорим о возможностях VyOS более подробно и научимся более гибко управлять правилами межсетевого экрана, пробрасывать порты, разрешать трафик различных протоколов, часто используемых в сетях компаний, а также рассмотрим следующие вопросы:
- организация GRE-туннелей;
- работа с протоколом L2TPv3;
- QoS;
- zone-based firewall;
- увеличение производительности сетевого интерфейса (performance tuning);
- VRRP.
Virtual Router
The original, open source Wifi Hotspot for Windows 7, Windows 8.x and Windows Server 2012 and newer!
FYI, this project is no longer being updated. However, the software will still work as-is. If you find it helpful, please use it.
What is Virtual Router?
Virtual Router is a free, open source software based router for PCs running Windows 8, Windows 7 or Windows Server 2008 R2. Using Virtual Router, users can wirelessly share any internet connection (Wifi, LAN, Cable Modem, Dial-up, Cellular, etc.) with any Wifi device (Laptop, Smart Phone, iPod Touch, iPhone, Android Phone, Zune, Netbook, wireless printer, etc.) These devices connect to Virtual Router just like any other access point, and the connection is completely secured using WPA2 (the most secure wireless encryption.)
This application has had OVER 10 MILLION DOWNLOADS over the years. I am humbled and appreciative of being able to help so many people by adding a feature to Windows that Microsoft should have added themselves. Thanks you!
Download / Install
Click below to download the installer for Virtual Router v1.0 so you can get started using it today!
Important: To install Virtual Router, you will also need to have .NET Framework 3.5 installed on your Windows computer.

For previous releases, you can find those located within the Release folder inside this repository.
Where can Virtual Router be used?
Anywhere you are!
Including:
- Home
- Office
- School
- Airport
- Bus Station
- The Park
- Grandmas House
- The In-Laws
- Absolutely Anywhere!
No Advertising, No Hassle
Unlike similar applications, Virtual Router is not only completely Free, but will not annoy you with any advertisements. Also, since Virtual Router is not ad-supported, it does not track your web traffic the way other ad-supported applications do/can.
Frequently Asked Questions (FAQ)
Is Virtual Router Free to use?
Yes, Virtual Router is completely Free. If you’ve paid for it, then I suggest you demand a refund.
Will I incur extra charges from my ISP using Virtual Router?
The bandwidth the extra devices you have connected to a Virtual Router shared Internet connection will of course count towards your internet service bandwidth. Using Virtual Router functions identically to using a router to share your internet connection. If you have questions regarding how much bandwidth you have allocated and/or what overage charges you may be subject to, then you should contact your Internet Service Provider.
Which Wifi Devices are Supported?
The device support is dependent on you having a driver installed that is Certified for Windows 7 or Windows 8. As far as we know, part of the requirement for a wireless driver to be «Certified for Windows 7» or «Certified for Windows 8» must support the Virtual Wifi and Wireless Hosted Network features of Windows 7.
Unfortunately, in regards to using Virtual Router, any driver that is «Certified for Windows Vista» will work with your Wifi device in Windows 7 or 8, however it will not support the Virtual Wifi and Wireless Hosted Network features.
Virtual Router will not start after installation
There are some cases that Virtual Router is unable to start immediately after installation. First you should make sure that you have the latest device drivers installed from the manufacturer of your Wifi device, then if that still doesn’t work you should try restarting/rebooting you machine if you haven’t already done so.
Error: «group or resource is not in the correct state to perform the requested operation»
Here’s a Hotfix available from Microsoft for a common cause of this problem on Windows 7 and Windows Server 2008 R2: http://support.microsoft.com/kb/2496820
If the hotfix doesn’t work, or you aren’t using Windows 7 or 2008 R2, then you could try some of the suggestions at the following link: http://superuser.com/questions/373861/how-can-i-start-hostednetwork-on-windows-7
How do I know if my computer/hardware supports Virtual Router?
First, you need to have a Wifi device and driver that both support the Windows Virtual Wifi and Wireless Hosted Network features. Drivers that are Certified for Windows 7 or Windows 8 will work.
Can I use Virtual Router with Windows Vista or Windows XP?
Unfortunately, Virtual Router will not work on Windows Vista or Windows XP, or any older version of Windows. Virtual Router is only compatible with Windows 7 and Windows 8 since the Virtual Wifi and Wireless Hosted Network features are new in Windows 7 and Windows Server 2008 R2.
What About Windows 7 Starter Edition?
Unfortunately, Microsoft has disabled the Virtual Wifi features in Windows 7 Starter Edition so Virtual Router will not work. This is the only edition of Windows 7 that the software will not work with.
Is the connection encrypted? How secure it this?
The wireless connection is encrypted with WPA2 encryption. Encryption is also required, with no method of disabling it. The security of you «Virtual Router» is dependent on the strength of you Password / Passphrase.
How To Change Device (Connected Peer) Icon
You can open the Device «Properties» dialog one of two ways:
- Double Click the Device / Connected Peer
- Right Click the Device / Connected Peer and Select «Properties…»
- Then click on the «Change Icon…» Button, and Select the Icon you want and click «Save».
Source Code
The source code for Virtual Router is located within the Source folder inside this repository.
This project was originally hosted on Microsoft’s CodePlex open source project hosting site, but that site is no longer in existence, so I moved the project hosting over here to GitHub.
Disclaimer
This software is provided «as-is» without any warranty express or implied.
Project History
This software was originally created in 2009 using Virtual Wifi features that were newly introduced in the Windows 7 operating system. There were a couple improvements and releases made to the software with the most recent release in 2013. This software works well for what it does, and what it was intended for. However, at this time the project is no longer being updated. Please use this software for what it does and what value it offers you. Just because there aren’t new updates doesn’t negate the benefits from working software that still solves a need people have. If you need to share your laptop or desktops Internet connection with your smartphone, tablet, or other device then this software will likely help you.
Plus, it doesn’t advertise or spy on you like other similar solution. It’s extremely humbling to see this software be so helpful to over 10 MILLION users over the years. And, people still use this software today, over 10 years after the first release! Thank you, and you are more than welcome!!
Feel free to use Virtual Router as-is. The latest released version still works just fine. However, this project will no longer be updated. I’m Chris Pietschmann, the creator of Virtual Router, and I truly thank the over 10 MILLION users for using Virtual Router over the years! Feel free to keep using Virtual Router where it provides value.