
Все способы:
- Способ 1: Перезапуск консоли
- Способ 2: Чистая загрузка
- Способ 3: Проверка на вирусы
- Способ 4: Утилиты SFC и DISM
- Способ 5: Создание новой учетной записи
- Вопросы и ответы: 1
Способ 1: Перезапуск консоли
Чаще всего проблемы с запуском PowerShell связаны с нарушением работы самой консоли. Если обычная перезагрузка системы не помогла, можно попробовать выключить, затем включить средство вручную. Таким образом, совершится перезапуск компонента, и при активации мелкие ошибки сбросятся, а работоспособность консоли придет в норму.
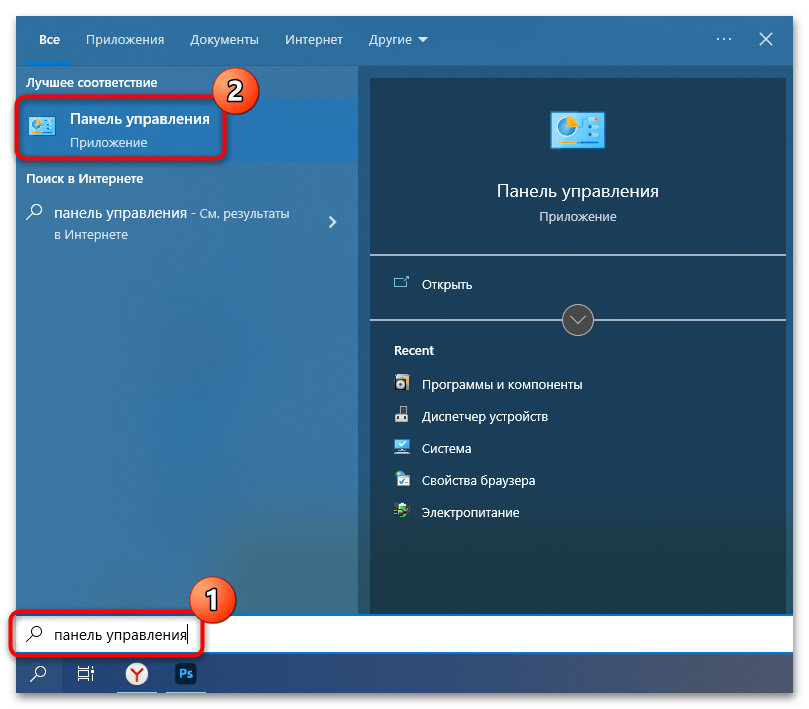
- Найдите в «Пуске» приложение «Панель управления» и запустите его.
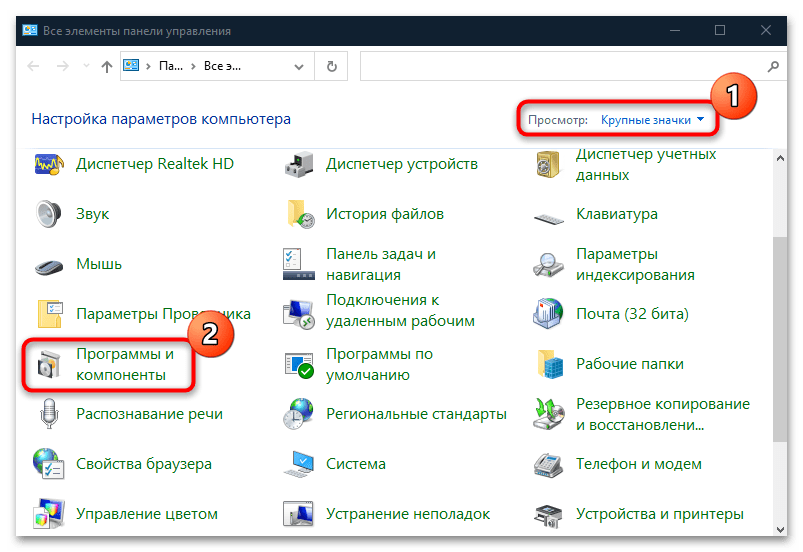
- Для удобства в качестве просмотра выставьте крупные или мелкие значки. Нажмите на раздел «Программы и компоненты».
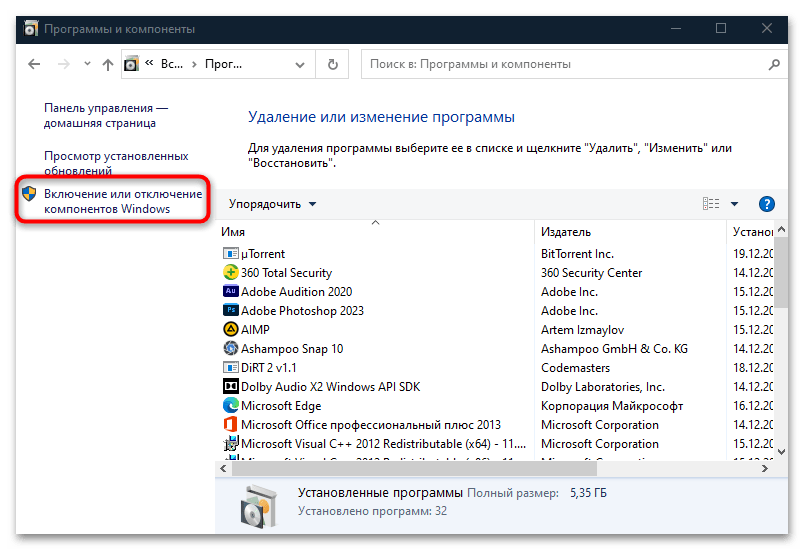
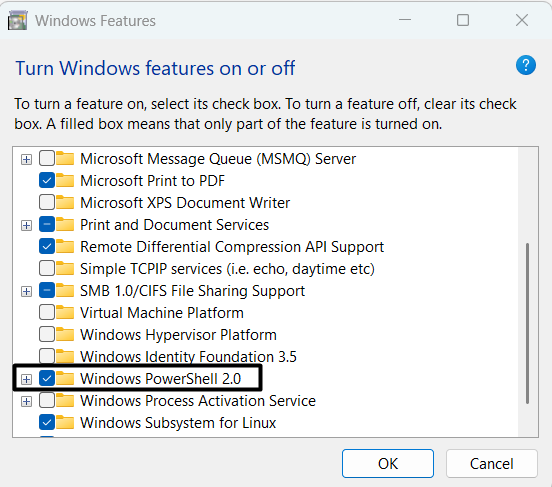
- На левой панели нажмите на строку «Включение или отключение компонентов Windows».
- В списке отыщите пункт «Windows PowerShell 2.0» и снимите с него галочку. Нажмите на кнопку «ОК».
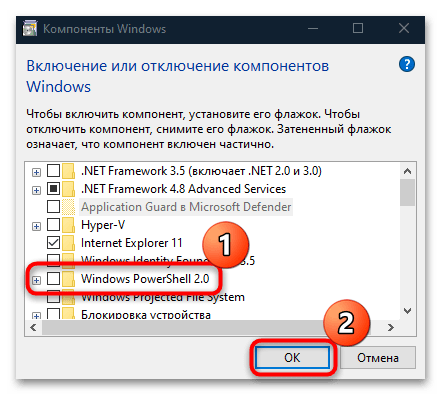
Останется перезагрузить компьютер, затем аналогичным образом активировать Windows PowerShell через «Панель управления».
Если консоль PowerShell была отключена изначально, то, скорее всего, именно поэтому она и не запускалась. В этом случае достаточно также следовать инструкции, только в Шаге 4 активировать средство и сохранить настройки.
Способ 2: Чистая загрузка
Если в работу консоли вмешиваются сторонние программы или приложения, то это также вызывает проблемы с запуском и общей работоспособностью инструмента. Проверить, так ли это, можно, выполнив чистую загрузку ОС:
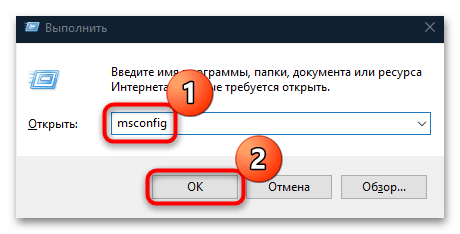
- Одновременно зажмите клавиши «Win + R» и в строке диалогового окна «Выполнить» пропишите
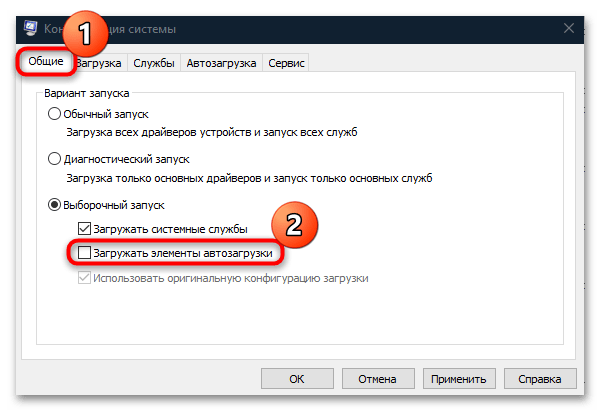
msconfig, затем нажмите на кнопку «ОК». - Откроется окно системной утилиты «Конфигурация компьютера», где сначала нужно на вкладке «Общие» снять отметку у пункта «Загружать элементы автозагрузки».
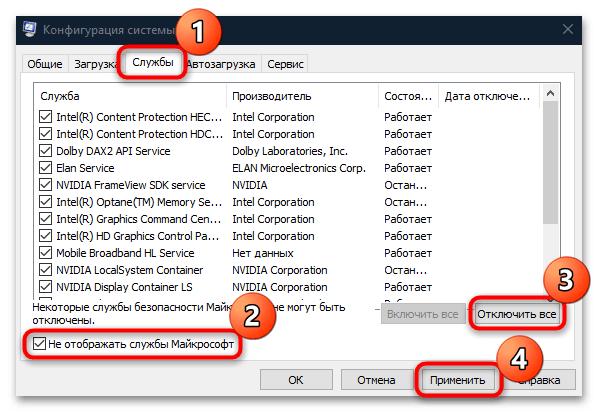
- Далее перейдите на вкладку «Службы», чтобы отключить сторонние службы при последующей загрузке. Для начала поставьте галочку у опции «Не отображать службы Майкрософт», потом выделите все оставшиеся службы и отключите их, нажав на соответствующую кнопку. Примените настройки.
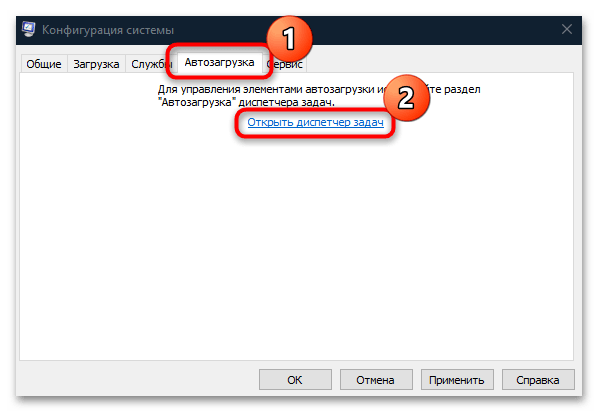
- Нажмите на вкладку «Автозагрузка» и кликните по ссылке «Открыть диспетчер задач».
- В запустившемся менеджере процессов вы сразу перейдете в «Автозагрузку», где отобразятся все сторонние процессы, которые запускаются вместе с системой. Поочередно выделяйте их и нажмите на кнопку «Отключить» в нижнем правом углу.
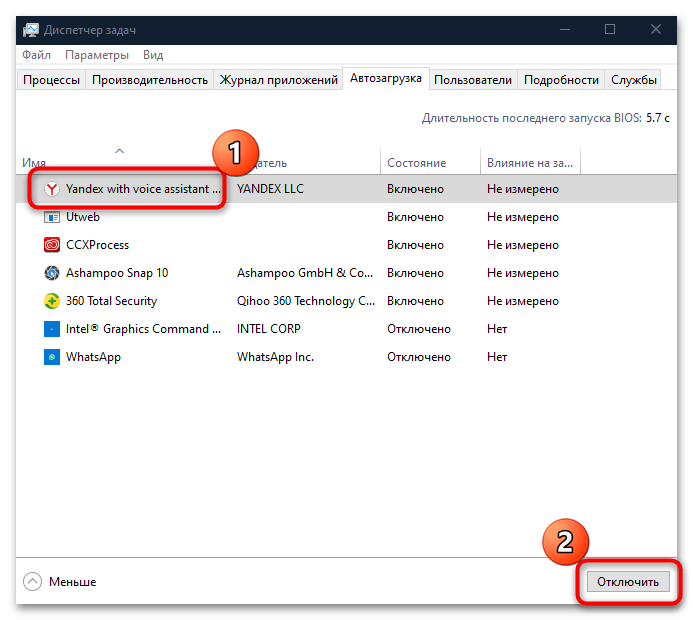
После того как все было выполнено в соответствии с инструкцией, перезагрузите систему. Windows 10 должна запуститься без сторонних процессов, и если в таком режиме PowerShell начал функционировать, то это значит, что на его работу влияет стороннее программное обеспечение. Попробуйте выявить его, затем удалить или переустановить.
Вероятно, сможет помочь откат системы к тому состоянию, когда проблемный софт еще не был установлен. Этот вариант можно использовать, если вы заметили проблему недавно.
Читайте также: Откат к точке восстановления в Windows 10
Способ 3: Проверка на вирусы
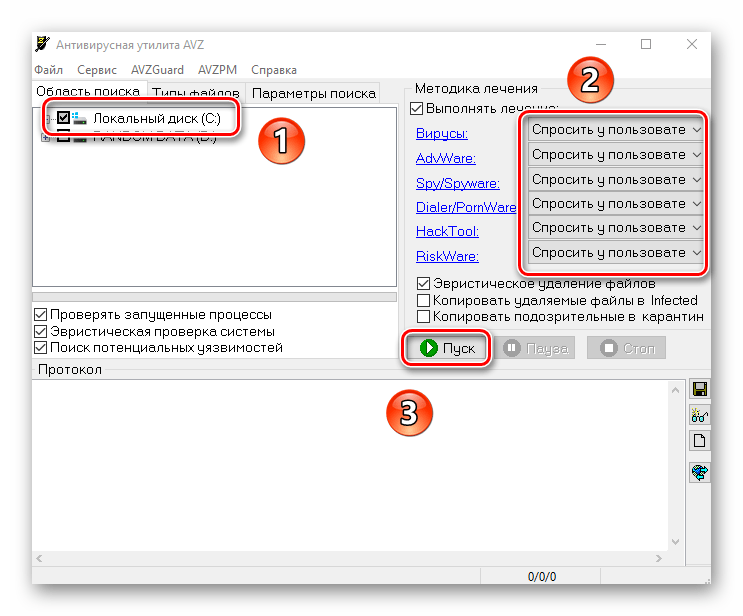
Другая распространенная причина невозможности запустить Windows PowerShell – это деятельность вирусных утилит. Если они получили доступ к пользовательским и системным файлам, то могут нанести им вред, который препятствует корректному функционированию средств. Попробуйте провести глубокую проверку компьютера на наличие вирусов, используя сторонние программы и штатные возможности Windows. Наш автор разбирал способы сканирования и удаления вредоносных утилит и файлов.
Подробнее: Методы удаления вируса с компьютера под управлением Windows 10
Вероятно, после сканирования потребуется восстановление системных файлов, поэтому переходите к следующему способу.
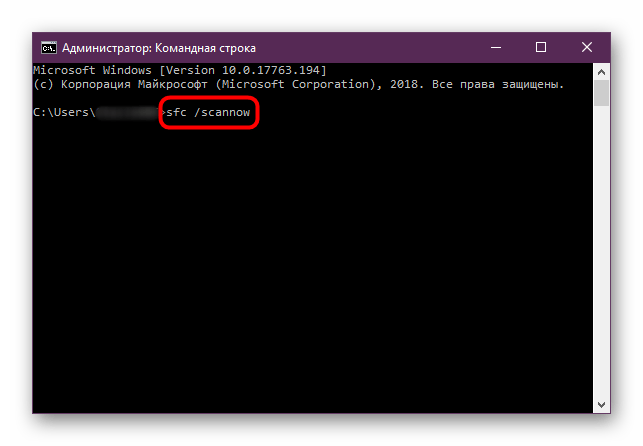
Способ 4: Утилиты SFC и DISM
Нередко и повреждение системных файлов становится причиной, из-за которой не запускается PowerShell в Windows 10. Если их целостность была нарушена, то восстановить ее можно с помощью предусмотренных в системе утилит – SFC и DISM. Первая используется для проверки непосредственно системных файлов, а вторая предназначена для сканирования хранилищ оригинальных данных, а применяют ее тогда, когда SFC не справляется с восстановлением их целостности. О том, как использовать упомянутые штатные утилиты, мы писали ранее в отдельном материале.
Подробнее: Использование и восстановление проверки целостности системных файлов в Windows 10
Способ 5: Создание новой учетной записи
Ваша учетная запись, которую вы используете, могла быть повреждена по различным причинам. Именно из-за этого появляется проблема с использованием консоли Windows PowerShell. Если восстановление целостности системных файлов не помогло, создайте новую учетную запись и войдите в систему под ней. Об этом у нас есть статья с пошаговым руководством.
Подробнее: Создание новой учётной записи в Windows 10
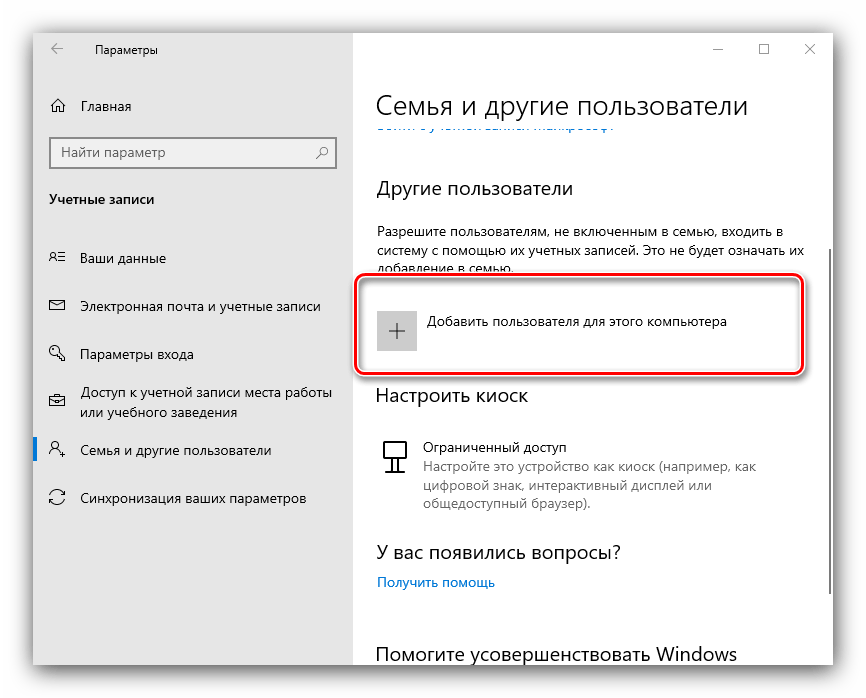
После успешного создания новой учетной записи в Windows выполните вход в систему, используя ее, затем проверьте, запускается ли PowerShell.
Читайте также: Методы управления учетными записями в Windows 10
Наша группа в TelegramПолезные советы и помощь
PowerShell is a powerful command-line tool in Windows that’s mainly used for automating the system’s management. As PowerShell is an integral part of a Windows OS, it must always work without issues. But that’s not the same for some users. A set of users reported that their Windows PowerShell utility isn’t opening on their Windows 11 system.
Whereas some users are getting the “PowerShell Has Stopped Working” error while using it. If you’re also facing similar issues with Windows PowerShell on your Windows 11 PC, try all the working fixes we’ve shared in this troubleshooting guide to resolve them all. All the workarounds can easily fix the PowerShell not working issue in Windows 11.
Why Is PowerShell Not Working in Windows 11?
There could be several reasons for the ill-functioning of the PowerShell utility in Windows 11. But below are some of the most common reasons for the PowerShell not working issue:
- Lack of Admin Privileges
- Disabled Windows PowerShell
- Improperly Configured Group Policies
- Corrupted Windows PowerShell Files
- Issues With the User Account
- Missing System Files
- Glitches in the System
- Background Service Conflict
- Buggy Windows Update
- Viruses & Malware
Fix the PowerShell Not Working Issue in Windows 11
Here are some working workarounds that can help you fix the “PowerShell Has Stopped Working” error:
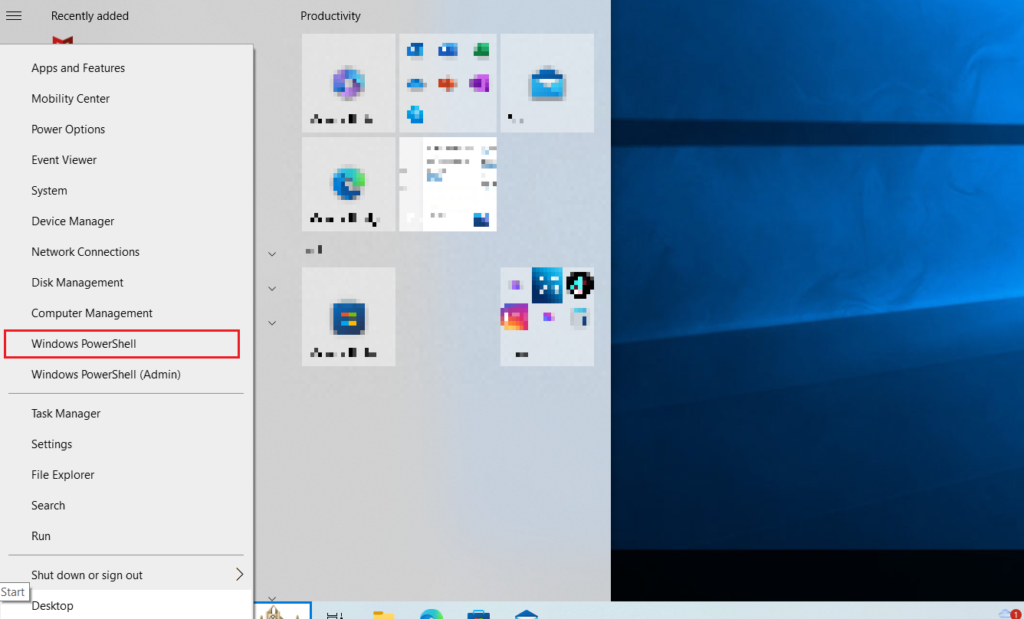
1. Make Sure Windows PowerShell Is Enabled
If you’ve recently turned on Hyper-V on your Windows PC, then it’s possible that due to this, Windows PowerShell got disabled. Thus, we once suggest you make sure that Windows PowerShell is enabled on your PC.
If you don’t know how to check the same, follow the below steps as they explain the same:
1. Press the Windows + R to open the Run utility, type OptionalFeatures in it, and press Enter.
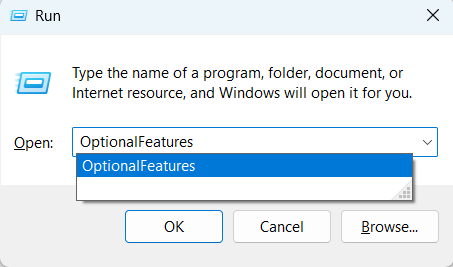
2. Search for the Windows PowerShell 2.0 option in the Turn Windows features on or off box.
3. Make sure the box next to Windows PowerShell 2.0 is checked.
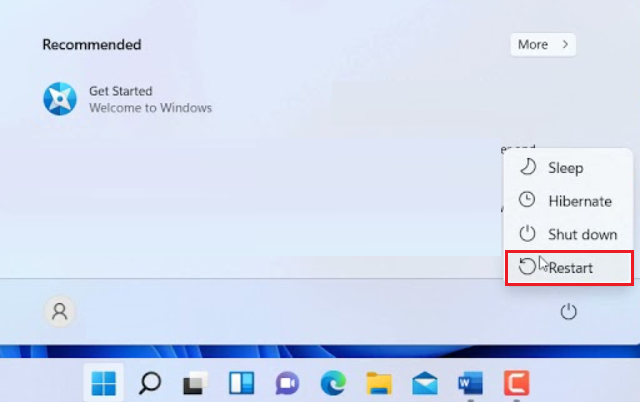
2. Restart Your Computer
Suppose PowerShell is already enabled on your system and is still not working or opening. In that case, this inconvenience may be occurring because of some temporary bugs & glitches in the system.
To check the same, we recommend you restart your Windows 11 PC or laptop, as doing so easily eliminates the temporary bugs and glitches from the system.
3. Use Alternate Ways To Open PowerShell
There are several ways to open PowerShell on a Windows 11 PC. If the one way doesn’t work, there are still more ways to open Windows PowerShell. So, if you’re unable to open PowerShell using a particular method, you can try an alternate method to open it.
Below we’ve explained all the possible methods to open Windows PowerShell in Windows 11:
From Run
PowerShell can easily be opened using the Run utility, and below are the steps to do so:
1. Press the Windows and R keys simultaneously to open the Run program on your Windows 11 system.
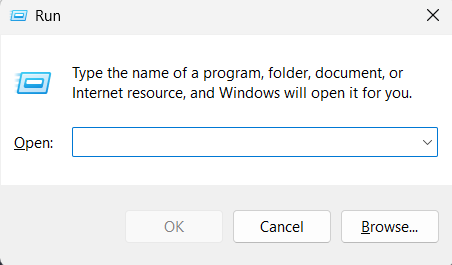
2. Type PowerShell or powershell.exe in its search box and hit Enter to open Windows PowerShell.

From File Explorer
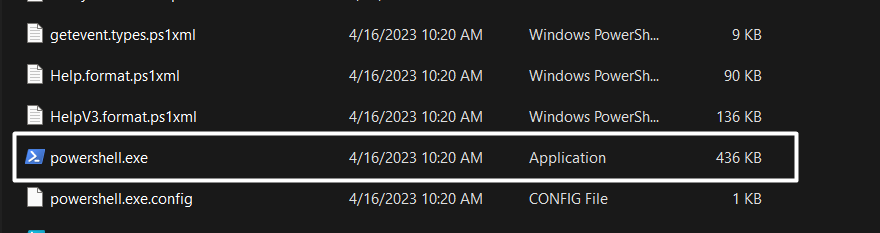
You can also open PowerShell using the File Explorer program. Here are the steps to do so:
1. Open the File Explorer program on your Windows 11 PC and go to the mentioned path:
C:\Windows\System32\WindowsPowerShell\v1.0
2. Search for powershell.exe, and double-click on it to open the Windows PowerShell utility.
Using Command Prompt
Another way to open PowerShell is using Command Prompt. Follow the steps to know how to do so:
1. Open the Command Prompt utility on your Windows 11 system using the Windows Search Box.

2. Select Command Prompt from the Best match section and run the below command in it:
PowerShell
From Start Menu
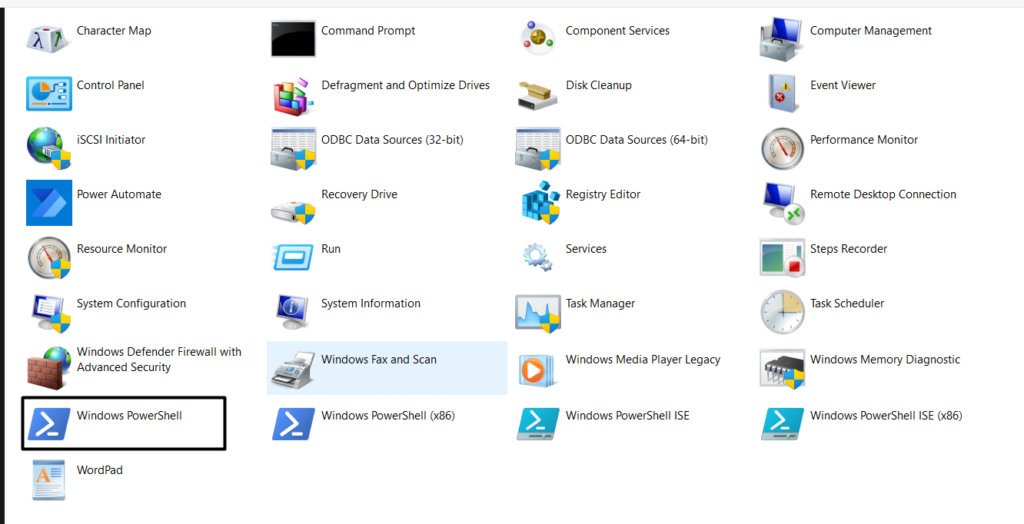
Lastly, you can launch PowerShell on your PC from the Start Menu. Follow the below steps to know how to do so:
1. Hit the Windows key on your keyboard to open the Windows Search Box and click on All apps >.
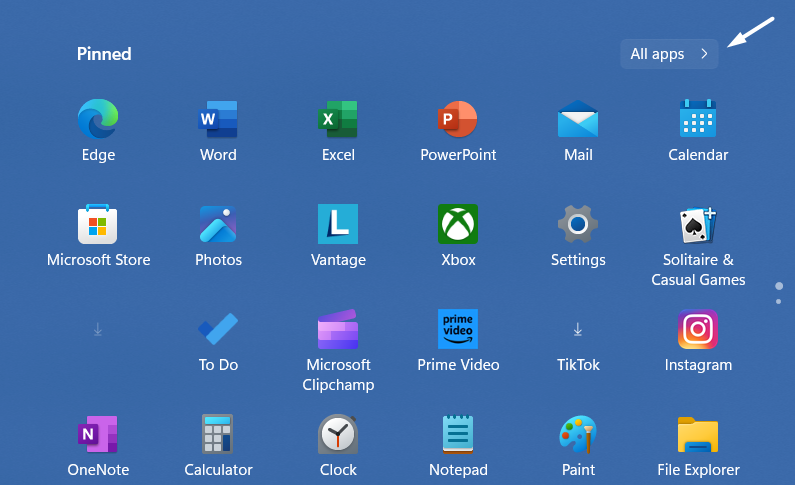
2. Search for Windows Tools in the All apps section and click on it to access all the Windows tools.

3. Choose Windows PowerShell in the Windows Tools window to open Windows PowerShell.
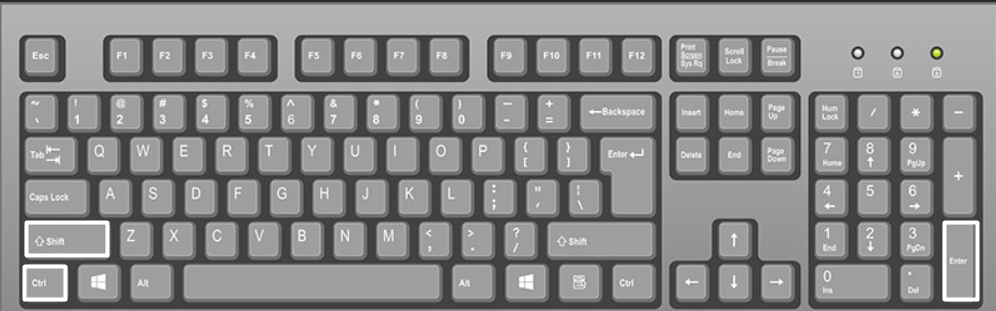
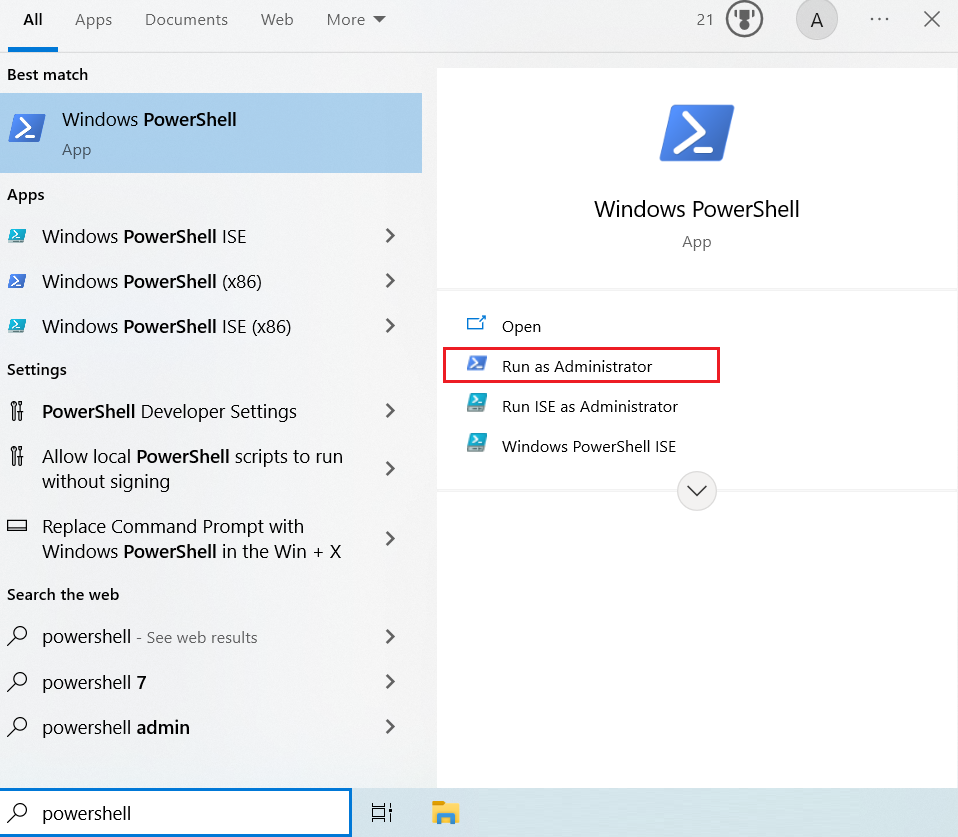
4. Run Powershell as Administrator
Sometimes apps or programs also don’t open because of a lack of administrative privileges, which could be the same in this case. So, we suggest you run PowerShell with admin rights to see if it opens or not. Try the below-mentioned steps to check the same:
1. Open the Run utility using the Windows + R shortcut and type powershell in the search box.
2. Press the Ctrl + Shift + Enter keys at the same time and then click on Yes in the UAC to open it with admin rights.
5. Run a Quick Antivirus Scan
It could be possible that your Windows system has malware and viruses, which is preventing the PowerShell utility from working on your Windows 11 PC.
Due to this, we suggest you run a quick antivirus scan on your system to find all the infectious files and remove them. So, follow the below steps to run a virus scan on your Windows 11 PC:
1. Open the Windows Security app on your Windows PC and go to the Virus & threat protection section.
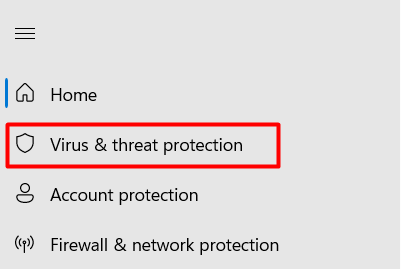
2. Click the Quick scan button to start the quick virus scan to find infectious files on the system.
Once the scan is completed, check if any infectious files are found on your Windows 11 system. If yes, follow the on-screen instructions to remove those from your Windows system.
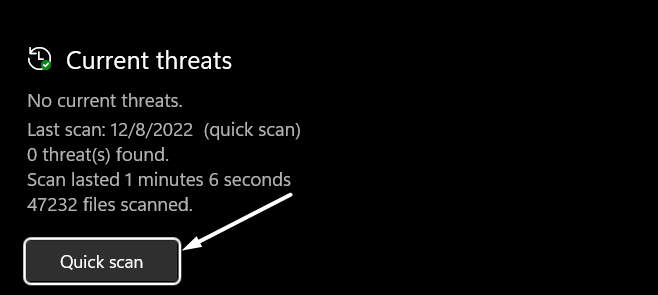
6. Run DISM & SFC Scans
One of the most common reasons for the PowerShell not working problem in Windows 11 is the missing essential system files and corrupted Windows OS image.
Due to this reason, we suggest you run DISM and SFC scans on your Windows 11 system, respectively, to get rid of this issue. You can try the below steps to run both scans on your PC:
1. Use any method to open the Command Prompt or Terminal utility on your Windows system.
2. Execute the below-mentioned commands in it one by one to start the DISM scan on the system:
Dism /Online /Cleanup-Image /CheckHealthDism /Online /Cleanup-Image /ScanHealthDism /Online /Cleanup-Image /RestoreHealth
3. Type sfc /scannow in the console and press Enter to start the System File Checker (SFC) scan.

4. After running the SFC and DISM scans, restart your computer to check the status of the issue.
7. Delete Suspicious Third-Party Programs
If you started facing the PowerShell not working issue after installing a particular app or you think that a particular app is causing this issue, we suggest you remove it from the system.

It could be possible that your instincts are true and the app is the real culprit for the issue. In case you can’t delete the app, try updating it to fix all the bugs and glitches with it.
8. Edit Group Policy and Registry
Misconfigured group policy settings could also be the reason for the ill-functioning of PowerShell in Windows 11 PC. Luckily, it can be fixed by setting the Don’t run specified Windows applications policy in the Group Policy Editor program to the Not configured option.
So, try the same by following the below steps and check if it works:
1. Open the Group Policy Editor program on your PC and follow the below-mentioned path:
User Configuration > Administrative Templates > System2. Search for Don’t run specified Windows applications in the right pane and double-click on it.
3. Select the Not configured radio button in the Don’t run specified Windows applications dialog box.
4. Once done, click on OK to save the changes and restart your Windows 11 PC to fix the issue.
9. Change Execution Policy
If you’re running a script that isn’t digitally signed, then you may be getting an error due to the execution policy. Fortunately, the error can easily be eliminated by making minor changes to the execution policy. Try the below-mentioned steps to change the execution policy:
1. Use the Windows and R keys at the same to open Run, type powershell in it, and press Enter.
2. Copy-paste the below-mentioned command in the PowerShell utility and press the Enter key:
Set-ExecutionPolicy RemoteSigned -Force -Scope LocalMachine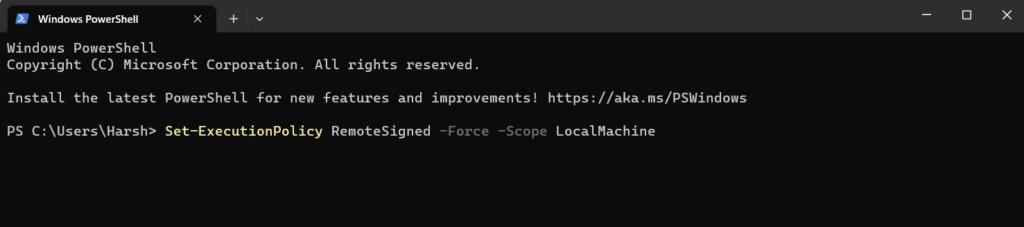
3. Restart your Windows 11 PC and check whether the Windows PowerShell program is working fine now.
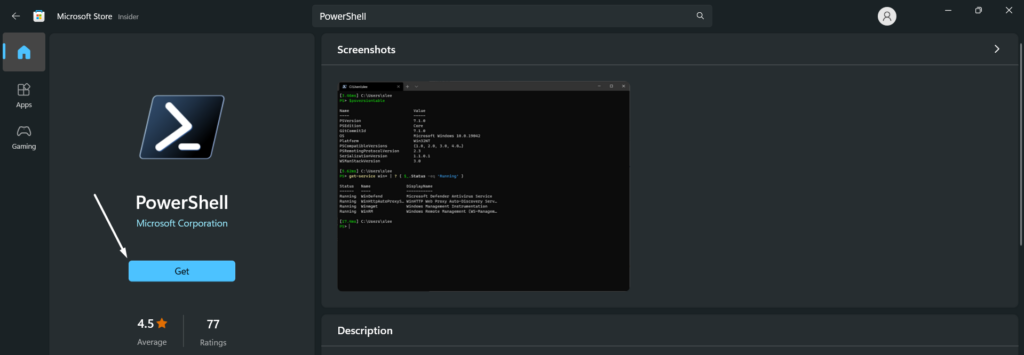
10. Update PowerShell
Bugs and glitches in the PowerShell utility could also be the reason for its improper functioning. Thus, to fix those bugs and glitches, we suggest you update your PowerShell utility. Follow the below-listed steps to update the Windows PowerShell program:
1. Open the Microsoft Store on your Windows 11 PC and search for PowerShell using the search at the top.

2. Select PowerShell from the search results and click the Get or Update button to start updating it.
11. Reset PowerShell To Default
It could be possible that the PowerShell itself has some issues, maybe incorrect settings, because of which the “PowerShell Has Stopped Working” error is appearing on your Windows 11 system.
In that ase, we suggest you reset your Windows PowerShell utility to default to correct all its settings. You can follow the below instructions to do so:
1. Use the Windows + E shortcut to open File Explorer and navigate to the below path in it:
C:\Users\Username\AppData\Roaming\Microsoft\Windows\Start Menu\Programs\Windows PowerShell
2. Right-click on Windows PowerShell there and click on the Bin icon in the context menu.
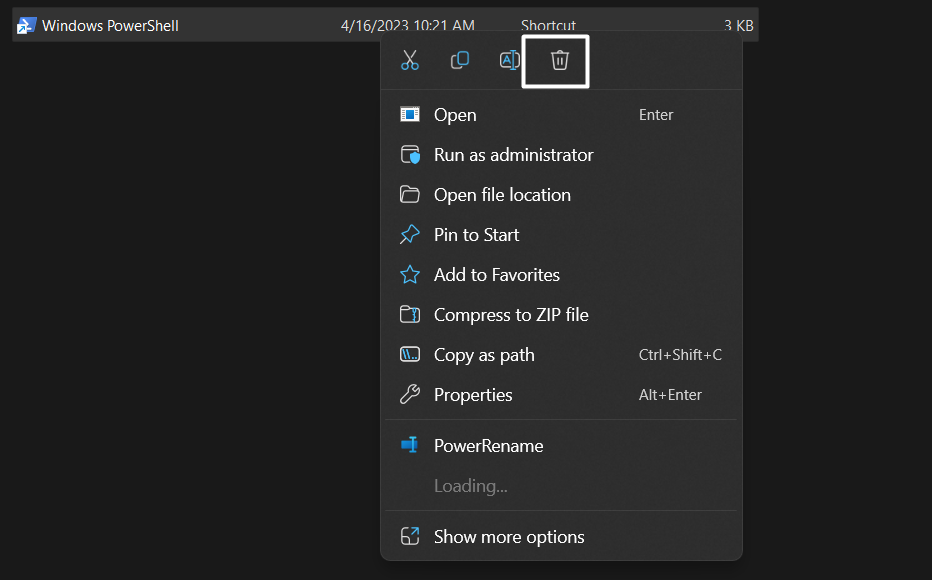
3. Create a new user account, move to the above path again, and copy the PowerShell shortcut to a USB drive.
4. Once done, sign into your system with the old user account, and copy the shortcut in the same directory.
12. Use System Maintenance Troubleshooter
Windows 11 comes with a System Maintenance troubleshooter that helps you find and fix issues in your system. The best part is that it can fix issues with the PowerShell utility.
So, we advise you to run the System Maintenance troubleshooter and check if it resolves the PowerShell not working issue. You can follow the below-listed prompts to run it:
1. Open the Control Panel on your system using the Windows Search Box or any other way.

2. Change the View by: dropdown to Small icons and choose the Troubleshooting option.
3. Click on the Run maintenance tasks option under the System and Security section.
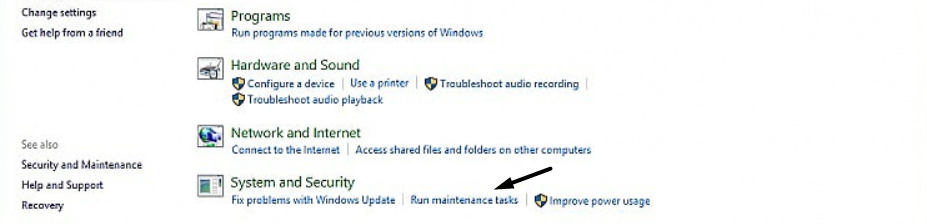
4. Lastly, follow the on-screen instructions to run the System Maintenance troubleshooter on your PC.
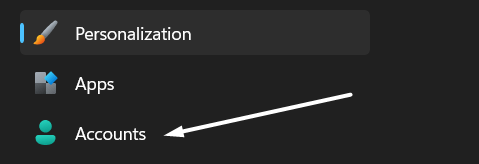
13. Create a New User Account
It could be possible that your user account has been corrupted, which is why the Windows PowerShell program isn’t working properly.
In that case, the best possible workaround is to create a new user account and log in with it to fix the issue. So try the below instructions to create a new Windows user account:
1. Open the Settings app using the keyboard shortcut and go to the Accounts section from the left.
2. Click on Other users in the Account settings section and then click the Add account button.
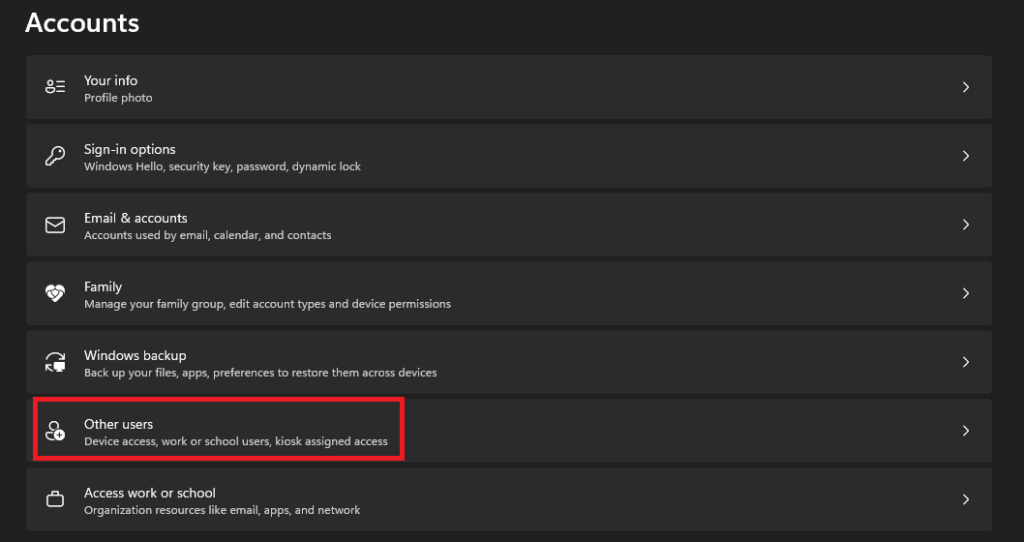
3. Select the I don’t have this person’s sign-in information option and then click on Next.
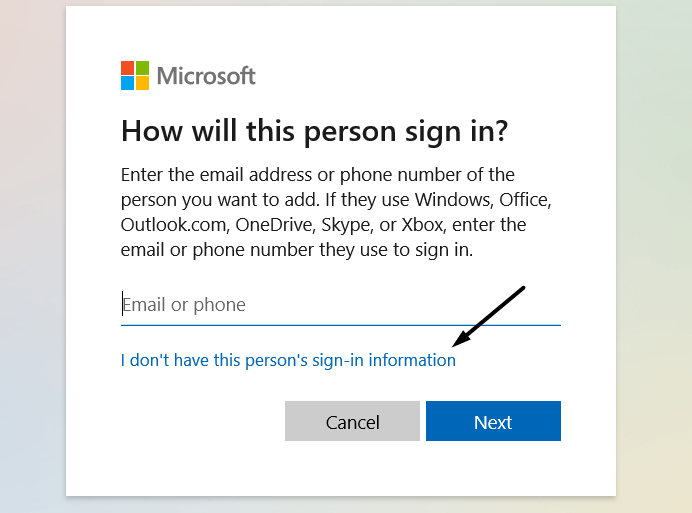
4. Click on the Add a user without a Microsoft account option and then click the OK button.
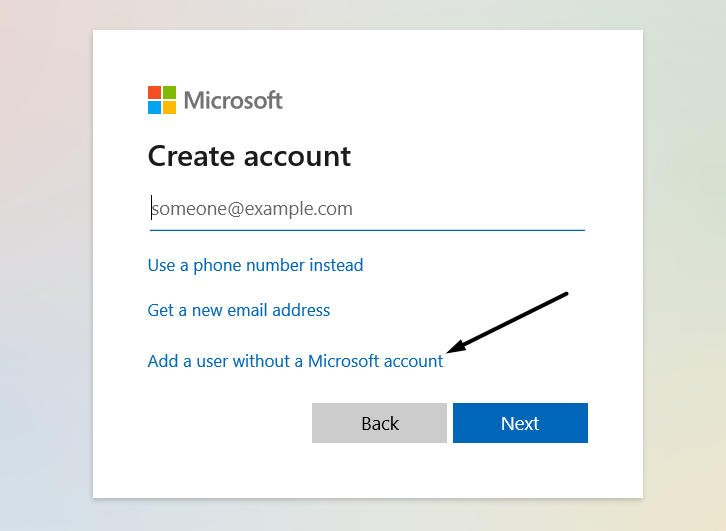
5. In the following window, enter the name and password you want to assign to your new user.
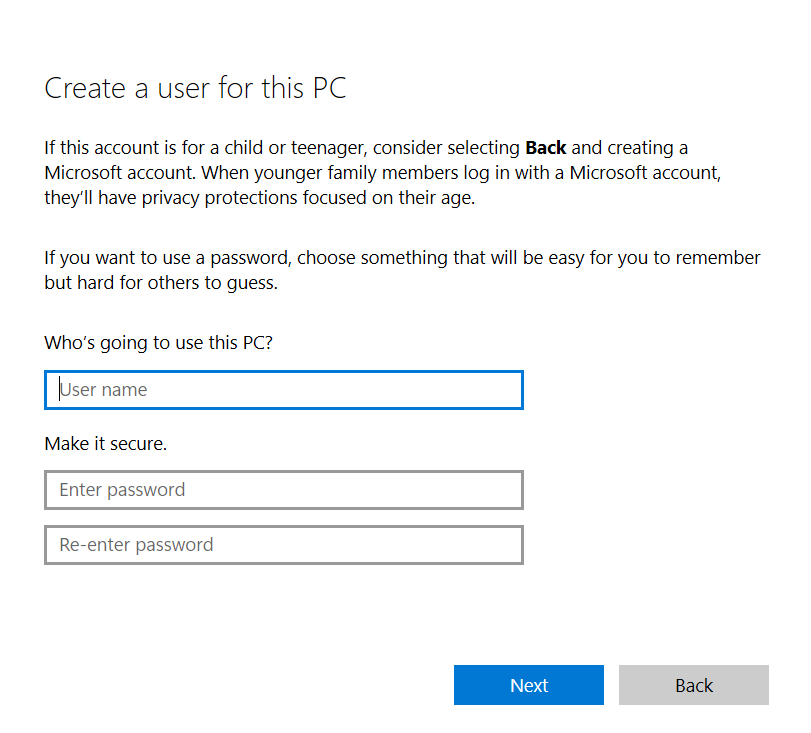
6. Lastly, follow the on-screen instructions to create a new user account and sign in with it.
14. Perform a Clean Boot
If the issue is still there, it could be possible that a third-party program or service is causing it.
To check whether that’s the same, we suggest you boot your Windows 11 PC in Safe mode. You can follow the below-mentioned steps to learn to boot your system in Safe mode:
1. Open the Run utility, type msconfig in its search box, and hit the Enter key on your keyboard.

2. Go to the Boot section, and tick the Safe boot and Network checkboxes in the Boot options section.

3. Click on the Apply button to save the changes and then move to the Startup tab of it.

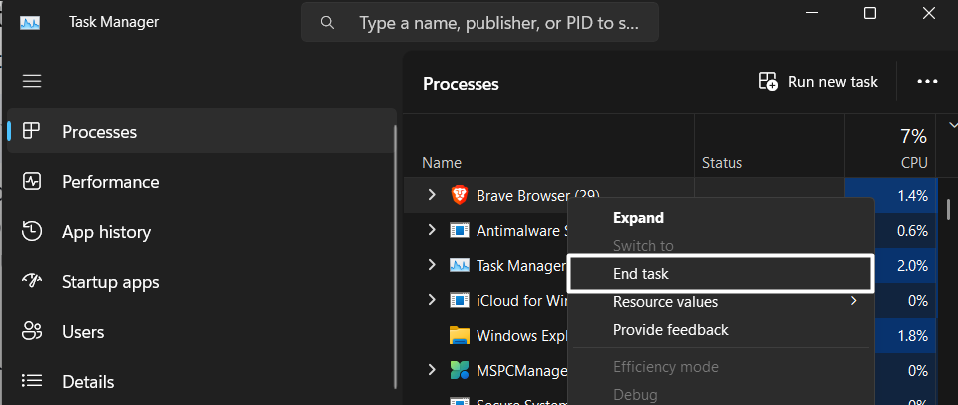
4. Click on Open Task Manager in the System Configuration window to open Task Manager.

5. In the end, force close all the running programs & processes in the Task Manager app.
Once done, restart your system and check whether the PowerShell not working issue is fixed. If yes, then a third-party program was causing it, and you can find the real culprit by deleting all the apps one by one.
15. Update Windows
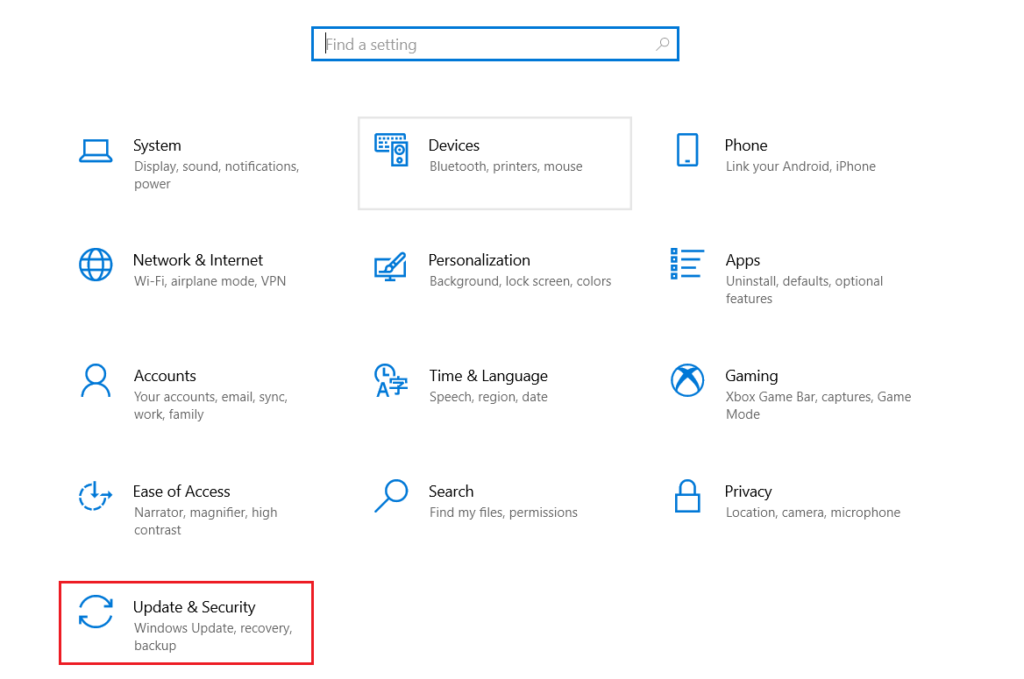
It could be possible that your current Windows build has some bugs and glitches which is causing this issue. Keeping this in mind, we recommend you update your system to the latest version to eliminate the issue. Follow the mentioned steps to update your system:
1. Open the Settings app on your system and click on Windows Update at the top right corner.
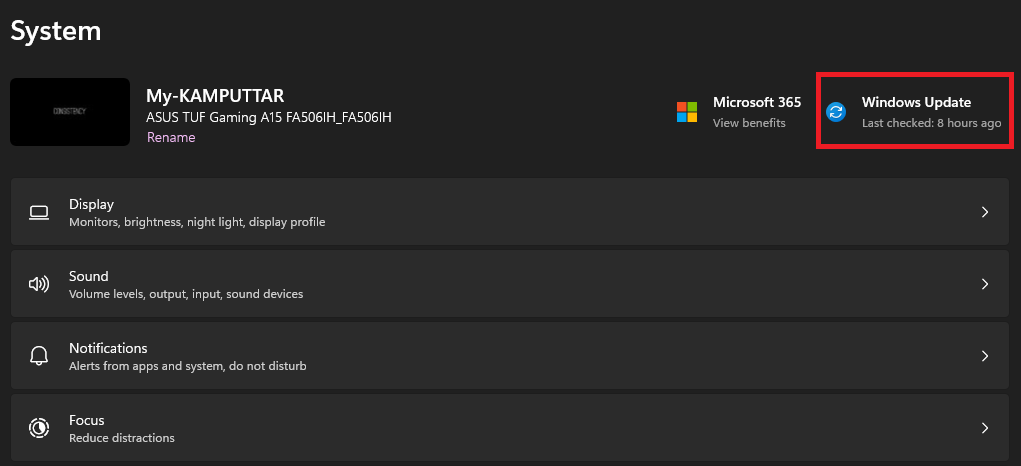
2. Click the Check for updates button to search for newly available Windows build updates.

3. Click the Download & install all button to install the pending Windows updates on your system.

4. Restart your Windows 11 system and check whether the Windows PowerShell not working issue is fixed.
16. Reset the Device
Lastly, if nothing makes Windows PowerShell work again, you’ve no other option than resetting your Windows 11 PC or laptop. Doing so will definitely eliminate the “PowerShell Has Stopped Working” error on your PC, as it’ll clean the entire system and reset the settings to default.
As a result, the issue will get eliminated during the reset process. So follow the below-mentioned steps to factory reset your Windows 11 device:
1. Open the Windows key on your keyboard to open Windows Search Box, and type Settings in it.

2. Select the Settings option from the Best match section to launch the Settings program.

3. Move to the Recovery section of it and click on the Reset PC button on the following window.
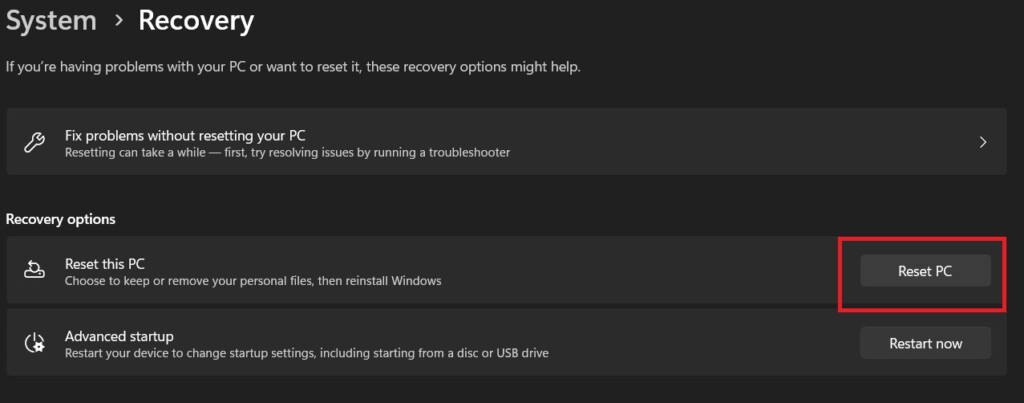
4. Select the Remove everything option in the next prompt and then select Local Reinstall.

5. You need to now follow the on-screen prompts to factory reset your Windows 11 system.
FAQs
Why Can’t I Run PowerShell on Windows 11?
It could be possible that your Windows 11 system has some bugs and glitches, because of which it isn’t working. Another possible reason could be incorrect PowerShell settings.
How Do I Enable PowerShell in Windows 11?
Follow the below-mentioned path to enable Windows PowerShell on your Windows 11 PC:
Settings > Apps > Optional features > More Windows features > Enable Windows PowerShell 2.0
How Do I Fix PowerShell Not Working?
If your Windows PowerShell utility isn’t working properly, try resetting it. If that also doesn’t make it work again, consider updating it from the native app store, Microsoft Store.
How Do I Reset PowerShell in Windows 11?
You need to reinstall the Windows PowerShell program on your Windows 11 system to reset it.
Does PowerShell Work on Windows 11?
Yes, Windows PowerShell works on Windows 11. You can install it from the Microsoft Store.
Use Windows PowerShell With Ease
PowerShell is an integrated component of Windows 11 and other versions. We use it for a variety of purposes, such as running system scans, deploying codes, and much more. But some users are currently facing different issues with PowerShell on their Windows 11 PC.
If you were also experiencing issues with Windows PowerShell on your Windows 11 PC, we hope this guide helped you get rid of them. If yes, then let us know which of the mentioned workaround assisted you in fixing the PowerShell not working issue on your PC.
Home
Windows
By
Anup Thapa
In addition to system management and administration, PowerShell is often used to troubleshoot various issues in Windows. But if PowerShell itself isn’t working properly, troubleshooting can be a handful.
Generally speaking, most PowerShell issues occur due to misconfigured settings. Problems with specific modules are also very common, mostly due to a corrupt module store.
In this article, we’ve listed step-by-step instructions for resolving these and more PowerShell issues.
Why Is PowerShell Not Working?
Here are the most common reasons that prevent PowerShell from working properly:
- No admin privileges
- PowerShell is disabled
- Misconfigured group policies
- Corrupt PowerShell files
- Misconfigured / corrupt user account
- Background service conflict
- Buggy Windows version
How to Fix PowerShell Not Working?
Before you start troubleshooting, we recommend running PowerShell as administrator from the following location:%SystemRoot%\system32\WindowsPowerShell\v1.0\powershell.exe.
Replace system32 with syswow64 for the x86 version.
For minor errors such as Access Is Denied, the item you selected is unavailable, or this file does not have an app associated with it for performing this action, this could be all that’s needed to fix the issue.
Restart PC (Special Case)
Note: This fix only applies to Windows 10 S.
After an in-place upgrade of Windows 10 S, you may encounter the Your organization used Device Guard to block this app error when launching PowerShell.
This error occurs because of a policy that prevents Windows 10 S from controlling Win32 apps. This restriction should normally be cleared during the upgrade, but in case it’s not, you can clear it by restarting the PC a few times.
Enable PowerShell via Windows Features
You may be facing issues with PowerShell because it’s disabled in the Windows Features utility. Here’s how you can enable PowerShell in such cases:
- Press Win + R, type
optionalfeatures, and press Enter. - Make sure the box next to Windows PowerShell is checked to enable it, and press OK.


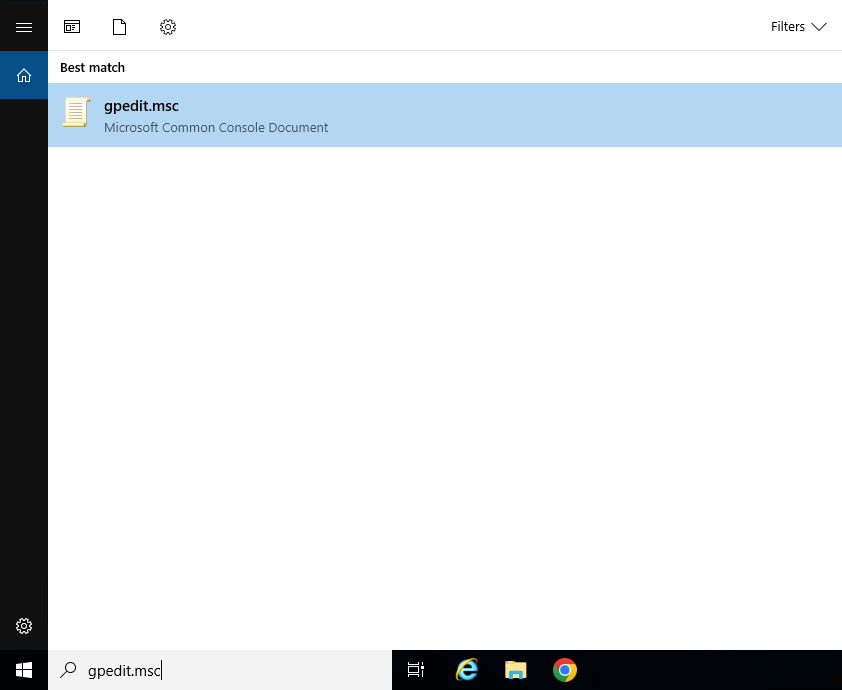
Modify Group Policy and Registry
Misconfigured group policy settings could also be the reason why PowerShell isn’t working. For instance, users have encountered error messages such as “This operation has been canceled due to restrictions in effect on this computer. Please contact your system administrator.”
Here’s what you can do to check if this is the issue:
- Press Win + R, type
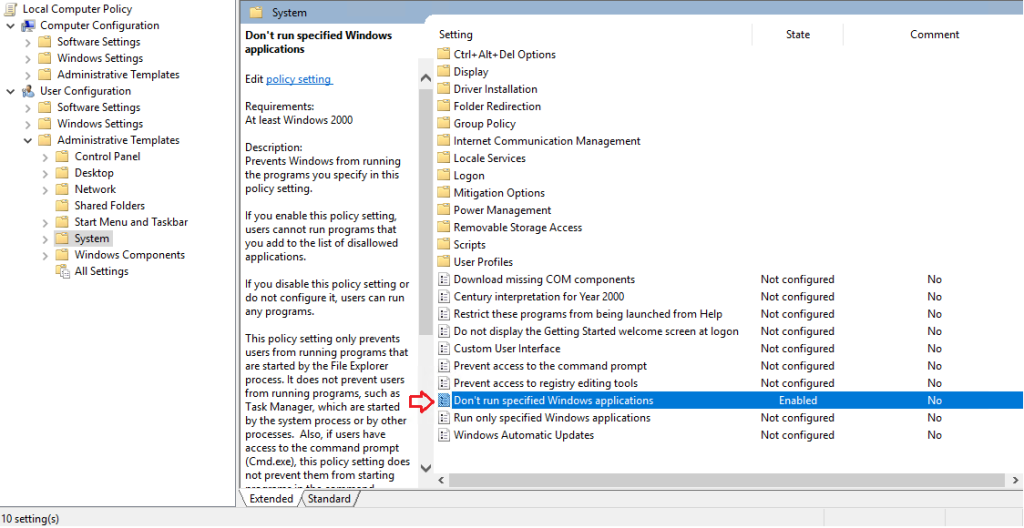
gpedit.msc, and press Enter. - Navigate to User Configuration > Administrative Templates > System.
- Double-click the Don’t run specified Windows applications policy and set it to Not configured, and press OK.

- Restart your PC and test if PowerShell works properly now.

Modify Execution Policy
When attempting to run a script that isn’t digitally signed, you may face errors due to the execution policy. We have a detailed article on changing the execution policy for your further reading, but here are the main steps:
- Press Win + R, type
powershell, and press CTRL + Shift + Enter. - Execute the following command:
Set-ExecutionPolicy RemoteSigned -Force -Scope LocalMachine
- Do note that you have to change the set execution policy separately for the 32-bit and 64-bit versions.

Update / Reinstall PowerShell Framework
Another reason for errors in PowerShell is that the PowerShell files, commonly the module store for instance is corrupted. In such scenarios, you can execute the following command to update the PowerShell framework:
iex "& { $(irm https://aka.ms/install-powershell.ps1) } -UseMSI"

If PowerShell isn’t launching at all or something similar, you can take the following steps instead to update/reinstall it via the GUI instead:
- Download the x64 version or x86 version as appropriate for your system.
- Launch the PowerShell Installer and follow the on-screen instructions.
- If you’d like to install a different PowerShell version, you can find all the releases on the PowerShell GitHub page.
Try Using Different Account
Although uncommon, misconfigured settings and other issues with the current user account you’re on could also be preventing PowerShell from working properly. In such cases, users have had success with switching to a different user account.
We recommend enabling the default administrator account to check if this is indeed the problem in your case. Here are the steps to do so:
- If Command Prompt works, execute the following command in CMD and skip ahead to Step 5.
net user administrator /active:yes
- Alternatively, press Win + R, type
lusrmgr.msc, and press Enter. - Open Users and double-click Adminstrator.
- Uncheck the Account Is Disabled option and press OK.

- The admin account should be accessible now. Log into it and test if PowerShell works. If it does, the issue is with the previous account. You can try the solutions listed below to fix the corrupt account. If that doesn’t work, you’ll ultimately need to backup your user files and migrate to a new account.


Perform a Clean Boot
Background conflicts with third-party apps (usually antiviruses), or even some Microsoft services could be the reason why PowerShell isn’t working. To test this, you can clean boot with only the core services and check if PowerShell works then. Here are the steps to do so:
- Press CTRL + Shift + Esc and switch to the Startup tab in the Task Manager.
- Disable all unnecessary startup programs, especially ones that you suspect might be causing the issue.

- Press Win + R, type
msconfig, and press Enter. - Switch to the Services tab and enable the Hide all Microsoft services checkbox.

- Click on Disable All and press OK.
- Restart your PC and test if PowerShell works now.
- If it works, you can enable the service that you think is causing the issue, restart, and check if it being enabled affects PowerShell. By repeating this process, you can eventually figure out the culprit.
- If PowerShell doesn’t work despite clean booting, the issue is likely something else. In this case, repeat Steps 3 – 5 but enable the services this time to resume booting normally.


Use System Repair Utilities
As stated, file corruption is a common reason for such issues in Windows, and PowerShell is no exception. We recommend using the CHKDSK, SFC, and DISM utilities to scan for and repair any corruption. Here’s how you can do so:
- Press Win + R, type cmd and press CTRL + Shift + Enter.
- Type
chkdsk C: /f /x /rand press Enter.
- If CheckDisk reports any issues, you can troubleshoot for that specific problem. Otherwise, execute the following commands next:
DISM /Online /Cleanup-Image /Restorehealth
Sfc /Scannow


If Command Prompt isn’t working either, you can boot into safe mode and try using the aforementioned utilities there.
Update Windows
There have been multiple cases in the past where various Windows components including PowerShell stopped working after an update. Numerous users faced this particular issue after an antimalware update, for instance.
Problems like this get patched pretty soon, so if you encountered this issue after an update, the best thing to do is to install the new update when it comes out. Automatic Updates are enabled on most PCs, but just in case, here’s how you can do so manually:
- Press Win + I and select Windows Update.
- Press the Check for Updates button. Download and install the update if available.


How to Fix PowerShell Modules Not Working?
PowerShell modules are located in the following directories:C:\Program Files\WindowsPowerShell\Modules C:\Windows\System32\WindowsPowerShell\v1.0\Modules
Most often, the files in these directories get corrupted which leads to issues with the modules. If a specific module is not working in PowerShell, updating or reinstalling it fixes the issue in most cases. Here’s how you can do so:
- Press Win + R, type
powershell, and press CTRL + Shift + Enter. - Type
Get-Module -ListAvailableand note the name of the module you’re trying to update or reinstall.
- To update the module, execute the following command:
Update-Module -Name ModuleName
- To uninstall the module, execute the following commands:
Uninstall-Module -Name ModuleName
Install-Module -Name ModuleName


Estimated reading: 3 minutes
970 views
In addition to system management and administration, PowerShell is often used to troubleshoot various issues in Windows. But if PowerShell itself isn’t working properly, troubleshooting can be a handful.
Generally speaking, most PowerShell issues occur due to misconfigured settings. Problems with specific modules are also very common, mostly due to a corrupt module store.
In this article, we’ve listed step-by-step instructions for resolving these and more PowerShell issues
Here are the most common reasons that prevent PowerShell from working properly:
- No admin privileges
- PowerShell is disabled
- Misconfigured group policies
- Corrupt PowerShell files
- Misconfigured / corrupt user account
- Background service conflict
- Buggy Windows version
Method 1: Restart your server/computer
Sometimes, a simple restart can fix temporary glitches or conflicts that cause PowerShell to stop working
Method 2: Run update Windows
Make sure your Windows operating system is up to date with the latest patches and updates. Microsoft often releases bug fixes and improvements that can resolve known issues
How to run update Windows Server
Method 3: Enable Windows PowerShell Script
You can enable the execution of the PowerShell script on Windows in two different methods. Follow the below-mentioned steps to enable it.
1. Using the Local Group Policy Editor
Step 1: In the Windows Search box, type ” gpedit.msc” and press Enter
Step 2: Navigate to User Configuration -> Administrative Templates -> System

Step 3: Double-click the Don’t run specified Windows applications policy and set it to “Not configured” or “Disabled” in the top-left corner. Finally, press Apply and then press OK
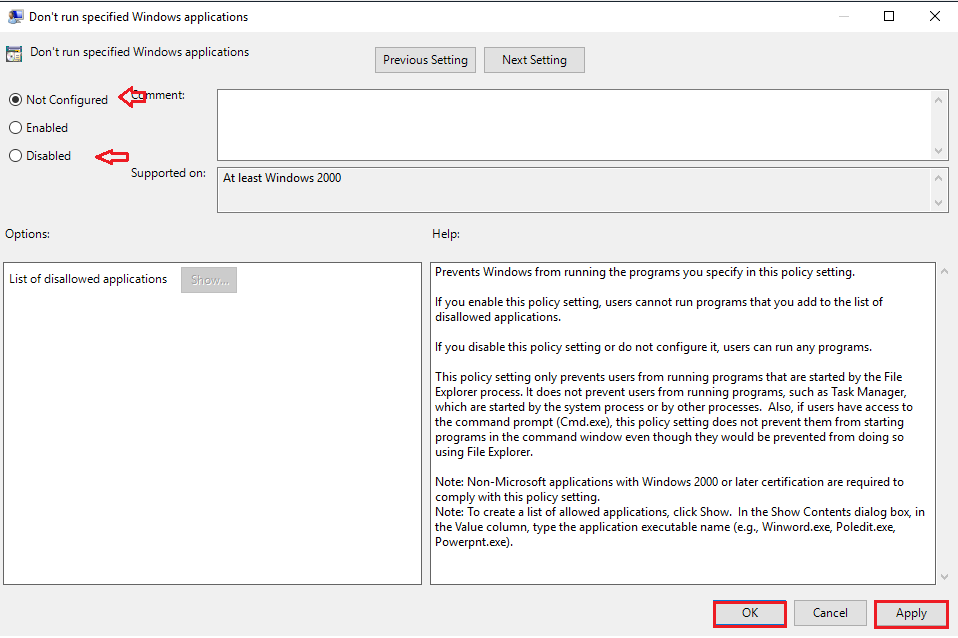
Step 4: Restart your PC and test if PowerShell works properly now
2. Using the Registry Editor
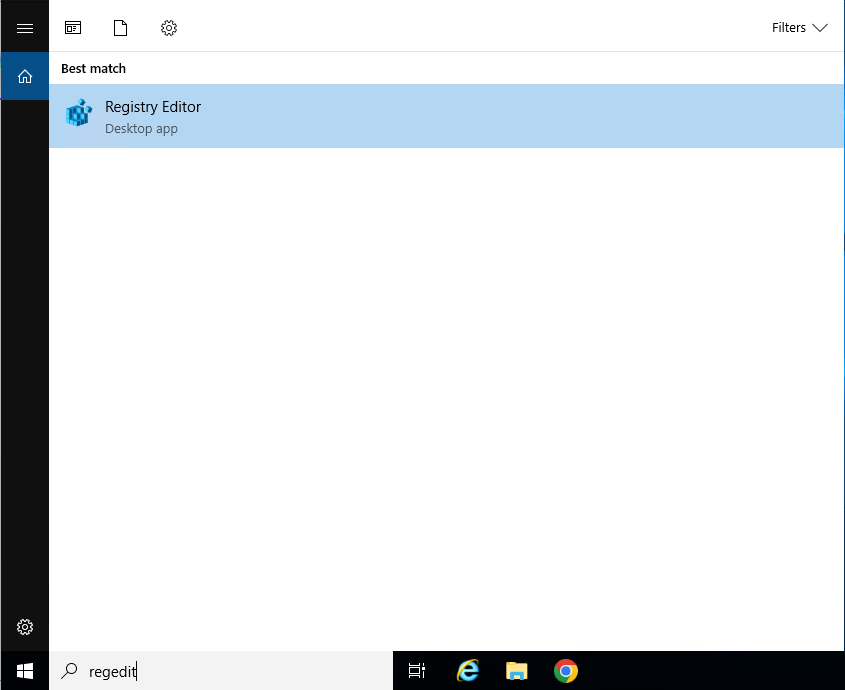
Step 1: In the Windows Search box, type “regedit” and press Enter
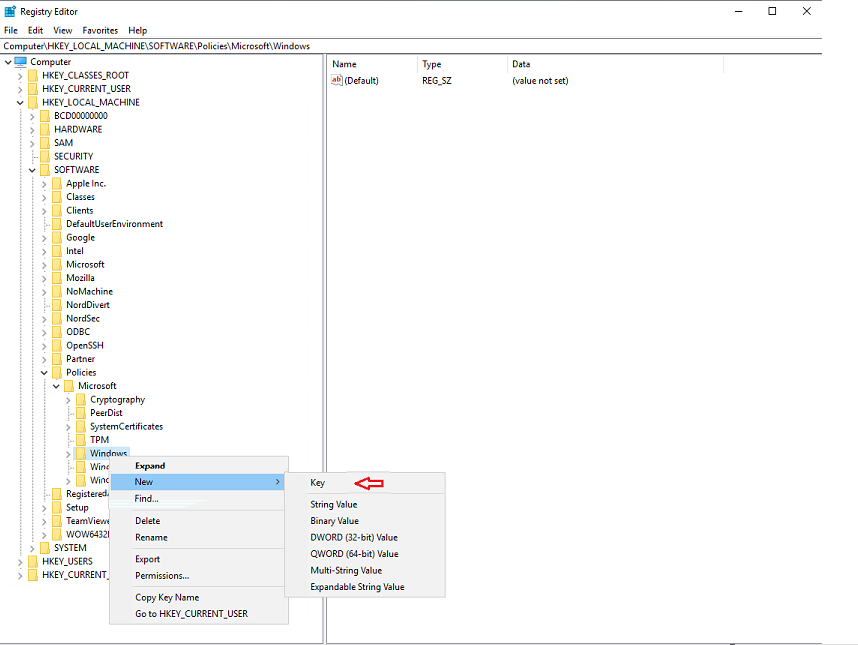
Step 2: Navigate to the following path: HKEY_LOCAL_MACHINE\SOFTWARE\Policies\Microsoft\Windows
From the left-hand side right-click on the Windows and choose New > Key. And name the new registry key as PowerShell
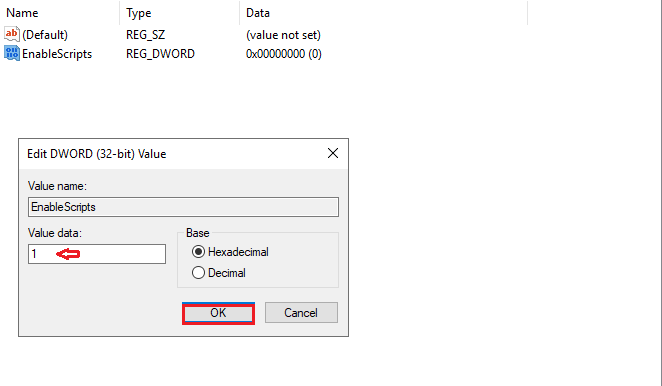
Step 3: Click on the PowerShell key and from the Left-hand side Right-click on the empty area and choose New > DWORD (32-bit) Value. And Name the DWORD as EnableScripts.
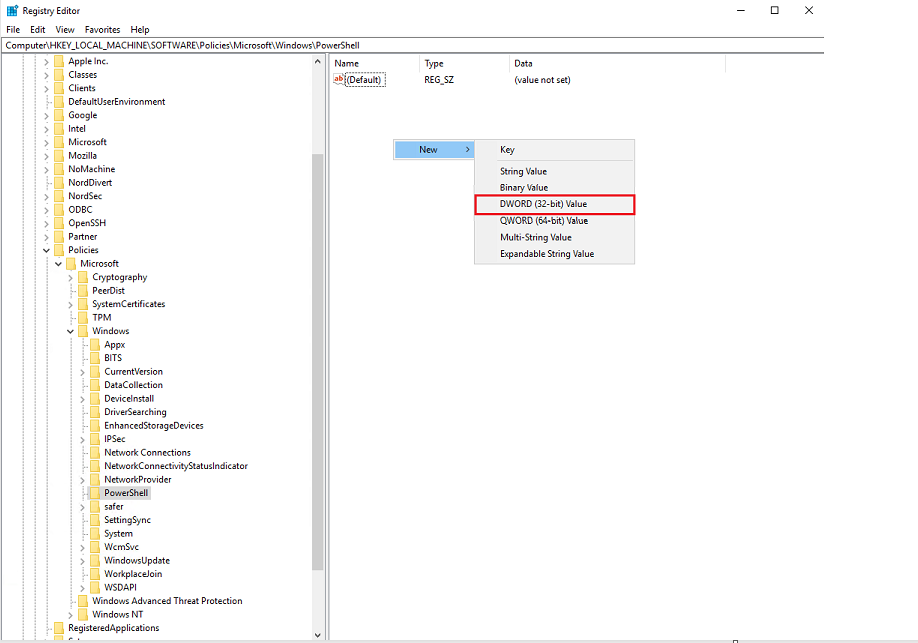
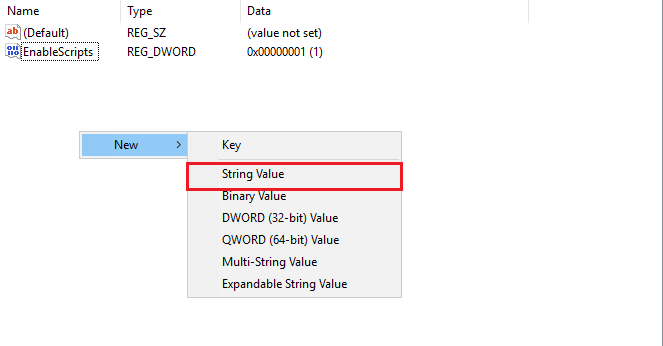
Right-click on the newly created DWORD and choose Modify, and set the Value 0 – 1.
Step 4: Now again right-click on an empty area and choose New > String Value. And Name the String Value as ExecutionPolicy.
And Right click on Newly Created String value and choose modify and enter the value as mentioned below.
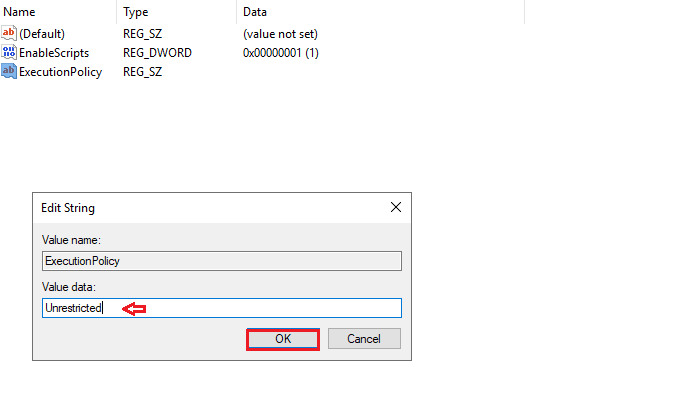
- AllSigned: Allow only Singed scripts
- RemoteSigned: Allow local scripts and remote signed scripts
- Unrestricted: Allow all scripts Click on Ok and Restart the system once.
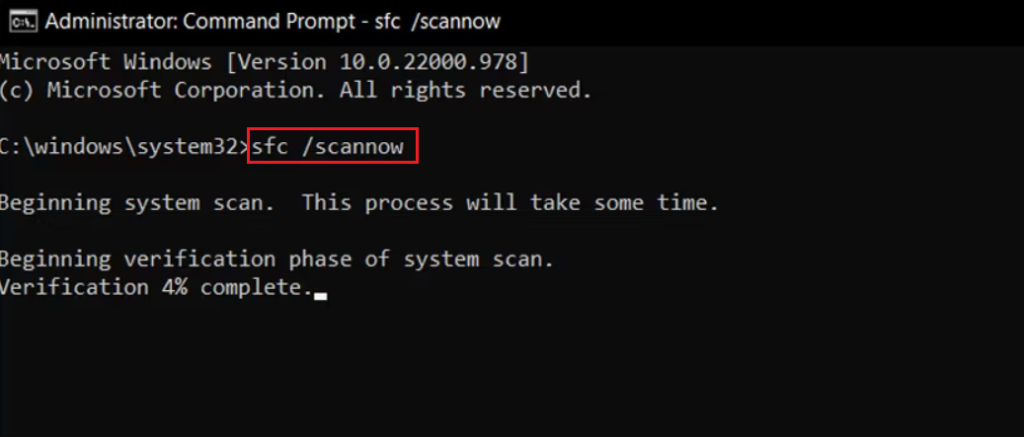
Method 4: Perform an SFC Scan
Step 1: In the Windows Search box, select the Command Prompt app. Right-click it, then click Run as administrator. Command Prompt will open with administrator permissions
image
Step 2: Type the command below and hit Enter.
sfc /scannow
DISM /Online /Cleanup-Image /ScanHealth
DISM /Online /Cleanup-Image /RestoreHealth
Step 3: Wait for the scan process to complete and fix any issues if present.
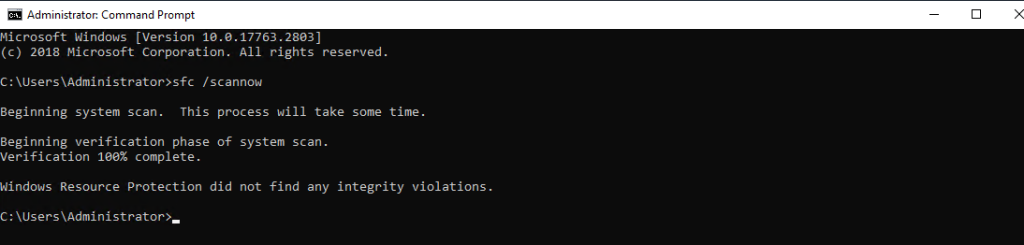
> Then, restart your computer and check again
Check if the problem with PowerShell is fixed.
. Good Luck!

Facing the issue of PowerShell not opening on your PC can be quite frustrating. This not only disrupts your smooth user experience but also prevents you from running commands and scripts. But there’s no need to worry because you’ve come to the right place. In this guide, you’ll find several effective solutions to help you overcome the problem of PowerShell not launching.
However, before diving into the solutions, it’s essential to identify the root cause behind the error so you can resolve the issue accordingly. Let’s explore some of the main causes you are unable to open PowerShell and how to eliminate them.
Table of contents
- What stops PowerShell from opening in Windows?
- Fix 1. Restart Your PC
- Fix 2. Open PowerShell as Administrator
- Fix 3. Check for Windows Updates
- Fix 4. Run Windows App Troubleshooter
- Fix 5. Perform SFC and DISM Scans
What stops PowerShell from opening in Windows?
The causes mentioned below contribute largely to PowerShell not opening on your computer. Here’s how:
- Corrupted System Files: Many applications rely on system files to function properly. If any of these system files get damaged, it can impact the smooth execution of PowerShell. Hence, corrupted system files can result in various issues leading to the inability of launching PowerShell.
- Conflicting Programs: Background process and any application clashing with PowerShell can also serve as a potential cause for the program not opening. These conflicting programs take place due to incompatibility of software, therefore causing clashes.
- Outdated App Version: A system bug within the current version of the app or an outdated app version can also be the reason for PowerShell not opening. Ensure you have the latest version of the program downloaded on your PC to fix any bugs or compatibility issues related to PowerShell and allow for optimal performance. Moreover, an outdated Windows system may also be the culprit.
- Hidden Malware: Another main cause for PowerShell not opening can be hidden software, such as a virus or malware. These malicious software can prevent the application from opening and can interfere with its function.
Now that we know the main causes behind this problem, lets’ go about fixing this issue.
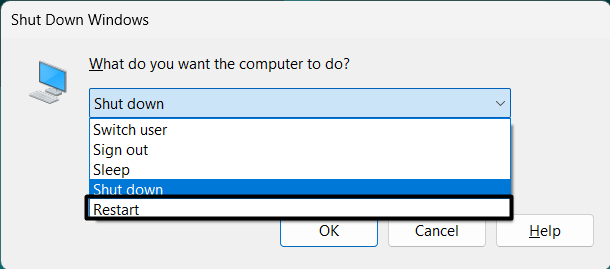
Fix 1. Restart Your PC
Before we start with the technical solutions, the first fix is to restart your computer. If PowerShell is not opening due to damaged system files or temporary glitches interfering with the program, then simply restarting the system will resolve the issue. Doing so will refresh your computer system.
Here’s how to do it:
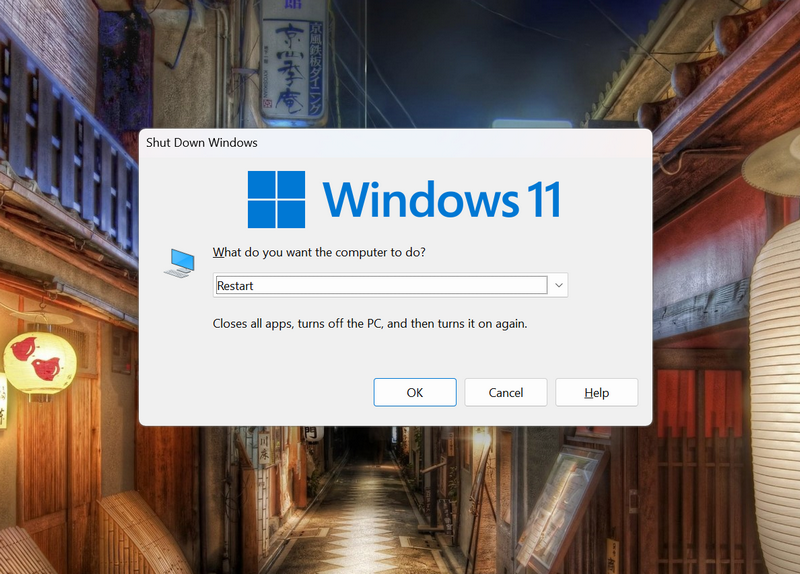
- First, click on the Start menu from the taskbar.
- Then, click on the Power icon.
- Select the Restart option.
Your PC will now restart. Once it does, launch PowerShell and check if it opens.
Fix 2. Open PowerShell as Administrator
Another way to ensure that PowerShell launches effectively is to run the application with admin rights. This allows the necessary permissions needed by Windows PowerShell in order to function properly and run certain scripts and commands.
So make sure the system has the required rights by opening PowerShell as administrator. Follow the steps below to do so:
- Click on the Search icon from the taskbar.
- Type PowerShell in the search bar.
- From the right pane, click on Run as administrator and wait for it to launch.
Fix 3. Check for Windows Updates
To fix PowerShell not opening, check for any pending Windows updates and download and install if there are any available. Having the latest Windows updates installed ensures that any bugs within the system or any other compatibility issues are resolved as it comes with the required fixes.
Therefore, this can also be a potential solution to your problem related to PowerShell.
You can check for Windows updates in the following way:
- Go to the Start icon.
- Next click on the Gear icon.
- From there, select Update & Security.
- Click on the Windows Update option from the left pane.
- Now, click on the Check for updates button on the right pane.
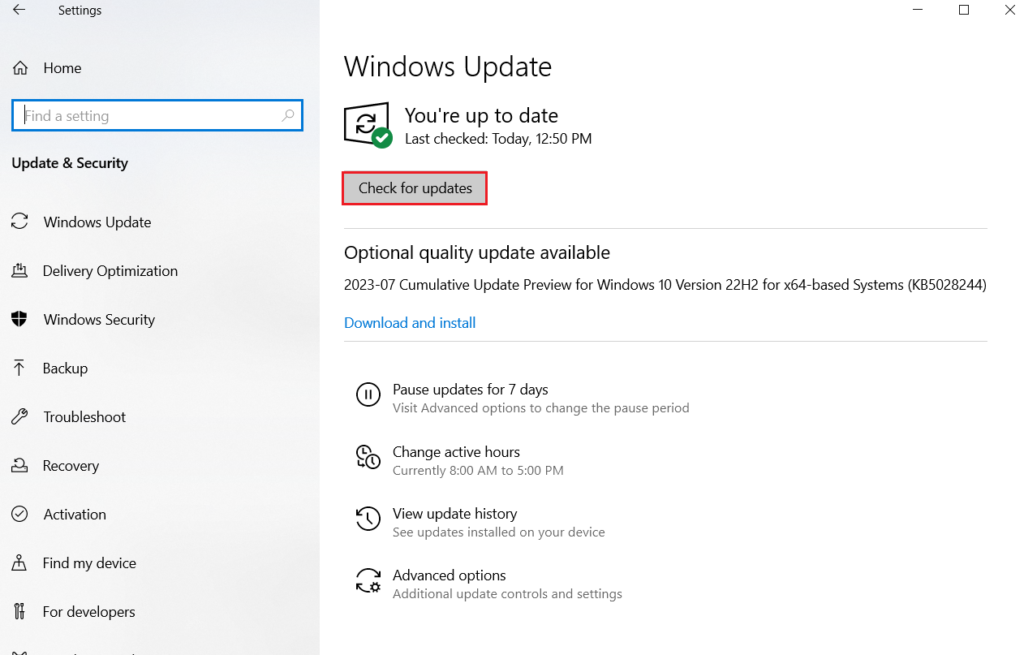
- If there are any updates available, click on Download and install.
Fix 4. Run Windows App Troubleshooter
Since PowerShell is a Windows Store app, running the Windows App troubleshooter can help detect any possible issues with it. So, run this diagnostic tool to identify the cause of PowerShell not opening and how to fix it.
Follow the steps below to do it:
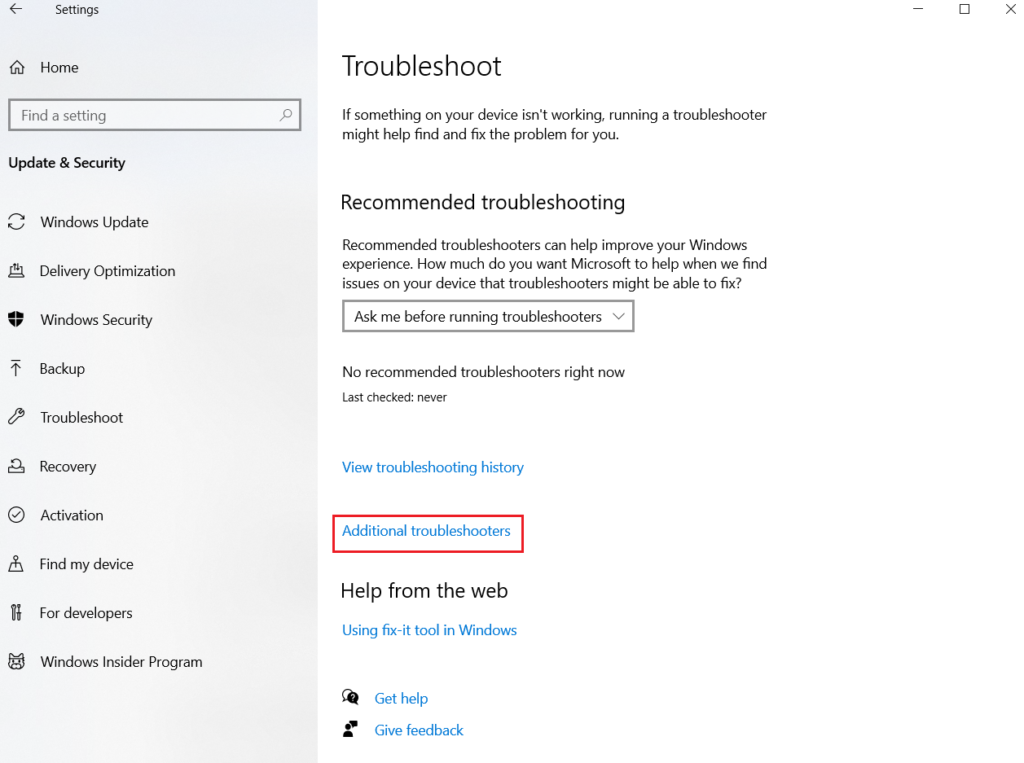
- Go to the Start menu and click on it.
- Then, select Settings.
- After that, click on Update & Security.
- From the left pane, go to the Troubleshoot tab.
- Click on Additional troubleshooters.
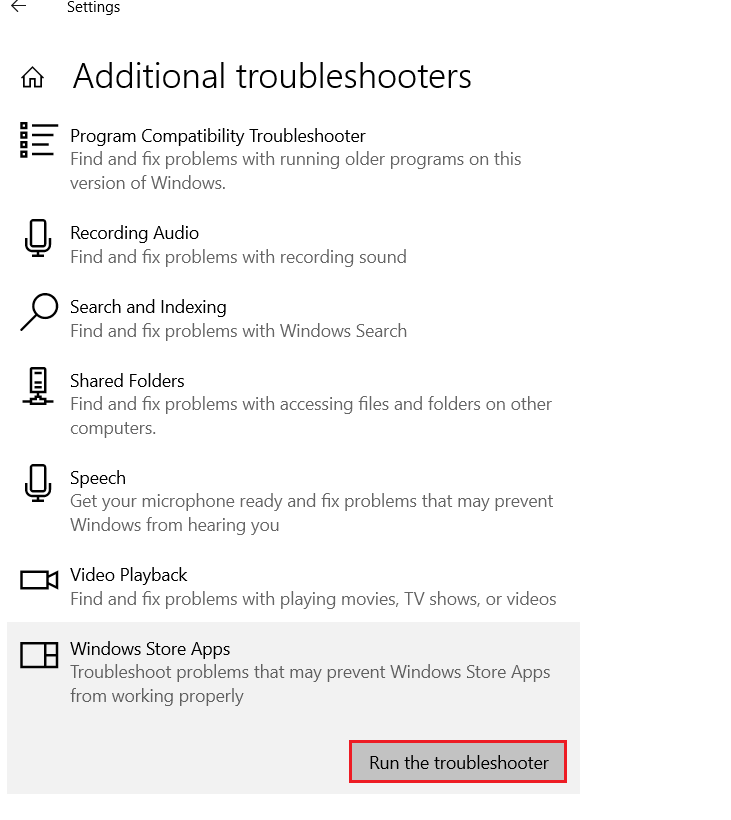
- Now, scroll down and select Windows Store Apps.
- Finally, click on Run the troubleshooter.
Fix 5. Perform SFC and DISM Scans
The SFC and DISM utilities are Microsoft built-in that enable the system to repair or replace damaged system files. So, if the PowerShell not opening issue is arising due to missing or corrupt system files, then running the SFC and DISM scans will prove to be an effective fix as these will restore the associated files to their original state.
Run the SFC and DISM by following the steps below:
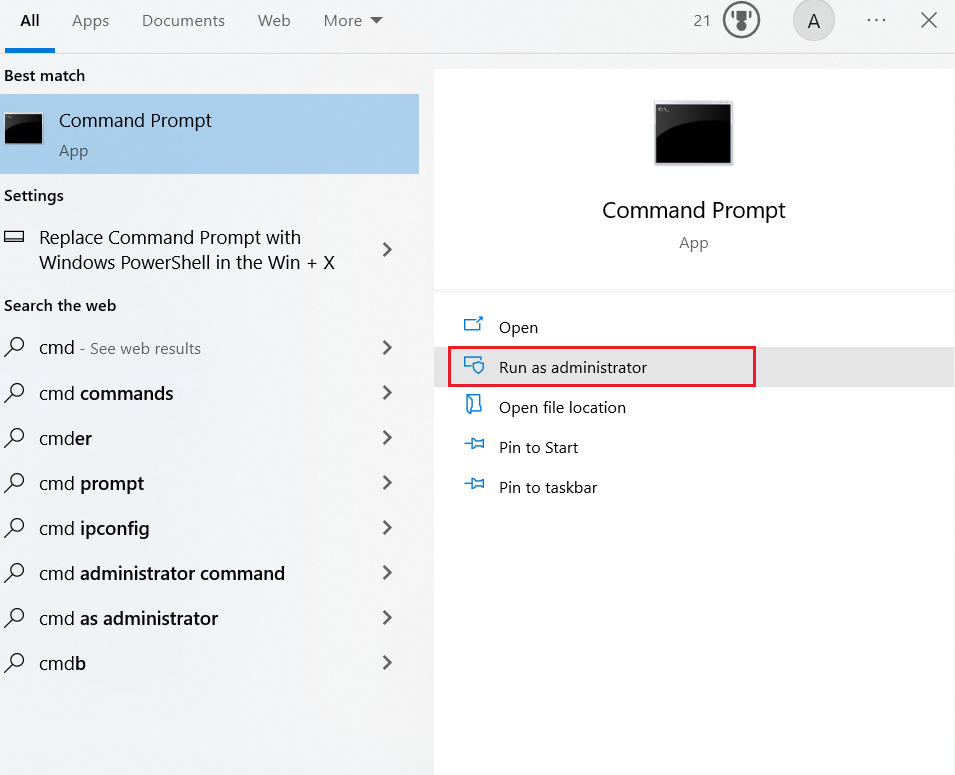
- First, click on the Search bar located on the taskbar of your computer.
- Search for cmd.
- Then, select Run as administrator from the right pane.
- For and SFC scan, type in the following command and wait for its completion:
sfc/scannow
- Similarly, for a DISM scan, run the command given below:
DISM /Online /Cleanup-Image /RestoreHealth
- Once done, restart your computer and see if the PowerShell not opening issue is resolved.
- Click on the Search bar on the taskbar.
- Type cmd in the search bar.
- Then, select Run as administrator from the left pane.
- Enter the following command:
- Wait until the process is finished. Then, close the Command Prompt and see if it fixes the problem.
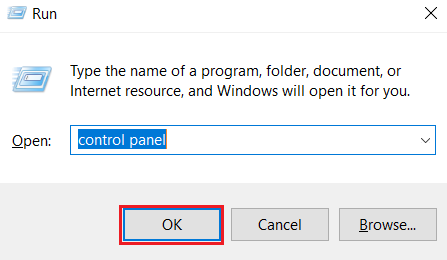
- First, press the Windows + R keys from your keyboard. This will open the Run dialog box.
- Then, type Control Panel in the text field and click OK.
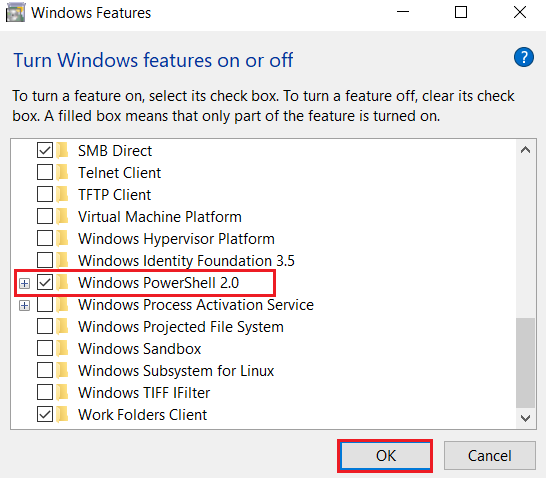
- Once the Control Panel opens, go to Programs and Features.
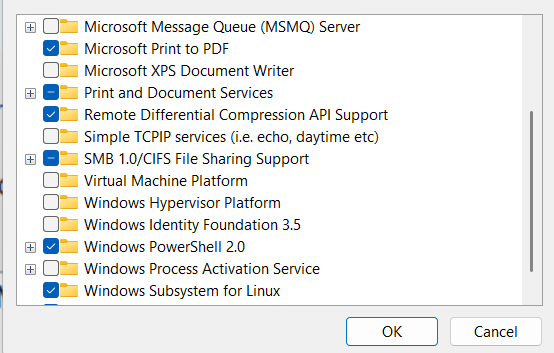
- Select Turn Windows features on or off on the left pane.
- Scroll down and locate Windows PowerShell 2.0 and uncheck the box.
- Click on the OK option to confirm the action. This will uninstall PowerShell.
- Now, to re-install PowerShell follow the steps from 1-4 and check the box for the PowerShell feature.
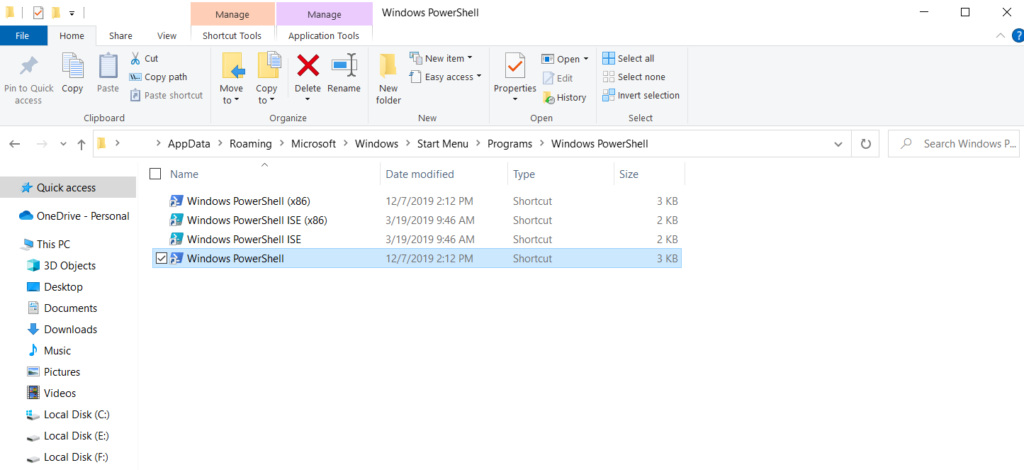
- Press the Windows + E shortcut keys to open File Explorer.
- Navigate to the following path and make sure to replace Username with the one on your PC:
- Now to delete the PowerShell entry, select it and press the Delete key. If a confirmation box appears, select a suitable response.
- After that, make a new user account on the same PC and navigate to the same path as mentioned above.
- Next, transfer the PowerShell shortcut to a USB drive.
- Using your initial account, head over to the Windows PowerShell folder.
- Finally, paste the shortcut here. This will reset PowerShell to its default settings.
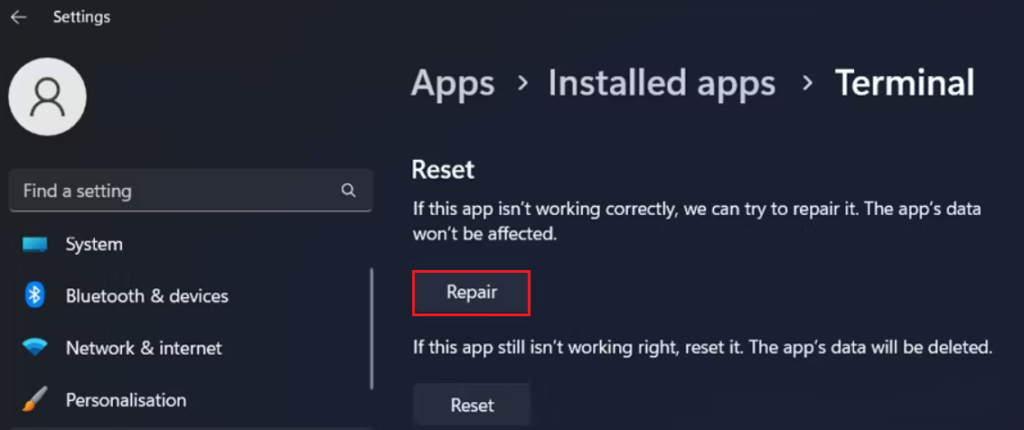
- First, right-click on the Start menu from the Taskbar.
- Then, select Settings.
- From the left pane, go to Apps.
- Select Installed Apps situated on the right pane.
- Search for Terminal in the search bar.
- Next, click on the horizontal three dots icon next to the Terminal app.
- Select Advanced options.
- Scroll down and click on the Repair button under the Reset section. Now check to see if the issue is resolved.
Fix 6. Run Shell Commands for Windows Store
Another solution on our list is to execute Shell commands for Windows Store. This will address any issues related to the components of the Windows Store, which also affect the proper working of PowerShell.
To run Shell commands for Windows Store, follow the instructions below:

powershell -ExecutionPolicy Unrestricted Add-AppxPackage -DisableDevelopmentMode -Register $Env:SystemRoot\WinStore\AppxManifest.xml
Fix 7. Re-Install PowerShell
If the problem exists in the Windows PowerShell application itself, then uninstalling and reinstalling this program would be an efficient solution. Re-installing PowerShell will ensure all the files are in good condition and remove any corrupt file or other issues responsible for PowerShell not opening.
Here’s how to uninstall and reinstall PowerShell:
Fix 8. Reset PowerShell to Default
Resetting PowerShell to its original settings will remove any changes that might be causing the application to not open. This method is great for removing any sort of misconfiguration or damaged data and resolving the conflict.
Here’s how you can do it:
C:\Users\Username\AppData\Roaming\Microsoft\Windows\Start Menu\Programs\Windows PowerShell
Fix 9. Repair Windows Terminal
Last but not least, if PowerShell is not launching because of issues within Windows Terminal, then this solution is preferred. By repairing the Windows Terminal, you can ensure that the components essential to PowerShell’s proper functioning, are in a suitable state. This will help in overcoming the inability to open PowerShell.
Follow the steps given below to repair Windows Terminal:
How to Fix PowerShell Not Opening on Windows — FAQs
How can I launch PowerShell manually?
In order to open PowerShell manually, go to the Start icon on the taskbar of your PC. Then, type “PowerShell” in the search bar and click on the Open option from the left pane. This will launch the application.
Is disabling Windows PowerShell safe?
The Windows PowerShell is a useful program allowing you to access apps and change system settings. But running incorrect commands can potentially harm your computer. So, to protect your device from third-parties using this tool to run malicious commands, temporarily disabling the PowerShell feature can be a preferred option. When in need to use this application, you can always re-enable it.
Raza Arshad
Raza Arshad is a certified Google IT Support Professional. With a keen eye for detail and a passion for problem-solving, he excels in identifying and resolving bugs and Windows-related issues. Armed with a deep understanding of computer systems, Raza effortlessly navigates through complexities to pinpoint the root cause and implement effective solutions. His exceptional skills in bug detection and Windows troubleshooting make him a valuable asset in any IT support team.