
Applies ToWindows 10, version 1809, all editions Windows Server 2019, all editions Windows 8 Windows 7 Windows 10 Windows Server 2012 Standard Windows Server 2008 R2 Standard
Симптомы
При попытке установить Windows на компьютер с установочного DVD-диска или из ISO-файла появляется одно из следующих сообщений об ошибке.
Примечание. Эта проблема может возникать при установке систем Windows 7, Windows Server 2008 R2, Windows 8 или Windows Server 2012.
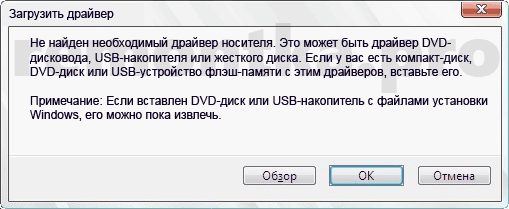
Загрузка драйвера
Не найден необходимый драйвер носителя. Это может быть драйвер DVD-дисковода, USB-накопителя или жесткого диска. Если у вас есть компакт-диск, DVD-диск или USB-устройство флэш-памяти с этим драйвером, вставьте его.
Примечание. Если вставлен установочный носитель Windows (DVD-диск или USB-накопитель), его можно безопасно извлечь, чтобы выполнить этот этап.
Загрузка драйвера
Не найден необходимый драйвер для дисковода оптических дисков. Если у вас есть дискета, компакт-диск, DVD или USB-устройство флэш-памяти с драйвером, вставьте этот носитель.
Примечание. Если в дисковод оптических дисков вставлен установочный носитель Windows, его можно безопасно извлечь, чтобы выполнить этот этап.
Решение
Чтобы устранить данную проблему, воспользуйтесь одним из описанных ниже способов в зависимости от ситуации.
-
Запишите установочный DVD-диск на более низкой скорости.
-
Создайте установочный DVD-диск на более качественном DVD-носителе.
-
Обновите встроенное ПО BIOS для вашего DVD-дисковода.
-
С помощью инструмента Windows 7 USB/DVD Download Tool создайте загрузочное USB-устройство флэш-памяти, а затем с его помощью установите Windows.
Дополнительная информация
Эта проблема возникает по одной из следующих причин:
-
Установочный DVD-диск был извлечен в процессе установки.
-
Для создания установочного DVD-диска использовался низкокачественный DVD-носитель.
-
Была выбрана слишком высокая скорость записи установочного DVD-диска.
-
DVD-дисководу не удается прочитать данные с носителя.
-
ISO-файл поврежден.
Способы устранения неполадок
Чтобы устранить данную проблему, воспользуйтесь одним из описанных ниже способов в зависимости от ситуации.
-
Запустите DVD-диск на другом компьютере, чтобы проверить исправность носителя.
-
Протестируйте свой DVD-дисковод с помощью официального установочного DVD-диска Windows.
-
Подключите ISO-файл к виртуальной машине, чтобы проверить, не поврежден ли он.
При устранении данной неполадки сначала проверьте, не поврежден ли ISO-файл. Каждый ISO-файл, скачанный с веб-сайта загрузки для подписчиков MSDN, имеет значение SHA1, которое можно сравнить со значением SHA1 на данном веб-сайте MSDN. Однако на веб-сайте Microsoft Volume Licensing Service Center (VLSC) в настоящее время контрольные суммы и значения SHA1 не представлены.
Чтобы сравнить значения SHA1 для скачанного вами ISO-файла, выполните следующие действия.
-
Установите Контроллер проверки целостности/контрольной суммы файла Майкрософт. Его можно скачать на следующем веб-сайте Центра загрузки Майкрософт:
Скачать Контроллер проверки целостности/контрольной суммы файла Майкрософт
-
Введите в командной строке приведенную ниже команду и нажмите клавишу ВВОД:
Fciv.exe <имя файла>.iso -sha1
-
Убедитесь, что значение SHA1 совпадает со значением SHA1, указанным на веб-сайте загрузки для подписчиков MSDN.
К примеру, для ISO-файла Windows 7 Корпоративная с пакетом обновления 1 (SP1), 64-разрядная версия, на данном веб-сайте отображается следующая информация:
Имя файла: en_windows_7_enterprise_with_sp1_x64_dvd_u_677651.iso
Языки: Английский
SHA1: A491F985DCCFB5863F31B728DDDBEDB2FF4DF8D1
При выполнении команды для ISO-файла Windows 7 Корпоративная с пакетом обновления 1 (SP1), 64-разрядная версия, отображается следующая информация:
Команда: fciv.exe en_windows_7_enterprise_with_sp1_x64_dvd_u_677651.iso -sha1
Вывод:
A491F985DCCFB5863F31B728DDDBEDB2FF4DF8D1
en_windows_7_enterprise_with_sp1_x64_dvd_u_677651.iso
ISO-файл не поврежден, если значение SHA1 на веб-сайте загрузки для подписчиков MSDN совпадает со значением, созданным при выполнении команды.
Нужна дополнительная помощь?
Нужны дополнительные параметры?
Изучите преимущества подписки, просмотрите учебные курсы, узнайте, как защитить свое устройство и т. д.
При установке Windows 11 и 10 (а также 8.1 и 7) на компьютер или ноутбук пользователь может столкнуться с ошибками «Не найден необходимый драйвер носителя. Это может быть драйвер DVD-дисковода, USB-накопителя или жесткого диска» (во время установки Windows 11/10 и 8.1), «Не найден необходимый драйвер для дисковода оптических дисков. Если у вас есть дискета, CD, DVD или флэш-накопитель USB с этим драйверов, вставьте этот носитель» (при установке Windows 7).
Текст сообщения об ошибке не особо понятен, особенно для начинающего пользователя, потому как не ясно, о каком именно носителе идет речь и можно предположить (неверно), что дело в SSD или новом жестком диске, на который происходит установка (об этом здесь: Не виден жесткий диск при установке Windows 7, 8 и Windows 10), однако обычно это не так и дело в другом.
Основные шаги, чтобы исправить ошибку «Не найден необходимый драйвер носителя», которые будут подробно описаны в инструкции далее:
- Для новых ноутбуков и ПК попробуйте отключить контроллер VMD в БИОС/UEFI. Обычно опцию можно найти где-то на вкладке Advanced.
- Если вы устанавливаете Windows 7 и делаете это с флешки (см. Установка Windows 7 с флешки), подключите USB накопитель к разъему USB 2.0.
- Если диск с дистрибутивом записан на DVD-RW, либо долго не использовался, попробуйте заново записать загрузочный диск с Windows (а лучше, возможно, попробовать установку с флешки, особенно если есть сомнения в полной работоспособности привода для чтения дисков).
- Попробуйте записать установочную флешку с помощью другой программы, см. Лучшие программы для создания загрузочной флешки. Например, сравнительно часто (по неясным причинам) ошибку «Не найден необходимый драйвер для дисковода оптических дисков» видят пользователи, записавшие USB накопитель в UltraISO.
- Используйте другой USB накопитель, удалите разделы на текущей флешке, если она содержит несколько разделов.
- Заново скачайте ISO Windows и создайте установочный накопитель (дело может быть в поврежденном образе). Как скачать оригинальные ISO образы Windows 10, 8 и Windows 7 с сайта Майкрософт.
Основная причина ошибки Не найден необходимый драйвер носителя при установке Windows 7
Ошибка «Не найден необходимый драйвер носителя» во время установки Windows 7 наиболее часто бывает вызвана (особенно в последнее время, по мере обновления компьютеров и ноутбуков у пользователей) тем, что загрузочная флешка для установки подключается к разъему USB 3.0, а официальная программа установки ОС не имеет встроенной поддержки драйверов USB 3.0.
Простое и быстрое решение проблемы — подключить флешку к порту USB 2.0. Их отличие от разъемов 3.0 — в том, что они не синего цвета. Как правило, после этого установка происходит без ошибок.
Более сложные способы решения проблемы:
- Записать на ту же флешку драйверы для USB 3.0 с официального сайта производителя ноутбука или материнской платы. При условии, что там есть эти драйверы (могут находиться в составе Chipset Drivers), а записывать их обязательно нужно в распакованном виде (т.е. не как exe, а как папку с файлами inf, sys и, возможно, другими). При установке нажать «Обзор» и указать путь к этим драйверам (если драйверов нет на официальных сайтах, можно использовать сайты Intel и AMD для поиска драйверов USB 3.0 для вашего чипсета).
- Интегрировать драйверы USB 3.0 в образ Windows 7 (здесь требуется отдельное руководство, которого у меня на данный момент нет).
Ошибка «Не найден необходимый драйвер для дисковода оптических дисков» при установке с DVD
Основная причина ошибки «Не найден необходимый драйвер для оптических дисков» при установке Windows с диска — поврежденный диск или плохо читающий диски привод DVD.

При этом, повреждений вы можете и не видеть, а на другом компьютере установка с этого же диска происходить без проблем.
В любом случае, первое, что следует попробовать в данной ситуации — либо записать новый загрузочный диск Windows, либо использовать загрузочную флешку для установки ОС. Оригинальные образы для установки доступны на официальном сайте Майкрософт (выше приводил инструкцию о том, как их скачать).
Использование другого ПО для записи загрузочного USB накопителя
Иногда случается, что сообщение об отсутствующем драйвере носителя появляется при установке Windows 10, 8 и Windows 7 с флешки, записанной какой-то определенной программой и не появляется при использовании другой.
Попробуйте:
- Если у вас мультизагрузочная флешка, записать накопитель с одним образом, например, с помощью Rufus или WinSetupFromUSB.
- Просто использовать другую программу для создания загрузочной флешки.
Проблемы с загрузочной флешкой
Если указанные в предыдущем разделе пункты не помогли, дело может быть и в самой флешке: если есть возможность, попробуйте использовать другую.
А заодно проверьте, не содержит ли ваша загрузочная флешка несколько разделов — это тоже может приводить к появлению таких ошибок при установке. Если содержит, удалите эти разделы, см. Как удалить разделы на флешке.
Дополнительная информация
В некоторых случаях, ошибка может быть вызвана и поврежденным образом ISO (попробовать загрузить заново или из другого источника) и более серьезными проблемами (например, неправильно работающая оперативная память может приводить к повреждению данных при копировании), хотя это и случается редко. Тем не менее, если есть возможность, стоит попробовать произвести загрузку ISO и создание накопителя для установки Windows на другом компьютере.
На официальном сайте Майкрософт также присутствует собственная инструкция по исправлению проблемы: https://support.microsoft.com/ru-ru/kb/2755139.
Quick Tips
- Download and copy the necessary drivers to the USB.
- Use the 32-bit version of Windows 11/10 as a temporary fix.
- Use Diskpart to change the disk format from MBR to GPT.
Preliminary Fixes
- Check/Switch the USB Ports: One common cause of this error is the USB port being used. Some USB ports may not be compatible with the installation process, especially if they are USB 3.0 ports. Check and fix it.
- Check the USB Drive on Another System: Sometimes, the issue might be with the USB drive itself. Verifying the USB drive on another system can help determine if the drive is faulty or if the installation media is corrupted.
Method 1: Disable CSM and Secure Boot
CSM and Secure Boot features can interfere with the installations, so you must disable them using the BIOS settings. You can install Windows 11 without Secure Boot if you have TPM 2.0 and UEFI on your PC. Here’s how to disable Secure Boot in the BIOS:
Step 1: Restart your PC.
Step 2: Press the designated F-key (usually the F2 or Esc key) to access the BIOS.
You need to check the key assigned by the PC manufacturer to access the BIOS.
Step 3: After you enter the BIOS, switch to the Security tab.
Note: Your PC’s BIOS option may differ. Look for the Secure Boot option in all the tabs in the BIOS.

Step 4: Click on the Secure Boot option.

Step 5: Click on the Secure Boot Control option and select the Disabled option.

Step 6: Press the F10 key to save the changes and exit the BIOS.
Step 7: Your PC will reboot, and you must boot using the Windows USB installation media. Proceed with the installation and check if the Windows setup encounters the same error.
Similarly, disable the CSM mode, which is also a feature in the BIOS that enables support for installing older operating systems.
Method 2: Download and Install the Missing Drivers
If your PC uses an Intel processor, download and extract the Intel Rapid Storage Technology (IRST) driver for your PC model. AMD users will have to do the same and download and extract the AMD RAID Driver (SATA, NVMe RAID) drivers.

After that, copy the extracted drivers folder to the Windows USB installation media.

Repeat the following steps:
Step 1: Power on your PC and boot using the Windows USB installation media till you reach where the setup asks you to load drivers. If you copied the drivers to another USB drive, plug it in.
Step 2: Click on the Browse button.

Step 3: Select the appropriate driver folder and click on the OK button.

Step 4: Click on the driver to select it and then click on the Next button.

Step 5: After the driver installs successfully, pick a drive for installation and continue with the setup.
Method 3: Try Installing the 32-Bit Version (For Windows 10)
If you are having trouble with the Windows 10 installation, try the 32-bit version of the operating system instead of the 64-bit version. This is a temporary workaround that worked for many users, but you will have to stick with the 32-bit version on the OS. And whenever you wish to change, you’ll have to clean install the 64-bit version of Windows.
Corrupt USB installation media is also a reason why the error pops up when you try to select the drive and proceed with the Windows installation. So, you must recreate the Windows USB installation media with the help of either the Windows Media Creation tool or Rufus.
Ensure you download the latest ISO file from the official Windows website and use it to create the Windows USB installation media. Connect the USB drive to your PC and check if the installation proceeds without any errors.
Method 5: Convert Disk to GPT
Windows 11 requires the PC to support UEFI, and the storage drive must be in the GPT format. If the primary storage disk is in MBR format, you must convert it to GPT before installing the operating system.
Step 1: Press the Shift + F10 keyboard shortcut to open the Command Prompt on the Windows Setup page.
Step 2: Type the following command and press Enter to launch the Diskpart utility:
diskpart
Step 3: After that, execute the following command:
list disk
Step 4: You will see a list of all the disks, including the Windows USB installation media. Note the number of your system disk. The command to select the disk is:
select disk disknumberStep 5: Replace the disknumber part with the actual number of the disk from the list. So, the final command in our case becomes:
select disk 0
Step 6: After selecting the disk, execute the following command:
clean
Step 7: The selected disk is wiped clean. Execute the following command to convert it to GPT:
convert gpt
Step 8: After you see the successful command execution message, execute the following command:
list disk
Step 9: You will notice that an asterisk (*) appears in front of the disk under the GPT column. It indicates that the disk is in GPT format now.
Step 10: Close the Command Prompt window and continue the Windows installation.
That’s it. This should fix the no device drivers were found error from your Windows 10/11 PC once and for all.
Was this helpful?
Thanks for your feedback!
The article above may contain affiliate links which help support Guiding Tech. The content remains unbiased and authentic and will never affect our editorial integrity.
Windows 10/11 won’t install drivers is a common issue and many users are bothered by it. MiniTool Software collects some methods that are proved to be effective and shows them in this article. You can select a suitable method to help you solve the issue.
Windows 10/11 Won’t Install Drivers on PC
The device drivers are very important parts of a computer. When you want to use a device on your PC, you need to make sure the device driver is properly installed and you’d better keep it up-to-date. However, some users report that Windows 10/11 won’t install drivers on their computers. For example, they receive the error message saying cannot complete the device driver installation wizard during the installation process.
This problem will affect your normal use of the computer device. So, you need to take active measures to solve the issue.
Well then, what should you do when you are unable to install drivers on Windows 10/11? You can use the Windows built-in troubleshooter to find and fix errors. You can also run a DISM and SFC scan to fix the issue. Besides, you can update the device driver or clean boot your device to have a try. If all of the fixes don’t work for you, you will need to reset your computer.
In this article, we will show you how to use these methods to solve the issue. We will also show you how to use the best free data recovery software to help you recover your missing files on a Windows computer.
MiniTool Power Data Recovery FreeClick to Download100%Clean & Safe
How to Fix: Windows 10/11 Won’t Install Drivers
- Fix 1: Run the Hardware and Device Troubleshooter
- Fix 2: Update the Device Driver
- Fix 3: Run DISM and SFC
- Fix 4: Clean Boot Your Computer
- Fix 5: Reset Your PC
Fix 1: Run the Hardware and Device Troubleshooter
Windows has a built-in tool that can help you solve the device driver issue. It is a hardware and device troubleshooter. This tool is available on both Windows 11 and Windows 10. You can open it via Control Panel. Yes, Control Panel is still available on Windows 11.
Way 1: Run the Hardware and Device Troubleshooter via Control Panel
- Click the search icon from the taskbar and search for control panel.
- Select Control Panel from the search result to open it.
- Expand View by and select Large icons.
- Click Troubleshooting to continue.
- Click View all from the left panel.
- Click Hardware and Devices.
- Click Advanced.
- Click Run as Administrator.
- Click Next to run this tool.
This tool can automatically find and fix found errors on the devices. You should wait until the whole process ends.
Way 2: Run the Hardware and Device Troubleshooter via Command Prompt
If you can’t find the hardware and devices troubleshooter via Control Panel, you can use Command Prompt instead. Here is a guide:
- Click the search icon from the taskbar and type cmd.
- Select Command Prompt from the search result to open it.
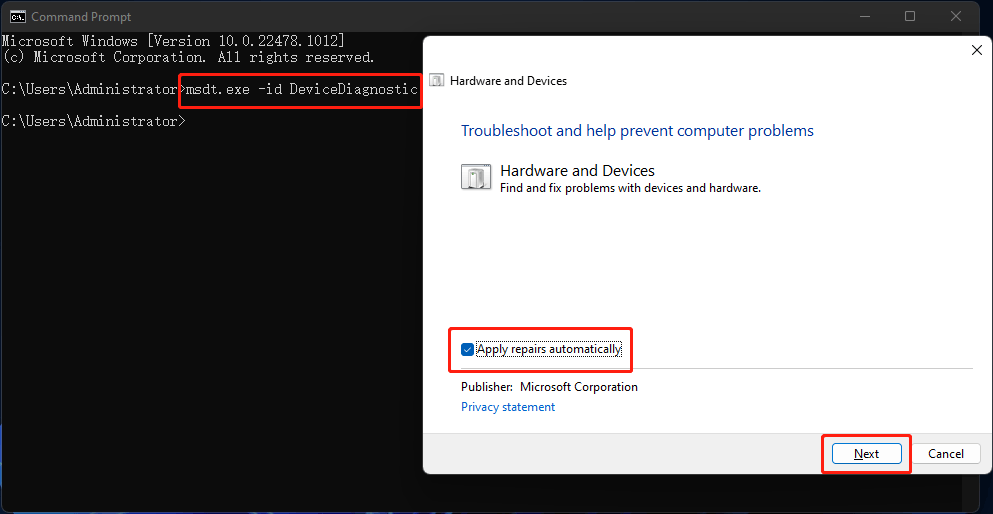
- Type exe -id DeviceDiagnostic into Command Prompt and press Enter.
- The Hardware and Devices troubleshooter will open. You can click Advanced to make sure Apply repairs automatically is selected.
- Click Next to run this tool. This tool will begin to detect problems. You should wait until the process ends. If necessary, you need to follow the on-screen guide to complete the fix. For example, you may need to restart your computer to finish installing drivers and updates.
After running this tool, you can go to check if your needed device drivers are installed successfully.
Fix 2: Update the Device Driver
If you can’t install the device driver on your computer, you can update it to have a try. This can also fix the missing, broken, or outdated device driver. It is easy to do this:
- Right-click on Start and select Device Manager.
- Find the target device and right-click it.
- Select Update driver.
- On the pop-up page, click Search automatically for drivers to search for the best available driver and install it on your computer.
Fix 3: Run DISM and SFC
At times, the issues of Windows 10/11 won’t install drivers are caused by missing or corrupted system files. You can run DISM (inbox Deployment Image Servicing and Management) and SFC (System File Checker) in Command Prompt to repair the system files.
Here is what you can do:
1. Click the search icon from the taskbar and search for cmd.
2. Right-click Command Prompt from the search result and select Run as administrator.
3. Type the following commands one by one and press Enter after each.
- DISM /Online /Cleanup-Image /ScanHealth
- DISM /Online /Cleanup-Image /CheckHealth
- DISM /Online /Cleanup-Image /RestoreHealth
4. After running DISM completely, you need to type sfc /scannow and press Enter to run SFC on your device. This tool can scan your Windows OS and then restore your missing & corrupted system files. You should wait until the process is 100% completed.
Fix 4: Clean Boot Your Computer
Software conflicts can also cause driver installation issues like Windows 10/11 won’t install drivers. It is impossible to uninstall all software from your computer. But this doesn’t mean that you can’t solve this issue. You can clean boot your computer and then find out if it is a software conflict issue. If yes, you can take further steps to find the culprit.
How to Clean Boot Your Windows 10/11 Computer?
1. Click the search icon from the taskbar.
2. Type msconfig into the search box.
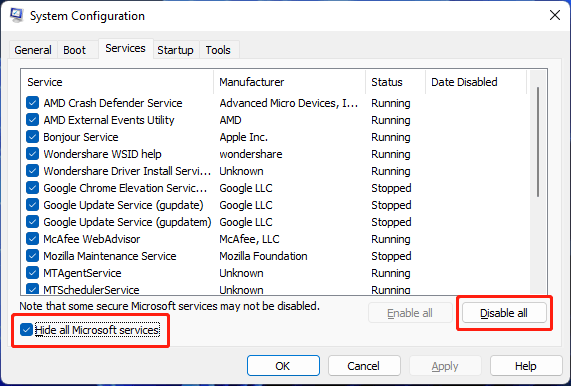
3. Click System Configuration from the search result to open it.
4. On the System Configuration interface, you need to check the option of Hide all Microsoft services. This can make sure that all the Microsoft services are still running after you clean boot your Windows 10/11 computer.
5. Click the Disable all button to continue.
6. Switch to the Startup section.
7. Click the Open Task Manager link.
8. On Task Manager, you can select the startup program that may interface with your system and then click the Disable Then, repeat this step to disable all the suspected programs.
9. Close Task Manager.
10. Close System Configuration.
11. Restart your computer.
12. Check if you can install your needed device driver. If you can, it means that third-party software prevents you from installing device drivers. To find out which is the cause, you can repeat step 1 to step 5 but enable half of the listed services. The recently installed software should be considered. You can try this way until you find the culprit.
If Windows 10/11 still won’t install drivers, the next fix may help you.
Fix 5: Reset Your PC
If you can’t use the above methods to solve the device driver installation issue, you may need to reset your PC. To protect your files on the computer, you’d better back up your device before resetting your PC. In this part, we will show you a full guide on how to reset your PC.
Step 1: Back up Your Computer
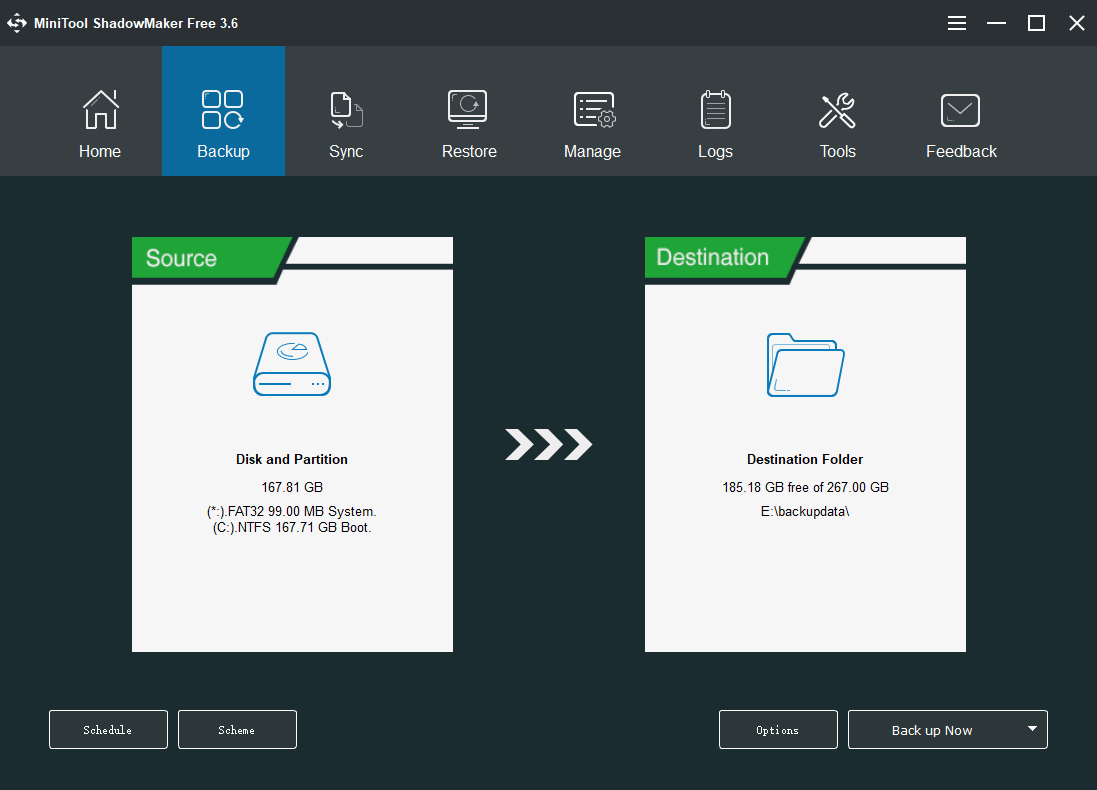
You can use MiniTool ShadowMaker, a professional Windows backup software, to back up your files, folders, partitions, disks, and systems. This software supports automatic backup, differential and incremental backup. With it, you can also schedule a backup based on your requirements.
This software has a trial edition. You can use it for free within 30 days. If you want to try it, you can click the following button to download and install it on your device. It works on all versions of Windows, including Windows 11, Windows 10, Windows 8.1/8, and Windows 7.
MiniTool ShadowMaker TrialClick to Download100%Clean & Safe
After the installation, you can open this software, switch to the Backup section, and select the disk or partition, files or folders to backup.
After backing up your computer, you can feel free to reset your PC.
Step 2: Reset Your Computer
- Click the Start button from the taskbar.
- Go to Settings > System > Recovery.
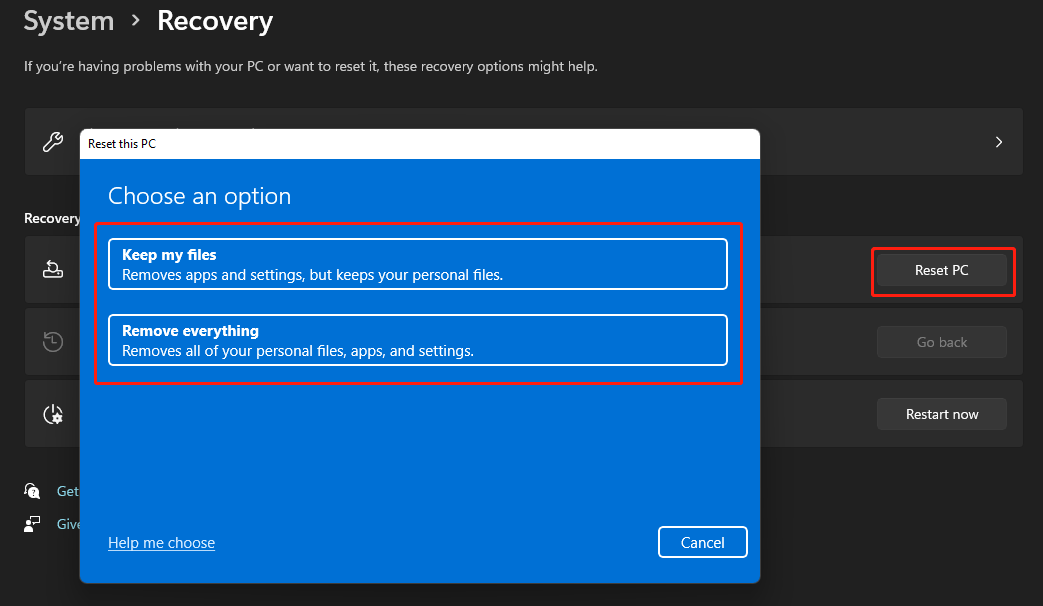
- Under the Recovery options section, you need to click the Reset PC button to continue.
- On the pop-up page, click Keep my files or Remove everything based on your situation to continue.
- On the next page, click Cloud download or Local reinstall based on your requirements to continue.
- Follow the on-screen instructions to reset your PC.
Step 3: Recover Your Lost Files if There Is No Available Backup
When you use your Windows computer, some of your files may get deleted or lost by mistake. For example, your files are removed accidentally after you reset your computer and you want to get them back. In this situation, you can use professional data recovery software to get them back.
MiniTool Power Data Recovery is a professional data recovery tool for Windows. It can be used to recover pictures, documents, videos, movies, music files, and more from all kinds of data storage devices like hard drives, SSDs, memory cards, SD cards, USB flash drives, etc.
Tip: No matter which data recovery software you are using, it can only recover deleted and lost files that are not overwritten by new data.
This software also has a trial edition. You can use it to scan the drive you want to recover data from. Then, you can see if it can find your needed files. If yes and you want to recover them, you can use a full edition to do this.
MiniTool Power Data Recovery TrialClick to Download100%Clean & Safe
After downloading and installing this software on your PC, you can follow this guide to rescue your files:
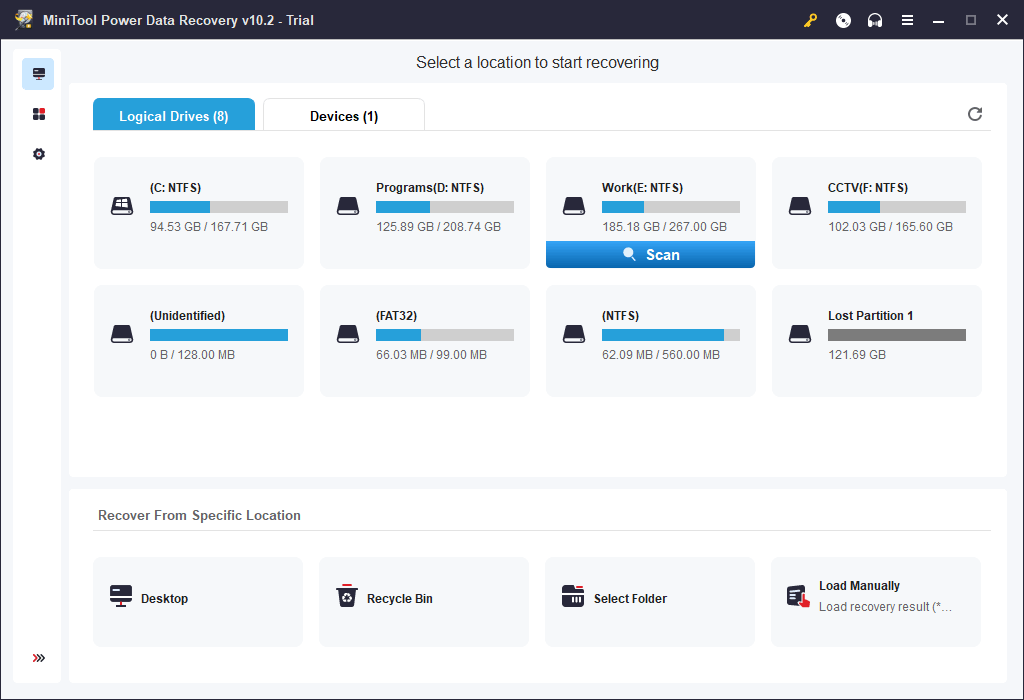
- Open the software to enter its main interface.
- This software shows you all the available partitions under Logical Drives. You can hover over the target partition and click the Scan button to start scanning it. If you want to directly scan the whole disk, you need to switch to the Devices section and select the target drive to scan.
- When the scanning process ends, you can see the scan results. You can check if your needed files are there. To recover them, you need to upgrade this software to a full edition. Then, you can select all your needed files and click the Save button to select a suitable location to save them. When selecting the destination folder, you should not select the original location. Otherwise, the deleted files might be overwritten and become unrecoverable.
Although there is a chance to recover your lost data, you’d better form a good habit of regularly backing up files in case the lost files are overwritten.
Unable to Install Drivers on Windows 10/11
If you can’t install drivers on your Windows 10/11 computer, you can just try the methods mentioned in this article to help you out. You should find a suitable method here. In addition, if you want to recover deleted files on your computer, you can try the software introduced in this blog.
Should you have any other related issues, you can let us know in the comments. You can also contact us via [email protected].

Обращение к читающим
Прежде чем начать свой рассказ, сразу оговорюсь: это чисто мой опыт, я мог где-то накосячить или что-то неправильно сделать (по вашему мнению), мог поступить по-другому и т.д. Но повторюсь: это мой опыт и мое решение проблемы, если желаете прочесть — я буду рад, покритиковать — тоже буду рад. Но не надо, пожалуйста, рассказывать, что вы все мастера, а другие нет.
Введение в ситуацию
На дворе 2020 год, и, к удивлению, не все еще умеют переустанавливать Windows. Вот и мой друг столкнулся с такой проблемой и попросил помочь с данной процедурой. Ничего сложного подумаете вы? Если бы…
Нетбук от фирмы ASUS, модель R540L, без оптического привода, 1 вход USB 3.0 и 1 вход USB 2.0.
У меня всегда есть несколько .iso файлов для таких просьб или личных нужд. Если их совсем уж обычно разбить на группы, то они такие: Windows 10 Pro, Windows 7 Ultimate SP1, Windows 7 Professional. В принципе, ничего сверхординарного, но все нужное под рукой.
Столкновение с проблемой №1 — «Не найден необходимый драйвер для дисковода оптических дисков»
Все начинается как обычно, берется .iso файл и делается загрузочная флешка. Загрузочную флешку делал через программы UltraISO и Rufus (кстати, последнюю рекомендую больше, чем первую). Итак, вставил флешку, в BIOS (НЕ UEFI) выставляю загрузку с флешки и ничего не предвещало беды, но выскакивает окошко, которое многие из нас очень хорошо знают — «Не найден необходимый драйвер для дисковода оптических дисков».

Флешка стоит в порте USB 2.0 (черный), установочный дистрибутив проверенный и устанавливал его много раз на разные системы, в BIOS настройки верные, так что проблема не в этом.
Я не отчаялся. Следующим шагом было внедрение драйверов USB 3.0 в загрузочную флешку.
Для этого есть множество способов, вплоть до специальных программ от разных фирм. Сразу скажу — либо я что-то неверно сделал, либо все это туфта.
Столкновение с проблемой №2 — «Черный экран и зависание»
Итак, пробую я внедрить эти драйвера в флешку.
- Первая программа — MSI Win 7 Smart Tool.

Смотрю инструкцию по использованию, хотя даже интуитивно все понятно. Делаю, как указано в инструкции, и жду, пока идет установка, процесс внедрения драйверов занял около 25-30 минут.
Далее снова произвожу манипуляции начала установки Windows 7 и после логотипа компании все что я вижу — это просто черный экран… Даже нижний слэш не моргает, как это часто бывает. Окей, пробуем следующую.
- Вторая программа — Windows 7 USB 3.0 Creator Utility от Intel. Уж почему-то я подумал, раз эта программа от производителей чипсета данного ноутбука, то она должна точно все сделать верно.

После прочтения инструкции и проведения всех «тыков» по нужным кнопкам — меня снова постигла неудача. Произвожу все те же манипуляции запуска установки и снова вижу этот ненавистный черный экран.
В итоге я решил попробовать сделать все банально просто (или глупо, это как посмотреть) и подсунуть установщику драйвера напрямую.
Скачал нужные драйвера с сайта компании, закинул их в папку на флешке (перед этим записав на нее чистый образ) и запустил установку. Черного экрана нет, экран установки запускается, выскакивает сообщение об ошибке, и я хочу через кнопку «Обзор» подсунуть установщику драйвера. Нажимаю «Обзор», а флешки-то моей он не видит… При «кормлении» ему других папок пишет, что драйвера не найдены.
И тут я уже почти отчаиваюсь.
Нестандартное решение ошибки «Не найден необходимый драйвер носителя»
Перелопатив кучу форумов, прочитав кучу статей в интернете, уже думал плюнуть и поставить Windows 10, который стоял до этого. Но меня все-таки попросили поставить Windows 7, так что будет стоять Windows 7, и неважно, сколько у меня это займет времени и нервов (друг-то названивает каждые 2 часа с вопросом «Ну что там? Скоро?»). И тут я нашел мое спасительное решение проблемы.
Все сводится к тому, что мне нужен Windows 8. Удивились? Я тоже. А суть в том, что требуется взять установщик Windows 8 и подсунуть ему установку Windows 7.
Итак, по пунктам:
- Скачиваем любой доступный дистрибутив Windows 8 (я взял этот).
- Делаем загрузочную флешку с Windows 8 с помощью Rufus.

- После того как программа закончит свое действие, открываем флешку и переходим к папке «/sources» и находим файл под названием «install». Тип файла будет .esd .
- Открываем через WinRAR .iso файл с Windows 7 и находим по тому же пути файл с таким же названием, копируем его и вставляем с заменой на флешку, вместо intall.esd .
- После этого сбрасываем BIOS до настроек «по умолчанию» и запускаем установку с флешки. И видим установщик Windows 8, но если продолжить установку — устанавливается Windows 7. (Прошу прощения за качество скриншотов, они взяты из видео, приложенного ниже)


Вот и все! Проблема наконец-то решена, Windows 7 начала нормально устанавливаться. Никаких лагов, зависаний, ошибок обнаружено не было. Метод, конечно, может быть похожим на «танец с бубном», но он рабочий и реально помог мне. Многие могли бы сделать по-другому, и это ваше право. Но если хоть одному человеку поможет данный метод — я буду чувствовать, что все это было написано не зря!
Ссылка на видео с описанием данного метода — YouTube.
Telegram-канал @overclockers_news — теперь в новом формате. Подписывайся, чтобы быть в курсе всех новостей!