
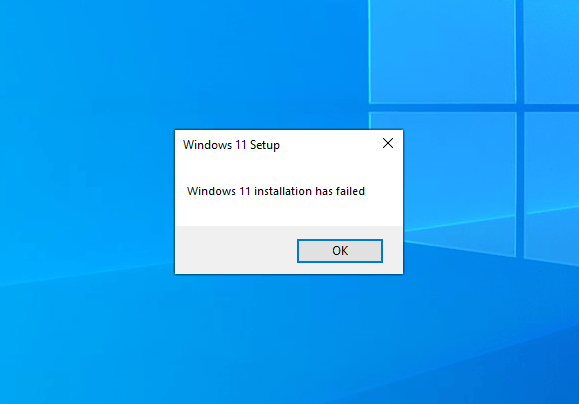
Ready to update to Windows 11 but you’re getting the “Windows 11 installation has failed” error? Many users have reported the exact problem, and luckily it’s not a difficult one to solve. If you’re in the same boat, read on to find out how to fix the error and update to Windows 11.
Try these fixes…
1: Remove external hardware
2: Run Windows Update
3: Update your device drivers
4: Enable TPM 2.0 and Secure Boot
5: Bypass TPM and Secure Boot check
Windows 11 system requirements
Before we dive into anything advanced and try the fixes, you need to make sure that your PC is eligible to update to Windows 11. You can either refer to the table below, or download the PC Health Check app from Microsoft to check compatibility.
| Processor | 1 gigahertz (GHz) or faster with 2 or more cores on a compatible 64-bit processor or System on a Chip (SoC) |
| RAM | 4 GB |
| Storage | At least 64 GB |
| System firmware | UEFI, Secure Boot capable |
| TPM | Trusted Platform Module (TPM) version 2.0 |
| Graphics card | Compatible with DirectX 12 or later with WDDM 2.0 driver |
| Display | High definition (720p) display that is greater than 9” diagonally, 8 bits per color channel. |
If you’re using the PC Health Check app, simply follow these steps:
- Download and install the PC Health Check app.
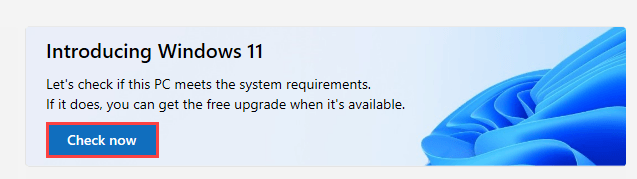
- Run the app, and click Check now.

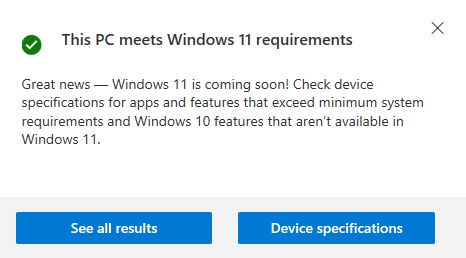
- The app will show you if your PC is eligible for Windows 11 upgrade or not.

Fix 1: Remove external hardware
A quick troubleshooting tip that’s often overlooked by many is to remove any external devices connected to your PC/laptop. Here we want to keep only the basic functionality of your PC for the Windows 11 upgrade. For example, you can remove any USB hub, speaker, printer, headphone, scanner, etc.
After you rule out any possible interference from these devices, try to install Windows 11 again. If this doesn’t help, try the next fix.
Fix 2: Run Windows Update
Microsoft suggests that you need to make sure all the available Windows updates are installed before you attempt to upgrade to Windows 11. Here’s how to check for Windows updates and install the available ones:
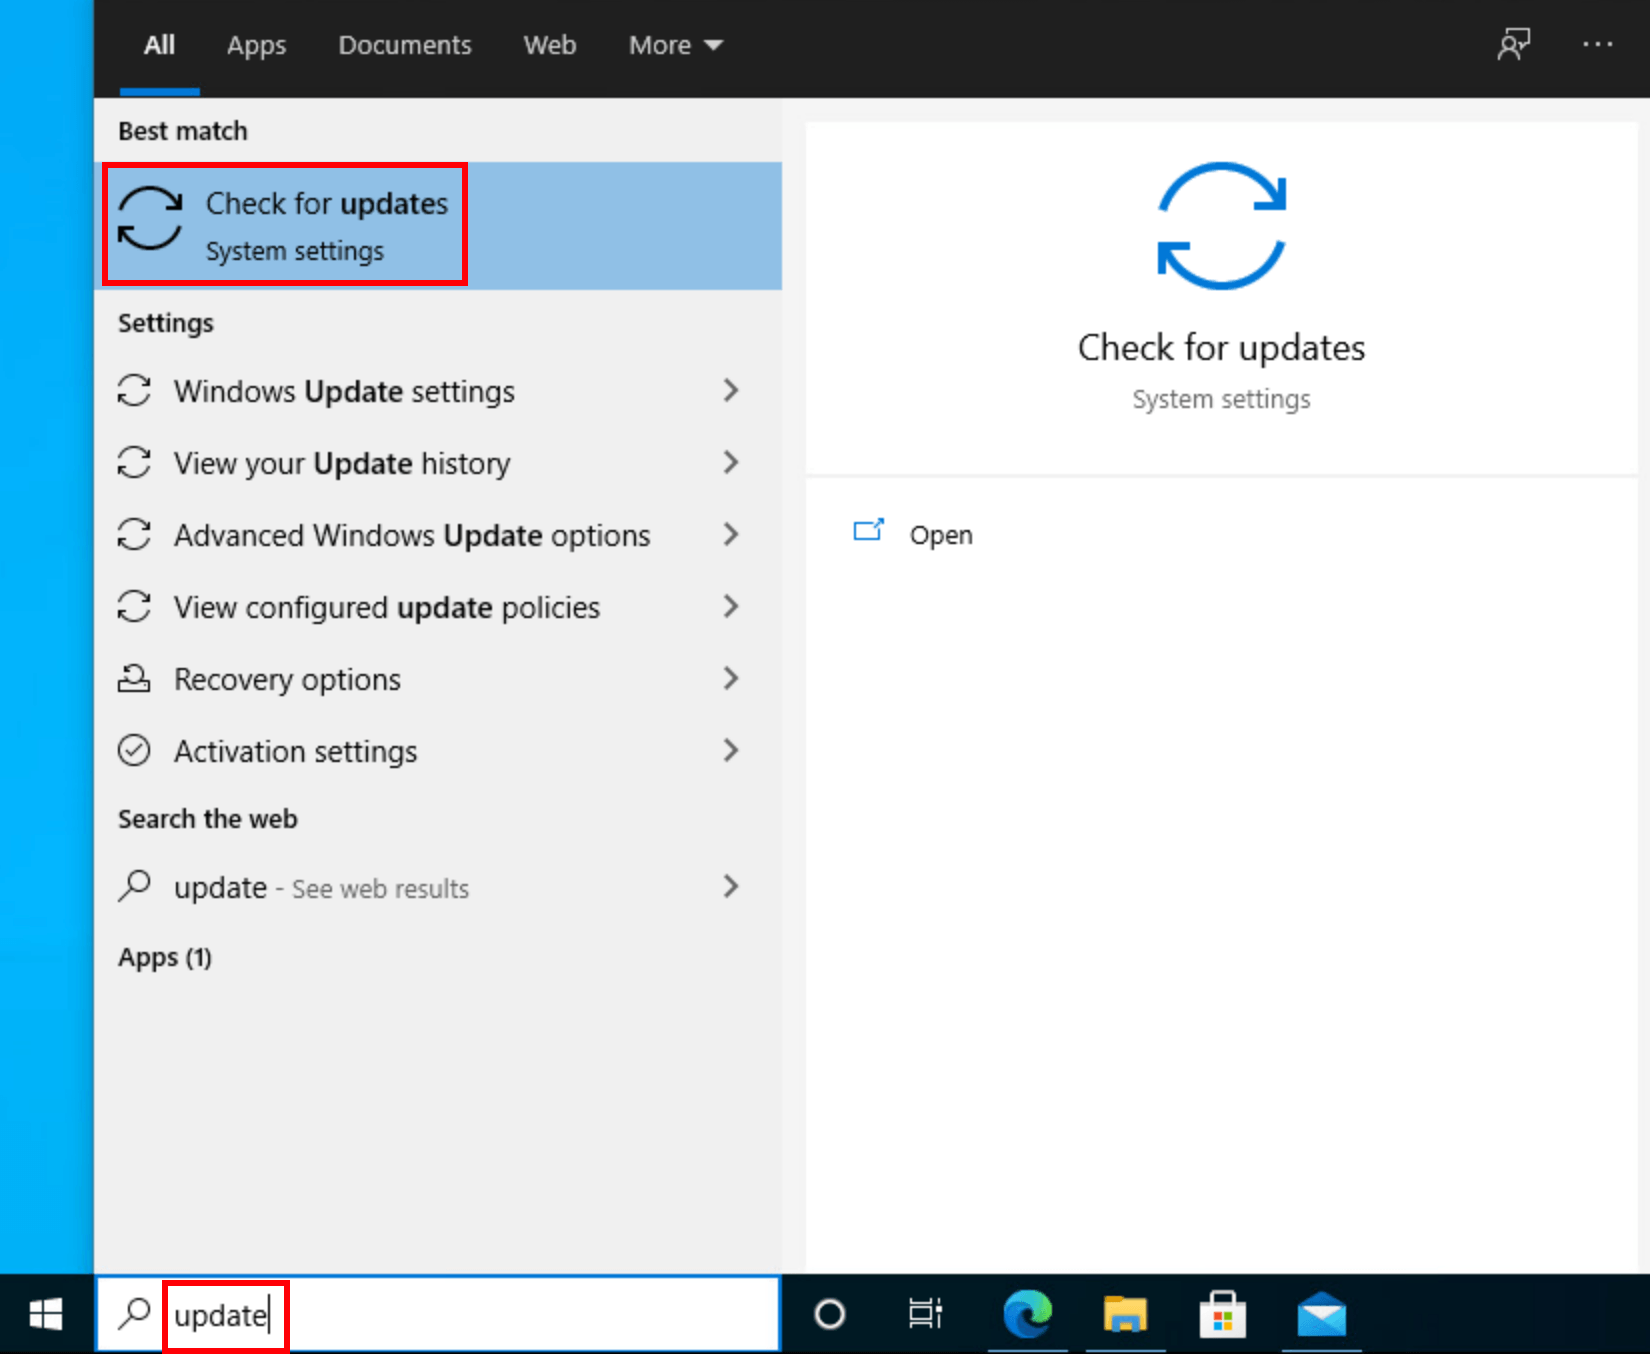
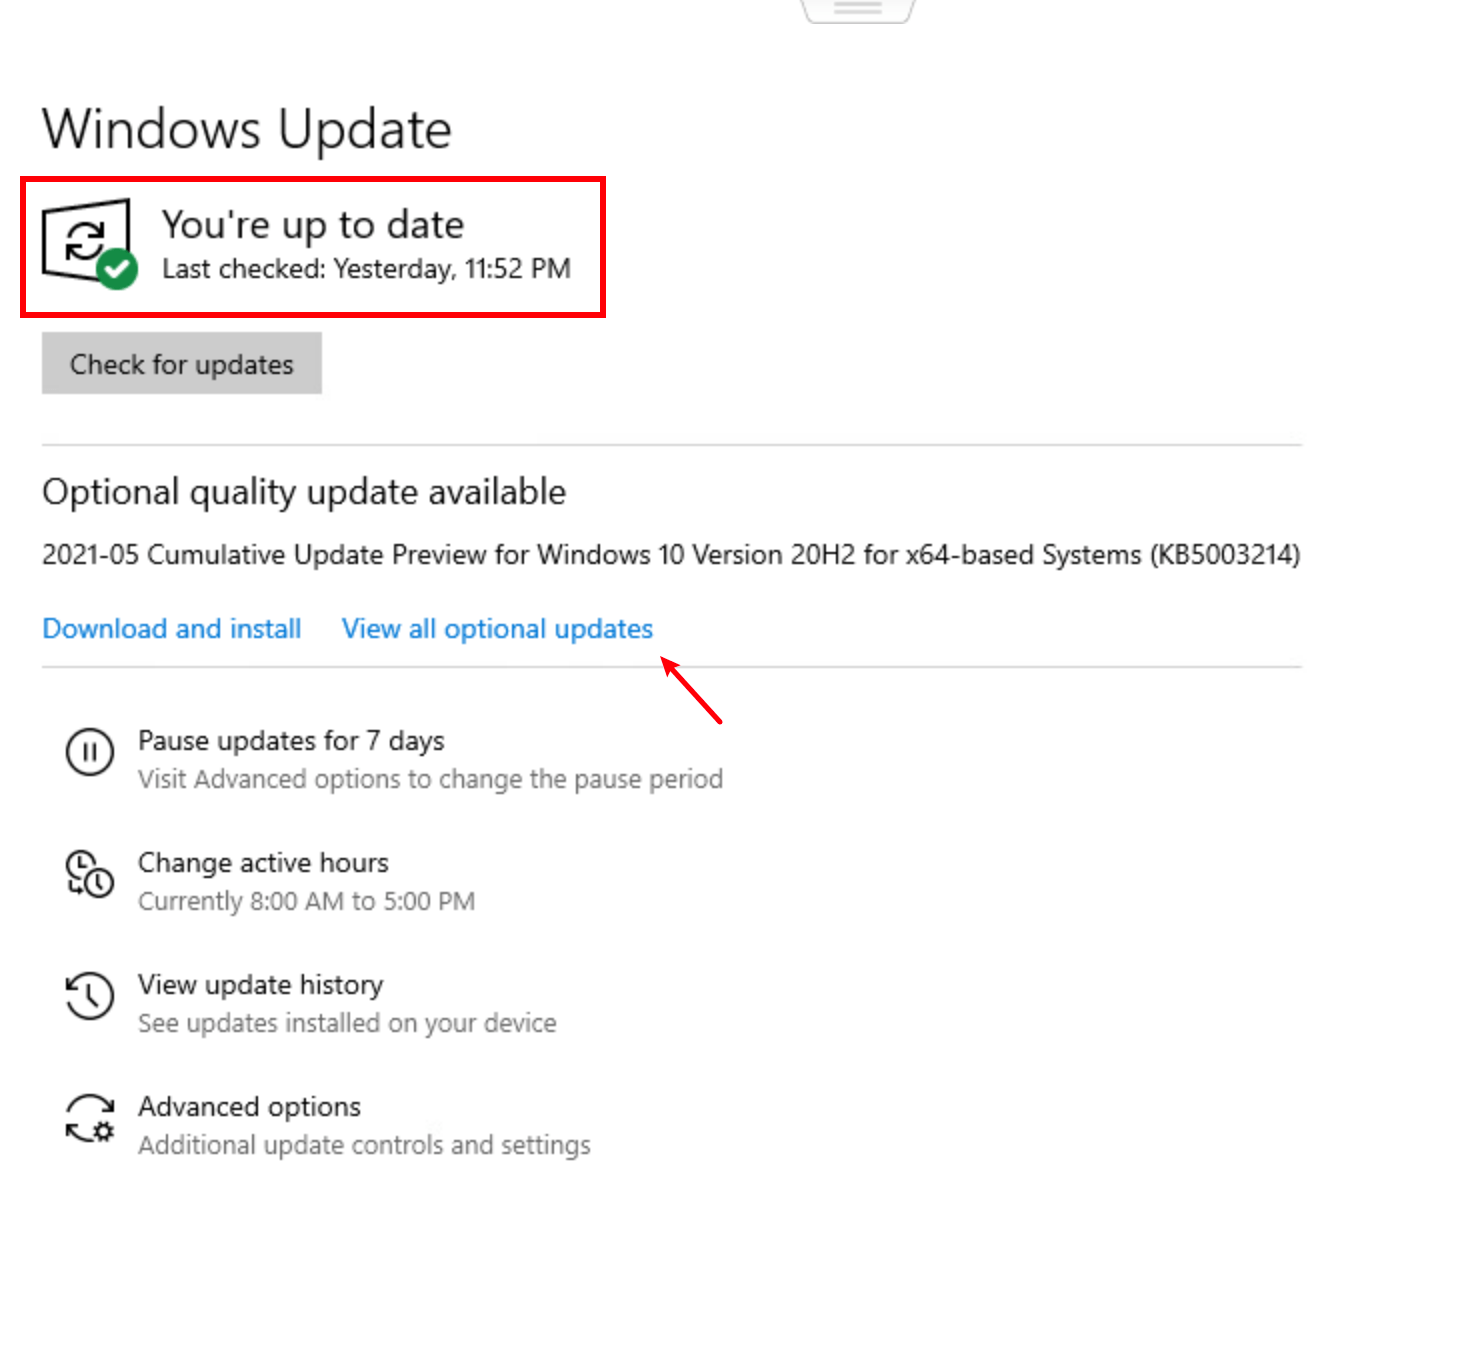
- In the search bar next to your Start button, type update, then click Check for updates.

- Windows will scan for available updates. If there are no available updates, you’ll get a You’re up to date sign. You could also click View all optional updates and install them if needed.

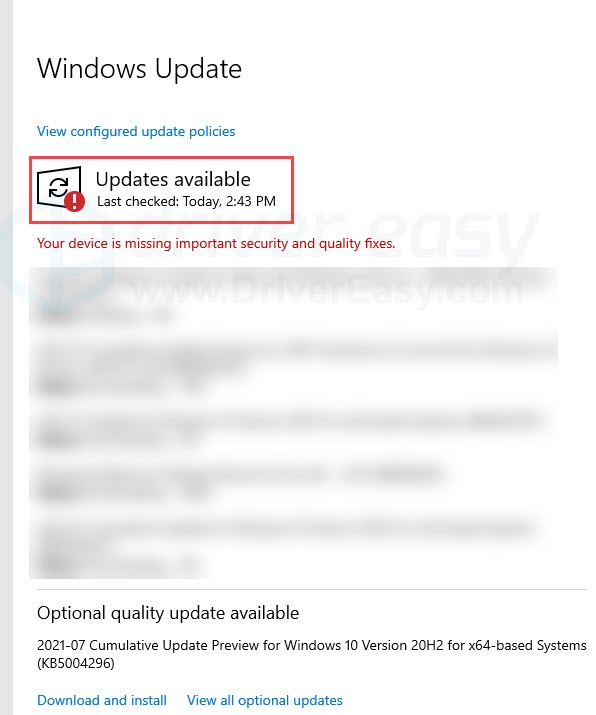
- If there are available updates, Windows will automatically download them for you. Follow instructions to complete the installation if needed.

- You may be prompted to restart your PC. Make sure you save important files in advance.
If you still get the “Windows 11 installation has failed” error, try the next fix.
Fix 3: Update your device drivers
Similar to the above, it’s important to make sure all the hardware drivers are up-to-date before you upgrade to Windows 11. There are two ways you can get the right drivers on your PC: manually or automatically.
Manual driver update – To manually update your drivers, you can update the drivers via Device Manager. Note that Device Manager doesn’t always detect the latest available update for you. You can also search on the manufacturer’s website, for example, for your graphics card. Make sure you download the driver that’s compatible with your Windows version.
Automatic driver update – If you don’t have the time, patience, or computer skills to update your drivers manually, you can, instead, do it automatically with Driver Easy. Driver Easy will automatically recognize your system and find the correct drivers for you, then it will download and install them correctly:
- Download and install Driver Easy.
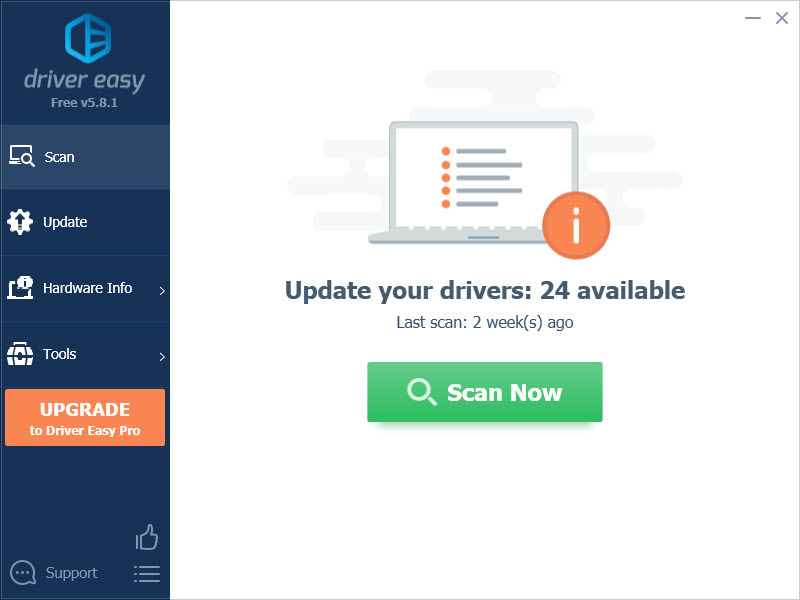
- Run Driver Easy and click the Scan Now button. Driver Easy will then scan your computer and detect any problem drivers.

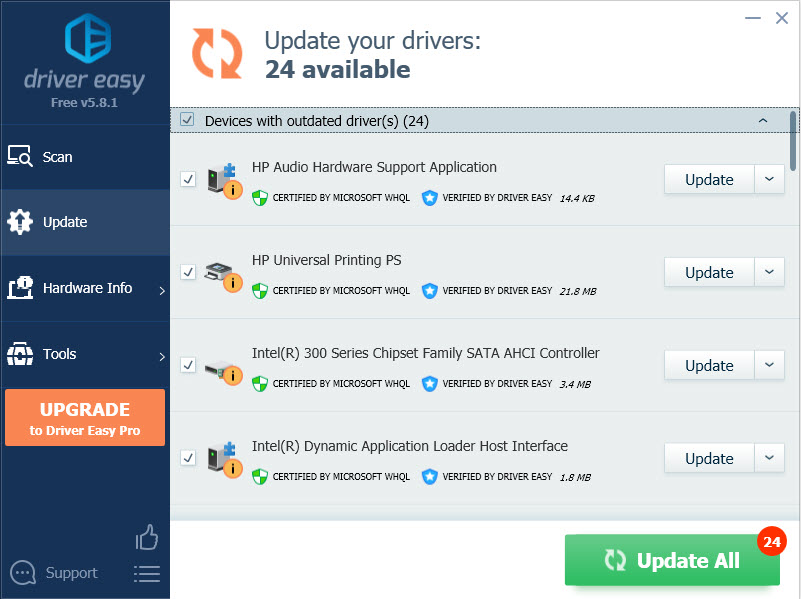
- Click the Update button next to the flagged drivers to automatically download the correct version of the drivers, then you can manually install them (you can do this with the FREE version).
Or click Update All to automatically download and install the correct version of all the drivers that are missing or out of date on your system. (This requires the Pro version which comes with full support and a 30-day money-back guarantee. You’ll be prompted to upgrade when you click Update All.)

If you need assistance, please contact Driver Easy’s support team at support@drivereasy.com.
Restart your PC then try to install Windows 11 again. If the error persists, try the next fix.
Fix 4: Enable TPM 2.0 and Secure Boot
According to the system requirement for Windows 11, TPM 2.0 and the Secure Boot option need to be enabled on your PC. Below are the steps to check the TPM on your PC and enable TPM 2.0 and Secure Boot from BIOS:
Check if your PC has a TPM 2.0 chip
- Press the Windows key and R to invoke the Run box.
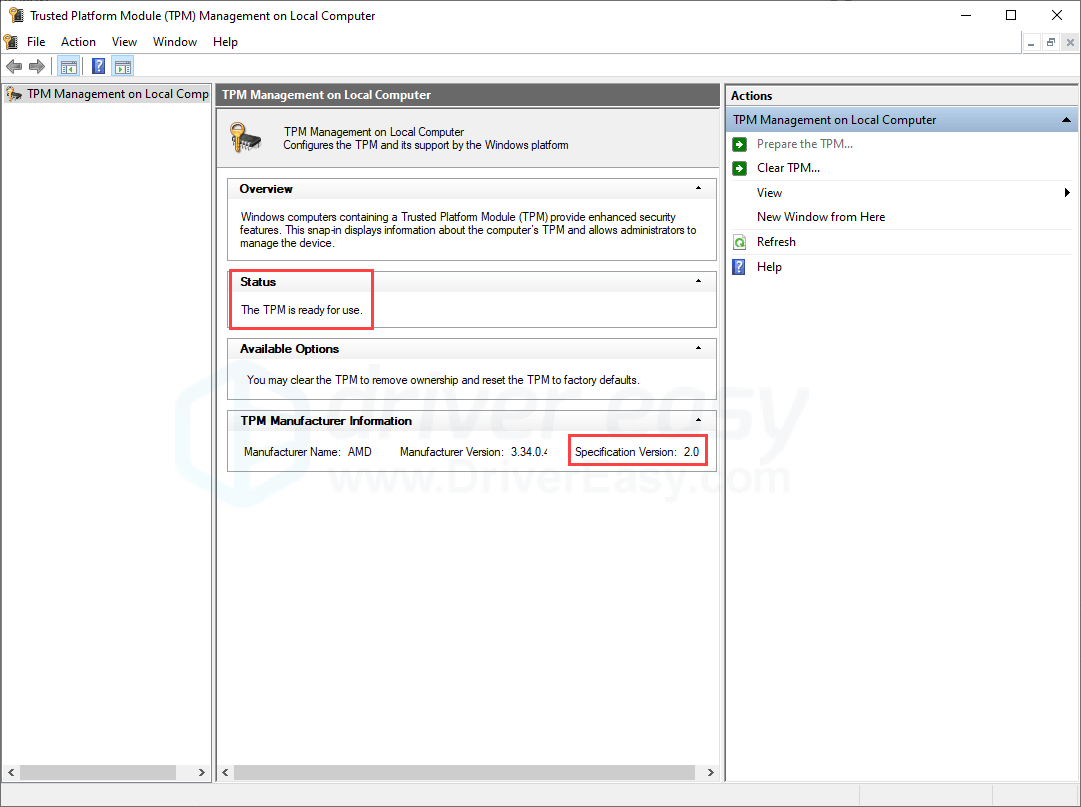
- Type in tpm.msc, then click OK.
- If the TPM 2.0 is already enabled on your PC, you should see the following results with ” The TPM is ready for use” and “Specification Version: 2.0“.

If your PC doesn’t have a compatible TPM chip, the result may show “Compatible TPM cannot be found”. You can jump to Fix 5 to bypass TPM and Secure Boot check.
Enter BIOS
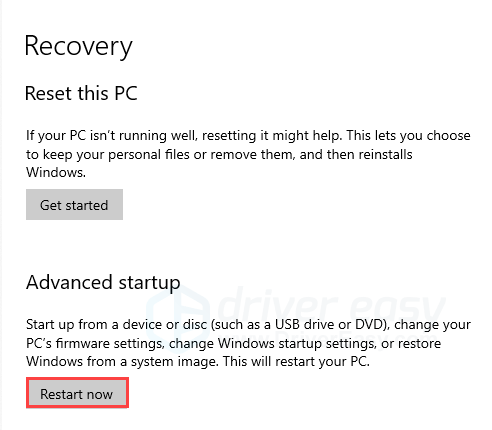
- Press the Windows key to open the search menu, type recovery, then click Recovery options.
- Under Advanced Startup, click Restart now.

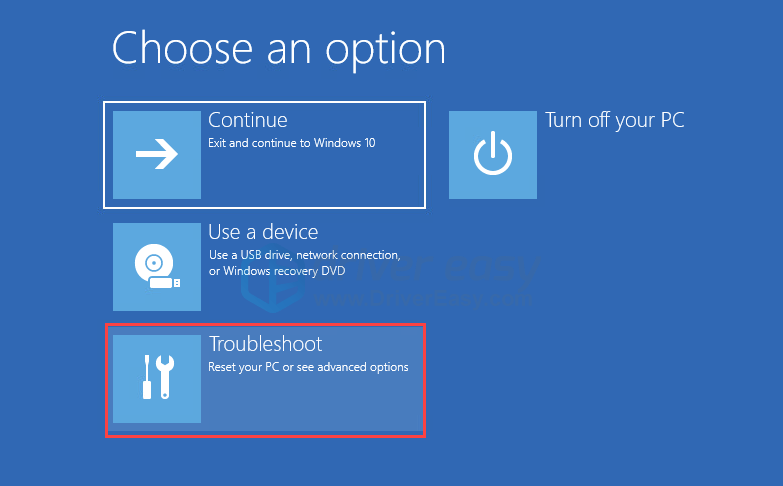
- Click Troubleshoot.
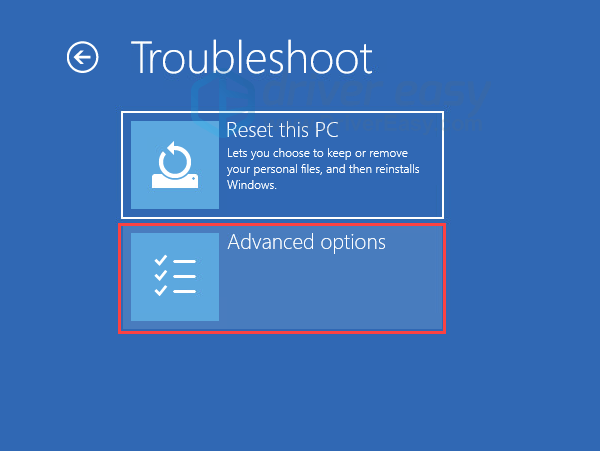
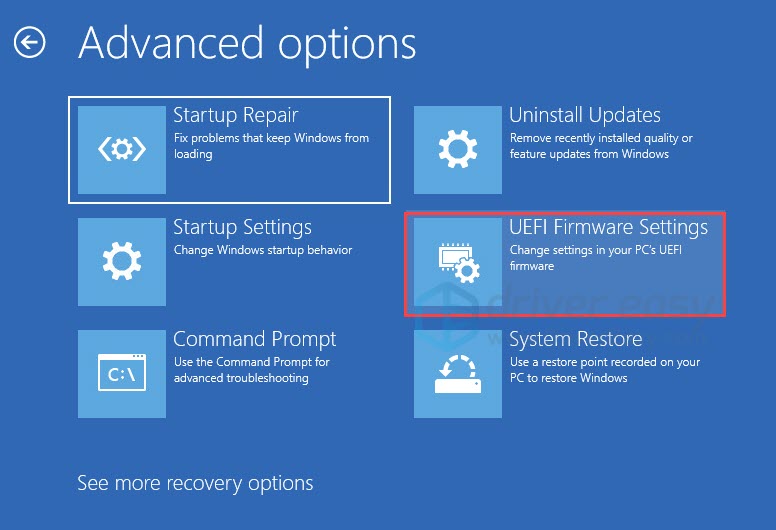
- Select Advanced options.
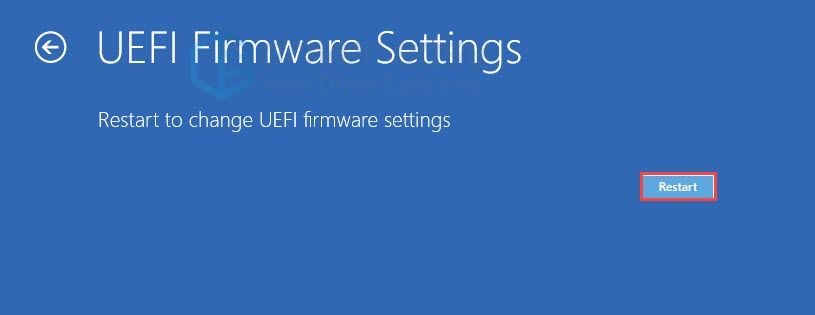
- Click UEFI Firmware Settings.
- Click Restart.
After you enter the BIOS screen, follow the steps below to enable TPM 2.0 and Secure Boot.
Enable TPM 2.0
- Go to the Security or Advanced tab.
- You may see different terms, such as TPM Configuration, TPM 2.0 Security, TPM Support, TPM Device Selection, Intel Platform Trust Technology (PTT), or AMD fTPM Switch.
- Once you find it, set it to enabled.
Enable Secure Boot
- Go to the Boot or Security tab.
- Find Secure Boot and enable it.
- Save the changes and exit to boot your PC.
Fix 5: Bypass TPM and Secure Boot check
If your device doesn’t have a TPM 2.0 chip, then it doesn’t meet the requirement for Windows 11. But it doesn’t mean you can’t upgrade to Windows 11. One trick that makes it possible is to bypass the system check of TPM,and the Secure Boot option when upgrading. Here’s how:
Although this method allows you to install Windows 11 on an unsupported device, it’s not recommended by Microsoft. Your device won’t be entitled to receive future updates on Windows 11, and there could be compatibility issues.
It can be risky to make changes to the registry, so before you proceed, make sure you backup your registry.
- Press the Windows key and R to open the Run box.
- Type in regedit, then click OK. If prompted for permission, click Yes.
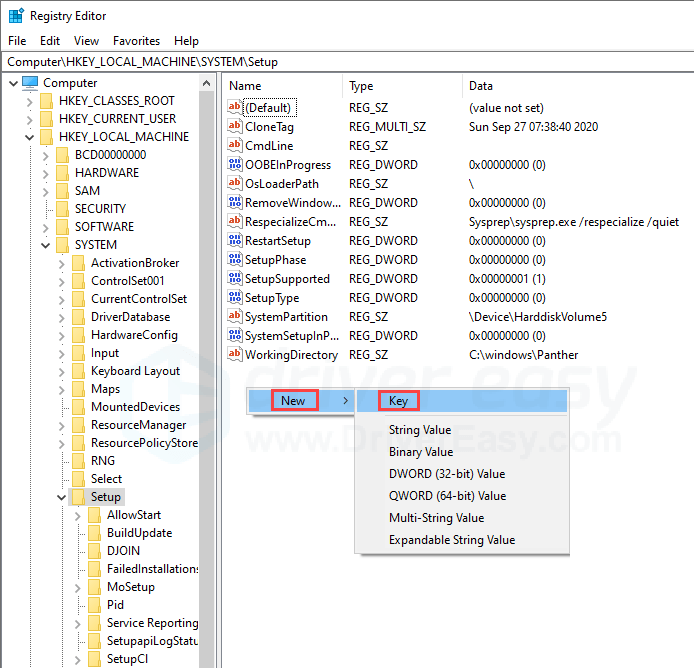
- Copy Computer\HKEY_LOCAL_MACHINE\SYSTEM\Setup and paste it to the address bar, then press Enter.
- Right-click anywhere empty on the right, select New and click Key. Name it as LabConfig.

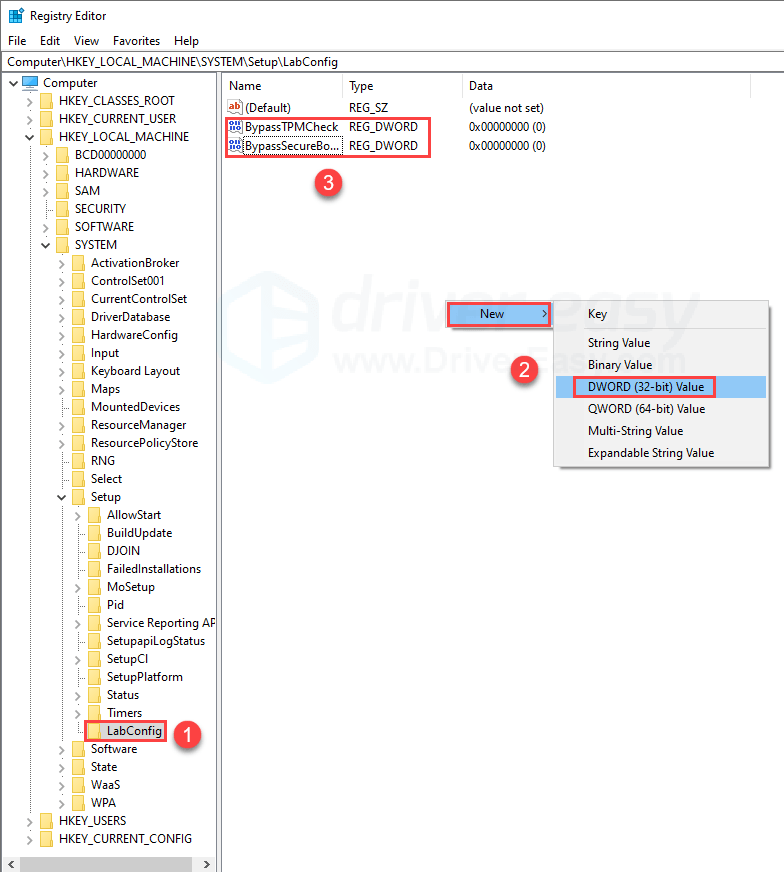
- Select LabConfig, then right-click an empty area on the right and create two DWORD Value options. Name them as BypassTPMCheck and BypassSecureBootCheck respectively.

- Double-click BypassTPMCheck, change the value data to 1, select Decimal, and click OK.
- Repeat the same for BypassSecureBootCheck option. Change the value data to 1, select Decimal, and click OK.
- Exit the Registry editor, and reboot your PC.
- You should now be able to install Windows 11.
Hopefully this article is helpful! Please feel free to leave a comment if you have any questions or suggestions.
5
5 people found this helpful
Some Windows 11 users attempting to utilize the Windows 11 Installation Assistant are reporting that the program closes after a second or so. This problem seems to be prevalent with insider builds of Windows 11 (particularly with Dev insider builds)
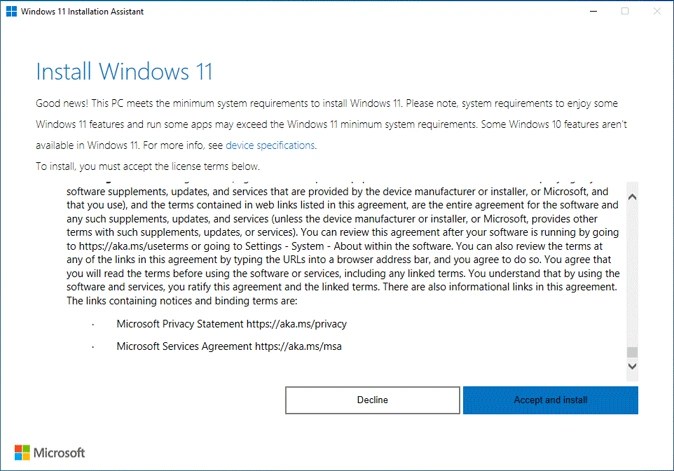
Of course, this problem won’t affect a lot of Windows 11 users, since few of them will have much use with running the Windows 11 Installation assistant tool if they’re already on Windows 11.
Note: You can expect to face this issue if you’re looking to move away from an Insider Development build of Windows 11 to the official release version.
If this scenario is applicable and you find that the Windows 11 Installation assistant closes as soon as you open it, there is one potential workaround that you can use to make sure the window stays open.
Other affected users have discovered that you can ‘force’ the window to stay open by forcing the executable to run in compatibility mode with Windows 7. This method is confirmed to work by a lot of affected users.
How to Prevent the Windows 11 Installation Assistant window from Automatically closing
This method should work for you if you are currently using an insider dev build, but we couldn’t verify its effectiveness for stable releases of Windows 11.
It involves forcing the Windows 11 Installation Assistant window to remain open by forcing the main executable to run in Compatibility Mode with Windows 7:
Here’s what you need to do
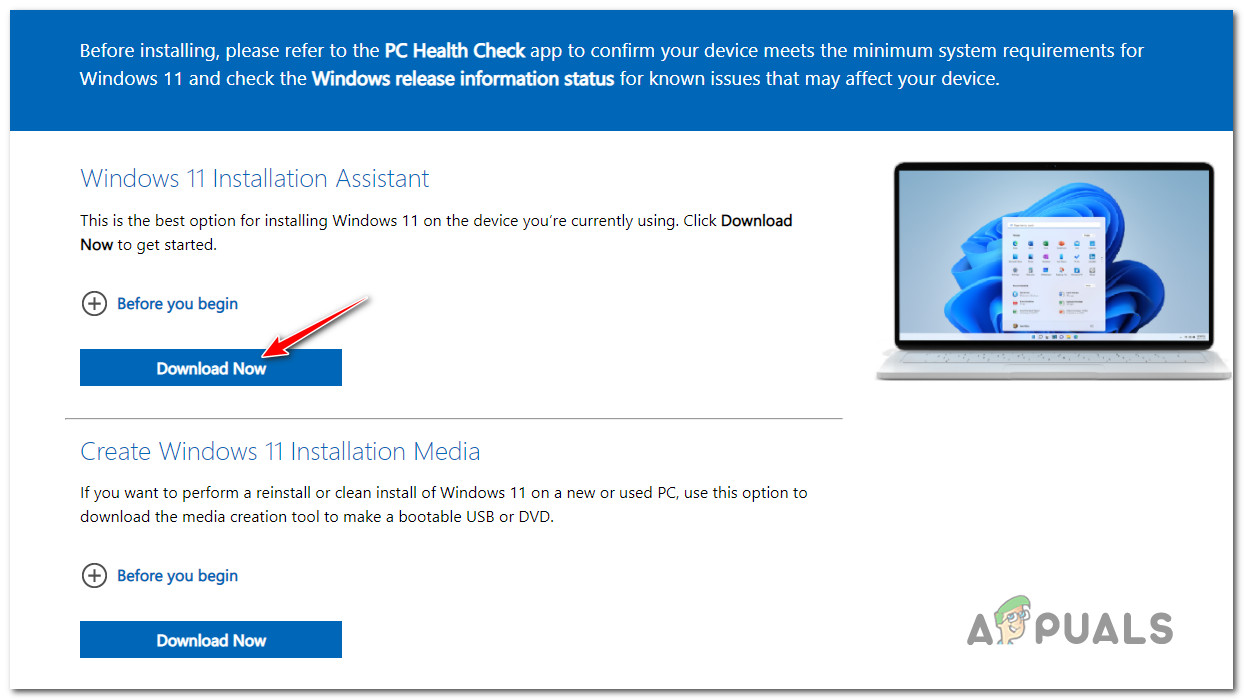
- To make sure you’re using the latest version available for Windows 11 Installation Assistant, open your default browser and visit the official download page for Windows 11.
- Once you’re inside, click on the Download Button directly under Windows 11 Installation Assistant.

Downloading the Windows 11 Installation Assistant - Wait until the installer is downloaded locally, then navigate manually where the download is located. Most likely, you’ll find it inside the download folder.
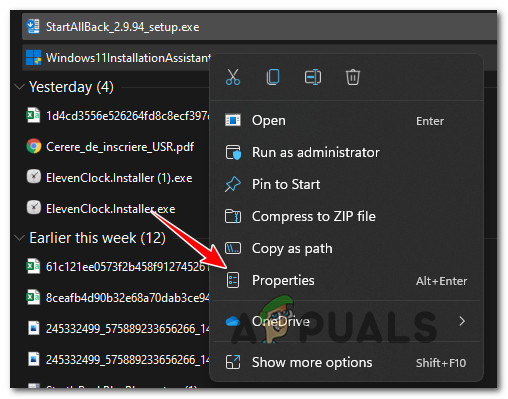
- Next, once you manage to discover the executable, right-click on it and choose Properties from the context menu.

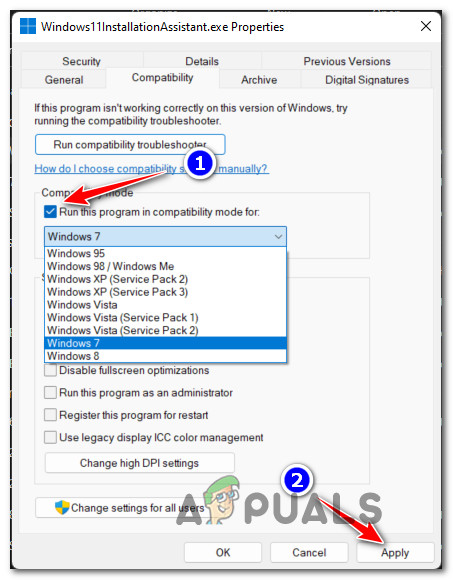
Accessing the Properties screen - Once you’re inside the Properties screen of Windows11 Installation Assistant Properties screen, select the Compatibility tab from the ribbon menu at the top.
- Next, check the box associated with Run this program in compatibility mode for, then select Windows 7 from the drop-down menu below.

Configuring the executable to launch in Compatibility mode with Windows 7 - Hit Apply to save the changes, then run the executable normally and see if the window nor remains open long enough for you to perform your tasks.
Unfortunately for those of you that found this method to be ineffective, the only way is to go for a clean install or repair install procedure:
- Clean install Windows 11
- Repair install Windows 11
Note: In case you are looking to move away from an insider dev build, the only way really is to go for a clean install.
Kamil Anwar
Kamil is a certified MCITP, CCNA (W), CCNA (S) and a former British Computer Society Member with over 9 years of experience Configuring, Deploying and Managing Switches, Firewalls and Domain Controllers also an old-school still active on FreeNode.
В Windows 11 версии 24H2 вы сможете получать важные обновления, включая функции повышенной безопасности, улучшенной производительности и другие новые функции. Однако, многие пользователи столкнулись с проблемами при установке обновления. Они писали о сообщении об ошибке: “Это обновление не может быть загружено и установлено, поскольку оно еще не подготовлено для вашего устройства”.
Причины подобной проблемы могут быть связаны с отсутствием необходимой памяти, несовместимостью, повреждением системных файлов и т.д. Если вы не можете установить Windows 11 24H2, это руководство познакомит вас с проверенными методами решения проблемы.
Часть 1. Почему не получается установить Windows 11 версии 24H2❓
Вероятно вам не удаётся установить это обновление Windows 11, например вы могли столкнуться с остановкой обновления на определённом проценте прогресса и последующим сбоем. В некоторых случаях вы можете увидеть сообщения об ошибках или даже откат к предыдущей версии после успешной установки обновления.
Некоторые распространённые причины проблем при установке Windows 11 24H2 включают:
- Недостаточно места для установки этого обновления.
- Установка заблокирована из-за устаревшего или неподдерживаемого оборудования.
- Обновление не может быть установлено из-за повреждённых системных файлов.
- Ошибки установки могут возникать из-за проблем со службой обновления Windows.
Итак, как же установить Windows 11 версии 24H2? Продолжайте читать, чтобы решить этот вопрос.
Часть 2. Как исправить проблему с установкой Windows 11 24H2?⚒️
Почему обновление 24H2 не загружается? Если вы столкнулись с подобной проблемой, то привёденные ниже решения помогут вам её исправить:
- 1. Установите вручную патч KB5046617
- 2. Освободите место на диске (диск C)
- 3. Запустите средство устранения неполадок Центра обновления Windows и сбросьте компоненты Центра обновления Windows
- 4. Выполните ручную установку с «Помощником по установке Windows 11» (Windows 11 Installation Assistant)
- 5. Вернитесь к предыдущей версии 23H2
- 6. Другие полезные способы загрузки обновления Windows 11 версии 24H2
1. Установите вручную патч KB5046617
Некоторые пользователи получили код ошибки 0x800f0922 или 0x800f0991, когда процесс установки достиг 40% или 35%. Но вы можете выбрать установку версии 24H2 вручную из каталога обновлений Microsoft вместо Центра обновления Windows.
В каталоге обновлений Microsoft представлены официальные патчи для обновлений, которые вы можете загрузить и установить на свой компьютер, и таким образом устранить проблемы с установкой Windows 11 24H2. Для обновления 24H2 вам понадобится патч KB5046617, вот как его можно установить.
✍ Шаги:
-
Перейдите в каталог обновлений Microsoft и найдите патч обновления KB5046617.
-
Найдите и нажмите кнопку “Загрузить” рядом с патчем KB5046617, там также будет указана версия 24H2.
-
После загрузки дважды щёлкните по файлу, чтобы установить его, и перезагрузите компьютер.
2. Освободите место на диске (диск C)
Обновления Windows загружаются и устанавливаются на диск C, и для беспроблемной установки обновления 24H2 необходимо, чтобы на диске C было не менее 64 ГБ свободного места. Если ваш файловый менеджер показывает, что объём свободного места на диске C составляет менее 64 ГБ, вам необходимо освободить место на диске.
✍ Шаги:
-
Перейдите в настройки Windows 11 и выберите “Система” > “Хранилище”.
-
Включите кнопку в разделе “Контроль памяти”, чтобы удалить временные кэши и файлы в Windows 11.
-
Затем перейдите в корзину, щёлкните по ней правой кнопкой мыши и выберите “Очистить корзину”.
-
Также, удалите неиспользуемые приложения и программное обеспечение, которыми вы редко пользуетесь.
3. Запустите средство устранения неполадок Центра обновления Windows и сбросьте компоненты Центра обновления Windows
Ещё можно воспользоваться Средством устранения неполадок для разрешения проблем с Центром обновления Windows. Вероятно, оно сможет исправить основные ошибки или сбои, которые приводят к тому, что Windows 11 версии 24H2 не загружается и не устанавливается. Кроме того, оно может сбросить некоторые компоненты Центра обновления Windows.
✍ Шаги:
-
Нажмите Win+I, чтобы запустить настройки Windows 11 на своём компьютере.
-
Выберите “Система” с левой стороны.
-
Теперь пролистайте вниз до “Средство устранения неполадок” и выберите “Другие средства устранения неполадок”.
-
Найдите в списке пункт “Центр обновления Windows” и нажмите кнопку “Выполнить”.
4. Выполните ручную установку с «Помощником по установке Windows 11» (Windows 11 Installation Assistant)
Если ваш Windows не обновляется автоматически, вы можете воспользоваться помощником по установке, чтобы установить обновление вручную. Этот процесс похож на переустановку всей системы Windows, вы можете избавиться от проблемы “Windows 11 версии 24H2 не устанавливается” следующим образом.
✍ Шаги:
-
Перейдите на официальный веб-сайт Microsoft.
-
Нажмите на кнопку “Загрузить сейчас” в разделе “Windows 11 Installation Assistant”.
-
Дважды щёлкните, чтобы запустить утилиту, и следуйте инструкциям по установке на экране для установки версии 24H2.
5. Вернитесь к предыдущей версии 23H2
Предыдущая версия 23H2 была стабильной, в ней было меньше проблем с обновлениями, и, вероятно, она была более совместима с текущей прошивкой и аппаратным обеспечением вашего ПК. Итак, если вы установили нестабильное обновление 24H2 и хотите вернуться к стабильной работе, вы можете воспользоваться функцией отката обновления, чтобы вернуться к предыдущей версии Windows 11.
✍ Шаги:
-
Зайдите в настройки компьютера. Выберите “Система”, затем “Восстановление”.
-
Пролистайте вниз до надписи “Параметры восстановления” и выберите опцию “Вернуться назад”.
-
Нажимайте кнопку “Далее”, пока не увидите кнопку “Вернуться к предыдущей сборке”. Нажмите “Нет, спасибо”, если появится запрос на обновление.
6. Другие полезные способы загрузки обновления Windows 11 версии 24H2
Существует несколько альтернативных способов загрузки обновления. Несмотря на то, что это рабочие способы, всегда рекомендуется использовать официальный метод обновления, чтобы обезопасить себя от уязвимостей безопасности системы. Альтернативные способы получения обновления:
-
Программа Windows Insider
-
Установка при помощи ISO-файла
Чтобы узнать больше об этих методах, пожалуйста, ознакомьтесь со следующим пошаговым руководством: 3 способа обновления до Windows 11 24H2 на ПК.
Часть 3. Подготовка: Как создать резервную копию данных перед установкой Windows 11 24H2
Перед устранением неполадок или установкой вам следует создать резервную копию данных, чтобы предотвратить их потерю. Рекомендуется обратиться за помощью к специализированному программному обеспечению для резервного копирования, такому как 4DDiG Partition Manager.
Это универсальный инструмент для управления дисками и для резервного копирования. При помощи него можно копировать данные, переносить ОС на другие диски, создавать WinPE-диск для резервного копирования с незагружаемого компьютера, восстанавливать удалённые или отсутствующие разделы и т.д. Благодаря интуитивно понятному интерфейсу и простоте в использовании, эта универсальная программа может обеспечить безопасность данных при подготовке к обновлению Windows всего несколькими щелчками мыши. Одним словом, она отлично подходит для новичков.
Основные возможности 4DDiG Partition Manager
- Копирование диска с операционной системой, диска с данными и разделами для резервного копирования
- Перенос операционной системы на SSD-накопитель или несколько устройств без переустановки системы
- Объединение, форматирование, разделение, расширение, сжатие, удаление, создание, восстановление и изменение размера разделов
- Устранение проблем, связанных с разделами и ошибками загрузки
- Простое создание загрузочных дисков Windows для установки системы
- Возможность форматирования дисков в нескольких форматах файловой системы: NTFS, FAT32, exFAT и так далее
- Совместимость со многими компьютерами и устройствами хранения данных
- Надёжный и простой в использовании инструмент как для новичков, так и для профессиональных пользователей
Как создать резервную копию данных с 4DDiG Partition Manager
-
В программе 4DDiG Partition Manager перейдите в меню “Клонировать диск” и нажмите “Клонировать диск с данными/операционной системой”.
-
Выберите диск для записи данных и нажмите “Далее”, чтобы продолжить. Если вам будет предложено, чтобы процесс копирования удалил исходные данные на выбранном диске, пожалуйста, нажмите “Подтвердить”, если выбранный диск пуст или его данные перенесены на другие диски.
-
Теперь вы можете просмотреть, как будет выглядеть выбранный диск после копирования. Выберите место хранения, в которое вы хотите скопировать диск с операционной системой. После этого нажмите кнопку «Начать».
-
Подождите, пока 4DDiG Partition Manager скопирует диск. После успешного завершения процесса нажмите кнопку «Готово».
Часть 4. Часто задаваемые вопросы о проблемах с установкой Windows 11 24H2
В1: Как установить Windows 11 24H2 на неподдерживаемое оборудование?
Используйте сторонние инструменты, такие как Rufus, чтобы обойти проверку оборудования и установить обновление.
В2: Как исправить проблему с загрузкой Windows после обновления 24H2?
Запустите «Восстановление при загрузке» или перезагрузите систему из меню «Дополнительные параметры загрузки».
В3: Как проверить возможность установки обновления Windows 11 24H2?
Перейдите в «Настройки» > «Система» > «О системе», чтобы узнать, подходит ли ваша система для обновления.
В4: Как установить Windows 11 24H2?
Вы можете воспользоваться Центром обновления Windows или загрузить ISO-файл обновления 24H2 для установки с официального веб-сайта Microsoft.
Заключительные мысли
Если у вас возникла проблема с установкой обновления 24H2 для Windows 11, больше не беспокойтесь, поскольку её легко решить. Эта инструкция поможет вам провести успешную установку системы, начиная с обновления вручную и заканчивая освобождением места на диске. 4DDiG Partition Manager – отличный инструмент для управления данными и обеспечения безопасности. Эта программа незаменима для резервного копирования, копирования диска или смены операционной системы.
Александр Кокин (старший редактор)
Александр Кокин, главный редактор 4DDiG, занимается предоставлением наилучших решений для проблем, связанных с Windows и Mac, включая восстановление данных, ремонт, исправление ошибок.
While trying to install the Windows update, are you encountering Windows 11 installation has failed error? If so, you are not alone; several other users have reported facing a similar problem. Luckily, the problem is fixable, and you can do it on your own by following the steps mentioned below.
However, before we learn how to troubleshoot the error, let us narrow down the reasons that cause the installation of Windows 11 to fail.
Reasons for Windows 11 Installation Failed
The error can be caused due to multiple reasons. Here we list down the most common ones that will help you understand the reason behind the blocked Windows 11 installation task.
- The external hard drive is attached to the PC.
- Outdated or corrupt device drivers.
- Either the PC is incompatible with Windows 11 or does not meet system requirements.
- Faulty Windows 11 ISO file downloaded or the Insider preview build has problems.
- Issues with disk, UEFI, secure boot, or MBR.
- Insufficient disk space.
- Interference caused by the antivirus or third-party application.
- Copying Windows installation files twice.
- Corrupt Boot Manager.
- Incorrect File extension.
Common Windows 11 Installation Problems
- Installation fails without an error code due to antivirus software.
- Windows 11 installation has failed ISO.
- The setup installation has failed.
- Cannot install Windows 11 – Error 0xc1900101.
- Installation Failed in Safe_OS Phase.
- The setup has failed to validate the product key.
- Windows Installer error.
- This PC can’t run Windows 11.
Whatever the error message or reason is, we will help fix it. Follow the fixes explained individually in the correct order to find the perfect solution for you.
Read Also: Exploring Windows 11: 5 Common Problems & Fixes
What Does the Meaning of This Error
The error means that the installation process was unable to complete successfully due to various system-related issues. This error can occur during an upgrade from Windows 10 or a fresh installation of Windows 11.
Best Ways To Fix Windows 11 Installation Failed Error
To troubleshoot the Windows 11 installation stuck, here are some basic fixes, followed by the complex ones. Before going with the technical ones, follow the quick tips below:
Basic Tips to Fix Windows 11 Upgrade and Installation Errors
Fix 1 – Disconnect all connected external hard drives.
Fix 2 – Check the copy of Windows 11 you are using. It must be genuine.
Fix 3 – Scan the PC for malware infection. For this, you can use the antivirus program you are using or can use the T9 antivirus.
Fix 4 – Update your device drivers
After performing the above fixes one last thing you need to try before getting into technicalities is to update the hardware drivers. You can update them either manually or automatically.
Manually Update Driver –
To update drivers manually you can use Device Manager, Windows built-in utility to keep drivers updated. Press Windows + X select Device Manager and update the hardware drivers.
However, it is not easy to update drivers manually, as you will have to update each driver individually. Also, there is no guarantee that you will get the latest available update. To deal with this you can visit the manufacturer’s website, and download the driver. But for that, you need to have system and device details, which again is not easy and requires a lot of time and effort.
If you want to avoid this, then the best thing you can do is update drivers automatically.
Automatically Update Drivers –
Advanced Driver Updater is one of the best driver updating tools for Windows. Using it you can scan the system for outdated drivers and update them without any hassle. The tool shows the latest and compatible driver updates and even takes backups of drivers and allows scheduling driver scanning. To use it, follow these steps:
Features, User Reviews, Pros & Cons, And More about the tool
1. Download, install, and run Advanced Driver Updater.
2. To scan the PC click Start Scan Now and wait for the process to finish.

3. Click on Update driver next to the driver you want to update. However, if you want to update all drivers at once you can do it by switching to the paid version which comes with a 60-day money-back guarantee and technical support. You can contact the support team for technical support at support@systweak.com.

4. Restart the PC and try to install Windows 11. The error should be fixed. If it persists we’ve other fixes, try them.
After performing these basic steps, restart steps restart your computer and try reinstalling Windows 11. Suppose this helps; there is no need to move further. You can enjoy working on Windows 11. However, if this does not help, continue reading to implement the fixes explained below:
Technical Troubleshooting To Fix Windows 11 Installation Stuck, Error
Method 1 – Check the PC for compatibility
Most PC users do not know that to install Windows 11; their PC should meet the following system requirements.
- Processor: 1 gigahertz (GHz) or faster with 2 or more cores on a compatible 64-bit processor or System on a Chip (SoC)
- RAM: 4 gigabytes (GB)
- Storage: 64 GB or larger storage device
- System firmware: UEFI, Secure Boot capable
- TPM: Trusted Platform Module (TPM) version 2.0
- Graphics card: Compatible with DirectX 12 or later with WDDM 2.0 driver
- Display: High definition (720p) display that is greater than 9” diagonally, 8 bits per color channel
- Internet connection and Microsoft accounts: Windows 11 Home edition requires internet connectivity and a Microsoft account to complete device setup on first use.

If your PC fails to meet them, you will face Windows 11 install failure and other errors, as shown in the screenshot below.

To check if your computer meets the requirements
Note : Microsoft provides a step-by-step guide for you to open the PC Health Checkup app on its official webpage
1. Install the PC Health Checkup app if not already installed.
2. Press Windows key + S and search for PC Health Check. Select the best search result.
3. Click Check Now.

4. The app will show whether your PC is compatible with Windows 11 or not.

If it is compatible and you are still struggling with Windows 11 and can’t install an update, it seems TPM2.0 and Secure Boot are missing from the BIOS.
What is TPM 2.0?
TPM is a computer chip that offers hardware-based security. When the BIOS/UEFI and CPU do not fall under Micrpspft’s permitted range, you cannot install Windows 11. Following the list of supported AMD and Intel CPU
- 8th Generation Intel Core Processors and Newer Products
- AMD Ryzen Processor
- Ryzen 3000 Series and Newer Products
Steps to check TPM 2.0 on your PC
1. Press Windows + R to open the Run window.
2. Type tpm.msc and press the Enter key.
3. This will open the TPM management window. Here, under the Status tab, if you can read The TPM is ready for use it means TPM is enabled. Verify the TPM version from under the TPM Manufacturer Information.

4. If TPM is compatible but disabled, you will get a message ‘Compatible TPM can’t be found’. This means you must log in to the BIOS to enable it.

To do so, follow these steps.
Enabling TPM 2.0 Via BIOS
1. Press the Shift key while clicking the Restart option.
2. This will help you access the boot page. Here, select Troubleshoot.

3. Click Advanced options.

4. Click UEFI Firmware Settings and press Restart to enter the BIOS.

5. If you cannot find TPM look for PTT as the name may differ depending on the motherboard. However, remember both function the same. Click Settings > Security > TPM 20. Security and enable TPM.
Note : On certain systems, you may find terms like TPM Configuration, TPM Support, TPM Device Selection, Intel Platform Trust Technology (PTT), or AMD fTPM Switch. Select either to enable TPM.

Enable Secure Boot
1. Click the Boot or Security tab.
2. Look for Secure Boot and enable it.
3. Save the change and exit to restart the PC.
Method 2 – Perform a Clean Boot
Most of the time, third-party applications interact with your Windows installation. To ensure these programs do not interfere with Windows installation, perform a clean boot. To do so, follow these steps:
1. Press Windows + R to open the Run window.
2. Type msconfig and press the Enter key.

3. Click on the Boot tab. Uncheck Safe boot > click Apply.

4. Click the General tab and select the Selective Startup option.
5. Uncheck the Load startup items option. Click Apply.

6. Click the Services tab > select the box next to Hide All Microsoft Services > and click Disable All.

7. Click the Startup tab > select Open Task Manager.

8. Now select the items one by one and Disable them.
9. Next, enable each item individually and Restart the PC after enabling each item.

This will help fix Windows 11 installation failure with no error code issue and help narrow down the program that is creating issues.
Method 3 – Update Windows
Before you try to upgrade to Windows 11, ensure you have all the Windows updates installed. To check if you have them all, follow these steps:
1. Press Windows + I to open Windows Settings.
2. Double click Update & Security.
3. Windows Updates > Check for updates.

4. Windows now scan for available updates. If you have all the updates installed you will get You’re up to date message. However, it is best that you click View all optional updates and install them too. However, if any updates are missing Windows will install them automatically. Follow these steps until you get You’re up to date prompt.

5. Restart the PC to save changes. Now try to update Windows, you should not get the “Windows 11 installation has failed” error. However, if the error persists, trypersists try the next fix.
Method 4 – Uninstall the Language Pack
Some experts have discovered that there are certain language packs installed on Windows 10 that are not supported by Windows 11. Hence, it is suggested that you uninstall the language pack before attempting to install Windows 11. Here are the steps –
1. Press Windows + S to open the search box and type “change display language”. Click on the same option in the search results.

2. Next, choose English (US).

3. Now, type “Uninstall display language” in the search box and a new box will open. Click on the Install/Uninstall languages button.

4. Now locate the alternative language and delete it from your PC.
5. Restart the Computer.
Method 5 – Create Installation Media and Setup
Another method to fix the error is to create a new installation media. Here is what you need to do –
1. Register for the Windows 10/11 upgrade and choose the free version.
2. Ensure that you have ample free space on your hard drive.
3. Visit the Microsoft official website and download the Media Creation Tool. Remember to choose 32-bit or 64-bit depending on your PC’s architecture.
4. Double-click on the file downloaded and choose “Create installation media for another PC”.
5. Click on Next and follow the onscreen instructions to create the installation media.
Method 6 – Uninstall GPU to fix error 0xc1900101
There have been a few users who have received the “The installation failed in the SAFE_OS phase 0xc1900101” error while installing Windows 11. This is a rare error and the exact cause of this error is not yet determined. However, we have a few steps that have helped others with the same error.
1. Remove all the external devices attached to your PC (except Mouse & Keyboard).
2. Uninstall The GPU Driver by pressing Win + X to open the Power menu and select Device Manager.
3. Click on Display Adapters, to extend and reveal your graphics card.
4. Right-click on the Intel Graphics card and choose Uninstall Device from the context menu.

5. Next, reboot your computer and enter the BIOS by pressing the F9/F10/F11 key.
6. Locate Active Core Settings under the Processor section and modify the Active Processor Core to 1. Remember to save and exit the BIOS settings.

7. Reboot your PC.
Method 7 – Upgrade System Disk
Upgrading your hard drive involves replacing your current disk with a newer one. This will help improve storage, speed, and performance. Here is what you need to do to upgrade the system disk.
1. Select a hard disk that is better than your current hard disk.
2. Backup your important data on cloud storage or external disk.
3. Next, clone the existing hard disk to the new one by choosing the option (Keep Everything).
Note : You can use any third-party disk cloning software. (EaseUS Todo Backup, AOMEI Backupper)
4. If cloning is not possible then you can clean-install Windows 11 by creating a new disk as explained in Method 5.
Note : You will have to physically replace the hard disk. If you are not too confident then we recommend you get a hardware technician to do it for you.
Method 8 – Reinstall Windows 11
Reinstalling Windows 11 is very easy if you follow the steps and do not miss even a single one. Here are the steps –
Reboot your PC and enter the BIOS.
You need to set the Boot Priority to either USB or DVD depending on the Windows installation media you possess.
1. Exit the BIOS and insert the installation media.
2. The PC will boot from the new option you have selected.
3. In the new screen, choose Language, Time, and Currency format, Keyboard, and then click on the Next button.

4. Click on Install Now and then select “I don’t have a product key”.

5. Choose the Windows 11 edition and then click on Next.

6. Accept the Microsoft license agreement and click on Next.
7. Choose the “Install Windows Only” option.

8. Select the hard disk partition and click on Next.

9. The Windows installation process will now begin. Wait for the entire process to complete which will include a reboot of your PC. Remember to unplug the installation media when your PC reboots.
Method 9 – Bypass TPM and Secure Boot Check
If you found that your device doesn’t have TPM 2.0 chip you must be thinking that you can’t use Windows 11, right? Luckily that is not the case. You can update to Windows 11 using a trick that helps bypass system checks for TPM and Secure Boot.
Note : This step will help upgrade to Windows 11 but you will not be able to receive Windows 11 updates.
Before we proceed we suggest taking a backup of the registry as we will make some changes to the Windows registry. To backup the Windows registry press Windows + S and type regedit and press the Enter key. This will open Registry Editor. Click Computer > Right-click Export. This will back up all the keys and subkeys.
1. Once the keys are exported, copy and paste the following command in the address bar Computer\HKEY_LOCAL_MACHINE\SYSTEM\Setup and press the Enter key.

2. Right-click on the blank space > select New > key > Name it as LabConfig.

3. Select LabConfig, right-click on the blank space on the right, and create two DWORD (32-bit) Value options. Name them as BypassTPMCheck and BypassSecureBootCheck.

4. Double-click BypassTPMCheck, change the value data to 1 and select Decimal > OK.

5. Do the same for BypassSecureBootCheck option. Change the value data to 1, select Decimal > click OK.
6. Close Registry Editor and then try to install Windows 11. This should work and you should no longer see the side-by-side configuration is incorrect in Windows 11.
Fixed Windows 11 Installation has Failed to Start
We hope the above solution helps to fix the Windows 11 installation failure or upgrade failed error. If this doesn’t help we suggest optimizing the PC and running a system file checker to fix corrupt system files.
Please let us know which fix worked for you in the comments.
Recommended:
Fixed – “We Couldn’t Find Any Drives During Windows 11 Installation
9+ Ways To Fix Windows Stuck on “Checking for Updates”
Все способы:
- Способ 1: Обеспечение совместимости
- Способ 2: Очистка кеша обновлений
- Способ 3: Замена дистрибутива
- Не приходит обновление до Windows 11
- Дополнительные решения
- Вопросы и ответы: 0
Способ 1: Обеспечение совместимости
Несовместимость с программным или аппаратным обеспечением – одна из основных причин проблем с установкой или обновлением до Windows 11. В большинстве случае эта проблема успешно решается.
- Если Windows 11 устанавливается путем обновления предыдущего выпуска, в данном случае Windows 10, сначала обновите Windows 10 до последней сборки и установите все накопительные обновления через «Центр обновлений».
Читайте также: Обновление Windows 10 до последней версии
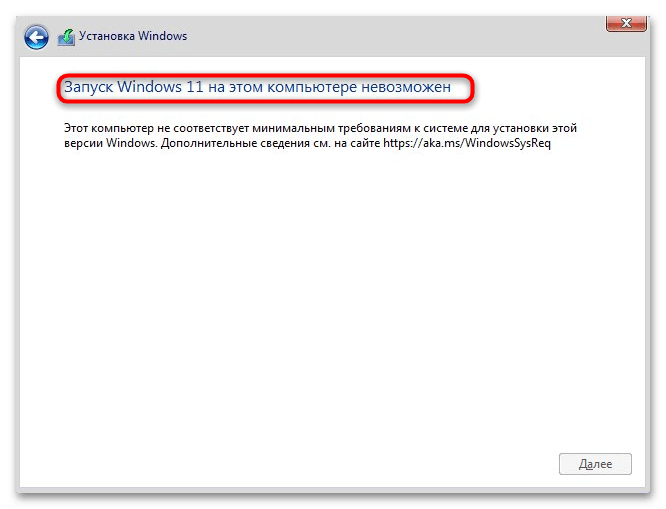
- Если в начале установки Виндовс 11 в окне мастера появляется сообщение «Этот компьютер не соответствует минимальным требованиям» или «Запуск Windows 11 на этом компьютере невозможен», воспользуйтесь нашими инструкциями по обходу ограничений на установку Windows на неподдерживаемые компьютеры.
Подробнее:
Как установить Windows 11 без TPM 2.0 и Secure Boot
Обход ограничений Windows 11 в Rufus
Как отключить проверку совместимости с Windows 11
Способ 2: Очистка кеша обновлений
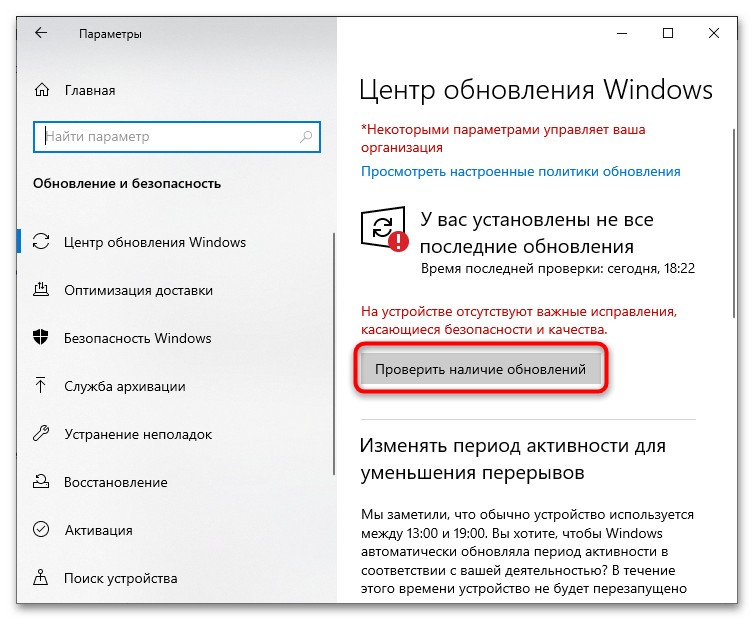
При появлении ошибок установки Windows 11 путем обновления Windows 10 средствами «Центра обновлений» рекомендуется выполнить очистку папки с загруженными файлами новой системы.
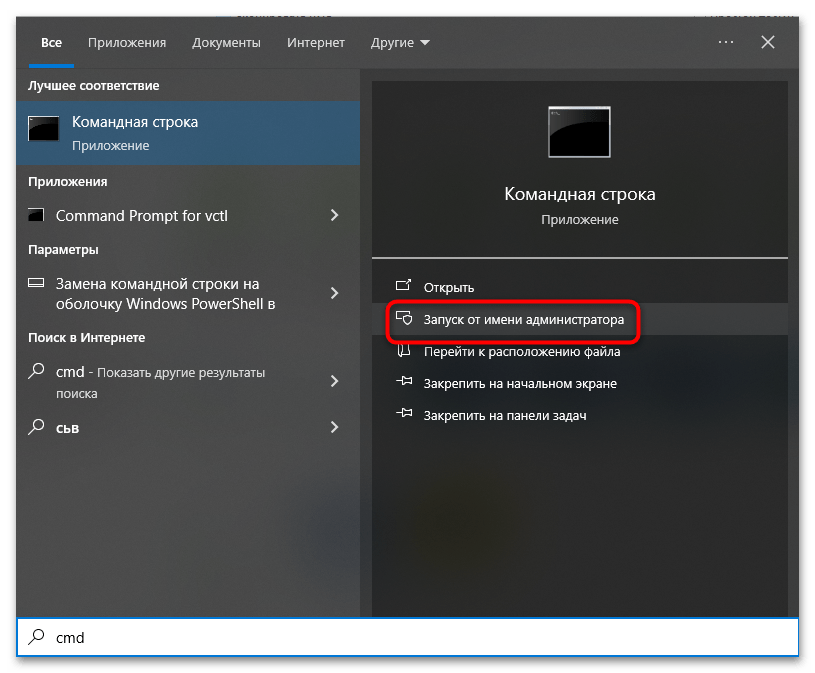
- Откройте от имени администратора «Командную строку» из поиска Виндовс.
- Выполните одну за другой следующие команды:
net stop wuauservcd C:\Windows\SoftwareDistributiondel /f /s /q Downloadnet start wuauserv
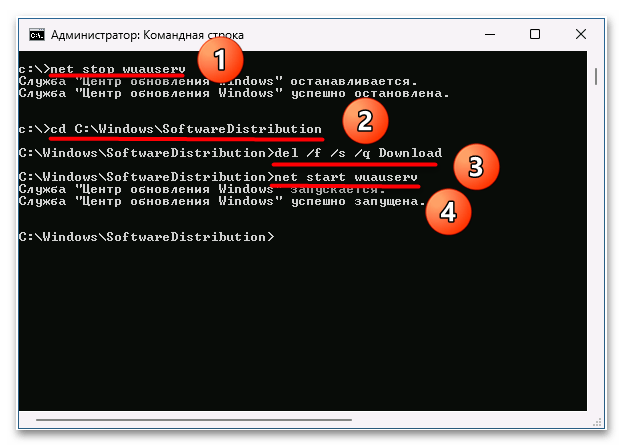
После этого можно будет пробовать обновляться до Windows 11 через «Центр обновлений».
Способ 3: Замена дистрибутива
Причиной ошибки может также стать некорректная запись установочной флешки и использование неофициальных сборок. На наличие повреждений дистрибутива могут указывать сообщения об отсутствии лицензионного соглашения, драйверов или библиотек, появление синего экрана в процессе установки и так далее. Поэтому рекомендуется использовать только официальные дистрибутивы Виндовс 11, в случае записи образа на флешку сторонними программами желательно использовать опцию верификации, если таковая доступна.
Читайте также:
Установка Windows 11 с флешки
Создание загрузочной флешки с Windows 11
Не приходит обновление до Windows 11
В некоторых ситуациях пользователь вообще не может обновиться до Виндовс 11, поскольку это самое обновление в принципе не приходит на его компьютер. Причин этому есть сразу несколько: уже упомянутая несовместимость, некорректные настройки операционной системы, сбои в работе отвечающих за эту процедуру служб и приложений. Все неполадки и их решения мы рассмотрели в отдельном материале по ссылке ниже.
Подробнее: Почему не приходит обновление Windows 11
Дополнительные решения
Помимо перечисленных выше основных, существуют и другие причины проблем с установкой Windows 11.
- Исключите неполадки с оборудованием: проверьте на предмет ошибок HDD/SSD и оперативную память. Как это сделать, читайте по ссылкам ниже:
Подробнее:
Как выполнить диагностику жесткого диска в Windows 10
Проверяем SSD на наличие ошибок
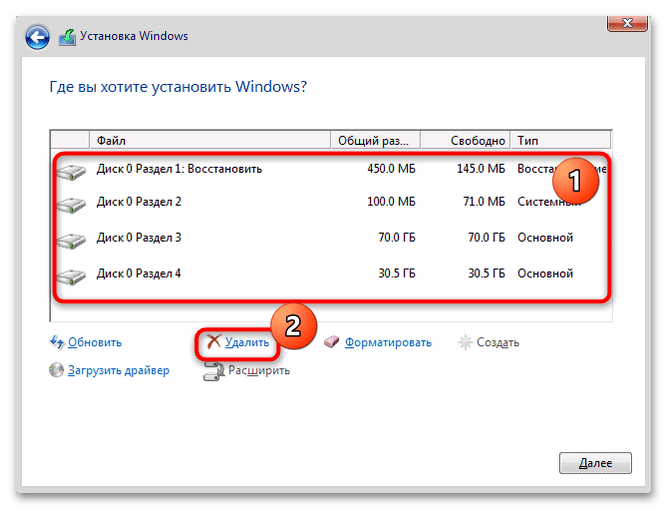
Как проверить оперативную память в Windows 10 - Возможно, на диске неправильно выбран раздел. Если уверены, что он выбран верно, в окне мастера установки удалите его и все служебные разделы и попробуйте установить Windows 11 в полученное нераспределенное пространство.
- Сбросьте параметры BIOS/UEFI к дефолтным значениям. Эффективнее всего выполнить такой сброс, полностью выключив компьютер и вытащив на 10-15 минут питающую BIOS батарейку CMOS.
Подробнее: Как сбросить настройки БИОС
- Попробуйте вставить загрузочную флешку в другой разъем, лучше всего расположенный на задней панели.
- Отключите всю ненужную периферию: принтеры, дополнительные жесткие диски, флешки, USB-адаптеры, модемы и цифровые TV.
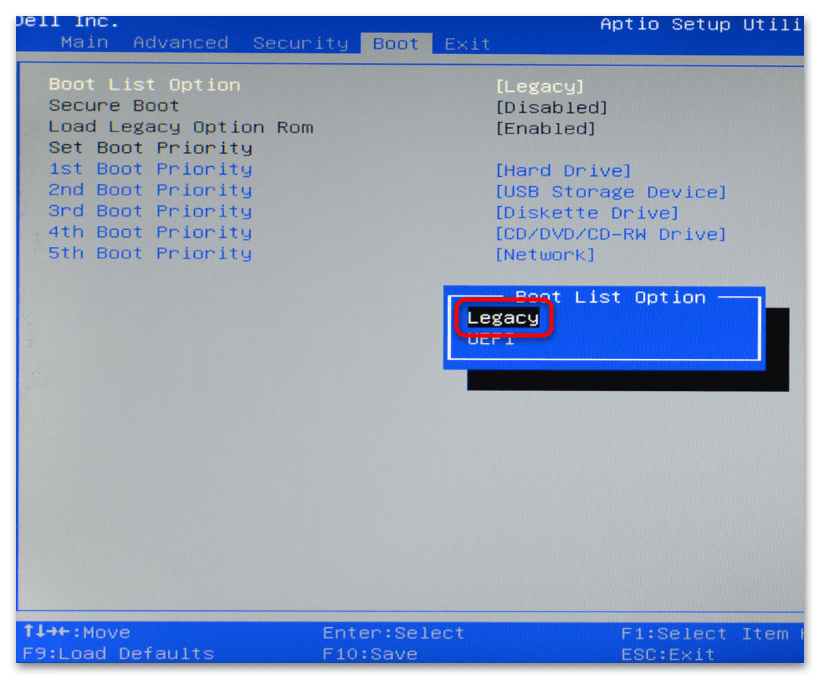
- Если в BIOS выставлен режим загрузки UEFI, переключитесь в режим Legacy. Расположение этой настройки будет отличаться в зависимости от модели материнской платы. Например, в классическом старом BIOS для переключения в режим совместимости нужно найти и отключить опцию «Secure Boot». Также отвечающая за переключение между режимами опция может именоваться «Boot Option Filter», «Boot Mode», «Boot Device Control».
Читайте также: Отключаем UEFI Secure Boot в BIOS
- Ошибка установки бывает вызвана отсутствием в составе официального дистрибутива Виндовс 11 подходящих драйверов. Случаи очень редкие, если они и встречаются, то только при установке Windows 11 на эксклюзивное оборудование. Проблема решается путем полуавтоматической установки оригинальных недостающих драйверов, предварительно скопированных в отдельную папку на установочной флешке. В таких случаях операционная система обычно сама сообщает о проблеме и предлагает выбрать каталог с драйверами.
Причинами проблем с установкой Windows 11 также могут стать несовместимость драйверов, ошибки подключения к «Центру обновлений», антивирусное ПО, фоновая работа некоторых приложений и служб. При получении ошибки обращайте внимание на ее код – по нему можно найти подходящее решение, в том числе через поиск на нашем сайте.
Читайте также: Методы исправления ошибки 0xc0000005 при установке Windows 11
Наша группа в TelegramПолезные советы и помощь