
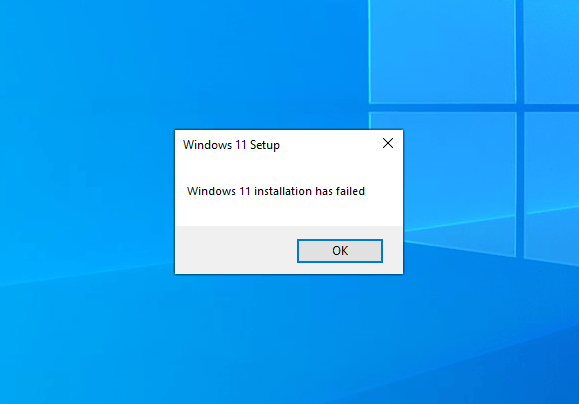
Ready to update to Windows 11 but you’re getting the “Windows 11 installation has failed” error? Many users have reported the exact problem, and luckily it’s not a difficult one to solve. If you’re in the same boat, read on to find out how to fix the error and update to Windows 11.
Try these fixes…
1: Remove external hardware
2: Run Windows Update
3: Update your device drivers
4: Enable TPM 2.0 and Secure Boot
5: Bypass TPM and Secure Boot check
Windows 11 system requirements
Before we dive into anything advanced and try the fixes, you need to make sure that your PC is eligible to update to Windows 11. You can either refer to the table below, or download the PC Health Check app from Microsoft to check compatibility.
| Processor | 1 gigahertz (GHz) or faster with 2 or more cores on a compatible 64-bit processor or System on a Chip (SoC) |
| RAM | 4 GB |
| Storage | At least 64 GB |
| System firmware | UEFI, Secure Boot capable |
| TPM | Trusted Platform Module (TPM) version 2.0 |
| Graphics card | Compatible with DirectX 12 or later with WDDM 2.0 driver |
| Display | High definition (720p) display that is greater than 9” diagonally, 8 bits per color channel. |
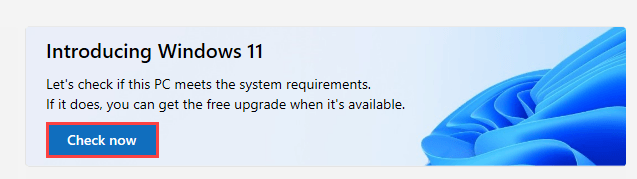
If you’re using the PC Health Check app, simply follow these steps:
- Download and install the PC Health Check app.
- Run the app, and click Check now.

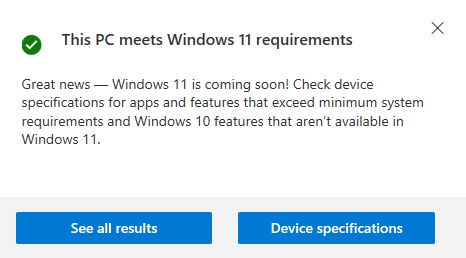
- The app will show you if your PC is eligible for Windows 11 upgrade or not.

Fix 1: Remove external hardware
A quick troubleshooting tip that’s often overlooked by many is to remove any external devices connected to your PC/laptop. Here we want to keep only the basic functionality of your PC for the Windows 11 upgrade. For example, you can remove any USB hub, speaker, printer, headphone, scanner, etc.
After you rule out any possible interference from these devices, try to install Windows 11 again. If this doesn’t help, try the next fix.
Fix 2: Run Windows Update
Microsoft suggests that you need to make sure all the available Windows updates are installed before you attempt to upgrade to Windows 11. Here’s how to check for Windows updates and install the available ones:
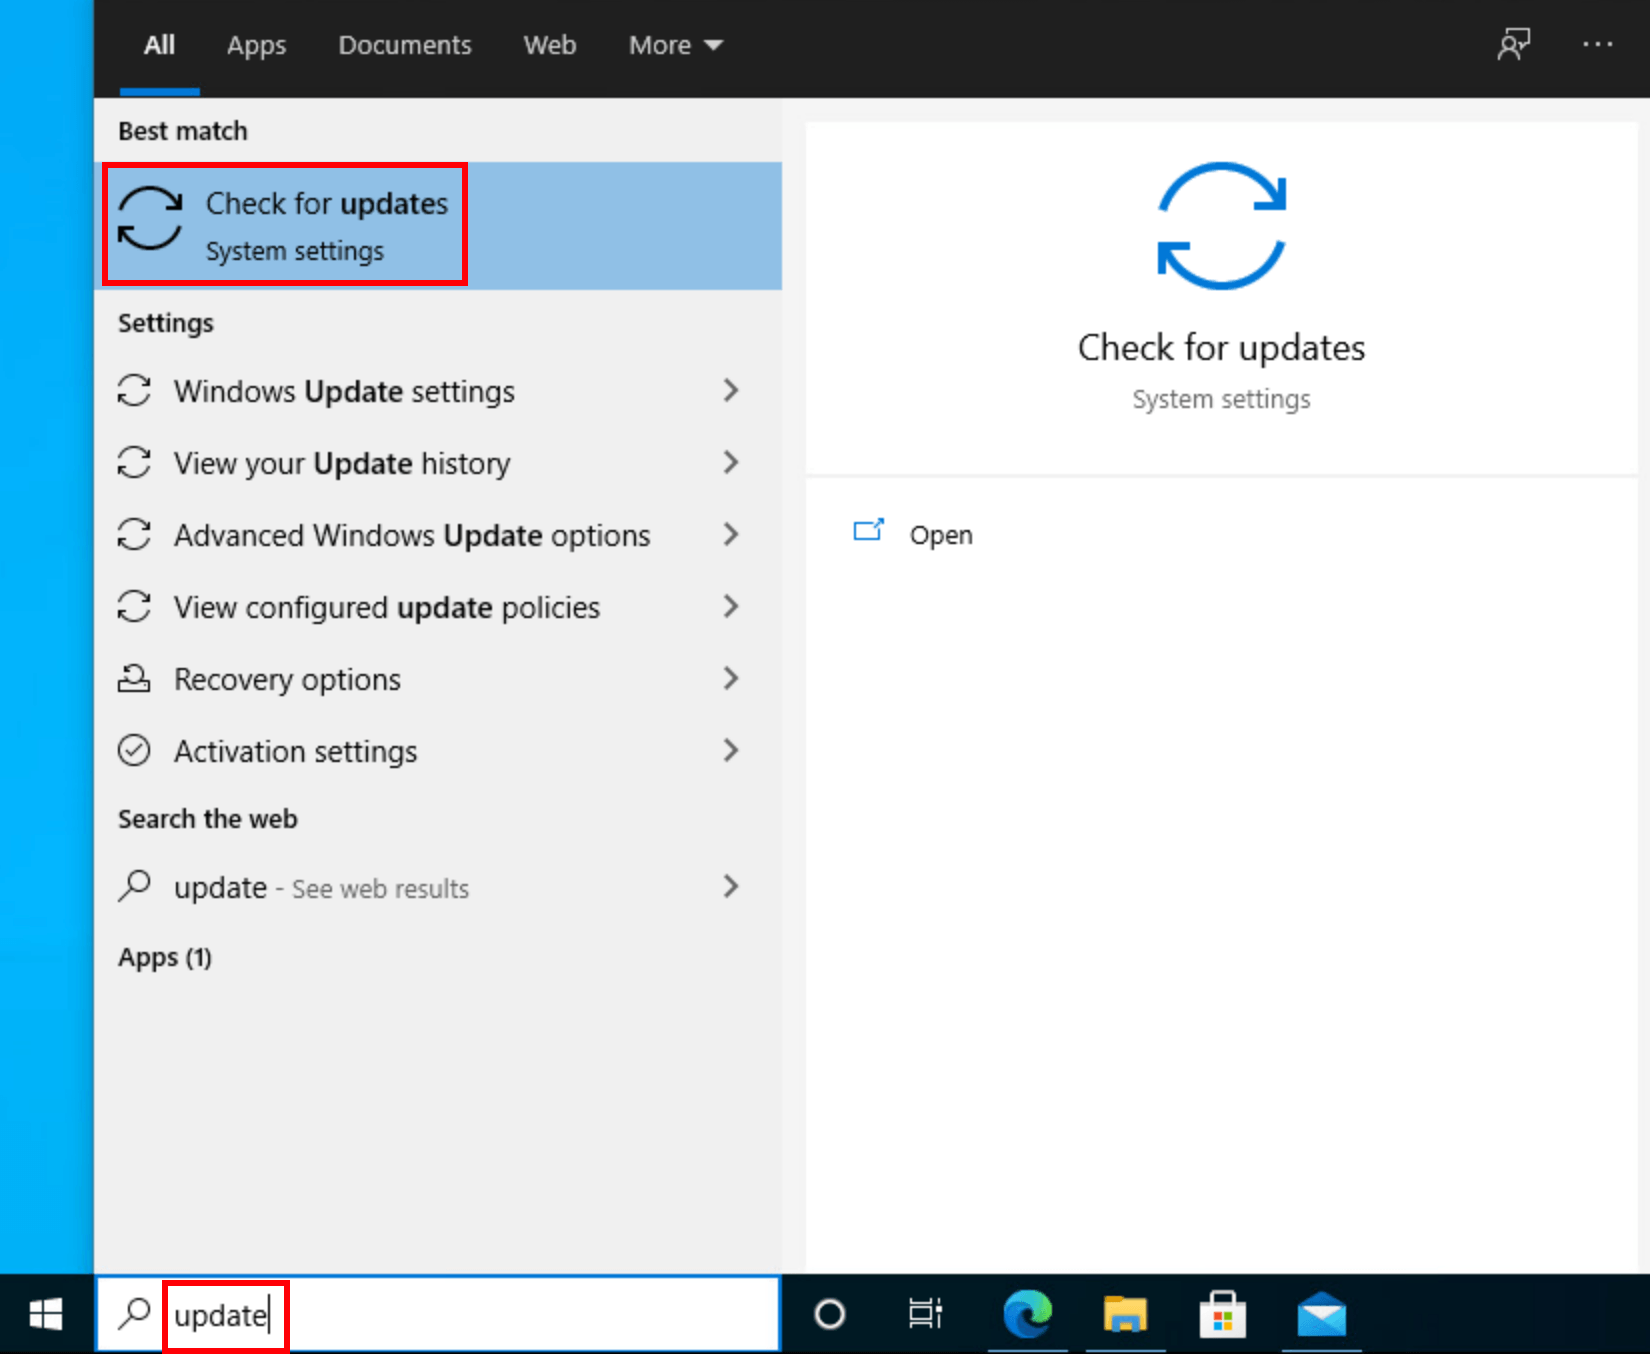
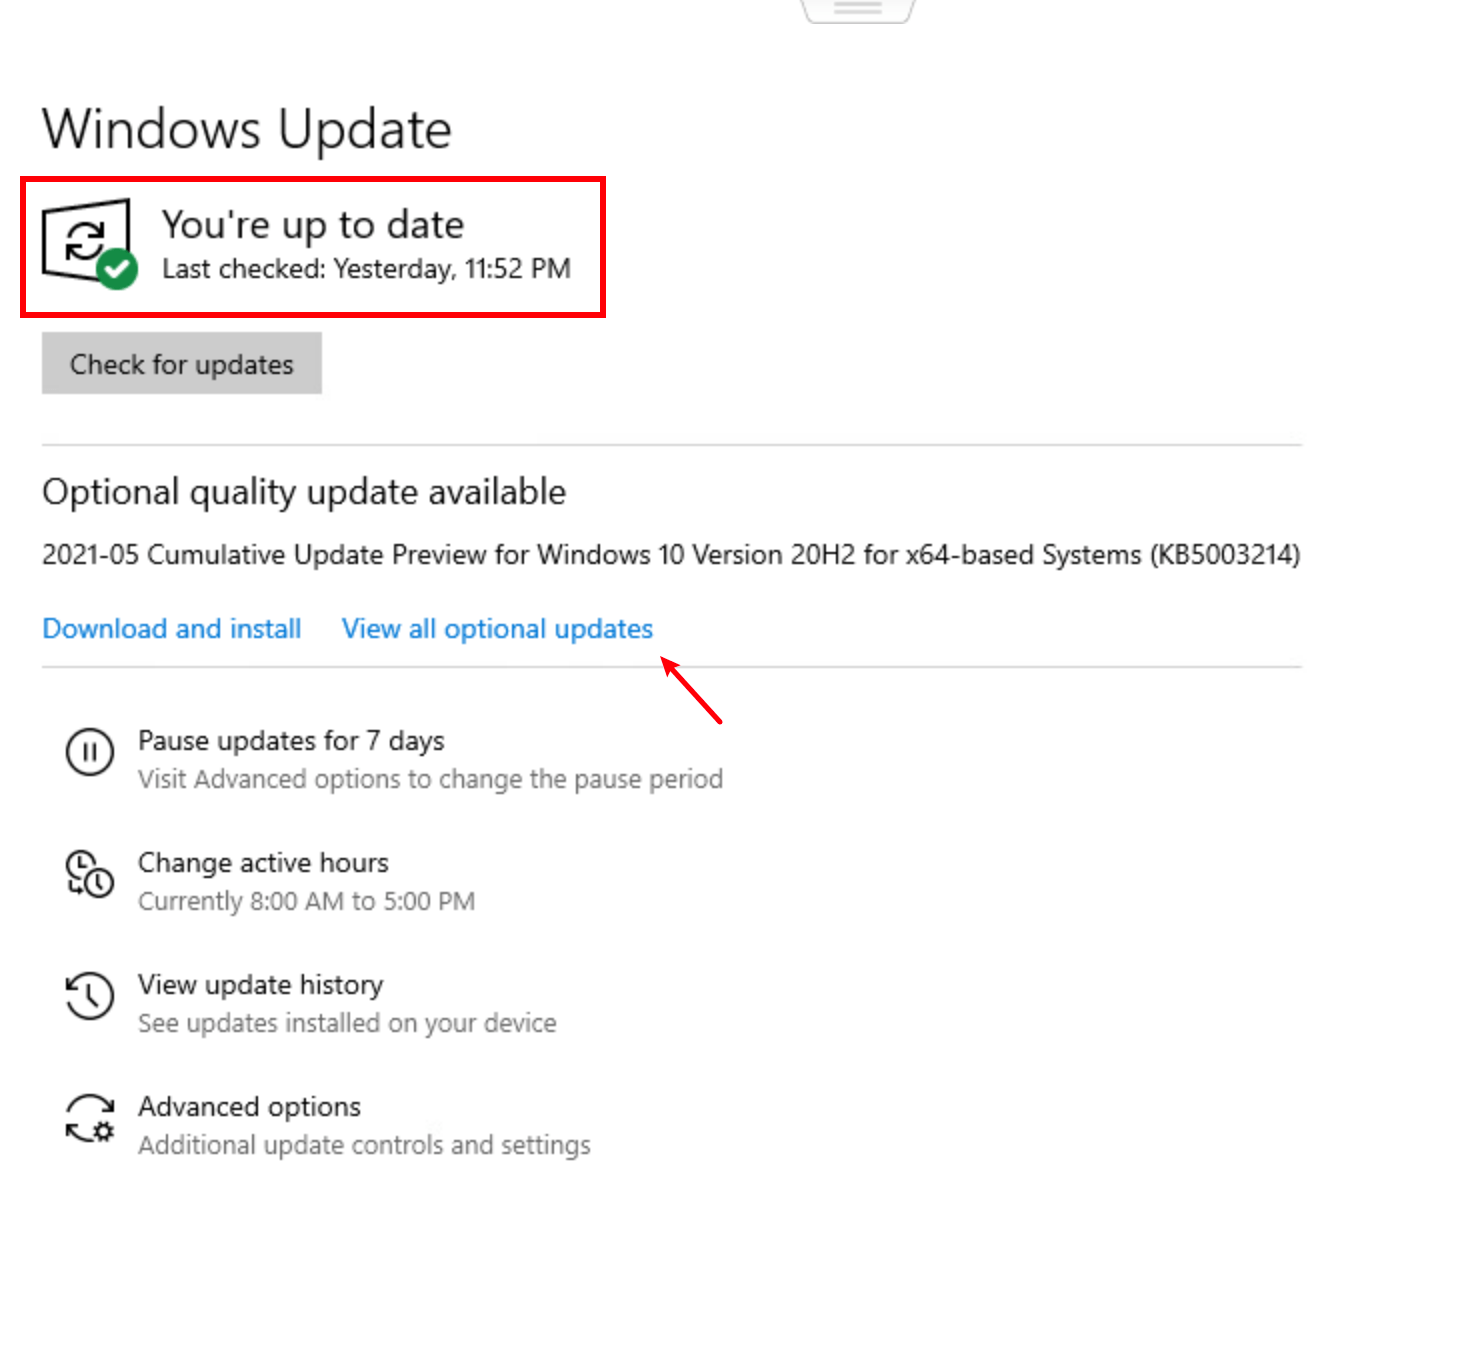
- In the search bar next to your Start button, type update, then click Check for updates.

- Windows will scan for available updates. If there are no available updates, you’ll get a You’re up to date sign. You could also click View all optional updates and install them if needed.

- If there are available updates, Windows will automatically download them for you. Follow instructions to complete the installation if needed.

- You may be prompted to restart your PC. Make sure you save important files in advance.
If you still get the “Windows 11 installation has failed” error, try the next fix.
Fix 3: Update your device drivers
Similar to the above, it’s important to make sure all the hardware drivers are up-to-date before you upgrade to Windows 11. There are two ways you can get the right drivers on your PC: manually or automatically.
Manual driver update – To manually update your drivers, you can update the drivers via Device Manager. Note that Device Manager doesn’t always detect the latest available update for you. You can also search on the manufacturer’s website, for example, for your graphics card. Make sure you download the driver that’s compatible with your Windows version.
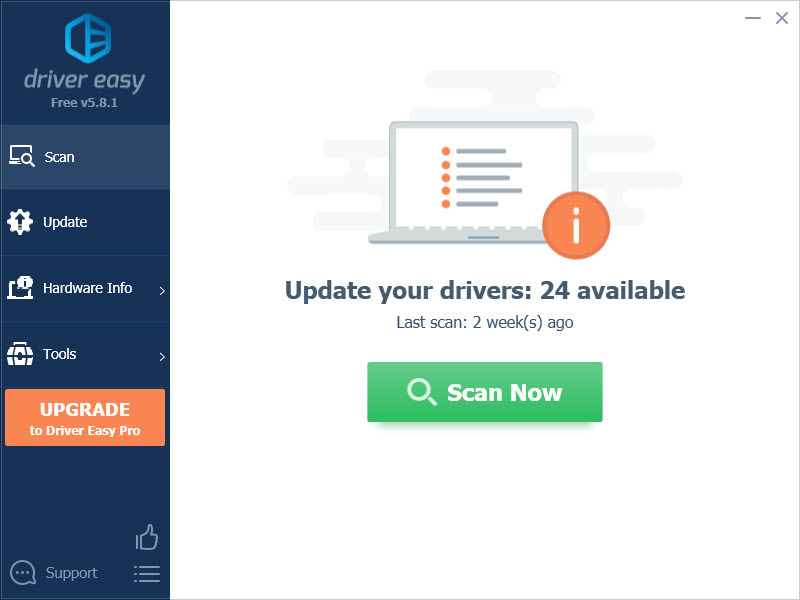
Automatic driver update – If you don’t have the time, patience, or computer skills to update your drivers manually, you can, instead, do it automatically with Driver Easy. Driver Easy will automatically recognize your system and find the correct drivers for you, then it will download and install them correctly:
- Download and install Driver Easy.
- Run Driver Easy and click the Scan Now button. Driver Easy will then scan your computer and detect any problem drivers.

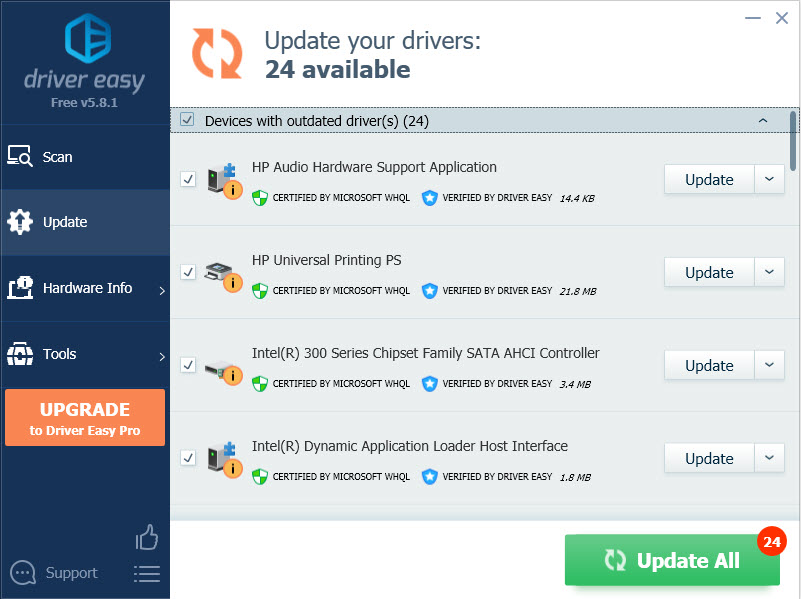
- Click the Update button next to the flagged drivers to automatically download the correct version of the drivers, then you can manually install them (you can do this with the FREE version).
Or click Update All to automatically download and install the correct version of all the drivers that are missing or out of date on your system. (This requires the Pro version which comes with full support and a 30-day money-back guarantee. You’ll be prompted to upgrade when you click Update All.)

If you need assistance, please contact Driver Easy’s support team at support@drivereasy.com.
Restart your PC then try to install Windows 11 again. If the error persists, try the next fix.
Fix 4: Enable TPM 2.0 and Secure Boot
According to the system requirement for Windows 11, TPM 2.0 and the Secure Boot option need to be enabled on your PC. Below are the steps to check the TPM on your PC and enable TPM 2.0 and Secure Boot from BIOS:
Check if your PC has a TPM 2.0 chip
- Press the Windows key and R to invoke the Run box.
- Type in tpm.msc, then click OK.
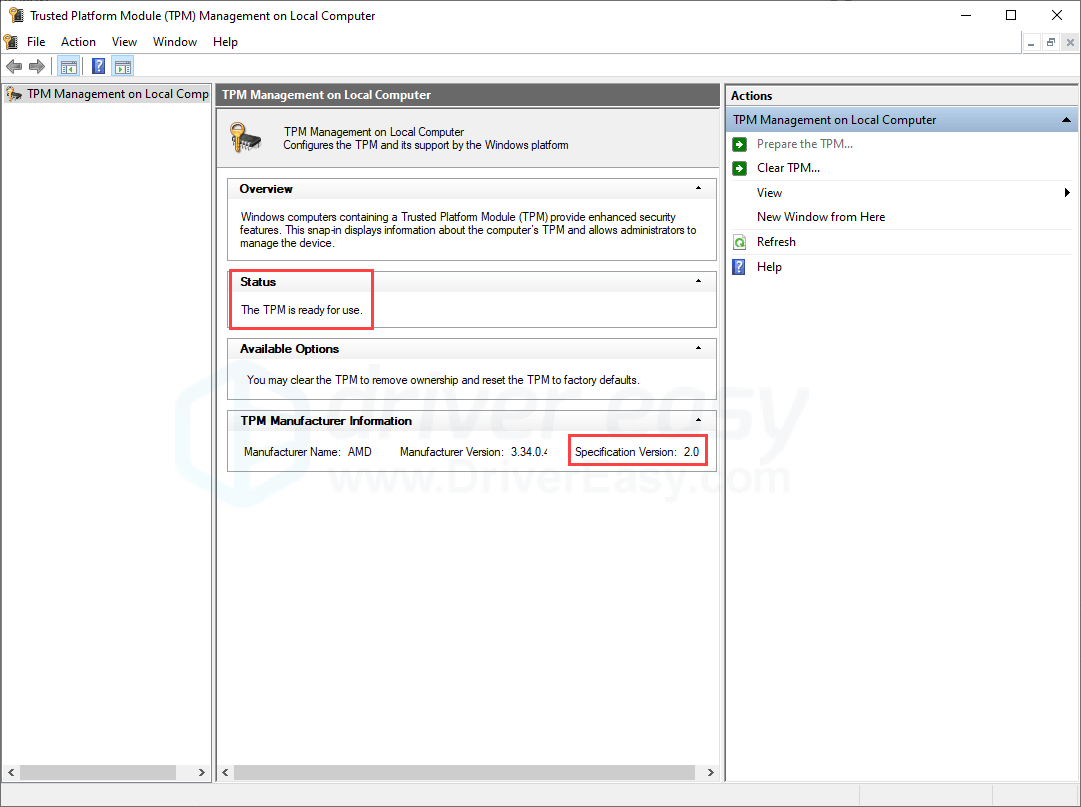
- If the TPM 2.0 is already enabled on your PC, you should see the following results with ” The TPM is ready for use” and “Specification Version: 2.0“.

If your PC doesn’t have a compatible TPM chip, the result may show “Compatible TPM cannot be found”. You can jump to Fix 5 to bypass TPM and Secure Boot check.
Enter BIOS
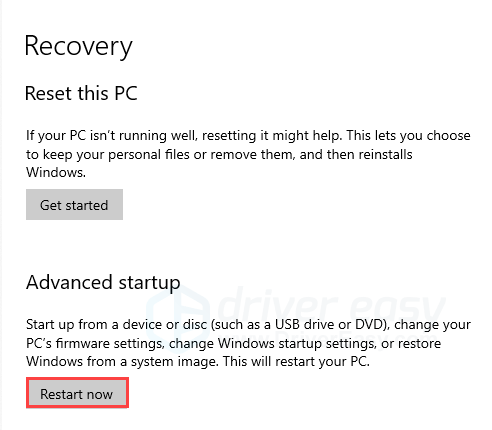
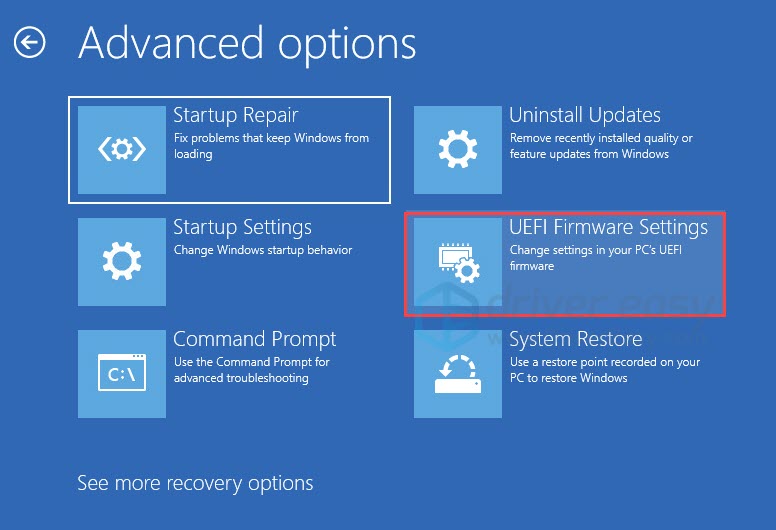
- Press the Windows key to open the search menu, type recovery, then click Recovery options.
- Under Advanced Startup, click Restart now.

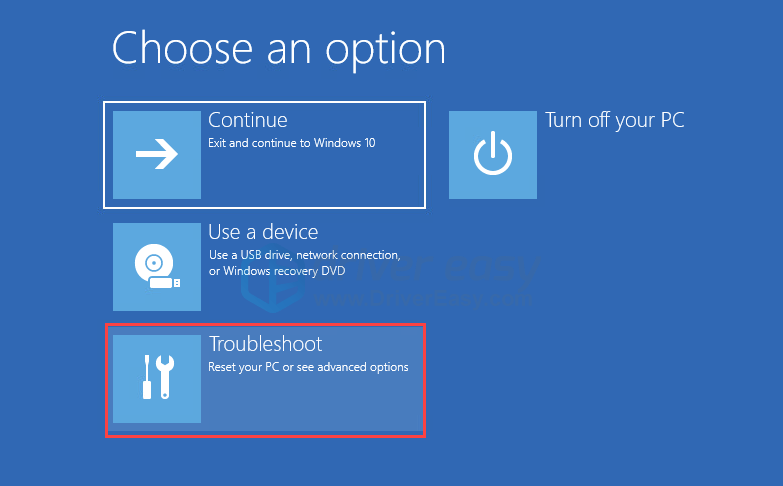
- Click Troubleshoot.
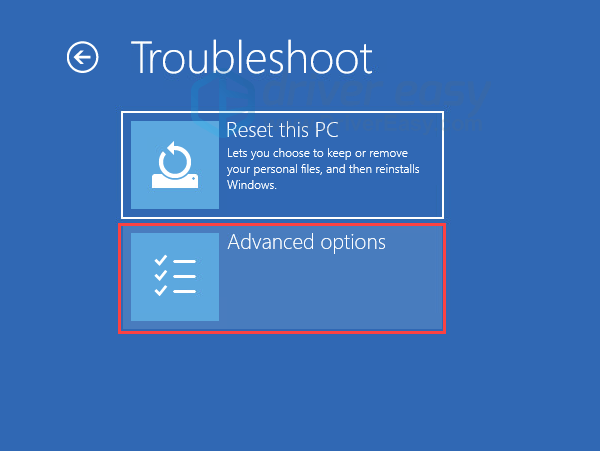
- Select Advanced options.
- Click UEFI Firmware Settings.
- Click Restart.
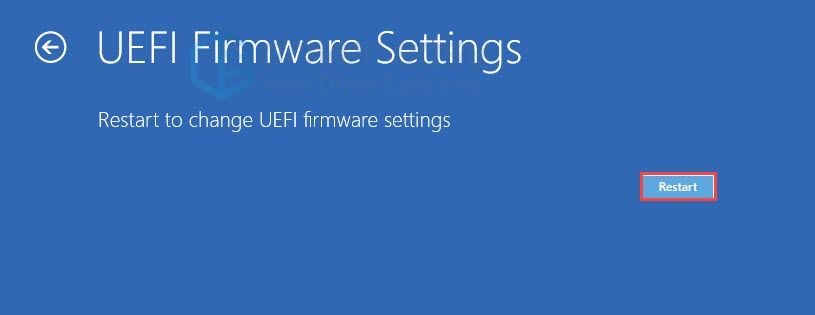
After you enter the BIOS screen, follow the steps below to enable TPM 2.0 and Secure Boot.
Enable TPM 2.0
- Go to the Security or Advanced tab.
- You may see different terms, such as TPM Configuration, TPM 2.0 Security, TPM Support, TPM Device Selection, Intel Platform Trust Technology (PTT), or AMD fTPM Switch.
- Once you find it, set it to enabled.
Enable Secure Boot
- Go to the Boot or Security tab.
- Find Secure Boot and enable it.
- Save the changes and exit to boot your PC.
Fix 5: Bypass TPM and Secure Boot check
If your device doesn’t have a TPM 2.0 chip, then it doesn’t meet the requirement for Windows 11. But it doesn’t mean you can’t upgrade to Windows 11. One trick that makes it possible is to bypass the system check of TPM,and the Secure Boot option when upgrading. Here’s how:
Although this method allows you to install Windows 11 on an unsupported device, it’s not recommended by Microsoft. Your device won’t be entitled to receive future updates on Windows 11, and there could be compatibility issues.
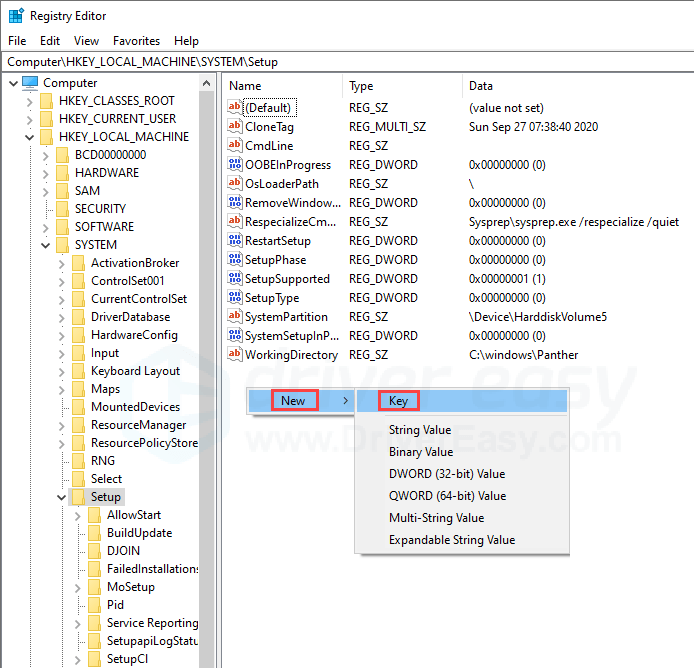
It can be risky to make changes to the registry, so before you proceed, make sure you backup your registry.
- Press the Windows key and R to open the Run box.
- Type in regedit, then click OK. If prompted for permission, click Yes.
- Copy Computer\HKEY_LOCAL_MACHINE\SYSTEM\Setup and paste it to the address bar, then press Enter.
- Right-click anywhere empty on the right, select New and click Key. Name it as LabConfig.

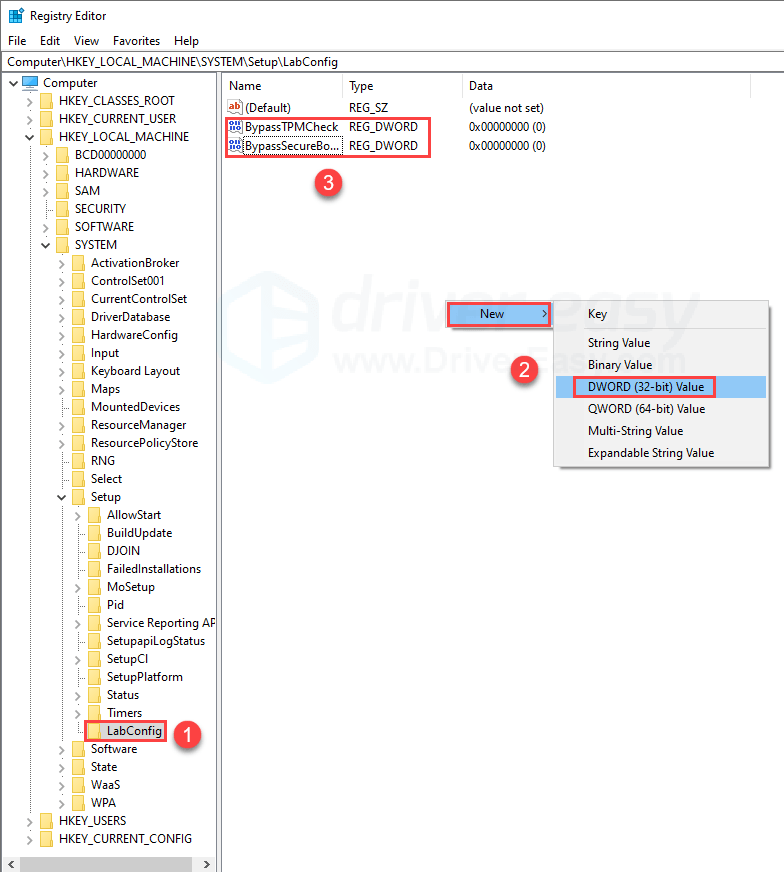
- Select LabConfig, then right-click an empty area on the right and create two DWORD Value options. Name them as BypassTPMCheck and BypassSecureBootCheck respectively.

- Double-click BypassTPMCheck, change the value data to 1, select Decimal, and click OK.
- Repeat the same for BypassSecureBootCheck option. Change the value data to 1, select Decimal, and click OK.
- Exit the Registry editor, and reboot your PC.
- You should now be able to install Windows 11.
Hopefully this article is helpful! Please feel free to leave a comment if you have any questions or suggestions.
5
5 people found this helpful
Существует множество причин, по которым при обновлении или установке Windows 11 может появиться сообщение об ошибке, но распространенные ошибки можно исправить с помощью нескольких действий, которые можно выполнить самостоятельно. Примечание. При обновлении устройство с более старой версии Windows, например Windows 7, Windows 8.1 или Windows 10, будет Windows 11.
Прежде чем искать определенный код ошибки, воспользуйтесь советами в разделе Общие решения. Если они не помогут решить проблему с обновлением или установкой, воспользуйтесь таблицей кодов ошибок в конце этой статьи.
Общие решения
Вот несколько советов, которые помогут вам исправить ошибки обновления и установки:
Отсоедините все ненужные устройства. Это могут быть наушники, принтеры, сканеры, динамики, USB-устройства флэш-памяти и внешние жесткие диски.
Если вы используете ноутбук, подключенный к стыковочному узлу, отстыкуйте его.
Прежде чем пытаться обновить Windows, убедитесь, что на устройстве установлены все важные обновления, в том числе обновления драйверов оборудования.
Чтобы убедиться, что на устройстве установлены все обновления, просмотрите статью Центр обновления Windows: вопросы и ответы.
Используйте Защитник Windows для защиты своего устройства во время обновления — антивирусное программное обеспечение не от Майкрософт может вызывать проблемы с обновлением. Если у вас есть установочный носитель и вся необходимая информация для активации, вы можете переустановить программное обеспечение после обновления.
Чтобы удалить антивирусное приложение, перейдите в раздел Панель управления\Программы\Программы и компоненты. Выберите программу и нажмите Удалить. Нажмите кнопку Да, чтобы подтвердить операцию.
Устаревшее программное обеспечение может мешать обновлению Windows, поэтому попробуйте удалить старые или ненужные приложения.
Если вы хотите переустановить приложение позже, перед удалением убедитесь, что у вас есть установочный носитель и вся необходимая информация для активации.
Чтобы удалить программное обеспечение, перейдите в раздел Панель управления\Программы\Программы и компоненты. Выберите программу и нажмите Удалить. Нажмите кнопку Да, чтобы подтвердить операцию.
Чтобы выполнить обновление до Windows 11, на жестком диске требуется достаточно места для установки.
Чтобы просмотреть объем свободного места на жестком диске на компьютере, выберите проводник на панели задач (в Windows 7 она называется Обозреватель Windows) или нажмите клавишу с логотипом Windows + E.
Затем выберите Компьютер или Этот компьютер и найдите раздел Жесткие диски или Устройства и диски. Системным считается диск, на значке которого есть логотип Microsoft Windows. Количество свободного места будет указано под диском.
Если свободное место на диске заканчивается, ознакомьтесь с советами по освобождению места на диске компьютера.
Ошибки 0xC1900101
Ошибка, начинающаяся с 0xC1900101 — это, как правило, ошибка драйвера. При отображении какого-либо из этих кодов ошибок, попробуйте сначала выполнить следующие действия, чтобы устранить проблему. Если эти действия не помогли, дополнительные технические сведения см. в статье Устранение ошибок обновления Windows .
-
0xC1900101 — 0x2000c
-
0xC1900101 — 0x20017
-
0xC1900101 — 0x30018
-
0xC1900101 — 0x3000D
-
0xC1900101 — 0x4000D
-
0xC1900101 — 0x40017
-
Убедитесь, что на вашем устройстве достаточно свободного места. На вашем устройстве требуется не менее 16 ГБ свободного места для обновления 32-разрядной ОС или 20 ГБ для 64-разрядной ОС. Дополнительные сведения см. в статье Освобождение места на диске в Windows.
-
Запустите Центр обновления Windows несколько раз. Скачайте и установите все доступные обновления в Центре обновления Windows, в том числе обновления программного обеспечения, обновления для оборудования и некоторые сторонние драйверы. Используйте средство устранения неполадок клиентский компонент Центра обновления Windows для исправления ошибок обновления Windows 11.
-
Проверьте сторонние драйверы и скачайте все обновления. Сторонние драйверы и инструкции по установке для любого оборудования, которое вы добавили к устройству, можно найти на веб-сайте изготовителя.
-
Отключите дополнительное оборудование. Удалите все внешние устройства хранения данных и диски, док-станции и другое оборудование, подключенное к устройству, которое не нужно для основных функций.
-
Проверьте диспетчер устройств на наличие ошибок. В поле поиска на панели задач введите диспетчер устройств. Выберите в результатах Диспетчер устройств. В появившемся окне найдите все устройства с желтым восклицательным знаком рядом (может потребоваться выбрать каждую категорию, чтобы перейти в список устройств). Нажмите и удерживайте (или щелкните правой кнопкой мыши) имя устройства и выберите один из вариантов Обновить драйверы или Удалить, чтобы исправить ошибки.
-
Удалите программы безопасности сторонних разработчиков. Убедитесь, что вы знаете как переустановить программы, а все необходимые ключи под рукой. Защитник Windows защитит ваше устройство на это время.
-
Исправьте ошибки жесткого диска. В поле поиска на панели задач введите командная строка. Выберите из списка результатов Командная строка. В появившемся окне введите chkdsk/f C: и нажмите клавишу ВВОД. Исправление ошибок на жестком диске начнется автоматически, и вам будет предложено перезапустить устройство.
Примечание: Чтобы выполнить это действие, у вас должны быть разрешения администратора.
-
Выполните корректный перезапуск в Windows. См. раздел Выполнение «чистой» загрузки в Windows.
-
Восстановление и восстановление системных файлов. В поле поиска на панели задач введите командная строка. Выберите из списка результатов Командная строка. В появившемся окне введите DISM.exe /Online /Cleanup-image /Restorehealth и нажмите клавишу ВВОД. (Узнайте, как восстановить образ Windows)
Примечание: Чтобы выполнить это действие, у вас должны быть разрешения администратора.
Другие распространенные ошибки
В следующей таблице перечислены наиболее распространенные ошибки обновления и установки, а также некоторые действия, которые можно попытаться исправить. Если у вас по-прежнему возникают проблемы с обновлением или установкой Windows, обратитесь в службу поддержки Майкрософт.
|
Ошибка |
Что она означает и как ее исправить |
|---|---|
|
0xc1900223 |
Это означает, что возникла проблема с загрузкой и установкой выбранного обновления. Центр обновления Windows повторит попытку позже, при этом вам не потребуется выполнять никаких действий. |
|
0xC1900208 — 0x4000C |
Эта ошибка может означать, что на компьютере установлено несовместимое приложение, которое не позволяет завершить процесс обновления. Удалите все несовместимые приложения, а затем попробуйте выполнить обновление снова. |
|
0xC1900107 |
Операция очистки предыдущей попытки установки по-прежнему ожидает завершения, для продолжения обновления требуется перезагрузка системы. Перезагрузите устройство и снова запустите программу установки. Если перезапуск устройства не решил проблему, воспользуйтесь программой очистки диска для удаления временных и системных файлов. Дополнительные сведения см. в статье Очистка диска в Windows. |
|
0x80073712 |
Файл, необходимый Центру обновления Windows, поврежден или отсутствует. Попробуйте восстановить системные файлы. В поле поиска на панели задач введите командную строку. Выберите из списка результатов Командная строка. В появившемся окне введите DISM.exe /Online /Cleanup-image /Restorehealth и нажмите клавишу ВВОД. |
|
0xC1900200 — 0x20008 0xC1900202 — 0x20008 |
Это может означать, что ваш компьютер не соответствует минимальным требованиям для скачивания или установки обновления до Windows 11. Узнайте больше о минимальных требованиях для Windows 11. |
|
0x800F0923 |
Это может означать, что драйвер или другое программное обеспечение на компьютере несовместимо с обновлением до Windows 11. Чтобы узнать, как устранить эту проблему, обратитесь в службу поддержки Майкрософт. |
|
0x80200056 |
Эта ошибка может означать, что процесс обновления был прерван, поскольку вы случайно перезагрузили компьютер или вышли из системы. Попробуйте снова выполнить обновление и убедитесь, что компьютер подключен к электросети и остается включенным. |
|
0x800F0922 |
Эта ошибка может означать, что вашему компьютеру не удалось подключиться к серверам Центра обновления Windows. Если вы используете VPN для подключения к рабочей сети, отключитесь от сети и выключите программное обеспечение VPN (если применимо), а затем попробуйте снова выполнить обновление. Эта ошибка также может означать, что в разделе, зарезервированном системой, недостаточно свободного места. Возможно, эту проблему удастся решить, используя стороннее программное обеспечение для увеличения размера раздела, зарезервированного системой. |
|
Ошибка: нам не удалось завершить обновления. Отмена изменений. Не выключайте компьютер. Ошибка: не удалось настроить обновления Windows. Отмена изменений. |
Это общие ошибки, которые могут возникать в случае сбоя обновления Windows. Чтобы выбрать оптимальный способ решения проблемы, необходимо определить конкретный код ошибки. Код ошибки, вызвавшей сбой обновления, можно найти в журнале обновлений. Найдите обновление, которое не было установлено, запишите код ошибки и обратитесь в службу поддержки Майкрософт. Чтобы просмотреть журнал обновлений в Windows 11, выполните приведенные далее действия.
|
|
Ошибка: обновление не применимо к этому компьютеру. |
Эта ошибка может означать, что на компьютере не установлены обязательные обновления. Убедитесь, что на вашем компьютере установлены все важные обновления, прежде чем пытаться выполнить обновление. |
|
0x80070070 — 0x50011 0x80070070 — 0x50012 0x80070070 — 0x60000 |
Эта ошибка может означать, что на компьютере недостаточно свободного места для установки обновления. Освободите место на диске и повторите попытку. Советы по освобождению места на диске |
|
0x80300024 |
Конечный диск, раздел или том не поддерживает указанную операцию с диском. Убедитесь, что компьютер соответствует минимальным требованиям для установки Windows. |
|
0x80070002 0x20009 |
Системе не удается найти указанный файл. Если у вас есть диск или диски, на которых вы не устанавливаете Windows 11, удалите эти диски. |
|
0xC1900101 0x20017 0xC1900101 0x30017 |
Драйвер вызвал проблему. Отключите или удалите все сторонние антивирусные или антишпионские программы в системе. Отключите все периферийные устройства, подключенные к системе, за исключением мыши, клавиатуры и дисплея. Обратитесь к поставщику оборудования за обновленными драйверами устройств. |
|
0x8007042B 0x4000D |
Программа установки Windows непредвиденно завершена из-за другого процесса, запущенного в фоновом режиме. Во время загрузки Windows в штатном режиме автоматически запускается несколько приложений и служб, которые потом работают в фоновом режиме. К ним относятся основные системные процессы, антивирусные программы, системные служебные программы и другое ранее установленное ПО. Эти приложения и службы могут вызвать помехи при попытке обновления до последней версии Windows 11. Чтобы определить, мешает ли фоновая программа обновлению, может потребоваться «чистая загрузка». См . статью Как выполнить чистую загрузку в Windows. |
|
0x800700B7 0x2000a |
Программа установки Windows непредвиденно завершена из-за другого процесса, запущенного в фоновом режиме. Удалите антивирусное или антишпионское программное обеспечение и повторите попытку обновления. |
Возможны три причины её возникновения
После того, как Microsoft опубликовала ISO-файл Windows 11, многие пользователи, не рисковавшие использовать бета-версии, наконец-то решились на установку финальной. Сделать это можно разными способами, но один из наиболее удобных — при помощи фирменной утилиты-ассистента (той самой, которая позволяет избежать проверки на совместимость аппаратного обеспечения и установить Windows 11 на любой компьютер). Однако, как оказалось, этот способ установки нередко сопряжён с ошибками.
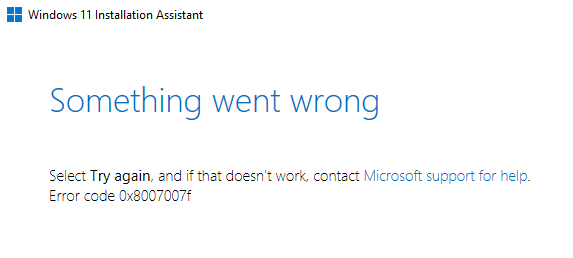
Одна из них возникает особенно часто, о чём свидетельствуют сообщения на крупнейшем американском форуме Reddit. Ошибка имеет обозначение 0x8007007f. С чем она может быть связана?
Основных причин её возникновения, как пишет источник, три: разрешение со стороны системы контроля учётных записей пользователей (UAC), нехватка свободного места на накопителе и драйверы. Запуск ассистента установки Windows 11 от имени Администратора в большинстве случаев решает проблему. Если возникновение ошибки обусловлено несовместимостью с драйверами, то можно попробовать их обновить. Если же ошибка продолжит возникать, то можно попробовать установку Windows 11 без ассистента — смонтировать ISO-образ в системе и запустить setup.exe напрямую.
6 октября 2021 в 13:13
| Теги: Microsoft, Windows
| Источник: Windowslatest
While trying to install the Windows update, are you encountering Windows 11 installation has failed error? If so, you are not alone; several other users have reported facing a similar problem. Luckily, the problem is fixable, and you can do it on your own by following the steps mentioned below.
However, before we learn how to troubleshoot the error, let us narrow down the reasons that cause the installation of Windows 11 to fail.
Reasons for Windows 11 Installation Failed
The error can be caused due to multiple reasons. Here we list down the most common ones that will help you understand the reason behind the blocked Windows 11 installation task.
- The external hard drive is attached to the PC.
- Outdated or corrupt device drivers.
- Either the PC is incompatible with Windows 11 or does not meet system requirements.
- Faulty Windows 11 ISO file downloaded or the Insider preview build has problems.
- Issues with disk, UEFI, secure boot, or MBR.
- Insufficient disk space.
- Interference caused by the antivirus or third-party application.
- Copying Windows installation files twice.
- Corrupt Boot Manager.
- Incorrect File extension.
Common Windows 11 Installation Problems
- Installation fails without an error code due to antivirus software.
- Windows 11 installation has failed ISO.
- The setup installation has failed.
- Cannot install Windows 11 – Error 0xc1900101.
- Installation Failed in Safe_OS Phase.
- The setup has failed to validate the product key.
- Windows Installer error.
- This PC can’t run Windows 11.
Whatever the error message or reason is, we will help fix it. Follow the fixes explained individually in the correct order to find the perfect solution for you.
Read Also: Exploring Windows 11: 5 Common Problems & Fixes
What Does the Meaning of This Error
The error means that the installation process was unable to complete successfully due to various system-related issues. This error can occur during an upgrade from Windows 10 or a fresh installation of Windows 11.
Best Ways To Fix Windows 11 Installation Failed Error
To troubleshoot the Windows 11 installation stuck, here are some basic fixes, followed by the complex ones. Before going with the technical ones, follow the quick tips below:
Basic Tips to Fix Windows 11 Upgrade and Installation Errors
Fix 1 – Disconnect all connected external hard drives.
Fix 2 – Check the copy of Windows 11 you are using. It must be genuine.
Fix 3 – Scan the PC for malware infection. For this, you can use the antivirus program you are using or can use the T9 antivirus.
Fix 4 – Update your device drivers
After performing the above fixes one last thing you need to try before getting into technicalities is to update the hardware drivers. You can update them either manually or automatically.
Manually Update Driver –
To update drivers manually you can use Device Manager, Windows built-in utility to keep drivers updated. Press Windows + X select Device Manager and update the hardware drivers.
However, it is not easy to update drivers manually, as you will have to update each driver individually. Also, there is no guarantee that you will get the latest available update. To deal with this you can visit the manufacturer’s website, and download the driver. But for that, you need to have system and device details, which again is not easy and requires a lot of time and effort.
If you want to avoid this, then the best thing you can do is update drivers automatically.
Automatically Update Drivers –
Advanced Driver Updater is one of the best driver updating tools for Windows. Using it you can scan the system for outdated drivers and update them without any hassle. The tool shows the latest and compatible driver updates and even takes backups of drivers and allows scheduling driver scanning. To use it, follow these steps:
Features, User Reviews, Pros & Cons, And More about the tool
1. Download, install, and run Advanced Driver Updater.
2. To scan the PC click Start Scan Now and wait for the process to finish.

3. Click on Update driver next to the driver you want to update. However, if you want to update all drivers at once you can do it by switching to the paid version which comes with a 60-day money-back guarantee and technical support. You can contact the support team for technical support at support@systweak.com.

4. Restart the PC and try to install Windows 11. The error should be fixed. If it persists we’ve other fixes, try them.
After performing these basic steps, restart steps restart your computer and try reinstalling Windows 11. Suppose this helps; there is no need to move further. You can enjoy working on Windows 11. However, if this does not help, continue reading to implement the fixes explained below:
Technical Troubleshooting To Fix Windows 11 Installation Stuck, Error
Method 1 – Check the PC for compatibility
Most PC users do not know that to install Windows 11; their PC should meet the following system requirements.
- Processor: 1 gigahertz (GHz) or faster with 2 or more cores on a compatible 64-bit processor or System on a Chip (SoC)
- RAM: 4 gigabytes (GB)
- Storage: 64 GB or larger storage device
- System firmware: UEFI, Secure Boot capable
- TPM: Trusted Platform Module (TPM) version 2.0
- Graphics card: Compatible with DirectX 12 or later with WDDM 2.0 driver
- Display: High definition (720p) display that is greater than 9” diagonally, 8 bits per color channel
- Internet connection and Microsoft accounts: Windows 11 Home edition requires internet connectivity and a Microsoft account to complete device setup on first use.

If your PC fails to meet them, you will face Windows 11 install failure and other errors, as shown in the screenshot below.

To check if your computer meets the requirements
Note : Microsoft provides a step-by-step guide for you to open the PC Health Checkup app on its official webpage
1. Install the PC Health Checkup app if not already installed.
2. Press Windows key + S and search for PC Health Check. Select the best search result.
3. Click Check Now.

4. The app will show whether your PC is compatible with Windows 11 or not.

If it is compatible and you are still struggling with Windows 11 and can’t install an update, it seems TPM2.0 and Secure Boot are missing from the BIOS.
What is TPM 2.0?
TPM is a computer chip that offers hardware-based security. When the BIOS/UEFI and CPU do not fall under Micrpspft’s permitted range, you cannot install Windows 11. Following the list of supported AMD and Intel CPU
- 8th Generation Intel Core Processors and Newer Products
- AMD Ryzen Processor
- Ryzen 3000 Series and Newer Products
Steps to check TPM 2.0 on your PC
1. Press Windows + R to open the Run window.
2. Type tpm.msc and press the Enter key.
3. This will open the TPM management window. Here, under the Status tab, if you can read The TPM is ready for use it means TPM is enabled. Verify the TPM version from under the TPM Manufacturer Information.

4. If TPM is compatible but disabled, you will get a message ‘Compatible TPM can’t be found’. This means you must log in to the BIOS to enable it.

To do so, follow these steps.
Enabling TPM 2.0 Via BIOS
1. Press the Shift key while clicking the Restart option.
2. This will help you access the boot page. Here, select Troubleshoot.

3. Click Advanced options.

4. Click UEFI Firmware Settings and press Restart to enter the BIOS.

5. If you cannot find TPM look for PTT as the name may differ depending on the motherboard. However, remember both function the same. Click Settings > Security > TPM 20. Security and enable TPM.
Note : On certain systems, you may find terms like TPM Configuration, TPM Support, TPM Device Selection, Intel Platform Trust Technology (PTT), or AMD fTPM Switch. Select either to enable TPM.

Enable Secure Boot
1. Click the Boot or Security tab.
2. Look for Secure Boot and enable it.
3. Save the change and exit to restart the PC.
Method 2 – Perform a Clean Boot
Most of the time, third-party applications interact with your Windows installation. To ensure these programs do not interfere with Windows installation, perform a clean boot. To do so, follow these steps:
1. Press Windows + R to open the Run window.
2. Type msconfig and press the Enter key.

3. Click on the Boot tab. Uncheck Safe boot > click Apply.

4. Click the General tab and select the Selective Startup option.
5. Uncheck the Load startup items option. Click Apply.

6. Click the Services tab > select the box next to Hide All Microsoft Services > and click Disable All.

7. Click the Startup tab > select Open Task Manager.

8. Now select the items one by one and Disable them.
9. Next, enable each item individually and Restart the PC after enabling each item.

This will help fix Windows 11 installation failure with no error code issue and help narrow down the program that is creating issues.
Method 3 – Update Windows
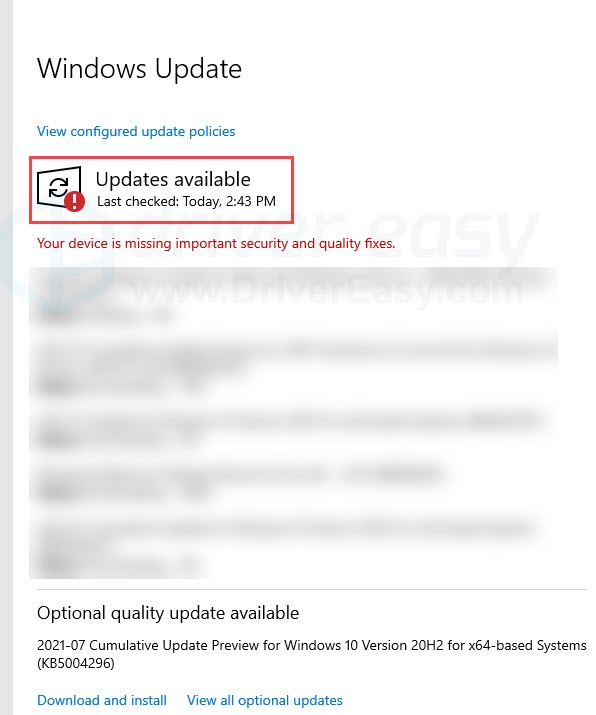
Before you try to upgrade to Windows 11, ensure you have all the Windows updates installed. To check if you have them all, follow these steps:
1. Press Windows + I to open Windows Settings.
2. Double click Update & Security.
3. Windows Updates > Check for updates.

4. Windows now scan for available updates. If you have all the updates installed you will get You’re up to date message. However, it is best that you click View all optional updates and install them too. However, if any updates are missing Windows will install them automatically. Follow these steps until you get You’re up to date prompt.

5. Restart the PC to save changes. Now try to update Windows, you should not get the “Windows 11 installation has failed” error. However, if the error persists, trypersists try the next fix.
Method 4 – Uninstall the Language Pack
Some experts have discovered that there are certain language packs installed on Windows 10 that are not supported by Windows 11. Hence, it is suggested that you uninstall the language pack before attempting to install Windows 11. Here are the steps –
1. Press Windows + S to open the search box and type “change display language”. Click on the same option in the search results.

2. Next, choose English (US).

3. Now, type “Uninstall display language” in the search box and a new box will open. Click on the Install/Uninstall languages button.

4. Now locate the alternative language and delete it from your PC.
5. Restart the Computer.
Method 5 – Create Installation Media and Setup
Another method to fix the error is to create a new installation media. Here is what you need to do –
1. Register for the Windows 10/11 upgrade and choose the free version.
2. Ensure that you have ample free space on your hard drive.
3. Visit the Microsoft official website and download the Media Creation Tool. Remember to choose 32-bit or 64-bit depending on your PC’s architecture.
4. Double-click on the file downloaded and choose “Create installation media for another PC”.
5. Click on Next and follow the onscreen instructions to create the installation media.
Method 6 – Uninstall GPU to fix error 0xc1900101
There have been a few users who have received the “The installation failed in the SAFE_OS phase 0xc1900101” error while installing Windows 11. This is a rare error and the exact cause of this error is not yet determined. However, we have a few steps that have helped others with the same error.
1. Remove all the external devices attached to your PC (except Mouse & Keyboard).
2. Uninstall The GPU Driver by pressing Win + X to open the Power menu and select Device Manager.
3. Click on Display Adapters, to extend and reveal your graphics card.
4. Right-click on the Intel Graphics card and choose Uninstall Device from the context menu.

5. Next, reboot your computer and enter the BIOS by pressing the F9/F10/F11 key.
6. Locate Active Core Settings under the Processor section and modify the Active Processor Core to 1. Remember to save and exit the BIOS settings.

7. Reboot your PC.
Method 7 – Upgrade System Disk
Upgrading your hard drive involves replacing your current disk with a newer one. This will help improve storage, speed, and performance. Here is what you need to do to upgrade the system disk.
1. Select a hard disk that is better than your current hard disk.
2. Backup your important data on cloud storage or external disk.
3. Next, clone the existing hard disk to the new one by choosing the option (Keep Everything).
Note : You can use any third-party disk cloning software. (EaseUS Todo Backup, AOMEI Backupper)
4. If cloning is not possible then you can clean-install Windows 11 by creating a new disk as explained in Method 5.
Note : You will have to physically replace the hard disk. If you are not too confident then we recommend you get a hardware technician to do it for you.
Method 8 – Reinstall Windows 11
Reinstalling Windows 11 is very easy if you follow the steps and do not miss even a single one. Here are the steps –
Reboot your PC and enter the BIOS.
You need to set the Boot Priority to either USB or DVD depending on the Windows installation media you possess.
1. Exit the BIOS and insert the installation media.
2. The PC will boot from the new option you have selected.
3. In the new screen, choose Language, Time, and Currency format, Keyboard, and then click on the Next button.

4. Click on Install Now and then select “I don’t have a product key”.

5. Choose the Windows 11 edition and then click on Next.

6. Accept the Microsoft license agreement and click on Next.
7. Choose the “Install Windows Only” option.

8. Select the hard disk partition and click on Next.

9. The Windows installation process will now begin. Wait for the entire process to complete which will include a reboot of your PC. Remember to unplug the installation media when your PC reboots.
Method 9 – Bypass TPM and Secure Boot Check
If you found that your device doesn’t have TPM 2.0 chip you must be thinking that you can’t use Windows 11, right? Luckily that is not the case. You can update to Windows 11 using a trick that helps bypass system checks for TPM and Secure Boot.
Note : This step will help upgrade to Windows 11 but you will not be able to receive Windows 11 updates.
Before we proceed we suggest taking a backup of the registry as we will make some changes to the Windows registry. To backup the Windows registry press Windows + S and type regedit and press the Enter key. This will open Registry Editor. Click Computer > Right-click Export. This will back up all the keys and subkeys.
1. Once the keys are exported, copy and paste the following command in the address bar Computer\HKEY_LOCAL_MACHINE\SYSTEM\Setup and press the Enter key.

2. Right-click on the blank space > select New > key > Name it as LabConfig.

3. Select LabConfig, right-click on the blank space on the right, and create two DWORD (32-bit) Value options. Name them as BypassTPMCheck and BypassSecureBootCheck.

4. Double-click BypassTPMCheck, change the value data to 1 and select Decimal > OK.

5. Do the same for BypassSecureBootCheck option. Change the value data to 1, select Decimal > click OK.
6. Close Registry Editor and then try to install Windows 11. This should work and you should no longer see the side-by-side configuration is incorrect in Windows 11.
Fixed Windows 11 Installation has Failed to Start
We hope the above solution helps to fix the Windows 11 installation failure or upgrade failed error. If this doesn’t help we suggest optimizing the PC and running a system file checker to fix corrupt system files.
Please let us know which fix worked for you in the comments.
Recommended:
Fixed – “We Couldn’t Find Any Drives During Windows 11 Installation
9+ Ways To Fix Windows Stuck on “Checking for Updates”
|
|
|
8 / 10 / 0 Регистрация: 30.04.2011 Сообщений: 198 |
|
|
04.10.2024, 10:16. Показов 1919. Ответов 12 Без проблем делал себе образы Windows 7, 8, 10, 11 (по версию 23H2). Сейчас вот обрадовался, что вышла Windows 11 Enterprise LTSC 2024. Сделал образ. Тестирую и ошибка при установке: И куда копать? Информации в ошибке, вообще, нет. PS: кстати, это уже вторая бесполезная ошибка в Window 11. Минус им. Миниатюры
0 |
|
3096 / 1573 / 150 Регистрация: 27.02.2021 Сообщений: 7,740 |
|
|
04.10.2024, 10:44 |
|
|
Сообщение от moverast Тестирую и ошибка при установке: Это не установка, а восстановление из забэкапленного ранее образа (с настроенного образа). Установка делается из .iso, который лежит на флешке или на диске. Сейчас UEFI-Bios пошли с заморочками, там остаются записи о ранее установленных системах. «Настроенный» образ чем сделал, откуда загружаешь.
0 |
|
8 / 10 / 0 Регистрация: 30.04.2011 Сообщений: 198 |
|
|
04.10.2024, 17:15 [ТС] |
|
|
Сообщение от vladj2007 Это не установка, а восстановление из забэкапленного ранее образа (с настроенного образа). Установка делается из .iso, который лежит на флешке или на диске. Сейчас UEFI-Bios пошли с заморочками, там остаются записи о ранее установленных системах. «Настроенный» образ чем сделал, откуда загружаешь. 1. Взял образ Windows 11 LTSC с MSDN. Загрузился в режиме аудита. Далее тестирую установку полученного ISO и получаю вышеуказанную ошибку. Добавлено через 3 часа 56 минут Добавлено через 1 час 31 минуту
0 |
|
Заблокирован |
|
|
05.10.2024, 06:44 |
|
|
0 |
|
8 / 10 / 0 Регистрация: 30.04.2011 Сообщений: 198 |
|
|
05.10.2024, 07:29 [ТС] |
|
|
Сообщение от HP Fedora Чтобы не мучить очко Я хочу использовать механизмы от Microsoft. Плюс иметь больше свободы. NTlite не подходит.
0 |
|
Заблокирован |
|
|
05.10.2024, 09:01 |
|
|
moverast, это и делает NTlite без замучивания очка
0 |
|
Заблокирован |
|
|
05.10.2024, 09:35 |
|
|
moverast, за 12 минут мы имеем образ содержащий все правильные драйверы от производителя ноутбука Миниатюры
0 |
|
Заблокирован |
|
|
05.10.2024, 10:48 |
|
|
moverast, есть ещё такое мнение: по Соглашению нельзя вносить изменения в ПО, можно только редактировать образ, ты по ходу изменения внёс в ПО какие-то, ну хз, я так считаю
0 |
|
8 / 10 / 0 Регистрация: 30.04.2011 Сообщений: 198 |
|
|
05.10.2024, 12:22 [ТС] |
|
|
Сообщение от HP Fedora за 12 минут мы имеем образ содержащий все правильные драйверы от производителя ноутбука Мне не нужно интегрировать драйвера. Мне нужно установить обновления и настроить операционную систему, как мне удобно. Добавлено через 33 секунды Сообщение от HP Fedora есть ещё такое мнение: по Соглашению нельзя вносить изменения в ПО, можно только редактировать образ, ты по ходу изменения внёс в ПО какие-то, ну хз, я так считаю Я для эксперимента не вносил никаких изменений и сразу сделал захват образа. В итоге всё равно: «Ошибка при установке Windows 11».
0 |
|
8 / 10 / 0 Регистрация: 30.04.2011 Сообщений: 198 |
|
|
05.10.2024, 13:15 [ТС] |
|
|
Обратил внимание. что ошибка выходит после сообщения, что сейчас будет перезагрузка. Появляется ошибка. Если нажать ОК, то начинается циклическая перезагрузка. Достал логи установки. Вижу следующие ошибки в setupact.log: Error MOUPG CSetupManager::Execute(345): Result = 0x800700B7 и в setuperr.log: 2024-10-05 15:43:46, Error IBSLIB BCD: Failed to add system store from file. File: \Device\HarddiskVolume1\EFI\Microsoft\Bo ot\BCD Status: c000000f[gle=0x00000002] Погуглил 0x800700B7, но все результаты разные. Непонятно что делать.
1 |
|
Заблокирован |
|
|
05.10.2024, 15:12 |
|
|
Сообщение от moverast Мне нужно установить обновления и настроить операционную систему, как мне удобно. не спорь с дядей у NTLite ОЧЕНЬ ОГРОМНЫЙ функционал
0 |
|
Заблокирован |
|
|
05.10.2024, 15:18 |
|
|
moverast, при постановке обновлений в очередь для интеграции в NTLite не нужно ничего самому выбирать, как по дефолту выбраны обновления так и оставить
0 |
|
8 / 10 / 0 Регистрация: 30.04.2011 Сообщений: 198 |
|
|
05.10.2024, 17:03 [ТС] |
|
|
Проблема решена. Нужно удалить папку «Windows.old». Видимо Microsoft очень спешили и забыли это сделать сами.
0 |
|
Новые блоги и статьи
Все статьи Все блоги / |
||||
|
Выполнение асинхронных задач в Python с asyncio
py-thonny 12.05.2025 Современный мир программирования похож на оживлённый мегаполис – тысячи процессов одновременно требуют внимания, ресурсов и времени. В этих джунглях операций возникают ситуации, когда программа. . . |
Работа с gRPC сервисами на C#
UnmanagedCoder 12.05.2025 gRPC (Google Remote Procedure Call) — открытый высокопроизводительный RPC-фреймворк, изначально разработанный компанией Google. Он отличается от традиционых REST-сервисов как минимум тем, что. . . |
CQRS (Command Query Responsibility Segregation) на Java
Javaican 12.05.2025 CQRS — Command Query Responsibility Segregation, или разделение ответственности команд и запросов. Суть этого архитектурного паттерна проста: операции чтения данных (запросы) отделяются от операций. . . |
Шаблоны и приёмы реализации DDD на C#
stackOverflow 12.05.2025 Когда я впервые погрузился в мир Domain-Driven Design, мне показалось, что это очередная модная методология, которая скоро канет в лету. Однако годы практики убедили меня в обратном. DDD — не просто. . . |
Исследование рантаймов контейнеров Docker, containerd и rkt
Mr. Docker 11.05.2025 Когда мы говорим о контейнерных рантаймах, мы обсуждаем программные компоненты, отвечающие за исполнение контейнеризованных приложений. Это тот слой, который берет образ контейнера и превращает его в. . . |
|
Micronaut и GraalVM — будущее микросервисов на Java?
Javaican 11.05.2025 Облачные вычисления безжалостно обнажили ахиллесову пяту Java — прожорливость к ресурсам и медлительный старт приложений. Традиционные фреймворки, годами радовавшие корпоративных разработчиков своей. . . |
Инфраструктура как код на C#
stackOverflow 11.05.2025 IaC — это управление и развертывание инфраструктуры через машиночитаемые файлы определений, а не через физическую настройку оборудования или интерактивные инструменты. Представьте: все ваши серверы,. . . |
Инъекция зависимостей в ASP.NET Core — Практический подход
UnmanagedCoder 11.05.2025 Инъекция зависимостей (Dependency Injection, DI) — это техника программирования, которая кардинально меняет подход к управлению зависимостями в приложениях. Представьте модульный дом, где каждая. . . |
Битва за скорость: может ли Java догнать Rust и C++?
Javaican 11.05.2025 Java, с её мантрой «напиши один раз, запускай где угодно», десятилетиями остаётся в тени своих «быстрых» собратьев, когда речь заходит о сырой вычислительной мощи. Rust и C++ традиционно занимают. . . |
Упрощение разработки облачной инфраструктуры с Golang
golander 11.05.2025 Причины популярности Go в облачной инфраструктуре просты и одновременно глубоки. Прежде всего — поразительная конкурентность, реализованная через горутины, которые дешевле традиционных потоков в. . . |
Наверх