
Все способы:
- Способ 1: Проверка доступа к интернету
- Способ 2: Настройки брандмауэра
- Способ 3: Разрешение удаленного подключения
- Способ 4: Отключение спящего режима
- Способ 5: Удаление обновления
- Способ 6: Установка пароля
- Способ 7: Изменение типа соединения
- Способ 8: Редактирование системного реестра
- Вопросы и ответы: 0
Способ 1: Проверка доступа к интернету
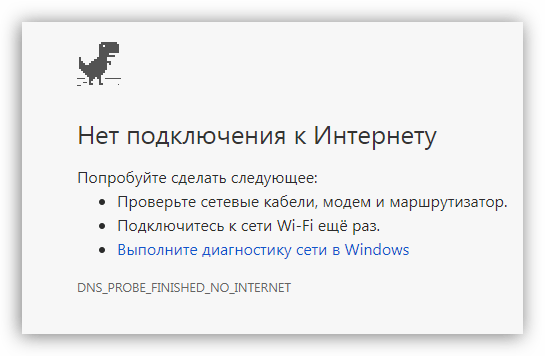
Если не удается подключиться к удаленному рабочему столу, в первую очередь проверьте доступ к интернету, ведь соединение происходит между устройствами по сети. Для проверки достаточно запустить браузер и попытаться посетить несколько веб-сайтов.
Если вы обнаружили, что с интернетом на компьютере есть проблемы, ознакомьтесь с нашими инструкциями с решением наиболее распространенных проблем.
Подробнее: Решение проблемы с неработающим интернетом на ПК
Способ 2: Настройки брандмауэра
Еще одна причина, из-за которой не подключается удаленный рабочий стол в Windows 10, — это настройки встроенного брандмауэра, где активна блокировка доступа к нему:
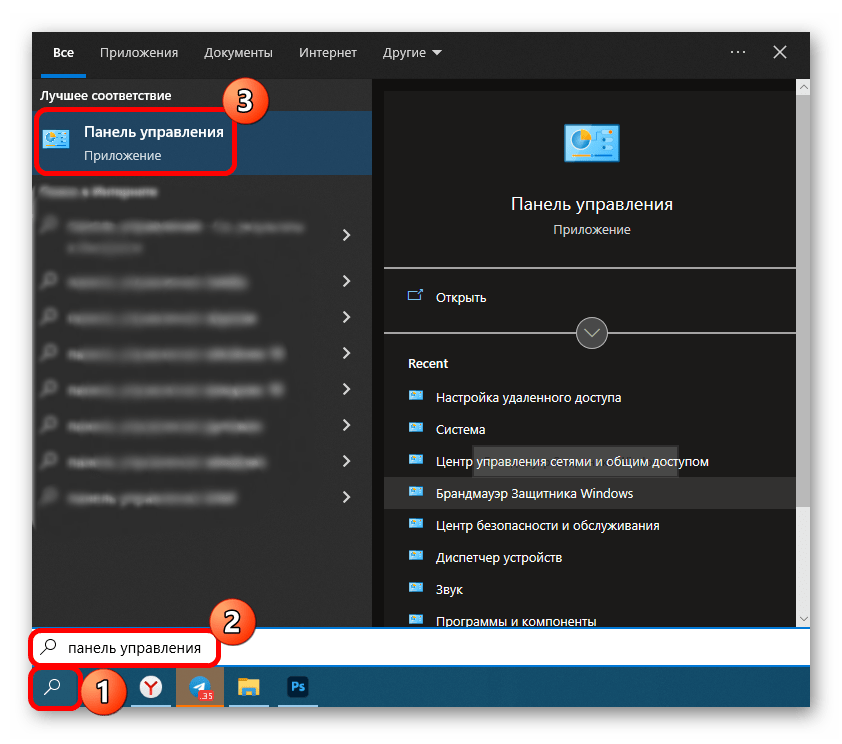
- Запустите «Панель управления», используя поиск системы.
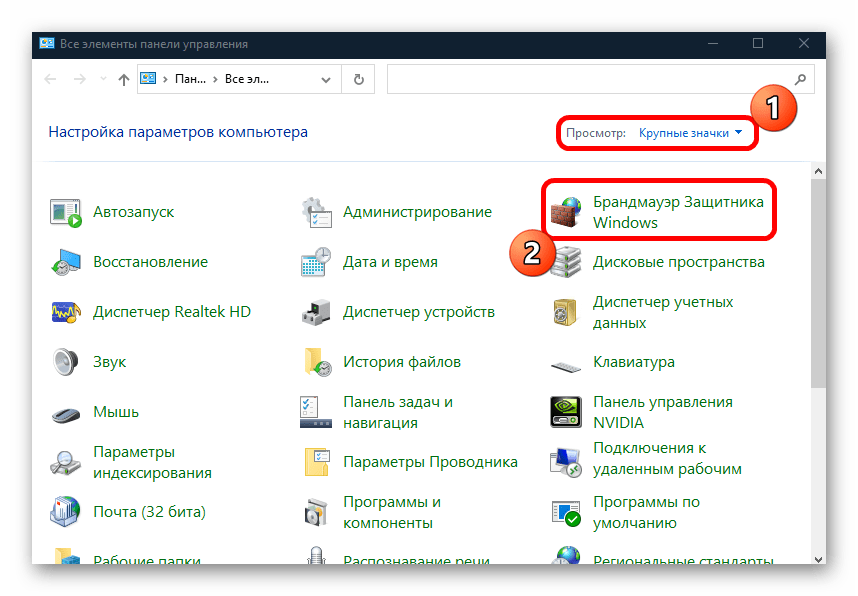
- Для удобства выберите отображение разделов в виде крупных значков, затем перейдите в «Брандмауэр Защитника Windows».
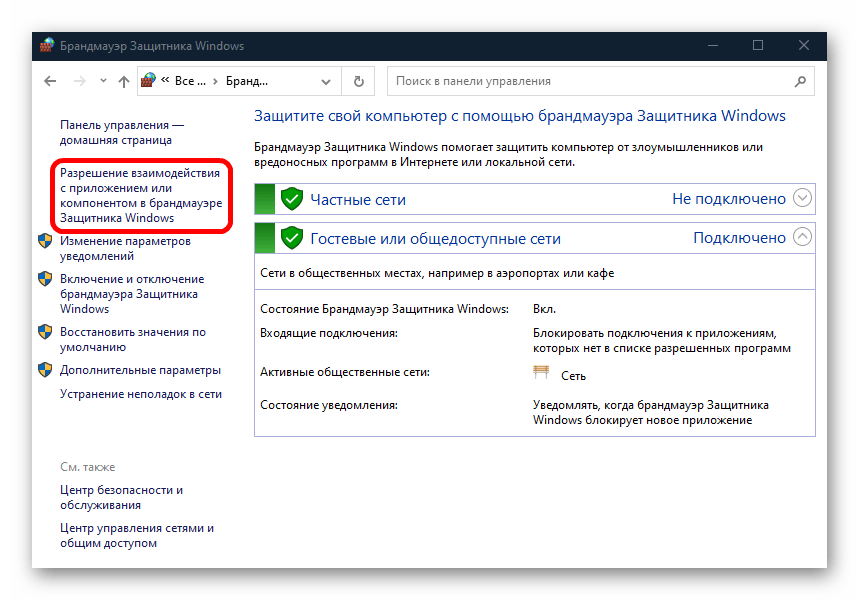
- На панели слева кликните по строке «Разрешение взаимодействия с приложением или компонентом в брандмауэре Защитника Windows».
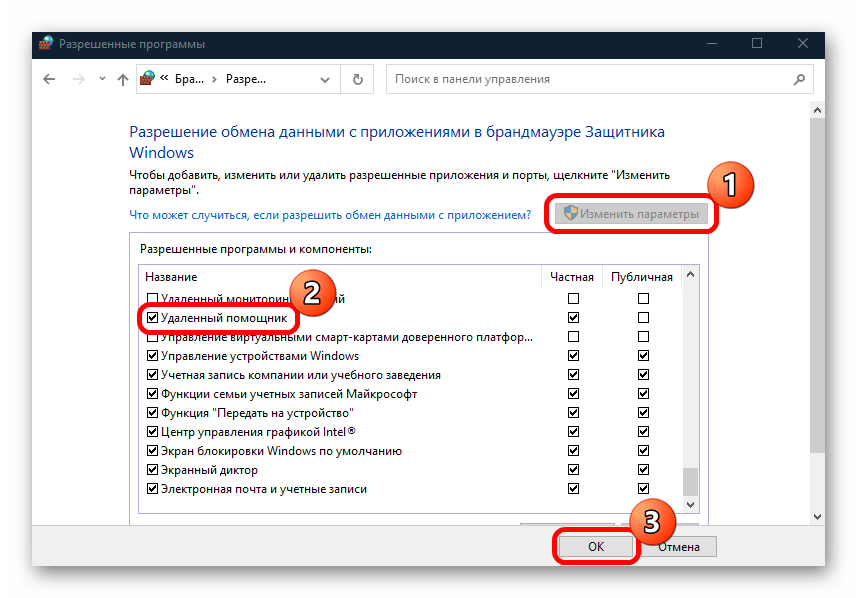
- Щелкните по кнопке «Изменить параметры», чтобы настройки стали активными. Отметьте галочкой пункт «Удаленный помощник» — он отвечает за подключение удаленных рабочих столов. Также можно выбрать тип сети, для которой будет доступна функция. Нажмите на «ОК», чтобы сохранить настройки.
После этого можете попробовать вновь подключить к рабочему столу.
Если у вас установлен сторонний антивирус, то проверьте, не блокирует ли он подключение. Алгоритм действий отличается, но обычно этот параметр можно найти в настройках программы.
Способ 3: Разрешение удаленного подключения
Если вы впервые используете функцию подключения к удаленному рабочему столу, то стоит проверить разрешение этой возможности не только в брандмауэре, но и в самой системе:
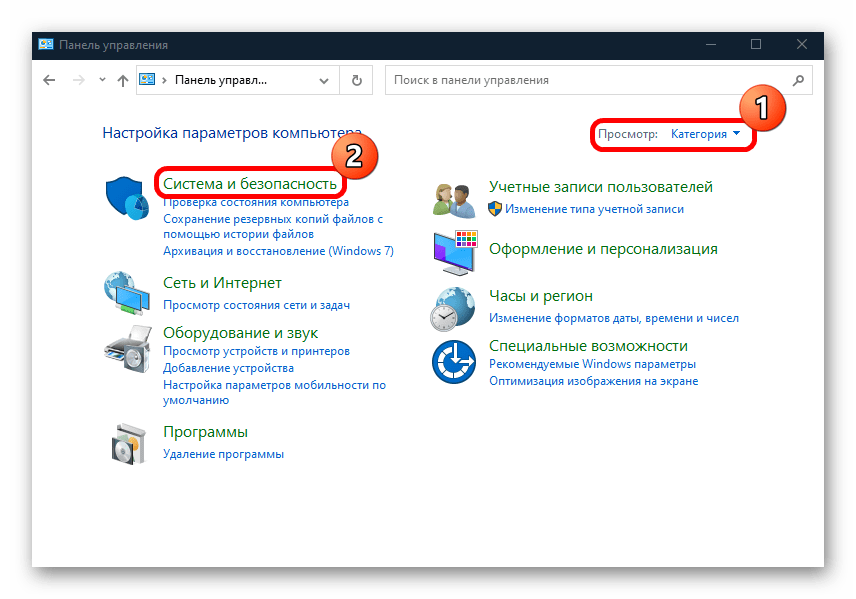
- В «Панели управления» лучше выбрать «Категория» в меню «Просмотр». Затем кликните по разделу «Система и безопасность».
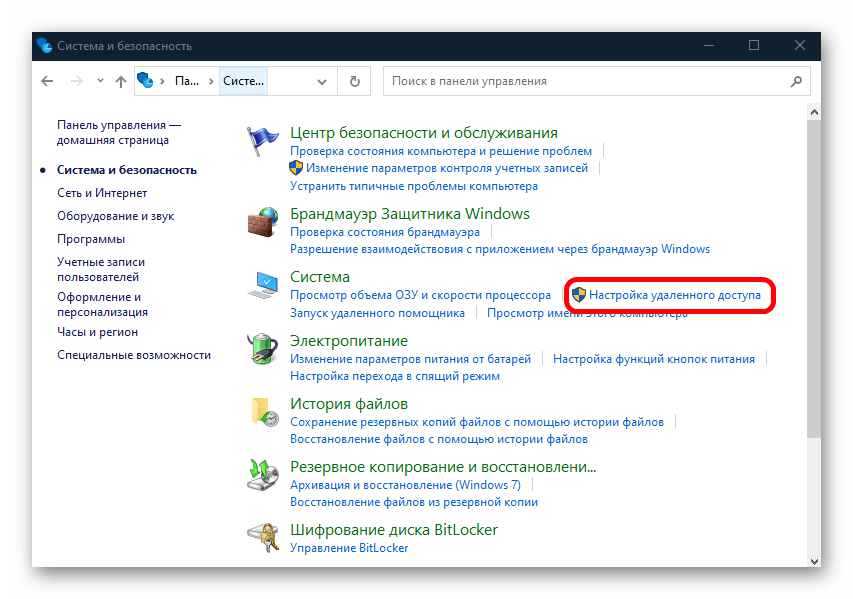
- Далее в блоке «Система» щелкните по строке «Настройка удаленного доступа».
- В новом окне перейдите на вкладку «Удаленный доступ», а в разделе «Удаленный рабочий стол» отметьте пункт «Разрешить удаленные подключения к этому компьютеру». Кликните по «ОК», чтобы настройки вступили в силу.

После этого удаленные подключения станут включены, поэтому проблема должна быть решена. Если не сработало, то переходите к следующим способам.
Способ 4: Отключение спящего режима
Как ни странно, но иногда осуществить удаленное подключение не удается из-за включенного спящего режима. Если ваш компьютер уходит в сон после определенного периода бездействия, то попробуйте отключить данную функцию через системные «Параметры» или классическую «Панель управления». Более подробную информацию можно узнать из нашего отдельного материала.
Подробнее: Отключение спящего режима в Windows 10

Способ 5: Удаление обновления
Разработчики Microsoft регулярно выпускают апдейты, которые предназначены для исправления ошибок и улучшения работы системы. Одно из таких обновлений может блокировать попытку подключения к удаленному рабочему столу, поэтому есть смысл попробовать его удалить, чтобы исправить неполадку:
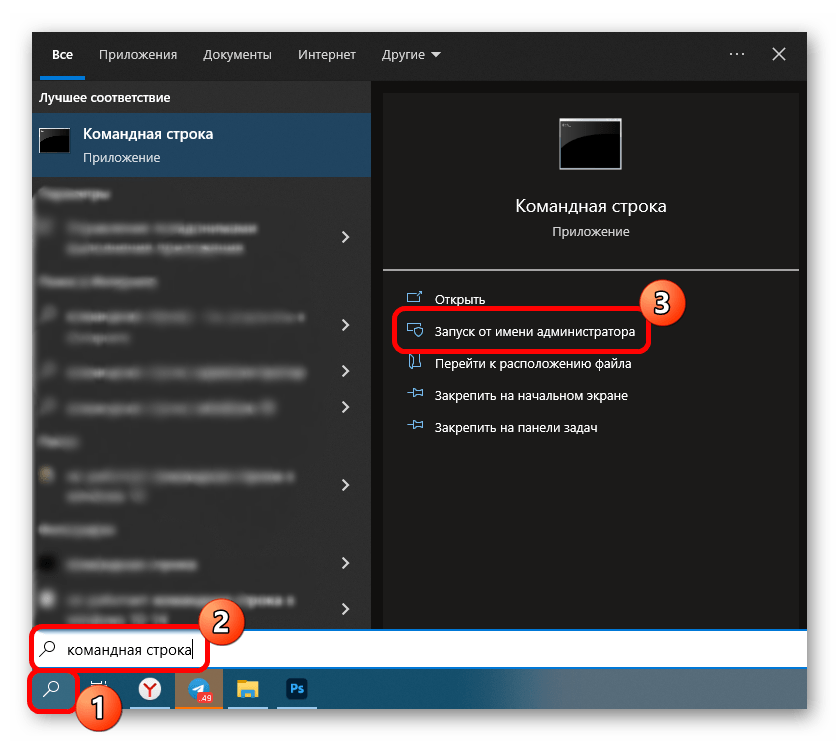
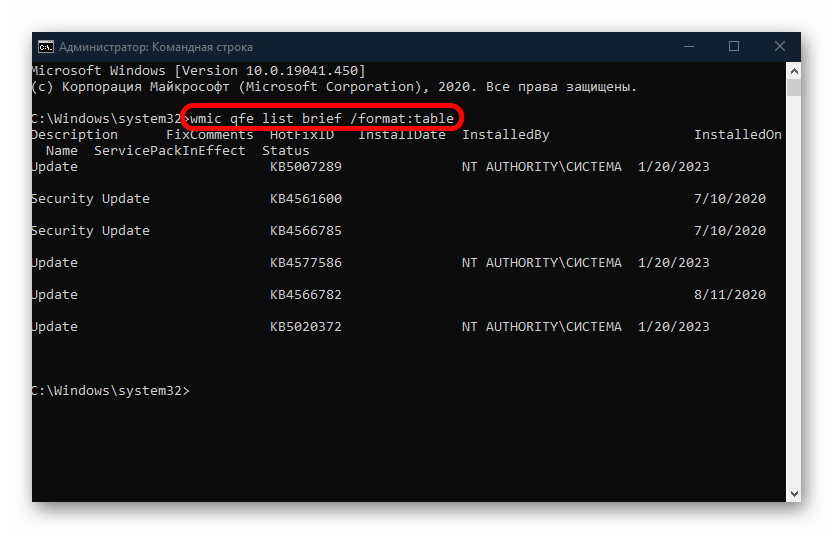
- Запустите «Командую строку» от имени администратора. Проще всего воспользоваться строкой системного поиска.
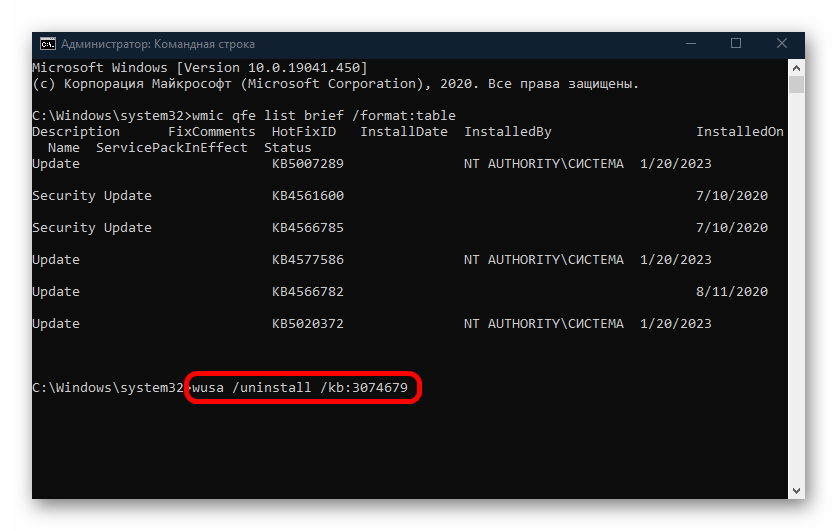
- Чтобы отобразить список всех установленных обновлений в окне консоли, выполните команду
wmic qfe list brief /format:table. - Если в перечне есть обновление безопасности «KB3074679», то вставьте
wusa /uninstall /kb:3074679и нажмите на клавишу «Enter».
После того как проблемное обновление удалено, перезагрузите компьютер и попытайтесь снова подключиться к удаленному рабочему столу.
Способ 6: Установка пароля
Отсутствие пароля для учетной записи также является одной из причин удаленного подключения. Если профиль никак не защищен, то ни одно входящее подключение невозможно. Есть несколько способов установить пароль – об этом писал наш автор в отдельном руководстве.
Подробнее: Установка пароля на Windows 10

Способ 7: Изменение типа соединения
Если вы используете общедоступное подключение, то, скорее всего, оно препятствует удаленному подключению. Попробуйте изменить тип сети:
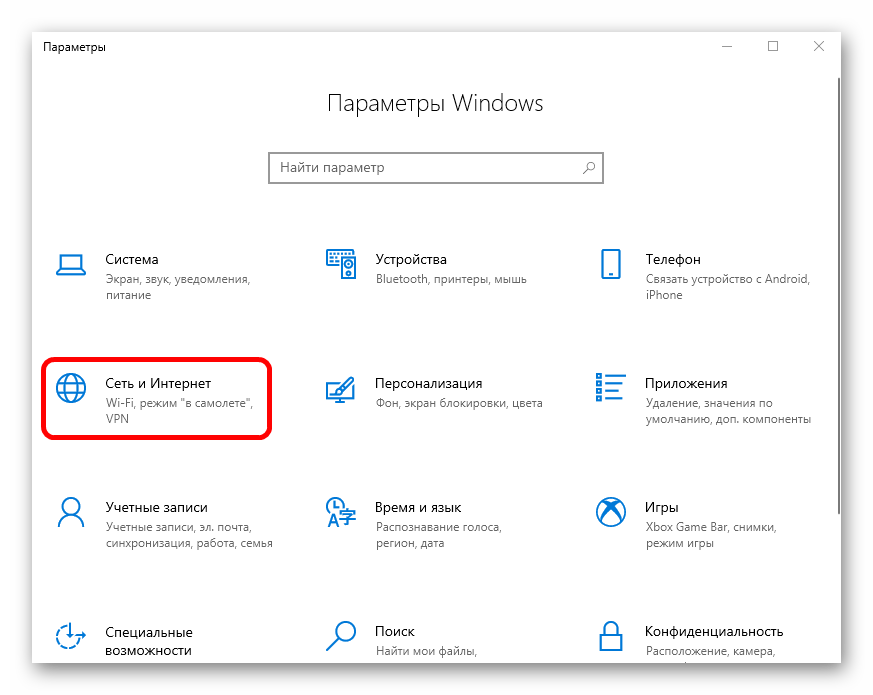
- Нажмите на «Пуск» и перейдите в системные «Параметры».
- Выберите раздел «Сеть и Интернет».
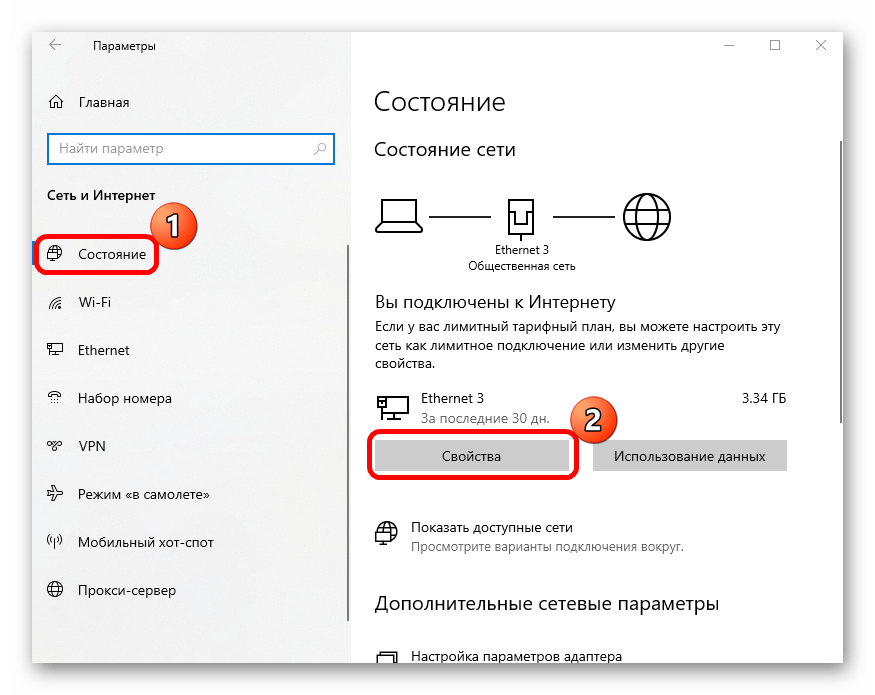
- На вкладке «Состояние» нажмите на «Свойства» активного подключения.
- В блоке «Сетевой профиль» поставьте отметку у пункта «Частные».

При активном общедоступном подключении срабатывает встроенная защита, поэтому при смене сетевого профиля есть вероятность, что проблема будет решена.
Способ 8: Редактирование системного реестра
В некоторых случаях может помочь редактирование системного реестра, а точнее, создание нового параметра, который заставит протокол удаленного рабочего стола использовать PRC/HTTP вместо HTTP/UDP.
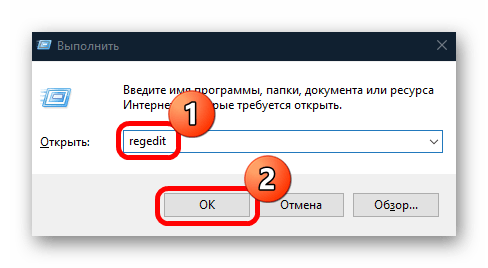
- Нажмите на клавиши «Win + R», затем введите команду
regeditи выполните ее, кликнув по кнопке «ОК». - Перейдите по пути
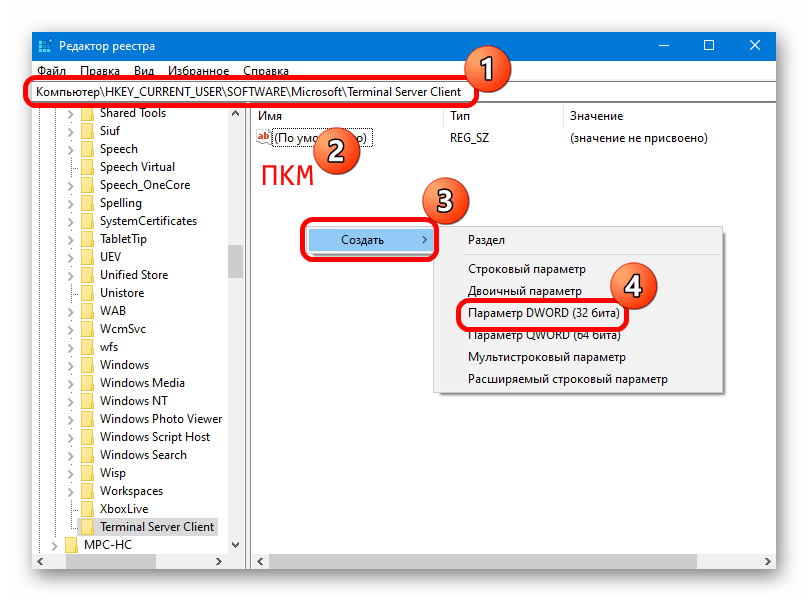
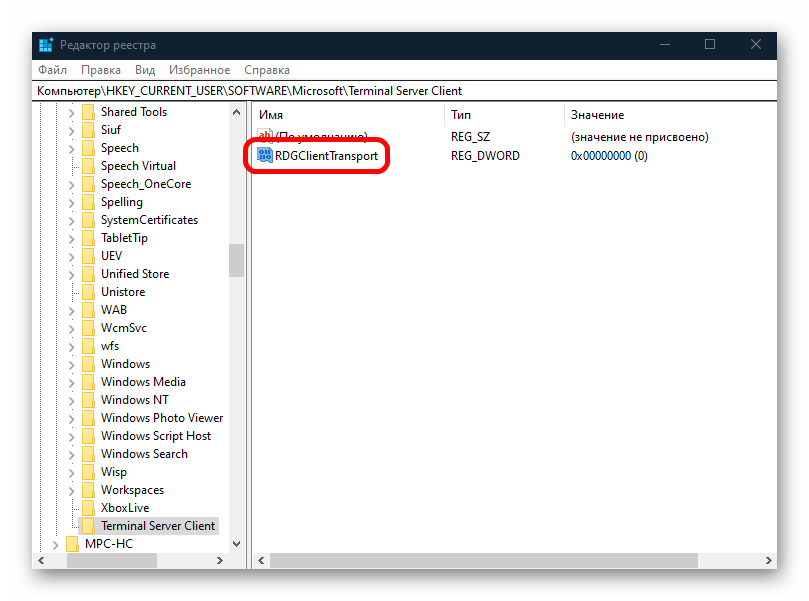
HKEY_CURRENT_USER\SOFTWARE\Microsoft\Terminal Server Client. В последнем каталоге создайте новый ключ. Для этого кликните правой кнопкой мыши по свободной области центральной части окна, затем наведите курсор на пункт «Создать» и выберите «Параметр DWORD». - Задайте имя новому параметру – «RDGClientTransport». Дважды кликните по нему ЛКМ, чтобы открыть окно с его свойствами.
- В поле «Значение» введите «1», остальное оставьте без изменений и сохраните настройки.
Как только нужные изменения будут внесены, перезагрузите систему и проверьте, сработал ли способ, попытавшись подключиться к удаленному рабочему столу.
Наша группа в TelegramПолезные советы и помощь
Remote Desktop is a powerful Windows 10 feature that allows users to remotely access and control their computer from anywhere, providing they have an internet connection. However, it can be incredibly frustrating when you’re ready to work or access files remotely, and you find that the Remote Desktop feature won’t connect. This issue can stem from a variety of causes, including network problems, incorrect settings, or system permissions. In this article, we’ll explore the common reasons why Remote Desktop might not connect in Windows 10 and provide clear, step-by-step solutions to get you back up and running.

Table of Contents
Firstly, make sure your internet connection is working fine. Try running a speed test (Speedtest by Ookla) to verify the same. If you have an extremely slow connection, some issues are bound to happen.
Method 1: Allow Remote Connections to your Computer
By default, remote connections are disabled and therefore, if you are trying to set up a connection for the first time, you need to manually enable the feature. Allowing remote connections is as simple as toggling on a single switch in the settings.
1. Open Windows Settings by pressing the Windows Key + I simultaneously. Click on System.
2. Move to the Remote Desktop tab (second last) from the left-hand pane and toggle on the switch for Remote Desktop.

3. If you receive a pop-up requesting affirmation on your action, simply click on Confirm.

Also Read: Fix The L2TP Connection Attempt Failed Error on Windows 10
Method 2: Modify Firewall Settings
Remote Desktop while being an extremely handy feature can also act as a doorway for hackers and allow them unrestricted access to your personal computer. To keep a check on your computer’s security, a remote desktop connection isn’t allowed through the Windows Firewall. You will need to manually allow Remote Desktop through the defender firewall.
1. Type Control Panel in either the Run command box or the start search bar and press enter to open the application.
2. Now, click on Windows Defender Firewall.
3. In the following window, click on the Allow an app or feature through the Windows Defender Firewall hyperlink.

4. Click on the Change Settings button.
5. Scroll down the Allow apps and features list and check the box next to Remote Desktop.
6. Click on OK to save the modification and exit.

Along with the Defender Firewall, an antivirus program you have installed on your computer may be blocking a remote connection from being set up. Temporarily disable the antivirus or uninstall it and check if you are able to create a connection.
Also Read: Access Your Computer Remotely Using Chrome Remote Desktop
Method 3: Enable Remote Assistance
If you are having trouble setting up a remote connection, try enabling remote assistance and then sending an invitation to the other user.
1. Double-click on the Windows File Explorer shortcut icon on your desktop to launch the application and right-click on This PC.
2. Click on Properties in the ensuing context menu.

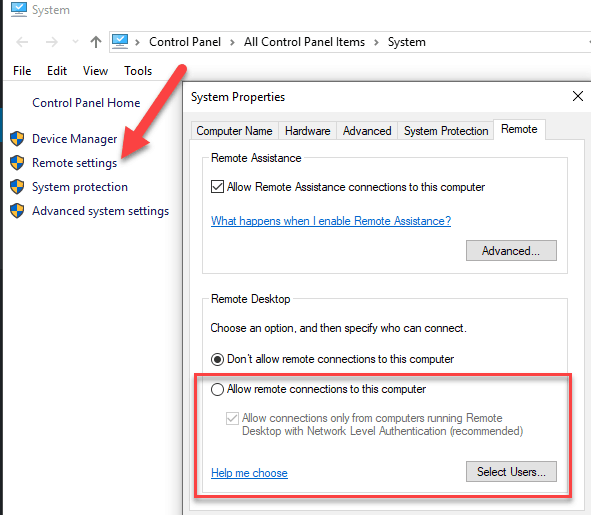
3. Open Remote Settings.

4. Check the box next to ‘Allow Remote Assistance connections to this computer’.

5. Remote Assistance also needs to be manually allowed through the firewall. So follow steps 1 through 4 of the previous method and tick the box next to Remote Assistance.
To Send an Assistance Invitation:
1. Open the Control Panel and click on the Troubleshooting item.
2. On the left pane, click on Get help from a friend.
3. Click on Invite someone to help you. in the following window.

4. Choose any of the three methods to invite your friend over. For the purpose of this tutorial, we will continue with the first option, i.e, Save this invitation as a file. You can also directly mail the invitation.

5. Save the invitation file in your preferred location.

6. Once the file is saved, another window displaying the file password will open up. Carefully copy the password and send that to your friend. Do not close the Remote Assistance window until the connection is established, otherwise, you will need to create and send a new invitation.

Also Read: Fix Remote Desktop Cannot Connect to the Remote Computer
Method 4: Disable Custom Scaling
An important setting that often gets overlooked when setting up a remote connection is custom scaling. To those unaware, Windows allows users to set a custom size for their text, apps, etc. using the Custom Scaling feature. However, if the feature (custom scale) isn’t compatible with the other device, issues will arise in remotely controlling the computer.
1. Launch Windows Settings once again and click on System.
2. On the Display settings page, click on Turn off custom scaling and sign out.
3. Sign back into your account and check if you are able to connect now.
Also Read: How to Enable Remote Desktop on Windows 10
Method 5: Modify the Registry Editor
Some users have been able to solve the remote desktop won’t connect problem by modifying the Terminal Server Client folder in the Registry editor. Be extremely careful in following the below steps and making changes to the registry as any accidental mistake can prompt additional issues.
1. Press Windows key + R to launch the Run command box, type Regedit, and hit the enter key to open the Registry Editor.
2. Using the navigation menu on the left panel, head down to the following location:
HKEY_CURRENT_USER\Software\Microsoft\Terminal Server Client
3. Right-click anywhere on the right panel and select New followed by DWORD (32-bit) Value.

4. Rename the value to RDGClientTransport.
5. Double-click on the newly created DWORD Value to open its Properties and set Value Data as 1.

Method 6: Delete existing Remote Desktop Credentials
If you had previously connected to a computer but are now facing issues in connecting again, try deleting the saved credentials and starting all over again. It is quite possible that some of the details were changed and thus, the computers fail to connect.
1. Perform a search for Remote Desktop Connection using the Cortana search bar and hit enter when the results arrive.
2. Click on the Show Options arrow to reveal all tabs.

3. Move to the Advanced tab and click on the ‘Settings…’ button under Connect from anywhere.

4. Delete the existing credentials for the computer you are having a hard time connecting to.
You can also manually enter the IP address of a remote computer and edit or delete the credentials from the General tab itself.
Also Read: How to Setup Remote Desktop Connection on Windows 10
Method 7: Change Network Settings
For the sake of our digital security, remote desktop connections are only allowed on private networks. So if you are connected to a public network, switch to a more secure private one or manually set the connection as private.
1. Open Windows Settings once again and click on Network & Internet.
2. On the Status page, click on the Properties button under your current network.
3. Set the Network Profile as Private.

Method 8: Add the IP Address to the Host’s file
Another manual solution to the remote desktop won’t connect issue is adding the remote computer’s IP address to the host’s file. To know a Computer’s IP address, open Settings > Network & Internet > Properties of the currently connected network, scroll down to the end of the page, and check the IPv4 value.
1. Search for Command Prompt in the Start Search bar and select Run as Administrator.
2. Type the following command and press enter
cd C:/Windows/System32/Drivers/etc
3. Next, execute notepad hosts to open the host’s file in the notepad application.

4. Add the remote computer’s IP address and press Ctrl + S to save the changes.
If issues with the remote desktop feature only started after performing the most recent Windows Update, uninstall the update or wait for another one to arrive with the bug hopefully fixed. Meanwhile, you can use one of the several third-party remote desktop programs available for Windows. As mentioned earlier, TeamViewer and Anydesk are crowd favorites, free, and very easy to use. RemotePC, ZoHo Assist, and LogMeIn are a few great paid alternatives.
Recommended:
- Change Remote Desktop Port (RDP) in Windows 10
- A Comprehensive Guide to Discord Text Formatting
- 5 Ways To Remove Chromium Malware From Windows 10
- How to Show CPU and GPU Temperature on Taskbar
We hope this guide was helpful and you were able to fix Remote Desktop Won’t Connect in Windows 10. Still, if you have any doubts then feel free to ask in the comment section below.
Подключение к удаленному рабочему столу с помощью протокола RDP является распространенной задачей. Пользователи могут в дистанционном формате выполнять свои рабочие задачи на корпоративном компьютере и в корпоративной сети. Особенно это актуально в случаях, когда для работы требуется большой объем вычислительных ресурсов, которые могут быть недоступны на домашнем ПК.
В этой статье мы рассмотрим несколько типовых проблем с RDP и пути их решения.
Две типовые проблемы при подключении
Первая стандартная ошибка при подключении выглядит следующим образом:

Перед возникновением такой ошибки обычно пользователь видит сообщение «Инициализация удаленного подключения», после которого компьютер выдаёт ошибку.
Вторая типовая ошибка — это ошибка «Удаленному рабочему столу не удалось подключиться к удаленному компьютеру».
Каждая из ошибок имеет схожие причины и пути решения, поэтому мы в этой статье мы рассмотрим типовые способы устранения проблем с подключением, которые будут актуальны для каждой ошибки.
Вот какие причины могут привести к проблемам с подключением по RDP:
- неправильные настройки подключения;
- проблема соответствия доменного имени и IP-адреса удаленного компьютера;
- кэш DNS-сервера;
- кэш RDP;
- использование порта RDP другим приложением;
- брандмауэр блокирует подключение;
- обновление Windows.
Давайте рассмотрим эти причины и пути их устранения.
Проверьте настройки подключения
Одна из причин, по которой может возникнуть проблема с подключением по RDP — неправильные настройки самого подключения. Ниже перечислены несколько настроек, которые могут повлиять на возможность подключения по RDP:
Неправильные учетные данные
Если вы вводите неправильные данные для авторизации на удаленном компьютере, подключение по RDP будет невозможно. Убедитесь, что вы вводите правильные учетные данные, и что они имеют достаточные права для подключения.
Неправильный адрес удаленного компьютера
Если для подключения по RDP пользователь указывает неправильное имя компьютера, то, соответственно, клиент не сможет его найти и выдаст ошибку «Удаленному рабочему столу не удалось найти компьютер». Чтобы узнать имя удаленного компьютера для подключения, выполните следующие шаги:
- Откройте «Проводник» на удаленном компьютере и перейдите на вкладку «Этот компьютер».
- Кликните правой кнопкой мыши в рабочей зоне и нажмите «Свойства».
- После этого откроется страница «Система». В разделе «Имя компьютера, имя домена и параметры рабочей группы» вы найдете нужные данные для подключения.
Если проблема не решена, переходите к следующему разделу.
Cloud
Подключение к удаленному компьютеру по IP-адресу
В качестве адреса при подключении к удаленному компьютеру обычно указывается его доменное имя. Доменное имя — это символьный адрес сервера. Ему сопоставляется определенный IP-адрес. Доменные имена нужны для удобства пользователей, чтобы им не приходилось каждый раз при посещении google.com вбивать в браузерную строку адрес ближайшего сервера Google. Доменные имена и соответствующие им IP-адреса хранятся на DNS-сервере. Иногда доменному имени в DNS-сервере присваивается неправильный адрес — в таком случае пользователь не сможет подключиться к серверу по домену. Чтобы исключить или, наоборот, исправить эту проблему, давайте попробуем подключиться к удаленному компьютеру по IP-адресу.
Чтобы узнать IP-адрес удаленного компьютера, откройте на нём командную строку: нажмите Win+R и введите в окне cmd. В командной строке выполните команду ipconfig. Так вы узнаете IP-адрес компьютера:
Теперь при подключении к удаленному компьютеру через RDP используйте IP, а не доменное имя.
Попробуйте очистить кэш DNS
Иногда помогает очистка кэша DNS. Для этого откройте командную строку и выполните в ней команду ipconfig / flushdns:
Добавьте IP-адрес RDP-сервера в файл hosts
Файл hosts в Windows — это текстовый файл, который содержит ассоциации доменных имен с IP-адресами. Этот файл используется компьютером как первичный источник информации об именах хостов для компьютера, перед тем, как он обращается к DNS-серверу за информацией. Чтобы исправить ошибку в DNS-сервере, вы можете добавить в hosts запись с доменным именем и IP-адресом удаленного компьютера.
Для этого откройте файл hosts с помощью Блокнота. Файл находится в каталоге C:\Windows\System32\drivers\etc\. Добавьте в него новую строку с IP-адресом удаленного компьютера и его доменным именем и сохраните изменения.
По умолчанию для подключения по RDP используется порт 3389. Если какое-то другое приложение на компьютере использует такой же порт, то при подключении возникнет ошибка. Давайте попробуем изменить порт на 3388 и проверим, получится ли подключиться по RDP с другим портом. Для этого:
- Откройте редактор реестра и перейдите в каталог RDP-Tcp.
- Найдите запись PortNumber.
- Нажмите ПКМ на неё и выберите «Изменить».
- Введите любой другой номер порта в поле данных значения.
Попробуйте воспользоваться альтернативным клиентом RDP
Если у вас не получилось устранить проблему с подключением по RDP через клиент от Microsoft, то вы можете воспользоваться аналогами. Например, AnyDesk или Remote Utilities.
Откатите или установите обновления Windows
Во многих случаях функциональность удаленного рабочего стола (RDP) может быть нарушена после обновления Windows, поскольку один из вновь установленных файлов может нарушить работу RDP. Также существует проблема с шифрованием CredSSP, которая лечится установкой обновления.
Таким образом, если ваша операционная система недавно обновлялась, попробуйте осуществить откат.
Измените настройки брандмауэра
Отключение брандмауэра — это простой способ проверить, является ли брандмауэр причиной проблем с подключением по RDP. Если при выключенном брандмауэре проблема исчезает, то необходимо настроить его или оставить отключенным. Последний вариант не совсем безопасен, поэтому осуществим его настройку.
Чтобы настроить брандмауэр:
- Откройте Брандмауэр Защитника Windows и нажмите в левом меню «Разрешение взаимодействия с приложением или компонентом в брандмауэре Защитника Windows».
- Нажмите «Изменить параметры».
- В перечне программ найдите «Удаленный рабочий стол» и установите напротив него флажки «Частная» и «Публичная».
Закройте окно и попробуйте подключиться. Если проблема была в брандмауэре, теперь вы сможете подключиться к удаленному компьютеру.
Заключение
В этом материале мы рассмотрели две типовые проблемы при подключении к удаленному рабочему столу по RDP. RDP-протокол позволяет организовать удаленное взаимодействие с рабочими станциями. От пользователя потребуется обеспечить лишь стабильное подключение.
Here you will be finding basic and simple troubleshooting tips for Windows Remote Desktop connection problem. You can apply and check every method mentioned below when you can’t connect to a Windows 10 or Windows 7/8.1 computer with RDP client from another computer. Understanding the requirements of RDP (Remote Desktop Protocol) and how it works will solve most of the problems.
The Remote Desktop connection utility helps to take control of other computers over the network and work like you are sitting in front of them. When it comes to Windows 7 and later Operating Systems such as Windows 10 and 8.1, we can’t connect remote desktop easily because of the default security settings. This article explains how to enable remote desktop connection in Windows 10 and Windows 7, so all versions of Windows OS users can connect remotely.

6 Steps to Fix Remote Desktop Connectivity Issue in Windows 10/8.1/7
Before dive deep, make sure you have the active network connection between both computers. If no network communication, obviously, the remote desktop will not work.
Since it uses RDP packets to communicate, your routers and firewalls should not block this packet. The following methods are applicable for server versions such as Windows 2012 R2, 2016 and 2019 also when the remote desktop is not working.
1) Allow Connection for All Versions
By default, remote desktop is disabled in the latest Windows Operating Systems. To Enable it, Right-click ‘My Computer’ and select Properties.
Got go Remote Settings as shown below.
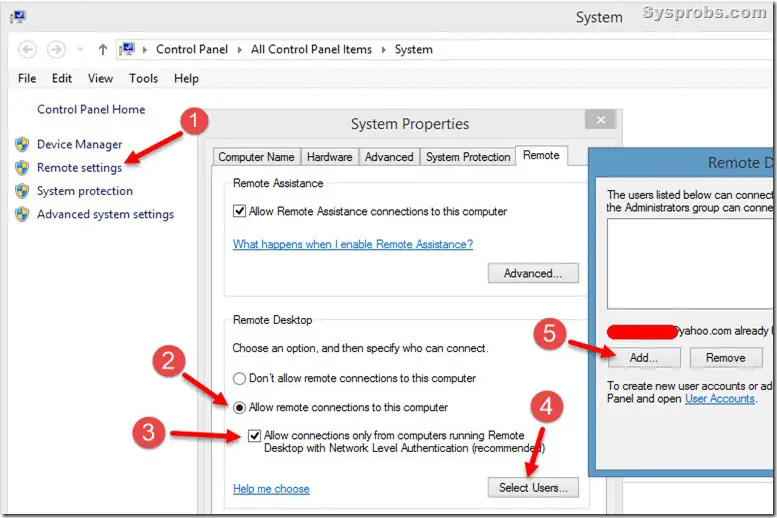
Two options are available to enable remote desktop connection in Windows 10.
Select Allow connections from computers running any version of Remote Desktop to allow people using any versions of Remote Desktop or RemoteApp to connect your computer. This is a good choice if you don’t know the exact version of the client, but it is less secure than the second option and not recommended. Also, you need to use this option if the request comes from older versions of Operating Systems.
Select Allow connections only from computers running Remote Desktop with Network Level Authentication to allow computers using the Remote Desktop or RemoteApp version which supports Network Level Authentication to connect your computer. This is the most secure choice. Since most of the recent Operating Systems support this authentication method, it is highly recommended to use this option.
Enable RDP in Windows 10
Windows 10 has similar settings to enable RDP connections.
If the Network Level Authentication option is enabled, the older versions of remote desktop clients can’t be used to connect the latest Windows Operating Systems.
2) Allow Remote Desktop Connection in Windows Firewall.
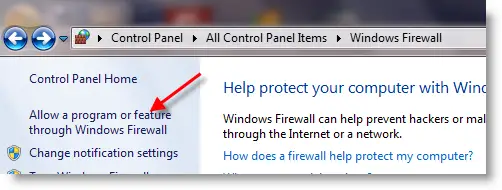
The remote desktop connection uses RDP (Remote Desktop Protocol) that is blocked in Windows firewall by default. But, when we enable Remote desktop connection (as described in step 1), it automatically gets enabled and allows incoming remote desktop connections in the firewall. To confirm it, go to Windows Firewall in control panel.
Click on Allow programs… option as shown below.
In the next screen, you can see which programs are allowed or blocked in Windows Firewall.
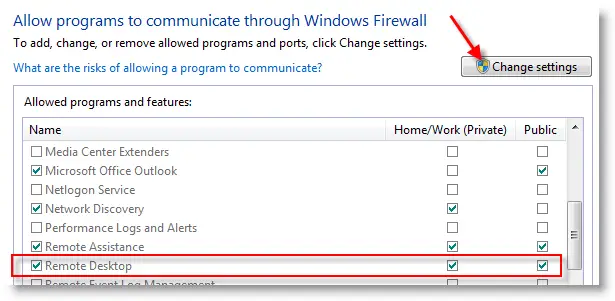
In the above example, Remote Desktop is enabled in Private and Public networks in Windows 7. To change any of the options here, first press ‘Change Settings’ button and modify. Similar settings can be found and used in Windows 10 as well.
If you are using third-party firewall protection tools, then you need to enable the incoming RDP protocol to make it work.
Remote Desktop connection works with RDP traffic on TCP 3389 port.
3) Allowed Remote Desktop Users
Here is one more consideration when we can’t connect Remote Desktop to a Windows computer.
Not all users can take the remote desktop connection to other computers. Only the local administrators, administrator group members, and ‘Remote desktop Users’ group have the ability to use remote desktop connectivity. If you are trying a user account which doesn’t have this privilege, then the remote desktop will not work.
If domain (Active directory) setup is in place, the access of remote desktop connectivity works according to the group policy and permissions. Make sure that the user name you are trying to connect a Windows computer is in the appropriate access group.
Read Also: Simple Tip to access the Facebook desktop full site on your smartphone
4) Check the Remote Desktop Services
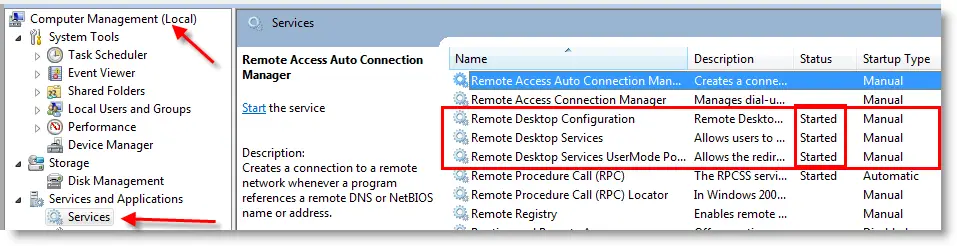
All services related to Remote desktop connections are disabled by default. Once you enable remote desktop (as mentioned in the first step) access, these three services will start automatically. These services should be up and running all the time to accept the incoming remote desktop connection. If you can’t connect RDP to a Windows 10, then you must check these services also.
Go to Computer management, then Services. Look for following services and make sure they are running.
5) Try This If Remote Desktop Connection is Slow
Sometimes the RDP connection will be slow and experience the poor display performance due to slow network connectivity. If you use Windows 8.1/10 remote desktop connection through WAN (Wide Area Network) or the Internet, then you will be facing this issue.
Usually, we can use the RDP connection for basic tasks only, and not for any multimedia or high graphical required activities over the network. Therefore the screen resolution and color depth settings can be reduced to have better experience in a slow network. To do that, before making the connection, change a few settings in display properties of RDP client in Windows 10 or 8.1.
Changing the settings to lower color depth (15 bit in Windows 8.1 as marked by 2) in Remote Desktop Connection program will improve the performance by using minimal bandwidth in slow network connections. Also, reducing the display (in pixels as marked 3) resolution can help in seeing the remote computer in smaller/limited screen size which can hugely improve the performance in a slow network.
5) Connect Remote Desktop to Windows 10 from Outside Network – Internet
If you like to take Remote desktop connection to your Windows 10 or 8.1 through the Internet from anywhere in the world, then there are specific configurations need to be done in the Internet router. Here are a few considerations.
1) The port forwarding should be enabled in the Internet router to forward any incoming RDP connection on public IP (or DNS name) to internal Windows 8.1/10 computer which you like to connect via RDP over the internet.
2) Your home/office internet should have public static IP or DynDNS with a dynamic IP address. Because your internet modem gateway should have a valid static IP or name to be able to accept a connection on the internet.
6) Third-Party Free Apps
This can be the ultimate and simple solution with the additional features if you are looking for a product that can replace tradition Windows remote desktop utility.
These programs will work through the Internet without any changes on your home Internet router or firewall. But unlike Microsoft’s built-in RDP client, some of the free programs require someone to install and accept RDP connection from the destination computer.
1) Ammyy Admin
2) AeroAdmin
3)TeamViewer
Conclusion
Hope this guide is helpful in troubleshooting Windows 10, Windows 8.1/7 and MS server remote desktop connection issues on your home or office network. Also, there are few tweaks and other third-party programs mentioned here to overcome the connectivity issues from the Internet and WAN.
Windows Remote Desktop is a great feature provided by Microsoft in Windows 10 and almost all earlier versions of Windows. Remote Desktop can be used to access the computer over the network. It is also called RDP or Remote Desktop Protocol.
Sometimes RDP in Windows 10 stops working. There are various reasons for this. We will discuss some solutions that you might look for and will help you resolve the issue of RDP in Windows 10 not working.
Pro Tip: If you are in a hurry and don’t have time to troubleshoot, you can use Google Chrome Remote Desktop or TeamViewer 13 as Remote Desktop alternatives.
Otherwise, you can go through the list of possible solutions that may resolve Windows 10 remote desktop not working. Just follow the steps one by one and at the end of each step, see if the remote desktop starts working again.
1. Allow RDP in Windows Firewall
The first time you try to access the remote desktop the windows firewall will not allow you to do so because it is not active by default. It is because of security reasons as it gives security warnings if you try to access your computer from a different device. It may also happen if you are using any other antivirus software that does not let any other device access your computer. So in the case of antivirus the solution may be to uninstall it or stop it from running in the background.
In case of Windows firewall warnings, we have to turn it on
- Type “firewall” in the search and open the Windows Defender Firewall.
- From the left menu click on Allow an app or feature through Windows Firewall.


- Click on change settings
- Now find the Remote Desktop and turn it on


There you go, the Windows firewall will now allow you to connect to this PC remotely using remote desktop protocol.
2. Enable Remote Desktop in Windows Settings
Just like changing the firewall settings, it is necessary that you allow remote connection as well if you are using remote desktop for the very first time. So in order to do this:
- Search for remote settings and you will find Allow Remote connections to your computer, open it by clicking.
- Now in the settings that will open check Allow remote connections to this computer and click OK to save changes.


Remote connections are now enabled and now you can use it for the very first time. In order to use this feature, you have to make sure that your computer is not in hibernation mode or sleep mode, in that case, you won’t be able to connect your computer in remote desktop.
3. Turn off custom scaling
When you try using the remote desktop feature, the scaling feature of windows should be turn off as it might not be compatible with the device that will control your computer. This is a very recommended method as it has helped fix the error of the remote desktop. So in order to turn off the custom scaling follow the method:
- Open the settings You can do that simply by pressing Windows Key + I shortcut.
- Once the settings open, go to the System section.
- Click on Turn off custom scaling and sign out, if it is not already turned off.

Sign in again and try to use remote desktop, hopefully, it will start working.
4. Disable IPv6 protocol
Another option that has worked for many is to disable IPv6 (internet protocol version)on your network adapter. By default, Windows prefers IPv6 over IPv4. So if you are having problems using IPv6 to connect to the servers, you can force your computer to use IPv4 only.
- Open Settings ->Network and Internet -> Ethernet -> Change Adapter options
- Right click on the adapter for which you want to disable it, and select properties.
- Look for the checkbox which says Internet Protocol Version 6 (TCP/IPv6), uncheck it.
- Click on OK, and restart your computer.
There are times when Windows Update will also break the remote desktop connection and create problems for you. We have already written about one recent problem with the RDP authentication error function requested is not supported here.
These are some simple yet useful methods that can help you solve the issue of remote desktop connection. Please share your experiences in the comments below.