
WinSleep — это утилита, предназначенная для управления периодами активности и сна вашего компьютера с целью снижения потребления электроэнергии и увеличения срока службы устройства. Программа особенно полезна для пользователей, стремящихся оптимизировать затраты на электричество за счет более эффективного использования ресурсов ПК. С помощью WinSleep можно легко настроить расписание работы устройства, позволяющее отключать его в периоды простоя, будь то во время работы или отдыха.
Интерфейс программы интуитивно понятен и не перегружен лишними элементами, несмотря на то, что основные функции и настройки представлены на главном экране. В верхней части интерфейса доступен раздел системной информации, где отображаются данные о загрузке процессора, использовании сети и времени бездействия пользователя. Эти показатели помогают настроить оптимальные политики для экономии энергии.
В нижней части окна программы представлена временная шкала, которая визуализирует периоды активности и простоя компьютера. Разные состояния (активность, сон, гибернация и политики сна) отмечены цветами, что позволяет легко отслеживать их на графике. Для удобства пользователей предусмотрена возможность оставить легенду цветовых обозначений включенной.
Основная функция WinSleep заключается в создании расписания перехода в режим сна в зависимости от заданных условий. Программа позволяет устанавливать различные расписания: на конкретные дни недели, ежемесячно или на произвольные периоды, когда компьютер не используется. Допускается создание нескольких политик сна, однако, если они пересекаются, приложение применяет первую по приоритету. По завершении одного расписания, программа автоматически переходит к выполнению следующего, согласно заданным параметрам.
WinSleep особенно полезен, если у вас мощное оборудование, как, например, высокопроизводительный процессор и видеокарта, но вы хотите избежать постоянного их включения и, как следствие, больших затрат на электроэнергию.
Основные возможности приложения WinSleep:
- Управление периодами активности и сна компьютера для экономии ресурсов.
- Возможность создания расписаний на ежедневной, еженедельной и ежемесячной основе.
- Интуитивно понятный интерфейс с системной информацией о загрузке процессора, сети и времени простоя.
- Визуализация активности компьютера на временной шкале с удобными цветовыми кодами.
- Настройка нескольких политик сна с учетом приоритетов при их пересечении.
- Автоматический переход к следующим расписаниям после выполнения заданного периода.
Sleep Timer
Sleep Timer is a powerful and easy to use computer software program that allows users to customize their computer’s sleep settings. With Sleep Timer, users can set their computer to sleep after a given amount of time. The program also provides users with the ability to adjust the amount of time before their computer sleeps, the type of sleep mode the computer will enter, and a wide range of additional settings.
Sleep Timer is designed to be simple to use and efficient. Users can quickly set their computer to sleep by following a few simple steps. The program allows users to set their computer to sleep after a set amount of time, allowing them to save energy and preserve the life of their computer. In addition, Sleep Timer can also be used to set a manual sleep mode, allowing users to manually put their computer to sleep at any time.
Sleep Timer also provides users with the ability to customize the sleep settings of their computer. Users can adjust the amount of time before the computer goes to sleep, the type of sleep mode the computer will enter, and a wide range of additional settings. This allows users to tailor the sleep settings of their computer to their individual needs.
Finally, Sleep Timer also provides users with the ability to monitor their computer’s sleep settings. The program can be used to view a detailed log of the sleep settings on the computer, allowing users to easily monitor how their computer is being used.
Features of Sleep Timer
• Set your computer to sleep after a given amount of time.
• Set a manual sleep mode.
• Customize the sleep settings of your computer.
• View a detailed log of the sleep settings on the computer.
• Efficient and easy to use.
• User friendly interface.
• Adjust the amount of time before the computer goes to sleep.
• Choose the type of sleep mode the computer will enter.
• Wide range of additional settings.
• Set alarms to remind users to put their computer to sleep.
• Automatic updates available.
• Compatible with Windows and Mac operating systems.
The Sleep Timer feature allows users to set a time limit for their music to stop playing automatically.
1. Compatibility: The sleep timer software should be compatible with operating systems including Windows XP, Vista, 7, 8, 10, Mac OS X 10.5 or higher.
2. User Interface: The software should have a user-friendly interface that enables users to easily set the timer and manage their sleep schedule.
3. Customization: The user should be able to customize the timer to fit their individual needs. This includes setting the length of the timer, setting alarms, and setting reminders.
4. Security: The software should be secure and protect user data from unauthorized access.
5. Backup: The software should have a backup feature to ensure that the user’s data is not lost in the event of a computer crash.
6. Update: The software should be regularly updated to ensure that it remains compatible with the latest operating systems and security protocols.
Automatically stops music, enhancing battery life.
User-friendly interface, easy to operate.
Customizable to fit individual sleep patterns.
Limited customization options for different sleep schedules.
Potential to disrupt ongoing tasks due to abrupt shutdown.
May not function reliably on all operating systems.
👨💻️ USER REVIEWS AND COMMENTS 💬
image/svg+xmlBotttsPablo Stanleyhttps://bottts.com/Florian Körner
Fraser N.
I recently tried out the Sleep Timer software and found it to be very useful! It was surprisingly easy to use and I liked that I could adjust the timer to the exact amount of time I needed. I also liked that it had customizable sounds and gave me the option to turn off the music after the timer was finished. The visuals were also attractive and the app ran smoothly. On the downside, it didn’t have any advanced features such as the ability to set multiple timers or to have the timer run automatically at certain times. Overall, I found the Sleep Timer software to be a helpful tool for my daily routine.
image/svg+xmlBotttsPablo Stanleyhttps://bottts.com/Florian Körner
Aaron Y.
Sleep Timer is a great tool for those who need to set a specific amount of time for a task. I like that I can set the timer for any desired amount of time, from a couple of minutes to a few hours. It’s very easy to use; it’s very intuitive and the interface is user-friendly. The sound quality for the alarm is quite good and it’s loud enough to be heard from another room. It also offers different alarm sounds to choose from.
image/svg+xmlBotttsPablo Stanleyhttps://bottts.com/Florian Körner
Harris R.
This software is really conveneint and usefull for those who have trouble falling asleep.
image/svg+xmlBotttsPablo Stanleyhttps://bottts.com/Florian Körner
Robbie Thorngren
Sleep Timer software is a program that allows users to set a timer for their computer to automatically shut down or go to sleep mode after a certain period. This software is designed to help users save energy, prevent damage to their hardware, and ensure that they get enough sleep. Its main features include customizable timer settings, automatic shutdown options, and the ability to override the timer if needed. With Sleep Timer software, users can have peace of mind knowing that their computer will not stay on longer than necessary.
image/svg+xmlBotttsPablo Stanleyhttps://bottts.com/Florian Körner
Mason
Simple to use, effective timing, customizable settings.
image/svg+xmlBotttsPablo Stanleyhttps://bottts.com/Florian Körner
Harry
Convenient, uncomplicated bedtime routine helper.
«Easily customize your computer’s sleep»
It is a powerful and easy-to-use computer tool that allows users to customize their computer’s sleep settings. One can determine how long the computer should remain active before entering sleep mode. In addition, the application offers the ability to adjust the amount of time before the computer goes to sleep, the type of sleep mode to use, and a variety of other settings. It is designed to be simple and efficient. One can quickly put the computer to sleep by following a few simple steps. Moreover, its features allow for displaying a detailed log of the computer’s sleep settings, thus providing an easy way to monitor how the computer is being used.
We all like our apps and programs to work smoothly and efficiently. But sometimes, certain apps can start to hog resources and slow down our computers.
If you’re finding that an app is making your PC run sluggishly, you can use the Task Manager to sleep the app and give your system a much-needed break.
Unless you’re like me, you probably have several apps open anytime. And while that can help get work done, it can also be a little overwhelming. Let’s find out the best way to manage all those open apps and how to put apps to sleep in Windows 11/10.

How to Put Apps to Sleep in Windows 11/10 – Step by Step Guide
Windows 11 has a new power-saving feature that allows you to put apps to sleep. This can help save battery life and improve performance.
Here’s a step-by-step guide on how to put apps to sleep in Windows 11.
- Press the Windows + I key on your keyboard to launch the Settings app.
- Click on System -> Power & Sleep.
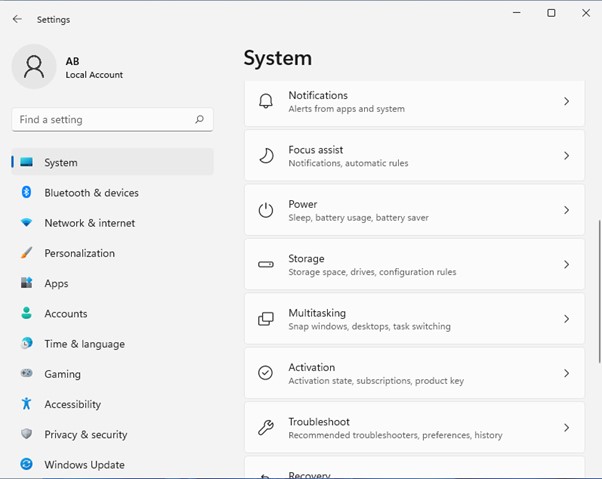
- Under the Sleep section, you will see an option called “App sleep settings”. Click on it.
- You will see a list of many apps installed on your computer. For each app, there are three options – “Never”, “After 1 minute”, and “After 3 minutes”.
Choose the option that you want for each app. If you want an app to never go to sleep, select the “Never” option for that app.
If you want an app to go to sleep after 1 minute of inactive, select the “After 1-minute” option for that app. And if you want an app to go to sleep after 3 minutes of idle, select the “After 3 minutes” option for that app.
How to put background and Startup services to sleep:
Windows keeps many services running in the background even when you’re not using them. These include everything from system processes to app notifications.
While most of these are essential for the proper functioning of your PC, some may not always be required.
For example, you may not need app notifications while working on something important. Or, you may want to put certain apps to sleep when they’re not in use to conserve battery power on your laptop.
If you want more control over which apps are put to sleep, you can use a third-party application like InsomniaX or AmphetaDesk. These apps allow you to put any app to sleep and prevent your computer from going to sleep when specific applications are running.
Windows 11 Sleep mode not working?
There are chances that on a few occasions, even after sending the sleep command to Windows, it doesn’t go to sleep mode.
In this scenario, we have to look for a few of the below options that sometimes causes this issue:
Disable Hybrid Sleep Mode:
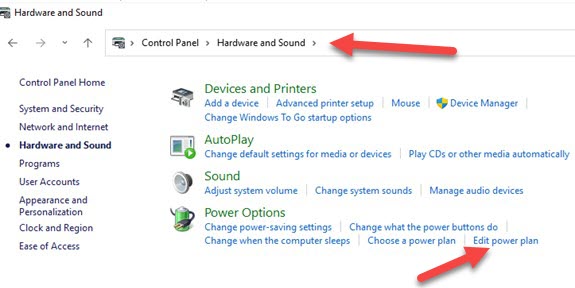
- Go to Start -> Control Panel -> Hardware and Sound -> Power Options -> Edit Plan Settings
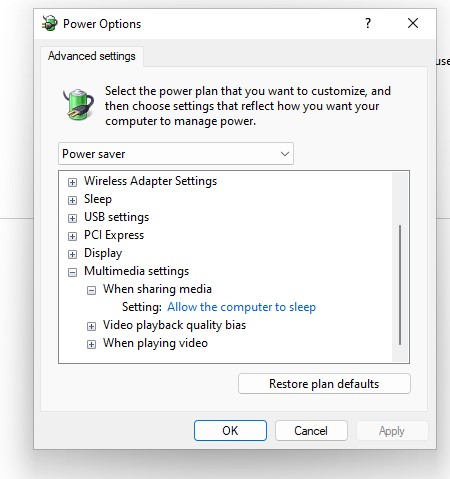
- In the edit settings, select the change advanced power settings button
- Under sleep option-> Allow Hybrid sleep from the list -> change settings to off
- Now under Media settings -> when sharing media -> allow computer to sleep -> apply-ok
Disable Fast Startup:
- Go to Start -> Control Panel -> Hardware and Sound -> Power Options
- Edit Plan Settings -> Change settings that are currently unavailable
- Uncheck the turn on fast Startup -> save changes option
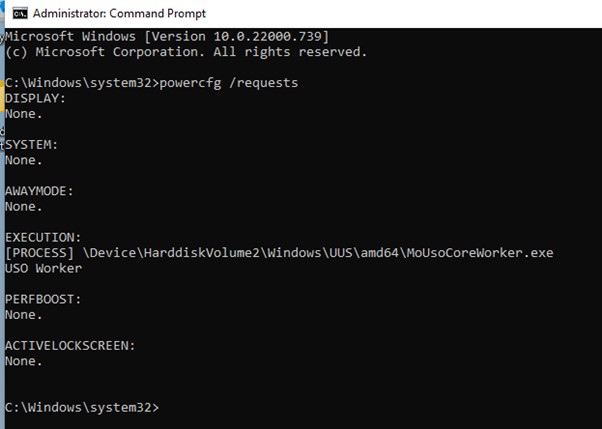
Check Energy Request:
- In the search bar -> Type cmd -> right click “Run as administrator”
- Type the below command at the cmd and press Enter to run: powercfg /requests
- After executing the above command, if any problematic app appears, disable the app from Task Manager and put the system to sleep mode.
Related: Simple methods to fix IRQL Not Less or Equal in Windows 10/11
Related Questions:
What is App Sleep?
App Sleep is a new Windows 11 that allows you to put apps to sleep when they’re not in use, thereby saving battery life.
When an app is put to sleep on your PC, it will not be able to run in the background or receive push notifications.
You can manually put an app to sleep or allow Windows 11 to do it automatically when your device is inactive for some time.
How do I put an app to sleep?
You can manually put an app to sleep by going to the settings > System > Battery Saver and selecting the “App Sleep” tab. All your apps will be listed here, and you can toggle them on or off as you desire.
You can also allow Windows 11 to automatically put apps to sleep when your device is inactive for some time by going to the settings > System > Battery Saver and selecting the “Automatically enter App Sleep mode” option.
Can I Wake Up a Sleeping App?
Launching a sleeping app from the Start Menu or Taskbar can wake you up. The app will then remain active until you close it or it becomes inactive again.
Alternatively, you can go to the settings > System > Battery Saver and select the “Wake up apps” option, allowing all sleeping apps to be woken up periodically to check for updates and notifications.
Putting apps to sleep can help free up memory and allow the device to run more smoothly. This, in turn, increases the life of OS and keeps them up and running for a long time. Please let us know your experience putting apps to sleep in Windows 11/10 in the comment section below.
Друзья, хочу поделиться с вами полезным лайфхаком для Windows 10. Многие из нас привыкли использовать Alt + F4 или другие стандартные комбинации для перевода компьютера в спящий режим. Но что, если я скажу вам, что есть способ сделать это еще удобнее?
В Windows 10 и 11 есть возможность создать собственное сочетание клавиш для перехода в спящий режим. Это не только упростит процесс, но и позволит вам настроить систему под свои предпочтения.
Процесс настройки довольно прост и не требует глубоких технических знаний.
Сообщество:
Кстати, много полезного, интересного в мире ИИ и Технологий, а также лайфхаки есть в нашем Telegram-канале
Найдите свободное место на рабочем столе.
Щелкните правой кнопкой мыши, чтобы вызвать контекстное меню.
В появившемся меню наведите курсор на пункт «Создать».
Из выпадающего списка выберите опцию «Ярлык».
В появившемся диалоговом окне «Создание ярлыка» вам нужно ввести специальную команду.
Скопируйте и вставьте следующее:
rundll32.exe powrprof.dll,SetSuspendState 0,1,0
Эта команда создаст ярлык для перехода в спящий режим прямо на вашем рабочем столе.
Нажимаем «Далее».
Далее пишем название нашего ярлыка, например: Сон.
Готово, у нас теперь есть EXE-шник для перевода компьютера в сон.
Но все еще чего-то не хватает… Эстетики) Меняем значок:
Щелкаем правой кнопкой на созданный нами ярлык и выбираем «Свойства». В появившемся окне нажимаем «Сменить значок» и выбираем тот, который нам больше всего нравится.
Если вам не нравятся стандартные значки, не проблема) В интернете можно найти множество красивых иконок (формат ICO) на любой вкус и цвет. Просто скачайте понравившуюся и укажите путь к ней в этом же окне.
Прикольные иконки и многое другое есть в нашем Telegram-канале. Подписывайся, стань частью нашего сообщества!)
Windows 10 comes with a feature that allows apps to run in the background even when they are not started. This enables apps to receive information, send notifications, and stay up to date even when they aren’t actively running.
Although useful, these apps can sometimes consume a considerable amount of system resources, including CPU, RAM, Internet bandwidth, and battery power.
Fortunately, you can choose which apps and programs can run in the background. In this article, we discuss ways to put programs to sleep selectively so they can’t wake without being actively used or how to disable the background apps feature altogether.
Put programs to sleep from Windows Settings
Disable programs from running from Task Manager/Configuration Manager
Unfortunately, the above mentioned settings only apply to Windows Universal apps (also known as Metro Apps). If you want to prevent traditional Windows programs and executables from running in the background, you will need to follow the steps below:
- Open the Task Manager (Ctrl + Shift + Esc)
- Open the Startup tab
- Select the programs you don’t want to run in the background and then click on the Disable button


To disable all startup items at once, follow the steps below:
- Open the Microsoft Configuration Manager by going to Run –> msconfig
- In General tab, select “Selective startup” and uncheck “Load startup items“


This will make your system faster. The apps and programs will not consume any system resources until you start them. This may slightly increase the startup time of each application but will also increase system performance.
The Verdict
I usually keep selective background apps running as they are very useful in providing timely information and updates. For example, my currently enabled background apps include Mail and Calendar, Microsoft Store, Microsoft To Do, OneNote for Windows 10, Skype and Windows Security.
What apps do you prefer running in the background?