
Иногда может потребоваться отследить изменения, выполняемые программами или настройками в реестре Windows. Например, для последующей отмены этих изменений или для того, чтобы узнать, как те или иные параметры (например, настройки оформления, обновлений ОС) записываются в реестр.
В этом обзоре — популярные бесплатные программы, которые позволяют легко просмотреть изменения в реестре Windows 10, 8 или Windows 7 и некоторая дополнительная информация.
Regshot
Regshot — одна из самых популярных бесплатных программ для отслеживания изменений в реестре Windows, доступная на русском языке.
Процесс использования программы состоит из следующих шагов.
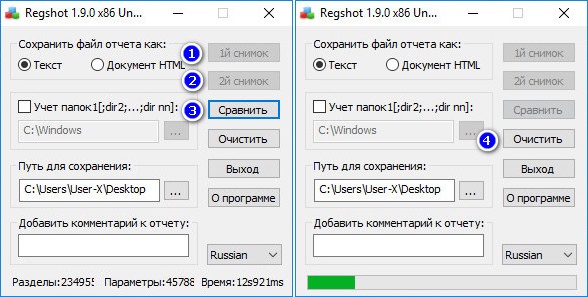
- Запустите программу regshot (для русскоязычной версии — исполняемый файл Regshot-x64-ANSI.exe или Regshot-x86-ANSI.exe (для 32-бит версии Windows).
- При необходимости переключите интерфейс на русский язык в правом нижнем углу окна программы.
- Нажмите по кнопке «1-й снимок», а затем — «снимок» (в процессе создания снимка реестра может показаться, что программа зависла, это не так — подождите, процесс может занять несколько минут на некоторых компьютерах).
- Произведите изменения в реестре (измените настройки, установите программу и т.п.). Я для примера включил цветные заголовки окон Windows 10.
- Нажмите кнопку «2-й снимок» и создайте второй снимок реестра.
- Нажмите кнопку «Сравнить» (отчет будет сохранен по пути в поле «Путь для сохранения»).
- После проведения сравнения отчет будет автоматически открыт и в нем можно будет увидеть, какие параметры реестра были изменены.

- При необходимости очистить снимки реестра нажмите кнопку «Очистить».

Примечание: в отчете вы можете увидеть куда больше измененных параметров реестра, чем по факту было изменено вашими действиями или программами, так как Windows сама часто изменяет отдельные параметры реестра во время работы (при обслуживании, проверке на вирусы, проверке обновлений и т.п.).
Программа Regshot доступна для бесплатной загрузки на сайте https://sourceforge.net/projects/regshot/
Registry Live Watch
Бесплатная программа Registry Live Watch работает по несколько иному принципу: не путем сравнения двух образцов реестра Windows, а путем мониторинга изменений в режиме реального времени. Однако программа не отображает самих изменений, а лишь сообщает о том, что такое изменение произошло.
- После запуска программы в верхнем поле укажите, какой раздел реестра нужно отследить (т.е. следить за всем реестром сразу она не может).

- Нажмите «Start Monitor» и сообщения о замеченных изменениях будут сразу отображаться в списке внизу окна программы.
- При необходимости вы можете сохранить журнал изменений (Save Log).


Скачать программу можно с официального сайта разработчика http://leelusoft.altervista.org/registry-live-watch.html
WhatChanged
Еще одна программа, позволяющая узнать, что изменилось в реестре Windows 10, 8 или Windows 7 — WhatChanged. Её использование очень похоже на таковое в первой программе этого обзора.
- В разделе Scan Items отметьте «Scan Registry» (программа также умеет отслеживать изменения файлов) и отметьте те разделы реестра, которые нужно отследить.
- Нажмите кнопку «Step 1 — Get Baseline State» (получить первоначальное состояние).
- После изменений в реестре нажмите по кнопке Step 2 для сравнения исходного состояния с изменившимся.
- В папке с программой будет сохранен отчет (файл WhatChanged_Snapshot2_Registry_HKCU.txt) содержащий информацию об изменившихся параметрах реестра.


У программы нет собственного официального сайта, но она легко находится в Интернете и не требует установки на компьютер (на всякий случай перед запуском проверьте программу с помощью virustotal.com, при этом учитывайте, что в оригинальном файле есть одно ложное обнаружение).
Еще один способ сравнить два варианта реестра Windows без программ
В Windows присутствует встроенный инструмент для сравнения содержимого файлов — fc.exe (File Compare), который, в том числе, можно использовать и для сравнения двух вариантов ветвей реестра.
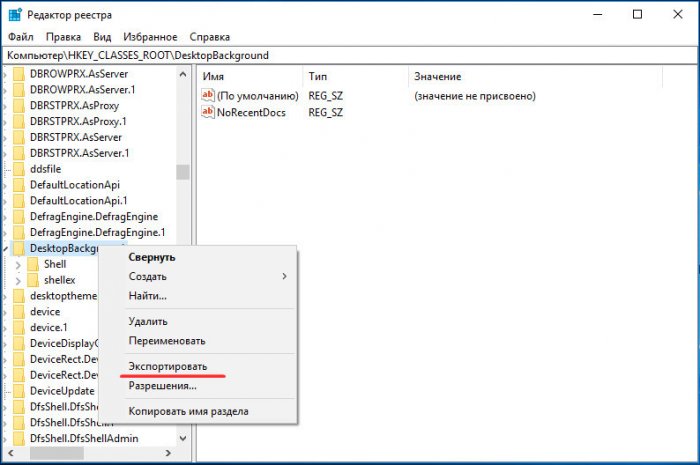
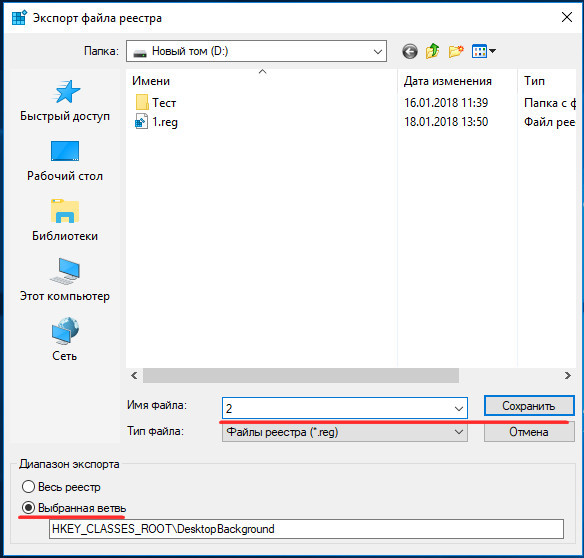
Для этого с помощью редактора реестра Windows экспортируйте необходимую ветвь реестра (правый клик по разделу — экспортировать) до изменений и после изменений с разными именами файлов, например, 1.reg и 2.reg.
Затем используйте в командной строке команду наподобие:
fc c:\1.reg c:\2.reg > c:\log.txt
Где указаны сначала пути к двум файлам реестра, а затем — путь к текстовому файлу результатов сравнения.
К сожалению, способ не подойдет для отслеживания значительных изменений (потому как визуально в отчете не получится ничего разобрать), а лишь для какого-то небольшого раздела реестра с парой параметров, где предполагается изменение и скорее для отслеживания самого факта изменения.
Any new software installed in your system is not installed alone. To function and work properly, it may require many other files and registries. Whenever you install any software, all the required files are also copied into the system.
Whenever you uninstall the software from the Windows Operating System, it is not guaranteed that all its supported files and registries will also be removed. Some of them remain in your system. These files are unnecessary and occupy unused space or memory in your system. Therefore, you must keep track of all the additional files on your computer. There are several software programs that offer this functionality. They will keep track of all files before and after the installation of the software, and notify you that these files are from that particular application. Therefore, you may take any action according to your needs.
The following are software that monitors your system for file and registry changes. Tip: You can also create a backup/clone of your system using the image software.
MultiMon
Multimon is a powerful monitoring software with many features, including monitoring Registry entries. This application displays the results of a wide range of activities in real time. You can export the output to text files or use any output viewer. This tool allows the user to visualize all activities in a single view. You can view detailed information regarding the activities.
While I have not tested it on Windows 11, it should work on both Windows 10 and Windows 11.
You can download MultiMon from here (under system monitoring tools)
Once MultiMon has been downloaded, you will need to run its exe file in order to install it on your computer. As soon as the installation is complete, a window will appear asking you what you would like to monitor and which drive. Once you click the play button, all the results will be displayed. The output can also be exported in text format. Multimon takes snapshots of the entire Registry.
You should click the play button before installing the new software and after installing it so you have both the snapshots and you can see which files and Registry entries have been changed in the meantime.

Regshot Unicode
Regshot Unicode is an Open-source Registry monitoring tool that monitors your computer’s file system and Registry keys. A snapshot of the system registry is taken before and after the changes have been made. You will be able to see what changes have been made to your files by looking at that snapshot. The remote registry option has also been added to the latest release.
Download RegShot from here
Upon installing Regshot Unicode on your system, a window will appear. Click on “1st When you click on “capture shot”, it will capture the image without downloading any software. Now download and install any software/program and then click on “2nd shot”. After comparing the two shots, HTML log will be opened that displays all the changes that took place following the installation of the new program.
InstallWatch Pro
You may also use InstallWatch to monitor your files. It works quite the same as RegShot. It provides 2 points and then compares the changes between these two points.
Using this software, you can identify, detect, and track changes made to files and directories in great detail. The displayed results are very easy to read. The app will prompt you to take a snapshot before and after analyzing the snapshot. The results will be displayed in either HTML or text. Using the results, you can see exactly which Registry settings have been changed.
Download InstallWatch Pro from here

SysTracer
Another utility, called SysTracer, scans and checks your system for changed Registry keys and files.
A very useful tool, it first scans your entire computer and tracks any changes made to files, registry entries, installed programs, system services, running processes, and opened UDP and TCP ports.
Download SysTracer from here
Initially, it will scan your computer. It is necessary for you to select the files that you wish to scan with it. Then it will create a binary image file, known as a snapshot.

Snap shots are helpful for checking the modified files after scanning and before scanning.

The Registry can also be searched.

Moreover, you can view the difference list and you can export it wherever you wish. This will make it easy for you to find the results.

WhatChanged
WhatChanged is a program designed to track changes to your computer files and Registry monitoring. In essence, it uses the “Brute Force” method in order to record the modifications in files and registry entries recently made to your system’s files and registry. This will make it easier for you to present the changes. WhatChanged informs you about the new programs you have installed in your system, and if any program is present in your system that is unnecessary, it deletes it.
Download WhatChanged from here.
Process Monitor
Process Monitor is a real time monitoring tool used to monitor files and the registry. It comes with some advanced features. It scans the system in real time and shows you the changes that occurred in the Registry and Files of System.
In addition to detecting and correcting any errors in the Windows Registry, it also fixes them. This is a free tool.
Download Process Monitor form here

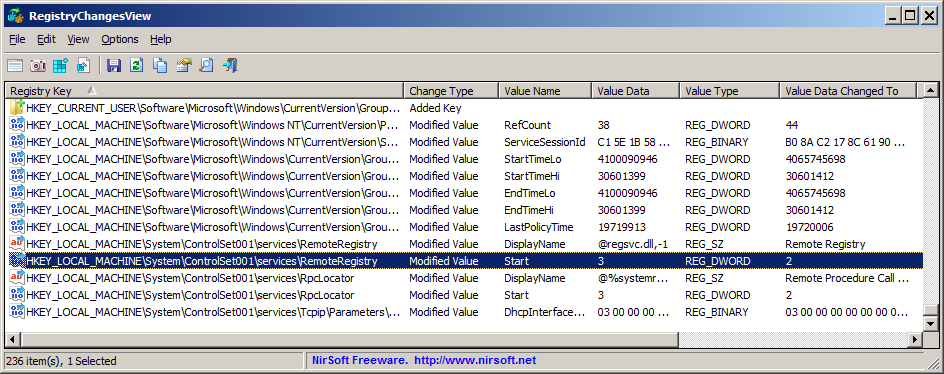
RegistryChangesView
RegistryChangesView allows you to take a snapshot of the Windows Registry and compare different snapshots. You can also compare your saved Registry snapshots and the snapshots in the Windows Shado Copy.
By comparing two Registry snapshots, you can see the changes made between the two snapshots in the Registry, and optionally export the Registry changes into a .reg file, which can then be opened in RegEdit. You can run the .reg file to revert the changes.
There are several free tools available that allow you to monitor your files and make registry changes easily. Now that you have installed the software or program, you will notice all the changes made to your system.
Даже самые незначительные изменения настроек в Windows, не говоря уже об установке или удалении программ сопровождаются соответствующим изменениями в системном реестре. Обычно пользователям нет до них никакого дела, но иногда может возникнуть необходимость их отследить, скажем, для сравнения или ручной отмены какого-нибудь изменения, внесенного скриптом или приложением.
Если предполагаемые изменения невелики, отследить их можно средствами самой операционной системы. Откройте редактор реестра, выделите в нем ветвь, в которую предположительно будут внесены изменения и экспортируйте ее в REG-файл с именем 1.
Внесите необходимые изменения и повторно экспортируйте ветку в REG-файл, но уже с именем 2.
Допустим, вы сохранили оба файла в корень диска D. Сравним их. Откройте командную строку и выполните в ней две такие команды:
chcp 1251
fc D:/1.reg D:/2.reg > D:/compare.log
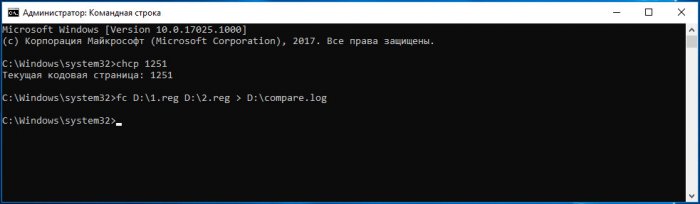
Первая устанавливает кириллическую кодировку, вторая сохраняет результат сравнения в лог.
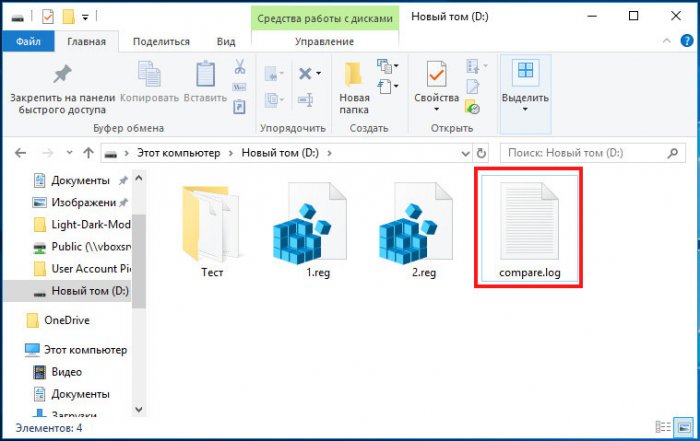
Способ рабочий, но неудобный, так как содержимое файлов реестра сравнивается и выводится посимвольно в столбик, что создает трудности при чтении такого лога. По этой причине подходит способ для отслеживания очень незначительных изменений, двух-трех параметров, не более. В остальных случаях лучше воспользоваться специальными утилитами.
Наиболее известной программой для отслеживания изменений в реестре является Regshot. Запускаем утилиту, жмем кнопку «1й снимок», производим настройки, установку ПО и т.д., после чего жмем кнопку «2й снимок», а затем «Сравнить».
Результаты будут выведены в обычном текстовом или HTML-файле (по выбору сравнивающего).
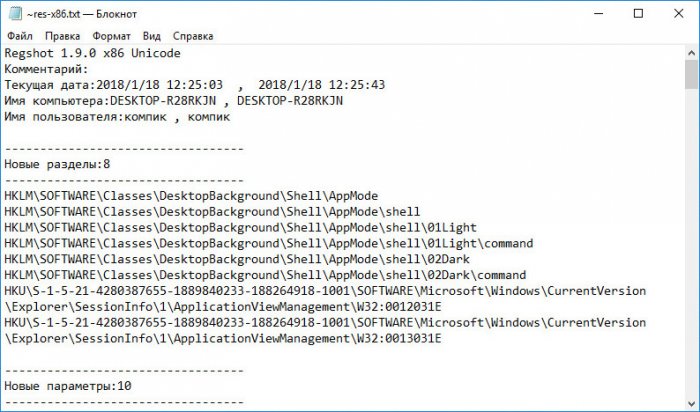
Программа показывает какие разделы и параметры были созданы и удалены, какие изменены и общее количество изменений. К сожалению, Regshot не позволяет сканировать определенные разделы и ключи, из-за чего в файл отчета записываются изменения, сделанные самой Windows.
Несколько иной подход к отслеживанию изменений в реестре предлагает другая бесплатная утилита Registry Live Watch. В отличие от Regshot, она не сравнивает два снимка реестра, а отслеживает изменения в его разделах в режиме реального времени, выводя данные в специальном текстовом поле своего окна. Кроме того, Registry Live Watch позволяет отслеживать изменения, произведенные конкретным исполняемым файлом.
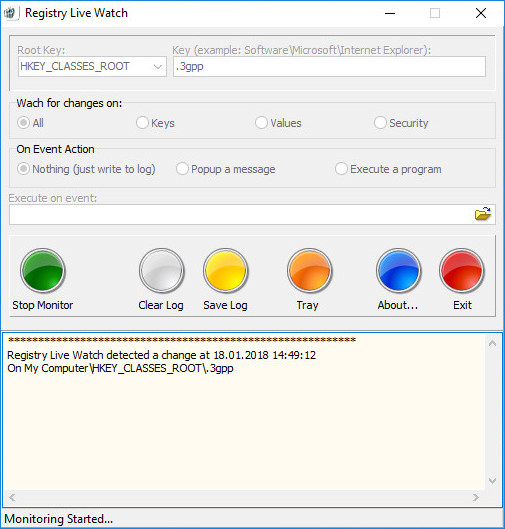
Но и у этой программы есть свой недостаток. Она не может мониторить весь реестр и даже его разделы, а только отдельные ключи.
Нечто похожее на Regshot представляет собой бесплатная программка CRegistry Comparison. После запуска она предлагает выбрать каталог для сохранения исходного снимка, после чего тут же создает и сохраняет его.
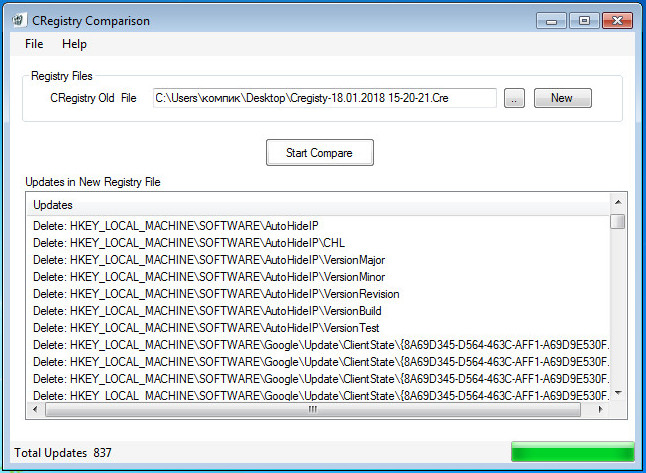
Снимок есть, теперь можно настраивать Windows, устанавливать программы и так далее. После этого запускаем CRegistry Comparison, нажатием кнопки «Browse .cre file» указываем путь к ранее созданному снимку и жмем «Start Compare». Утилита проанализирует снимки и выведет зарегистрированные изменения в своем окне.
Скачать утилиты можно по ссылкам:
Regshot: sourceforge.net/projects/regshot
Registry Live Watch: leelusoft.altervista.org/registry-live-watch.html
CRegistry Comparison: https://cloud.mail.ru/public/8h59/uXYmN9LLv
| RegistryChangesView v1.30 Copyright (c) 2017 — 2023 Nir Sofer |
See Also
- OfflineRegistryFinder — Scan and search Windows Registry Hives (offline / external drive).
Description
RegistryChangesView is a tool for Windows that allows you to take a snapshot of Windows Registry and later compare it with another Registry snapshots, with the current Registry or with Registry files stored in a shadow copy created by Windows.
When comparing 2 Registry snapshots, you can see the exact changes made in the Registry between the 2 snapshots, and optionally export the Registry changes into a standard .reg file of RegEdit.
System Requirements
This utility works on any version of Windows, starting from Windows XP and up to Windows 11. Both 32-bit and 64-bit systems are supported.
Versions History
- Version 1.30:
- Added option to change the sorting column from the menu (View -> Sort By). Like the column header click sorting, if you click again the same sorting menu item, it’ll switch between ascending and descending order. Also, if you hold down the shift key while choosing the sort menu item, you’ll get a secondary sorting.
- Added ‘Sort By’ toolbar button.
- Version 1.29:
- Fixed bug: RegistryChangesView failed to handle large values (with more than 16,344 bytes) when a value is added or removed.
- Version 1.28:
- Updated to work properly in high DPI mode (Toolbar, status bar, and properties window).
- Version 1.27:
- Fixed bug: When specifying relative path to create a Registry snapshot, the security hive was created under the System32 directory instead of the specified snapshot folder.
- Version 1.26:
- Fixed the /cfg command-line option to load the .cfg file from the current directory if full path is not specified.
- Version 1.25:
- Added option to create a Registry snapshot with the ntuser.dat hive of another user on your system, instead the user that runs the RegistryChangesView tool.
- Version 1.22:
- Added option to choose another font (name and size) to display in the main window.
- Version 1.21:
- Added ‘Case Sensitive’ option to the Quick Filter window.
- Version 1.20:
- Added more command-line options, which allow you to compare Registry snapshots and export the result to .reg file or csv/tab-delimited/xml/html file.
- Version 1.15:
- Added new columns: ‘Data Length’ and ‘Data Length Changed To’.
- Version 1.12:
- Fixed bug: RegistryChangesView failed to handle large values (with more than 16,344 bytes) properly and this problem also caused RegistryChangesView to crash on some systems.
- Version 1.11:
- Added /cfg command-line option to start RegistryChangesView with the specified config file.
- Version 1.10:
- RegistryChangesView now consumes less memory when loading large amount of items.
- Version 1.08:
- Fixed bug: RegistryChangesView generated .reg file incorrectly when the value names had ‘\’ or ‘»‘ characters.
- Fixed bug: In some circumstances, RegistryChangesView omitted the key name of the first .reg file value.
- Version 1.07:
- Fixed bug: RegistryChangesView exported REG_EXPAND_SZ values incorrectly.
- Version 1.06:
- Fixed bug: The browse button on the ‘Create Registry Snapshot’ window didn’t work.
- Version 1.05:
- Added /CreateSnapshot command-line option for creating Registry snapshot from command-line.
- Version 1.01:
- Fixed bug: Under certain conditions, RegistryChangesView skipped half of subkeys or crashed while reading Registry key that had many subkeys.
- Version 1.00 — First release.
Examples for useful things you can do with this tool
- You can create a Registry snapshot before installing a new software and then after the installation is completed, compare this Registry snapshot with the current Registry and see
all Registry changes made by the installer (Be aware that you’ll also see some changes made by Windows or other programs in the same time).
If there are Registry changes that you don’t like, you can generate a .reg file to revert back the changes. - If you make a change in Windows configuration from the GUI of Windows and you want to see how to make this change in the Registry, simply
create a Registry snapshot before making the config change and then after the configuration change, compare this Registry snapshot with the current Registry and optionally
generate a .reg file that makes this configuration change. - If there is unwanted change in the Registry of your system but you don’t have any previous snapshot, you can compare the current Registry with a shadow copy created by Windows and
try to locate the unwanted Registry changes. - You can also use this tool as a simple way to backup the Registry. The snapshot created by RegistryChangesView simply contains Registry hive files with the same name as the original one (ntuser.dat, SYSTEM,
SOFTWARE, and so on…)
Start Using RegistryChangesView
RegistryChangesView doesn’t require any installation process or additional DLL files. In order to start using it, simply run the executable file — RegistryChangesView.exe
After running RegistryChangesView, the main options window is displayed, which allows you to choose 2 Registry snapshots to compare.
For every snapshot , you can choose one of the following data sources: ‘Current Registry’, ‘Saved Registry Snapshot’, and ‘Shadow Copy’.
You can choose any combination you want, as long as ‘Data Source 1’ is not identical to ‘Data Source 2’. For example: you can choose to compare the Registry of 2 different shadow copies,
compare a shadow copy with current Registry, compare a saved Registry snapshot with current Registry, compare a saved Registry snapshot with another saved Registry snapshot, and so on…
If you want to generate a new Registry snapshot, simply choose ‘Saved Registry Snapshot’ in the data source combo-box and then click the ‘Create Registry Snapshot’ button.
In the ‘Create Registry Snapshot’ window choose the folder to save the Registry Snapshot, click the ‘Create Snapshot’ button, and wait a few seconds to create the snapshot.
You can also create a new Registry snapshot from the main window by pressing F8 (File -> Create Registry Snapshot).
After choosing the 2 Registry data sources to compare , you should also set the following options:
- Direction:
This field determines how the 2 Registry snapshots are compared. For example: if the direction you choose is ‘Registry Data Source 1 => Registry Data Source 2’, every Registry key or value that exists on the second snapshot but
doesn’t exist on the first snapshot will be displayed as ‘Added Key’ or ‘Added Value’. But if you choose the opposite direction (‘Registry Data Source 2 => Registry Data Source 1’), every Registry key or value that exists on the second snapshot but
doesn’t exist on the first snapshot will be displayed as ‘Removed Key’ or ‘Removed Value’.
The direction field also affects the way that .reg file is generated (‘Export Selected Items To .Reg File’ and ‘Copy As .Reg File Format’ options).
if the direction you choose is ‘Registry Data Source 1 => Registry Data Source 2’, the generated .reg file will make the changes from snapshot 1 to snapshot 2.
if the direction you choose is ‘Registry Data Source 2 => Registry Data Source 1’, the generated .reg file will make the changes from snapshot 2 to snapshot 1. - Hives to compare:
Allows you to choose which Registry hives to compare.
For example, If you only want to see the Registry changes on HKEY_CURRENT_USER, you should select the ‘HKEY_CURRENT_USER’ and ‘HKEY_CURRENT_USER\Software\Classes’ hives and deselect all others.
After choosing all option, click the ‘Ok’ button. RegistryChangesView will compare the 2 Registry data sources you chose and the result will be displayed on the main window.
Some Important Remarks
- By default, the SAM and SECURITY Registry hives are not selected for comparison and for generating new Registry snapshots.
You can choose these 2 Registry hives if you need to compare them, but you should be aware that there is a security risk:
These Registry hives contain encryption keys and password hashes of your system and if you leave a Registry snapshot with SAM/SECURITY hives that can be accessed by a non-admin user,
hacker that finds these files on your system might be able to use them for penetrating your system. - When you choose ‘Current Registry’ as one of the data sources, RegistryChangesView generates a temporary Registry snapshot on %temp%\TempRegSnapshotX folder (X = numeric value) and deletes it after the Registry comparison process is finished.
- The Registry snapshot created by RegistryChangesView is just a folder that contains the Registry files with their original name.
If you have a copy of Registry hives and you want to use them as a snapshot, simply copy them into a separated folder with their original filename ( Software, System, ntuser.dat, UsrClass.dat ) and choose this folder as a Registry snapshot.
Columns Description
- Registry Key:
Full path of the Registry key. - Change Type:
Type of Registry change:
Added Key, Removed Key, Added Value, Removed Value, Modified Value. - Value Name:
Name of the Registry value (Relevant only when the ‘Change Type’ is ‘Added Value’, ‘Removed Value’, or ‘Modified Value’) - Value Data:
The content of Registry value (Relevant only when the ‘Change Type’ is ‘Added Value’, ‘Removed Value’, or ‘Modified Value’).
If the ‘Change Type’ is ‘Modified Value’ — this columns shows the original value (before the change) and the ‘Value Data Changed To’ column shows the value after the change. - Value Type:
Type of Registry value (REG_SZ, REG_DWORD, REG_BINARY, and so on…).
If the ‘Change Type’ is ‘Modified Value’ — this columns shows the original value type (before the change) and the ‘Value Type Changed To’ column shows the value type after the change. - Value Data Changed To:
The content of Registry value after the change (Relevant only when the ‘Change Type’ is ‘Modified Value’). - Value Type Changed To:
The type of Registry value after the change (Relevant only when the ‘Change Type’ is ‘Modified Value’). - Key Modified Time 1:
The timestamp of the specified Registry key in the first snapshot. - Key Modified Time 2:
The timestamp of the specified Registry key in the second snapshot.
Generating .reg file
RegistryChangesView allows you to generate a .reg file that can be used to import with RegEdit tool of Windows.
There are 2 options to generate .reg file: (Both options work on selected items, you can press Ctrl+A to select all items)
- Export Selected Items To .Reg File (Ctrl+E): Exports into a .reg filename that you choose.
- Copy As .Reg File Format (Ctrl+R): Generates text in .reg file format into the clipboard.
The .reg file is generated according to the ‘Direction’ field in the Options window.
if the Direction is ‘Registry Data Source 1 => Registry Data Source 2’, the generated .reg file will make the changes from snapshot 1 to snapshot 2.
if the Direction is ‘Registry Data Source 2 => Registry Data Source 1’, the generated .reg file will make the changes from snapshot 2 to snapshot 1.
Quick Filter
If you want to see only Registry keys or values that contain specific strings, you can press Ctrl+Q (View -> Quick Filter),
and then in the quick filter text-box type the desired filter string.
Command-Line Options
| /cfg <Filename> |
Start RegistryChangesView with the specified configuration file. For example: RegistryChangesView.exe /cfg «c:\config\rcv.cfg» RegistryChangesView.exe /cfg «%AppData%\RegistryChangesView.cfg» |
| /sreg <Filename> | Save the Registry comparison result into a .reg file. |
| /stext <Filename> | Save the Registry comparison result into a regular text file. |
| /stab <Filename> | Save the Registry comparison result into a tab-delimited text file. |
| /scomma <Filename> | Save the Registry comparison result into a comma-delimited text file (csv). |
| /shtml <Filename> | Save the Registry comparison result into HTML file (Horizontal). |
| /sverhtml <Filename> | Save the Registry comparison result into HTML file (Vertical). |
| /sxml <Filename> | Save the Registry comparison result into XML file. |
| /CreateSnapshot [Folder] |
Creates a Registry snaphot in the specified folder. If the folder doesn’t exist, RegistryChangesView will create it. By default the snapshot will be created according to the last settings, but you can change it by using the commands below ( /CreateSnapshot.SoftwareHive , /CreateSnapshot.SystemHive and so on…) |
|
/CreateSnapshot.SoftwareHive [0 | 1] /CreateSnapshot.SystemHive [0 | 1] /CreateSnapshot.NTUserHive [0 | 1] /CreateSnapshot.UsrClassHive [0 | 1] /CreateSnapshot.DefaultHive [0 | 1] /CreateSnapshot.BCD00000000Hive [0 | 1] /CreateSnapshot.SAMHive [0 | 1] /CreateSnapshot.SecurityHive [0 | 1] |
Specifies which hives to include in the snapshot (1 = include, 0 = execlude)
For example: |
|
/DataSourceType1 [1 | 2 | 3] /DataSourceType2 [1 | 2 | 3] |
Specifies the data source to compare: 1 — Current Registry 2 — Saved Registry Snapshot 3 — Shadow Copy |
|
/RegSnapshotPath1 [Path] /RegSnapshotPath2 [Path] |
Specifies the path of the Registry snapshot when DataSourceType is 2 |
|
/ShadowCopyPath1 [Path] /ShadowCopyPath2 [Path] |
Specifies the path of the Shadow Copy when DataSourceType is3 |
|
/DataSourceDirection [1 | 2] |
Specifies the comparison direction: 1 — Registry Data Source 1 => Registry Data Source 2 2 — Registry Data Source 2 => Registry Data Source 1 |
|
/Compare.SoftwareHive [0 | 1] /Compare.SystemHive [0 | 1] /Compare.NTUserHive [0 | 1] /Compare.UsrClassHive [0 | 1] /Compare.DefaultHive [0 | 1] /Compare.BCD00000000Hive [0 | 1] /Compare.SAMHive [0 | 1] /Compare.SecurityHive [0 | 1] |
Specifies which hives to compare (1 = compare, 0 = don’t compare) |
Examples:
- Compare a saved Registry snapshot with current Registry, and export the result to regcomp1.reg:
RegistryChangesView.exe /DataSourceDirection 1 /DataSourceType1 2 /DataSourceType2 1 /RegSnapshotPath1 «C:\temp\RegSnapshot20190622075426» /sreg «c:\regcomp1.reg» - Compare 2 saved Registry snapshots and export the result to regcomp1.csv:
RegistryChangesView.exe /DataSourceDirection 1 /DataSourceType1 2 /DataSourceType2 2 /RegSnapshotPath1 «C:\temp\RegSnapshot20190622075426» /RegSnapshotPath2 «C:\temp\RegSnapshot20190623022112» /scomma «c:\temp\regcomp1.csv»
Translating RegistryChangesView to other languages
In order to translate RegistryChangesView to other language, follow the instructions below:
- Run RegistryChangesView with /savelangfile parameter:
RegistryChangesView.exe /savelangfile
A file named RegistryChangesView_lng.ini will be created in the folder of RegistryChangesView utility. - Open the created language file in Notepad or in any other text editor.
- Translate all string entries to the desired language.
Optionally, you can also add your name and/or a link to your Web site.
(TranslatorName and TranslatorURL values) If you add this information, it’ll be
used in the ‘About’ window. - After you finish the translation, Run RegistryChangesView, and all translated
strings will be loaded from the language file.
If you want to run RegistryChangesView without the translation, simply rename the language file, or move
it to another folder.
License
This utility is released as freeware.
You are allowed to freely distribute this utility via floppy disk, CD-ROM,
Internet, or in any other way, as long as you don’t charge anything for this and you don’t
sell it or distribute it as a part of commercial product.
If you distribute this utility, you must include all files in
the distribution package, without any modification !
Disclaimer
The software is provided «AS IS» without any warranty, either expressed or implied,
including, but not limited to, the implied warranties of merchantability and fitness
for a particular purpose. The author will not be liable for any special, incidental,
consequential or indirect damages due to loss of data or any other reason.
Feedback
If you have any problem, suggestion, comment, or you found a bug in my utility,
you can send a message to nirsofer@yahoo.com
RegistryChangesView is also available in other languages. In order to change the language of
RegistryChangesView, download the appropriate language zip file, extract the ‘registrychangesview_lng.ini’,
and put it in the same folder that you Installed RegistryChangesView utility.
| Language | Translated By | Date | Version |
|---|---|---|---|
| Arabic | Simo:Thami | 04/09/2018 | RegistryChangesView v1.08 |
| Brazilian Portuguese | João Mac-Cormick | 13/01/2021 | 1.27 |
| Czech | Jiří Cmunt | 14/04/2025 | 1.30 |
| Dutch | Jan Verheijen | 26/09/2023 | 1.30 |
| French | Largo | 16/09/2017 | 1.01 |
| French | Eric FICHOT | 10/08/2022 | 1.29 |
| German | «Latino» | 21/04/2025 | 1.30 |
| Greek | geogeo.gr | 06/05/2018 | 1.07 |
| Hungarian | Timinoun | 03/08/2024 | 1.30 |
| Italian | Andrea Carli e bovirus | 25/09/2023 | 1.30 |
| Japanese | maboroshin | 28/01/2020 | 1.25 |
| Japanese | youzeeen | 12/06/2021 | 1.28 |
| Persian | ZendegiyeSabz | 01/10/2023 | 1.30 |
| Polish | Hightower | 29/09/2023 | 1.30 |
| Russian | traumig (update by Ghaal) | 07/07/2019 | 1.20 |
| Russian | Òàõòàóëîâ Þðèé | 29/02/2024 | 1.30 |
| Simplified Chinese | DickMoore | 13/06/2021 | 1.28 |
| Simplified Chinese | https://www.52pojie.cn | 04/12/2023 | 1.30 |
| Slovak | František Fico | 02/10/2023 | 1.30 |
| Spanish | Ricardo A. Rivas | 14/12/2020 | 1.27 |
| Traditional Chinese | Danfong Hsieh | 25/09/2023 | 1.30 |
| Turkish | HARUN ARI | 25/09/2023 | 1.30 |
| Ukrainian | Lembergman (update by Ghaal) | 07/07/2019 | 1.20 |
Обзоры утилит от Sysinternals.com:
- Process Explorer (контроль за процессами)
- PageDfrg (дефрагментация системных файлов)
- Autoruns (управление автозагрузкой)
- FileMon (монитор файловой системы)
- RegMon (монитор реестра)
Свободно распространяемая на www.sysinternals.com утилита Registry Monitor предоставляет возможность собрать информацию об обращениях к реестру Windows. Утилита RegMon записывает в log-файл абсолютно все обращения к реестру, включая обращения самой системы и всего программного обеспечения, которое работает на момент сбора данных. Программа имеет настраиваемый фильтр, при помощи которого можно собрать информацию об обращениях к реестру только одной или нескольких программ, либо исключить из наблюдения определенные программы.
Интерфейс утилиты RegMon достаточно прост и будет подробно рассмотрен в этой статье. Будут даны рекомендации по способам фильтрации собранной информации, по решению конкретных вопросов, связанных с определением конкретных разделов реестра, к которым обращается программа.
Внешний вид Registry Monitor показан на рисунке ниже.
- File:
- Open — открывает ранее собранный и сохраненный лог-файл для анализа в Registry Monitor-е. Будьте внимательны, открывая лог, текущие собранные данные будут потеряны, поэтому, если они нужны, то сохраните предварительно собранные данные в файл.
- Save — сохраняет собранные данные в файл.
- Save as… — сохраняет собранные данные в файл.
- Process Properties… — свойства процесса. Если в окне, где отображены собранные данные, выделить любую строку, то данный пункт меню станет доступен и при его выборе откроется окно с информацией о том процессе, обращение которого к реестру выделено. Пример окна с информацией о процессе показан ниже.
- Capture Events — переключатель, который включает или приостанавливает сбор сведений об обращениях к реестру.
- Exit — выход.
- Edit:
- Copy — копирует в буфер обмена выделенную строку.
- Delete — удаляет выбранную строку.
- Include Process — быстрая настройка фильтра. После применения этого пункта меню будут отслеживаться обращения к реестру только указанного процесса. Чтобы отменить эту настройку исправьте фильтр (о чем будет рассказано ниже).
- Exclude Process — исключить процесс. Обращения данного процесса более не будут попадать в собранные данные и он, таким образом, будет исключен из мониторинга.
- Include Patch — будут собираться данные только при обращении к выделенному в момент применения команды меню разделу реестра и его подразделам. Для отмены отслеживания только определенного раздела реестра исправьте фильтр, о чем более подробно будет рассказано далее.
- Find… — поиск строки в собранных данных в окне Registry Monitor.
- Regedit Jump… — если выделить в окне Registry Monitor строку и выбрать этот пункт меню, то будет запущен редактор реестра RegEdit и в нем будет автоматически развернуто дерево разделов того раздела, имя которого находится в выделенной строке Registry Monitor-а. Двойной клик мышью по любой строке собранных данных в RegMon выполняет такое же действие, т.е. открывает RegEdit сразу на том ключе, к которому было зафиксировано обращение процесса.
- Clear Display — очищает экран от собранных данных. Будьте осторожны, если данные представляют интерес, то не забудьте предварительно сохранить их в файл.
- Options:
- Font… — открывает диалоговое окно выбора шрифта, которым будет отображаться собранная информация в окне Registry Monitor.
- Highlight Colors… — открывает диалоговое окно выбора цвета для строк и текста, которые необходимо подсвечивать в собранных данных. Более подробно о подсветке строк смотрите ниже, в настройках фильтра.
- Filter/Highlight… — открывает окно настройки фильтра и подсветки строк. Пример этого окна показан ниже.

В данном примере собирается информация об обращениях к реестру всех процессов, за исключением IEXPLORE.EXE и Explorer.EXE, причем, все обращения к реестру процесса csrss.exe подсвечиваются в окне другим цветом. Галки внизу окна позволяют собирать только определенные события, как то:
- Log Opens — включает или отключает сбор информации о процессах, которые открывают ключи реестра.
- Log Reads — включает или отключает сбор информации о процессах, которые читают ключи реестра.
- Log Writes — включает или отключает сбор информации о процессах, которые пишут в ключи реестра.
- Log Successes — включает или отключает сбор информации о процессах, любое обращение которых к реестру было удачно (т.е., к примеру, процесс смог успешно считать или записать значение).
- Log Errors — включает или отключает сбор информации о процессах, любое обращение которых к реестру закончилось ошибкой (например, процесс не нашел определенный ключ реестра).
В этом же окне кнопка Defaults сбрасывает все сделанные настройки фильтра в значениях, при которых будут собираться все данные.
- History Depth… — позволяет настроить количество строк, которые будут запоминаться Registry Monitor-ом. Именно такое количество строк затем будет сохранено в лог-файле работы RegMon-а. Для хранения всех строк используется значение 0.
- Always On Top — включение этого параметра позволит всегда видеть окно RegMon-а выше всех окон, что весьма удобно при сборе данных от нескольких приложений, между которыми необходимо переключаться.
- Auto Scroll — этот параметр позволяет включить прокрутку окна с собранными данными. Последнее обращение к реестру всегда будет видно на экране.
- Clock Time — если этот параметр выключен, то в лог будет записано время обращения процесса к реестру, относительно времени запуска Registry Monitor. Если включен, то будет записано системное время.
- Show Milliseconds — если предыдущий параметр включен, т.е. в лог записывается системное время, то имеет смысл включить и этот параметр. В этом случае, к системному времени будут записываться и миллисекунды, что повысит точность определения времени обращения процесса к реестру.
- Log Boot — выбор этого параметра включает мониторинг обращения к реестру во время загрузки системы. Т.е. после его выбора надо перезагрузиться и Registry Monitor запишет в лог-файл с именем REGMON.LOG, находящийся в папке, где установлена Windows, все обращения к реестру на протяжении загрузки системы. Такой лог-файл будет иметь размер в несколько десятков мегабайт. Запись обращений к реестру будет продолжаться до тех пор, пока не будет запущен RegMon или до следующей перезагрузки системы.
RegMon может быть применен для решения практически любых задач, когда есть интерес узнать, куда, к каким ключам реестра программа обращается в ходе своей работы. Иногда требуется выяснить, где хранятся настройки программы, какие ключи используются в ходе ее работы. Это бывает полезно для решения проблем при настройке безопасности, при настройке экспорта ключей реестра для создания резервных копий настройки программного обеспечения, для внесения изменений в настройки программы, которые не документированы производителем, и доступ к которым есть только через реестр и т.д.
Для примера я решил выяснить, где Outlook Express хранит правила для сортировки сообщений. Это позволит настроить автоматический экспорт нужной ветки реестра и всегда иметь архивную копию правил сортировки. Наличие такой копии позволит восстановить правила сортировки за пару минут, что при большом количестве правил сэкономит очень много времени.
Итак, запустим RegMon. Настраивать пока фильтр не будем. Включим опцию Always On Top, чтобы окно RegMon не «убегало» на задний план. При запущенном RegMon-е откроем Outlook Express. Сразу после окончания его загрузки нажмем кнопку Capture или выберем пункт меню File — Capture Events, чтобы остановить сбор данных. Пример окна Registry Monitor после запуска Outlook Express с остановленным процессом сбора информации показан ниже.
В данном случае интересны обращения к реестру только процесса msimn.exe, поэтому щелкнем на нем правой кнопкой и выберем Include Process, либо выберем в меню Edit — Include Process. На запрос о том, хотим ли мы применить этот фильтр к уже собранным данным можно ответить и положительно и отрицательно, это не имеет значения. Теперь нужно очистить окно Registry Monitor. Для этого выберите Edit — Clear Display. Последний штрих в подготовке сбора данных — донастройка фильтра. Для этого выберем Options — Filter/Highlight. В настройке фильтра, внизу, снимем все галки за исключением Log Writes и Log Successes, настроив, таким образом, отсеивание всех обращений к реестру за исключением успешной записи в реестр значений процессом msimn.exe. Пример настройки фильтра показан ниже.

После того, как фильтр настроен, нужно создать в Outlook Express правило для почты. Чтобы создать правило в Outlook Express, выберите Сервис — Правила для сообщений — Почта. В открывшемся окне создайте правило. Пример уже созданного правила показан на следующем рисунке.
После того, как правило настроено, нажмите OK в этом окне. Вы вернетесь в окно, показанное ниже.
Теперь проверьте, что в Registry Monitor включен сбор данных и окно очищено от собранных ранее данных. После нажатия в окне, показанном на рисунке 4, кнопки OK Outlook Express запишет в реестр созданное правило. Нажмите OK. Registry Monitor соберет данные об успешной записи в реестр процессом msimn.exe информации. Окно RegMon-а с собранной информацией показано на следующем рисунке.
Таким образом, мы получили информацию о разделе, в котором Outlook Express хранит настройки правил. Сохранение одного правила потребовало записи 23 значений. Теперь нужно найти самый верхний раздел реестра из тех, имена которых сейчас находятся в столбце Patch Registry Monitor. Подведите курсор по очереди к каждому значению в столбце Patch и во всплывающей подсказке будет выведен путь к разделу реестра. Найдите самую короткую запись. В данном случае это HKEY_CURRENT_USERIdentities{D7691494-4CF1-4D7F-9A0F-A700B85345C2}SoftwareMicrosoftOutlook Express5.0RulesMail00. Щелкните в окне Registry Monitor по записи с самым коротким путем два раза левой кнопкой мыши. Откроется редактор реестра, в котором автоматически будет развернуто дерево разделов до раздела, по которому был выполнен двойной щелчок. Окно реестра показано на следующем рисунке.
Таким образом, мы выяснили где Outlook Express хранит настройки правил. Теперь при написании скрипта для ежедневного бэкапа можно будет включить в него строку, которая выполнит экспорт правил Outlook Express в reg-файл, который затем будет помещен в резервную копию на сервер или на другой носитель.
Рассмотренный пример не самый сложный, он призван показать методику работы с Registry Monitor, поняв которую найти все ключи программы в реестре становится не такой уж и сложной задачей.