
Как обновить БИОС материнской платы
В этой инструкции я буду исходить из того, что вы знаете, зачем вам требуется обновление, и опишу как обновить БИОС по шагам, которые следует выполнить вне зависимости от того, какая именно материнская плата установлена на компьютере.
В том случае, если вы не преследуете какую-то определенную цель, обновляя БИОС, а система не проявляет каких-либо проблем, которые могли бы иметь отношение к его работе, я бы рекомендовал оставить все как есть. При обновлении всегда имеется риск того, что произойдет сбой, исправить последствия которого значительно сложнее, чем переустановить Windows.
Требуется ли обновление для моей материнской платы
Первое, что следует выяснить перед тем, как приступать — ревизию вашей материнской платы и текущую версию БИОС. Сделать это не сложно.

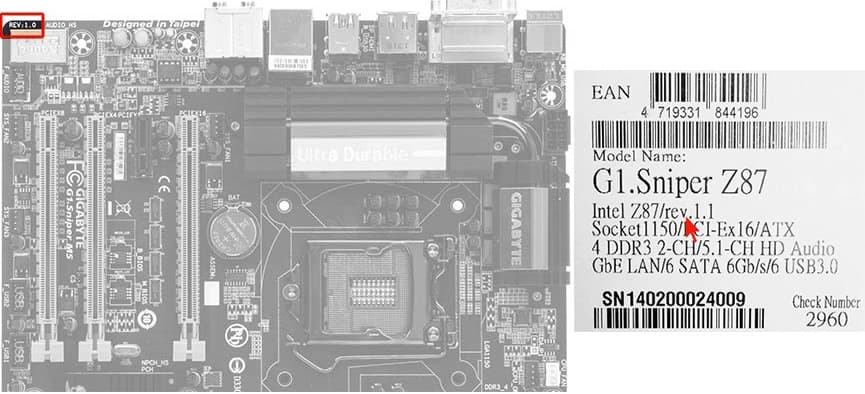
Для того, чтобы узнать ревизию, вы можете посмотреть на саму материнскую плату, там вы найдете надпись rev. 1.0, rev. 2.0 или аналогичную. Еще один вариант: если у вас сохранилась коробка или документация к материнской плате, там также может быть информация о ревизии.
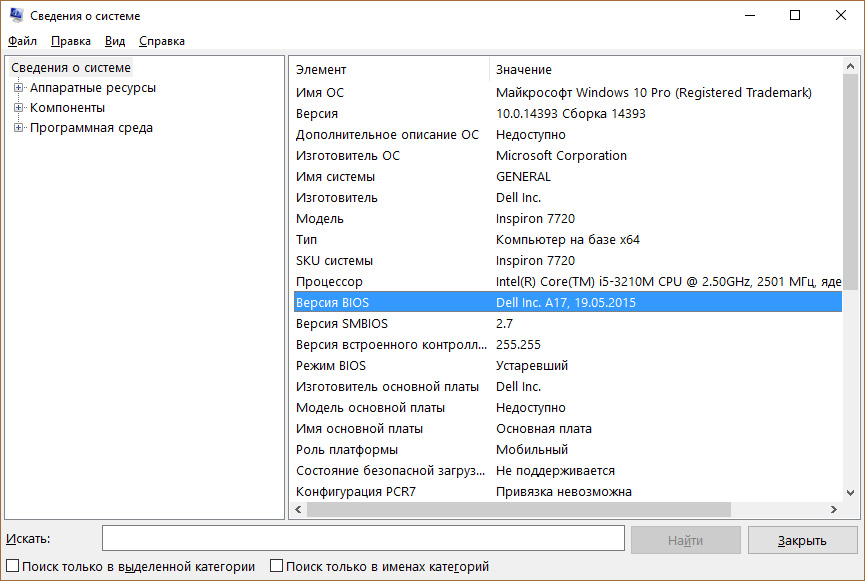
Для того, чтобы узнать текущую версию БИОС, вы можете нажать клавиши Windows + R и ввести msinfo32 в окне «Выполнить», после чего увидеть версию в соответствующем пункте. Еще три способа узнать версию БИОС.

Вооружившись этими знаниями, следует отправиться на официальный сайт производителя материнской платы, найти плату вашей ревизии и посмотреть, есть ли для нее обновления БИОС. Обычно увидеть это можно в разделе «Загрузки» или «Поддержка» который открывается при выборе определенного продукта: как правило, все достаточно легко находится.

Примечание: если вы покупали уже собранный компьютер какого-либо крупного бренда, например, Dell, HP, Acer, Lenovo и аналогичного, то следует заходить на сайт именно производителя компьютера, а не материнской платы, выбрать там вашу модель ПК, после чего в разделе загрузок или поддержки посмотреть, доступны ли обновления БИОС.
Различные способы, которыми можно обновить БИОС
В зависимости от того, кто производитель и какая модель материнской платы на вашем компьютере, способы обновления БИОС могут отличаться. Вот наиболее распространенные варианты:
- Обновление с помощью фирменной утилиты производителя в среде Windows. Обычный способ для ноутбуков и для большого количества материнских плат ПК — Asus, Gigabyte, MSI. Для обычного пользователя этот способ, на мой взгляд является более предпочтительным, так как подобные утилиты проверяют, правильный ли файл обновления вы загрузили или даже сами скачивают его с сайта производителя. При обновлении БИОС в Windows закройте все программы, которые можно закрыть.

- Обновление в DOS. При использовании такого варианта на современных компьютерах как правило создается загрузочная флешка (раньше — дискета) с DOS и самим BIOS, а также возможно дополнительной утилитой для обновления в данной среде. Также обновление может содержать отдельный файл Autoexec.bat или Update.bat для запуска процесса в DOS.
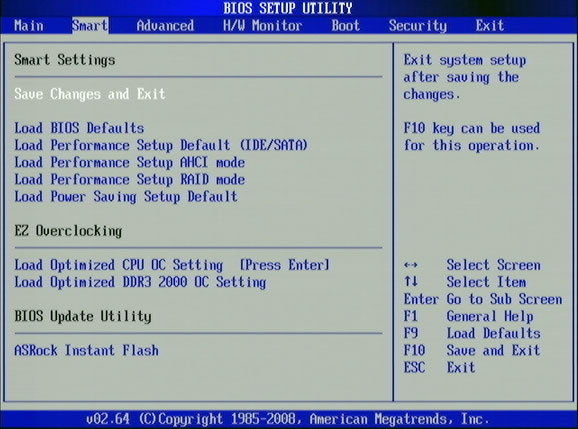
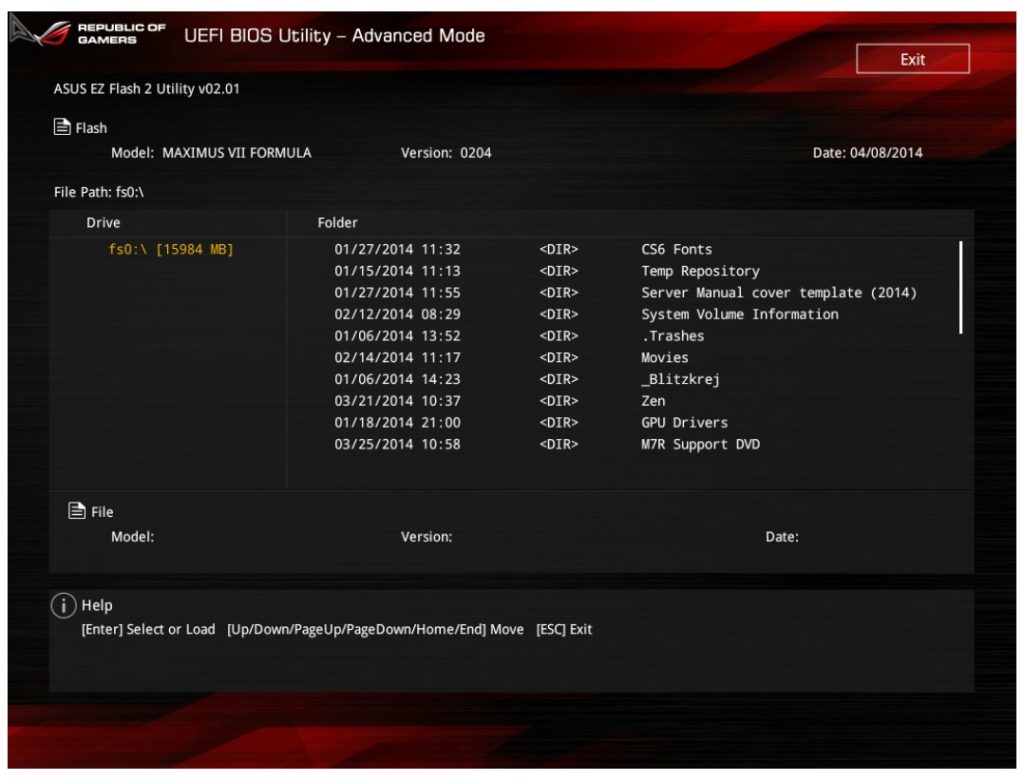
- Обновление БИОС в самом БИОС — многие современные материнские платы поддерживают такой вариант, при этом, если вы абсолютно уверены в том, что вы загрузили правильную версию, этот способ будет предпочтительным. В данном случае, вы заходите в БИОС, открываете нужную утилиту внутри него (EZ Flash, Q-Flash Utility и др.), и указываете устройство (обычно — USB флешка), с которого требуется произвести обновление.


Для многих материнских плат можно использовать любой из этих способов, например, для моей.
Как именно обновлять БИОС
В зависимости от того, какая именно у вас материнская плата, обновление БИОС может выполняться по-разному. Во всех случаях я настоятельно рекомендую читать инструкцию производителя, хотя она часто и представлена только на английском языке: если полениться и упустить какие-либо нюансы, есть вероятность того, что во время обновления случатся сбои, которые будет нелегко поправить. Например, производитель Gigabyte рекомендует отключить Hyper Threading при процедуре для некоторых своих плат — не прочитав инструкцию, вы об этом не узнаете.
Инструкции и программы для обновления БИОС производителей:
- Gigabyte — http://www.gigabyte.com/webpage/20/HowToReflashBIOS.html. На странице представлено все три вышеописанные способа, там же можно скачать программу для обновления БИОС в Windows, которая сама определит нужную версию и загрузит ее из Интернета.
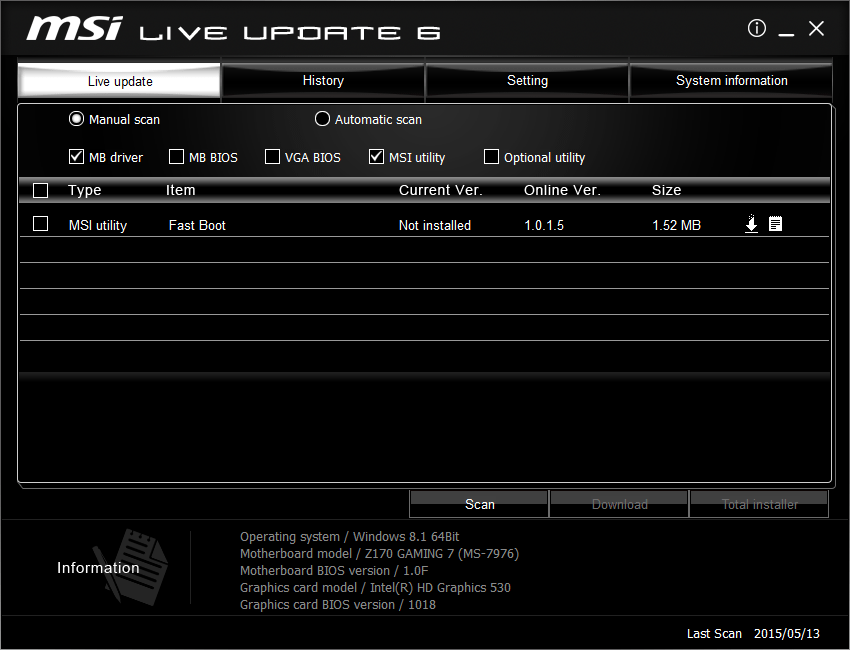
- MSI — для обновления БИОС на материнских платах MSI вы можете использовать программу MSI Live Update, которая также может сама определить нужную версию и скачать обновление. Инструкции и программу можно найти в разделе поддержки по вашему продукту на сайте http://ru.msi.com

- ASUS — для новых материнских плат Asus удобно использовать утилиту USB BIOS Flashback, которую вы можете загрузить в разделе «Загрузки» — «Утилиты БИОС» на сайте http://www.asus.com/ru/. Для более старых материнских плат используется Asus Update Utility для Windows. Есть варианты обновить БИОС и в DOS.

Один пункт, который присутствует почти в любой инструкции производителей: после обновления рекомендуется сбросить БИОС на настройки по умолчанию (Load BIOS Defaults), после этого заново настроить все нужным образом (если требуется).
Самое главное, на что я хочу обратить ваше внимание: обязательно смотрите официальные инструкции, я специально не описываю весь процесс для разных плат, потому что стоит мне упустить хоть один момент или у вас окажется особенная материнская плата и все пойдет не так как нужно.
Все способы:
- Обновляем BIOS на компьютере
- Способ 1: Обновление с помощью утилиты, встроенной в BIOS
- Способ 2: USB BIOS Flashback
- Способ 3: Обновление в среде MS-DOS
- Способ 4: Обновление в Виндовс
- Вопросы и ответы: 4
Как вы наверное знаете, БИОС — это микропрограмма, которая хранится в микросхеме ПЗУ(постоянного запоминающего устройства) на материнской плате компьютера и отвечает за конфигурацию всех устройств ПК. И чем лучше эта программа, тем выше стабильность и быстродействие работы операционной системы. А это значит, что версию CMOS Setup можно периодически обновлять в целях повышения производительности функционирования ОС, исправления ошибок и расширения перечня поддерживаемого оборудования.
Обновляем BIOS на компьютере
Приступая к обновлению БИОС, помните, что в случае неудачного завершения этого процесса и выхода из строя оборудования, вы теряете право на гарантийный ремонт от производителя. Обязательно подстрахуйтесь на предмет бесперебойного электропитания при прошивке ПЗУ. И хорошо подумайте, действительно ли вам необходимо проводить апгрейд «вшитого» ПО.
Способ 1: Обновление с помощью утилиты, встроенной в BIOS
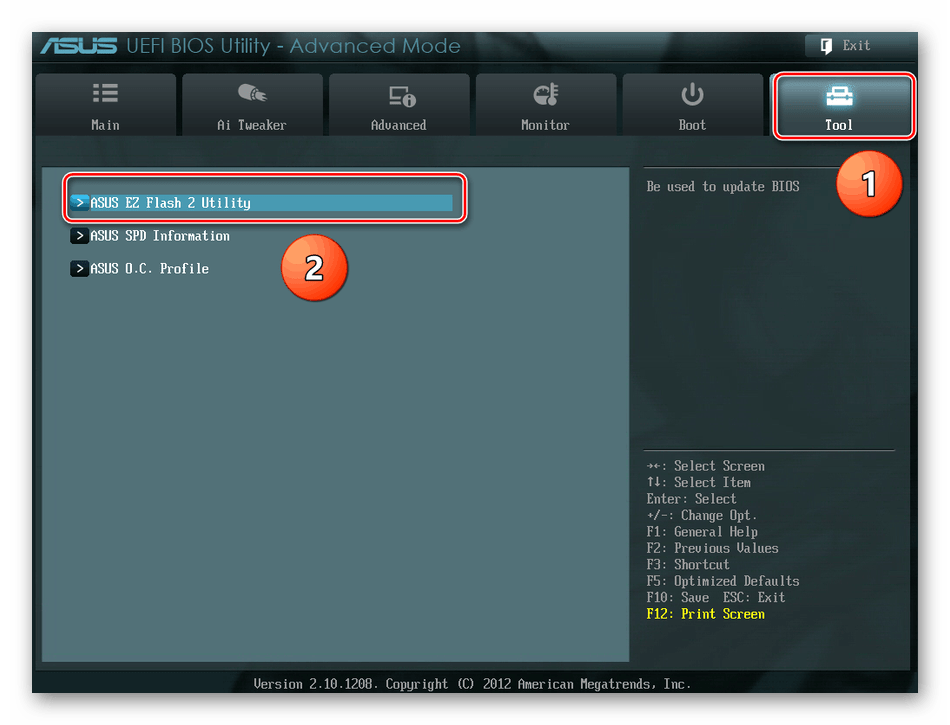
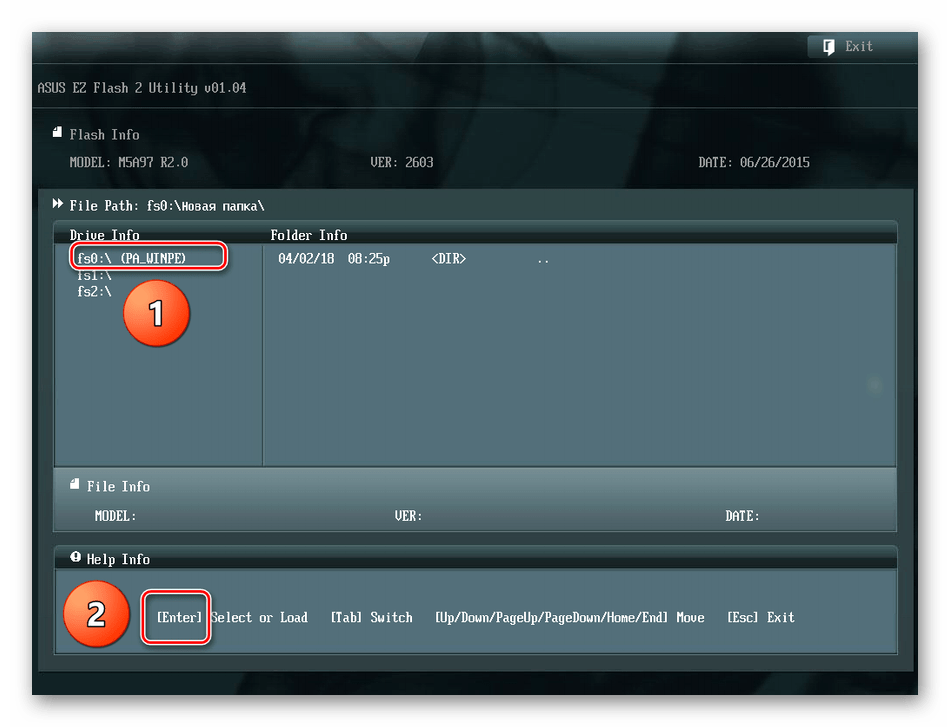
В современных материнских платах часто встречаются микропрограммы со встроенной утилитой для обновления прошивки. Пользоваться ими удобно. Рассмотрим для примера EZ Flash 2 Utility от фирмы ASUS.
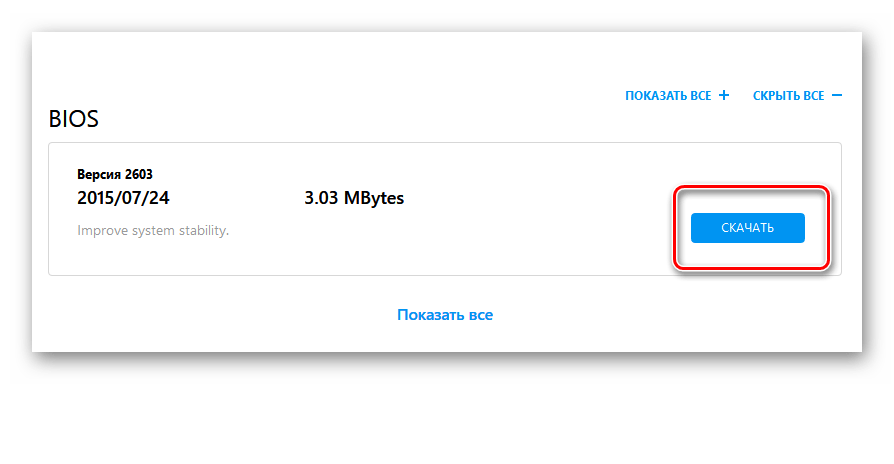
- Загружаем нужную версию BIOS с сайта производителя «железа». Скидываем установочный файл на флешку и вставляем в USB-порт компьютера. Перезагружаем ПК и входим в настройки БИОС.
- В главном меню перемещаемся на вкладку «Tool» и запускаем утилиту, нажав на строку «ASUS EZ Flash 2 Utility».
- Указываем путь к файлу новой прошивки и нажимаем Enter.
- После непродолжительного процесса обновления версии БИОС, компьютер перезагружается. Поставленная цель достигнута.
- Скачиваем последнюю версию прошивки на официальном сайте.
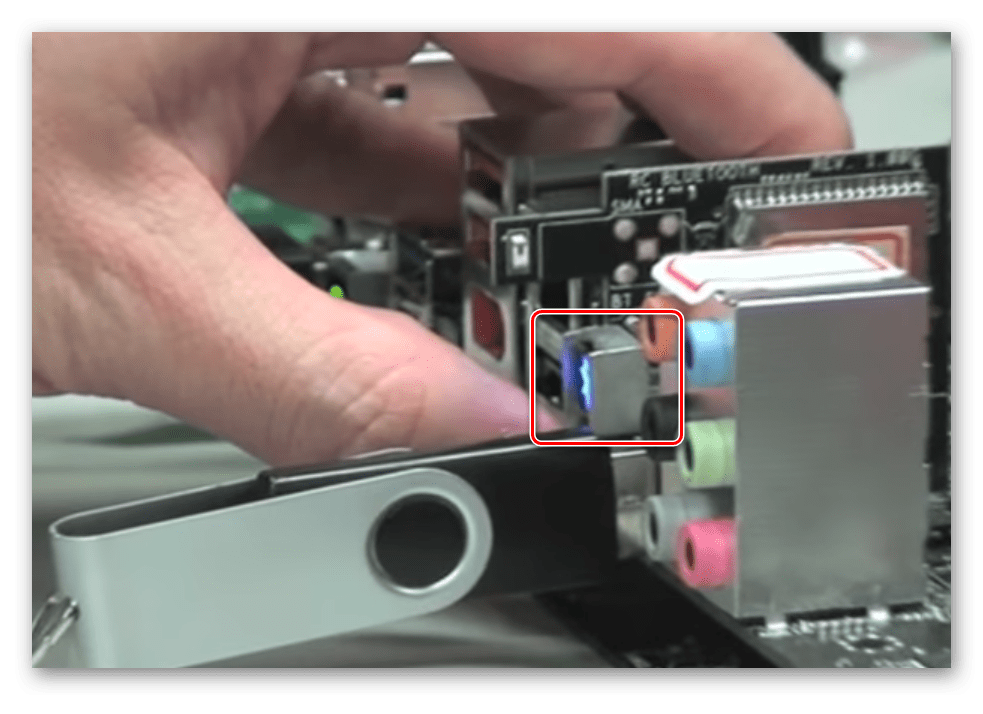
- Записываем загруженный файл на USB-устройство. Втыкаем флешку в USB-порт на задней стороне корпуса ПК и нажимаем специальную кнопку, расположенную рядом.
- Удерживаем кнопку нажатой три секунды и с использованием только питания 3 вольта от батареи CR2032 на материнской плате БИОС успешно обновлен. Очень быстро и практично.
Способ 2: USB BIOS Flashback
Этот метод появился недавно на материнских платах известных производителей, например ASUS. При его применении не нужно входить в BIOS, загружать Windows или MS-DOS. Даже включать компьютер не нужно.
Способ 3: Обновление в среде MS-DOS
Когда-то для обновления БИОС из DOS требовалось наличие дискеты с утилитой от производителя и скачанным архивом прошивки. Но так как floppy-дисководы стали настоящим раритетом, то сейчас для апгрейда CMOS Setup вполне подойдет USB-накопитель. Детально ознакомиться с этим способом вы можете в другой статье на нашем ресурсе.
Подробнее: Инструкция по обновлению BIOS c флешки
Способ 4: Обновление в Виндовс
Каждый уважающий себя производитель компьютерного «железа» выпускает специальные программы для перепрошивки BIOS из операционной системы. Обычно они есть на дисках с ПО из комплектации материнской платы или на сайте компании. Работать с этим софтом довольно легко, программа может автоматически найти и скачать файлы прошивки из сети и обновить версию BIOS. Нужно только инсталлировать и запустить данное программное обеспечение. Прочитать про такие программы можно, перейдя по ссылке, указанной ниже.
Подробнее: Программы для обновления БИОСа
В заключение пару небольших советов. Обязательно резервируйте старую прошивку БИОС на флешке или ином носителе на случай возможного отката на прошлую версию. И скачивайте файлы только на официальном сайте фирмы-производителя. Лучше быть излишне осторожным, чем тратить бюджет на услуги ремонтников.
Наша группа в TelegramПолезные советы и помощь
-
Home
-
News
- How to Update BIOS Without USB | 2 Simple Ways
How to Update BIOS Without USB | 2 Simple Ways
By Ariel | Follow |
Last Updated
Can you update BIOS without USB? How to update BIOS without USB on Windows 10/11? If you are still trying to figure them out, this post from MiniTool Partition Wizard is worth reading. It shares 2 feasible ways to update BIOS without USB.
BIOS is a firmware embedded on the chip on the computer’s motherboard. The BIOS firmware is pre-installed on the motherboard of a PC. Sometimes the BIOS version may get outdated and trigger some issues. So, it’s important to update BIOS timely. Can you update BIOS without USB? How to update BIOS without flash drive? Let’s keep reading.
How do I update my bios without USB stick? I want to update my bios to the latest version but I don’t have a USB stick I have a Prime a320m-k motherboard. how do I update my bios without a USB stick?https://www.reddit.com/r/ASUS/comments/gv6ux6/how_do_i_update_my_bios_without_usb_stick/
Can you update BIOS without flash drive? Of course, the answer is “Yes”. You can update BIOS without a USB. To do this work, you just need to download the BIOS update utility depending on your motherboard or use the UEFI firmware settings if available.
Before You Do
Before updating BIOS without USB, there are some important things you should note. First, you need to check your current BIOS version and review the release notes according to your motherboard. More importantly, you’d better back up all important data, including the operating system, beforehand in case of potential loss.
Here it’s highly recommended you back up the computer using MiniTool Partition Wizard. It’s a powerful disk backup utility that can easily back up OS, clone a hard drive, and back up partitions on Windows. Besides, it’s a multifunctional partition manager that can extend/resize/format/delete partitions, change cluster size, check SD card health, convert FAT32 to NTFS without data loss, and more.
MiniTool Partition Wizard DemoClick to Download100%Clean & Safe
How to Update BIOS Without USB on Windows 10/11
How to update BIOS without USB? Here we summarize 2 simple ways. You can choose one that works best for you.
Way 1. Use the BIOS Update Utility
As you know, some motherboard manufacturers release the BIOS update utility such as MSI. If you update BIOS without a USB, you can utilize this tool. Here’s how to update MSI BIOS without USB.
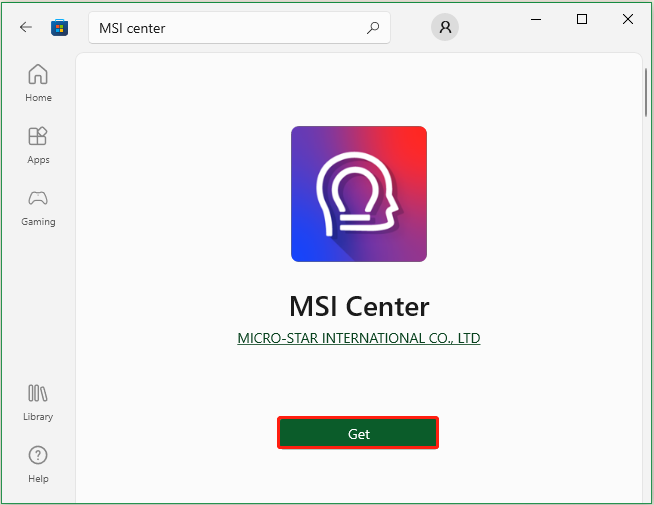
Step 1. Open your Microsoft Store on Windows, type MSI center in the search box, and select it.
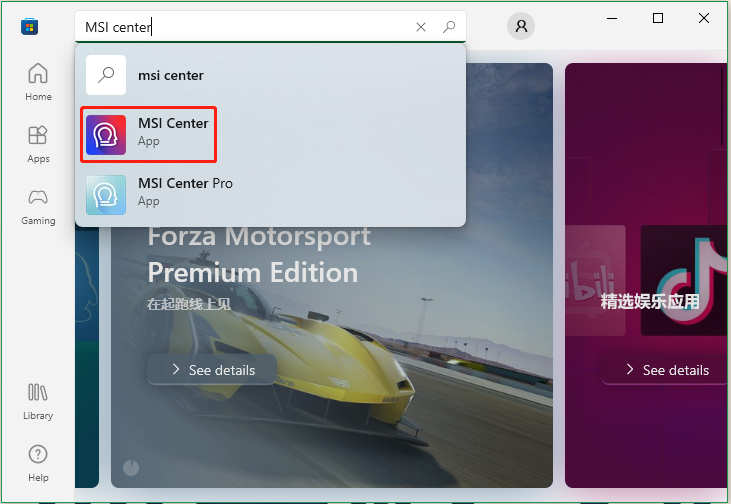
Step 2. Click on Get to start downloading the MSI BIOS update utility and wait for the process to complete.
Step 3. Once downloaded, run the app, navigate to the Support tab, and select the Advanced option to expand additional features and settings.
Step 4. Now, you can look for the BIOS update option and finish the MSI BIOS update without USB via the on-screen instructions.
Way 2. Use the UEFI Firmware Settings
In addition, you can update ASUS BIOS without USB using the UEFI firmware settings. Let’s follow the full guide below:
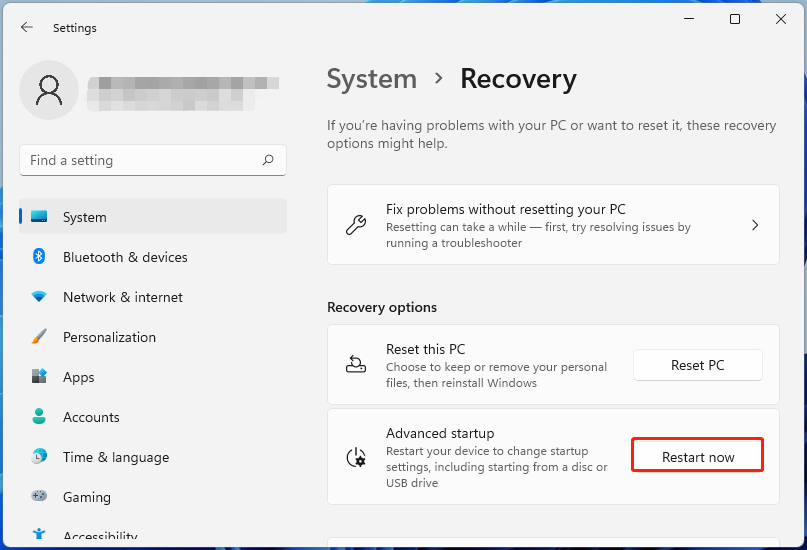
Step 1. Press the Win + I keys to open the Settings window and select System.
Step 2. Select Recovery from the right panel and click on Restart now.
Step 3. Then you will enter the Advanced Startup menu. Select Troubleshoot and click on Advanced options > UEFI Firmware Settings.
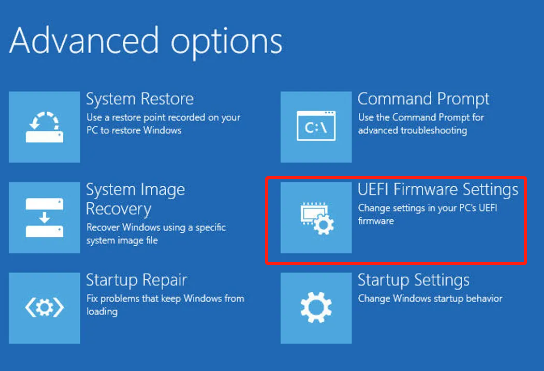
Step 4. In the UEFI firmware settings window, enter the Advanced Mode and go to the Tool menu.
Step 5. Select ASUS EZ Flash Utility and select Via Internet. Then press the left and right arrow keys to select your internet connection and press Enter.
Step 6. Follow the on-screen prompts to complete the ASUS BIOS update.
About The Author
Position: Columnist
Ariel has been working as a highly professional computer-relevant technology editor at MiniTool for many years. She has a strong passion for researching all knowledge related to the computer’s disk, partition, and Windows OS. Up till now, she has finished thousands of articles covering a broad range of topics and helped lots of users fix various problems. She focuses on the fields of disk management, OS backup, and PDF editing and provides her readers with insightful and informative content.
-
Проверка версии прошивки
-
Где скачать?
-
Инструкция по обновлению
-
В Windows
-
В BIOS
-
В DOS
Прошивка BIOS это не трудоемкий процесс и займет немного времени. Рекомендуется устанавливать новую версию и только от производителя, если в предыдущей наблюдалась некорректная работа. Рассмотрим в статье вопрос: как обновить BIOS на компьютере Windows 10.
Проверка версии прошивки
Проверить текущую версию прошивки можно несколькими способами:
- Просмотрев информацию на самой материнской плате или на оставшейся упаковке. Ищите похожую надпись rev 1.0, rev 1.1, rev 1.3.

- В операционной системе Windows. Откройте команду “Выполнить” (Win+R) и пропишите команду
msinfo32
В открывшемся окне “Сведения о системе” смотрите элемент “Версия BIOS”.

- В самом меню BIOS (ознакомьтесь со статьей: как запустить BIOS) в Main или внизу экрана.

Где скачать?
Установочные файлы BIOS можно скачать на официальных сайтах разработчиков материнских плат или на сайтах производителей ноутбуков (например Dell, Lenovo, HP, Acer) в разделе “Загрузки” (Download).
Инструкция по обновлению
Существует несколько способов прошить BIOS.
В Windows
Чтобы выполнить обновление, скачайте нужную прошивку на компьютер. Затем воспользуйтесь фирменной утилитой от производителя системной платы:
- программа Winflash от ASUS.
- программа Live Update 6 от MSI.

Если скачанный файл является исполняемым (расширение .exe) запустите его и ожидайте окончания установки (об этом пишет производитель в инструкции по прошивке, например Dell).
Совет! Обновление выполняется на всех версиях Windows 10, 8, 7, XP.
В BIOS
Большинство современных плат поддерживают способ апгрейда версии в среде BIOS. Для прошивки загрузите установочный файл на флешку и подключитесь к ПК. Используйте утилиту в материнских платах для установки BIOS:
- для ASUS это EZ Flash 2.

- для Gigabite это Q-Flash.
В DOS
Чтобы обновить BIOS используя среду DOS, нужно создать загрузочную флешку с DOS и самим BIOS. К тому же, может понадобится утилита для процесса обновления (Gigabite используют DOS Flash utility). Обновление должно содержать файл с расширением .bat (Update.bat или Autoexec.bat) для запуска прошивки в DOS. Этот способ отживает свое и применяется к старым моделям материнских плат.
Возникли вопросы, касательно прошивки вашего компьютера? Спрашивайте об этом в комментариях или используйте специальную форму.
Your computer’s BIOS (Basic Input/Output System) software is an essential part of keeping all your systems running smoothly.
Updating it can help resolve bugs and fix hardware issues. But before you make any updates to your BIOS, it’s important to know exactly when and how to update it. Making an unnecessary change could harm your computer instead of help if not done properly.
Contents
- What is BIOS software?
- What is a BIOS software update?
- When should I update my BIOS?
- Checking your BIOS version on Windows 10
- How to update BIOS software on Windows 10
What is BIOS software?
Your PC’s BIOS software is one of the most important elements that control the operation of your computer. BIOS is the system that prompts your computer’s operating system to start up when you turn on your computer.
The BIOS is generally embedded in a chip on your computer’s motherboard. You can think of BIOS as your computer’s first responder, activating the operating system that allows you to connect with different applications and functions on your computer.
This is an essential part of your PC’s functionality, and keeping it updated can help improve your system’s responsiveness and resolve existing software bugs. Now that you know what BIOS software does, let’s discuss when you might want to initiate a BIOS update, and how to update BIOS on Windows 10.
What is a BIOS software update?
When most of us think of software updates, we tend to think of big system upgrades, added design features, or even a whole new interface for an application. For example, when we update smartphone apps like Instagram, we often see new ways to share with friends, new colors, and even new icons.
In short, system updates often mean big changes when we’re talking about phones and operating system updates. However, this isn’t always the case with programming updates on your computer.
As for BIOS updates, these changes may not be quite as noticeable as other system upgrades. BIOS system updates don’t happen nearly as frequently as operating system updates, and users may not always want to initiate an update if they don’t need to.
BIOS updates don’t make your computer faster per se, but if your operating system isn’t working properly, you may want to download the latest version. Conversely, if your computer is functioning properly, a BIOS update probably isn’t necessary, so it’s best not to mess around with changing the software.
When should I update my BIOS?
In general, there are three scenarios where you may want to consider upgrading your BIOS:1. Bugs: If your BIOS is already experiencing systematic bugs, updating may help repair these.
2. CPU hardware changes: If you’ve upgraded your computer’s processor, you may need to update your BIOS so that the motherboard, where BIOS is embedded, and your CPU can collaborate properly.
3. Hardware malfunctions: Updating BIOS can sometimes be a method of troubleshooting for issues with your RAM and/or CPU. Only update BIOS as a troubleshooting method if HP support or your IT company recommends doing so.
If your computer is working normally and you don’t fall into these three categories, it’s unlikely that you need to worry about updating your BIOS software. You know what they say — don’t fix it if it ain’t broken.
Next, let’s jump into how you can check in on your BIOS version on Windows 10 as well as how to perform a BIOS update.
Checking your BIOS version on Windows 10
If you do find that you need to update your BIOS because of a bug or hardware issue, checking the version number and date is actually quite simple. Knowing this information will help you confirm if there’s an update available for your processor.
We’ve created a step by step guide to help you identify this information so that you can check for any available software updates.
1. Navigate to your computer’s search bar at the bottom left of your home screen.
2. Search for “Control Panel.”
3. Once in the Control Panel, click on “Administrative Tools.”
Note: If the Administrative Tools icon is not displayed immediately, simply type “Administrative Tools” into the Control Panel search bar in the top right of the window.
4.
Click “System Information.”
Once you’re in the System Information window, you’ll be able to see a variety of information about your computer and its operating system, including BIOS version/date and BIOS mode. From here, you can take note of your software version to check if there are any updates to be made.
How to update BIOS software on Windows 10
After you’ve confirmed your BIOS version number, you’ll need to head to your computer’s manufacturing site to see what updates are available.
On an HP computer, first go to HP Software & Driver Downloads. Once there, you’ll need to identify your product type and its serial number. Click the product type and enter the serial number by letting HP detect the product, or manually enter the serial number if you already know it.
FIND YOUR PRODUCT’S SERIAL NUMBER
There are two ways you can find your HP product serial number; either on a product label or using your system’s control panel.
Option 1: Find the serial number on the product label. Places to look:• On the underside or back edges of the laptop
• Inside the removable battery compartment
• On the underside of the stand
• On the back of the display on an All-in-One PC
• On the side of a desktop PC
Option 2: Find the serial number from the control panel.
1. Type “Command Prompt” into the system’s search bar at the bottom left of your screen and click on the Command Prompt Desktop App.
2. In the window, type “wmic bios get serialnumber” and press “Enter.”
VIEW SYSTEM INFORMATION AND UPDATE BIOS
After you have entered the serial number on the product identification page, choose your operating system as “Windows 10.” Once here, you’ll be able to find your product’s software and driver information.
Note: Only install BIOS updates from HP. Downloading a BIOS update incorrectly can affect your computer’s ability to start and you may jeopardize memory.
If your computer is managed by an IT company, contact them directly to ensure you install BIOS correctly. If you have questions about software updates, feel free to chat with HP Technical Support.
If Windows is able to start:1. Open the full “BIOS” tab to find the BIOS version history and any available updates. If there is a higher version number that is compatible with your processor, continue with steps 2-9.
Note: If there is not an update listed, your computer does not require a BIOS update.
2. If you see an updated version of BIOS, click “Download.” Follow the HP Download and Install Assistant prompts to save the file to your computer. Do not select the option to run the file.
3. Close any open applications.
4. Temporarily disable your antivirus software by searching for “security” in your Windows search. Then open the Security and Maintenance settings, and click “Security” to access the virus protection settings.
5. Navigate to the folder or your desktop where you saved the BIOS update file.
6. Once you’ve found the file name, double-click to start the BIOS update installation. Note: Do not shut down or restart the computer until the update is complete.
7. After the update has finished, follow any additional on-screen instructions, and then restart your computer. Note: if a “251” or CMOS error appears after restarting, go to Error: CMOS Checksum Bad to resolve the issue.
8. If BitLocker was suspended, search Windows for “bitlocker,” then click Resume Protection.
9. Re-enable your antivirus software.
If Windows is not able to start:
If you are not able to start Windows on your computer, you will need to use a second computer that has internet access to obtain and download the BIOS update.
Setup the BIOS file on a USB flash drive:1. Using the second computer, follow steps 1-2 above using the original computer to fill out the software information.
2. In the InstallShield Wizard window, click “Next.”
3. Select “I accept the terms in the licensing agreement,” then click “Next.”
4. Select “Create Recovery USB flash drive,” then click “Next.”
5. Choose your USB flash drive from the list, then click “Next.”
6. Once the BIOS file copies to your flash drive, it should say “The recovery flash drive was created successfully,” click “Finish.”
Update the BIOS on the original computer:7. Turn on the original computer, and immediately press the Esc key repeatedly, about one time every second, until the Startup Menu opens.
8. Press the F2 key to open the HP PC Hardware Diagnostics UEFI menu.
9. Plug in the USB flash drive that contains the BIOS update file into an available USB port on the original computer.
10. Click “Firmware Management” or “BIOS Management.”
11. Click “BIOS Update.”
12. Click “Select BIOS Image to Apply.”
13. Click “HP_TOOLS-USB Drive,” then click on “Hewlett-Packard.”
14. Click “BIOS,” then click “CURRENT” or “NEW.”
15. Select the BIOS update file that matches the System Board ID.
16. Click “Apply Update Now” and type in your administrator password if prompted.
If the BIOS update worked, your computer will automatically restart after 30 seconds to complete the update.
If the BIOS update failed, you will see an error message notifying you that the update did not go through. The system may run a BIOS recovery after restarting. Do not restart or turn off the computer manually if the update has failed.
Similar to any major software changes, if you are unsure whether or not you should complete an update or system reboot, consult your IT company or our support team to help you address any technical issues.