
Переустановка Windows 10 связана с несколькими довольно длинными процедурами, вроде установки драйверов и обновлений. На это может уйти час-два времени в зависимости от мощности вашего устройства и скорости интернет-соединения. Почему бы не сделать так, чтобы программа установки Windows 10 сразу добавляла в систему все драйвера и обновляла её? В этой инструкции мы расскажем, как интегрировать драйвера и обновления в образ диска (ISO или дистрибутив) Windows 10, чтобы они автоматически установились вместе с системой.
Что понадобится для интеграции драйверов и обновлений в образ Windows 10
- Распакованный образ Windows 10. Его можно скачать с официального сайта Microsoft и распаковать в любую папку с помощью какого-нибудь архиватора, например, бесплатного 7-Zip.
- Папка с необходимыми драйверами для вашего устройства. Можете просто сохранить все драйвера Windows.
- MSU-файл обновления Windows 10, который можно скачать из каталога обновлений Microsoft.
- Устройство на Windows 7 (и старше) с несколькими гигабайтами свободного пространства на системном диске и достаточно мощным процессором. Проводить операции, описанные ниже, на планшете с процессором Intel Atom и 16 ГБ встроенной памяти не стоит.
- Бесплатная программа NTLite.
Описанный в статье способ работает также для Windows 7 и Windows 8.1, но вам придётся получать их образы, обновления и драйвера другими методами.
Как интегрировать драйвера и обновления в образ Windows 10
Процесс добавления драйверов в дистрибутив Windows 10 можно условно разделить на несколько частей.
Установка программы NTLite
Подготовка образа Windows 10 к интеграции драйверов
Добавление драйверов и обновлений в образ Windows 10
Вы можете использовать полученный ISO-файл для создания загрузочной флешки Windows. Все драйвера и обновления будут установлены автоматически вместе с системой.
Привет друзья! Если вам часто приходится устанавливать Windows 10 на различные компьютеры, то вы можете интегрировать в дистрибутив (ISO-образ) операционной системы все обновления, вышедшие со 2 августа 2016 года. Сделать это можно при помощи утилиты Dism.
Во-первых, смотрим «Управление дисками» нашего ноутбука с установленной Windows 10.
На диск (C:) установлена Windows 10.
Новый том (F:) является переносным жёсткий диском USB.
Всю интересующую вас информацию о последних обновлениях, вышедших для Windows 10, можно узнать на страничке «Журнала обновлений Windows 10»
Видим, последний «Накопительный пакет обновлений KB3194798».
Затем идём на сайт Майкрософт (используйте браузер Internet Explorer или Microsoft Edge) и скачиваем «Накопительный пакет обновлений KB3194798», повышающей номер сборки Widows 10 до 14393.321, размер 779,7 MB, жмём Download:
жмём левой мышью на ссылку и скачиваем «Накопительный пакет обновлений KB3194798» на диск (F:)
и присоединяем его к виртуальному дисководу (в моём случае (E:).

Заходим на виртуальный дисковод (E:) и копируем все файлы Windows 10.

Открываем Новый том (F:), создаём на нём папку, называем её «Win10», заходим в эту папку и вставляем все файлы Windows 10.


Для последующей работы в этой папке нам будет нужен файл-образ Windows 10 (файл — install.esd), находится он в папке «sources»

Дистрибутив Windows 10 содержит в себе несколько релизов операционной системы. Узнаём индексы всех релизов. Введём команду:
Dism /Get-WimInfo /WimFile:F:\Win10\sources\install.esd
Нам нужна Windows 10 Домашняя для одного языка, как видим, она имеет индекс 3.

Следующей командой я разворачиваю файл install.esd на виртуальный диск VHD (раздел G:).
На диск (G:) разворачивается Windows 10.
Dism /apply-image /imagefile:F:\Win10\sources\install.esd /index:3 /ApplyDir:G:\

Следующая команда произведёт экспорт обновлений из «Накопительного пакета обновлений KB3194798», находящегося на диске (F:) на смонтированный раздел (G:) (Windows 10) виртуального диска VHD.
Dism /image:G: /add-package /packagepath:F:\

После экспорта обновлений идём на диск (F:) и удаляем файл install.esd находящийся по адресу F:\Win10\sources\install.esd

Теперь архивируем Windows 10 на диске (G:) в файл install.wim командой
Dism /capture-image /imagefile:F:\Win10\sources\install.wim /capturedir:G: /name:windows(данной командой мы архивируем Windows 10 на диске (G:) в файл install.wim, который будет расположен по адресу F:\Win10\sources\install.wim

Файл install.wim создан и находится по адресу: F:\Win10\sources\install.wim.

Друзья, теперь нам осталось только собрать дистрибутив Windows 10 с помощью комплекта средств для развёртывания и оценки Windows ADK, но ISO-образ с операционной системой будет весить 4,5 ГБ. Если вы хотите, чтобы ISO-образ Windows 10 весил меньше — 3 ГБ, то примените к файлу install.wim сжатие (compress) recovery (конвертация в install.esd).
Вводим команду:
Dism /Export-Image /SourceImageFile:F:\Win10\sources\install.wim /SourceIndex:1 /DestinationImageFile:F:\Win10\sources\install.esd /Compress:recovery
в результате, в расположенной по адресу F:\Win10\sources\ папке появился новый файл-образ install.esd. Теперь удаляем файл install.wim и оставляем install.esd, делаем на его основе дистрибутив Windows 10.

Независимо от того, сжимали ли вы файл install.wim в install.esd, нам осталось только скачать и установить комплект средств для развертывания и оценки Windows ADK для Windows 10 версии 1607 и создать с помощью него ISO-образ Windows 10 с интегрированными обновлениями.
Ссылка на скачивание Windows ADK
https://developer.microsoft.com/ru-ru/windows/hardware/windows-assessment-deployment-kit
После установки открываем среду развёртывания и работы с образами,
вводим команду:
Oscdimg /u2 /m /bootdаta:2#p0,e,bF:\Win10\boot\Etfsboot.com#pef,e,bF:\Win10\efi\microsoft\boot\Efisys.bin F:\Win10 F:\Windows.isoгде:
u2, это файловая система UDF, а m — размер образа без ограничений.
b — загрузочный сектор записать etfsboot.com, путь к файлу etfsboot.com при указании b(boot) пишется без пробела bF:\Win10\boot\etfsboot.com
bF: — где F: — буква диска.
F:\Win10 — создать ISO-образ из файлов и папок, находящихся на разделе F:
F:\Windows.iso — созданный образ разместить на разделе F:
присвоить имя образу — Windows.iso

Дистрибутив Windows 10 с интегрированными последними обновлениями и названием Windows.iso, находится на диске (F:) и весит всего 3 ГБ.

Если при помощи него установить операционную систему, то после установки у неё будет версия Windows 10 1607 (Сборка ОС 14393.321).

Интеграция обновлений в дистрибутив, содержащий все основные редакции Windows 10 (Windows 10 PRO, Windows 10 Домашняя, Windows 10 Домашняя для одного языка, Windows 10 Для образовательных учреждений)
Друзья, созданный нами дистрибутив Windows 10 со всеми последними обновлениями содержит только один релиз Win 10 (Домашняя для одного языка), так как, если помните, в начале статьи мы с вами развернули файл install.esd на виртуальный диск VHD (раздел G:) командой
(Dism /apply-image /imagefile:F:\Win10\sources\install.esd /index:3 /ApplyDir:G:\) и в этой команде мы указали index:3 (Win 10 (Домашняя для одного языка).
Если вы хотите создать дистрибутив с четырьмя основными релизами Windows 10, то при создании архива install.wim нужно добавить параметр description. Давайте рассмотрим этот вопрос подробно на примере нашей же статьи.
Скачиваем с официального сайта Майкрософт на Новый том (F:) свежий дистрибутив Windows 10 и присоединяем его к виртуальному дисководу (в моём случае (E:).
Заходим на виртуальный дисковод (E:) и копируем все файлы Windows 10.
Открываем Новый том (F:), создаём на нём папку, называем её «Win10», заходим в эту папку и вставляем все файлы Windows 10, после этого УДАЛЯЕМ из неё install.esd.
Следующей командой я разворачиваю файл install.esd на виртуальный диск VHD (раздел G:). На диск (G:) разворачивается Windows 10PRO.
Dism /apply-image /imagefile:E:\sources\install.esd /index:1 /ApplyDir:G
(где index:1, это Windows 10 PRO
Следующая команда произведёт экспорт обновлений из «Накопительного пакета обновлений KB3194798», находящегося на диске (F:) на смонтированный раздел (G:) (Windows 10 PRO) виртуального диска VHD.
Dism /image:G: /add-package /packagepath:F:\
Теперь архивируем Windows 10 на диске (G:) в файл install.wim командой
Dism /capture-image /imagefile:F:\Win10\sources\install.wim /capturedir:G: /name:PRO /description:PRO
(данной командой мы архивируем Windows 10 PRO на диске (G:) в файл install.wim, который будет расположен по адресу F:\Win10\sources\install.wim, после этого форматируем раздел G: и командой
Dism /apply-image /imagefile:E:\sources\install.esd /index:2 /ApplyDir:G разворачиваем Windows 10 Home (Домашняя).
Следующая команда произведёт экспорт обновлений из «Накопительного пакета обновлений KB3194798», находящегося на диске (F:) на смонтированный раздел (G:) (Windows 10 Home) виртуального диска VHD.
Dism /image:G: /add-package /packagepath:F:\
Теперь архивируем Windows 10 houm на диске (G:) добавляя архив в файл install.wim в котором уже находится WIN pro
Dism /Append-Image /imagefile:F:\Win10\sources\install.wim /capturedir:G: /name:Houm /description:Houm
после этого опять форматируем раздел G: и командой
Dism /apply-image /imagefile:E:\sources\install.esd /index:3 /ApplyDir:G
разворачивается Windows 10Singl
делаем интеграцию обновлений и добавляем в install.wim
Dism /Append-Image /imagefile:F:\Win10\sources\install.wim /capturedir:G: /name:Singl /description:singl
Статьи по этой теме:
- Создание собственного настроенного дистрибутива Windows 10. Или идеальный способ переноса Windows на твердотельный накопитель SSD. Простой способ для начинающих пользователей
- Создание собственного настроенного дистрибутива Windows 10. Способ для опытных пользователей
Если вы хотите, чтобы образ Windows, которые вы распространяете на компьютеры, всегда содержал последние кумулятивные обновления безопасности, вы можете добавить новые пакеты обновления в установочный офлайн образ Windows с помощью DISM. Этот способ позволит вам обновить установочный ISO/WIM образ Windows 11/10 и Windows Server 2022/2019/2016.
Содержание:
- Подготовка к интеграции обновлений безопасности в образ Windows
- Смонтировать WIM образ в Windows
- DISM: Добавляем MSU и CAB обновления в WIM образ Windows
В этом примере мы покажем, как добавить последнее кумулятивное обновление безопасности (от апреля 2023 года) в установочный образ Windows 11 22H2. Мы будем интегрировать в образ кумулятивное обновление KB5025239, которое в том числе добавляет в Windows встроенную поддержку Local Administrator Password Solution (Windows LAPS).
Подготовка к интеграции обновлений безопасности в образ Windows
Итак, нам понадобятся:
- Установочный образ Windows в ISO формате или его WIM файл;
- Файл с обновлениями в формате .MSU, которые нужно скачать с сервера обновлений Microsoft (как вручную скачать msu файлы обновлений). Достаточно скачать последнее кумулятивное обновления для вашей версии Windows.
На вашем компьютере создайте следующую структуру каталогов:
- C:\updates\mnt – – папка, в которую мы будем монтировать файл install.wim с установочным образом Windows;
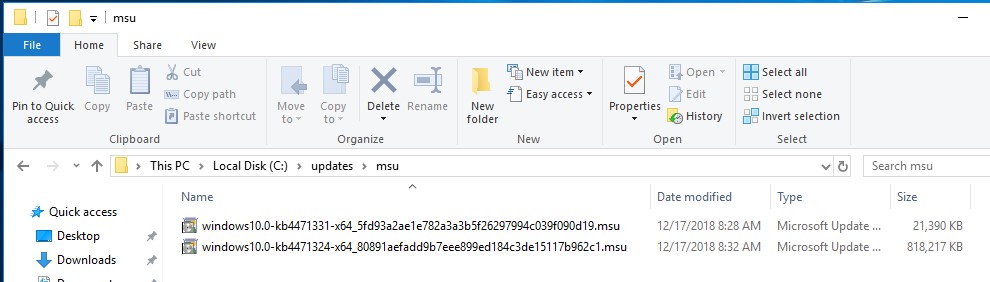
- C:\updates\msu – каталог, в который нужно скопировать обновления для вашей версии Windows в формате MSU ;

- C:\updates\WinImage\ — в этот каталог нужно скопировать файл install.wim из каталога Sources вашего установочного образа Windows 11 22H2. Также вы можете о скопировать WIM образ с сервера WDS, MDT, SCCM или другого средства развертывания ОС, которое используется для установки Windows по сети через PXE.
Смонтировать WIM образ в Windows
В современных установочных ISO образах Windows, которые генерируются с помощью Media Creating Tool в целях экономии места вместо WIM файла используется формат ESD. Поэтому вам нужно сначала сконвертировать файл ESD в формат WIM с помощью утилиты DISM.
Смонтируйте ISO образ в виртуальный привод:
Mount-DiskImage –ImagePath "C:\DIstr\iso\Windows1122h2.iso"
Выведите список редакций Windows в образе:
DISM /Get-WimInfo /WimFile:"E:\sources\install.esd"
В этом примере мы экспортируем из ESD образа только WIM файл для редакции Windows 10 Pro (ее индекс 6, поэтому в следующей команде мы укажем
/SourceIndex:6
):
dism /export-image /SourceImageFile:"E:\sources\install.esd" /SourceIndex:6 /DestinationImageFile:C:\Updates\WInImage\win11pro.wim /Compress:max /CheckIntegrity
Смонтируйте файл install.wim c установочным образом Windows в каталог C:\updates\mnt с помощью DISM:
dism /mount-wim /wimfile:C:\Updates\WInImage\win11pro.wim /index:1 /mountdir:C:\updates\mnt
Совет. В нашем случае в WIM образе содержится только одна редакция Windows 11 Pro, поэтому мы указываем
/index:1
. Если WIM образ содержит сразу несколько редакций Windows, нужно указать индекс нужной версии ОС, либо выполнить интеграцию обновления для каждого образа по очереди.
DISM: Добавляем MSU и CAB обновления в WIM образ Windows
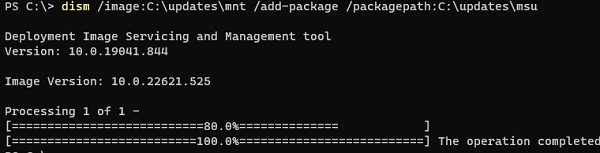
Теперь вы можете запустить процесс интеграции подходящих MSU обновлений из указанного каталога в ваш образ Windows.
dism /image:C:\updates\mnt /add-package /packagepath:C:\updates\msu
Если система обнаружит неподходящее обновление (не соответствует версия ОС, разрядность или если обновление уже установлено), оно будет пропущено, а в лог
C:\Windows\Logs\DISM\dism.log
будет записана соответствующая информация.
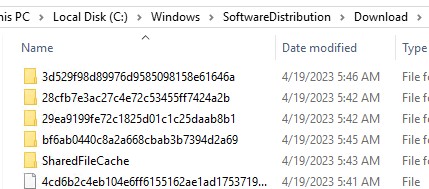
Если вы не хотите вручную качать MSU файлы обновлений, вы можете использовать в качестве источника компьютер с аналогичной версией Windows, на котором уже установлены последние обновления безопасности, вы можете получить все необходимые файлы обновления непосредственно с него. Дело в том, что Windows сохраняет все cab файлы обновлений, полученные с серверов Windows Update или сервера WSUS в каталог
C:\Windows\SoftwareDistribution\Download
.
С помощью следующей команды вы запустите интеграцию в образ install.wim файлов обновлений, которые уже скачаны и установлены на другом компьютере (с именем PC1122H2), через локальную сеть:
Start /w for /R \\PC1122H2\C$\Windows\SoftwareDistribution\Download\ %f in (*.cab) do dism /image:C:\updates\mnt /add-package /packagepath:”%f”
В данном примере мы получим доступ к каталогу обновлений на удаленном компьютере через административную шару C$. Появится окно, в котором можно наблюдать за процессом установки обновлений в офлайн образ Windows. DISM будет пытаться добавить в ваш WIM образ Windows каждый найденный CAB файл на удаленном компьютере.
Вы можете уменьшить размер WIM образа за счет удаления файлов неиспользуемых обновлений (см. статью об очистке папки WinSxS). Выполните команду:
dism /image:C:\updates\mnt /Cleanup-Image /StartComponentCleanup /ResetBase /ScratchDir:C:\Temp
И последний шаг – нужно сохранить изменения и отключить смонтированный образ.
dism /unmount-wim /mountdir:C:\updates\mnt /commit
dism /Cleanup-Wim

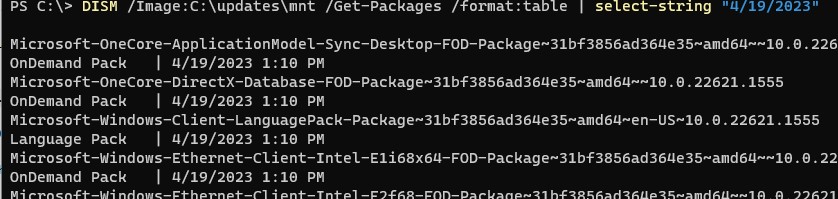
После завершения установки обновлений вы можете проверить, что обновления были успешно интегрированы в образ Windows. Вывести список установленных сегодня обновлений в смонтированном WIM образе Windows:
DISM /Image:C:\updates\mnt /Get-Packages /format:table | select-string "4/19/2023"
Или на офлайн WIM образе:
Dism /image:C:\Updates\WInImage\win11pro.wim /Get-Packages
Если размер полученного install.wim файла более 4 Гб, вы не сможете использовать его для установки Windows на компьютере с UEFI. Дело в том, что для установки Windows на UEFI устройстве используется установочный носитель с файловой системой FAT32, которая не поддерживается файлы более 4 Гб (как создать установочную флешку Windows).
В этом случае нужно разделить исходный install.wim на более маленькие SWM файлы командой:
dism /split-Image /imagefile:C:\Update\Winmage\install.wim /swmfile:C:\Update\WinImage\install.swm /filesize:4096
Осталось скопировать полученный образ в install.wim (или SWM файлы) в исходный каталог/виртуальную машину или пересобрать установочный ISO образ, например, с помощью oscdimg, UltraISO или Dism++.
Пример команды DISM для сборки установочного ISO Windows образа с поддержкой UEFI и BIOS:
oscdimg.exe -h -m -o -u2 -udfver102 -bootdata:2#p0,e,bc:\win11\iso\boot\etfsboot.com#pEF,e,bc:\win11\iso\efi\microsoft\boot\efisys.bin -lWin10 c:\iso c:\win11.iso
Microsoft releases cumulative updates monthly for Windows 10. This makes your pre-downloaded ISO image for Windows old, and each time you deploy it, the computer then needs to download the latest updates manually.
To avoid this, you can update Windows 10 ISO image by adding new updates directly to the ISO image to keep them always up to date. This can be done using a process called slipstreaming.
Let’s see how you can add new updates to the image so that you do not need to check for updates on each computer each time you make a fresh installation.
Table of Contents
Slipstreaming
Slipstreaming is referred to as adding new updates to a pre-existing Windows setup media. Users can keep their ISO or WIM images up to date by using the slipstream method and adding new updates to their downloaded files.
This way, you would not need to download a complete image each time a new update is released.
You need to perform several steps to add new Windows update(s) to an existing ISO image file. Follow the step-by-step guide given below to add single or multiple updates simultaneously to an ISO file.
How to add new updates to Windows 10 ISO image
The process of adding new updates might be tricky for some users, depending on how tech-savvy you are. Therefore, we have broken down the process into several easier to follow steps.
If you have performed the task a few times, it can become pretty easy to repeat the same steps.
Download and extract Windows 10 ISO files
Initially, you need an ISO file to begin with. You can download Windows 10 ISO images using this guide and then extract them within a folder by right-clicking the image and selecting Extract from the Context Menu.

Alternatively, you can also mount the ISO image and then copy the contents to another folder.
Download updates from Microsoft Update Catalog
Now you need to download the relevant update(s) directly from Microsoft Update Catalog.
Learn how to download any update and install from Microsoft Catalog.
- Open Microsoft Catalog website. Since the ISO image we will be deploying is the Windows 10 version 2004 x64, we will search for the “Windows 10 version 2004 x64.”
- Now click on the last updated column title once to sort the updates from the latest to earlier.

- Now download the latest cumulative update and any other updates you’d like to incorporate into the ISO image. Since our ISO image is old, we are downloading all of the latest updates.


Make sure to move these files to a separate folder when downloaded. Downloading any of the older cumulative or security updates would not be necessary as the latest ones already include all previous updates.
You also need to ensure that the updates are not blocked from running on your computer.
To do this, right-click on the downloaded update and click on Properties. Now check the box next to Unblock and then click Apply and Ok.
If the unblock checkbox does not appear, it means that the update wasn’t blocked in the first place.
Find image index number
Usually, an ISO image contains multiple editions of the same Windows, such as Professional, Education, Home, etc. Each of these editions has its own index number. An index number is an integer associated with each of these editions, which is required further into updating the ISO image. Hence, we must determine the index number for the edition you will be deploying in the future using this image.
Use the following command in Command Prompt to find the index number:
Dism /Get-ImageInfo /ImageFile:PathForInstall.wim
Replace PathForInstall.wim with the path for “install.wim” file within the extracted ISO folder, as in the example below:

The resultant of the command entered would help you identify the index number. Since I will be using the Professional edition, the associated index number will be 6.
Mount install.wim file
This step involves mounting the Windows 10 edition with index 6 install.wim file before incorporating the update(s) into it. Here is how to do it.
- Create a new and empty folder where you will mount the install.wim file.
- Now use the following command in Command Prompt to mount the install.wim file to the newly created folder:
DISM /mount-wim /wimfile:"<em>PathForInstall.wim</em>" /index:<em>IndexNumber</em> /mountdir:"<em>PathToMountFolder</em>"
Remember to replace PathForInstall.wim with the path to install.wim file within the extracted ISO image, IndexNumber with the index number determined in the last step, and PathToMountFolder with the path to the new folder which you had created to mount install.wim file.
Since the index number associated with Windows 10 Professional was 6 in our case, I will be using the command below:
DISM /mount-wim /wimfile:"D:\Softwares\ISOs\Win10_2004_English_x64\sources\install.wim" /index:6 /mountdir:"D:\mount"

You have now successfully mounted the install.wim file in a custom folder. Proceed to the next step to add new updates to it.
Add new updates to Windows ISO image
We have finally arrived in the spotlight of the process. This is where you can add the newly downloaded updates from Microsoft’s Catalog to the existing ISO image.
Use the following command in Command Prompt to add update(s) to the .wim file. Note that the number of PathToUpdate depends upon how many updates you wish to add and modify the command accordingly.
Dism /Add-Package /Image:"PathToMountFolder" /PackagePath="PathToUpdate1.msu" /PackagePath="PathToUpdate2.msu" /PackagePath="PathToUpdate3.msu"
Since we are adding 2 updates to the .wim file, we will be using the following command:
Dism /Add-Package /Image:"D:\mount" /PackagePath="D:\Updates\windows10.0-kb4577586-x64_c9bb49df325c20ddc147137b3f769fa44d800dde.msu" /PackagePath="D:\Updates\windows10.0-kb4579311-x64_9cc8221b0ed1bc799278d029c4edadf785920da9.msu"

This step may take a few minutes, depending upon the size of the updates.
Commit and dismount
Once the updates have been incorporated into the .wim file, all that is left to do is save the changes and then dismount the install.wim file. Use the command given below in Command Prompt to commit the changes and dismount.
dism.exe /Unmount-wim /mountdir:"PathToMountFolder" /commit
Replace PathToMountFolder with the path leading to the folder where install.wim file is mounted. In our case, we will be using the following command:
dism.exe /Unmount-wim /mountdir:"D:\mount" /commit
Note that this takes a few minutes, and the Command Prompt may look like it is stuck. However, that is not the case. Please allow a few minutes to commit and dismount successfully.

Covert extracted folder back to ISO image
You may now convert the updated Windows files and folders back to an ISO image using third-party tools. Here is a guide on how to convert files and folders into ISO images.
Closing words
Some people might find it easier to download a whole new version of Windows 10 ISO image than to update an existing ISO file. However, if you do not have the time to download an entire image or frequently need to change to an image with the latest updates, this method is for you.
With lesser download volume and the latest feature updates, updating an existing ISO image can be speedy, and it eliminates the headache of updating each separate computer later on.
Download Windows Speedup Tool to fix errors and make PC run faster
As a PC user, your pre-downloaded Windows 11/10 ISO image tends to get outdated due to Microsoft releasing cumulative updates monthly for the OS. Consequently, the computer then needs to download the latest updates manually each time you reinstall the OS. In this post, we show you how to add Windows Update Packages to Windows 11/10 ISO Image.
This can be done using a process called Slipstreaming. The slipstream process injects new updates to your downloaded Windows ISO image file – this way, you won’t need to download a complete image each time a new update is released.
We can add Windows Update Packages to a Windows ISO Image in 3 ways. We’ll explore this topic using the methods outlined below in this section.
1] Using DISM GUI tool

To add Windows Update Packages to Windows ISO Image using DISM GUI tool, do the following:
- Mount your Windows ISO to a drive letter. For the purposes of this tutorial, we assume the Windows 10 version is 21H1.
- Create a folder, example
D:\Win10ISOand copy the contents of the ISO to the folder. - Next, visit the Microsoft Update Catalog and get the Windows Update .msu or .cab packages.
- Depending on your OS architecture, search Microsoft Update Catalog using the phrase windows 10 version 21H1 x64 to find updates available for Windows 10 v21H1 64-bit. If you’re running 32-bit Windows, then use the
x86keyword instead ofx64. - Create a for example;
D:\v21H1 Updatesand download all the available updates to the folder.
Alternatively, you may use a third-party tool called WSUS Offline Updater to download the MSU packages pertaining to your computer.
- Next, download the DISM GUI tool and run the program as administrator.
- Next, create a folder, for example
D:\Mounted-WIMwhere you’re going to mount the install.wim file - In the DISM GUI tool, point the path to install.wim. In this example, the path would be
D:\Win10ISO\sources\install.wim.
Note: In the sources folder, if the file install.esd exists instead of install.wim, you’ll need to convert the ESD file to WIM format in order to service the image.
- Next, click the Display WIM Info button to view the indexes in the WIM file. For the purposes of this tutorial, we’ll choose Index: 6 for Windows 10 Pro.
- Next, select 6 in the Index drop-down box
- Next, in the Mount location, type in D:\Mounted-WIM.
- Click the Mount WIM button.
- Click on the Package Management tab in DISM GUI.
- Type in or browse to locate the packages folder. In this example, the Windows Update packages are stored under D:\v21H1 Updates.
- Click on the Add Packages button.
- Go back to the Mount Control tab, and click Dismount WIM.
- Click Yes when you’re asked to commit changes made to the WIM. Now, every available Windows Update package (*.msu and *.cab) in that folder will be integrated into the install.wim image.
- You can now delete the D:\Mounted-WIM and D:\v21H1 Updates folders manually.
You’ve now successfully updated your Windows Setup source or USB installation media. You can run Setup.exe now if you plan to do a Windows 10 repair installation or in-place upgrade of Windows 10. Or, you can point to the path of the updated install.wim if you want to run DISM mentioning the setup source path to fix any corruption in the system.
2] Using DISM console tool
To add Windows Update Packages to Windows ISO Image using DISM console tool, do the following:
- Press Windows key + R to invoke the Run dialog.
- In the Run dialog box, type cmd and then press CTRL + SHIFT + ENTER to open Command Prompt in admin/elevated mode.
- In the command prompt window, type the command below and hit Enter to get the WIM file info and its indexes.
dism.exe /Get-WimInfo /wimFile:"D:\Win10ISO\sources\install.wim"
- Next, to mount the install.wim image (index: 6) to the specified folder, run the command below:
dism.exe /Mount-WIM /WimFile:"D:\Win10ISO\sources\install.wim" /index:6 /MountDir:"D:\Mounted-WIM"
- Next, to add Windows Update Packages to the mounted WIM file, run the command below:
dism.exe /image:"D:\Mounted-WIM" /Add-Package /PackagePath:"D:\v21H1 updates"
- To verify that the packages appear correctly, run the command below:
Dism /Get-Packages /image:<path_to_image>
After reviewing done updating your image, you can now proceed to unmount the WIM file.
- To unmount the WIM file and to apply the changes (package addition or removal), run the command below:
dism.exe /Unmount-wim /mountdir:"D:\Mounted-WIM" /commit
- Exit CMD prompt.
3] Using NTLite
To add Windows Update Packages to Windows 11/10 ISO Image using NTLite, do the following:
- Mount the Windows ISO.
Alternatively, if you have the Windows installation USB media (instead of ISO) and want to update it, insert the USB drive instead.
- Create a folder, e.g.,
D:\W10-20H1-Setupand copy the contents of the mounted drive to the folder. - Next, download NTLite and install it.
- Launch the program.
- In the NTLite window, click Add > Image directory.
- Next, select the folder that contains the
install.wimimage you want to customize – e.g.,D:\W10-20H1-Setup\Sources.
Note: If the ISO/USB setup disk/mounted folder contains install.esd instead of install.wim, you’ll need to first convert the ESD file into WIM in order to service it.
- Next, select the edition of Windows 10 you want to slipstream. The Windows 11/10 ISO, downloaded from Microsoft, contains several Windows 10 editions in it.
- Right-click on the chosen edition and click Load.
- Click the Updates tab on the left.
- Click on the Add button and select Latest online updates.
- Next, select all the available updates from the list and click Enqueue. The Windows Update .msu files are now added to the update queue.
Unlike the other methods, you don’t need to manually download the .msu packages from the Microsoft Update Catalog.
- Once you add the updates to the update queue, click on the Apply button.
- Finally, click on the Process button to complete the integration process. NTLite will prompt you to disable the real-time antivirus protection to speed up the file copy process.
- When done, exit NTLite program.
That’s it on the 3 methods to add Windows Update Packages to Windows 11/10 ISO Image!
How do I manually install Windows Update package?
To manually install a Windows Update package, first, download the update from the Microsoft Update Catalog. Save the file to your computer, then double-click the downloaded file. Follow the on-screen instructions to complete the installation. Restart your computer if prompted to ensure the updates are applied successfully.
How to repair Windows 11 using ISO image?
To repair Windows 11 using an ISO image, download the Windows 11 ISO from Microsoft’s official site. Right-click the ISO file, select “Mount,” and open the setup.exe file. Choose the “Upgrade” option, ensuring “Keep personal files and apps” is selected. Follow the prompts to complete the repair and resolve system issues.
Obinna has completed B.Tech in Information & Communication Technology. He has worked as a System Support Engineer, primarily on User Endpoint Administration, as well as a Technical Analyst, primarily on Server/System Administration. He also has experience as a Network and Communications Officer. He has been a Windows Insider MVP (2020) and currently owns and runs a Computer Clinic.