Программа bcdedit для windows 10

В современных версиях Windows информация для запуска операционной системы храните в файле конфигурации загрузки BCD (Boot Configuration Data). В этом файле хранятся данные об установленной Windows и параметрах ее загрузки. Если файл BCD удален или поврежден, Windows перестает загружаться. Также вы не сможете загрузить Windows, если повреждена MBR запись на жестком диске. В этой статье мы покажем, как корректно пересоздать файл хранилища данных конфигурации загрузки BCD и
Master Boot Record
(MBR) на примере Windows 10 и 11.

Содержание:

  • Ошибка “The boot configuration data file is missing some required information”
  • Автоматическое восстановление конфигурации загрузчика Windows
  • Идентификация разметки дисков и букв томов
  • Восстановление загрузочного сектора MBR в Windows 10/11
  • Пересоздание BCD файла загрузчика Windows 10

Ошибка “The boot configuration data file is missing some required information”

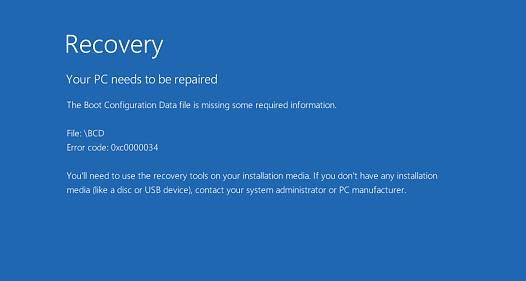
Если файл BCD поврежден, отсутствует, если вы удалили / отформатировали отдельный раздел диска с меткой System Reserved (и размером 500Мб), специальный OEM раздел, то скорее всего при попытке загрузить Windows появится такое сообщение:

Your PC needs to be repaired
The Boot Configuration Data file is missing some required information
File: \Boot\BCD
Error code: 0xc0000034

The Boot Configuration Data file is missing some required information

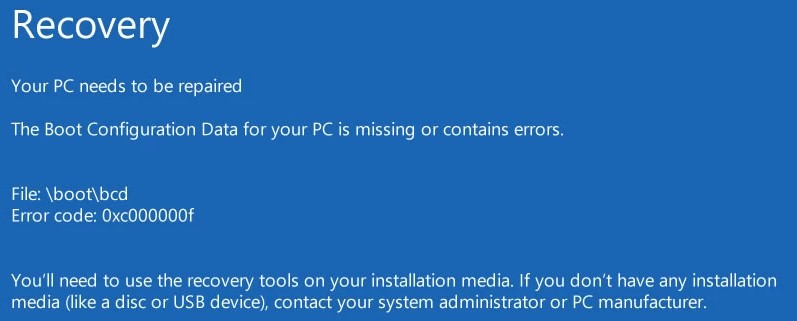
Также ошибка может выглядеть так:

The Boot Configuration Data for your PC is missing or contain errors.
File: \boot\bcd
Error Code: 0xc000000f

При повреждении MBR может быть ошибка No operating system found.

ошибка 0xc000000f отсутсвует файл boot\bcd при загрузке Windows 10bcd-

Автоматическое восстановление конфигурации загрузчика Windows

При появлении такой ошибки, в первую очередь попробуйте исправить проблему с загрузкой ОС с помощью режима автоматического восстановления (Startup Repair), который можно запустить из среды восстановления Windows RE.

Совет. Желательно периодически проверять работоспособность среды WinRE, и если она не работает, воспользоваться для ее восстановления методикой из статьи Восстановление среды WinRE в Windows.

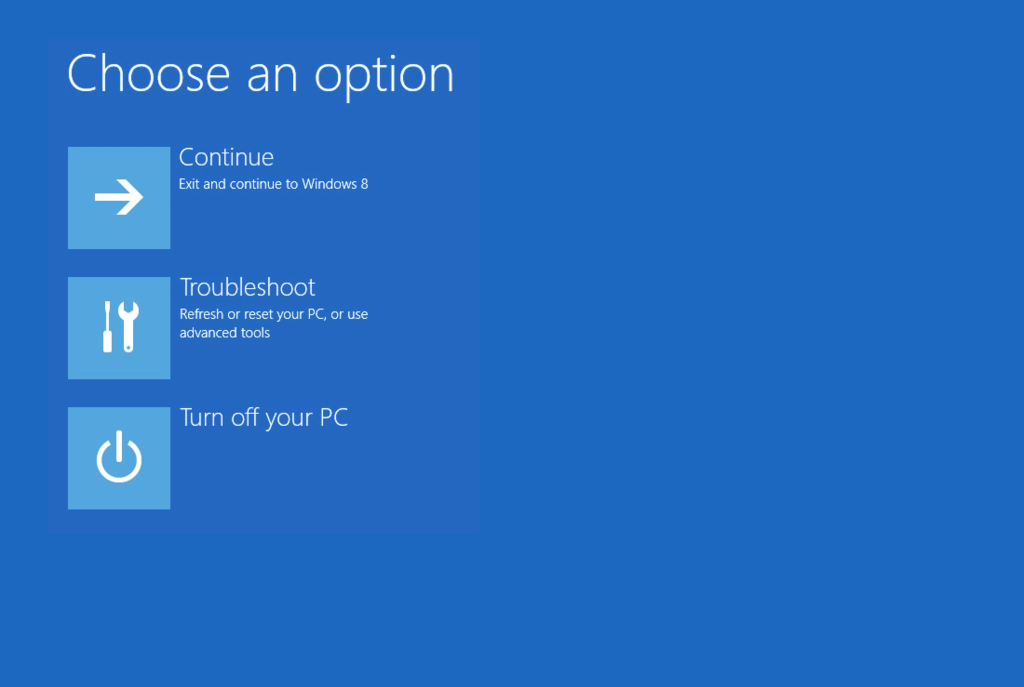
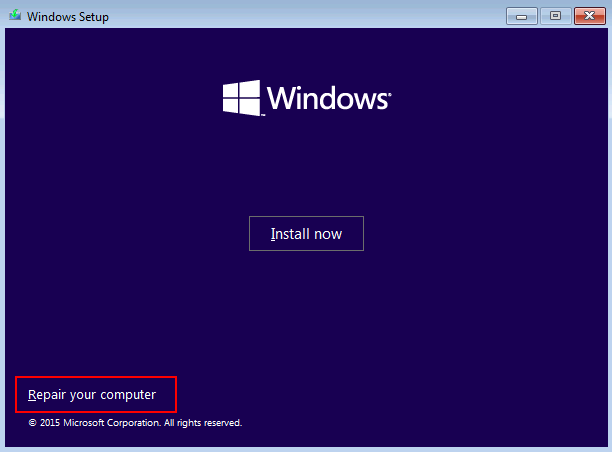
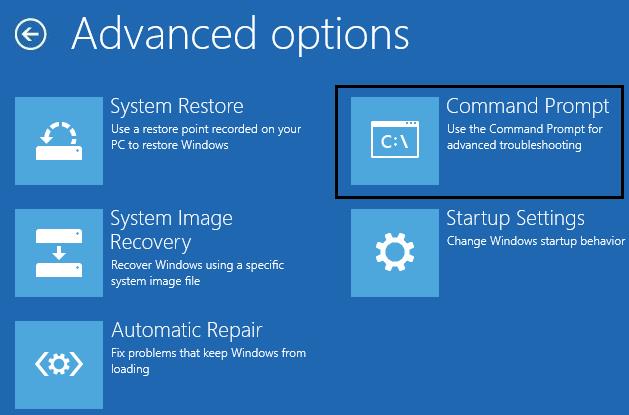
Если автоматическое восстановление с помощью Startup Repair не помогло решить проблему, вам нужно загрузиться с загрузочного или установочного диска с Windows или в среде WinRe (Repair your computer -> Troubleshoot -> Advanced options -> Command Prompt), запустить командную строку и попробовать полностью пересоздать файл конфигурации загрузчика BCD и обновить MBR запись.

Advanced options - data-lazy-src=

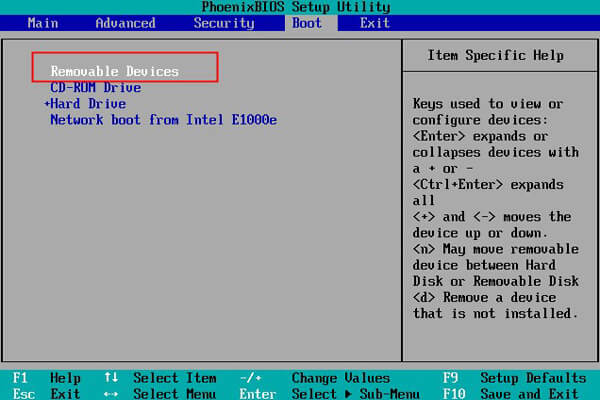
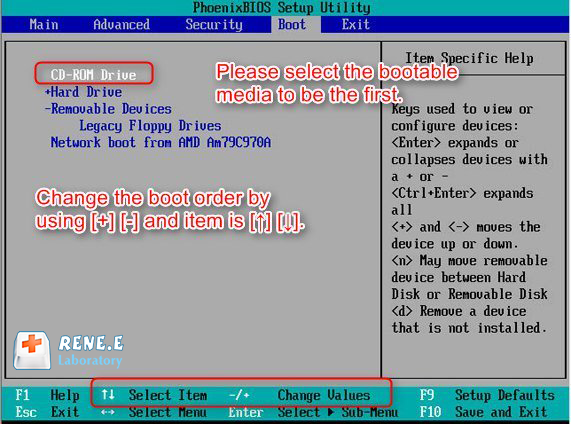
В этом примере я буду использовать установочный диск с Windows 10. Выберите в настройках BIOS первичным загрузочным устройство DVD диск или USB флешку с дистрибутивом Windows (в зависимости от того, с какого устройства вы хотите загрузить компьютер). Загрузитесь с установочного диска и на экране выбора языка установки нажмите сочетание клавиш Shift+F10. Перед вами откроется консоль командной строки.

Попробуйте восстановить BCD файл автоматически, выполнив команду:

bootrec /RebuildBCD

Перезагрузите компьютер и проверьте, загружается ли Windows (не забудьте изменить приоритет загрузочных устройств в BIOS). Если Windows не загружается, еще раз загрузитесь с установочного диска и откройте окно командной строки.

Идентификация разметки дисков и букв томов

Очень важно. Все инструкции, описанные ниже, подходят для обычных компьютеров с BIOS (или загружающихся в режиме UEFI legacy) и MBR таблицей разделов. На компьютерах с UEFI прошивками для пересоздания BCD нужно использовать следующе инструкци: восстановлению EFI загрузчика в Windows 10 или восстановление удаленного EFI раздела в Windows.

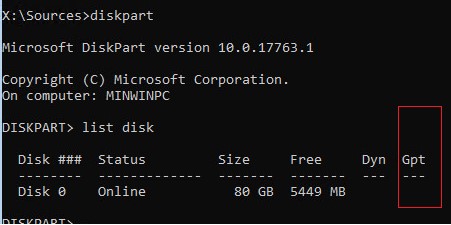
Как понять, используется ли у вас BIOS или UEFI система? Проще всего проверить тип таблицы разделов на диске, на котором установлена Windows: GPT или MBR. Для этого выполните команду:

diskpart

Затем выполните:

list disk

  • Если у диска в столбце Gpt указана звездочка (*), значит на диске используется таблица разделов GPT. Это значит, что у вас компьютер с UEFI, и для восстановления загрузчика нужно использовать статью по ссылке выше.
  • Если в столбце GPT звездочка отсутствует, значит у вас на диске таблица разделов MBR, и вы можете продолжить следовать данной инструкции.

проверить тип разметки диска gpt или mbr

Далее вам нужно идентифицировать локальные диски и разделы системы (скорее всего назначенные им буквы дисков будут отличаться от дисков, которые вы видели при работе в Windows). Проще всего это сделать с помощью утилиты diskpart. Выполните следующие команды:

diskpart
list vol

diskpart: list volumes

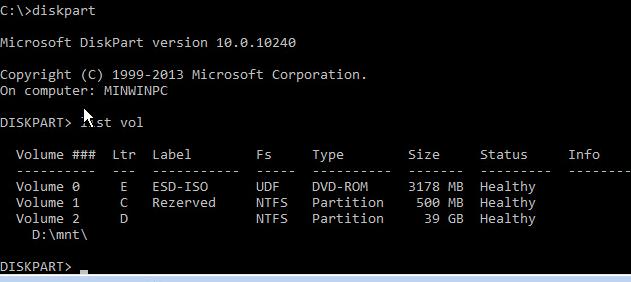
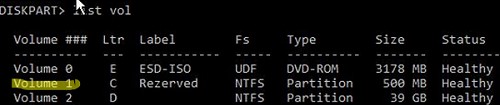
Перед вами появится список разделов в системе, назначенные им буквы дисков и их размер. В нашем случае к компьютеру подключен 1 жесткий диск, на котором имеются всего два раздела:

  • Раздел System Reserved размером 500 Мб, которому назначена буква диска C:. На этом небольшом служебном разделе по-умолчанию хранится файл конфигурации загрузки BCD (подробнее)
  • NTFS раздел размером 39 Гб, которому назначена буква D:. На этом разделе находится установленная Windows, программы и данные пользователя.

Важно. Запомните буквы дисков, назначенные разделам. Данные буквы дисков будут использоваться в последующих командах.

Восстановление загрузочного сектора MBR в Windows 10/11

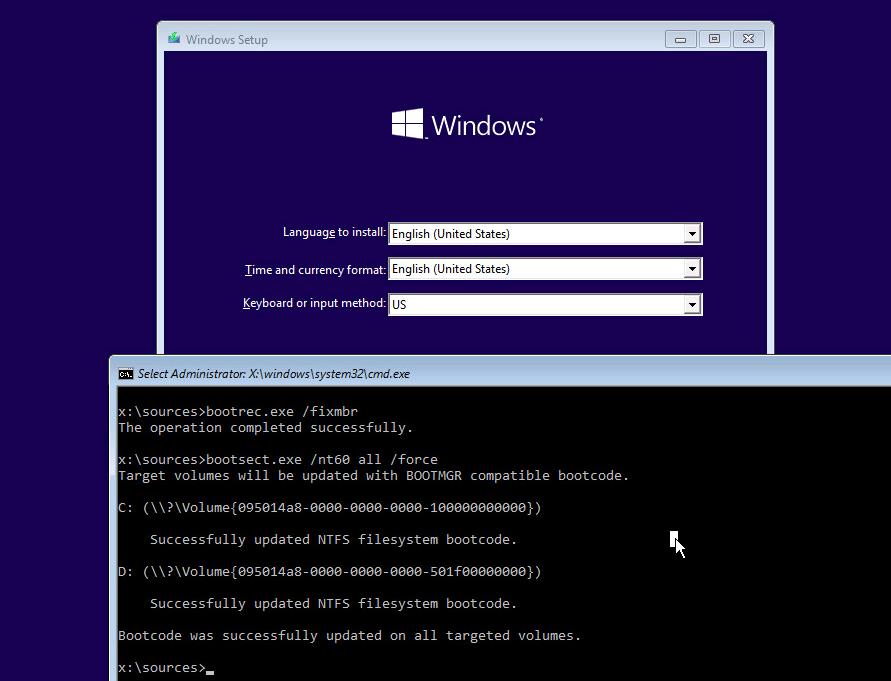
С помощью утилиты bootrec.exe можно перезаписать данные в MBR и загрузочном секторе, поместим в них ссылки на загрузчик Windows (bootloader).

Попробуйте перезаписать основную загрузочную запись (MBR) системного раздела для совместимости с загрузчиком Windows (существующая таблица разделов не перезаписывается).

bootrec.exe /fixmbr

Добавьте в загрузочные секторы диска код для загрузки файла bootmgr ( диспетчера загрузки Windows):

bootsect.exe /nt60 all /force

Прежде, чем идти далее, попробуйте автоматически пересоздать конфигурацию загрузчика BCD командами (это самый простой способ для начинающих):

bootrec /FixBoot
– команда создает новый загрузочный сектор на системном разделе (перезаписывает загрузочную запись раздела PBR).
bootrec /ScanOs
– просканировать диски и найти установленные копии Window, которых нет в хранилище конфигурации загрузки

В случае успешного сканирования появится запрос на добавление записей о найденный Windows в BCD:

Scanning all disks for Windows installations.  
Please wait, since this may take a while...  
Successfully scanned Windows installations. 
Total identified Windows installations: 1 [1] D:\Windows 
Add installation to boot list? Yes/No/All:

bootrec /RebuildBcd
– пересоздать хранилище конфигурации загрузкика, добавить в BCD найденные на компьютере копии Windows/

После этого перезагрузите компьютер и проверьте загрузку Windows. Если ОС не загружается, следуйте инструкции.

Если команда bootsect.exe не найдена, попробуйте указать полный путь к ней:
X:\boot\bootsect.exe /nt60 all /force

bootsect.exe nt60 all force

Пересоздание BCD файла загрузчика Windows 10

Далее с помощью команды BCDedit нужно создать новый файл с конфигурацией загрузчика (предполагается, что у вас нет резервной копии BCD).

Ваши дальнейшие действия зависят от того, есть ли на диске отдельный раздел System Reserved или нет. В командной строке выполните:

diskpart
list vol

Проверьте, есть ли на диске компьютера системный раздел System Reserved. Его можно идентифицировать по метке тома, либо более точнее по размеру (500 Мб для Windows 10+, 350 Мб для Windows 8.1 и 100 Мб для Windows 7).

проверить есть ли раздел system reserved в Windows

  • Если раздела нет (вы случайно удалили его), можно хранить конфигурацию загрузчика BCD на основном диске, где находится каталог Windows. Чтобы создать конфигурационные файл загрузчика BCD и Bootmgr на указанном диске, выполните команду:
    bcdboot C:\Windows /S C:

    Должно появится сообщение
    Boot files successfully created
    .
  • Если раздел System Reserved у вас имеется, удалите старый (поврежденный) файл BCD и создайте вместо него новый:
    del c:\boot\bcd

Если разделу System Reserved не назначена буква диска (по-умолчанию), вы можете сами назначить ее с помощью diskpart.

Запустите:
diskpart

Выберите диск (в моем случае в компьютере имеется всего один жесткий диск, а вы можете вывести список дисков командой list disk):
select disk 0

На скриншота выше видно, что раздел с меткой System Reserverd называется Volume 1. Выберите его:
select volume 1

Назначьте букву диска (я назначил букву C:, но вы можете использовать любую другую букву, в этом случае измените путь в следующих командах):
assign letter C:

exit

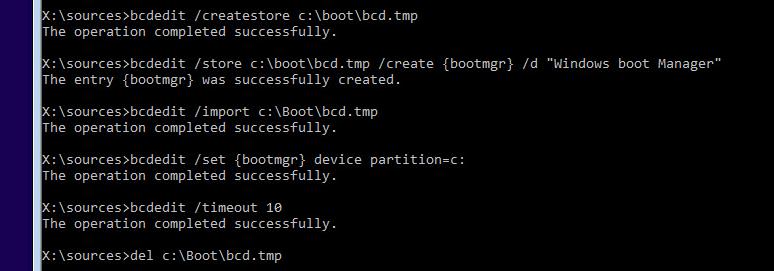
Создайте временный пустой файл bcd.tmp:
bcdedit /createstore c:\boot\bcd.tmp

Создайте запись для диспетчера загрузки bootmgr:
bcdedit.exe /store c:\boot\bcd.tmp /create {bootmgr} /d "Windows Boot Manager"

Импортируйте в BCD настройки из файла bcd.tmp:
bcdedit.exe /import c:\boot\bcd.tmp

Если команда bcdedit возвращает ошибку (
Ошибка создания хранилища. Отказано в доступе, access denied
) при доступе к файлу BCD, попробуйте снять с него атрибуты скрытый, read-only и системный:

attrib C:\Boot\BCD -s -h -r

Укажите, что загрузчик находится на служебном разделе System Reserved (ему назначена буква диска C: )
bcdedit.exe /set {bootmgr} device partition=c:

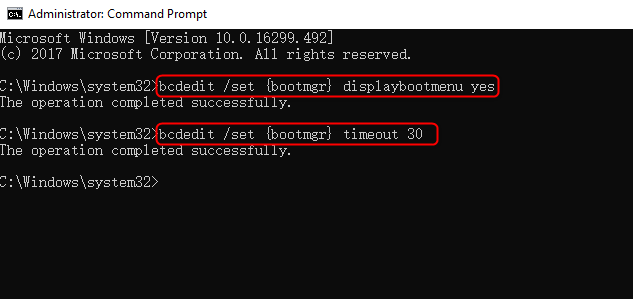
Настройте время ожидания при выборе ОС:
bcdedit.exe /timeout 10

Удалите временный файл:
del c:\boot\bcd.tmp

bcdedit.exe /set {bootmgr} device partition=c:

Итак, вы создали пустой BCD файл с параметрами загрузчика. Теперь в него нужно добавить записи об установленных на диске Windows .
Создайте в хранилище BCD новую запись для Windows 10:
bcdedit.exe /create /d "Windows 10" /application osloader

Команда должна вернуть уникальный идентификатор (GUID) данной записи загрузчика:

The entry {8a7f03d0-5338-11e7-b495-c7fffbb9ccfs} was successfully created.

The entry {8a7f03d0-5338-11e7-b495-c7fffbb9ccfs} was successfully created.

Укажем, что bootmgr должен использовать данную запись по-умолчанию (после истечения времени ожидания при выборе ОС, для загрузки будет используется именно эта запись).

bcdedit /default {8a7f03d0-5338-11e7-b495-c7fffbb9ccfs}

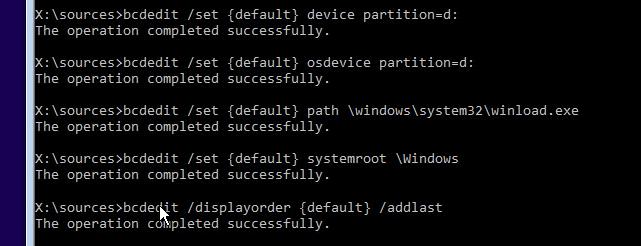
Теперь в новой записи загрузчика осталось указать пути к имеющейся на диске установленной копии Windows 10. Ранее мы определили, что в среде WinPE диску с установленной Windows присвоена буква D:. Используйте эту букву диска в следующих командах:

bcdedit.exe /set {default}device partition=d:
bcdedit.exe /set {default} osdevice partition=d:
bcdedit.exe /set {default} path \Windows\system32\winload.exe
bcdedit.exe /set {default} systemroot \Windows


Осталось сделать данную загрузочную запись в BCD видимой (по умолчанию она скрыта):
bcdedit.exe /displayorder {default} /addlast

bcdedit.exe /displayorder {default} /addlast

Итак, мы полностью пересоздали загрузчик Windows 10 (обновили файл BCD и перезаписали загрузочный сектор MBR).

Теперь нужно сделать раздел, на котором находится файл BCD с конфигурацией загрузчика активным (BIOS передает управлению загрузчику ОС с активным MBR раздел). Допустим, разделы на вашем диске распределены так.

  • Volume 0 – загрузочная/установочная флешка (ISO образ) диск, с которого вы загрузили компьютер
  • Volume 1 – раздел System Reserved с BCD загрузчиком (размер 500 Мб)
  • Volume 2 – раздел с файлами Windows (здесь находятся каталог Windows, Program Files, Users и т.д.)

diskpart список разделов на диске

В этом примере нужно сделать активным раздел Volume 1 (в вашем случае определите номер раздела самостоятельно). Сделать раздел активным можно с помощью diskpart:

diskpart
list disk
sel disk 0
list vol
select volume 1

(файлы bootmgr и «\Boot\BCD» находятся на этом разделе)
active
exit

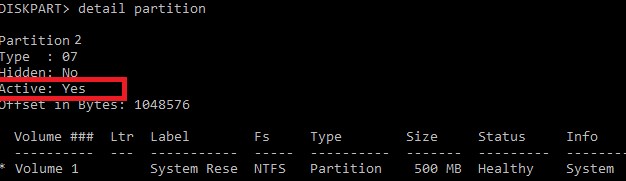
Проверьте, что раздел volume 1 теперь активный:

select vol 1
detail partition

Все верно (
Active: Yes
).

diskpart сделать раздел активным active:yes

Теперь вы можете перезагрузить компьютер и убедится, что Windows загружается в штатном режиме.

This guide explains how to use the BCDEdit (bcdedit.exe) utility for the following Windows versions: Vista, 7, 8, 8.1or10

BCDEdit is the command-line utility that you can use to manage BCD stores on your computer. BCDEdit works similarly to Bootcfg.exe available on Windows XP systems, but with more options available and various improvements.

BCDEdit on Windows

You must be logged-in as an Administrator in order to use BCDEdit.

Always create a backup of your current BCD file before using the utility with the help of the /export parameter:

bcdedit /export C:\exportBCDfile

To open bcdedit, you need to:

  1. Open Command Prompt
  2. Type:
    bcdedit
  3. Press Enter

When you type bcdedit in Command Prompt, the output is your computer’s current BCD configuration:

Microsoft Windows [Version 6.0] 
 Copyright (c) 2006 Microsoft Corporation. All rights reserved.
 
 C:\Windows\system32>bcdedit
 
 Windows Boot Manager 
 -------------------- 
 identifier {bootmgr} 
 device partition=C: 
 description Windows Boot Manager 
 locale en-US 
 inherit {globalsettings} 
 default {current} 
 resumeobject {0} 
 displayorder {current} 
 toolsdisplayorder {memdiag} 
 timeout 30
 
 Windows Boot Loader 
 ------------------- 
 identifier {current} 
 device partition=C: 
 path \Windows\system32\winload.exe 
 description Microsoft Windows Vista 
 locale en-US 
 inherit {bootloadersettings} 
 recoverysequence {0} 
 recoveryenabled Yes 
 osdevice partition=C: 
 systemroot \Windows 
 resumeobject {0} 
 nx OptIn

BCDEdit on Windows XP

Windows XP doesn’t have a bcdedit.exe utility available, but the bootcfg.exe utility instead. Bootcfg.exe is part of the Windows XP’s Recovery Console.

To read about bootcfg, follow our guide: Bootcfg – Guide for Windows XP.

BCDEdit on Windows Vista

To run bcdedit.exe on a Windows Vista system, you have these options available:

  • Use the original Windows Vista installation media to access Command Prompt
  • If Repair Your Computer option is available on Advanced Boot Options menu, boot into this mode to access Command Prompt
  • Use Easy Recovery Essentials

If you have the Windows Vista installation DVD, follow these steps:

  1. Insert the installation media and boot from it
  2. Select a language, time and keyboard and click Next
  3. Click Repair your computer

    Windows Vista Repair Your Computer Menu

  4. Select the operating system
  5. Click Next
  6. At the System Recovery Options screen, click Command Prompt

    Windows Vista System Recovery Options

  7. Type:
    bcdedit.exe
  8. Press Enter

If you have the “Repair Your Computer” option available, you can access Command Prompt from there:

  1. Restart the computer
  2. Press the F8 key to open the Advanced Boot Options menu
  3. Select Repair Your Computer and press Enter
    advanced-boot-options-repair-computer-windows-vista-on-dell

  4. If Repair Your Computer isn’t available, the recovery tools aren’t installed on your computer.
  5. At the System Recovery Options screen, click Command Prompt
  6. Type:
    bcdedit.exe
  7. Press Enter

If you use Easy Recovery Essentials Command-line:

  1. Download Easy Recovery Essentials
  2. Burn the ISO Image. Follow our instructions on how to burn a bootable ISO image. If you’d like to have a recovery USB instead, follow our instructions on how to make a recovery USB.
  3. Boot Easy Recovery Essentials from the CD, DVD or USB
  4. Select Launch Command Line

    Easy Recovery Essentials screenshot

To download Easy Recovery Essentials, click here.

BCDEdit on Windows 7

The options to run bcdedit.exe on Windows 7 systems are similar to those of Windows Vista.

If you have the Windows 7 installation DVD available, follow these steps:

  1. Insert the DVD in the optical drive
  2. Boot from it by restarting the computer and pressing any key when prompted
  3. Select a language, time and keyboard
  4. Click Next
  5. Click Repair your computer

    Windows 7 setup Install Now dialog, with repair your computer link

    Install Now (Windows 7)

  6. Select the operating system from the list and click Next
  7. At System Recovery Options, click Command Prompt
  8. Type:
    bcdedit.exe
  9. Press Enter

If you have the “Repair Your Computer” available at “Advanced Boot Options” (most Windows 7 systems have these recovery tools installed), follow these steps:

  1. Restart the computer
  2. Press the F8 key to open Advanced Boot Options
  3. Select Repair your computer

    Advanced Boot Options on Windows 7

    Advanced Boot Options on Windows 7

  4. Press Enter
  5. At the System Recovery Options, click Command Prompt
  6. Type:
    bcdedit.exe
  7. Press Enter

If you use Easy Recovery Essentials Command-line:

  1. Download Easy Recovery Essentials
  2. Burn the ISO Image. Follow our instructions on how to burn a bootable ISO image. If you’d like to have a recovery USB instead, follow our instructions on how to make a recovery USB.
  3. Boot Easy Recovery Essentials from the CD, DVD or USB
  4. Select Launch Command Line

    Easy Recovery Essentials screenshot

To download Easy Recovery Essentials, click here.

BCDEdit on Windows 8

On Windows 8 or Windows 8.1 systems, you need to have the original installation media (DVD or USB drive) in order to access Command Prompt.

If you have the installation media, follow these steps:

  1. Insert the Windows 8 DVD or Windows 8.1 USB drive
  2. Restart the computer and boot from the DVD/USB
  3. Click Repair your computer

    Windows 8 Repair Your Computer Menu

    Windows 8 Repair Your Computer Menu

  4. Click Troubleshoot

    Troubleshoot in Windows 8 recovery options screen

    Troubleshoot in Windows 8 recovery options screen

  5. Click Command Prompt
  6. Type:
    bcdedit.exe
  7. Press Enter

If you use Easy Recovery Essentials Command-line:

  1. Download Easy Recovery Essentials
  2. Burn the ISO Image. Follow our instructions on how to burn a bootable ISO image. If you’d like to have a recovery USB instead, follow our instructions on how to make a recovery USB.
  3. Boot Easy Recovery Essentials from the CD, DVD or USB
  4. Select Launch Command Line

    Easy Recovery Essentials screenshot

To download Easy Recovery Essentials, click here.

BCDEdit on Windows 10

On Windows 10 systems, you need to have the original installation media (DVD or USB drive) in order to access Command Prompt.

If you have the installation media, follow these steps:

  1. Insert the Windows 10 media
  2. Restart the computer and boot from the DVD/USB
  3. Click Repair your computer
    Windows 10 Setup screen

  4. Click Troubleshoot
    win10_restore

  5. Click Command Prompt
  6. Type:
    bcdedit.exe
  7. Press Enter

If you use Easy Recovery Essentials Command-line:

  1. Download Easy Recovery Essentials
  2. Burn the ISO Image. Follow our instructions on how to burn a bootable ISO image. If you’d like to have a recovery USB instead, follow our instructions on how to make a recovery USB.
  3. Boot Easy Recovery Essentials from the CD, DVD or USB
  4. Select Launch Command Line

    Easy Recovery Essentials screenshot

To download Easy Recovery Essentials, click here.

Commands and parameters

For the complete list of commands and parameters you can use with BCDEdit, type:

bcdedit /?

Whenever you are using this utility to modify a BCD store, make use use of these parameters:

  • /createstore to create a new empty boot configuration data (BCD) store.
  • /export to export the current configuration of the BCD store.
  • /import to import a previously exported configuration file.
  • /create to create a new entry in the BCD store.
  • /delete to delete an entry from the BCD store.
  • /deletevalue to delete a specified value.
  • /set to set a new value.
  • /default to specify the default entry.
  • /timeout to specify the timeout at startup value.

For example, to create a new entry in the BCD file to load Windows XP, run these commands:

  1. bcdedit /create {ntldr} /d "Windows XP"
  2. bcdedit /set {ntldr} device partition=C:
  3. bcdedit /set {ntldr} path \ntldr
  4. bcdedit /displayorder {ntldr} /addlast

More Information

Linked Entries

  • bootcfg

Support Links

  • Easy Recovery Essentials for Windows – our repair and recovery disk.

    It’s an easy-to-use and automated diagnostics disk. It’s available for Windows 8, Windows 7 and Windows Vista. It’s also available for Windows XP and Windows Server.

    Read more at Windows Recovery Disks.

  • The NeoSmart Support Forums, member-to-member technical support and troubleshooting.
  • Get a discounted price on replacement setup and installation discs: Windows XP, Windows Vista, Windows 7, Windows 8, Windows 10.

Applicable Systems

This Windows-related knowledgebase article applies to the following operating systems:

  • Windows XP (all editions)
  • Windows Vista (all editions)
  • Windows 7 (all editions)
  • Windows 8 (all editions)
  • Windows 8.1 (all editions)
  • Windows 10 (all editions)

Propose an edit

4 January 2021    Senior Program Developer

Summary
BCDEdit is a command line tool for managing boot configuration data. What are the often-used BCDEdit commands? And what are their functions? Get more about how to use the BCDEdit Command Line Tool in Windows 10 here.

Windows 10

What Is BCDEdit?

BCDEdit is a command line tool for managing boot configuration data. If you intend to use BCDEdit to change BCD, you will need administrator privileges to enable Command Prompt or command prompt in Windows RE.

BCDEdit Windows 10

BCDEdit Command Line Options

BCDEdit /createstore Creates a new empty boot configuration data storage (BCD).
BCDEdit /export Exports the contents that system stores into a file which could be used to restore the state of the system store.
BCDEdit /import Restores the system store using a backup file created by /export option.
BCDEdit /copy Makes a copy of a boot entry in the system store.
BCDEdit /create Creates a new entry in the boot configuration data store.
BCDEdit /set Sets an entry option value.
BCDEdit /delete Deletes a boot entry.
BCDEdit /default Specifies the default entry that the boot manager selects when the timeout expires.
BCDEdit /displayorder Specifies the display order of boot options.
BCDEdit /timeout Specifies how long the boot manager displays.

Note: You will need administrator privileges to enable Command Prompt. If you don’t have an administrator account, it’s recommended to use Renee Passnow to create it.

Use the BCDEdit Command Line Tool When Windows Boots Properly

Step 1: Type “cmd” in search box. Right click the “Command Prompt” and select “Run as administrator”.

Step 2: In the Command Prompt, type in the BCDEdit command that you need. Press “Enter”. After executing the command successfully, you can shut down the command prompt.

open command prompt

Use the BCDEdit Command Line Tool When Windows Fails to Boot

connect usb to laptop

Step 2: Turn on the PC. Change the boot order in BIOS setup and put “Removable Devices” as the first boot choice.

change boot order

Step 3: After you enter the Windows installation screen, click “Repair your computer” in the bottom-left corner.

Repair your computer

Step 4: Then select “Troubleshoot”> “Advanced Options”> “Command Prompt”.

command prompt

Step 5: In the Command Prompt, type in the BCDEdit command you may need. Press “Enter”.

Enable Windows Boot Manager via BCDEdit Command Line Tool

Step 1: Type “cmd” in search box. Right click the “Command Prompt” and select “Run as administrator”.

Step 2: In the Command Prompt, type in: bcdedit /set {bootmgr} displaybootmenu yes and bcdedit /set {bootmgr} timeout 30. Please press “Enter” after you type each command.

enable bootmgr with command prompt

If you want to disable Windows Boot Manager, just type in: bcdedit /set {bootmgr} timeout 0.

Add a Boot Option via BCDEdit Command Line Tool

For example, you want to add a boot entry (Windows XP) to Windows Boot Manager, please follow steps below:

Step 1: Type “cmd” in search box. Right click the “Command Prompt” and select “Run as administrator”.

Step 2: In the Command Prompt, type the following commands. Please press “Enter” after you type each command.

Bcdedit /create {ntldr} /d “Windows XP”
Bcdedit /set {ntldr} device partition=C:
Bcdedit /set {ntldr} path \ntldr
Bcdedit /displayorder {ntldr} -addlast
Bcdedit /set {ntldr} description “Windows XP”

After executing the above commands successfully, the boot entry (Windows XP) will be an option in Windows Boot Manager.

Create Administrator Account Using Renee PassNow

System rescue tool- Renee PassNow

Step 1: Download and install Renee PassNow in any workable Windows computer. 

Step 2: Choose creation method, USB or CD/DVD.

Select one option from [Crate a Live USB] and [Create a Live CD]. Then, select [x64] or [x86] according to your computer. Next, click on [Download Now] to download the licensed ISO. Remember to activate the software beforehand. After that, click on [Create USB] to create the boot media.

use renee passnow to create usb to reset passnword

Step 3: Boot the target PC from the created password reset USB/CD/DVD.

You will boot the target computer via a new created reset disk. Firstly, please hold a hot key to enter the BIOS menu and put CD-ROM or Removable Devices as the first choice. Please click here to know about how to change the boot order of your computer. After changing it successfully, please remember to save your setting and then restart your PC.

steps to change the boot order in BIOS

Step 4: Select “PassNow!”.

Reset password

Step 5: Click “Create new account” to create a new administrator to quickly access your PC.

The created administrator account named “Reneelab” with administrator rights, and its default password is “123456789”. You are able to change the password of target account with this new created administrator.

Create new account

Bcdedit.exe: The Boot Configuration Data Editor

bcdedit.exe is a command-line tool in Windows used to manage Boot Configuration Data (BCD). BCD is a firmware-independent database that replaced the boot.ini file used in older versions of Windows (like Windows XP). It controls how the operating system is started. bcdedit.exe allows you to view, modify, and create boot entries, control boot options, and troubleshoot boot-related problems. It’s a powerful tool, and incorrect usage can render your system unbootable. Therefore, understanding its functionalities and exercising caution are crucial.

Origin and Purpose

bcdedit.exe was introduced with Windows Vista and is included in all subsequent versions of Windows. Its purpose is to provide a command-line interface to the BCD store. Before bcdedit.exe, managing boot options was often cumbersome, requiring direct editing of text files (like boot.ini) or using GUI tools with limited capabilities. bcdedit.exe offers a standardized and more robust way to manage the boot process, especially in recovery scenarios.

Is it a Virus?

No, bcdedit.exe itself is not a virus. It is a legitimate and essential part of the Windows operating system. It’s typically located in the %SystemRoot%\System32 directory (usually C:\Windows\System32) and sometimes also in %SystemRoot%\SysWOW64 for 64-bit systems. If you find a file named bcdedit.exe in a different location, it could be a malicious program masquerading as the legitimate tool, but this is rare. You should always verify the file’s digital signature and location if you’re suspicious.

Can it Become a Virus?

bcdedit.exe cannot «become» a virus. It’s a static executable file. However, malware could potentially:

  1. Replace it: A virus could replace the legitimate bcdedit.exe with a malicious version. This would allow the malware to control the boot process, potentially preventing the system from starting or loading malicious code during startup.
  2. Exploit it: While highly unlikely, a vulnerability in bcdedit.exe itself could be exploited, though this would be a very sophisticated attack. Microsoft regularly releases security updates to address such vulnerabilities.
  3. Use it maliciously: Malware or a malicious user could use the legitimate bcdedit.exe to alter the BCD, making the system unbootable or redirecting the boot process to malicious code. This is the most likely scenario.

Therefore, the danger lies not in bcdedit.exe becoming a virus, but in how it can be manipulated or replaced by malicious actors.

Usage Guide

Important Note: Always run bcdedit.exe from an elevated command prompt (run as administrator). Incorrect commands can make your system unbootable. Back up your BCD store before making significant changes.

Basic Commands

  • /help or /?: Displays help information for all bcdedit.exe commands and options. bcdedit /? provides general help, while bcdedit /? <command> provides help for a specific command (e.g., bcdedit /? /create).

  • /enum: Lists all active boot entries in the BCD store. This is a crucial command for viewing the current boot configuration.

    bcdedit /enum

    You can also specify the type of entries to list:

    • bcdedit /enum OS (Lists operating system entries)
    • bcdedit /enum ALL (Lists all entries, including those not currently active)
    • bcdedit /enum ACTIVE (Lists only the active entries)
    • bcdedit /enum {identifier} (Lists a specific entry by its identifier, e.g., bcdedit /enum {current})
  • /copy: Creates a copy of an existing boot entry. This is useful for creating backups or modifying a copy without affecting the original.

    bcdedit /copy {current} /d "Windows 10 (Backup)"
    This command copies the current boot entry ({current}) and gives the new entry the description «Windows 10 (Backup)». It will generate a new GUID (Globally Unique Identifier) for the copied entry.

  • /create: Creates a new boot entry. This is less commonly used directly for creating operating system entries, as Windows setup usually handles that. It’s more often used for creating entries for boot loaders or other special purposes.

    bcdedit /create /d "My Custom Boot Entry" /application OSLOADER

    This creates a new boot loader entry. You’ll need to specify additional parameters (like /device and /path) to make it functional.

  • /delete: Deletes a boot entry. Use this with extreme caution!

    bcdedit /delete {identifier}
    Replace {identifier} with the GUID of the entry you want to delete.

  • /set: Modifies settings for a specific boot entry. This is the command you’ll use most often to change boot options.

    bcdedit /set {current} description "My Modified Windows 10"
    bcdedit /set {current} path \Windows\System32\winload.exe
    bcdedit /set {current} device partition=C:
    bcdedit /set {bootmgr} displaybootmenu yes
    bcdedit /set {bootmgr} timeout 30
    bcdedit /set {current} recoveryenabled No
    bcdedit /set {current} nx OptIn

    These examples show how to:
    * Change the description of the current boot entry.
    * Set the path to the boot loader (winload.exe or winload.efi on UEFI systems).
    * Specify the partition where the operating system is installed.
    * Enable the boot menu.
    * Set the boot menu timeout (in seconds).
    * Disable automatic recovery.
    * Set the Data Execution Prevention (DEP) setting.

  • /import and /export: These commands allow you to back up and restore the BCD store.

    bcdedit /export C:\BCDBackup (Backs up the BCD to a file)
    bcdedit /import C:\BCDBackup (Restores the BCD from a file)

    Always export your BCD before making any significant changes!

  • /bootsequence: Specifies the order in which the boot manager attempts to load operating systems.
    bcdedit /bootsequence {identifier1} {identifier2} ...
    Replace {identifier1}, {identifier2}, etc. with the GUIDs of the boot entries in the desired order.

  • /default: Sets the default boot entry.
    bcdedit /default {identifier}

  • /displayorder: Sets the display order of the boot menu.
    bcdedit /displayorder {identifier1} {identifier2} /addfirst

  • /timeout: Sets the boot menu timeout.
    bcdedit /timeout 10

  • /toolsdisplayorder: Sets the display order of the tools menu.
    bcdedit /toolsdisplayorder {memdiag} /addlast

Advanced Options and Troubleshooting

  • /ems: Enables or disables Emergency Management Services (EMS) for a boot entry. EMS allows remote management of a server even if the operating system is not running.

  • /bootems: Enables or disables EMS for the boot manager.

  • /dbgsettings: Configures kernel debugging settings.

  • /bootdebug: Enables or disables boot debugging.

  • /hypervisorsettings: Configures hypervisor settings.

  • /deletevalue: Deletes a specific value from a boot entry.

    bcdedit /deletevalue {current} nx
    This removes the nx (DEP) setting from the current boot entry.

  • /v (Verbose Mode): Some commands support a /v option to display more detailed output, which can be helpful for troubleshooting.

Troubleshooting Scenarios

  1. System Won’t Boot: If your system won’t boot, you can often use bcdedit.exe from the Windows Recovery Environment (WinRE). WinRE is usually accessible by booting from a Windows installation disc or USB drive and selecting «Repair your computer.» From WinRE, you can open a command prompt and use bcdedit.exe to:

    • Check the BCD entries (/enum).
    • Repair corrupted entries (/import a backup).
    • Set the correct default boot entry (/default).
    • Rebuild the BCD from scratch (more complex, requires careful use of /create and /set).
  2. Dual-Boot Problems: If you’re having issues with a dual-boot configuration, bcdedit.exe can be used to:

    • Add or remove boot entries for different operating systems.
    • Set the boot order (/bootsequence or /displayorder).
    • Adjust the boot menu timeout (/timeout).
  3. Incorrect Boot Options: If you’ve accidentally changed a boot setting (like disabling DEP), you can use bcdedit /set to correct it.

  4. «Boot Manager is Missing» Error: This often indicates a problem with the BCD store itself or the boot sector. You might need to use the bootrec.exe tool (another command-line tool in WinRE) to fix the boot sector and then use bcdedit.exe to repair the BCD.

Best Practices

  • Always run as administrator.
  • Back up your BCD before making changes (/export).
  • Understand the commands before using them. Use /help extensively.
  • Double-check identifiers (GUIDs) to avoid modifying the wrong entry.
  • Document your changes.
  • Test your changes after making them.
  • If you’re unsure, seek help from a qualified professional.

Conclusion

bcdedit.exe is a powerful and essential tool for managing the Windows boot process. While it offers a significant degree of control and flexibility, it also requires careful usage. Understanding its commands, options, and potential pitfalls is critical for maintaining a stable and bootable system. By following the guidelines and best practices outlined in this article, you can effectively use bcdedit.exe to manage your boot configuration and troubleshoot boot-related issues. Remember to always back up your BCD before making any major changes.

Although modifying the Boot Configuration Data (BCD) using the bcdedit.exe command line option is possible, there are only a few reliable applications available for customizing the boot configuration data in Windows. One of the best tools for this purpose is EasyBCD, which offers a range of useful features for editing and repairing BCD. However, EasyBCD is only free for personal use, and commercial users need to purchase a license.

For those searching for a free utility that can be used in commercial settings, the Visual BCD Editor is an excellent choice. This advanced graphical user interface (GUI) tool is based on the bcdedit command-line utility and provides complete access to the Windows 11/10/8/7/Vista BCD for viewing and modifying the Boot Configuration Data. Visual BCD also automatically creates loaders for Windows 11/10/87/Vista/XP/VHD and resolves issues with a dual startup.

Visual BCD Editor for Windows

Visual BCD Editor is a powerful and free tool designed to modify Boot Configuration Data (BCD). With this application, you can repair BCD, boot sector, MBR, and disk effortlessly. Its user-friendly interface allows you to add new OS entries to the Startup boot menu with ease, rename entries, set the default entry, and modify the expiry time of the default start menu. Additionally, you can use Visual BCD Editor to create and add new loaders for Windows, Mac, Linux, and VHD. This versatile tool is a must-have for anyone who needs to manage their computer’s boot configuration.

Visual BCD Editor includes a tool called Startup Repair that allows users to troubleshoot multi-boot problems easily. To access it, simply click the Repair BCD button. With just a single click, Startup Repair can repair partition boot sector records, master boot records (MBR), and disk structures. Unlike using the Command prompt, Visual BCD Editor handles all of these tasks automatically without requiring you to write any code. If you are experiencing any startup issues, using Startup Repair is highly recommended.

The Visual BCD Editor is a tool that comes with a straightforward user interface yet offers a powerful set of functions. While the software includes many options that may seem confusing, it is ideal for experienced users. Before making any changes to the startup entries, it is advisable to create a system restore point. Both EasyBCD and Visual BCD Editor are tools that require caution and care when used.

Download Visual BCD Editor

If you’re facing issues with dual-boot errors, Visual BCD Editor is a valuable tool to download and use for repairing them.

Conclusion

In conclusion, modifying the Boot Configuration Data in Windows can be challenging, but it is essential for maintaining the proper functioning of your computer. While the bcdedit.exe command line option is available, it can be unreliable, and users may prefer more user-friendly applications such as EasyBCD or Visual BCD Editor. While EasyBCD is an excellent choice for personal use, commercial users need to purchase a license. In contrast, Visual BCD Editor is a free, advanced GUI tool that provides complete access to the Windows 11/10/8/7/Vista BCD for viewing and modifying the Boot Configuration Data. With its easy-to-use interface and powerful features, Visual BCD Editor is an essential tool for anyone who needs to manage their computer’s boot configuration. However, as with any tool that involves modifying system settings, it is crucial to use caution and care before making any changes. Overall, Visual BCD Editor is a valuable tool for anyone facing issues with dual-boot errors, and it is highly recommended for troubleshooting and repairing the Boot Configuration Data in Windows.

Понравилась статья? Поделить с друзьями:
0 0 голоса
Рейтинг статьи
Подписаться
Уведомить о
guest

0 комментариев
Старые
Новые Популярные
Межтекстовые Отзывы
Посмотреть все комментарии
  • Как отключить битлокер через командную строку windows 10
  • Php redis extension windows
  • Как сделать панель задач крупнее windows 10
  • Windows 8 1 with update что это
  • Как восстановить переменную path windows 10