
Служба Windows Error Reporting (WER) служит для сбора и отправки отладочной информации о падении системных и сторонних приложений в Windows на сервера Microsoft. По задумке Microsoft, эта информация должна анализироваться и при наличии решения, вариант исправления проблемы должен отправляется пользователю через Windows Error Reporting Response. Но по факту мало кто пользуется этим функционалом, хотя Microsoft настойчиво оставляет службу сбора ошибок WER включенной по умолчанию во всех последних версиях Windows. В большинстве случае о службе WER вспоминают, когда каталог C:\ProgramData\Microsoft\Windows\WER\ReportQueue\ начинает занимать много места на системном диске (вплоть до нескольких десятков Гб), даже не смотря на то что на этом каталоге по умолчанию включена NTFS компрессия.
Содержание:
- Служба Windows Error Reporting
- Очистка папки WER\ReportQueue в Windows
- Отключение Window Error Reporting в Windows Server
- Отключаем сбор и отправки отчетов об ошибках в Windows 10
- Отключение Windows Error Reporting через GPO
Служба Windows Error Reporting
Служба Windows Error Reporting при появлении ошибки показывает диалоговое окно, предлагающее отправить отчет об ошибке в корпорацию Microsoft. Когда в Windows вы видите сообщение об ошибке
YourApp has stop working
, в это время в служба Windows Error Reporting запускает утилиту WerFault.exe для сбора отладочных данных (могут включать в себя дамп памяти).
Данные пользователя сохраняются в профиль пользователя:
%USERPROFILE%\AppData\Local\Microsoft\Windows\wer
Системные данные – в системный каталог:
%ALLUSERSPROFILE%\Microsoft\Windows\WER\
Служба Windows Error Reporting представляет собой отдельный сервис Windows. Вы можете проверить состояние службы командой PowerShell:
Get-Service WerSvc
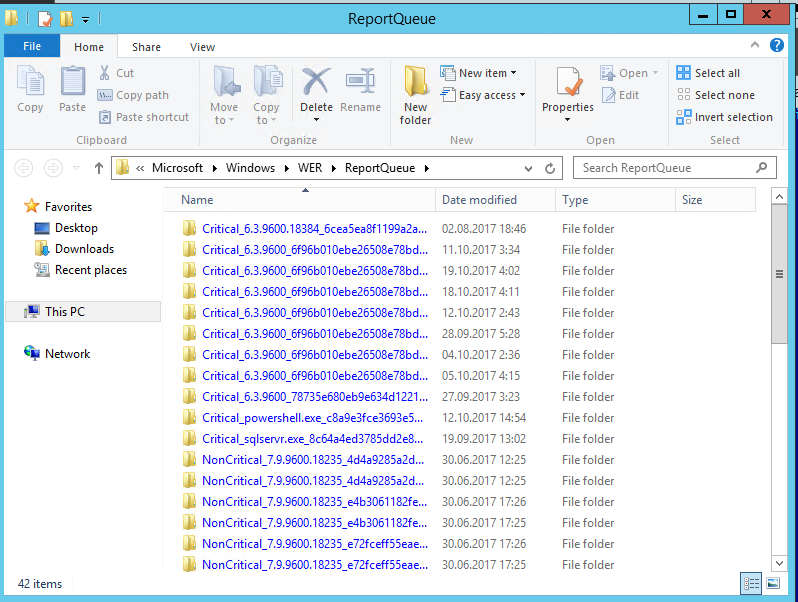
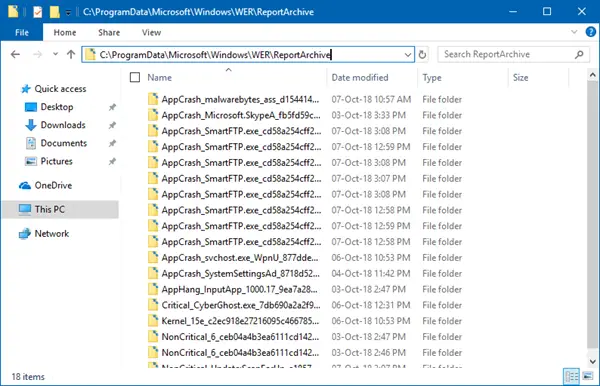
Внутри каталога WER\ReportQueue\ содержится множество каталогов, с именами в формате:
- Critical_6.3.9600.18384_{ID}_00000000_cab_3222bf78
- Critical_powershell.exe_{ID}_cab_271e13c0
- Critical_sqlservr.exe__{ID}_cab_b3a19651
- NonCritical_7.9.9600.18235__{ID}_0bfcb07a
- AppCrash_cmd.exe_{ID}_bda769bf_37d3b403
Как вы видите, имя каталога содержит степень критичности события и имя конкретного exe файла, который завершился аварийно. Во всех каталогах обязательно имеется файл Report.wer, который содержит описание ошибок и несколько файлов с дополнительной информацией.
Очистка папки WER\ReportQueue в Windows
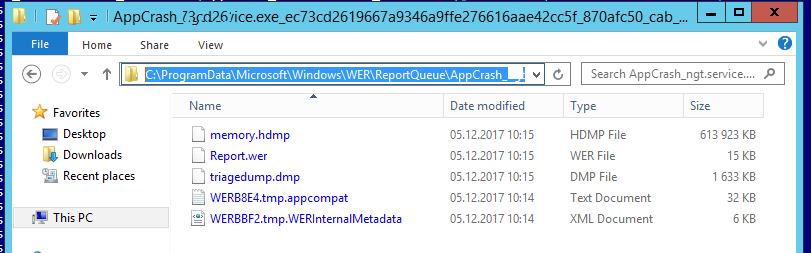
Как правило, размер каждой папки в WER незначителен, но в некоторых случаях для проблемного процесса генерируется дамп памяти, который занимает довольно много места. На скриншоте ниже видно, что размер файла дампа memory.hdmp составляет около 610 Мб. Парочка таким дампов – и на диске исчезло несколько свободных гигибайт.
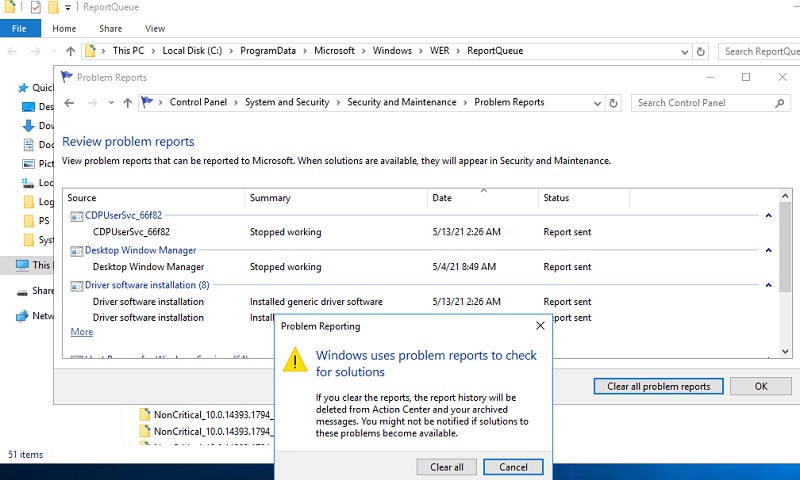
Чтобы очистить все эти ошибки и журналы штатными средствами, откройте панель управления и перейдите в раздел ControlPanel -> System and Security -> Security and Maintenance -> Maintenance -> View reliability history -> View all problem reports (Control Panel\System and Security\Security and Maintenance\Problem Reports) и нажмите на кнопку Clear all problem reports.
Для быстрого освобождения места на диске от файлов отладки, сгенерированных службой WER, содержимое следующих каталогов можно безболезненно очистить вручную.
- C:\ProgramData\Microsoft\Windows\WER\ReportArchive\
- C:\ProgramData\Microsoft\Windows\WER\ReportQueue\
Следующие команды PowerShell удалят из каталога каталогов WER все файлы, старше 15 дней:
Get-ChildItem -Path  'C:\ProgramData\Microsoft\Windows\WER\ReportArchive' -Recurse | Where-Object CreationTime -lt (Get-Date).AddDays(-15) | Remove-Item -force -Recurse
Get-ChildItem -Path  'C:\ProgramData\Microsoft\Windows\WER\ReportQueue' -Recurse | Where-Object CreationTime -lt (Get-Date).AddDays(-15) | Remove-Item -force –Recurse
Для очистки каталогов WER в пользовательских профилях используйте такой скрипт:
$users = Get-ChildItem c:\users|where{$_.name -notmatch 'Public|default'}
foreach ($user in $users){
Get-ChildItem "C:\Users\$User\AppData\Local\Microsoft\Windows\WER\ " –Recurse -ErrorAction SilentlyContinue | Remove-Item –force –Recurse
}
Отключение Window Error Reporting в Windows Server
В Windows Server 2019/2016/2012R2 вы можете управлять состоянием WER с помощью PowerShell. Вы можете отключить службу Windows Error Reporting:
Get-Service WerSvc| stop-service –passthru -force
Set-Service WerSvc –startuptype manual –passthru
Но есть более корректные способы отключения WER в Windows. В версии PowerShell 4.0 добавлен отдельный модуль WindowsErrorReporting из трех командлетов:
Get-Command -Module WindowsErrorReporting

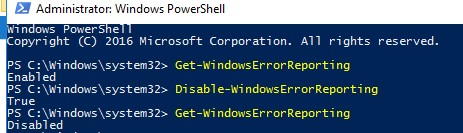
Проверить состояние службы Windows Error Reporting можно командой:
Get-WindowsErrorReporting
Для отключения WER, выполните:
Disable-WindowsErrorReporting
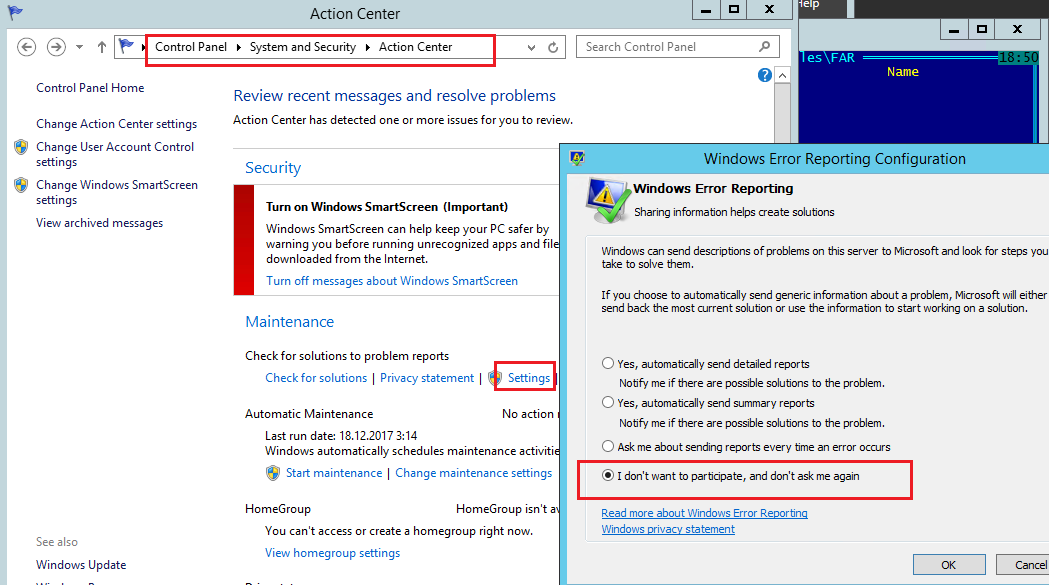
В Windows Server 2012 R2 можно отключить запись информации об ошибках Windows Error Reporting через панель управления (Control Panel -> System and Security -> Action Center -> раздел Maintenance -> Settings -> выберите опцию I don’t want to participate, and don’t ask me again
Отключаем сбор и отправки отчетов об ошибках в Windows 10
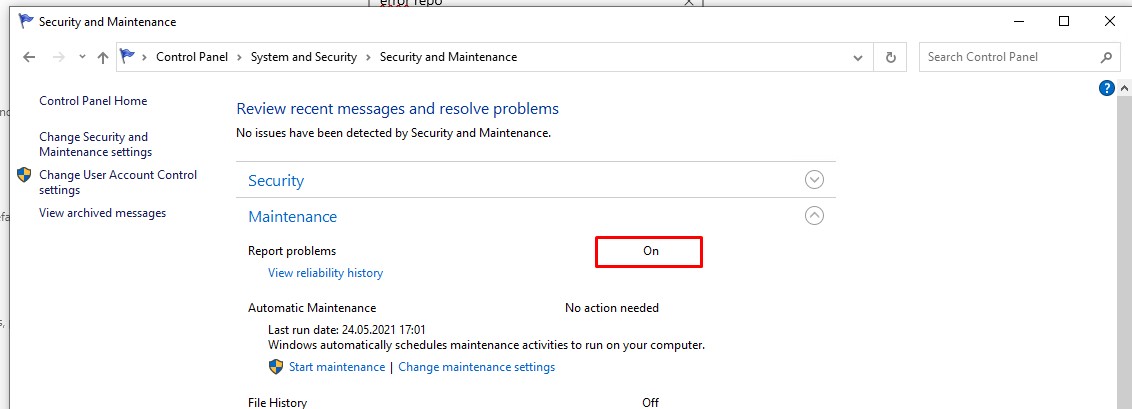
В Windows 10 нельзя отключить Error Reporting через панель управления. В графическогм интерфейсе можно только проверить ее статус (Система и безопасность ->Центр безопасности и обслуживания -> секция Обслуживание). Как вы видите, по умолчанию параметр Поиск решения для указанных в отчетах проблем включен (Control Panel -> System and Security -> Security and Maintenance -> Maintenance -> Report problems = On).
HKLM\SOFTWARE\Microsoft\Windows\Windows Error Reporting нужно создать новый параметр типа DWORD (32 бита) с именем Disabled и значением 1.
Можно отключить сбор ошибок WER для конкретных пользователей:
reg add "HKCU\Software\Microsoft\Windows\Windows Error Reporting" /v "Disabled" /t REG_DWORD /d "1" /f
Или отключить WER для всех:
reg add "HKLM\Software\Microsoft\Windows\Windows Error Reporting" /v "Disabled" /t REG_DWORD /d "1" /f

Измените параметр реестра и проверьте статус параметра Поиск решения для указанных в отчетах проблем в панели управления. Его статус должен изменится на Отключено.

Отключение Windows Error Reporting через GPO
Также вы можете управлять настройками службы Windows Error Reporting через групповые политики.
Запустите редактор локальной (
gpedit.msc
) или доменной GPO (
gpmc.msc
) и перейдите в ветку реестра Computer Configuration -> Administrative Templates -> Windows Components -> Windows Error Reporting (Компоненты Windows -> Отчеты об ошибках Windows). Для отключения сбора и отправки ошибок через WER включите политику Disable Windows Error Reporting (Отключить отчеты об ошибках Windows).
Аналогичная политика есть в пользовательском разделе политик (User Configuration).

Обновите GPO (перезагрузка не потребуется).
В результате в Windows перестанут формироваться сообщения об ошибках Windows и отправляться в Microsoft.
Windows 7 / Getting Started
The ReportArchive folder contains reports that have been uploaded or denied upload (via
policy or explicit user action). This folder is referred to as the Archive store. Reports that are
successfully submitted from the queue store(s) are automatically transferred to the archive store.
You also can create an Event Reporting Console (ERC) folder in the WER store folder(s). The
subfolders in the ERC folder store response metadata and templates used for displaying the
response data in the Problem Reports And Solutions Control Panel. You don’t need to modify
the data in the ERC folder, and modifying the data is not supported. The location of the
ReportArchive folder is either of the following:
- Users\<username>\AppData\Local\Microsoft\Windows\WER\ReportArchive (for reports
in the user store) - ProgramData\Microsoft\Windows\WER\ReportArchive (for reports in the computer store)
Queue Reporting
When a new error report is successfully submitted to any of the queues or directly to the
Watson back-end servers, WER enters Queue Reporting mode. In Queue Reporting mode,
WER will prompt you to send the queued report(s) if conditions permit. If conditions are not
optimal for reporting, WER schedules itself to be started when a network connection is established
(SENS) or when the current user logs on the next time (HKCU\Run). This ensures that at
some point in the future when conditions are right for reporting, infrastructure will be able to
show the queued reporting console.
In Queue Reporting mode, WER performs the following checks in the following order:
- Is the failing process running in an interactive desktop? If not, WerMgr.exe terminates.
This is necessary because WER dialog boxes should not be shown for noninteractive
desktops, such as the ones that the service accounts own. - Does the current user have reports in her queue, or is the current user an administrator
and is administrative queuing enabled? If neither of the conditions is true, the current
user has no reports to report. In this case, WER will ensure that network and logon
triggers for the current user are removed, and it will exit immediately. If either of the
conditions is true, WER attempts to prompt you to report entries in the queue. - WER sets the network and logon triggers for the current user in case conditions are not
optimal for reporting at this time. - WER checks network access to see if the last reporting time has expired. If either of
these checks fails, WerMgr.exe terminates. - Open the Problem Reports And Solutions Control Panel to prompt you and update the
last reporting time.
Store Maintenance
By default, the Queue Management System performs maintenance such as deleting stale
data and trimming the size of the queue on a report store whenever 50 saved reports are in
the store. When the total queued report count exceeds the number defined in the registry
value MaxQueueCount or the registry value MaxArchiveCount for archive stores, the queue
subsystem deletes the oldest .cab files from the queues in the following order until the size of
the queue reaches MaxQueueCount or no more CABs remain to delete:
- Archive Store
- Signoff Queue
- Upload Queue
The metadata for a report persists for one calendar year unless the user has disabled the
archive via the DisableArchive setting.
WER queue data retention policies can be configured using Group Policy. If no queuing
policies are configured, the Archive queue will retain 1,000 reports and the Upload/Signoff
queue will retain 50 reports. If a queue becomes full and a new report is created, the new
report will overwrite the oldest report in the respective queue.
Queue Triggers
This section describes the launch triggers that WER uses to ensure that the queued reporting
prompt is started for users when they have unsent reports in their queues. Triggers are
persistent across reboots.
WER launch triggers include:
- Network trigger This trigger starts WerMgr.exe in Queue Reporting mode for a
specific user when a network connection is established. The network trigger is implemented
through the SENS API that senses the presence of a network connection. - Logon trigger This trigger starts WerMgr.exe in Queue Reporting mode for a
specific user when the user logs on. WerMgr.exe is responsible for WER error queue management. - Administrator trigger The administrator trigger notifies an administrator of unsent
entries in the machine queue. This trigger occurs only for administrators on the system.
Are you frustrated by “access denied” errors when trying to open Windows Error Reporting (WER) archives? This guide helps you troubleshoot and modify permissions so you can capture critical crash dump files and resolve server issues.
TOC
Understanding Windows Error Reporting
Windows Error Reporting (WER) is a feature built into the Windows operating system that collects and archives data on application crashes, unhandled exceptions, and kernel-level issues. This data is invaluable to administrators and developers who need to diagnose the root causes of system instabilities. By default, WER stores temporary files in:
C:\ProgramData\Microsoft\Windows\WER\TempBefore long, these files are moved to a more permanent location:
C:\ProgramData\Microsoft\Windows\WER\ReportArchiveIf your application pool crashes repeatedly in a Windows Server environment (including Azure VMs), WER logs and crash dumps may be the key to diagnosing root causes. But retrieving these files can be a challenge when system or domain-level security policies restrict folder access. Let’s examine how WER works and why its archiving process often triggers permission issues.
What Is WER and Why Does It Matter?
WER automatically monitors the operating system and your applications for crash events or unresponsive processes. When a crash occurs, WER does the following:
- Captures the crash details – Memory dumps, stack traces, error logs, and other debug info.
- Generates a unique ID – WER associates the crash with a specific application, module, or OS component.
- Temporarily stores data – Initially in the
WER\Tempdirectory. - Archives data – Moves crash dumps and log files to
WER\ReportArchiveafter a short time, preserving them for further analysis. - Optionally sends data to Microsoft – Depending on your error reporting settings.
For Windows administrators, these archived crash reports are a goldmine. They can provide explicit error codes and stack information that pinpoint exactly where your application failed. Without them, diagnosing random or intermittent crashes is much more difficult.
Common Scenarios for Accessing WER Data
While many people never touch WER data, you may need direct access to WER\ReportArchive in situations such as:
- Intermittent or rare crashes: Standard event logs don’t provide enough detail.
- Custom application debugging: You need a full memory dump to analyze.
- Vendor support requests: Third-party software providers might request a crash dump.
- Forensic analysis: Investigating serious faults or security-related incidents.
However, opening these folders often fails due to strict access controls, especially on servers that are domain-joined and subject to group policies. The next sections explore why these hurdles exist.
Challenges with the WER\ReportArchive Folder
The WER\ReportArchive folder is protected by default. Windows places tight restrictions on critical system folders to prevent unauthorized users—or malicious software—from tampering with diagnostic data or system configurations. This can be especially noticeable on Windows Server platforms where security is typically stricter than on client operating systems.
Why Access May Be Denied
When you receive an “access denied” error, the root cause usually falls under one or more of the following categories:
- Ownership: A special system account (like
NT AUTHORITY\SYSTEMorTrustedInstaller) might own the folder. - Group Policy Restrictions: Domain policies might override manual permission changes, forcing administrators to escalate privileges or coordinate with domain admins.
- Azure VM Security: In cloud-hosted VMs, custom scripts or roles might hamper full local admin control.
- File in Use: WER might be actively writing or archiving data, causing locked file handles.
Ownership and Permissions
Even if you are a local Administrator, Windows often treats certain directories as “system-owned.” If the system account or TrustedInstaller has exclusive ownership, you’ll be locked out unless you manually take ownership. After taking ownership, you still need to edit the ACL (Access Control List) to grant your account or group explicit permissions.
Group Policies and Domain Restrictions
In a domain environment, group policies can automatically revert certain folders to default ownership or restrict changes to local Administrators. For example, a security baseline might enforce that system directories remain locked down. If your environment uses custom GPOs, you may need domain-level policy updates to ensure your changes are preserved.
Azure VM Considerations
On Azure VMs, you might assume you have full control by default—but additional roles or marketplace images can come with preconfigured security settings. For instance, Azure’s Security Center or similar services might have protective measures enabled. Even with local administrator privileges, changes can be undone by these configurations. If you suspect an Azure-level policy is interfering, coordinate with your organization’s Azure administrators.
Step-by-Step Guide to Gaining Access
Below are recommended approaches to fixing “access denied” errors and retrieving WER crash dump archives. We’ll begin with the simplest (using the GUI) and move on to more advanced or domain-oriented methods.
Method 1: Changing Ownership via GUI
This method is often the first attempt when you need quick access and have local or domain admin privileges.
- Open File Explorer and navigate to
C:\ProgramData\Microsoft\Windows\WER\ReportArchive. - Right-click the folder → Properties → Security → Advanced.
- In the “Advanced Security Settings” window, change the owner to your admin account:
- Click Change next to Owner.
- Type your username or administrator group name.
- Check the box labeled Replace owner on subcontainers and objects.
- Close and reopen the properties dialog.
- Grant Full Control: Back in the folder’s properties, click Edit (or “Change permissions”), then add your account or group with Full control.
If no group policies override your changes, you should now be able to browse ReportArchive, open crash files, and copy them elsewhere.
Method 2: Using Command Prompt Tools
If the GUI approach fails or you’re more comfortable with command-line operations, try takeown and icacls:
- Launch Command Prompt (or PowerShell) as Administrator.
- Take ownership recursively:
takeown /f "C:\ProgramData\Microsoft\Windows\WER\ReportArchive\AppCrash_w3wp.exe_..." /r /d yThe above command forces ownership even if you’re not listed on the ACL.
- Grant permissions:
icacls "C:\ProgramData\Microsoft\Windows\WER\ReportArchive\AppCrash_w3wp.exe_..." /grant Administrators:F /tHere, Administrators is the built-in administrators group. The /t switch applies changes to all subfolders and files.
- Verify there are no errors. Attempt accessing the folder again in Explorer.
These commands explicitly override ownership and ACLs. However, if group policies are set to revert changes, you might temporarily gain access but could lose it again on the next policy refresh.
Method 3: Reviewing Group Policies
Group Policy Objects (GPOs) play a major role in large organizations. If you’re repeatedly locked out after applying new permissions, investigate local or domain GPOs:
- Run
gpedit.msc(Local Group Policy Editor) if you’re not domain-joined. Check under Computer Configuration → Windows Settings → Security Settings → File System or Administrative Templates. - Check domain-level GPOs via the Group Policy Management Console (if you have domain admin rights).
- Identify conflicting policies. For instance, a policy might set “TrustedInstaller” or “SYSTEM” as the only allowed owner on system folders.
If your domain’s policies hamper local changes, you’ll need to collaborate with the domain admin team to either create an exception or temporarily relax these restrictions.
Method 4: Testing with a Different Admin Account
Sometimes your primary domain or local account is subject to specific security rules, but another admin account might not be. If you have multiple administrator accounts:
- Log off your current session.
- Log in as a different account with local admin privileges.
- Retry opening the
ReportArchivefolder or applying the ownership changes above.
It’s possible that the domain or local GPO treats these accounts differently. Testing with another account can also confirm if the problem is user-specific or systemwide.
Method 5: Coordinating with Domain Admins
In a managed enterprise environment, domain admins can easily override or fix permission conflicts. If you can’t bypass the “access denied” error:
- Open a support ticket with your IT or domain admin team.
- Provide specifics: The exact folder path (
C:\ProgramData\Microsoft\Windows\WER\ReportArchive), the error you see, and your attempts to fix it. - Request a domain policy review: They can either allow local ownership or provide a group-based policy granting you read/write access for these logs.
Realistically, domain administrators have the final say on your environment’s security configuration. If they deem it safe, they can relax the relevant settings for your server or create a policy exception.
Troubleshooting and Tips
Even after changing ownership and permissions, you might still face issues, either because group policies keep reverting settings or because the files you need are missing. Here are some extra pointers to help you navigate potential roadblocks.
PsExec for System-Level Access
Microsoft’s PsExec utility allows you to run commands under the Local System account. Because the System account often has more privileges than even a standard administrator, it’s a viable workaround:
- Download PsExec from the Microsoft Sysinternals website.
- Open Command Prompt as Administrator.
- Run:
psexec -s -i cmd.exeThis launches a new command prompt window as the System account.
- Navigate to the
ReportArchivefolder and try copying or moving the files to an accessible location.
However, if a domain-level GPO disallows System from altering permissions or if the GPO resets them, this approach might still fail. Use this method with caution, as running processes under the System account can have security implications.
Ensuring the Crash Dumps Are Still Present
WER data is sometimes transient. Even if you gain access, you might find that the crash dump you need is gone. Here’s why:
- Automatic cleanup: Windows may delete older dumps to free space.
- Rebooting: Certain logs or memory dumps are cleared after system restarts.
- Policy-based cleanup: Your IT department might have configured shorter retention periods.
If your crash dumps are missing, check Event Viewer to confirm if WER logs indicated a successful dump creation. Alternatively, see if logs were moved to a different location, or if they have been automatically uploaded to a remote share.
Long-Term Maintenance Strategies
To avoid repeating these headaches whenever you need new crash dumps, consider implementing a few best practices.
Regular Auditing of Permissions
Take inventory of which system folders require ongoing access. If you handle frequent debugging tasks, request that IT or domain admins make a permanent group policy exception for the WER\ReportArchive folder. That way, you don’t have to reapply ownership or permission changes after each policy refresh.
Automating Log Collection
In a production environment, especially if you manage many servers, manual retrieval of crash dumps is tedious. Tools and scripts can automate:
- Monitoring for new dump files in
WER\TempandWER\ReportArchive. - Copying the files to a secure share or an Azure Storage container.
- Notifying the admin or developer team that new crash logs are available.
Automation ensures that every critical dump is saved in a centralized, easily accessible location without repeatedly tampering with folder permissions.
Conclusion
Accessing and managing the C:\ProgramData\Microsoft\Windows\WER\ReportArchive folder can be challenging on Windows Server—particularly in domain-joined or Azure-hosted environments. By systematically adjusting ownership, verifying group policy settings, and collaborating with domain administrators, you can obtain the crash dumps you need to troubleshoot application pool failures or other system crashes.
Once you’ve secured the necessary permissions, you’ll have full visibility into the archived crash files. This will let you diagnose intermittent issues, collaborate effectively with vendors or support teams, and maintain a healthier Windows environment. Don’t forget to put in place policies or automation to ensure that collecting future WER data remains a smooth process.
The ReportArchive folder contains reports that have been uploaded or denied upload (via policy or explicit user action). This folder is referred to as the Archive store. Reports that are successfully submitted from the queue store(s) are automatically transferred to the archive store.
Can I delete ReportQueue files?
Delete Windows Error Reporting Files manually Open the File Explorer, and enable Hidden Files view from the menu. Here you will find a bunch of folders including LocalReportArchive, ReportArchive, ReportQueue, and Temp. You will have to open each of these folders and delete all archive files.
How do I access WER ReportArchive?
If you open the C:\Users\your name\AppData\Local\Microsoft\Windows\WER\ReportArchive folder, you will see all of the individual files.
Can I delete WER folder?
Windows Error Reporting runs as a Windows service and can optionally be entirely disabled. If Windows Error Reporting itself crashes, then an error reports that the original crashed process cannot be sent. You can delete the files from “C:\Userssername\AppData\Local\Microsoft\Windows\WER”.
Can I delete C ProgramData Microsoft Windows wer ReportArchive?
To free up some disk space quickly, you can manually delete debug and log files generated by the WER service in the following folders: C:\ProgramData\Microsoft\Windows\WER\ReportArchive\
How do I disable wer?
Disable Error Reporting in Windows 10
- Use the WIN+R keyboard shortcut to open the Run dialog box.
- Enter services. msc.
- Right-click or tap-and-hold Windows Error Reporting Service.
- Select Properties.
- Choose Disabled from the menu next to Startup type.
- Select OK or Apply.
- You can now close out of the Services window.
How do you read Wer?
wer files can also be accessed through the Windows Action Center (Control Panel\System and Security\Action Center). You’ll find a list of all crash reports behind the link “View problems to report” in the Maintenance section.
What is C ProgramData Microsoft Windows wer ReportArchive?
C:\ProgramData\Microsoft\Windows\WER\ReportArchive This directory contains System Created Windows Error Reporting Files. This is one of the locations that can be cleaned up with cleanmgr.exe . This directory is possibly related to the registry key HKEY_LOCAL_MACHINE\SOFTWARE\Microsoft\Windows\Windows Error Reporting .
How do I fix apphangxprocb1?
- Perform clean boot (Check the link for Performing clean boot)
- Enable half of the services.
- Determine whether the problem returns.
- Enable half of the startup items.
- Determine whether the problem returns.
- Repeat the above steps until you find out which service or program is causing the issue.
Is it safe to delete Windows error reports?
Archived error reports have been sent to Microsoft. You can choose to delete these, but you won’t be able to view reports about program crashes. If you’re not attempting to solve a problem, they’re probably not important.
How can I tell what is crashing my windows?
To view Windows 10 crash logs such as the logs of blue screen error, just click on Windows Logs.
- Then choose System under Windows Logs.
- Find and click Error on the event list.
- You can also create a custom view so you can view the crash logs more quickly.
- Choose a time period you want to view.
- Select the By log option.
What is Werfault?
werfault.exe is a process for Windows 10 that reports errors in Windows, and in Windows applications. These error reports help developers find and fix bugs in Windows along with the apps you use every day. werfault.exe stands for Windows Error Reporting Fault.
Download Windows Speedup Tool to fix errors and make PC run faster
Windows features a feedback mechanism where it generates error reports from Software and Hardware problems. These reports are stored temporarily in the system and sent back to Microsoft so it can find a solution to those problems and fix it in future updates. As time passes, these reports may take up a lot of space on the system. End users are free to delete them using the brand-new Free Up Space feature. However, sometimes you won’t be able to do that. In this post, we are sharing how to delete very large System queued Windows Error Reporting files that may run in Gigabytes.
When WER sends out an error file and looks for a solution, the WER server at Microsoft instantly sends out a solution if there is one available. In case the solution is under investigation or is unknown, the end user gets notified about it and may ask for additional information.
While the Free Up Space tool in Settings is able to clear these error reporting files, sometimes it is not able to delete very large system queued Windows error reporting files. The option to delete System queued Windows Error Reporting Files also exists in the Disk Cleanup Utility.
Delete Windows Error Reporting Files using Settings

Go to Settings > System > Storage > Free Up Space, and click to launch it.
Give it some time to populate all the files and folders. Once done, select only System created Windows Error Reporting files.
Click on Remove files button, and it should remove all of them.
Note: While you can use the Disk Clean Up tool, it’s being removed from the next version of Windows.
Delete Windows Error Reporting Files manually
- Open the File Explorer, and enable Hidden Files view from the menu.
- Go to C:\ProgramData\Microsoft\Windows\WER\
- Here you will find a bunch of folders including LocalReportArchive, ReportArchive, ReportQueue, and Temp.
- You will have to open each of these folders and delete all archive files.
- These files will have a name similar to 00c58c1f-b836-4703-9bcf-c699ca24d285.
If you cannot delete the files, you may have to take ownership of these folders, and then perform the action.
Disable Windows Error Reporting
If it becomes a regular annoyance for you because the files are generating every day and in size of gigabytes, it is best to disable the Windows Error Reporting Service for some time. Sometimes WER service cannot upload these files to Microsoft WER Server, and they stay behind, occupying lot of space.
Ashish holds a Bachelor’s in Computer Engineering and is a veteran Windows. He has been a Microsoft MVP (2008-2010) and excels in writing tutorials to improve the day-to-day experience with your devices.