
Readers help support Windows Report. We may get a commission if you buy through our links.
Read our disclosure page to find out how can you help Windows Report sustain the editorial team. Read more
The PROCESSOR_START_TIMEOUT error with error code 0x000001DF appears during Windows startup. It indicates that the CPU initialization process has taken too long or is encountering an issue causing your system to fail. You might see this error due to hardware, outdated drivers, or system configuration issues.
To begin with, check if your CPU is not overheating, then check the hardware components and reseat them. Next, turn off your PC, unplug the power cord, hold the power button for about 15-20 seconds to discharge any residual power, plug back the cord and power on your computer, and update your BIOS firmware from the system manufacturer’s website.
How can I fix the PROCESSOR_START_TIMEOUT error?
1. Boot into safe mode
- Press Windows + R to open the Run window.

- Type msconfig and click OK to open the System Configuration window.
- Go to Boot, then under Boot options, select Safe boot and Network.

- Click Apply, then OK to save the changes.
- Click Restart.


Your computer will restart with a minimal set of drivers and network access. If the error appears again, it indicates that the third-party app on your device is conflicting with the system. Once confirmed, reverse engineer the steps to restart your PC in normal mode.
2. Update/reinstall the device driver
- Boot into safe mode using the steps from method 1, then press Windows + R to open the Run window.
- Type devmgmt.msc and click OK to open the Device Manager app.

- From the list of system components, expand each category one by one and locate the driver with a yellow triangle with an exclamation mark inside.
- Right-click the driver and select Update driver from the context menu.

- Select Search automatically for drivers. If there are any other problematic drivers, update them as well.


Windows will try to find the best driver version for your device, but if it fails, head to the manufacturer’s website and download the latest driver. Alternatively, you can download and install the third-party driver updater tool to ensure all the device drivers stay up to date.
If updating the drivers doesn’t work, try reinstalling the drivers using the following steps:
- Relaunch the device manager app, locate the problematic driver, right-click the driver, and select Uninstall device.
- Click Uninstall again to confirm the choice.
- Once done, go to Action, then click Scan for hardware changes from the drop-down menu to reinstall the driver.


3. Run a malware scan
- Restart your PC in safe mode using the steps in method 1. Press the Windows key, type windows security in the search box, and click Open from the list of options to launch Windows Security.

- Go to Virus & threat protection, then click Scan options.

- Select Full scan and click Scan now.


Windows Security will scan your computer for potential security threats, including malware, viruses, spyware, and other malicious software. Once the scan is completed, you will receive a detailed report that includes the number of threats and actions taken. Next, restart your computer or rerun the scan if the security app prompts. If you use a third-party security app, you can run a full scan to fix the PROCESSOR_START_TIMEOUT error.
4. Run the Windows memory diagnostic tool
- Press Windows + R to open the Run window.
- Type mdsched.exe and click OK to open the Windows Memory Diagnostic tool.
- Select Restart now and check for problems.


Once the scan is complete, you will get to the login screen. Sign in to your profile and check the scan results. If there are errors, reseat the RAM and memory modules, then rerun the tool. If the issue persists, it might be due to faulty RAM, and you might have to replace it.
5. Run the System Repair scan
- Press Windows + I to open the Settings app.
- Go to System, then click Recovery.

- Under Recovery options, locate Advanced startup and click Restart now.

- On the Choose an option screen, select Troubleshoot.

- Choose Advanced options from the Troubleshoot screen.

- Select Startup Repair from the list of options, and Windows will restart and try to fix any startup issues.


6. Restore your PC to a previous version
- Press the Windows key, type control panel in the search box, and click Open from the list of options.

- Select Large icons for View by and select Recovery.

- Click the Open System Restore link.
- Select Choose a different restore point on the System Restore window and click Next.

- You will get a list of restore points; select the one created just before encountering the PROCESSOR_START_TIMEOUT error, then click Next to proceed.
- Click Finish to initiate the process.


Windows will restart, and try to restore your system settings to the selected version. If you see the System Restore didn’t complete successfully message, then it could be due to conflicting drivers or corrupted system files; read this guide to learn more.
7. Reset your PC
NOTE
Before proceeding with the steps to fix the PROCESSOR_START_TIMEOUT error, back up your important data, including documents, photos, videos, and files; next, disconnect any external devices and keep all the product keys handy for any third-party software you want to reinstall.
- Press Windows + I to open the Settings app.
- Go to System, then click Recovery.
- Under Recovery options, locate Reset this PC, and click the Reset PC button.
- On the Choose an option screen, select Keep my files or Remove everything.

- Select Cloud download or Local reinstall on the How would you like to reinstall Windows page.
- On the Additional settings page, click Change settings, if you want to change the settings. If you don’t want to change them, click Next to proceed.
- Click the Reset button from the Ready to reset this PC screen.


After resetting your computer, you can complete the Windows setup, sign in, check for Windows updates, and configure Windows settings according to your preferences.
In conclusion, to fix the PROCESSOR_START_TIMEOUT error, boot into safe mode, then update or reinstall the device driver. Then, run a malware scan, scan your disk using a memory diagnostic tool, and run the System Repair scan. Next, you can try to restore your system settings to the previous version or reset your PC.
If you often encounter BSoD on your PC, it could be due to corrupted drivers or missing system files; to learn more, read this guide.
Did we miss a step that helped you fix this BSoD error? Feel free to mention it in the comments section below; we will add it to the list.
Srishti Sisodia
Windows Software Expert
Srishti Sisodia is an electronics engineer and writer with a passion for technology. She has extensive experience exploring the latest technological advancements and sharing her insights through informative blogs.
Her diverse interests bring a unique perspective to her work, and she approaches everything with commitment, enthusiasm, and a willingness to learn. That’s why she’s part of Windows Report’s Reviewers team, always willing to share the real-life experience with any software or hardware product. She’s also specialized in Azure, cloud computing, and AI.
Provide feedback
Saved searches
Use saved searches to filter your results more quickly
Sign up

Синий экран с кодом ошибки CLOCK_WATCHDOG_TIMEOUT возникает, когда Windows не получает команды от центрального процессора. Из-за чего это происходит сказать сложно, так как причин огромное количество.
Чаще всего проблема программная, то есть компьютер в порядке, а сбой случается из-за неверно выставленных настроек BIOS, Windows 10 или каких-то других приложений. Далее мы расскажем, что делать, если у вас синий экран с кодом остановки CLOCK_WATCHDOG_TIMEOUT.
Верните BIOS к заводским настройкам
Если вы меняли какие-то настройки в BIOS, например, выставляли XMP профиль оперативной памяти или разгоняли центральный процессор, то с большой вероятностью именно это и вызвало ошибку..
Чтобы избавиться от нее, верните настройки микропрограммы к заводским. Для этого запустите BIOS, перейдите во вкладку «Exit» и найдите пункт «Load Default Settings». Иногда этот пункт называется «Load Optimized Defaults» или «Вернуть настройки к заводским», если BIOS переведен на русский язык. Имейте в виду, что это одно и то же.
Когда вы найдете нужный пункт, выберите его и нажмите «Enter» на клавиатуре. Затем еще раз нажмите «Enter», чтобы подтвердить операцию. После этого компьютер перезапустится с заводскими настройками BIOS, и ошибка CLOCK_WATCHDOG_TIMEOUT исчезнет.
Возвращение микропрограммы к заводским настройкам помогает в большинстве случаев. Если вам очень нужно настроить работу комплектующих в BIOS, то попробуйте выставить другие параметры. Например, для разгона оперативной памяти выберите другой режим XMP или при разгоне процессора, воспользуйтесь PBO. Главное, не повторяйте предыдущих действий.
Сбросьте настройки BIOS
Если возвращение к заводским настройкам не помогло, то сбросьте BIOS. Оговоримся сразу, что это не одно и то же. Сброс микропрограммы и возвращение ее параметров к заводским – это две разные процедуры. Если не помогла первая, то, скорее всего, поможет вторая.
Чтобы сбросить BIOS, открутите боковую стенку компьютера и взгляните на материнскую плату. В ее нижней части найдите надпись «CLR_CMOS». Прямо над ней вы увидите два контакта. Возьмите какой-нибудь металлический предмет, например отвертку, и коснитесь ей этих двух контактов. Само собой компьютер должен быть отключен от электросети. Оговоримся, что вашему здоровью ничего не угрожает и удара током не будет. Когда вы коснетесь двух контактов, BIOS сбросится.
На материнских платах премиум-сегмента вместо двух контактов можно увидеть маленькую кнопку. Она также подписана «CLR_CMOS». Для сброса BIOS нажмите на эту кнопку. Иногда потребуется зажать ее на несколько секунд. Точную информацию вы найдете в документации, которая была в коробке с материнской платой. Если у вас ее нет, то введите название материнки в интернете и найдите техническую документацию на сайте производителя.
Наименование можно узнать на самой плате. Оно будет выглядеть примерно так: «MSI B550M PRO VDH», «Gigabyte Z390 Aorus Elite», «ASRock B660M Pro RS» и так далее. Название материнки обычно записывается возле сокета процессора.
Кнопка сброса BIOS обычно располагается в нижней части материнской платы, но на некоторых моделях ее можно найти вместе с USB-разъемами на задней панели. Тогда вам не придется откручивать боковую крышку системного блока и лезть внутрь ПК. Просто нащупайте эту кнопку с обратной стороны компьютера и нажмите ее.
После сброса BIOS запускайте систему и начинайте ей пользоваться. Проблема CLOCK_WATCHDOG_TIMEOUT должна исчезнуть, но, если ошибка останется, значит BIOS в порядке и сбой вызывает что-то другое. Далее поговорим об этом.
Проверьте диспетчер устройств
Иногда ошибки с синим экраном происходят из-за сбоев в работе других устройств. Мышей, клавиатур, сетевых адаптеров, модулей Bluetooth и так далее. Чтобы убедиться в их исправности перейдите в диспетчере устройств Windows.
Для этого нажмите на кнопку «Поиск». Она располагается на панели задач, рядом с меню «Пуск». В появившемся окне впишите «Диспетчер устройств». Откройте программу и внимательно посмотрите на ее левый столбец, где перечислены ваши устройства. Если напротив одного или нескольких из них стоит желтый треугольник с восклицательным знаком, значит, эти устройства работают со сбоями и, скорее всего, они вызывают ошибку с синим экраном.
- Сначала попробуйте устранить сбои. По очереди нажимайте правую кнопку мыши на каждом устройстве с желтым треугольником и выбирайте пункт «Обновить драйвер».
- Если появляется сообщение, что для этих устройств уже установлены подходящие драйверы, то просто нажимайте «ОК» и закрывайте окно. В таком случае рекомендуется найти драйверы для этих устройств в интернете и скачать их оттуда.
- Проблема в том, что сделать это очень трудно. Найти драйверы в свободном доступе сложно, так как современные версии Windows находят их самостоятельно. Если вы можете найти и скачать установочные файлы драйверов для своих устройств, то обязательно сделайте это.
- После загрузки файлов перейдите в диспетчер устройств. Нажмите правой кнопкой мыши по оборудованию с желтым треугольником и нажмите «Удалить драйвер». Далее запустите файл, который вы скачали в интернете и установите его как любую другую программу. Возможно, что восклицательный знак пропадет и ошибка с синим экраном тоже.
- Если найти драйверы не удалось, то попробуйте отключить устройство с желтым треугольником. Этого не стоит делать в случае, когда устройство очень важное, например сетевой адаптер или звуковая карта. А вот Bluetooth модуль или принтер отключать можно. Без них компьютер будет работать стабильно.
Избавьтесь от вредоносных программ
Если раньше синего экрана не было, но после установки каких-то приложений ошибка CLOCK_WATCHDOG_TIMEOUT начала появляться, то, скорее всего, вы установили вредоносное ПО. Обязательно удалите программы, которые устанавливали в последнее время и проверьте систему с помощью антивирусных утилит.
Покупать антивирусы, например Kaspersky, не обязательно. Существует много бесплатных утилит, которые просканируют вашу систему, найдут вредоносные программы и удалят их. Самые распространенные из них:
- HitmanPro;
- Malwarebytes;
- Dr.Web CureIt.
Максимум, что от вас потребуют эти утилиты, ввести свой электронный адрес. Платить деньги вам придется только если вы захотите установить полные версии этих программ.
Важно, чтобы вы скачивали антивирусные утилиты с их официальных сайтов. В противном случае вместо вы можете установить еще больше вредоносного ПО.
Все антивирусные программы работают по одному алгоритму:
- установка приложения;
- сканирования системы;
- просмотр обнаруженных угроз;
- удаление всех найденных угроз.
Очистка системы от вредоносных программ – это последнее, что можно сделать на программном уровне. Остальные решения проблемы CLOCK_WATCHDOG_TIMEOUT потребуют манипуляций с комплектующими компьютера.
Почистите системный блок от пыли и замените термопасту
Синий экран часто возникает из-за перегрева центрального процессора.
Чтобы снизить рабочие температуры ЦП, разберите компьютер, почистите системный блок от пыли и замените термопасту. Важно не просто пропылесосить системный блок, а вытащить каждое комплектующее и убрать с него пыль. Особенно это касается кулера, который охлаждает центральный процессор. Снимите его вместе с радиатором, продуйте насколько возможно и очистите от пыли. Перед тем, как ставить его обратно уберите старый слой термопасты с крышки процессора и нанесите новый.
В запущенных случаях, полное обслуживание системного блока, снижает рабочую температуру ЦП на 20-30 градусов.
Также синий экран «BSOD» появляется из-за перегрева видеокарты, однако в таком случае вы будете наблюдать на мониторе различные искажения и артефакты перед выключением системы. Если у вас такого нет, то, скорее всего, видеокарта исправна. Значит, ошибку CLOCK_WATCHDOG_TIMEOUT вызывает не она.
Поменяйте местами модули оперативной памяти
Это последнее, что вы можете сделать без помощи специалистов. Просто поменяйте модули оперативной памяти местами и посмотрите на результат.
Также вы можете попробовать запустить компьютер с одной плашкой оперативной памяти. Если ошибка с синим экраном осталась, то поставьте другой модуль ОЗУ. Затем повторите то же самое, только с другим слотом. Например, если раньше плашка стояла во втором разъеме, то поставьте ее в четвертый.
Что делать, если ошибка CLOCK_WATCHDOG_TIMEOUT Windows осталась
В таком случае обращайтесь в сервисный центр. Для решения проблемы нужна полная диагностика персонального компьютера. Чтобы сделать это, нужны не только другие комплектующие, но и специальное оборудование в виде посткарт, мультиметров, осциллографов, микроскопов и так далее.
Разбирать компоненты и пытаться их отремонтировать, не рекомендуется. Самостоятельные попытки исправить неполадки приведут только к новым поломкам. Обращайтесь в профессиональную мастерскую HYPERPC, чтобы не допустить этого. В нашем распоряжении есть все для качественного и безопасного ремонта вашего компьютера. Мы найдем причину появления ошибки CLOCK_WATCHDOG_TIMEOUT и избавимся от нее.
The Clock Watchdog Timeout is one of the blue screen errors typically caused when specified processors do not process interrupts. It is not common to experience Clock Watchdog Timeout in Windows 10 computers, but some users have reported this BSOD error. The processor cannot process the interrupt because of deadlock or unresponsiveness.
When the resources are preoccupied with some other process and are dependent on each other to release those resources, a deadlock occurs, and you end up with a scary blue screen. You can take care of your system and avoid blue screen errors so that your work is not interrupted.
At times a simple reboot can get you out of Clock_Watchdog_Timeout bluescreen of death error, while other times, you may need to perform several fixes to get out of the stop code error loop.
The leading cause of this error is outdated or unstable device driver software, malware, external hardware, dust or debris stuck in hardware components, and incorrect BIOS settings. You can go through the solutions mentioned below and fix the Clock Watchdog Timeout in Windows 10 quickly.
To enter the system and perform the solutions, simply reboot your computer. Then, if you end up with a blue screen, again and again, you can start Windows 10 in safe mode.
1. Unplug External Hardware
Suppose you started experiencing clock watchdog error after plugging in any external hardware device like a flash drive, external hard disk, headphones, or speakers. In that case, you need to unplug them immediately.
The plugged hardware device is either incompatible with your PC or takes up too many resources, causing the stop code error. Simply unplug the device and reboot your PC.
This solution would eliminate the Clock_Watchdog_Timeout error from your Windows 10 PC if the hardware device were the culprit.
2. Update Windows OS To Fix clock_watchdog_timeout
As outdated drivers and systems are one of the reasons to experience clock watchdog timeout in Windows 10, you can try to update driver and OS to fix the stop code error.
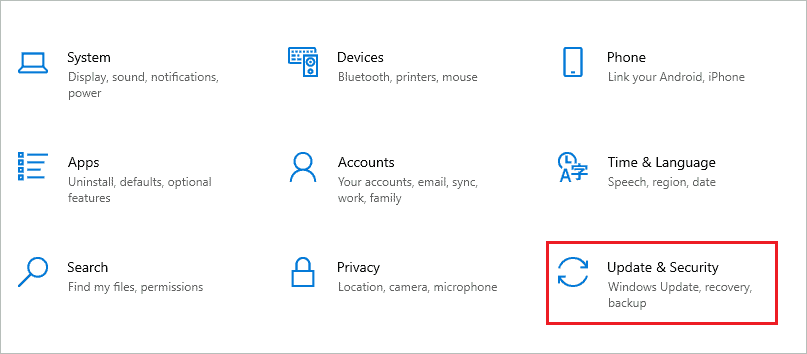
Press Windows key + I to open the Settings app and then go to Update & Security.
From the left panel, go to Windows Update and then click on the Check for updates button to check for the latest Windows updates.
If there are any new updates, download and install them. Once the update is installed, you can check if the clock watchdog timeout error is resolved or not.
3. Clean Dust from your PC
The dirt, dust, and debris accumulated on hardware components cause more harm than you can think of. Therefore, you need to clean it regularly to maintain good performance and PC health.
Make sure you don’t use pins and needles to remove the dirt, as it can damage the small components. Instead, the can of compressed air can help you get rid of all the dust.
4. Run Windows Memory Diagnostic Tool
You can check for issues in RAM and fix them using the Windows Memory Diagnostic tool. Before running the tool, save all the unsaved work and close all opened applications on your computer.
Press Windows key + R to open the Settings app and type mdsched.exe there. Press Enter or click OK to open Windows Memory Diagnostic.
In the Windows Memory Diagnostic tool, select Restart now and check for problems (recommended) option.
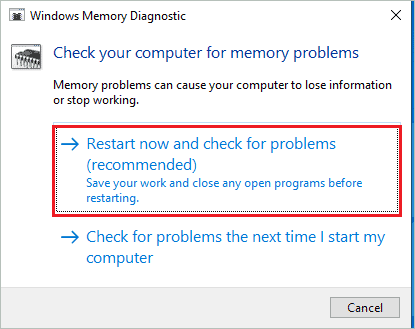
As soon as you select the option, your computer will restart and perform memory diagnostics. If there are any memory issues, Windows will fix them for you.
5. Roll Back Device Drivers
If you recently updated any device driver and then started getting a clock watchdog timeout error message on the blue screen, you need to roll back the driver to the previous version. The driver error can happen because of unstable, corrupt, or incorrect driver software used during the update.
Press Windows key + X to open the quick link menu and click on Device Manager to open it. Alternatively, you can search for Device Manager in the Start menu’s search bar.
In the Device Manager, expand the section and right-click on the driver you want to roll back—select Properties from the context menu.
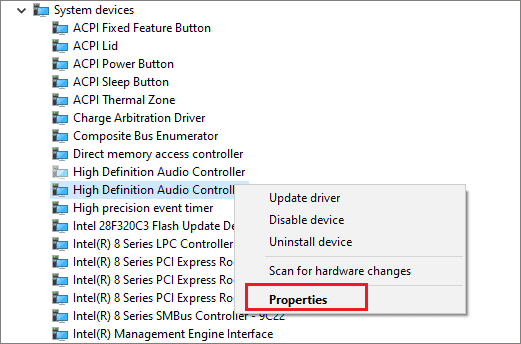
Go to the Driver tab in the Properties dialog box and click on the Roll Back Driver button. You can then follow the instructions on your screen to complete the rollback process.
If the Roll Back Driver button is greyed out, there is no option to roll back that particular driver.
6. Disable Antivirus To Fix clock_watchdog_timeout
If there is any third-party antivirus software on your PC, you can temporarily disable it to fix the clock watchdog timeout in Windows 10. Unfortunately, some third-party antivirus programs can cause the blue screen issue, primarily the antivirus tool from untrustworthy sources.
You can turn off Avast or other antivirus software from your computer just for some time and then check if you can get rid of the blue screen of death error. If the error is resolved after disabling the antivirus, you can start using Windows Security or trusted malware removal tools to protect your computer from security threats.
7. Uninstall Recently Installed Software/Applications
Some applications can cause stop code errors in Windows 10 because of compatibility issues. If you have recently installed any application and then started facing clock_watchdog_timeout in Windows 10, you can uninstall the app to fix the error.
If the BSOD error is fixed after removing the software, you can find the alternative for the app or speak to their executive about the issue.
8. Boot in Safe Mode
If you want to find out if default settings and apps are not causing a blue screen error code problem, you can boot your PC in safe mode. The safe mode starts with limited drivers, settings, and apps, thus giving you the idea of a troublemaker.
Click on the Windows logo on the taskbar and from there, click on Power Logo. Now, keep holding the Shift key and click on Restart.
When the PC restarts, go to Troubleshoot ➜ Advanced options ➜ Startup Settings and click on the Restart button.
Next, press F4 to enable safe mode on your computer.
Your PC will now restart in safe mode. If the PC does not show any error in safe mode, you can perform a clean boot by referring to the below section and find the third-party app causing a nuisance.
9. Perform a Clean Boot To Fix Clock Watchdog Timeout In Windows 10
If you are not sure which app is the troublemaker, you can perform a clean boot to find out. The entire process may take time, but you will be able to find the culprit easily.
Step 1: Type msconfig in the Start menu’s search bar and open System Configuration from the search results.
Alternatively, you can type msconfig in Run also to open System Configuration.
Step 2: Navigate to the Services tab and then check the checkbox next to ‘Hide all Microsoft services.’
Step 3: Click on the Disable all button to disable all non-Microsoft apps.

Step 4: Go to the Startup tab and click on the Open Task Manager link.
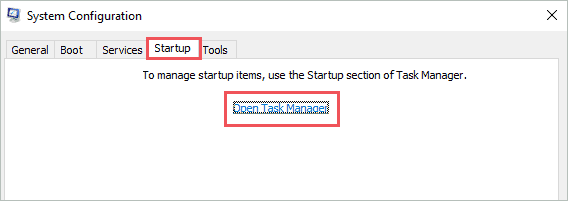
Step 5: Now, navigate to the Startup tab and go through all the startup apps. Click on the app you want to disable from startup and click on the Disable button.
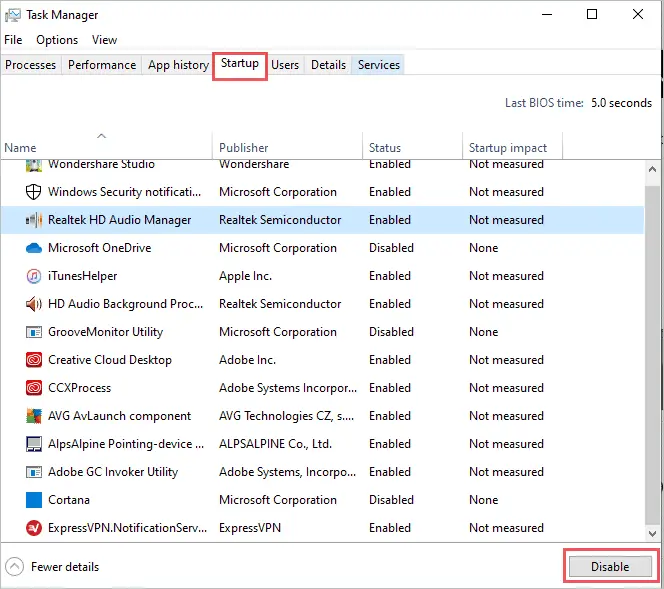
Step 6: Close the Task Manager and save changes in System Configuration.
Restart your PC and check if the blue screen error vanished or not. If the BSOD error is fixed after the restart, you will have to enable services and apps one by one until you find the culprit.
10. Scan your PC for Malware
The malware and virus are reasons for many stop code errors, including clock watchdog timeout in Windows 10. If you have any trusted third-party application, you can use that to scan and remove viruses from your computer.
If you have disabled the antivirus as per the above solution, you can use Windows Security to scan for viruses and malware.
Launch the Settings app on your PC and go to the Update & Security section. Next, go to Windows Security from the left panel and click on Virus & threat protection to open the Windows Security window.

Click on the Scan options link to see the options provided by Windows. Now, choose Full scan and click on the Scan now button.
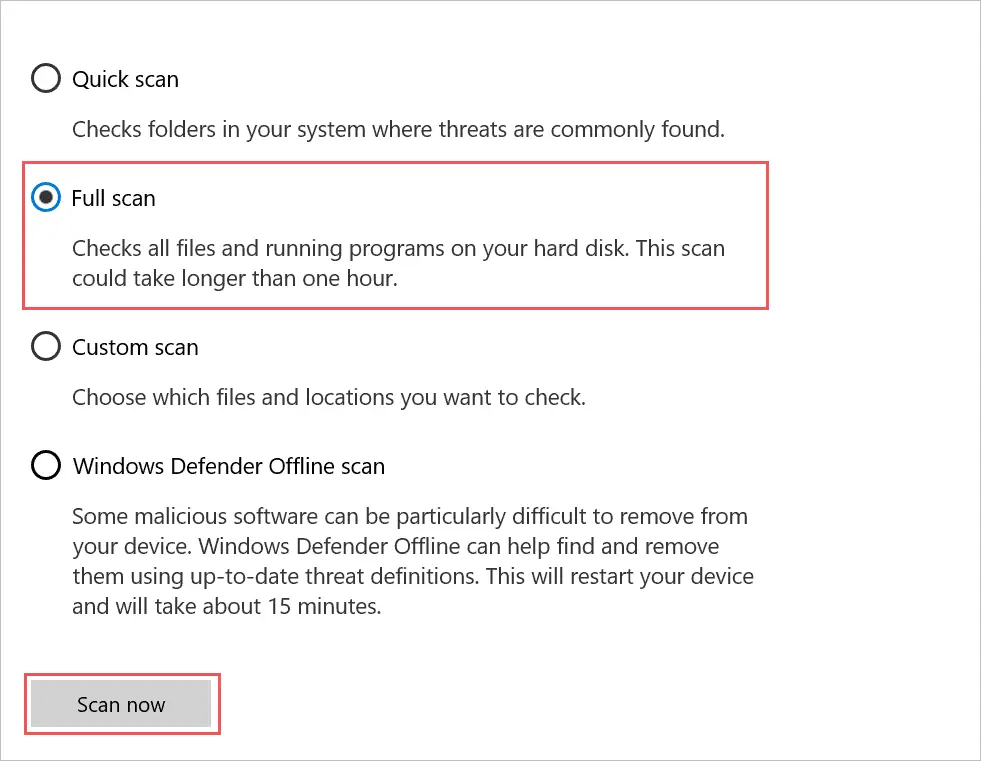
Let Windows scan and remove viruses from your computer. You can then reboot your PC and check if the Clock_Watchdog_Timeout error is still present or not. If you still suspect a virus or security threat on your computer, you can perform a Windows Defender offline scan once.
11. Execute SFC and chkdsk Commands
The corrupt system files can be one of the reasons to experience the watchdog clock timeout error in Windows 10. You can use the built-in System File Checker (SFC) utility to scan and fix corrupted system files.
You can execute the sfc /scannow command in elevated Command Prompt. The sfc command can also help you repair the registry errors.
Once the command is executed, you can check if the error is resolved or not. However, if the Windows stop code clock watchdog timeout is popping up on the blue screen, you can check the hard disk for issues.
You can use the chkdsk command to check the disk for bad sectors and fix it for you.
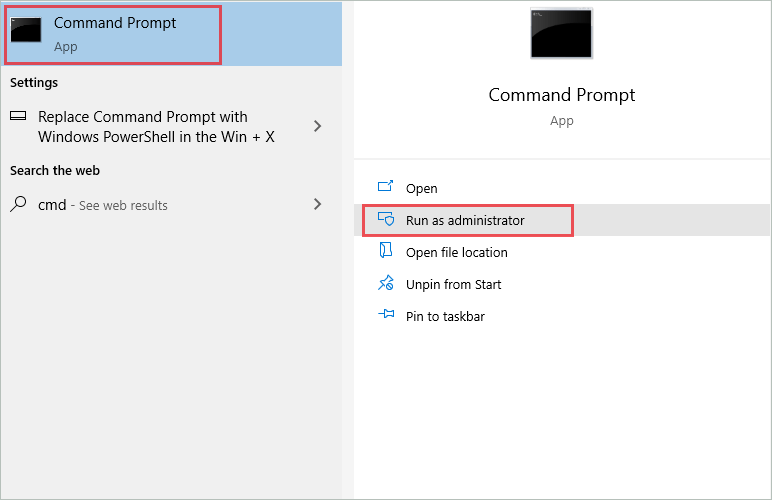
Press Windows key + S and type cmd there. Click on Run as administrator for Command Prompt to open it as administrator.
In the Command Prompt window, type-
chkdsk C: /f /x /r Press Enter to execute it.
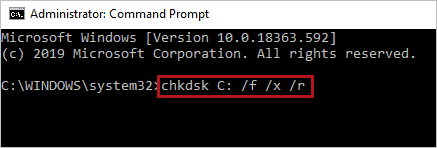
If your system drive letter is different from C, you can also make the change in the chkdsk command. Once the command is executed, reboot your computer and check if the stop code error is fixed or not.
12. Perform the Driver Update
The outdated and corrupt device drivers need to be updated with stable device driver software. You can update the device driver using Device Manager in Windows 10. If you are not sure how to update the driver manually, you can third-party driver updater like Driver Booster to update it for you.
Make sure you use the stable and correct latest driver to complete the update process of the device drivers. Also, download the update from trusted sources to avoid any malware or virus download.
13. Uninstall Recent Windows Update and Disable Auto Update
If you started experiencing clock watchdog timeout in Windows 10 after updating your Windows system, you could temporarily uninstall the problematic update. However, the buggy or incompatible update can cause issues with your PC. Follow the steps given below to uninstall the recent Windows Update.
Step 1: Open the Settings app and go to Update & Security.
Step 2: Navigate to the Windows Update from the left panel and then click on View update history.
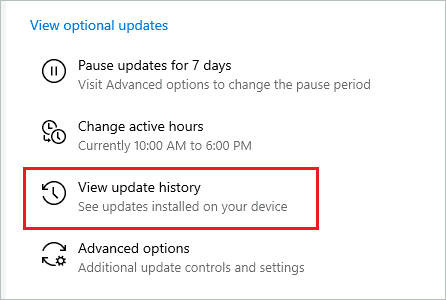
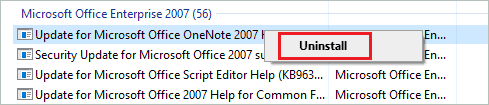
Step 3: On the next screen, click on Uninstall updates.
Step 4: Now, check the Installed On column to know the most recent update and then right-click on it. Select Uninstall to remove the update from your PC.
Once the update is uninstalled, you need to stop the update for a certain time; otherwise, it will be updated automatically.
To do so, go to Settings ➜ Update & Security ➜ Windows Update and click on Advanced options.
Scroll down to Pause updates and select a date to pause the update until that date.
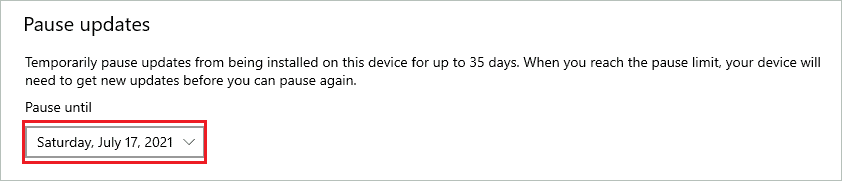
Now, reboot your computer and check if the clock watchdog timeout in Windows 10 issue is resolved or not.
14. Remove Overclocking To Fix Clock Watchdog Timeout In Windows 10
Overclocking is the process of increasing the speed of a processor by changing the clock rates. Many apps provide you ways and means to do it, but this can cause severe problems like BSOD on your system.
If you have recently overclocked your processor, make sure you undo it to fix the Clock_Watchdog_Timeout BSOD in Windows 10.
15. Reinstall Graphics Driver
This fix may sound weird, but reinstalling graphics drivers can help you eliminate annoying blue screen errors. You can reinstall the driver by following the detailed instructions given below.
Open Device Manager and expand the Display adapters section there.
Now, right-click on the graphics driver and select Uninstall device from the context menu.
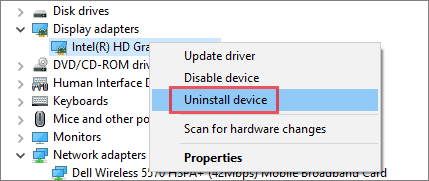
Confirm the uninstallation and then click on Action from the menu bar. Next, click on Scan for hardware changes.
The uninstalled graphics driver will be installed again.
Alternatively, you can restart your PC so that Windows can reinstall the driver for you. Once the display driver is reinstalled, you can check if the BSOD clock watchdog timeout error is fixed or not.
16. Manually Set the Speed of RAM
You can set the speed of your RAM manually to get rid of the clock watchdog timeout error. The process of changing the RAM speed depends on the manufacturer, so you need to read the manufacturer’s instructions to do it correctly. However, make sure that you don’t make incorrect settings; otherwise, your PC can suffer severe damage.
17. Reset BIOS
If you recently made any changes to BIOS and then started experiencing stop code clock watchdog timeout, you need to reset BIOS. You can refer to the manufacturer manual to reset BIOS, as the steps and instructions will differ from manufacturer to manufacturer.
When you reset the BIOS, the changes are set to default again, so all your new changes will be undone. After resetting BIOS, check if the blue screen error is fixed or not. If the error is fixed, the recent changes are not working well for your system, and you need to find another way to do those settings on your computer.
18. Disable Asus Turbo Feature in BIOS
Many users fixed the clock watchdog timeout in Windows 10 by turning off the Asus Turbo Feature. You can refer to the instruction manual to know how to do it. If you don’t have access to the instruction manual, refer to the manufacturer’s website with your laptop’s model number to find the instructions to disable the Asus Turbo feature in BIOS.
19. Disable C1-6, C1E, and Intel SpeedStep in BIOS
If you didn’t reset BIOS settings to default, you might have to disable specific settings to resolve clock watchdog timeout in Windows 10. The C1-6, C1E, and Intel SpeedStep need to be disabled from the BIOS of your computer.
Windows users were able to get rid of Clock_Watchdog_Timeout in Windows 10 by turning off above mentioned settings. But, again, you can refer to the manufacturer’s website or instruction manuals in case of confusion.
20. Update BIOS
If disabling specific settings and resetting BIOS didn’t help fix blue screen errors, you may have to update BIOS version. The outdated BIOS can be the reason for many troubles on your system, and therefore it is recommended to update it.
However, updating BIOS is a complicated task and needs to be done carefully. Any wrong changes during the BIOS update can lead to permanent damage to the computer.
21. Update SSD Firmware
The Solid State Drive (SSD) needs to be updated, as outdated firmware causes issues on your computer. If you have an SSD, make sure you download the latest firmware and update the SSD correctly. You can take the backup of your system using the system image and then proceed with the SSD update so that if anything goes wrong, you can revert the changes.
22. Perform System Restore
The final option to fix the clock watchdog timeout in Windows 10 is to perform the system restore. When you perform a system restore, the system is restored to the point that was created before making any severe changes.
The system restore will not delete your files and folders; it will only remove the installed apps after the restore point was created. All the settings changes post the restore point will also be lost, but you will get an error-free system after system restore.
Conclusion
The errors appearing on the computer can hamper our work and productivity, especially the blue screen errors. The clock watchdog timeout is one such blue screen error that can interrupt work. It is caused when the processor is not responsive to the interrupts. You may need to tweak system settings, BIOS, device drivers, and SSD to fix the clock watchdog timeout in Windows 10.
If the issue persists after tweaking all the settings, you may need to perform a system restore as well. The blue screen errors are unpredictable and can impact your system performance in many ways.
FAQs
What is a clock watchdog timeout?
Clock watchdog timeout is the blue screen or stop code error that occurs when the specified processor does not process the interrupt in the given time.
Can a PC be turned off with a blue screen error?
Yes, the PC can be turned off using the physical power button in case of a blue screen error.
What causes the clock watchdog timeout blue screen error?
Clock_Watchdog_Timeout is caused by incorrect BIOS settings, corrupted system files, unstable device driver software, overclocking, third-party application and antivirus software, and dust in the system.
What is watchdog used for?
Watchdog is a timer used in computers to help in recovering and detecting computer malfunctions.
Одна из самых сложных в определении причин и исправлении ошибок в Windows 10 — синий экран «На вашем ПК возникла проблема и его необходимо перезагрузить» и код ошибки CLOCK_WATCHDOG_TIMEOUT, который может появляться как в произвольные моменты, так и при выполнении определенных действий (запуск конкретной программы, подключение устройства и т.п.). Сама по себе ошибка говорит о том, что ожидаемое системой прерывание не было получено с одного из ядер процессора за ожидаемое время, что, как правило, мало говорит о том, что делать дальше.
В этой инструкции — о наиболее распространенных причинах ошибки и способах исправить синий экран CLOCK_WATCHDOG_TIMEOUT в Windows 10, если это возможно (в некоторых случаях проблема может быть аппаратной).
Синий экран смерти (BSoD) CLOCK_WATCHDOG_TIMEOUT и процессоры AMD Ryzen

Решил вынести информацию об ошибке применительно к владельцам компьютеров на Ryzen в отдельный раздел, поскольку для них, помимо причин, описанных далее есть и свои специфичные.
Итак, если у вас на борту установлен CPU Ryzen, и вы столкнулись с ошибкой CLOCK_WATCHDOG_TIMEOUT в Windows 10, рекомендую учесть следующие моменты.
- Не устанавливайте ранние сборки Windows 10 (версии 1511, 1607), поскольку в них возможны конфликты при работе на указанных процессорах, что приводит к ошибкам. В дальнейшем были устранены.
- Обновите БИОС вашей материнской платы с официального сайта её производителя.
По второму пункту: на ряде форумов сообщают, что, наоборот, ошибка проявляется после обновления БИОС, в данном случае срабатывает откат на предыдущую версию.
Проблемы с БИОС (UEFI) и разгон
Если в последнее время вы меняли параметры БИОС или выполняли разгон процессора, это может служить причиной ошибки CLOCK_WATCHDOG_TIMEOUT. Попробуйте следующие шаги:
- Отключить разгон процессора (если выполнялся).
- Сбросить БИОС на настройки по умолчанию, можно — оптимизированные настройки (Load Optimized Defaults), подробнее — Как сбросить настройки БИОС.
- Если проблема появилась после сборки компьютера или замены материнской платы, проверьте, есть ли на официальном сайте производителя обновление БИОС для неё: возможно, проблема была решена в обновлении.
Проблемы с периферийным оборудованием и работой драйверов
Следующая по распространенности причина — неправильная работа оборудования или драйверов. Если вы недавно подключили новое оборудование или же только что переустановили (обновили версию) Windows 10, обратите внимание на следующие методы:
- Установите оригинальные драйверы устройств с официального сайта производителя вашего ноутбука или материнской платы (если это ПК), особенно драйверы чипсета, USB, управления электропитанием, сетевых адаптеров. Не используйте драйвер-паки (программы для автоматической установки драйверов), также не воспринимайте серьезно «Драйвер не нуждается в обновлении» в диспетчере устройств — это сообщение не говорит о том, что новых драйверов действительно нет (их нет лишь в центре обновлений Windows). Для ноутбука также следует установить вспомогательное системное ПО, также с официального сайта (именно системное, различные прикладные программы, которые также могут там присутствовать не обязательны).
- В случае, если в диспетчере устройств Windows есть устройства с ошибками, попробуйте отключить их (правый клик мышью — отключить), если это новые устройства, то можно отключить их и физически) и перезагрузить компьютер (именно перезагрузка, а не завершение работы с последующим включением, в Windows 10 это может быть важно), а затем понаблюдать — проявляется ли проблема снова.
Еще один момент, касающийся оборудования — в некоторых случаях (речь о ПК, не ноутбуках) проблема может проявляться при наличии двух видеокарт на компьютере (интегрированного чипа и дискретной видеокарты). В БИОС на ПК обычно присутствует пункт для отключения интегрированного видео (как правило, в разделе Integrated Peripherals), попробуйте выполнить отключение.
Программное обеспечение и вредоносные программы
Помимо прочего, BSoD CLOCK_WATCHDOG_TIMEOUT может быть вызвана недавно установленными программами, особенно теми из них, которые работают с Windows 10 на низком уровне или добавляют свои системные службы:
- Антивирусы.
- Программы, добавляющие виртуальные устройства (можно посмотреть в диспетчере устройств), например, Daemon Tools.
- Утилиты для работы с параметрами БИОС из системы, например, ASUS AI Suite, программы для разгона.
- В некоторых случаях — софт для работы с виртуальными машинами, например, VMWare или VirtualBox. Применительно к ним, иногда ошибка возникает в результате неправильной работы виртуальной сети или при использовании специфичных систем в виртуальных машинах.
Также к такому ПО можно отнести вирусы и другие вредоносные программы, рекомендую выполнить проверку компьютера на их наличие. См. Лучшие средства удаления вредоносных программ.
Ошибка CLOCK_WATCHDOG_TIMEOUT как следствие аппаратных проблем
И, наконец, причиной рассматриваемой ошибки могут быть аппаратные и сопутствующие проблемы. Некоторые из них достаточно просто исправляются, к ним можно отнести:
- Перегрев, пыль в системном блоке. Следует почистить компьютер от пыли (даже при отсутствии признаков перегрева это не будет лишним), при перегреве процессора, возможно, также поменять термопасту. См. как узнать температуру процессора.
- Неправильная работа блока питания, напряжения отличные от требуемых (можно отследить в БИОС некоторых материнских плат).
- Ошибки оперативной памяти. См. Как проверить оперативную память компьютера или ноутбука.
- Проблемы с работой жесткого диска, см. Как проверить жесткий диск на ошибки.
Более серьезные проблемы этого характера — неисправности материнской платы или процессора.
Дополнительная информация
Если ничто из описанного пока не помогло, возможно, могут оказаться полезными следующие пункты:
- Если проблема возникла недавно, а система не переустанавливалась, попробуйте использовать точки восстановления Windows 10.
- Выполните проверку целостности системных файлов Windows 10.
- Часто проблема бывает вызвана работой сетевых адаптеров или их драйверов. Иногда не удается точно определить, что дело в них (обновление драйверов не помогает и т.п.), но, при отключении компьютера от Интернета, выключении Wi-Fi адаптера или вынимании кабеля из сетевой карты проблема исчезает. Это не обязательно говорит о проблемах именно сетевой карты (также могут быть виноваты системные компоненты, неправильно работающие с сетью), но может помочь в диагностике проблемы.
- Если ошибка проявляется при запуске какой-то конкретной программы, возможно, проблема вызвана именно её некорректной работой (возможно, конкретно в этой программной среде и на этом оборудовании).
Надеюсь, один из способов поможет решить проблему и в вашем случае ошибка не вызвана аппаратными проблемами. Для ноутбуков или моноблоков с оригинальной ОС от производителя вы также можете попробовать выполнить сброс на заводские настройки.