
(Image credit: Windows Central)
On Windows 10, ProcDump is a command-line tool specifically designed to create crash dump files manually. A «dump» is a special file that contains (all or parts) of the data loaded in memory at the time dump was triggered. Usually, you would use this file for analysis to determine the root of a problem with an app or the OS.
Although Windows 10 can create crash dumps files automatically when it encounters an error that it cannot handle, sometimes you may still need to generate these files manually. For example, if you are a developer and you are testing a new application. Or when an app is not responding or constantly crashing, and you need to send the details to the software vendor support to investigate the issue.
Whatever the reason might be, the Microsoft ProcDump tool is a nifty tool you can use in Command Prompt to create a crash dump file in many different ways, including generating a minidump file using the app or process name or process ID. You can also use the tool to create multiple dumps at different intervals automatically. Or you can specify other criteria, such as when the process reaches a specific processor usage, the app is unresponsive, and more.
In this Windows 10 guide, we will walk you through the steps to use the Microsoft ProcDump tool to generate dump files manually on your device.
- How to install ProcDump on Windows 10
- How to use ProcDump on Windows 10
How to install ProcDump on Windows 10
To install the ProcDump command-line tool on Windows 10, use these steps:
- Open ProcDump official page.
- Click the Download ProcDump link.
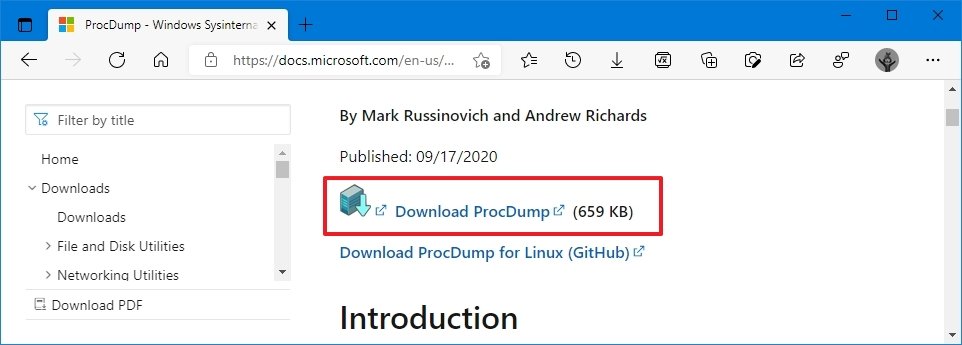
- Save the file on the device.
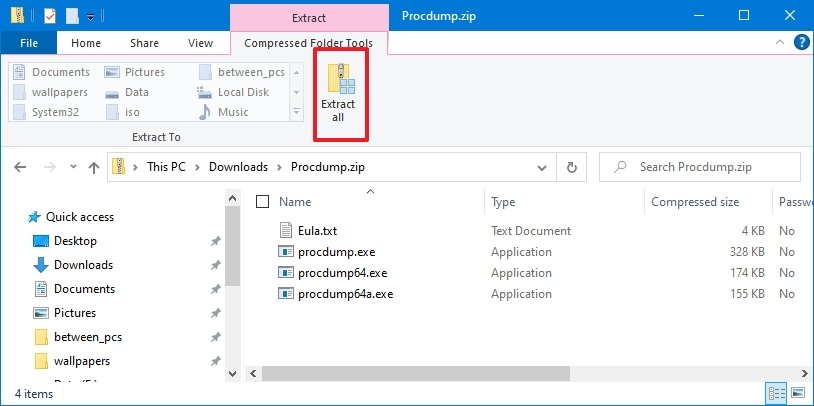
- Open the zip folder.
- Click the Extract all option from the «Compressed Folder Tools» tab.
- Confirm a path to extract the files.
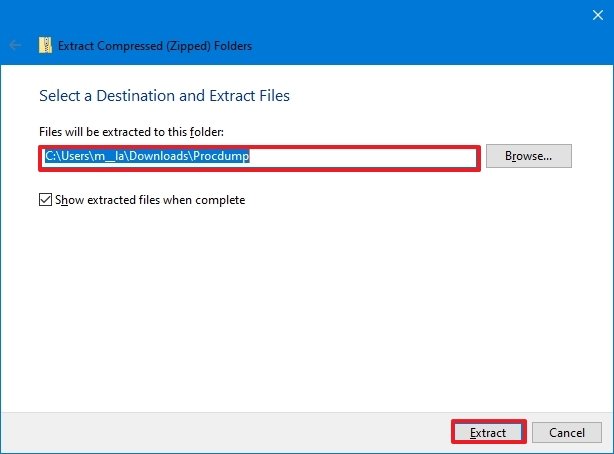
- Check the Show extracted files when complete option.
- Click the Extract button.
Once you complete the steps, you can use ProcDump with Command Prompt to create dumps files on Windows 10.
How to use ProcDump on Windows 10
The ProcDump tool includes many options to record and create dump files. In the steps below, we will show you a bunch of examples to create a dump file for a specific application and different scenarios, including when a process is unresponsive, crashes, uses a significant amount of processor resources, and more.
All the latest news, reviews, and guides for Windows and Xbox diehards.
To get started with the ProcDump tool, use these steps:
- Open Start.
- Search for Command Prompt, right-click the top result, and select the Run as administrator option.
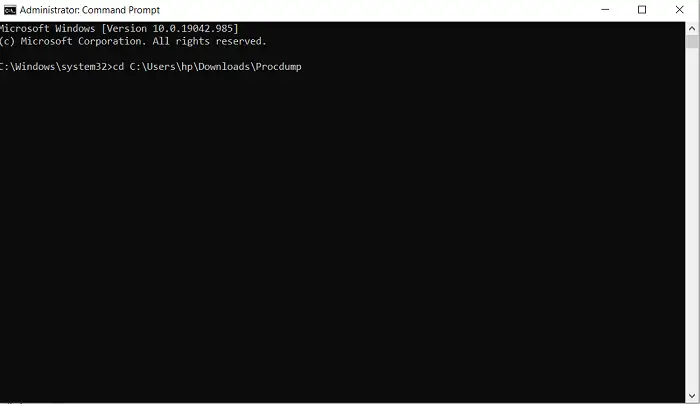
- Type the following command to navigate to the folder containing the ProcDump tool and press Enter:
cd C:\PATH\TO\PROCDUMPIn the command, make sure to update the path with the folder’s location with the ProcDump tool.For example, this command opens the tool location inside the «Downloads» folder:cd C:\Users\username\Documents\Procdump - Type the following command to create a minidump file of a running app and press Enter:
procdump APP-NAMEIn the command, replace APP-NAME for the executable name of the app.This example creates a dump file for the File Explorer app:procdump explorer

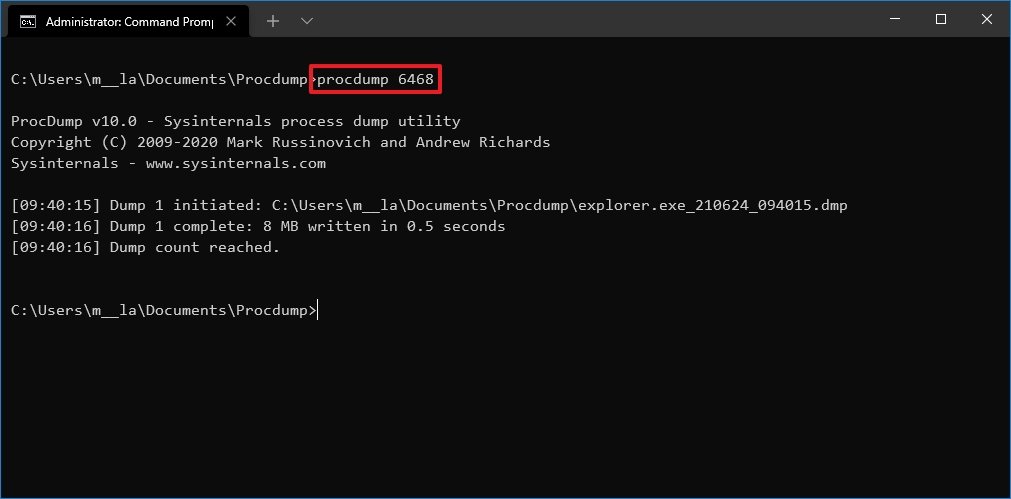
- Type the following command to create a dump file using the process ID of the app and press Enter:
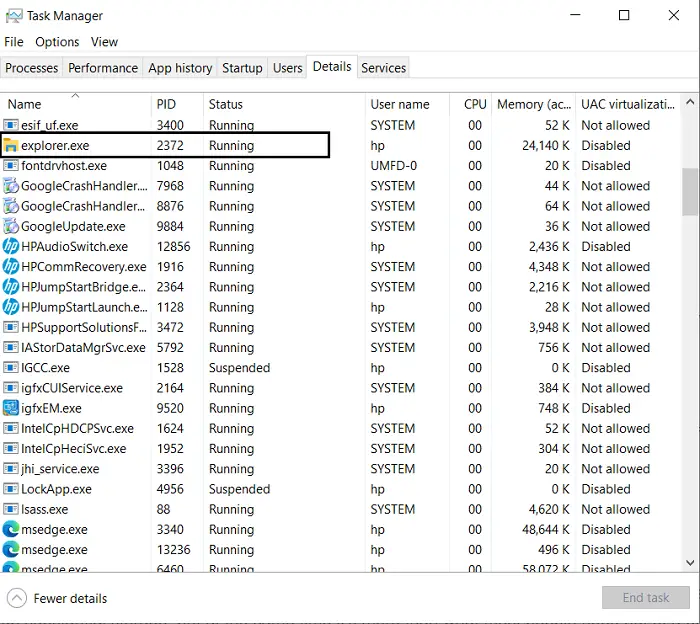
procdump PROCESS-IDIn the command, replace PROCESS-ID with the actual ID of the process or application.This example creates a dump file for File Explorer with the process ID of 6468:procdump 6468Quick tip: You can always confirm the process ID (PID) of an app in the Details tab of Task Manager or using thetasklistcommand.
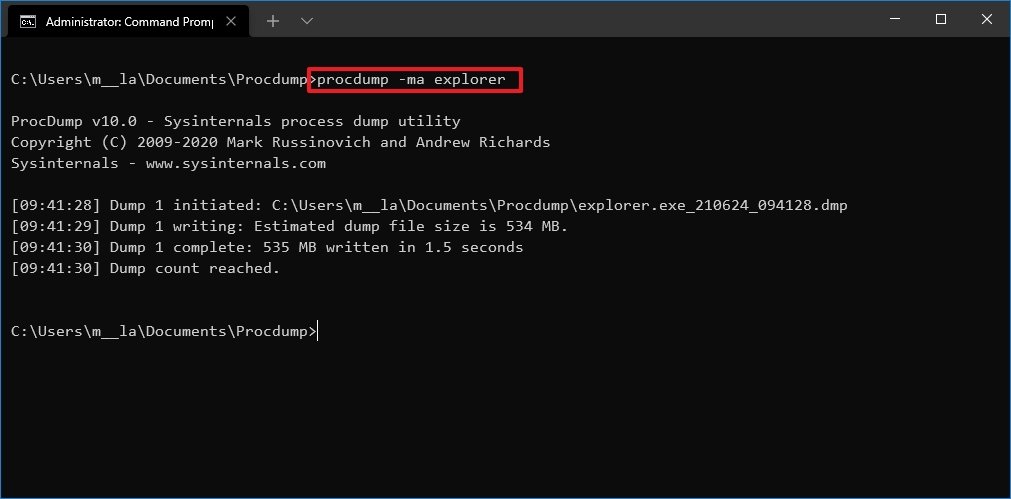
- Type the following command to create a full dump file for an application and press Enter:
procdump -ma APP-OR-PIDIn the command, replace APP-OR-PID for the name or process ID of the app.This example creates a full dump file for File Explorer:procdump -ma explorerQuick note: A full dump file contains everything available in memory related to the application. In contrast, a minidump file is only several megabytes in size, and it includes basic information about the application.
- Confirm the location of the .dmp file.
After you complete the steps, the dump file will be generated in the ProcDump folder.
Create multiple minidumps manually
To use ProcDump to create multiple minidump files on Windows 10, use these steps:
- Open Start.
- Search for Command Prompt, right-click the top result, and select the Run as administrator option.
- Type the following command to navigate to the folder containing the ProcDump tool and press Enter:
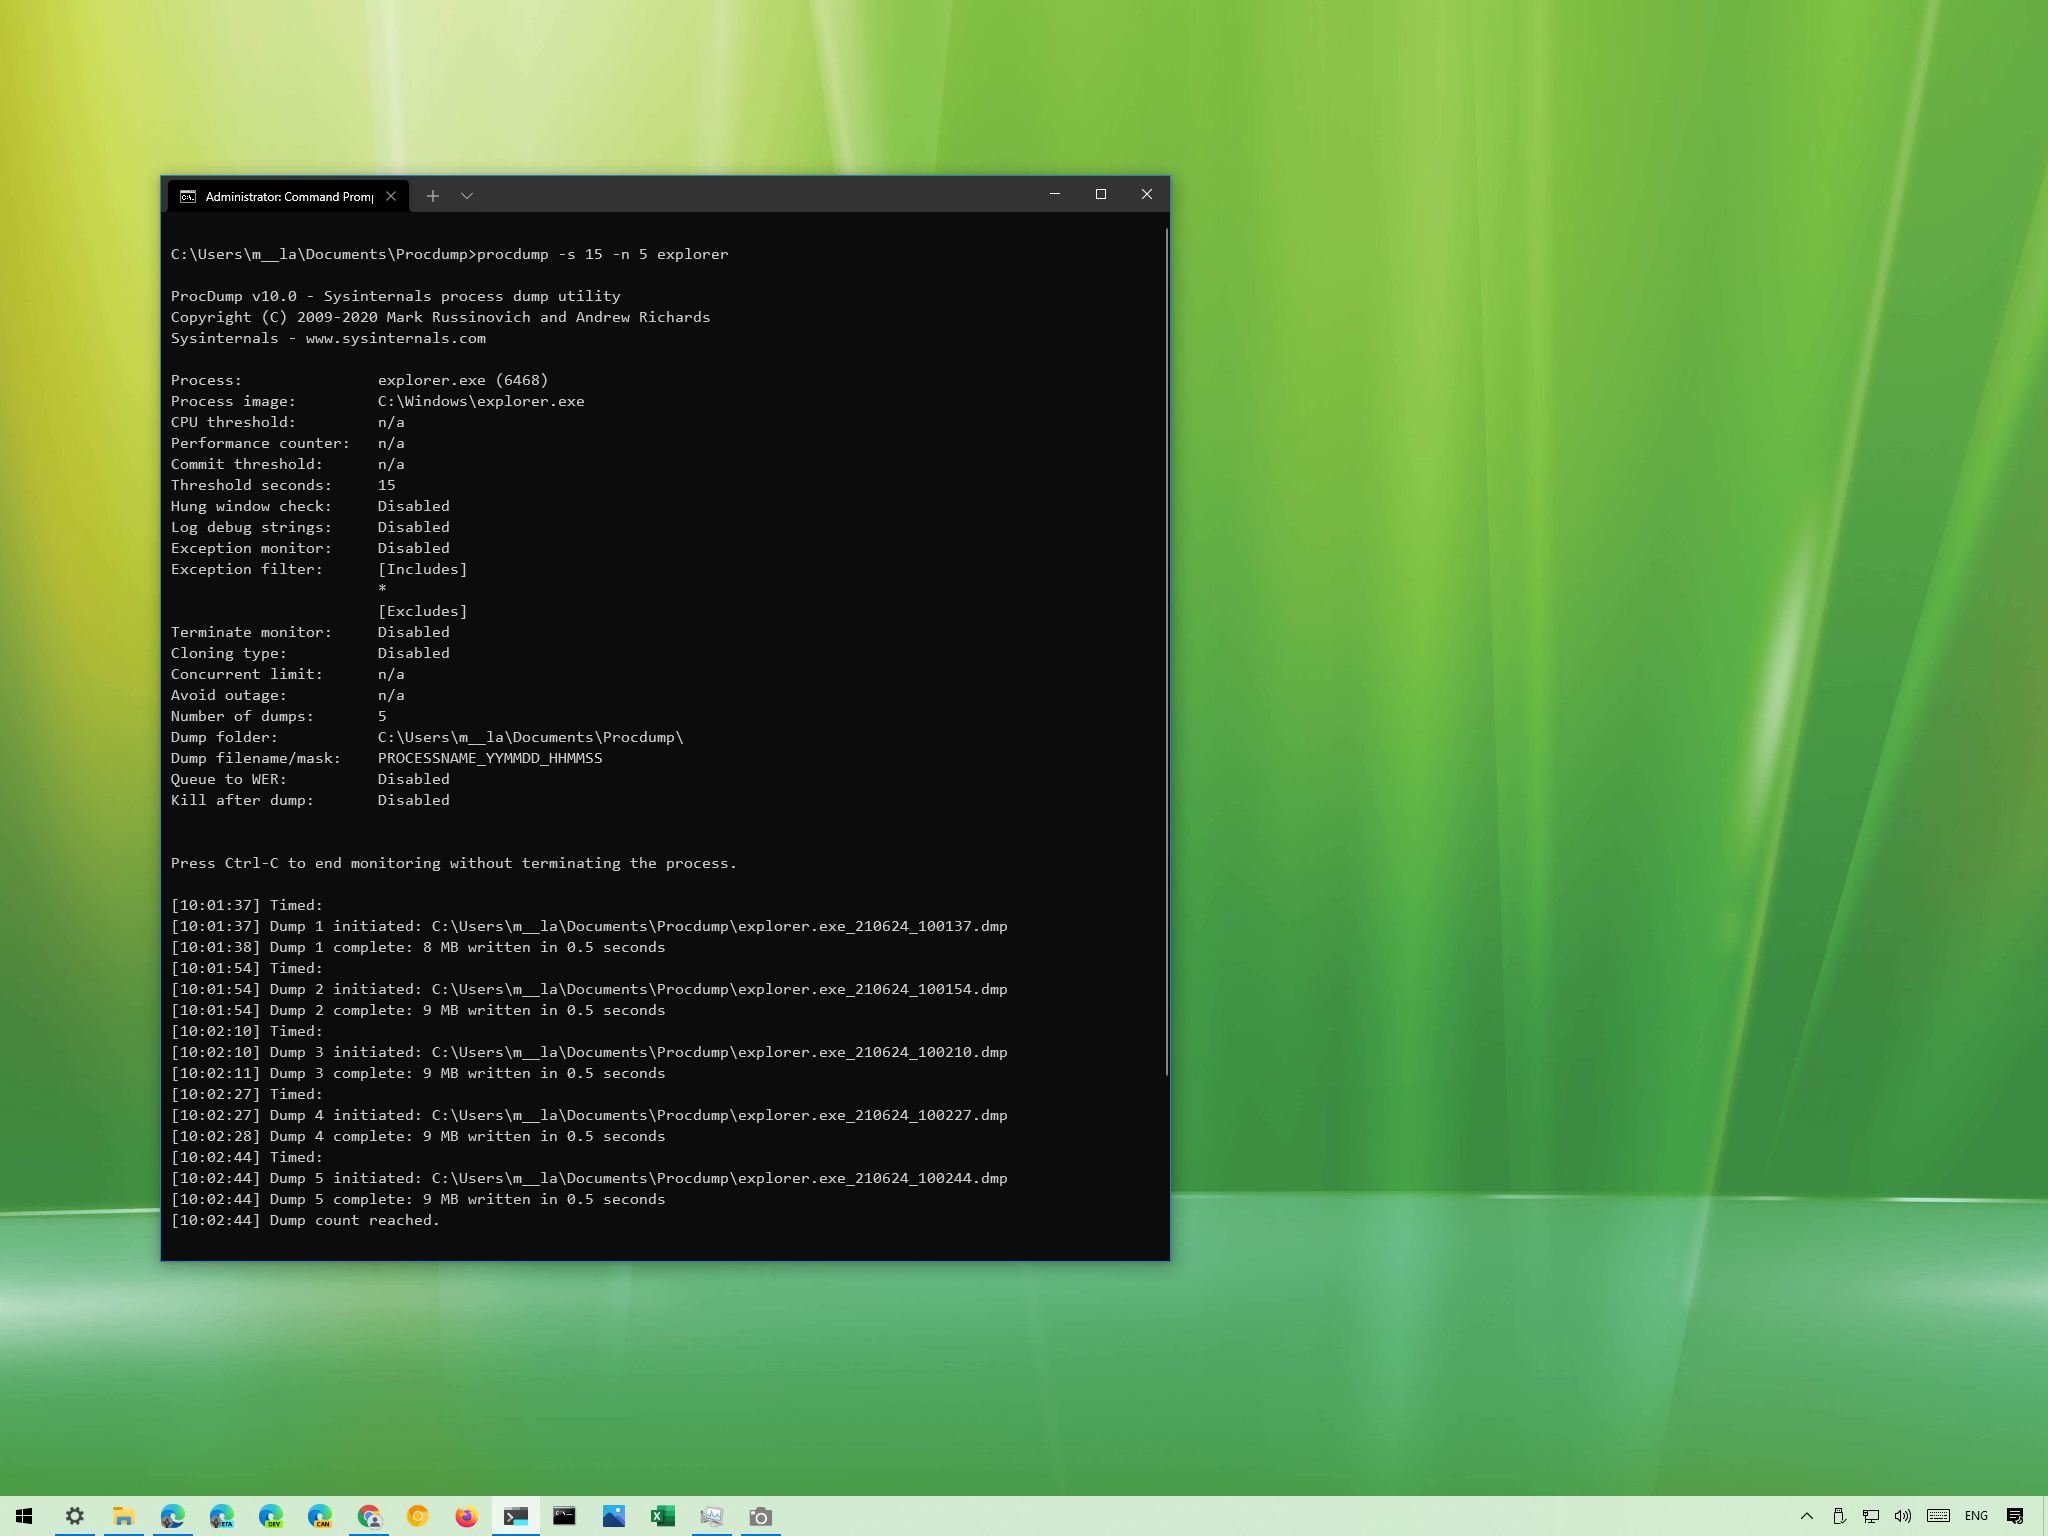
cd C:\Users\username\Documents\Procdump - Type the following command to write five minidumps 15 seconds apart from one another and press Enter:
procdump -s 15 -n 5 PROCESS-NAMEIn the command, replace the PROCESS-NAME for the name of the process you want to write a dump. Also, remember to update the 15 for the number of seconds to wait before generating a new file and 5 for the number of dump files you want to create.This example writes five dump files for the Windows Explorer process:procdump -s 15 -n 5 explorer
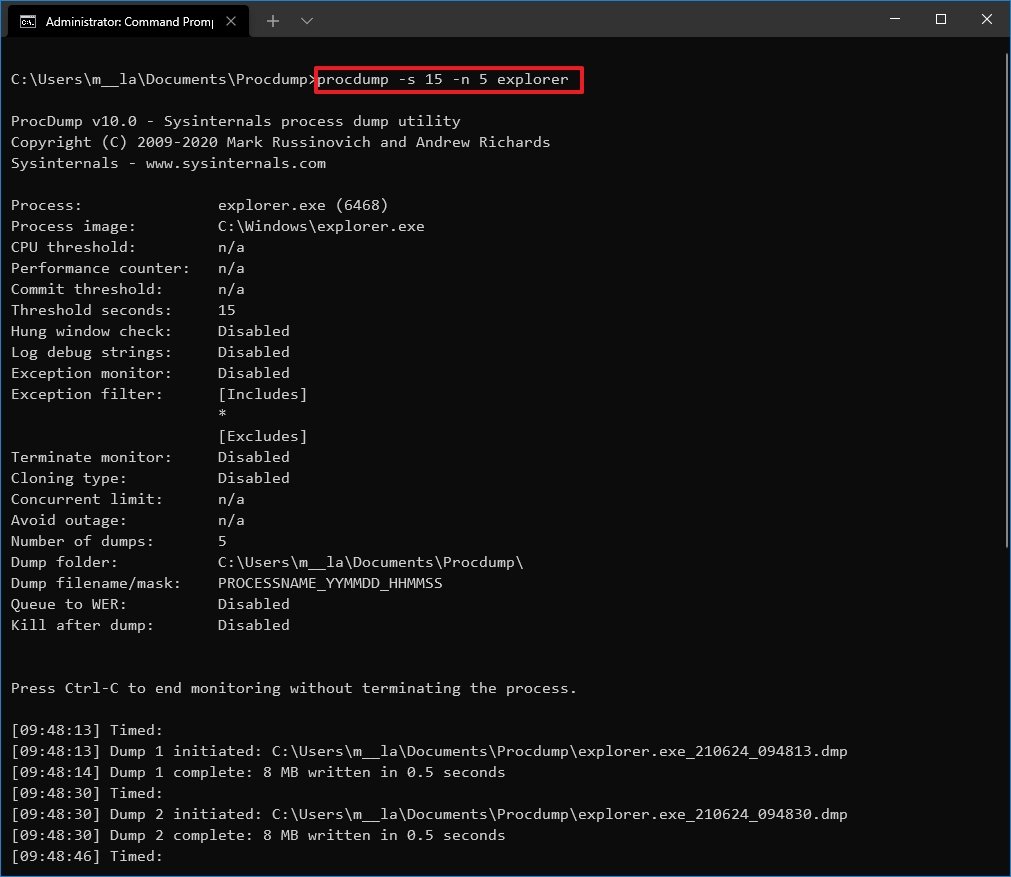
Once you complete the steps, the tool will create (in this case) five dump files 15 seconds apart from one another.
Create minidumps based on processor usage
To write a dump file after the app system usage reaches a specific threshold, use these steps:
- Open Start.
- Search for Command Prompt, right-click the top result, and select the Run as administrator option.
- Type the following command to navigate to the folder containing the ProcDump tool and press Enter:
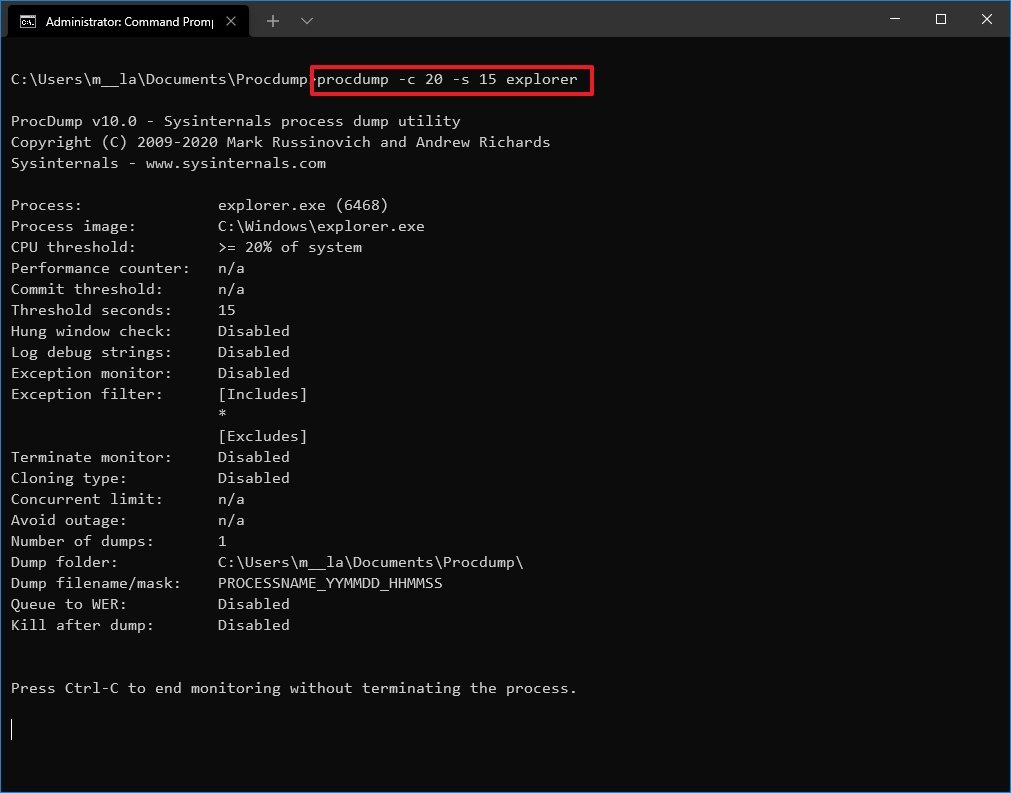
cd C:\Users\username\Documents\Procdump - Type the following command to write a minidump file when the process exceeds the 20% processor usage for 15 seconds and press Enter:
procdump -c 20 -s 15 PROCESS-NAMEIn the command, replace the PROCESS-NAME for the name of the process you want to write a dump. Also, remember to replace 20 and 15 for processor usage and a wait time in seconds.This example writes a dump file of the explorer.exe process that uses over 20% of processor resources for 15 seconds:procdump -c 20 -s 15 explorer
- (Optional) Type the following command to write an error dump file when a specific app pushes processor usage above 20% for 10 seconds and press Enter:
procdump PROCESS-NAME -p "\Processor(_Total)\% Processor Time" 20This example writes a dump file of the explorer.exe process that uses over 20% of processor resources for 10 seconds:procdump explorer -p "\Processor(_Total)\% Processor Time" 20
After you complete the steps, the command will monitor the application, and when it exceeds the processor usage for the time you specified, then a dump file will be generated.
Create minidumps for unresponsive process
To create a minidump as soon as a process is unresponsive, use these steps:
- Open Start.
- Search for Command Prompt, right-click the top result, and select the Run as administrator option.
- Type the following command to navigate to the folder containing the ProcDump tool and press Enter:
cd C:\Users\username\Documents\Procdump - Type the following command to write a minidump file when a process becomes unresponsive for more than five seconds and press Enter:
procdump -h PROCESS-NAME DUMP-NAME.dmpIn the command, replace the PROCESS-NAME for the name of the process you want to monitor and DUMP-NAME for the file’s name.This example writes a dump when the Windows Explorer process becomes unresponsive for five seconds:procdump -h explorer explorer-unresponsive-data.dmp

Once you complete the steps, a dump file will be written to the ProcDump folder when the application becomes unresponsive.
Create minidump during launch of a process
To launch an app, keep monitoring it, and write a dump file when an exception occurs, use these steps:
- Open Start.
- Search for Command Prompt, right-click the top result, and select the Run as administrator option.
- Type the following command to navigate to the folder containing the ProcDump tool and press Enter:
cd C:\Users\username\Documents\Procdump - Type the following command to start an app and create a dump file when it crashes, and press Enter:
procdump -e 1 -f "" -x C:\PATH\TO\STORE\DUMP "C:\PATH\TO\APP.EXE"In the command, replace C:\PATH\TO\STORE\DUMP for the folder location to store the dump. Also, change C:\PATH\TO\APP.EXE for the path of the app you want to monitor and create a dump.This example creates a dump file of Google Chrome when it crashes and stores the «dump» file inside the dumps folder:procdump -e 1 -f "" -x C:\dumps "C:\Program Files\Google\Chrome\Application\chrome.exe
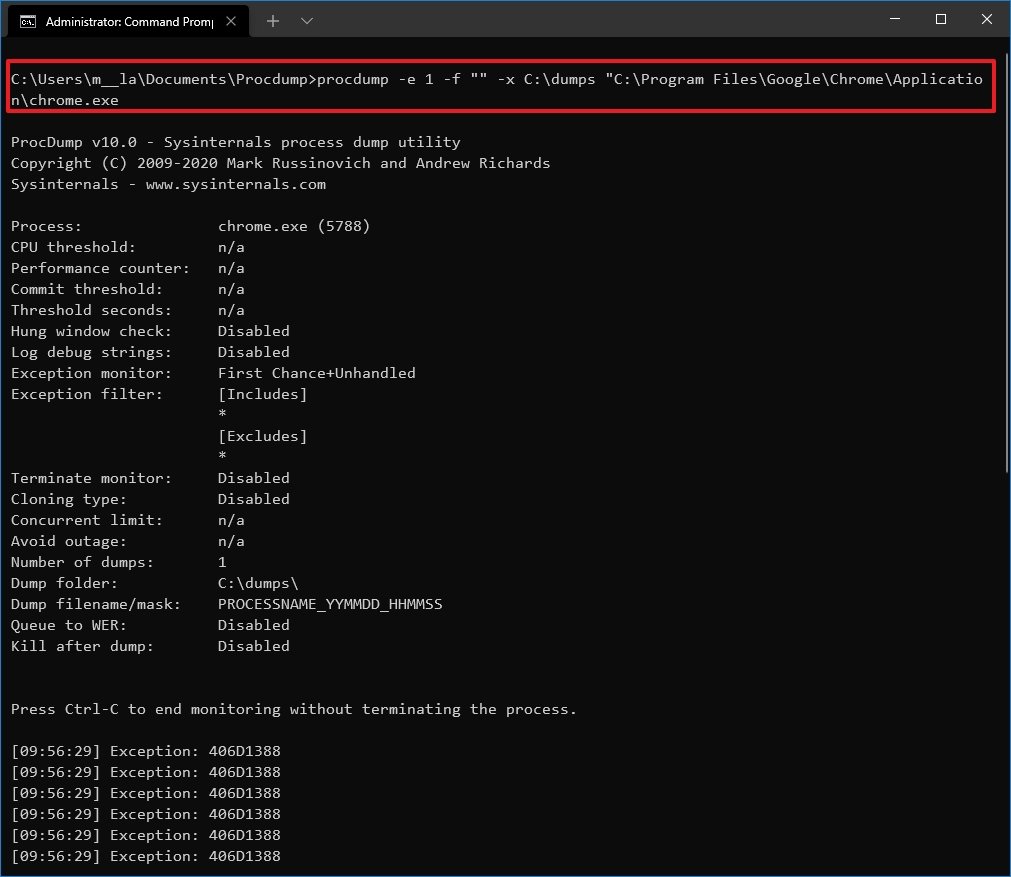
After you complete the steps, the tool will launch and monitor the app, and when it crashes, it will create a dump file in the folder location you specified.
Activate Postmortem Debugger to create full dump automatically
You can also register the tool as a Postmortem Debugger to allow ProcDump to monitor and automatically write a full dump when one or more processes crash. Here’s how:
- Open Start.
- Search for Command Prompt, right-click the top result, and select the Run as administrator option.
- Type the following command to navigate to the folder containing the ProcDump tool and press Enter:
cd C:\Users\username\Documents\Procdump - Type the following command to monitor and create a full dump file when one or more processes crash and press Enter:
procdump -ma -i C:\PATH\TO\STORE\DUMPIn the command, replace C:\PATH\TO\STORE\DUMP for the location to store the dump file.This examples stores the full dump file in the «dumps» folder:procdump -ma -i C:\dumps
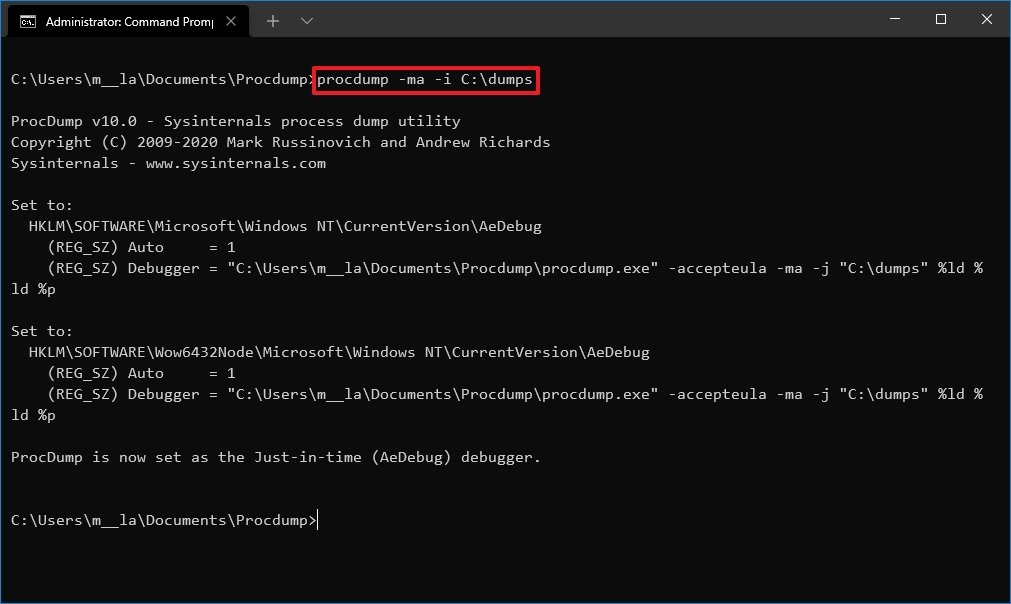
Once you complete the steps, the ProcDump tool will monitor the system, and it will create dump files whenever an application crashes.
We are focusing only on some basic examples. You can always run the
procdump -ecommand to review all the available options.
More Windows 10 resources
For more helpful articles, coverage, and answers to common questions about Windows 10, visit the following resources:
- Windows 10 on Windows Central — All you need to know
- Windows 10 help, tips, and tricks
- Windows 10 forums on Windows Central
Mauro Huculak has been a Windows How-To Expert contributor for WindowsCentral.com for nearly a decade and has over 15 years of experience writing comprehensive guides. He also has an IT background and has achieved different professional certifications from Microsoft, Cisco, VMware, and CompTIA. He has been recognized as a Microsoft MVP for many years.
ProcDump software is a powerful tool for troubleshooting performance and stability issues on Windows systems. It is a reliable and easy to use command line utility for generating crash dumps of processes and applications running on Windows systems.
ProcDump allows users to capture application crash dumps for later analysis.
Features:
• Create a dump file: ProcDump allows users to quickly and easily create a dump file of any process or application running on a Windows system. This allows users to analyze the memory state of the process, which can be very useful when troubleshooting performance and stability issues.
• Monitor a process: ProcDump can monitor a process and automatically create a dump file if certain conditions are met, such as if the process exceeds a certain amount of CPU usage or runs for a certain amount of time. This can be a very useful feature for detecting and troubleshooting problems.
• Trigger based on performance counters: ProcDump can also be set to trigger a dump file when a certain performance counter exceeds a certain threshold. This can be very useful for detecting and troubleshooting performance issues.
• Customizable dump file settings: ProcDump allows users to customize the settings of the dump file, such as the type and size of the dump file, and whether to include the entire process or only the memory of the process.
• Automate dump file creation: ProcDump can be used in conjunction with other tools to automate the creation of dump files. This can be very useful for automated testing or for creating a baseline for performance and stability monitoring.
• Support for multiple versions: ProcDump supports multiple versions of Windows, including Windows XP, Vista, 7, 8, and 10. This ensures that ProcDump can be used on any Windows system, regardless of the version.
• Support for multiple architectures: ProcDump also supports multiple architectures, including x86, x64, and IA64. This ensures that ProcDump can be used on any platform, regardless of the architecture.
• Integrated debugging tools: ProcDump includes several integrated debugging tools, such as the Windows Debugger and Windbg, which can be used to analyze the memory state of the process when the dump file is created.
• Support for remote systems: ProcDump can be used to create dump files of processes and applications running on remote systems. This can be very useful for troubleshooting performance and stability issues on distributed systems.
• Support for multiple languages: ProcDump supports multiple languages, including English, French, German, Spanish, Italian, and Japanese. This ensures that ProcDump can be used by anyone, regardless of their language.
The minimum technical requirements for using ProcDump are:
• Operating System: Windows XP SP2 or later
• CPU: Intel Pentium IV or higher
• RAM: 256 MB
• Hard Drive: 50 MB of free space
• Network: Internet connection for downloading the software and for obtaining support.
Экономьте время с помощью нового инструмента из пакета Sysinternals для сбора данных о процессах, занимающих ресурсы центрального процессора
Одна из самых распространенных проблем, с которой потребители обращаются в группу поддержки Microsoft, — слишком высокие показатели использования центрального процессора. Часто найти решение бывает трудно, так как необходимо сначала определить, какой процесс или операция потребляет много ресурсов центрального процессора, а затем выбрать оптимальный метод сбора данных о действиях процесса в период проявления проблемы, чтобы исследовать основную причину. На этот случай компания Microsoft предоставляет целый ряд инструментов, которые помогут решить проблему центрального процессора. В данной статье приведен краткий обзор этих средств и описана новая бесплатная утилита под названием ProcDump, с помощью которой можно сэкономить много времени, когда в следующий раз придется искать причины перегрузки центрального процессора.
Инструменты диагностики
До сих пор для диагностики проблем высокого показателя использования центрального процессора в компьютерах Windows применялись в основном следующие инструменты.
Adplus.vbs. Инструмент на VBscript, поставляется в составе пакета Debugging Tools for Windows (www.microsoft.com/whdc/devtools/debugging/default.mspx). Это отличное средство для сбора данных о процессе в периоды высокой нагрузки на процессор. Один из недостатков Adplus заключается в том, администратор обычно вынужден находиться у консоли и физически вводить команду Adplus для формирования дампа процесса, когда показатель использования центрального процессора резко возрастает.
Xperf. Это отличный инструмент для сбора данных об активности процесса во время резкого роста коэффициента использования центрального процессора. Администратору не обязательно находиться у консоли для мониторинга нагрузок центрального процессора. Xperf можно загрузить по адресу msdn.microsoft.com/en-us/performance/default.aspx. Утилита Xperf не полностью совместима с Windows Server 2003, но наш опыт сбора данных об операциях со стеком в Windows 2003 (важные сведения для анализа проблем высоких показателей использования центрального процессора) был очень успешным. Нужно лишь загрузить программное исправление по адресу support.microsoft.com/kb/938486 или установить ядро с более новой версией.
При использовании XPERF необходимо учитывать, что инструмент собирает данные обо всех процессах и активности в системе и лишь впоследствии позволяет сузить зону поиска. Поэтому нельзя сформулировать условие: «Пройти стек для XYZ.EXE», приходится собирать данные обо всей системе. Сбор и запись всех данных об активности в поисках проблемы, которая возникает лишь один раз в сутки, могут оказаться нецелесообразными, в зависимости от типичной рабочей нагрузки контролируемых компьютеров. Дополнительные сведения об Xperf приведены в статье «Изучаем Xperf», опубликованной в предыдущем номере журнала.
Process Explorer (procexp.exe). Настоятельно рекомендуется использовать программу Process Explorer, которую можно загрузить по адресу technet.microsoft.com/en-us/sysinternals/bb896653.aspx, чтобы, по крайней мере, взглянуть на поток, дающий всплеск нагрузки на центральный процессор, и определить участвующие компоненты. Их можно обновить, прежде чем обращаться в службу технической поддержки. Но для углубленного изучения проблемы требуется инструмент, который формирует дамп процесса во время пика использования центрального процессора; Process Explorer для этого непригоден (дополнительные сведения об Adplus и Process Explorer можно найти в статье «Когда процессы выходят из-под контроля» по адресу http://www.osp.ru/win2000/2009/01/5889733/). Но такие возможности есть у ProcDump.
Введение в ProcDump
ProcDump (procdump.exe) — новый инструмент Windows Sysinternals, созданный Марком Русиновичем, который можно загрузить по адресу technet.microsoft.com/en-us/sysinternals/dd996900.aspx. Программа Procdump.exe была разработана после того, как один из инженеров моей группы попросил Марка дополнить функциональность Process Explorer, чтобы записать файл дампа процесса для анализа проблем высокого показателя использования центрального процессора. После некоторых раздумий было решено, что лучший вариант — подготовить новую программу, и появился ProcDump.
С помощью ProcDump можно указать, сколько ресурсов центрального процессора должен занимать процесс и какое время должно пройти, прежде чем ProcDump создаст дамп процесса. Значит, администратору не обязательно присутствовать у консоли, чтобы выдать команду, когда процесс в очередной раз повысит нагрузку на центральный процессор. Необходимо определить порог потребления ресурсов центрального процессора, прежде чем ProcDump сформирует дамп процесса.
Например, замечено, что wmiprvse.exe (процесс WMI Provider Host) в произвольные моменты времени занимает до 90% ресурсов центрального процессора, и нужно получить несколько дампов для анализа. Следующая команда записывает дамп процесса диспетчера очереди печати три раза, когда потребление ресурсов центрального процессора программой wmiprvse.exe достигает или превышает 90% в течение трех секунд, и сохраняет дамп в заранее подготовленном каталоге c:procdumps:
c:procdump.exe -c 80-s 3-n
3 wmiprvse.exe c:procdumps
Параметр -c задает порог нагрузки центрального процессора. Параметр -s указывает, в течение какого времени служба должна занимать ресурсы центрального процессора на пороговом уровне, прежде чем начнется формирование дампа. Параметр -n указывает, сколько дампов нужно создать, а wmiprvse.exe — имя процесса, который предстоит отслеживать.
Поэтому в предшествующей команде дамп для службы WMI Provider Host будет записываться каждый раз, когда процесс занимает более 80% ресурсов центрального процессора в течение трех и более секунд. Файлы дампов будут храниться в каталоге c:procdumps. Имя файлам дампов назначается в формате ИМЯПРОЦЕССА_ДАТА_ВРЕМЯ.dmp; благодаря временной метке легко идентифицировать файлы, записанные в течение нескольких дней. Другая особенность ProcDump заключается в том, что поток, занимающий больше всего ресурсов центрального процессора, записывается в файл дампа, поэтому, открывая дамп, пользователь видит сообщение о потоке, занимающем центральный процессор, как показано на экране 1.

Больше не приходится гадать, какой поток выполняет работу. В окне экрана 1 можно ввести в отладчике команду ~ (тильда), чтобы выяснить, какой номер потока соответствует числу 0 x1194. На экране 2 показана командная строка и ее результат. Как видно, поток 2 (с числом 1194 в строке) является потоком, соответствующим 0x1194.
Я привел этот пример, чтобы продемонстрировать инструмент, но теперь можно переключить внимание на поток 2, чтобы выяснить, что происходило в то время, когда были заняты ресурсы центрального процессора. В командном окне выполните следующую команду, чтобы изменить контекст потока 2:
0:000> ~2 s
Результат команды на экране 3 показывает, что процесс wmiprvse.exe во время проведения теста перебирал различные каталоги (EnumDirsNT). Это вполне объяснимо, так как выданный мною запрос WMI требует перечисления всех каталогов в системе.
ProcDump также создаст процесс, если зависает любое из окон процесса (параметр -h); как всегда при использовании ProcDump, для запуска задачи не обязательно находиться у консоли.
Запуск процесса в отладчике
Особенно полезный параметр ProcDump (-x) обеспечивает запуск процесса непосредственно в отладчике. Параметр -x взаимодействует с разделом реестра Image File Execution Options. На экране 4 приведен пример команды, в которой параметр -x указан с процессом lsass.exe, и формируются три дампа lsass.exe, когда процесс занимает 90% ресурсов центрального процессора.
При следующем запуске lsass.exe утилита ProcDump отслеживает процесс с заданными параметрами. Это чрезвычайно удобный подход, так как существуют процессы, которые могут захватить ресурсы центрального процессора немедленно после запуска и приостановить систему до тех пор, пока центральный процессор не разгрузится, но к тому времени записывать в дамп будет нечего, так как перегрузка центрального процессора произошла. Благодаря параметру -x можно собрать данные об этих перегрузках.
Таким образом, ProcDump может быть оптимальным инструментом для диагностики большинства проблем высокой загрузки центрального процессора. Утилита ProcDump спроектирована в результате инициативы сотрудников группы Global Escalation Services компании Microsoft. Особая благодарность — старшему инженеру Мин Ченю, который первым обратился к Марку; ведущему инженеру Джеффу Дейли — за руководство и ценные указания; и, конечно, огромная благодарность Марку Русиновичу, ведущему техническому специалисту Microsoft, за то, что он прислушивается к нашим пожеланиям и быстро вносит изменения.
Майкл Моралес (morales@microsoft.com) — старший инженер службы поддержки Microsoft Global Escalation Services. Специализируется на проблемах отладки и производительности Windows
PostedNovember 20, 2020
UpdatedJune 29, 2022
0 out of 5 stars
| 5 Stars | 0% | |
| 4 Stars | 0% | |
| 3 Stars | 0% | |
| 2 Stars | 0% | |
| 1 Stars | 0% |
Microsoft Windows
- Download the ProcDump tool for Windows and save it to the root of the C: drive on the system in question.
- Run the commands from the command prompt.
The following syntax can be used while running the tool depending on what data is required in the process dump file:
procdump [-64] [-c CPU usage [-u] [-s seconds] [-n exceeds]] [-h] [-e] [-ma] [-r] [-o] [ [dump file]] | [-x][arguments]
Common Switches:
- -ma — Creates a dump of all process memory. This switch should always be used for support cases in order to ensure as much information as possible is collected.
- -e — Creates a dump when the target process encounters an unhandled exception. This is useful for most crashes.
- -t — Generates a dump when the process ends, even if no errors were encountered.
- -w — Instructs ProcDump to wait for a process with the specified name to launch. This is used when you want to start ProcDump before the process.
- -i — Install ProcDump as the post mortem debugger for Windows Processes. This will allow ProcDump to automatically be invoked on application errors.
- -u — When run with no other arguments, will uninstall ProcDump as the post mortem debugger.
- -c — Specify a CPU threshold at which to generated a dump. This is typically used when troubleshooting high CPU usage issues.
- -m — Specify a memory usage threshold (in MB) at which to generate a dump. This is typically used when troubleshooting high memory usage issues or memory leaks.
- -s — Write a dump after specified number of seconds. This is useful in conjunction with -c and -m.
- -n — Write n number of dumps.
- -x [arguments] — Have ProcDump execute the executable and writing the dump file to the specified arguments.
- -64 — Forces the creation of 64-bit dump. This switch should generally not be used on 32-bit processes.
Linux
- Download and install the ProcDump tool for Linux, per the instructions on GitHub, to the system in question.
- Run the commands from the command prompt with
sudo.
The following syntax can be used while running the tool depending on what data is required in the process dump file:
sudo procdump [OPTIONS...] TARGET
Common Switches:
- -C –CPU threshold at which to create a dump of the process from 0 to 100 * nCPU.
- -c — CPU threshold below which to create a dump of the process from 0 to 100 * nCPU.
- -M — Memory commit threshold in MB at which to create a dump.
- -m — Trigger when memory commit drops below specified MB value.
- -n — Number of dumps to write before exiting.
- -s — Consecutive seconds before dump is written (default is 10)
TARGET must be specified as -p pid, where pid is of the process in question.
Command Line Examples:
- Immediately generate a full memory process dump for CcSvcHst.exe: procdump -ma CcSvcHst.exe
- Generate a full memory process dump for the process with PID 4512 when it exists: procdump -ma -t 4512
- Attach to a process with the name httpd.exe when it launches. Then generate a full dump, if it encounters an unhandled exception: procdump -ma -e -w httpd.exe
- Have ProcDump run BadApp.exe and write a full dump to C:Dumps if it encounters an unhandled exception: procdump -ma -e -x C:Dumps C:Program FilesBadAppBadApp.exe
- Install ProcDump as the postmortem debugger, and instruct it to write full dumps to C:Dumps: procdump -ma -i C:Dumps
- Create up to 3 full dumps of the process with PID 3213, if that process consumes 75% or more total CPU for 10 seconds: procdump -ma -c 75 -s 10 -n 3 3213
References:
http://technet.microsoft.com/en-us/sysinternals/dd996900.aspx
https://github.com/Microsoft/ProcDump-for-Linux
Was this article helpful?
0 out of 5 stars
| 5 Stars | 0% | |
| 4 Stars | 0% | |
| 3 Stars | 0% | |
| 2 Stars | 0% | |
| 1 Stars | 0% |
In this article, we will be showing you the two ways in which you can manually create a Crash Dump file in Windows 11/10. Also known as a Memory dump file or a Windows dump file, a crash dump file holds details concerning a specific application or process crash in Windows.
What is a Crash Dump file?
Commonly used to analyze and troubleshoot an issue, these Memory dump files hold data on the files and processes that were running during a particular crash and also the Kernel-mode stack that stopped. While, for the most part, your computer creates these files on its own, mostly when there is a complication, there may arise a need for you to create them manually sometimes too. The most common scenario would be when an app is not responding on your computer, and you have to send details of its malfunctioning to technical support to resolve the issue.
Broadly speaking, there are three different types of crash dump files, even though all of them serve the same purpose. Dump files are categorized based on their file size and the information they hold. A complete memory dump has the biggest stack of information. It’s the biggest dump file that a system can support, with its size as big as your computer’s RAM. Kernel Memory dump files are smaller, making them easier to transfer around. The third and final type is a small memory dump file, which contains only the most basic information and is normally only 256KB in size.
As mentioned earlier, there are two ways in which you can create a crash dump file. One via the Task Manager, and the other using your Command Prompt.
1] Create Crash Dump files using Task Manager
First things first, open the Task Manager. The simplest way to do it is by clicking on the Taskbar and selecting Task Manager from the context menu. Click on the Processes tab and right-click the app that you want to create the file for. From the list of options that appear, select Create dump file.

Wait for some time till the process is finished. Once you’re notified that the file has been created, click on Open File location. If you don’t want it to stay where it’s been located by default, you can copy the .dmp file and paste it in the location of your choice.
TIP: You can configure Windows to create Crash Dump Files on Blue Screen.
2] Create Crash Dump files using Command Prompt
To do this, you’ll have to download ProcDump. It’s a command-line utility that helps users keep an application’s CPU spikes in check. It also generates crash dumps during spikes. This tool can be used alongside the command prompt to create crash dump files. Here’s how.
Firstly, download ProcDump from the Windows SysInternals website. The file is in a .zip format, so you will have to extract it. Upon downloading and installing, search for Command Prompt and open it to run it as an administrator.
Type the following command line to open the Procdump folder and press enter.
cd C:\Path\Procdump
You can get the path to the ProcDump app by right-clicking on the app icon and opening its properties.
After that, in order to create a dump file, paste the following command line.
procdump APP-NAME
For example, if you want to create a dump file for File Explorer, then the command line would be:
procdump explorer
This is going to create a mini-dump file for your file explorer. A similar command line can be used to create a dump file by replacing the app name with the Process ID. So, an alternate command line would be
procdump PROCESS-ID
You can easily find the process ID of any particular application by opening Task Manager and visiting the Details tab. Here, you’ll find all the processes running on your PC and their respective PID next to them.
If you want to create a full-size dump file for an application or process, you can make use of the following command.
procdump -ma APP NAME/PROCESS ID
Here too, both the executable name of the program or its process ID will work. As mentioned earlier, a complete dump file stores all the memory information about the app and takes up substantial storage, but at the same time, it’s more than what most people need out of a dump file.
TIPS:
- You can create Live Kernel Memory Dump File using Task Manager
- You can change the number of Memory Dump Files that are created.
Once done, you will find your manually created dump files housed in the same folder as all the other ProcDump files. Here is the link to download the .zip file for ProcDump from Microsoft.com.
We hope that this post was able to bring some clarity about what crash dump files are, why you may need them, and how they can be manually created if need be.
Where is the crash dump file in Windows?
In Windows, crash dump files are typically stored in the C:\Windows\Minidump or C:\Windows\Memory.dmp directories by default. This is where you’ll find the files after a system crash, which can be useful for diagnosing problems.
Related reads:
- Free Crash Dump Analyzer software
- What are System Error Memory Dump Files
- Crash, hang, and cause kernel memory leaks using NotMyFault
- Physical Memory Limits in Crash Dump files
- Machine Memory Dump Collector
- Physical memory allocation and memory status.