
Уровень сложностиСредний
Время на прочтение6 мин
Количество просмотров18K

Если вдруг кто-то не знает, или не внимательно следит за нашим блогом, то первого августа был праздник. Не такой грандиозный, как Новый год, День защитника Отечества, 8 Марта и др., чтобы выделить на него пару выходных и отмечать всей страной, но для нас, не менее значимый — «Всемирный день работника техподдержки». В честь этого события, было принято решение взять специалиста поддержки, поставить его на праведный путь и запрячь немного написать о непростых буднях работника поддержки (очевидно, это шутка. Или нет…). Возможно, всё закончится здесь, а может — будет небольшая серия из нескольких статей (если клиенты не загрызут его раньше), описывающих достаточно популярные вопросы и их простые и наглядные решения.
Передаём слово нашему специалисту поддержки.
Другие статьи серии «Будни техпода»
- Пробрасываем USB наĸопитель через RDP соединение ← Вы здесь
- Разворачиваем Android на Hyper-V
- Подготовка сервера с Linux для работы по RDP
- Стриминг через VDS-сервер
- Разворачиваем сайт из конструктора на vds за 130 рублей
- Размещение игрового сервера на VDS
- Поднимаем VPN на VDS сервере
Если не брать в расчёт такие вопросы как: «Как мне подключиться к серверу?», «Что такое VPS/VDS?», «Как поменять конфигурацию на сервере?», «Как мне играть в Майнкрафт на вашем сервере?», «Можно ли скамить мамонтов через эти ваши VPS серверы?» и др., то вопрос связанный с пробросом USB накопителей до своего VPS сервера — я бы поставил в ТОП 5 или даже в ТОП 3.
Большинству читателей нашего блога, статья может показаться бессмысленной, а способы настройки — «банальными», но судя по статистике обращений к нашей первой линии поддержки, вопрос очень актуален и является достаточно частым гостем в чатах помощи на сайте.
▍ Зачем это нужно?
«Подскажите, можно ли как-то настроить сервер таким образом, чтобы при подключении флешки к моему компьютеру, файлы с неё были доступны на сервере?», «У меня макбук, как с него подключиться к моему VPS и перекинуть файлы на сервер?», «Можно ли как-то перекинуть файлы с телефона на мой сервер?» — Примерно такие вопросы, мы чаще всего встречаем на первой линии поддержки. И порой достаточно сложно, без какого-либо подручного материала, объяснить неопытному клиенту, как добиться желаемого им результата.
Казалось бы, нажми Ctrl + C, да и скопируй нужный тебе файл на своём компьютере, затем подключись к серверу и нажми Ctrl + V. Делов-то. Но подобная процедура не всегда удобна и подойдёт скорее в тех случаях, когда необходимо перекинуть несколько небольших файлов. А если нам необходимо постоянно работать с документами на USB накопителе? Постоянно просматривать на нём файлы, перекидывать их с USB накопителя и обратно? Или, например, на сервере расположено программное обеспечение вашей компании, а вы — сотрудник, которому необходимо отредактировать свой рабочий документ с помощью него, и при этом вы не хотите загружать свой документ на сам сервер? Способ с простым копированием файлов через буфер обмена становится всё менее удобным. В этих случаях проще будет просто подключить нужный вам USB накопитель к вашему устройству и путём нескольких простых настроек, пробросить его до VPS сервера. Таким образом, у нас всегда будет доступ к нужным нам файлам, без необходимости прерывать работу и выходить с сервера (Также, по примерам из этой инструкции — можно будет настроить доступ не только к подключённым к вашему устройству USB накопителям, но и к любому диску/папке на устройстве).
▍ Настройĸа USB для операционной системы Windows
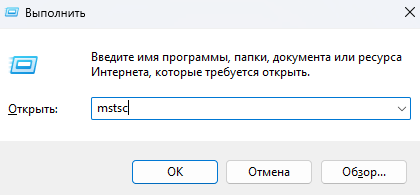
Если вы пользуетесь операционной системой Windows, то каких-либо сторонних программ вам скачивать не нужно. На системах под управлением этой операционной системы, подключение USB накопителя можно настроить через встроенное официальное приложение «Подключение к удалённому рабочему столу». Для его открытия — выполните следующие команды: Пуск -> Программы -> Стандартные -> Подключение к удалённому рабочему столу Или используйте Win + R (либо щёлкните правой кнопкой мыши по кнопке «Пуск», выберите «Выполнить») наберите mstsc, нажмите ОК. В открывшемся окне необходимо выбрать пункт «Показать параметры» и указать данные для авторизации (IP, логин и пароль).
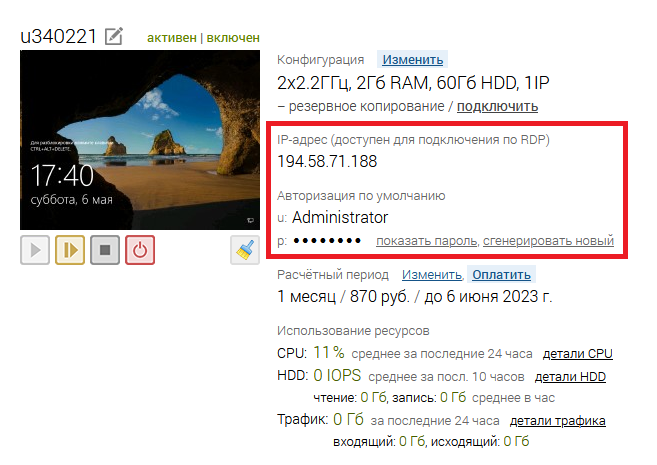
Если вы являетесь клиентом нашего хостинга, то, соответственно, берём эти данные из личного кабинета:

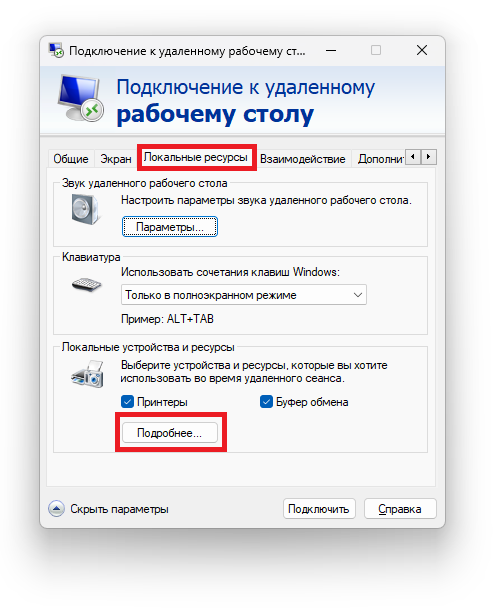
Переходим в раздел «Локальные ресурсы»:


Далее нам необходимо попасть в раздел «Локальные устройства и ресурсы» и нажать Подробнее.
В открывшемся окне выбираем пункт «Диски» и находим нужное нам USB устройство (в нашем случае это NIKON D5000 (F:)). Также вы можете выбрать любой диск на вашем ПК и он тоже будет доступен на вашем VPS сервере.

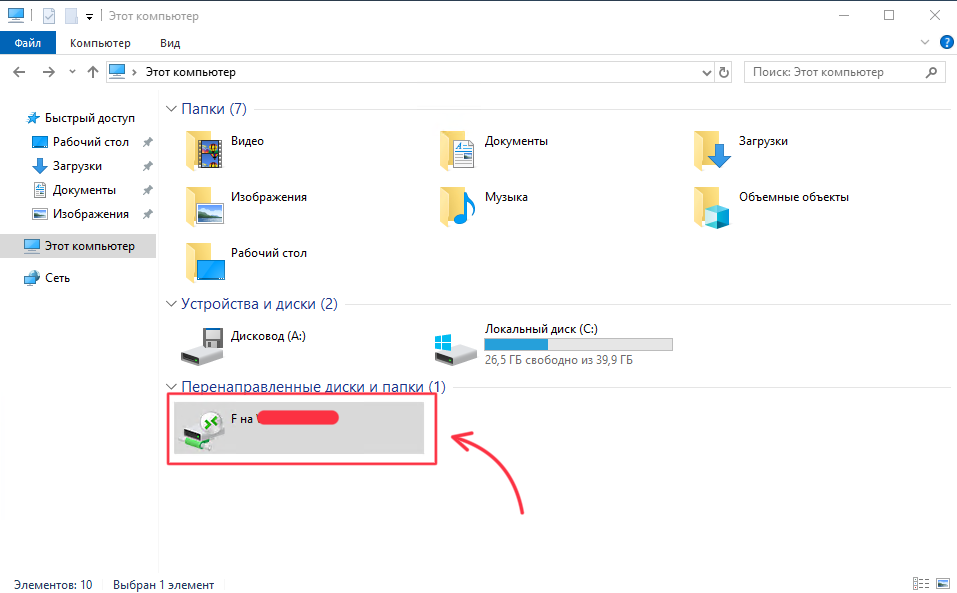
И подключаемся к серверу. Теперь в окне управления дисками, мы видим дополнительный диск. Это и есть наше USB устройство.
▍ Настройĸа USB для операционной системы Mac OS
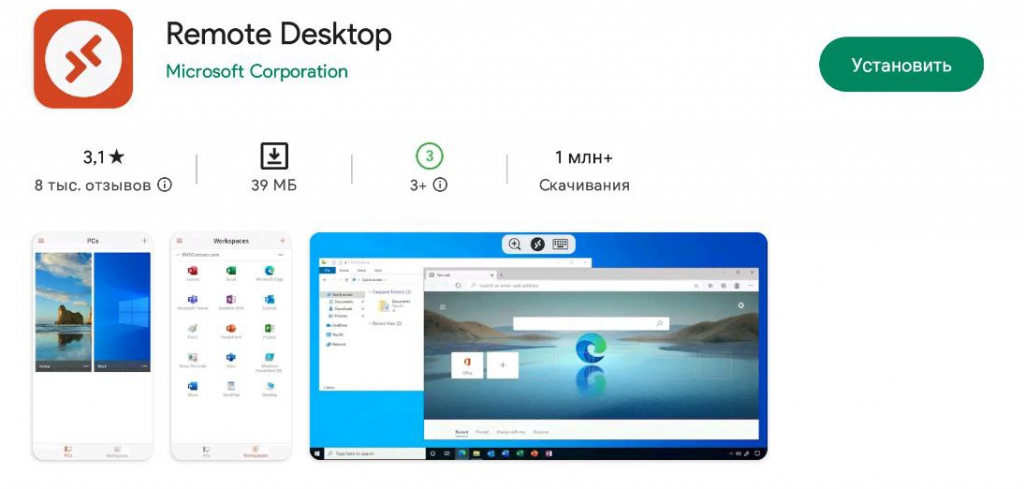
Если же вы пользуетесь операционной системой Mac OS, то вам придётся выполнить несколько дополнительных действий, относительно операционной системы Windows. На Mac OS нет встроенного RDP клиента, так что для подключения к VPS серверу его необходимо скачать и установить. Существует множество различных RDP клиентов, и каждый имеет свой дополнительный функционал. Мы же для подключения будем использовать официальное приложение компании Microsoft — Microsoft Remote Desktop (Удалённый рабочий стол), т.к оно достаточно удобное и в нём есть весь необходимый нам функционал для настройки USB. Скачать его можно бесплатно в магазине App Store.

Скачиваем и запускаем RDP клиент. Если вы уже являетесь его пользователем, то, вероятно, у вас уже настроено подключение к нужному вам серверу. Если нет, то подробнее с тем, как подключиться к вашему VPS серверу из-под Mac OS, используя это ПО, вы можете ознакомиться в одной из наших статей справочника.
Теперь мы можем приступить к настройке USB накопителя. Наводим курсор мыши на нужный нам сервер и в левом нижнем углу нажимаем на кнопку с изображением карандаша (Если интерфейс вашей программы отличается, то, возможно, вы используете устаревшую, или более новую версию ПО).

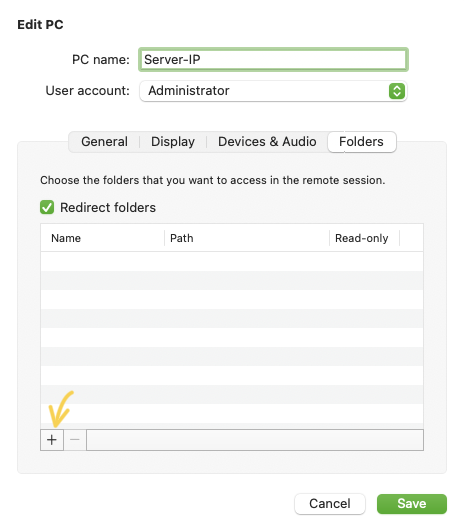
В открывшемся окне переходим во вкладку «Folders», ставим галочку в пункте «Redirect folders» и жмём на + в левом нижнем углу.

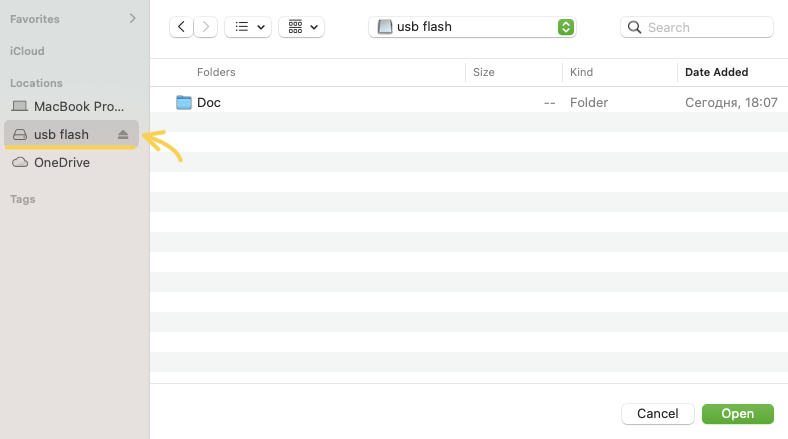
Далее, в открывшемся окне «Finder», в правом столбце необходимо найти нужное нам USB устройство (в нашем случае это устройство с именем Samsung) и нажать на кнопку Open.

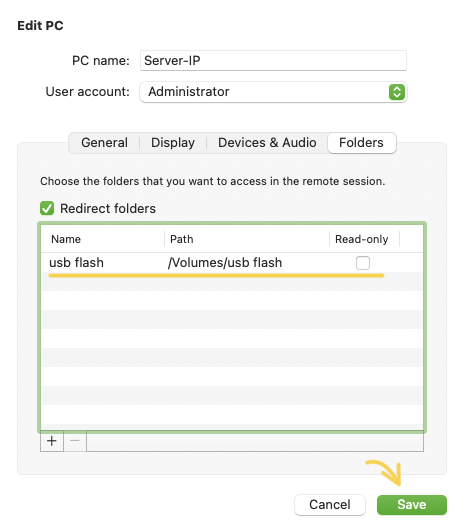
Как мы видим, в списке появилось наше устройство. Теперь у нас есть доступ ко всем данным на нём, и при подключении к серверу — мы сможем ими воспользоваться. Если необходимо получить доступ только к определённым папкам, то по этому же примеру мы выбираем нужное нам устройство Samsung и затем папку (таким образом, можно получить доступ к абсолютно любой папке из Mac OS). После всех изменений жмём кнопку Save.

Готово. Теперь осталось просто подключиться к серверу и открыть проводник. Тут мы видим наш системный диск, а также — дополнительный диск с USB накопителем, подключённым к нашему устройству.

▍ Настройĸа на операционных системах iPadOS/iOS/Android
Не только на устройствах под управлением десктопных версий ОС есть возможность предоставить доступ к папке или USB накопителю. На устройствах под управлением операционных систем iOS и Android также есть такая возможность, хоть слегка и ограниченная. Здесь есть возможность предоставить доступ лишь к одной конкретной папке на устройстве, наименование которой схоже с названием самой программы (возможно, в сторонних альтернативных клиентах есть более расширенный функционал, но наш пример построен на основе официального программного обеспечения компании Microsoft «Удалённый рабочий стол» или «RD Client» для устройств под управлением iOS/iPadOS). Скачать его можно в App Store (для iOS) или Google Play (для Android).

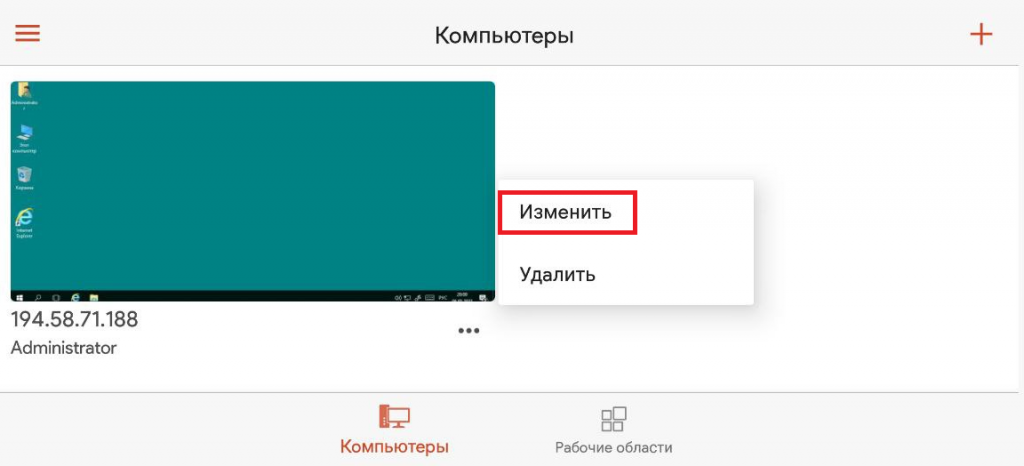
Настройка подключения к серверу очень схожа с версией для Mac OS. Мы также нажимаем + в левом верхнем углу и указываем данные для подключения. После запуска программы и настройки подключения к VPS серверу, нам необходимо нажать и удерживать нужный нам сервер до появления дополнительного меню. В нём мы выбираем пункт «Изменить».

Далее, нам необходимо пролистать в самый низ, до раздела «перенаправление звука и устройств» и включить ползунок на пункте «Хранилище».

В случае с iOS и iPadOS, после переключения этого ползунка — у нас появится доступ к файлам, которые находятся в приложении Файлы -> На iPad/iPhone -> RD Client.

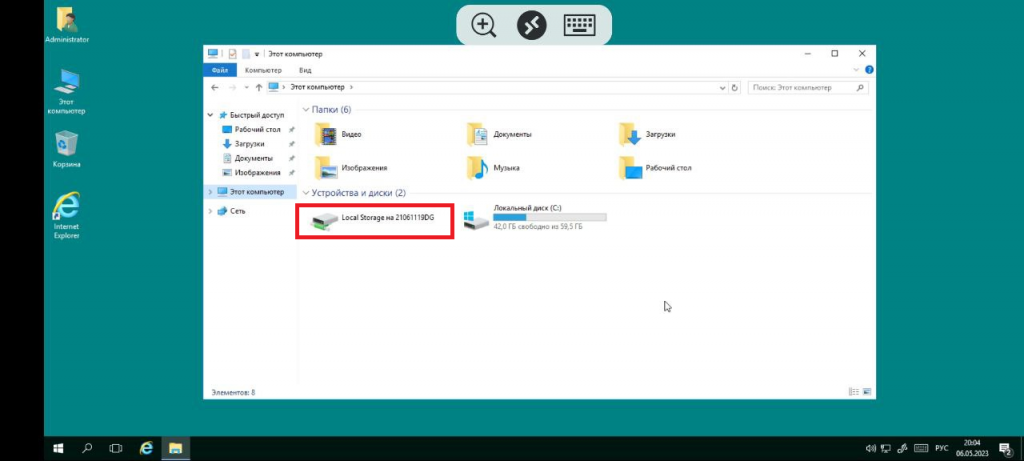
Теперь, после подключения к серверу, в проводнике мы сможем увидеть дополнительный подключённый диск, на котором и будут находиться файлы с устройства.

▍ Пара слов в заĸлючении
Как видно, эта процедура достаточно проста и не требует каких-либо специфических навыков. Справиться может любой и даже самый неискушённый пользователь. Вы можете задаться вопросом — «А как же Linux?». Удивительно, но за 3 года работы на этой должности, мне ни разу не попадался пользователь, который поинтересовался бы — «А как пробросить USB порт на Linux?». Вероятно, они из совсем другой лиги и подобных вопросов не задают :). Тем не менее — я протестировал несколько клиентов для этой ОС на возможность проброса USB, но нужный функционал нашёл только в «xfreerdp», взаимодействие с которым осуществляется только через терминал. Это не совсем то, что нужно. Если кто-то из читателей нашего блога знает RDP клиенты для Linux, в которых реализован такой же простой функционал, как и в версиях для Windows, Mac OS, iOS и Android — буду рад почитать про это в комментариях.
Telegram-канал с розыгрышами призов, новостями IT и постами о ретроиграх ?️

It’s worth noting that USB Network Gate requires activation. You need to activate the software for using it on the server computer (UNG Server). After that, you will be able to forward the USB device to the remote desktop. As for the Client part, it doesn’t need to be registered. You can install the app and use the Client module on an unlimited number of remote machines to connect to shared devices for free.
So, once you create a connection to a shared peripheral, the device shows up in the Device Manager of the RDP Server and all applications installed on that machine recognize the peripheral as though it were attached locally.
Note: Starting from version 7.x, USB Network Gate supports the ICA protocol, which means you can forward devices from a thin client to the terminal server over ICA.
USB to Remote Desktop software hosts versions for Windows, Linux, and Mac, so any server-client combination is possible. For example, your Windows PC can easily connect to a USB device from Mac or the other way around.

Проблема проброса USB-накопителей с локальной рабочей станции до удалённого сервера является одной из самых популярных проблем, с которой пользователи UltraVDS обращаются в техподдержку хостинга. Суть обращений в основном сводится к тому, что пользователь хочет настроить свой VPS таким образом, чтобы файлы и папки, размещённые на подключённом к компьютеру накопителю USB, были доступны также со стороны виртуального сервера.
Действительно, процедура копирования данных с флешки на VDS далеко не всегда представляется удобной и может применяться в основном в случаях, когда пользователь оперирует небольшим количеством файлов относительно малого объёма. Таким образом, всё более востребованным становится желание настроить пользовательское устройство и VPS в части проброса накопителя USB через удалённый рабочий стол. В данной статье мы посмотрим, как настроить доступ к нужным каталогам и файлам на локальной рабочей станции, чтобы оперировать ими с сервера через RDP.
Настройка на Windows-устройстве
Для организации доступа со стороны виртуального сервера к устройству, работающему под управлением операционной системы Windows, не требуется использование каких-либо сторонних приложений. В Windows подключение накопителя USB осуществляется через Подключение к удалённому рабочему столу. Для его запуска используйте комбинацию клавиш Win R, где в открывшемся окне введите mstsc и нажмите ОК.
В открывшемся окне введите IP-адрес вашего виртуального сервера и нажмите Показать параметры.

IP-адрес, а также имя пользователя и его пароль вы можете взять на странице вашего сервера на сайте UltraVDS.
Во вкладке Локальные ресурсы нажмите кнопку Подробнее.
Здесь раскройте ветку Диски и отметьте галочкой нужное устройство. В нашем примере мы отметили USB-накопитель USB-DRIVE (D:). Для сохранения изменений нажмите ОК.
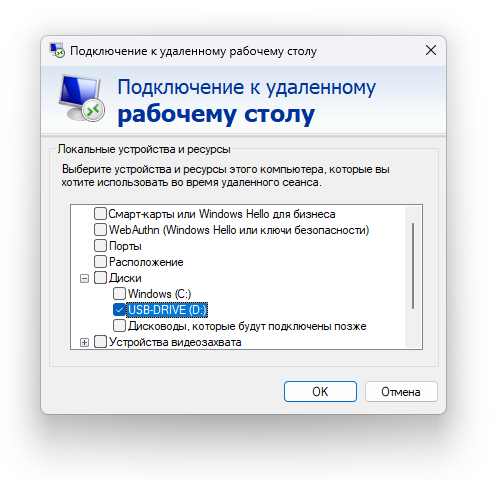
Далее, нажмите Подключить.
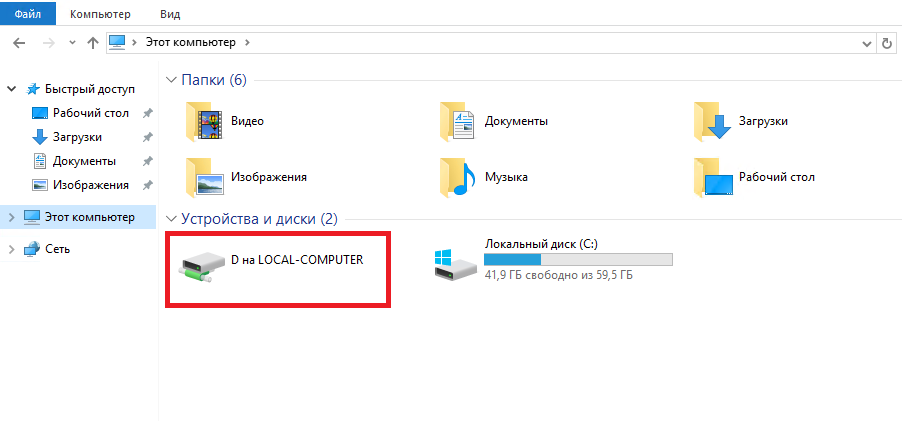
После того, как вы подключитесь к серверу, запустите проводник. Здесь в разделе Устройства и диски должен появиться ярлык, соответствующий проброшенному на сервер USB-накопителю.
Настройка на устройстве с Mac OS
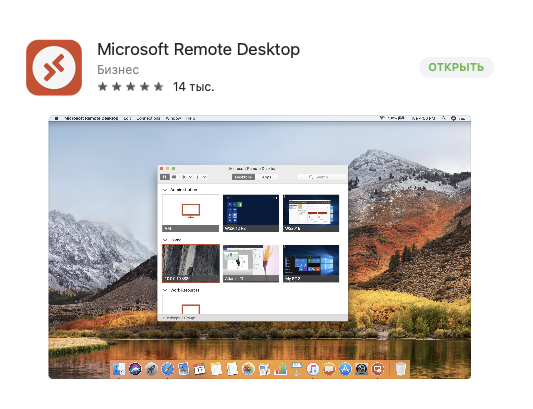
В операционных системах Mac OS нет штатного клиента удалённого рабочего стола. Поэтому для подключения к VDS необходимо загрузить и установить соответствующее приложение, коих существует великое множество. В нашем примере мы применим официальное приложение от Microsoft. Речь идёт о Microsoft Remote Desktop. Использовать данную программу довольно комфортно. К тому же, приложение в своём составе имеет функционал, необходимый для проброса USB-накопителя. Приложение доступно для бесплатной загрузки в магазине App Store.
По окончании установки запустите клиент RDP и подключитесь к вашему VPS. То, как это сделать, описано в соответствующей статье нашего справочника.
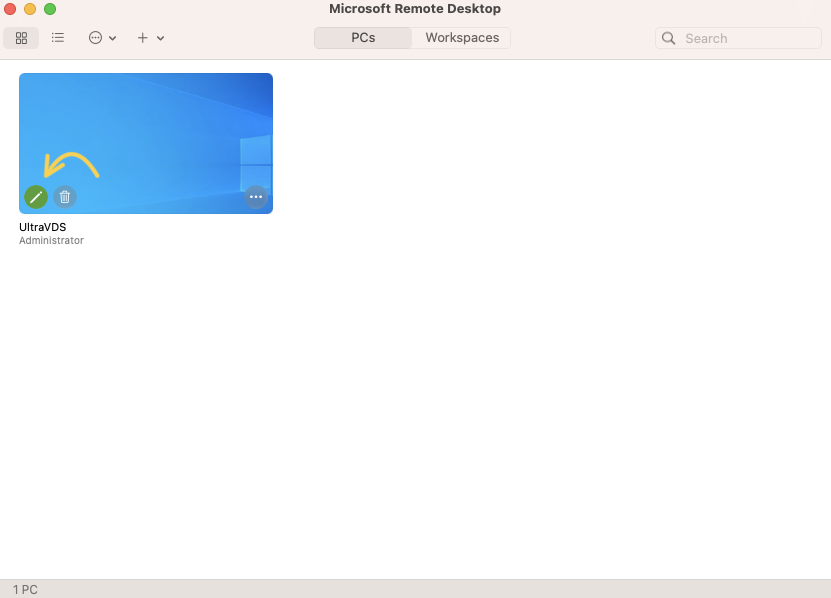
После того, как вы подключились к виртуальному серверу, наведите курсор на соответствующий VDS и в нижнем левом углу нажмите на кнопку редактирования подключения.
В окне редактирования перейдите во вкладку Folders. Затем активируйте пункт Redirect folders и нажмите значок + в нижнем левом углу.
Теперь в правой части окна найдите необходимое USB-устройство и нажмите Open.
Устройство должно появиться в списке Redirect folders, что говорит о том, что оно будет доступно при подключении к виртуальному серверу. Для сохранения внесённых изменений нажмите Save.
Теперь, когда вы подключитесь к своему VPS и запустите на нём проводник, вы найдёте там диск, соответствующий USB-накопителю в вашем Mac.
Настройка на Android-устройстве
Подключиться к VPS можно также из устройства, работающего под управлением Android. С этой целью также, как и в случае с Mac OS, проще всего использовать приложение Microsoft Remote Desktop. Процесс подключения более подробно описан в посвящённой этому статье.
Настройка данного RDP-клиента схожа с тем, как это осуществляется на устройствах с Mac OS.
Чтобы пробросить на сервер USB-накопитель, перейдите к созданному подключению и нажмите Изменить.
Далее перейдите в раздел Перенаправление устройств и звука и включите ползунок на строке Хранилище. После чего нажмите Сохранить.

Теперь подключитесь к вашему VDS, перейдите в проводник и среди дисков вашего виртуального сервера вы найдёте ярлык, соответствующий устройству, подключённому к локальной Android-системе.
FlexiHub Team uses cookies to personalize your experience on our website. By continuing to use this site, you agree to our cookie policy. Click here to learn more.

One of the challenges faced when connecting to computers over the RDP protocol is when it is needed to use local USB devices on a remote desktop. If you are running an application on a remote server over RDP, connecting some USB devices to the remote desktop can pose various difficulties.
Last updated Apr 19, 2024
This article will describe an effective software method that makes enabling remote desktop USB redirection relatively easy. Read on to learn the detailed steps for connecting USB to the remote desktop, and find out what challenges may arise when using USB over RDP.
Software for RDP USB Passthrough for Any Devices
FlexiHub is a software solution to a common RDP problem — the lack of support for USB devices. Sometimes, the remote machine needs to have access to locally-connected USB hardware, such as specialized mice, cameras, biometric scanners, and USB storage. This is where the application comes in.
When using the app to create a USB remote desktop connection, devices can be used on the remote machines with the same level of functionality as if they had a direct physical connection.
💡 FlexiHub makes it easy to access USB devices in remote desktop session, and avoid the most common issues related to redirecting USB over RDP.
How does USB for Remote Desktop software work
FlexiHub fully supports native RDP, using the protocol to pass the USB devices connected to a user’s computer to the RDP session host. USB passthrough is provided with per-session isolation, meaning that the shared devices can be restricted from other users connected to the same host machine.
FlexiHub works by sharing the USB ports of the local computer with remote desktop instances. This makes it possible to access USB devices in remote desktop sessions as soon as they are plugged into the local machine.
FlexiHub offers users a user-friendly and efficient method of setting up USB redirection in remote desktop environments.
Here is the demonstration of FlexiHub in action, and how it connects USBs to remote desktop:
Unlike some other solutions, there are no separate server and client instances that need to be installed. The application presents users with a unified interface that displays all available devices for remote desktop USB passthrough.
No special system configuration is required to run FlexiHub and it supports a wide range of USB devices.
How to redirect USB to remote desktop
Follow these steps to connect USB devices to a remote desktop:
-
2.
Download and install FlexiHub on all the computers that will take part in the RDP USB passthrough. Install the software on the computer that is physically attached to the peripheral as well as any remote machines that require access to the device.
-
3.
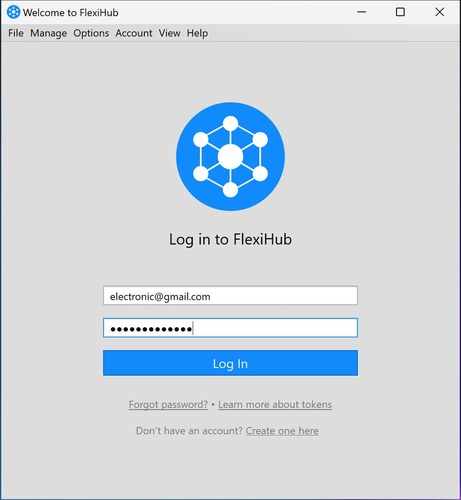
Start the application and log into your FlexiHub account. After that, the device is immediately made available for USB over RDP connection.

-
4.
Start an RDP client and then connect to a remote desktop using your credentials.
-
5.
Launch FlexiHub in the remote desktop session and log into the account with the credentials used previously.
-
6.
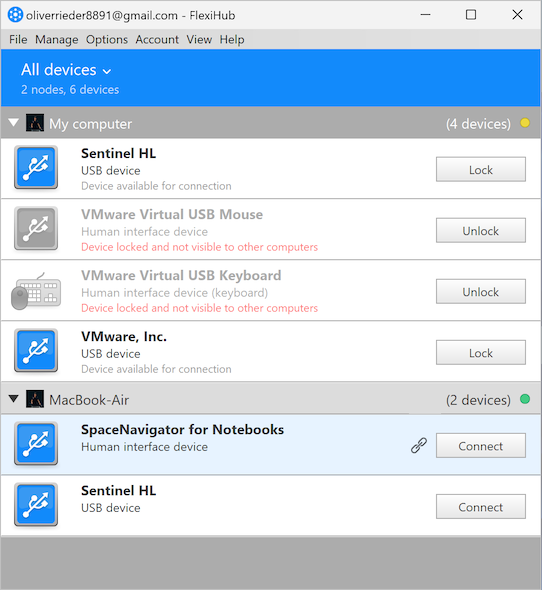
The FlexiHub interface will display all of the shared USB devices that are available for a remote connection. Click the Connect button next to the name of the device you want to access.

Advanced FlexiHub features for using USB in remote desktop
-
1.
FlexiHub securely transmits data using 2048-bit SSL encryption offering an extra layer of data protection. This keeps your data safe from misuse by other third parties.
-
2.
FlexiHub automatically detects devices connected to the server. As soon as a peripheral is attached, the app detects it and enables it to be shared with clients. You can use 3D mouse in remote desktop, webcams, keyboards, smart card readers, and share many more types of USB devices quickly and easily.
-
3.
The application does not require a public IP address since it uses a proprietary redirection server for sharing USB devices. This allows computers that can’t detect the server to still connect an RDP session and the USB device.
-
4.
FlexiHub does not require you to install USB drives on the remote machine when it connects a USB device to an RDP session.
-
5.
FlexiHub supports remote desktops running on the Windows, Mac, and Linux platforms. You can connect to a USB device from any protocol including Microsoft Terminal Services, Azure, Hyper-V, VMware, Citrix XenDesktop, and many others.
Device Isolation for Multi-User Systems
Private FlexiHub sessions with exclusive USB and COM device access for one specific user account.
Redirecting USB over RDP protocol — potential difficulties
You can use native operating system capabilities to redirect USB devices over RDP but you may run into difficulties. Certain devices work better than others because of certain issues such as bandwidth and network latency.
An example can be seen with USB devices that need consistently high throughput. Latency may impact their functionality in a VDI session. Another problem can come up with USB 3.0 devices attempting to use a USB 2.0 port on the client.
When sharing USB devices over RDP, an IT team needs to keep in mind the performance requirements of the peripheral equipment.
Factors to consider when sharing USB over RDP
- The state of the network is crucial when using USB audio devices. Unreliable networks are not recommended for these devices, as they need high throughput even when idle.
- Webcams are not supported when forwarding USB over remote desktop due to high bandwidth requirements that usually exceed 60 Mbps.
- The performance of USB scanners is directly related to the network’s state and scans may take longer than anticipated.
- WANs can pose latency and reliability issues that impact the performance of USB devices. An example of the problem is illustrated when reading a large file across the WAN. Each read request demands three two-way transfers between the remote desktop and a device. A small difference in network latency can be compounded over multiple requests to cause substantial performance degradation.
- Performance can be impacted by the file structure used on large USB disks. These can take a considerable amount of time to be recognized in an RDP session after being connected for the first time. Unreliable network links result in multiple retries which reduces performance. Using NTFS instead of FAT as the underlying filesystem can speed up connection time.
- USB CD/DVD readers, scanners, and touch devices also exhibit problems when used on a WAN with latency issues.
How to Set Up Remote Desktop Connections
When working over LAN, if you want to create a Remote Desktop connection you’ll need to configure the computer that will be accessed remotely to accept the incoming connections first.
The following steps show how to use Microsoft Remote Desktop and set it up via Windows Control Panel.
Allow remote access via Remote Desktop
Here is what you’ll need to do to allow the remote desktop connections to a selected machine:
-
2.
Go to the System and Security section of the Windows Control Panel.

-
3.
In the System section, locate and choose the «Allow remote access» option.

-
5.
In the Remote Desktop section of the displayed window, select the “Allow remote connections to this computer” option.

-
6.
To ensure secure connections by enforcing stronger authentication, it is recommended that you check the “Allow connections only from computers running Remote Desktop with Network Level Authentication” box.
-
7.
Finally, Apply new settings.


Once you have completed these steps, the target computer will be configured to accept Remote Desktop connections. You will need to manually configure firewall rules if you are using a third-party solution. If you are using the default Microsoft Defender firewall, the system will automatically add the rules required to enable Remote Desktop sessions.
How to use Remote Desktop Connection Manager
After configuring the selected computer to allow remote connections, your local machine can access it with a Remote Desktop connection.
-
1.
Launch the Remote Desktop Connection app. E.g. you can use the Windows search and type in “Remote Desktop Connection”. Select the result returned by the search.

-
2.
Provide the remote computer’s IP address or network name in the Computer field of the Remote Desktop Connection app.
-
3.
Click on the Show Options button to enter the credentials that will be used when you connect with a Remote Desktop connection. You have an option to save the credentials to avoid having to enter them on subsequent connections by checking the «Allow me to save credentials” box.
-
4.
After filling the Computer and User name fields, click the Connect button.

-
5.
Next, you will need to enter the password for the account in the displayed window. You can save the password for future connections by selecting the “Remember Me” option. You may be presented with a message indicating the remote computer’s identity cannot be verified. You can get around this issue by checking the «Don’t ask me again for connections to this computer” box. When finished, click Yes.
-
6.
After that, the connection to the remote machine will be established, allowing you to access the computer and perform activities like viewing files or running programs. A blue bar at the top of the screen provides multiple options to manage the remote connection.

Buttons located on the right side of the bar let you end the session, modify the window size, or minimize the connection window to the taskbar. You can also pin the bar or check its connection speed with buttons on the left side of the bar.
-
7.
Simply click the Close icon when finished working to end the connection.


Frequently Asked Questions
What is USB redirection?
USB redirection (Universal Serial Bus redirection) is a technology that enables users to access peripheral devices connected to a USB port from remote applications or desktop sessions.
What operating systems does USB for remote desktop software support?
FlexiHub is available for Windows, Linux, and Mac computers and offers true cross-platform compatibility. Servers and clients in any combination of operating systems can be used to share USB devices over an IP-based network. A server on a specific platform can share devices with clients no matter what OS they are using.
Are there any USB devices that can’t be redirected to an RDP session?
USB devices such as scanners are not prime candidates for redirection due to their high resource demands. One issue is the scanner’s use of back-to-back processes that are affected by network bandwidth or latency. Redirecting traffic from a USB scanner may result in decreased device performance.
How do I access my USB device from a remote desktop?
Download and install FlexiHub on the machine with the physical connection to the peripheral device. Then, install it on the computer that will remotely access the device in a remote desktop session. Open FlexiHub, locate the USB device and click the Connect button.
Related Articles
Connect to USB over network with one click
-
4.8 overall rank based on 386+ Reviews - Requirements: Windows, macOS, Linux, Android and Raspberry Pi.
- 11.51MB Size.
- Version 7.0.15297. (24 Mar, 2025).
-
Pricing starts $14 per month billed annually

How to Enable USB Redirection on Remote Desktop
USB redirection is a crucial feature for users who need to access USB devices connected to their local machines while using a remote desktop connection. This guide will walk you through the process of enabling USB redirection on Remote Desktop, ensuring seamless integration between your local and remote environments.
Step-by-Step Guide to Enable USB Redirection
1. Verify System Requirements
Before proceeding, ensure the following:
- You are using a Remote Desktop Protocol (RDP) client that supports USB redirection.
- Both the local and remote systems are running compatible operating systems. For example, USB redirection works well with Windows Server (2012 R2 and later) and Windows 10/11 Pro or Enterprise editions.
2. Configure Group Policy on the Remote Server
To enable USB redirection, you might need to configure the Group Policy on the remote server:
- Open the Group Policy Editor by typing
gpedit.mscin the Start menu search bar. - Navigate to Computer Configuration > Administrative Templates > Windows Components > Remote Desktop Services > Remote Desktop Session Host > Device and Resource Redirection.
- Locate the policy “Do not allow supported Plug and Play device redirection” and ensure it is set to Disabled.
- Click Apply and OK to save the changes.
3. Configure Remote Desktop Client Settings
- Open the Remote Desktop Connection app on your local machine (type
mstscin the Run dialog or search bar). - Click on Show Options and navigate to the Local Resources tab.
- Under the “Local devices and resources” section, click More….
- Expand the Other supported Plug and Play (PnP) devices section and select the USB devices you want to redirect.
- Click OK and then connect to the remote desktop.
4. Install Necessary Drivers
Some USB devices, such as specialized hardware or proprietary tools, may require additional drivers. Ensure these drivers are installed both on the local machine and the remote server.
5. Test USB Redirection
Once connected to the remote desktop, check if the USB device is recognized. For instance, if you redirected a USB storage device, it should appear in the remote machine’s File Explorer.
Common Issues and Troubleshooting
- USB Device Not Recognized: Ensure that USB redirection is enabled on both the client and the server. Check if the necessary drivers are installed.
- Group Policy Conflicts: Confirm that no conflicting Group Policy settings are blocking USB redirection.
- Firewall Restrictions: Ensure that the firewall allows RDP traffic and USB redirection.
- Outdated RDP Client: Update the RDP client to the latest version to avoid compatibility issues.