
Many users reported printer issues on Windows 11. Though Microsoft indicated they’ve resolved this issue, you may still encounter it on your PC. Don’t worry, you’re not alone. This post may help when you’re facing annoying printer issues.
Try these fixes:
There’re 4 fixes that have helped many gamers solve their problems. You don’t have to try them all; just work your way down the list until you find the one that works for you.
- Check for Windows Update
- Update printer driver
- Run printer troubleshooter
- Repair system file
Fix 1: Check for Windows Update
Microsoft has released KB5006746 to fix printer issues. If you just upgraded to Windows 11 and encountered printer issues, you can check if there’s an available Windows update.
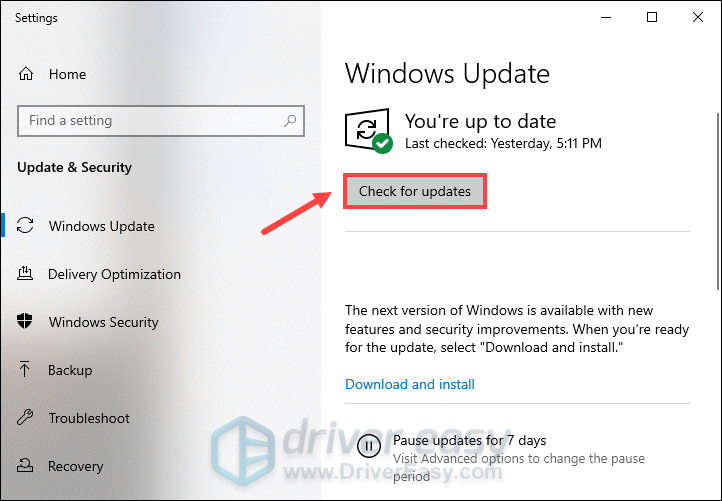
- Press the Windows logo key + I on your keyboard to open Settings.
- Go to Windows Update then click Check for updates.

- If there is an available update, windows will download and install it automatically.
- Then reboot your PC to check the printer issue is fixed or not.
Fix 2: Update printer driver
Outdated drivers usually cause all kinds of hardware issues. Therefore, updating related drivers is a way to fix printer issues on Windows 11. Actually, the workaround provided by Microsoft suggests installing printer drivers with admin privileges, then the issue can be fixed.
If you don’t have the time, patience or computer skills to update the driver manually, you can do it automatically with Driver Easy.
Driver Easy will automatically recognize your system and find the correct driver for it. You don’t need to know exactly what system your computer is running, you don’t need to risk downloading and installing the wrong driver, and you don’t need to worry about making a mistake when installing.
You can update your drivers automatically with either the FREE or the Pro version of Driver Easy. But with the Pro version it takes just 2 clicks:
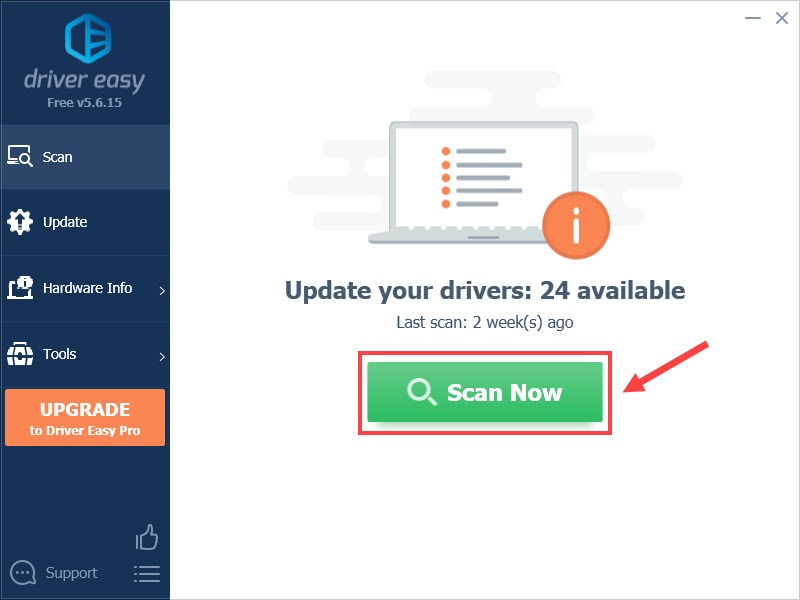
- Download and install Driver Easy.
- Run Driver Easy and click the Scan Now button. Driver Easy will then scan your computer and detect any problem drivers.

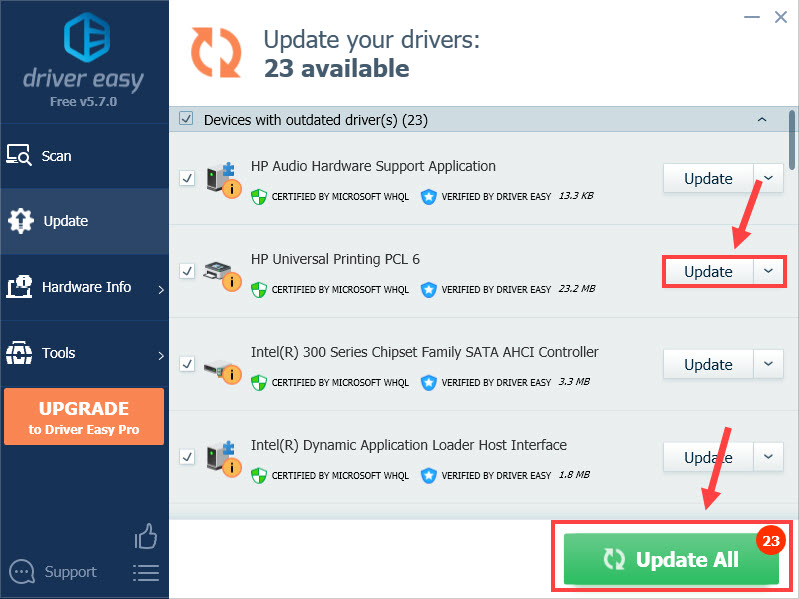
- Click the Update button next to the driver to automatically download the correct version of that driver, then you can manually install it (you can do this with the FREE version).
Or click Update All to automatically download and install the correct version of all the drivers that are missing or out of date on your system. (This requires the Pro version which comes with full support and a 30-day money back guarantee. You’ll be prompted to upgrade when you click Update All.)

The Pro version of Driver Easy comes with full technical support.
If you need assistance, please contact Driver Easy’s support team at support@drivereasy.com.
Restart your computer for the changes to take effect, and your printer should be working properly.
Fix 3: Run printer troubleshooter
Windows has an internal feature to examine and fix its own issue. Why not run its printer troubleshooter to fix your printer issue.
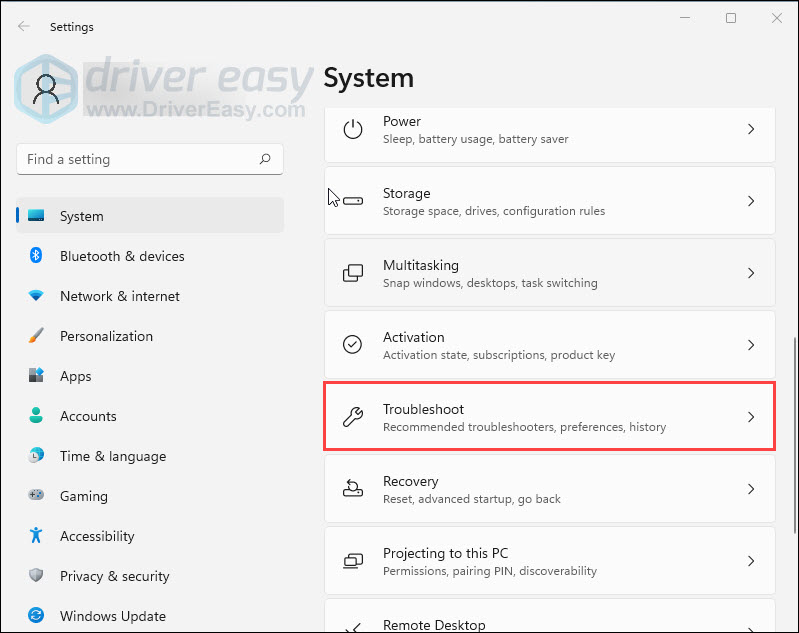
- Press the Windows logo key + I on your keyboard to open Settings.
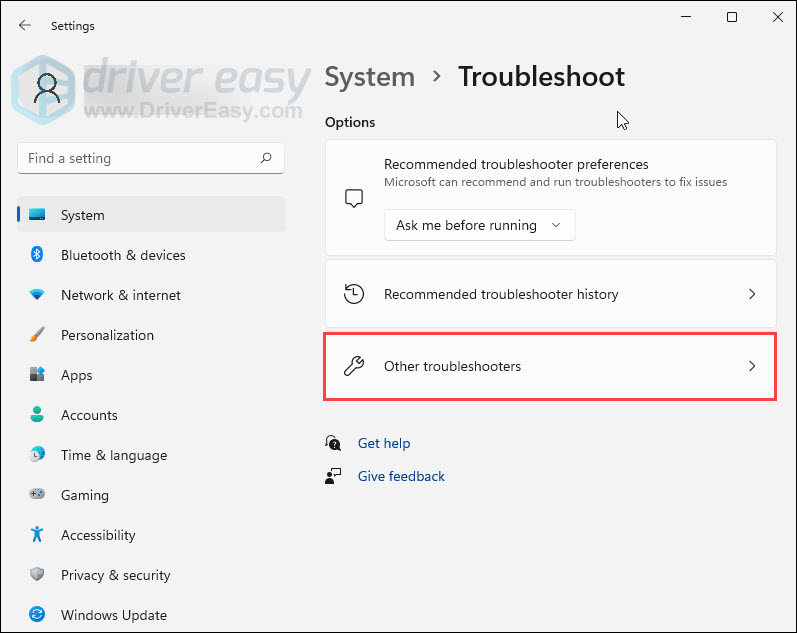
- Go to System and click Troubleshoot.

- Choose Other troubleshoot.

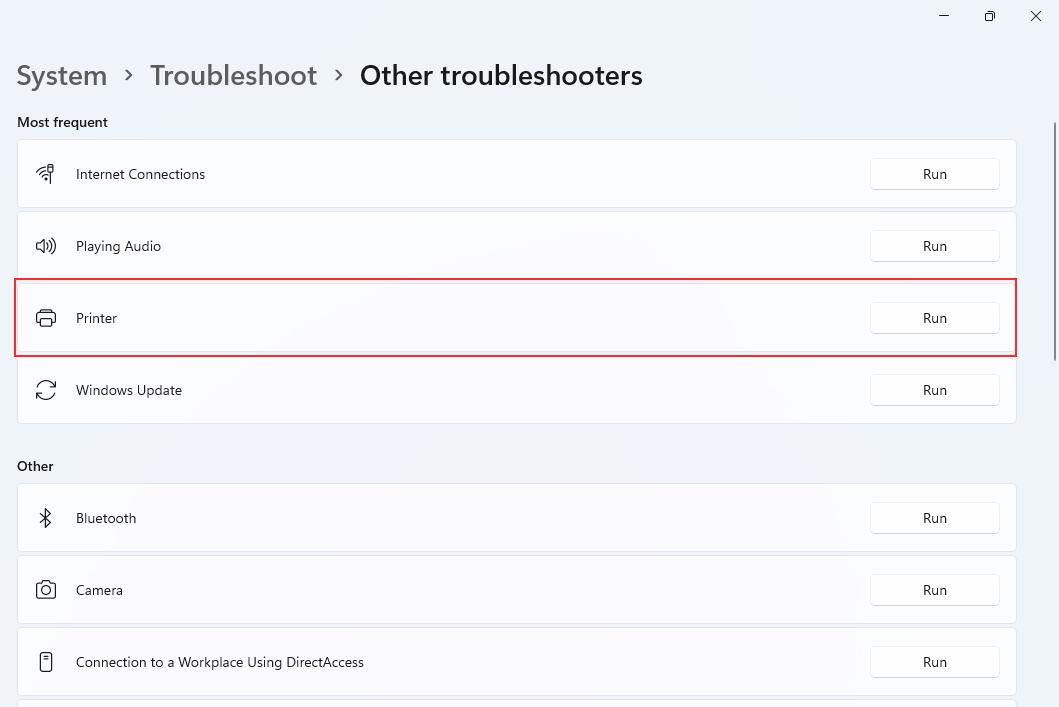
- Find the Printer section and click Run.
Fix 4: Repair system file
Missing, corrupt or damaged system files may cause all kinds of issues including printer issues. To eliminate this issue as a possible cause, you can try the fix below to repair possible system file issues.
System File Checker (SFC) is a handy feature in Windows that helps scan your system files and repair missing or corrupted system files(including those related to BSOD). To run the SFC scan:
1) On your keyboard, press the Windows logo key and type cmd. Then right-click on Command Prompt and click Run as administrator.
2) Click Yes when prompted to confirm.
3) In the command prompt window, type sfc /scannow and press Enter.
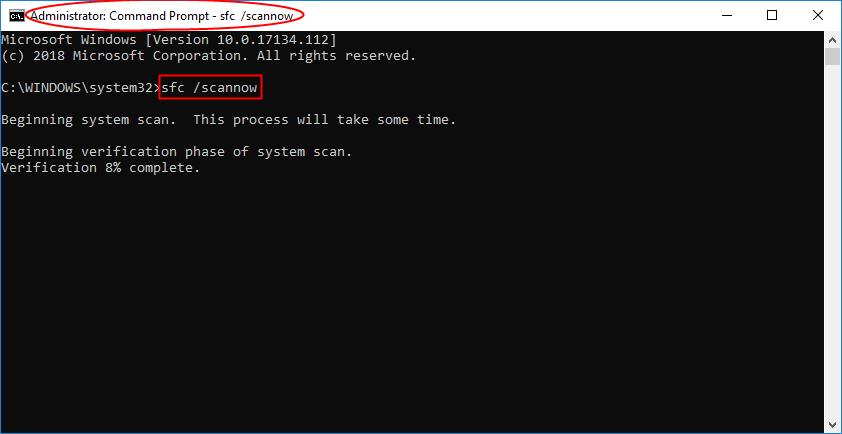
It’ll take some time for the SFC to replace the corrupted system files with new ones if it detects any, so please be patient.
4) Restart your computer for the changes to take effect.
5) Check your computer to see if the problem has been fixed. If yes, then congrats!
Facing printer issues on Windows 11 can be a frustrating experience. Hopefully, the post would help you fix the printer and make it work smoothly.
1
1 people found this helpful
- To fix a not working printer on Windows 11, use the “Printer” troubleshooter.
- Alternatively, you can uninstall and reinstall the printer driver to fix common issues.
- You can also try checking the physical connection, revising the configuration, and resetting the spooler.
If your printer isn’t working correctly on Windows 11 (be it an HP, Canon, Brother, Epson, or another brand), several factors might be responsible. For example, likely causes include:
- Connectivity issues: The computer may have lost connection with the printer due to software glitches or physical disconnections.
- Driver problems: Outdated or corrupted printer drivers can prevent proper operation.
- Print spooler errors: Malfunctions in the print spooler service can hinder print jobs.
- Incorrect printer selection: Accidentally sending print jobs to the wrong printer can result in no output.
Regardless of the problem, you can follow different troubleshooting steps to fix the printing issue on Windows 11, from simple actions like restarting the devices and checking the physical connection to using the troubleshooters to resetting the printer spooler and reinstalling the device driver.
In this guide, I’ll teach you several ways to troubleshoot and resolve common printing problems on Windows 11.
Fix not working printer on Windows 11
On Windows 11, you have several different ways to troubleshoot and fix issues when your printer is not working, no matter your brand (HP, Epson, Canon, Brother, etc.). To fix a printer, you can restart the device, check the connection, configure the default settings, run a troubleshooter, reset the printer spooler, and reinstall the printer.
1. Restart printer method
Although it might be obvious, it’s easy to forget that turning off, unplugging the power cord from the printer, and turning the peripheral back online can resolve the most common issues. For example, if Windows 11 is not detecting the USB printer, the printer suddenly starts having issues, or the device is unavailable.
Once the printer restarts, you can try to print again. If the printer is still not working, restart your computer and try again. If the printer doesn’t respond, continue with another troubleshooting method.
2. Check connection method
If you have a USB printer, ensure the data cable is properly connected to the printer and computer. You can try disconnecting and reconnecting the cable. Also, you may want to try a different USB port on the device.
If this is a wireless printer, ensure that the wireless functionality is turned on and working. You can also try to run the wireless connectivity test from the printer. Typically, the printer will have a blue wireless icon indicating the connection. You may need to check your device manufacturer for more specific details.
If you have problems with other wireless devices, you may need to restart the router or access point to fix the connectivity issue.
3. Configure default printer method
It could also happen that you have multiple printers installed on the computer and are sending the print job to the default printer, which is unavailable at that specific location.
You can quickly fix this problem by selecting the correct device when printing or changing the default printer settings.
To change the default printer settings on Windows 11, use these steps:
-
Open Settings on Windows 11.
-
Click on Bluetooth & devices.
-
Click the Printers & scanners page.

-
Turn off the “Let Windows manage my default printer” toggle switch under the “Printer preferences” section.
-
Select the printer from the list.
-
Click the “Set as default” button.


Once you complete the steps, you can try to print again.
However, if you already sent a print job to the wrong device, you may also need to open the queue and cancel any pending jobs before printing to the correct printer.
You can cancel the print job by going to Settings > Bluetooth & devices > Printers & scanners > (your) printer > Open print queue, right-clicking the job, and selecting the “Cancel” option.
4. Printer Troubleshooter method
Windows 11 comes with many troubleshooters, which are tools that run different scripts to diagnose and fix common problems automatically. After checking the connections, you may want to run the “Printer” troubleshooter to resolve common driver and settings problems or issues after an update with the wireless or USB printer.
To fix printer problems with the troubleshooter option on Windows 11, use these steps:
-
Open Settings.
-
Click on System.
-
Click the Troubleshoot tab.
-
Click the Other troubleshooters setting.

-
Under the “Most frequent” section, click the Run button for the “Printer” troubleshooter.
-
Continue with the on-screen directions from the “Get Help” app (if applicable).


Once you complete the steps, the troubleshooter will run a series of scripts to resolve the printing problem.
5. Reset printer spooler method
One of the most common issues while printing is a document getting stuck in the queue and trying to cancel the job won’t work. If this happens, the problem is likely to be with the “print spooler,” which is the service that sends the printing jobs to the printer.
To fix the print spooler service to continue printing on Windows 11, use these steps:
-
Open Start.
-
Search for services.msc and click the top result to open the Services console.
-
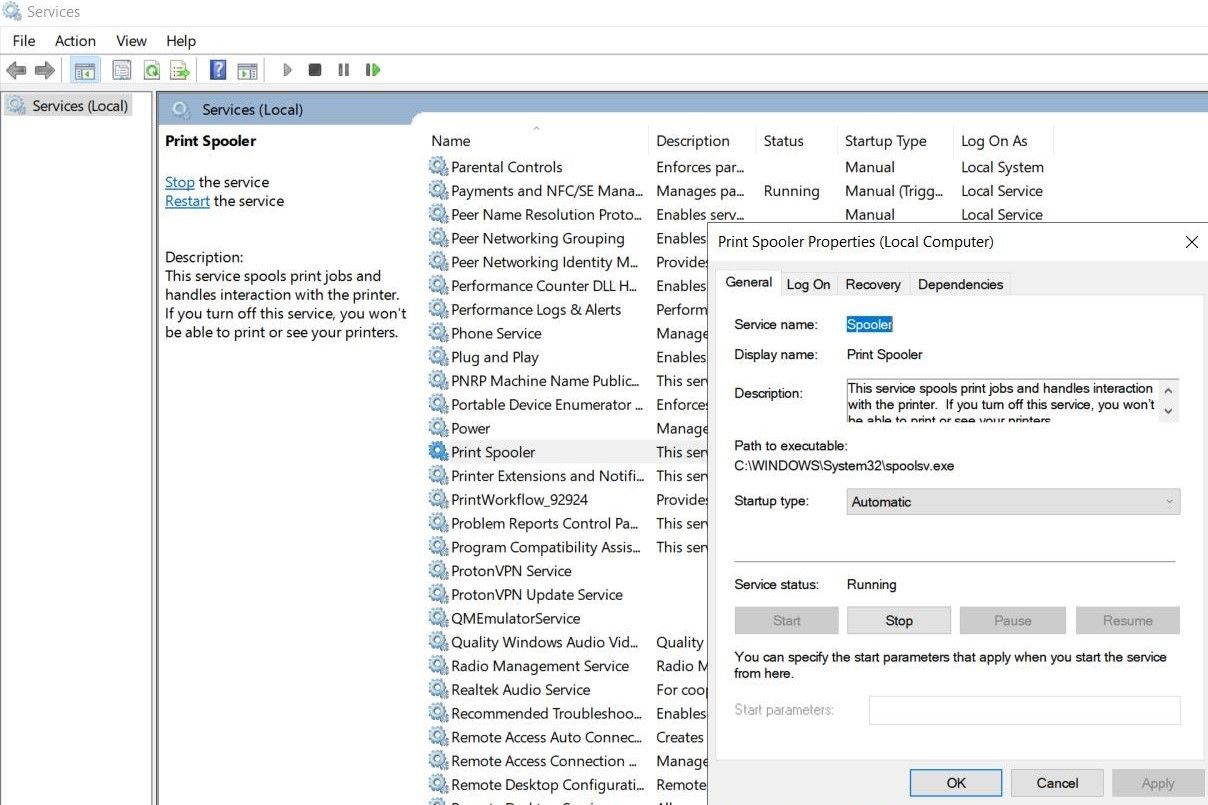
Right-click the Print Spooler service and select the Properties option.

-
Click the General tab.
-
Click the Stop button.

-
Use the “Windows key + R” keyboard shortcut to open the Run command.
-
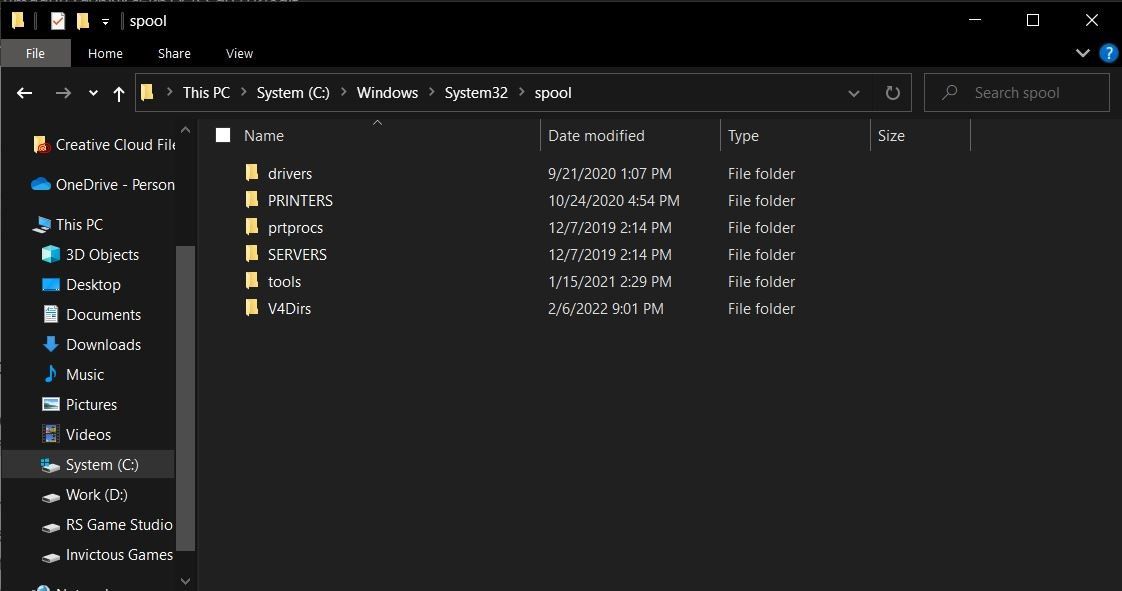
Type the following path to access the “printers” folder and press Enter:
-
C:\Windows\System32\spool\printers
-
Click the Continue button (if applicable).
-
Select everything in the “printers” folder (Ctrl + A keyboard shortcut) and hit the Delete button to remove the contents.

-
Click the General tab on the “Printer Spooler Properties” page.
-
Click the Start button to restart the service.

-
Click the OK button.


Once you complete the steps, you can try to print a document one more time, and the printer should work as expected.
6. Reinstall printer method
If the printer isn’t working because of corruption or a bug with the driver, you may be able to fix this problem by uninstalling and reinstalling the printer driver.
Uninstall driver
To remove a printer on Windows 11, use these steps:
-
Open Settings.
-
Click on Bluetooth & devices.
-
Click the Printers & scanners page.
-
Select the printer to open its properties page.
-
Click the Remove button.
-
Click the Yes button.


Once you complete the steps, you can delete the driver from Windows 11.
Install printer automatically
To add a wireless printer on Windows 11, make sure the printer is turned on and connected to the network, and then use these steps:
-
Open Settings.
-
Click on Bluetooth & Devices.
-
Click the Printers & scanners page.
-
Click the “Add device” button in the “Add a printer or scanner” setting.

-
Click Add device to install the wireless printer to Windows 11.


Once you complete the steps, Windows 11 will automatically set up the wireless printer. This guide provides more ways to install a wireless printer on your computer.
Install printer manually
If this is a USB printer, disconnect and reconnect the USB cable to trigger the installation once you remove the driver.
If Windows 11 fails to find the printer, you may need to install it manually with these steps:
-
Open Settings.
-
Click on Bluetooth & Devices.
-
Click the Printers & scanners page.
-
Click the “Add device” button in the “Add a printer or scanner” setting.
-
Click the “Add a new device manually” option for the “The printer that I want isn’t listed” option.
-
Select the “Add a printer using a TCP/IP address or hostname” option.

-
Click the Next button.
-
Select the Autodetect option in the “Device type” setting.
-
Check the “Query the printer and automatically select the driver to use” option.
-
Confirm the IP address of the printer.
Quick tip: This information can be found in the printer’s settings.
-
Click the Next button to install the wireless printer on Windows 11.
Quick note: If the setup doesn’t recognize the printer, you may have to select the brand and model from the wizard to install the correct drivers. If you can’t find the printer, click the “Windows Update” button to download the driver library. (This action can take a long time.)
-
Confirm the printer’s name.
-
Click the Next button.
-
Select the “Do not share this printer” option.
-
Click the Next button.
-
(Optional) Click the “Print a test page” button to test the printer connection.
-
Click the Finish button.


After you complete the steps, you can start printing from your laptop or desktop computer.
Additional troubleshooting steps
If this process didn’t resolve the issue, but the issue is related to the printer driver, you may need to uninstall and remove the driver from the computer before trying to reinstall the printer.
When the problem occurs after a driver or system update, rolling back to the previous version of the driver may resolve the problem or uninstall the most recent system update. Alternatively, you can also try downloading and installing an older printer driver version.
Are you still having issues with your printer? Let me know in the comments.
Microsoft may have jumped the barrel with Windows 11, which launched with a slew of faults and flaws. Some of these were resolved in the later versions, but others are still present today–printer errors being one of them.
Even after months of tinkering by the Microsoft team, if this issue is keeping you from printing important documents, you might want to look at this compilation of some tried and tested methods known to fix it.
Perform Basic Checks and Fixes
Apply the following preliminary checks and fixes first, as they may resolve the issue right away:
- Turn off your printer and turn it back on again.
- Unplug the printer from its power source and reconnect it.
- If you have a wired printer, make sure it’s properly connected and that the cable connecting it to your device is in good condition.
- Connect the printer to a different USB port to rule out possible port issues. If a USB port issue turns out to be the root cause of the problem, follow the instructions in our guide on how to diagnose and fix USB port issues.
- If you have a wireless printer, ensure it is properly paired with your device. You can also disconnect it once and repair it again to make sure there are no temporary glitches.
- If you have multiple printers connected to your device, unplug them all except the one you intend to use.
- If your office printer isn’t working correctly, make sure it isn’t already connected to more devices than it’s allowed to.
- Reload the printer tray if it has run out of paper.
- Ensure your printer hasn’t run out of ink or toner.
If none of the aforementioned basic checks and fixes resolves the issue, you can start applying the remaining fixes.
1. Run the Printer Troubleshooter
Start investigating the problem by running the Printer troubleshooter. It’s a built-in utility in Windows that helps users diagnose issues with their printers and provides suggestions for fixing them.
To run the troubleshooter, open Settings > System > Troubleshoot > Other troubleshooters. Here, you will find the Printer troubleshooter among the list of Windows troubleshooters. Click on the Run button next to it to activate it.
After that, follow the on-screen instructions to assist the troubleshooter in diagnosing the printer’s problem. If there are any software issues impeding your printing process, the troubleshooter will likely show you how to fix them.
2. Update the Relevant Drivers
Running the troubleshooter should be your go-to step whenever an error or issue arises. However, it is highly rare for it to diagnose, let alone solve, the problem. For this reason, your next reasonable step should be to check for driver updates and ensure the drivers are up-to-date. Here’s how to go about it:
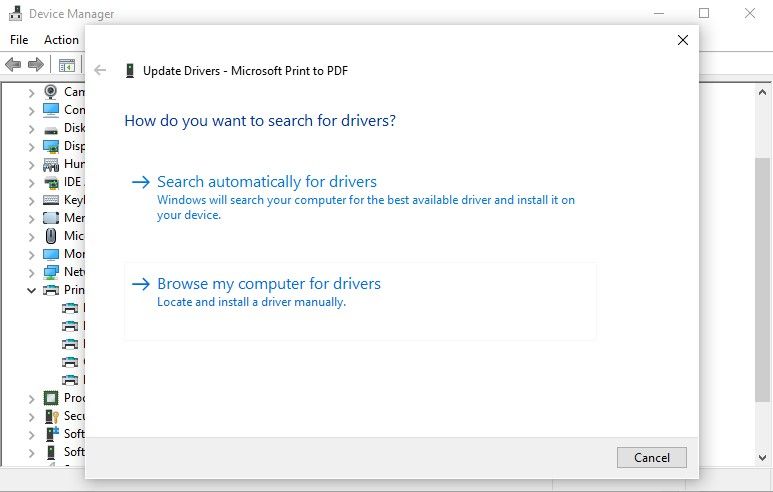
- Right-click the Start Menu button and select Device Manager from the list.
- Scroll down and expand the Print Queues category.
-
Right-click on Microsoft Print to PDF and select Update driver.

-
Selecting Search automatically for updated driver software in Windows 11 runs a check through your PC for updates.


If it shows the best device driver already installed, you can still give the manual option a try. To do this:
- Right-click Microsoft Print to PDF and select Properties from the drop-down menu.
- Go to the Details panel.
- Select Device instance path from the drop-down list under Property and then copy the Value that appears.
- Go to the DriverPack database.
- Paste the copied value in the search box, download a suitable driver and then install it.
3. Restart the Print Spooler Service
If updating the printer drivers does not fix the problem, you should check whether the print spooler service is running. The printer spooler service handles your operating system’s interactions with the printer. If this service is turned off, or its files get corrupted, your device may not even detect the printer.
So, you should restart the service and rebuild all of its files. Follow these steps to do that:
- Press Win + R to launch the Run dialogue box.
- Type «services.msc» and press enter.
- In services, find Print spooler and double-click on it.
-
Proceed by clicking on Stop.

-
Then follow the path C:\Windows\system32\spoolsv.exe and delete all the files present in the folder.

- Now, all you have to do is go back to Services and manually start the print spooler service again.
- Restart your PC.
4. Recheck Your Default Printer
Often, improper printer and scanner setup is the leading cause of printing issues. The most common reason why you face printer issues is that you didn’t choose your PDF printer as your default printing device or that you configured it to the incorrect port. It can simply be solved by:
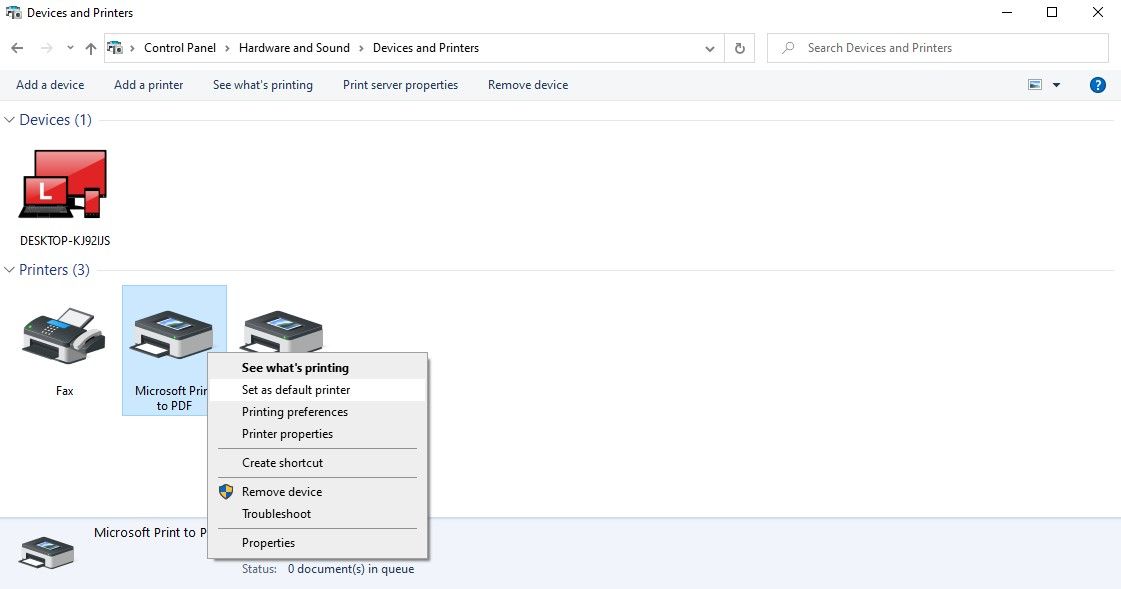
- Open Control Panel through your Windows search menu
- Click View devices and printers under Hardware and Sound.
-
Under the Printers panel, right-click on your PDF printer and select Set as default.

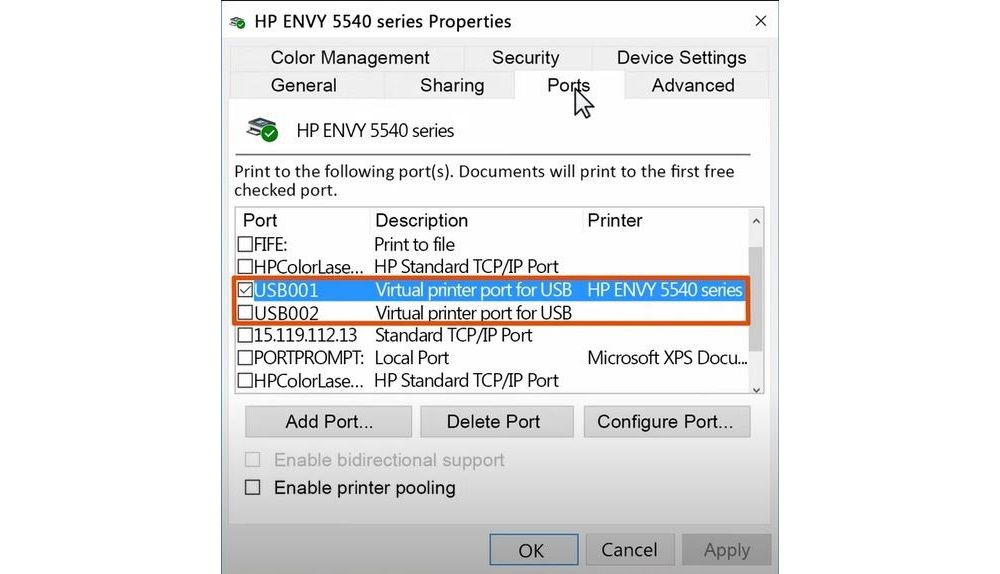
- Then, head over to Properties > Ports.
- Scroll through the list and select the port type that matches your connection.
-
Select Configure Port > Apply > OK.

5. Disable the Windows Defender Firewall
If your problem is still not solved the most probable culprit could be the Windows Defender firewall. It’s possible that your firewall has been configured too strictly, preventing the printer from interacting properly. So, turning off the firewall could fix the probem.
If you have never disabled the firewall before, check out our guide on how to temporarily disable the Microsoft Defender firewall.
6. Check for New Windows Updates
Windows releases updates periodically to fix existing bugs within the operating system. If you keep the updates paused or don’t let them install on time, you’re likely to run into unforeseen issues. To ensure that’s not the case, see if there is a new update available. If there is, you should install it immediately.
Here’s how you can check that:
- Press the Win key and click on the Settings icon.
- Head over to Windows Update
-
Click on Check for Updates.

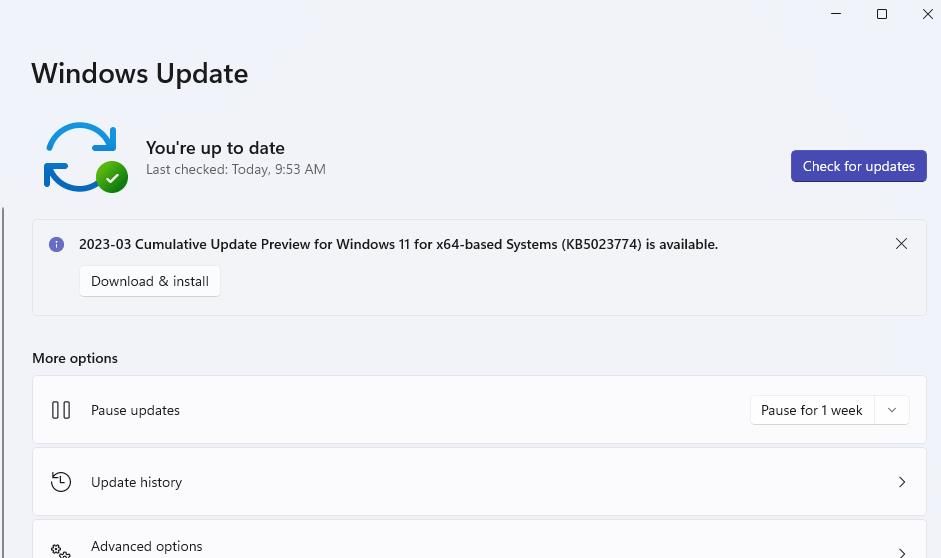
Windows will automatically search for updates, and if any new version is available, it will be installed, thus resolving your printer error.
7. Remove Your Last Windows 11 Update
Ironically, a new Windows update can also invite bugs that render your printer useless. If you noticed your printer stopped working right after a recent Windows update, you will need to delete the update from your computer.
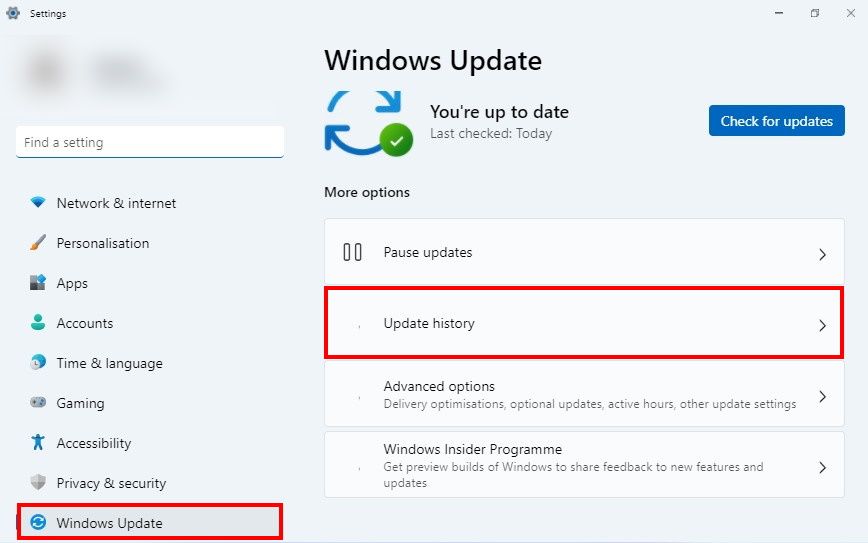
For this, head over to Settings > Windows Update > Update history. Here, scroll down and go to Uninstall updates located under Related settings. This action will prompt open a list of Windows updates where you must select the latest one and click on Uninstall.
If the latest Windows 11 update was the culprit, reversing it should do the trick and kickstart the printer once again.
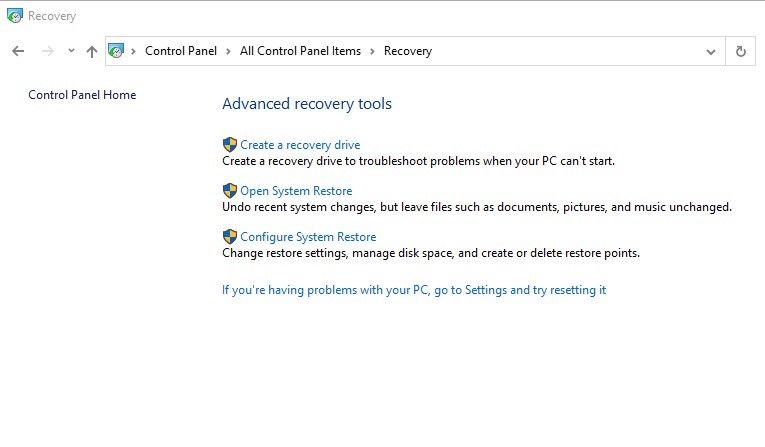
8. Run System Restore
If the problem began as soon as you upgraded to Windows 11, and you’ve exhausted all other alternatives, there’s one final solution–the Windows System Restore. Using this method restores Windows to a previous restore point where you know your printer was functional without any error.
To go back to a restore point:
- Press the Windows key and type Control Panel.
- Open the Control panel by clicking on its icon.
- Type «Recovery» in the Control Panel’s search box, and go to the Recovery settings.
-
Select Open System Restore.

- The System Restore dialogue box will launch open. Click on Next to proceed forward.
- Select the restore point to restore your computer back to when your printer was functioning without a hitch.
- Again, click on Next and then Finish to confirm your restore point.
- It will confirm one last time if you wish to proceed with the system restore process. Move your cursor to Yes and click.
Your PC will restart while it resets your Windows 11 to its last restore point.
Printer’s Fixed and Running—What’s Next?
Whether the printer’s malfunctioning due to troubles with your operating system or general hardware issues, it can be a frustrating experience. But hopefully, now that your printer is up and running smoothly again with the aid of these fixes mentioned above. Feel free to delve into how you can make the most of your home and office printers.
-
Home
-
News
- [Fixed]: Computer Freezes When Trying to Print Windows 10/11
[Fixed]: Computer Freezes When Trying to Print Windows 10/11
By Shirley | Follow |
Last Updated
Printing plays a very important role in daily life that can convert your digital documents into paper documents. However, sometimes your computer freezes when trying to print. This article from MiniTool will give you several useful and easy ways to help you deal with this issue.
Searching on Google, you will find that many users are asking some questions like “Why does my computer freeze when I try to print a pdf”, “Why does my computer crash when I try to print something”, and more. A user describes his problem as follows.
Whenever I attempt to print documents, images, etc. from Word, my laptop will lag or freeze. Trying to print from other programs separate from Word such as PDFs opened in Chrome, Firefox, and Microsoft Edge results in the same issue, the page «not responding» and or crashing. This issue only occurs when I try to print using a USB-connected printer. The issue is exclusive to my laptop as the printer works fine with other laptops.
answers.microsoft.com
In previous posts, we talked about how to fix Microsoft Edge crashes when printing. Today we are going to guide you solve the “computer freezes when trying to print” matter.
How to Fix Computer Freezes When Trying to Print Windows 10/11
Fix 1. Reconnect the Printer
Reconnecting the printer is an effective way to solve connection issues or temporary software issues. When your printer is connected to your computer by a USB cable, you can disconnect and reconnect the USB cable. At the same time, you can choose a new USB port to check whether the issue can be fixed. Here you may be interested in this post: If Your USB Port Not Working, These Solutions Are Available.
Fix 2. Restart the Printer Spooler Service
The Printer Spooler service is an important process used for managing printing tasks in Windows. When the computer freezes when trying to print, you can try to restart the Printer Spooler service.
Step 1. Press Windows + R key combinations to open the Run command window.
Step 2. In the new window, type services.msc and press the Enter key on your keyboard (Here you may be interested in this post: How to Fix Keyboard Typing in All Caps in Windows 10/11).
Step 3. Scroll down to click Print Spooler. Then click the Restart button from the left panel.
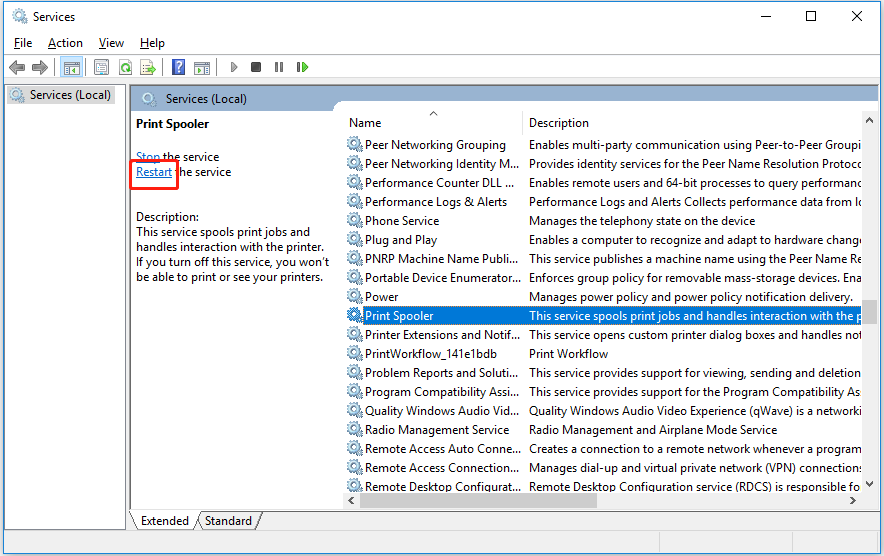
Step 4. Restart your PC and print your document again to check whether the problem of “computer or programs crash when trying to print Windows 10” persists.
Fix 3. Run Printer Troubleshooter
Troubleshooting the printer is also an effective way to fix “computer freezes when trying to print”. The major steps are as follows.
Step 1. Press the Windows + I keyboard shortcuts to open Windows Settings and select Update & Security.
Step 2. Move on to the Troubleshoot section and click on Printer then Run the troubleshooter.

Step 3. Wait for the problem-detecting process to complete and then follow the on-screen instructions to fix found problems.
Fix 4. Disable Antivirus
Computer antiviruses like Windows Defender can prevent your PC from virus infection. For example, you can make Windows Defender scan the USB drive automatically to protect your USB drive. However, some antiviruses conflict with other programs which can lead to the “computer freezes when trying to print” issue.
So, you need to disable all antivirus for a while to check whether you can print your files as normal. If this way fails to work, you had better re-enable the antiviruses to safeguard your data.
Top Recommendation
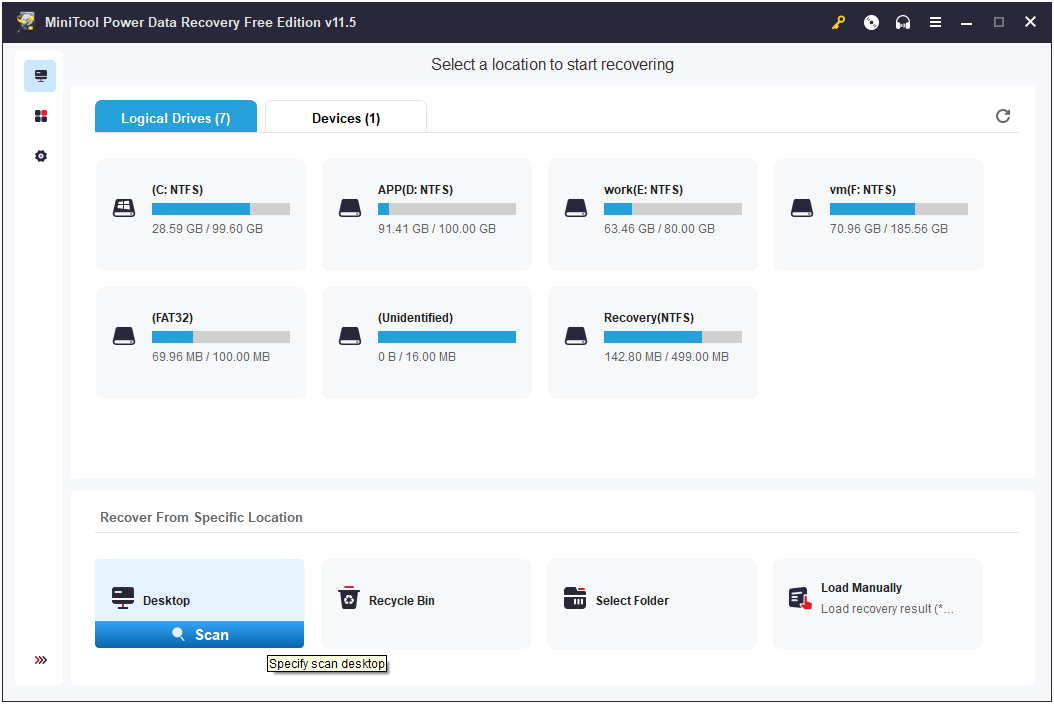
If your files get lost due to a virus attack or deleted by antiviruses, you can use MiniTool Power Data Recovery, a piece of free data recovery software, to get lost data back.
MiniTool Power Data Recovery works great on Windows Pictures folder recovery, Office files recovery, emails recovery, videos recovery, audio restoration, and so on. It supports recovering files in various data loss or data rescue situations. For example, it can restore your files when your File History reads “We found errors in your File History settings”.
Just click the button below to free download MiniTool Power Data Recovery and give it a try.
MiniTool Power Data Recovery FreeClick to Download100%Clean & Safe
Fix 5. Run DISM and SFC
Corrupted files can cause your computer all sorts of problems, such as Excel freezes when copying and pasting. So, to rule out corrupted file issues, you need to perform a DISM and SFC scan to scan and repair system files. For a detailed guide, you can refer to Use the System File Checker tool to repair missing or corrupted system files.
Bottom Line
When your computer freezes when trying to print Windows 10/11, you can try the solutions listed above to fix it. Besides, if your files are lost, you can use MiniTool Power Data Recovery to recover deleted files.
If you want to know more information about computer issues, welcome to visit MiniTool News Center.
About The Author
Position: Columnist
Shirley graduated from English major and is currently an editor of MiniTool Team. She likes browsing and writing IT-related articles, and is committed to becoming a professional IT problem solver. The topic of her articles are generally about data recovery, data backup, and computer disk management, as well as other IT issues. In spare time, she likes watching movies, hiking and fishing.