
Все способы:
- Способ 1: Изменение конфигурации системы
- Способ 2: Снятие ограничений через «Командную строку»
- Способ 3: Управление виртуальной памятью
- Способ 4: Проверка оперативной памяти на наличие ошибок
- Способ 5: Проверка параметров BIOS
- Способ 6: Уменьшение размера буфера интегрированной графики
- Способ 7: Внесение изменений в реестр
- Способ 8: Проверка работоспособности ОЗУ
- Вопросы и ответы: 0
Если у вас возникли подозрения, что операционная система Windows использует или отображает не всю оперативную память, для начала рекомендуем проверить, отображаются ли все подключенные планки, и как сторонние программы показывают доступный лимит памяти. В некоторых случаях отсутствие информации сразу указывает на физические проблемы комплектующих, поэтому программную часть можно будет пропустить и в первую очередь проверить подключение и состояние ОЗУ.
Подробнее: Просмотр оперативной памяти в Windows 11
Способ 1: Изменение конфигурации системы
Распространенная причина проблемы с использованием всей оперативной памяти в Windows 11 — неправильная настройка конфигурации системы. В ОС есть параметры, позволяющие вручную ограничить количество потребляемых системных ресурсов или же отключить подобное слежение. Поэтому вам понадобится самостоятельно проверить настройки, и при необходимости изменить их под себя.
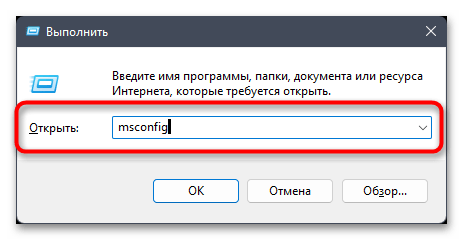
- Откройте утилиту «Выполнить», используя для этого сочетание клавиш Win + R. Введите в строке команду
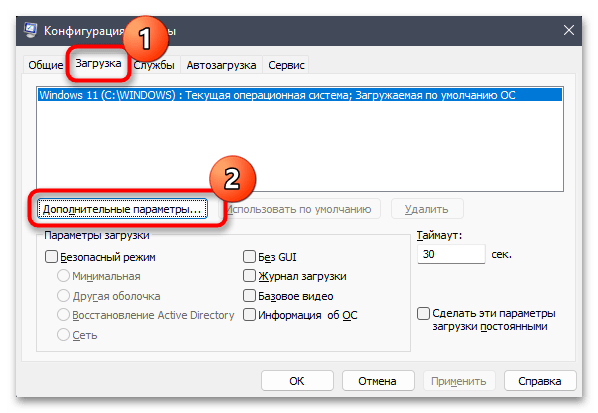
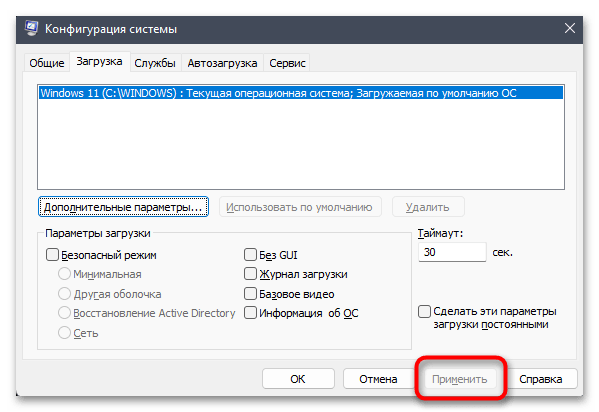
msconfigи нажмите Enter для ее применения. - В новом окне перейдите на вкладку «Загрузка» и нажмите по «Дополнительные параметры», чтобы открыть окно с требуемыми настройками.
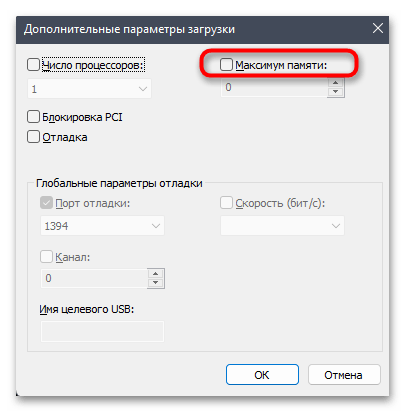
- Следующие действия зависят от того, установлена ли в параметрах загрузки галочка «Максимум оперативной памяти». Если да и выбрано количество мегабайт, рекомендуем отключить данный параметр.
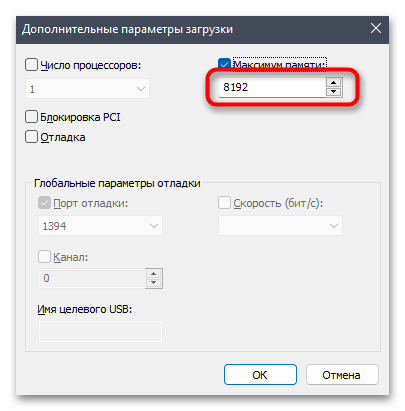
- Если сейчас он и так отключен, поставьте галочку и укажите число в мегабайтах, соответствующее объему вашей оперативной памяти, после чего нажмите «ОК», чтобы выйти из данного окна.
- В «Конфигурации системы» кликните по «Применить» и подтвердите отправку ПК на перезагрузку, чтобы изменения вступили в силу. При следующем входе в Windows можете приступать к проверке количества доступной оперативной памяти.
Способ 2: Снятие ограничений через «Командную строку»
Следующий метод по своему действию похож на предыдущий, но является более эффективным и иногда единственным рабочим, если установлено системное ограничение на количество доступной оперативной памяти. Суть способа заключается в использовании специальных консольных утилит, при помощи которых редактируется конфигурация загрузки ОС и убираются любые лимиты на использование ОЗУ.
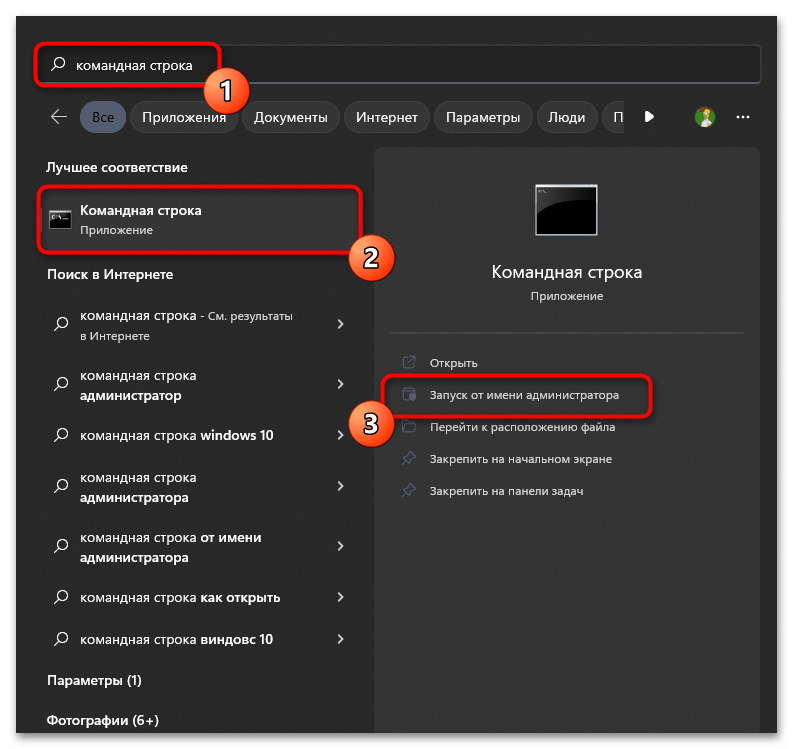
- Откройте «Пуск», отыщите «Командную строку» и обязательно запустите данное приложение от имени администратора.
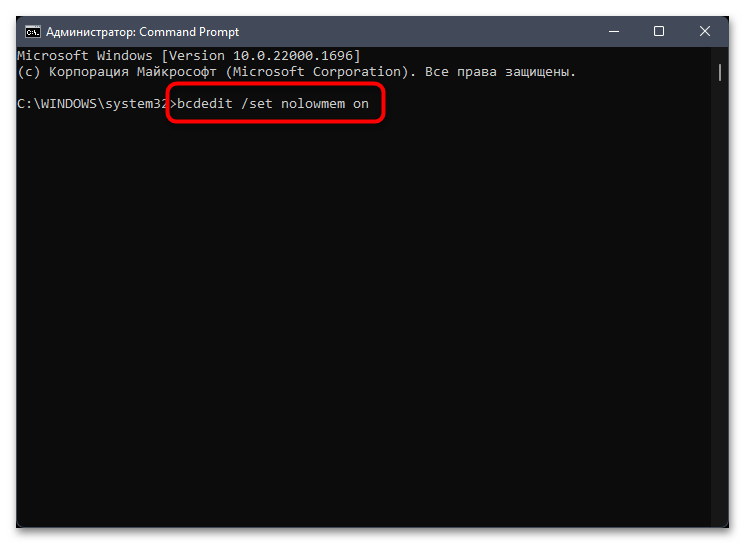
- Введите первую команду
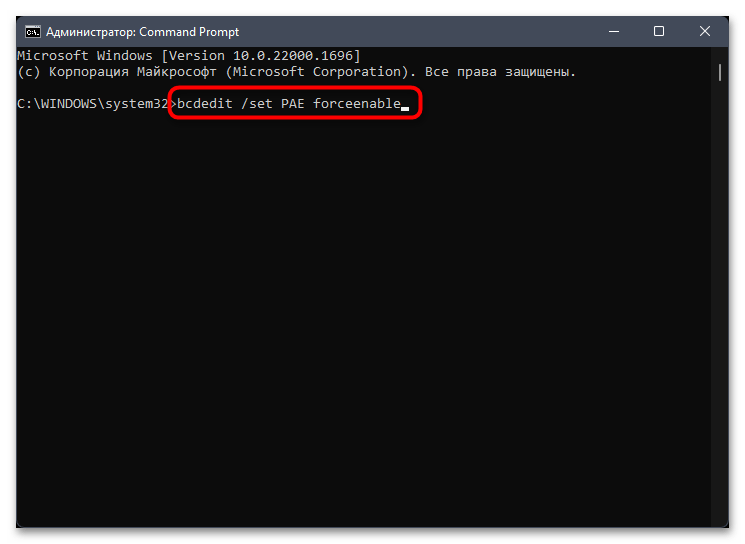
bcdedit /set nolowmem onи подтвердите ее активацию, нажав по клавише Enter. - После появления информации об успешном применении напишите еще одну команду
bcdedit /set PAE forceenableи точно так же ее подтвердите. Остается только перезагрузить компьютер, чтобы проверить, помогли ли данные действия исправить ситуацию.
Способ 3: Управление виртуальной памятью
Виртуальная память, она же еще называется файлом подкачки, никак не связана с физическим объемом установленной в компьютере оперативной памяти, поскольку потребляет свободное место с жесткого диска или SSD. Однако иногда неправильные настройки виртуальной памяти или системные сбои влияют на визуальное отображение или доступность максимального количества RAM, которое отличается от фактического. Поэтому мы рекомендуем проверить виртуальную память, отключив ее или выбрав режим автоматического назначения.
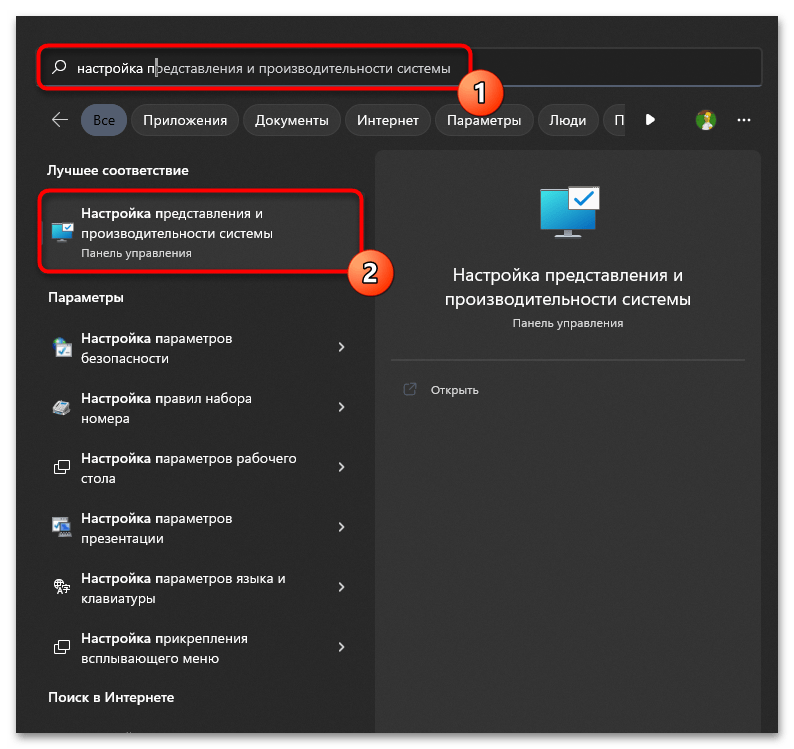
- Откройте «Пуск» и найдите элемент «Панели управления» с названием «Настройка представления и производительности системы». Нажмите по нему левой кнопкой мыши, чтобы перейти к соответствующему окну.
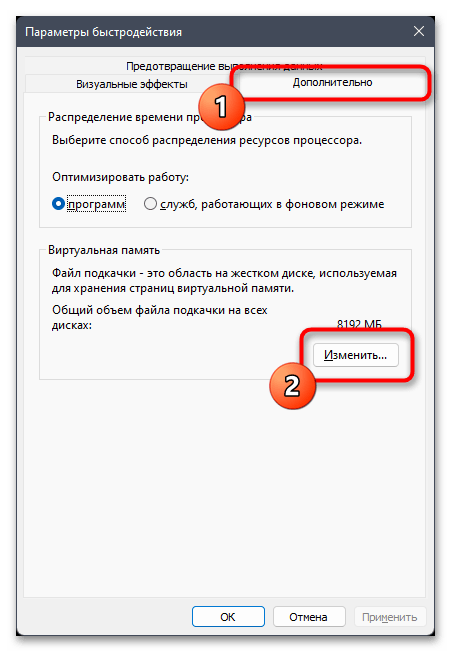
- В нем выберите вкладку «Дополнительно» и в блоке «Виртуальная память» кликните по «Изменить».
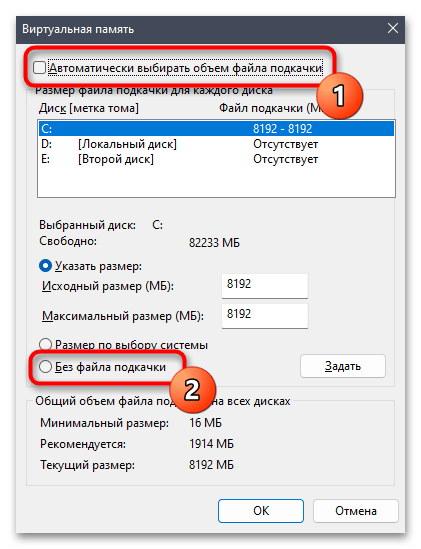
- Проверьте, какой режим использования файла подкачки сейчас установлен. Если он и так автоматический, попробуйте отключить файл подкачки, установив маркер возле соответствующего пункта. При ручном выборе размера пока что лучше переключиться на автоматически, чтобы проверить, повлияет ли это на решение рассматриваемой проблемы. Обязательно примените изменения и перезагрузите компьютер, чтобы они вступили в силу.
Способ 4: Проверка оперативной памяти на наличие ошибок
Существует вероятность, что проблемы с доступным количеством оперативной памяти вызваны программными сбоями в ее работе. Это может отражаться и на быстродействии операционной системы и появлении различных зависаний в программах или играх. Существуют разные методы программной проверки памяти, которые часто оказываются эффективными и исправляют различные сбои, налаживая корректное функционирование ОЗУ. О таких методах читайте в материале по следующей ссылке.
Подробнее: Поиск ошибок оперативной памяти на компьютере с Windows 11
Способ 5: Проверка параметров BIOS
Микропрограммное обеспечение BIOS влияет на настройки материнской платы и всех комплектующих. В нем есть множество разных параметров, предназначенных для работы функций, установки различных ограничений и изменения общей конфигурации системы. В случае с оперативной памятью в БИОС понадобится найти параметр, отвечающий за назначение ОЗУ в сборках, где ее объем превышает 4 ГБ. Сама функция должна быть обязательно активированной, чтобы пользователь мог использовать всю доступную память.
- В первую очередь щелкните по ссылке ниже и выберите подходящий для вас метод входа в BIOS, если собираетесь делать это впервые.
Подробнее: Как попасть в BIOS на компьютере
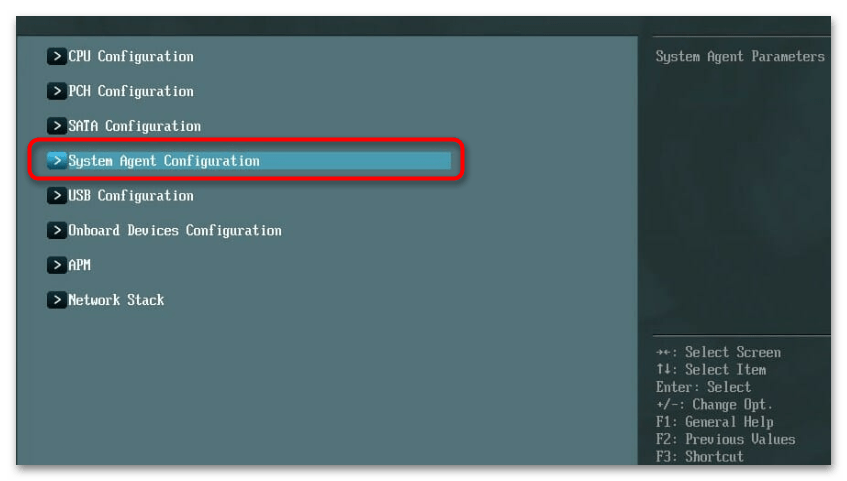
- Далее в BIOS или UEFI (зависит от ревизии и модели материнской платы) откройте раздел с дополнительными настройками. Он может называться «Advanced», «Advanced Options» или «System Agent Configuration».
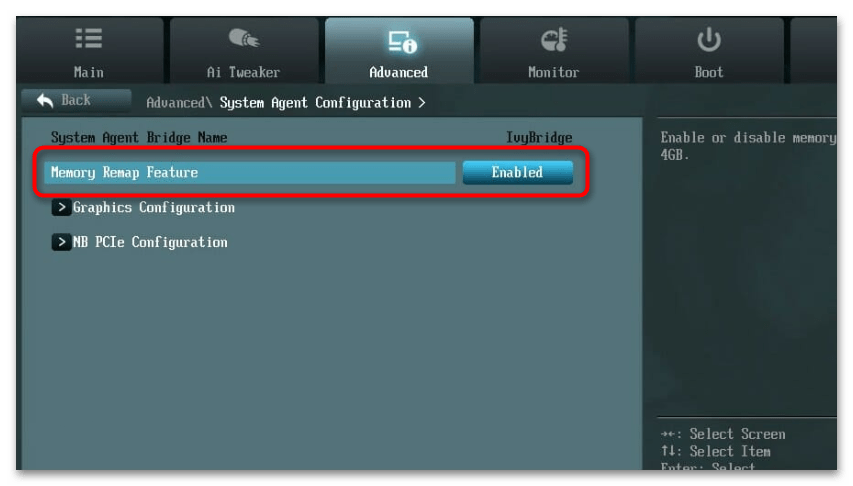
- В таком разделе понадобится найти функцию с названием «Memory Remap Feature». Реже могут встречаться следующие названия: «Memory Remapping», «DRAM Over 4G Remapping», «H/W DRAM Over 4GB Remapping», «Hardware Memory Hole», «Memory Hole Remapping». Все они относятся к одной и той же функции и отвечают за одинаковое действие — разблокировку ОЗУ, объем которой превышает 4 ГБ. Обязательно установите значение для данного параметра «Enabled». При выходе из BIOS сохраните настройки, затем запустите Windows 11 и проверьте изменения.
Способ 6: Уменьшение размера буфера интегрированной графики
Данный метод актуален только для пользователей с ПК или ноутбуком, в которых есть интегрированный в процессор видеочип. У интегрированной видеокарты память берется с оперативной, а сам буфер доступного размера формируется через BIOS по умолчанию в автоматическом режиме. Как раз потребление или блокировка RAM интегрированной графикой и может стать причиной того, что в Windows вы видите не всю оперативную память в операционной системе.
Читайте также: Что значит интегрированная видеокарта

Для решения этой ситуации вам необходимо в BIOS выбрать раздел «Advanced» и найти «Video Memory» или «UMA Frame Buffer Size», чтобы поменять автоматическое назначение на любое удобное для вас количество выделяемой памяти. Если интегрированной графикой вы в принципе не пользуетесь, блокировку ОЗУ можно отключить, тогда ее объем точно будет полностью доступен в Windows 11.
Способ 7: Внесение изменений в реестр
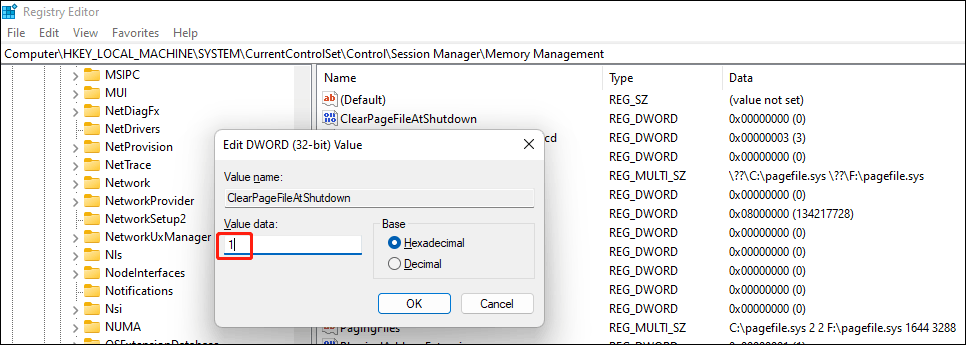
Рекомендация по внесению изменений в системный реестр больше рассчитана на устранение системных сбоев, когда файл подкачки автоматически не очищается при выключении ПК, что влечет за собой появление нарушений как в визуальном отображении доступного ОЗУ, так и в физическом, когда в играх или программах память задействована не вся. Отредактировать нужно всего один параметр, а осуществляется это так:
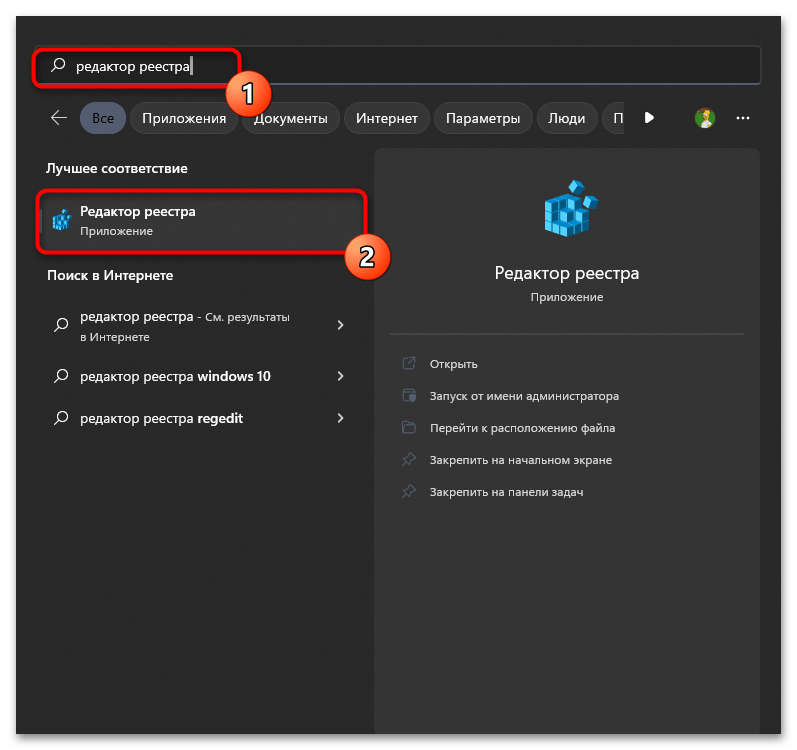
- Откройте «Пуск», через поиск отыщите «Редактор реестра» и запустите данное классическое приложение.
- Вставьте в адресную строку путь
Компьютер\HKEY_LOCAL_MACHINE\SYSTEM\CurrentControlSet\Control\Session Manager\Memory Managementи перейдите по нему, нажав клавишу Enter. - Найдите параметр с названием «ClearPageFileAtShutdown» и кликните по нему дважды для открытия «Свойств».
- Поменяйте значение на «1», сохраните изменения и перезагрузите компьютер, поскольку новые настройки реестра активируются только в новом сеансе ОС.


Способ 8: Проверка работоспособности ОЗУ
Если ничего из перечисленного выше не помогло сделать всю оперативную память доступной в Windows 11, скорее всего, дело не в программных ошибках, а физических. В первую очередь стоит запустить средства проверки оперативной памяти на работоспособность или переподключить планки к другим разъемам на материнской плате. Иногда единственным выходом будет замена ОЗУ или обращение в сервисный центр, но сначала все-таки попробуйте выполнить проверку вручную так, как это описано в материале далее.
Подробнее: Как проверить оперативную память на работоспособность
Наша группа в TelegramПолезные советы и помощь
Frankly, I love Windows 11 for a number of great features, fresh design language, and fluid UI. However, Windows 11 has a few issues that remind us of Windows 10 days. For instance, Windows 11 shows a black screen after an update at times, which makes the experience bitter, especially for those who are upgrading to Windows 11 from Windows 10. Now, there is another set of RAM-related problems on Windows 11, making users regret their decision to move to Windows 11. Memory problems like high RAM usage, memory leaks, and low memory are plaguing Windows 11 users. So here’s a one-stop guide to fix memory problems on Windows 11. If you are facing any kind of RAM issues on Windows 11, follow our tutorial below.
Fix Memory Problems on Windows 11 (2022)
In this tutorial, we have included fixes to multiple RAM issues on Windows 11. From memory leaks on Windows 11 to faulty RAM detection, we have included all the fixes and tools to better understand the memory problem. You can expand the table below and move to any section you want.
Table of Contents
How to Check Memory Leak on Windows 11
While the memory leak issue arising from File Explorer on Windows 11 has been fixed by Microsoft, you can confirm whether you are still affected and follow the fix below if you are still facing the problem. Here is how to check memory leaks on Windows 11.
1. Press the Windows 11 keyboard shortcut “Windows + R” to open the Run window. Here, type resmon and hit Enter. This will open the Resource Monitor.
2. Now, move to the “Memory” tab and take a look at the “Standby” memory. Make sure to close all the apps and windows. With no apps running and File Explorer closed, the Standby memory should free up, and the memory usage should come down. If the Standby memory still seems high and Windows 11 is not releasing the memory, it means you are having a memory leak issue on Windows 11.

Close File Explorer to Fix Memory Leak
Till now, the File Explorer on Windows 11 has been known to cause the memory leak issue. So, we need to perform some basic steps first in order to release the memory held by the system. Here are the steps to follow.
1. To fix the memory leak issue on Windows 11, close all the windows of File Explorer. Simply right-click on the File Explorer icon in the Taskbar and click on “Close all windows”.

2. Next, press “Ctrl + Shift + Esc” to open the Task Manager. Then, under the “Processes” tab, look for “Windows Explorer“. Right-click on it and click on “Restart”. This will restart Windows Explorer, which should further free up RAM on Windows 11.

Modify File Explorer Folder Options
Some users have reported that opening folder windows in a separate process help fix the memory leak issue on Windows 11. Try the steps below and see if this resolves the problem.
1. Press “Windows + E” to open the File Explorer. Click on the 3-dot menu on the top menu bar and open “Options“.

2. Here, move to the “View” tab and scroll down under the “Advanced settings”. Now, enable the checkbox for “Launch folder windows in a separate process“.
3. Finally, hit “OK” and restart your PC. Now onwards, Windows 11 should not reserve an unusual amount of memory for File Explorer.

Disable Startup Programs
In our article on how to speed up Windows 11, we have noted that disabling unnecessary startup programs significantly frees up resources on boot and prevents high RAM usage on Windows 11. For better maintenance, you should always disable unnecessary startup programs. Here is how to do it.
1. Press “Ctrl + Shift + Esc” to open the Task Manager. Now, move to the “Startup” tab.

2. Here, look for the programs that are not needed after login. Right-click on the program and disable them right away. If there is an unidentified program, make sure to disable it. Now, restart your PC, and a huge amount of RAM should free up.

Increase Virtual Memory
If you have low physical memory, you can increase the size of virtual memory, also known as “swap”. Basically, Windows 11 will use some sectors of the hard disk as RAM when your PC is low on memory. This will significantly help you combat high RAM usage on Windows 11. Here’s how to set it up
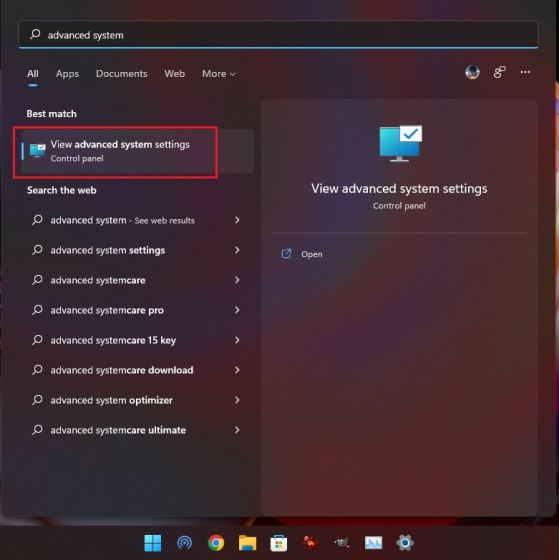
1. First, press the Windows key once and search for “advanced system”. Now, open “View advanced system settings“.
2. In the “System Properties” window, click on “Settings” under the “Performance” section.
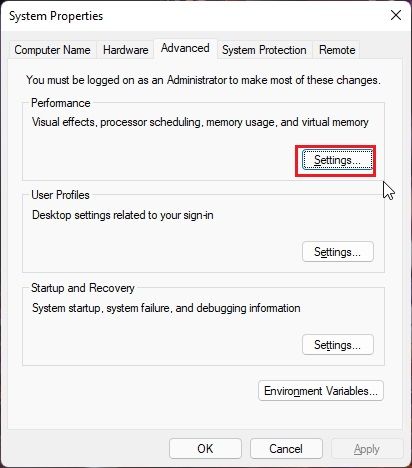
3. In the next window, move to the “Advanced” tab and click on “Change” under “Virtual memory”.
4. Uncheck the “Automatically manage paging file size for all drives” checkbox on the top and click on “Custom size”. Under the “Initial size” field, enter what is recommended below. For example, I have set “1912” as the initial size. As for the “Maximum size”, enter 4096. This will provide 4GB of additional virtual memory to your Windows 11 PC. Now, click on Set -> OK.
Note: You can set the Maximum size up to 3 times the physical memory. So if you have a PC with 8GB of physical RAM, you can set up to 24GB (24576MB) of virtual memory.
5. Finally, restart the PC, and the low RAM issue should be fixed on Windows 11.
Diagnose Memory Issues on Windows 11
If Windows 11 is crashing or freezing due to unexplainable reasons, it’s most likely the faulty RAM on your PC. Windows 11 comes with a built-in Windows Memory Diagnostic tool that performs several basic and advanced tests to check the reliability of the RAM. We’re going to use this tool to find possible memory issues.
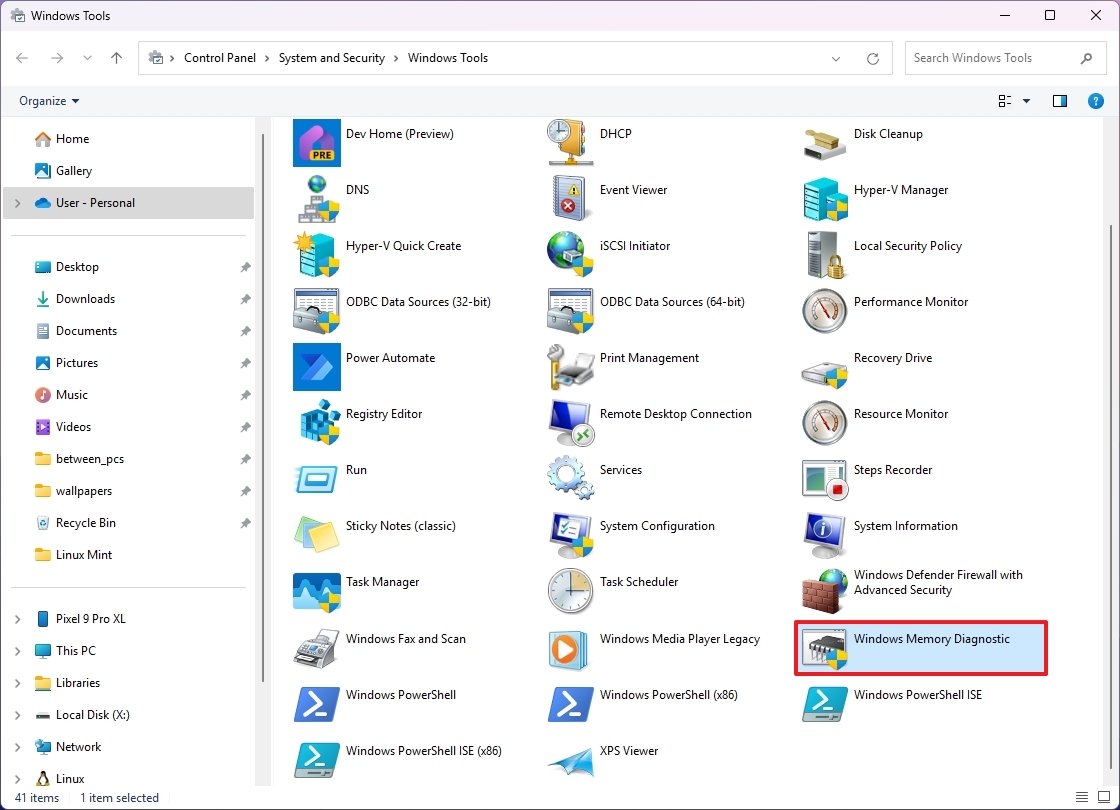
1. Press the Windows key once and search for “tools“. Now, open “Windows Tools” from the search result.

2. Next, open the “Windows Memory Diagnostic” tool.

3. It will ask you to restart your PC to check for RAM problems on Windows 11. Click on “Restart now“.

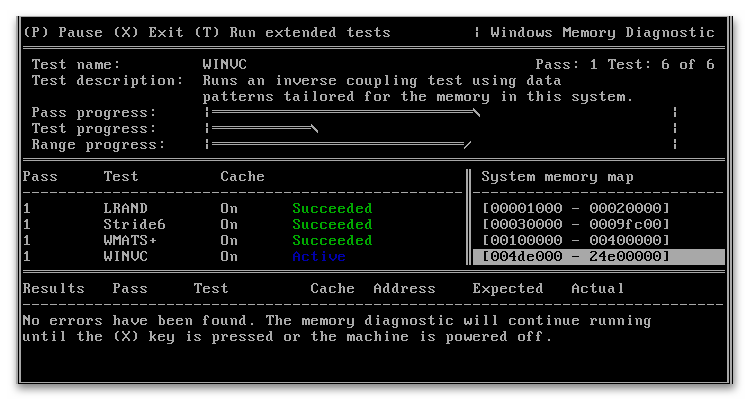
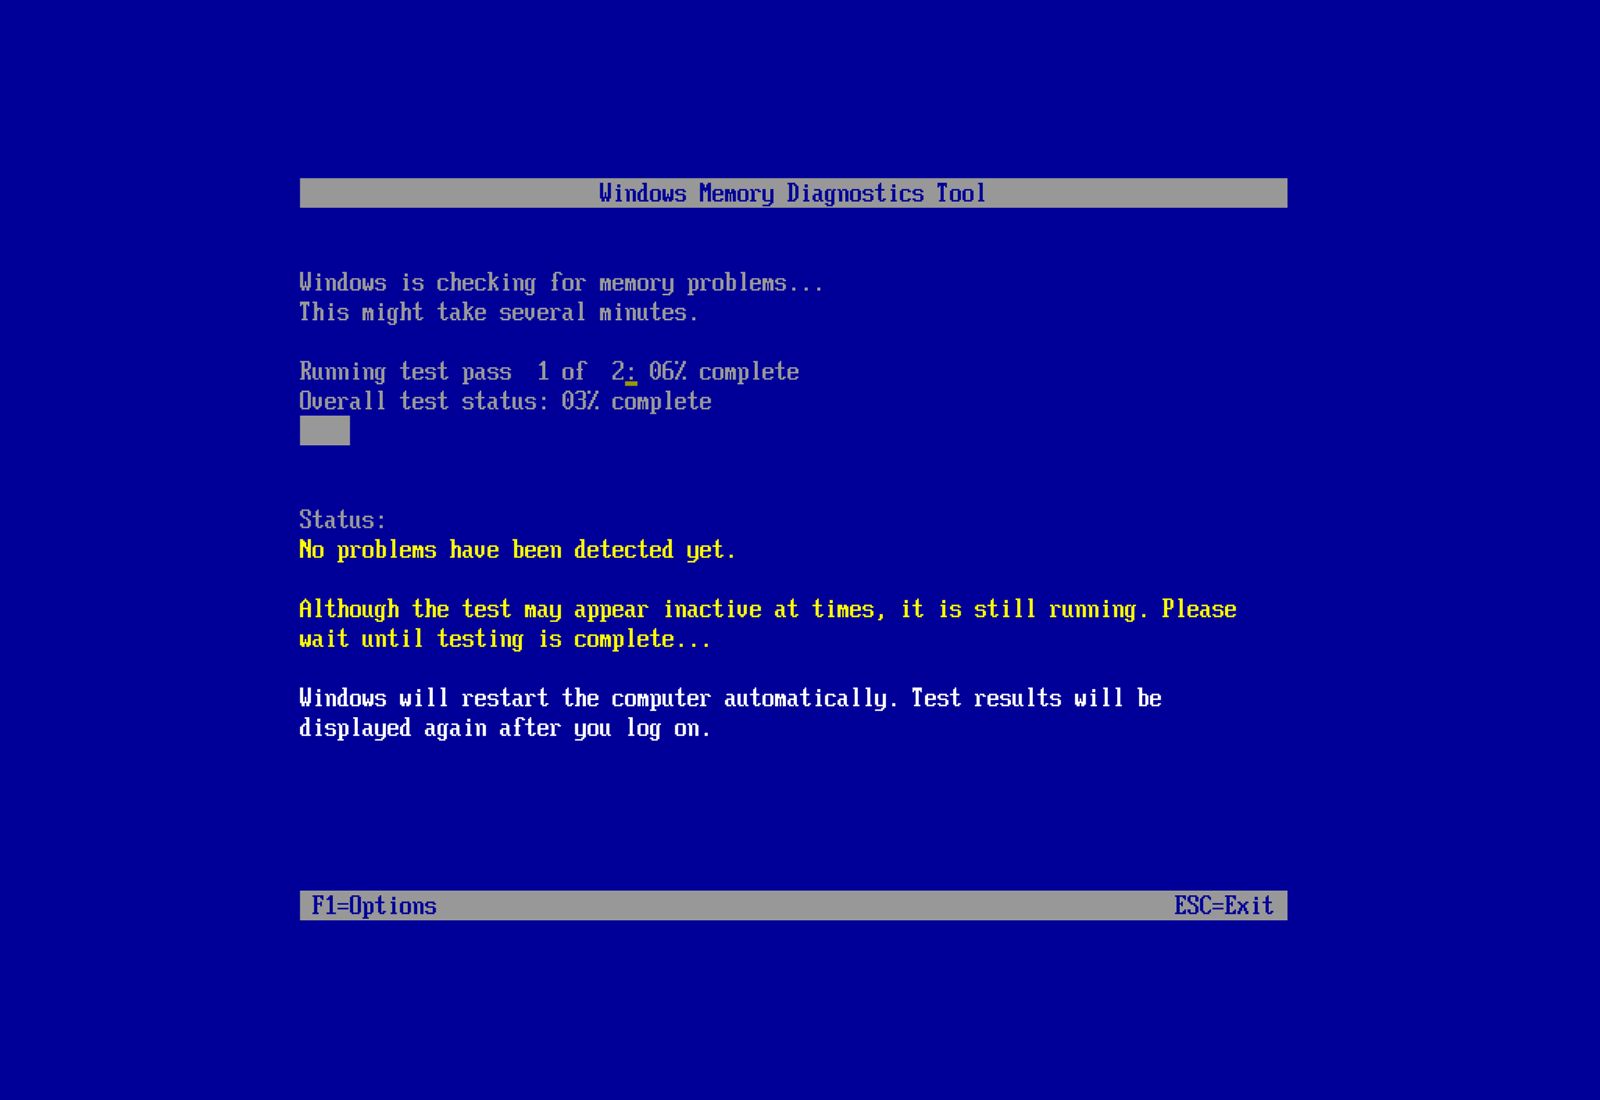
4. You will now enter the Windows Memory Diagnostics Tool screen, and it will automatically start the Standard test, which checks for all the BASIC tests, including INVC, MATS+, SCHCKR (cache enabled), LRAND, Stride6 (cache enabled), CHCKR3, and more.

5. In case you want to perform a more advanced test for RAM called Extended, you can press the “F1” key and choose the desired test. Use the “Tab” key to move between options and “F10” to apply the changes.

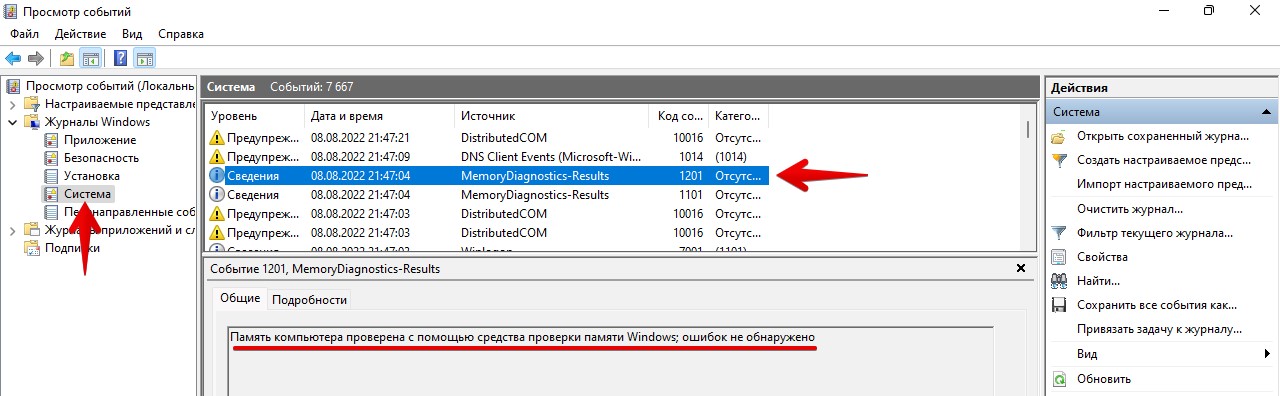
6. After the memory test is done, your PC will automatically restart. Log in to your PC to view the test results. Press the Windows key once and search for “Event Viewer“. Now, open it.

7. Here, expand “Windows Logs” and then open “System” logs. Now, scroll down and look for “MemoryDiagnostics-Results“.

8. Open it and review the result. If it says your memory does not have any errors, you should look at other sources for the root cause. And in case the tool detects an error, you might have to replace the RAM.

9. If you are not satisfied with the native Windows Memory Diagnostic Tool, go for the MemTest86 app (Free), which is the number #1 contender in our list of best tools to stress test RAM. It offers more than 13 algorithms and looks for all possible hardware errors in RAM.

Fix RAM Issues on Windows 11 Right Away
So these are the ways to fix memory problems on Windows 11. If you have a high RAM usage issue, it might have to do with a memory leak or background programs eating up an unusual amount of RAM. We have included multiple solutions for this issue, so just follow the guide above for a suitable solution. Anyway, that is all from us. If you are facing high disk usage on Windows 11, follow our tutorial to fix the said issue. And to access God mode on Windows 11, we have a handy guide in place for you. Finally, if you have any queries, let us know in the comments section below.
(Image credit: Mauro Huculak)
On Windows 11, if your PC is running sluggish and apps are crashing, or the system experiences a random Blue Screen of Death (BSOD), freezes, or reboots, the first thing you should check is the memory to discard a problem with any of the modules. This is not only because memory issues can make the device unstable, but also because they could cause data corruption and other errors.
If you suspect the problem is related to the system memory, you can use the «Windows Memory Diagnostic,» a legacy tool that can perform many tests to check your computer’s Random Access Memory (RAM) to determine whether one or more memory sticks have problems.
In this how-to guide, I’ll explain the steps to use the Windows built-in tool to determine whether your computer has a faulty memory module.
How to diagnose memory problems on Windows 11
To run a memory check on Windows 11, close your running apps and use these steps:
- Open Start.
- Search for Windows Tools and click the top results to open the app.
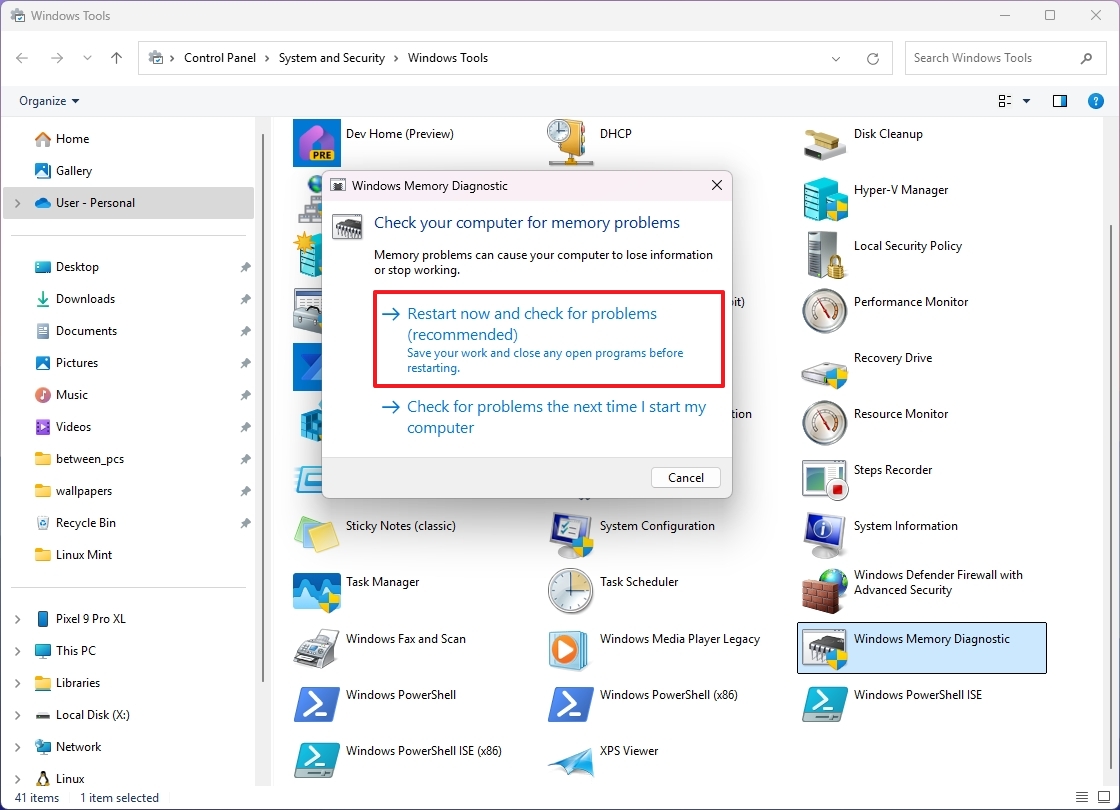
- Double-click the «Windows Memory Diagnostic» tool.
- Click the «Restart now and check for problems» option.
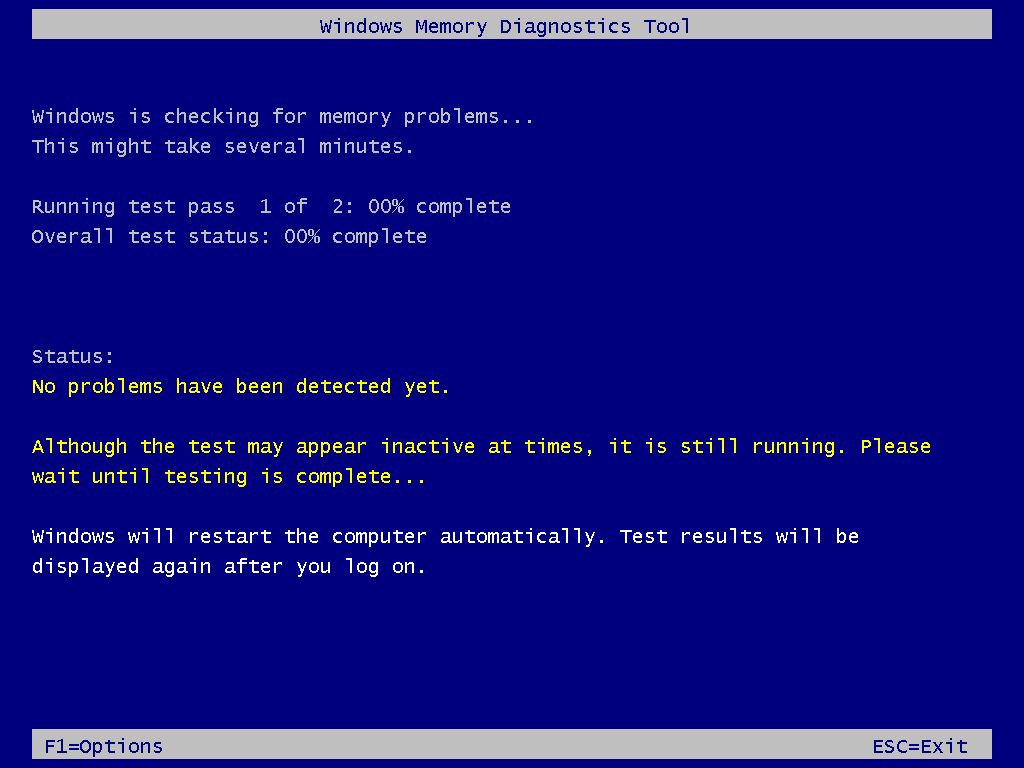
Upon restart, the tool will start testing the «Standard» mode right away. In this mode, the Windows Memory Diagnostic tool will run all the scans available in the «Basic» mode, in addition to LRAND, Stride6 (cache enabled), CHCKR3, WMATS+, and WINVC tests.
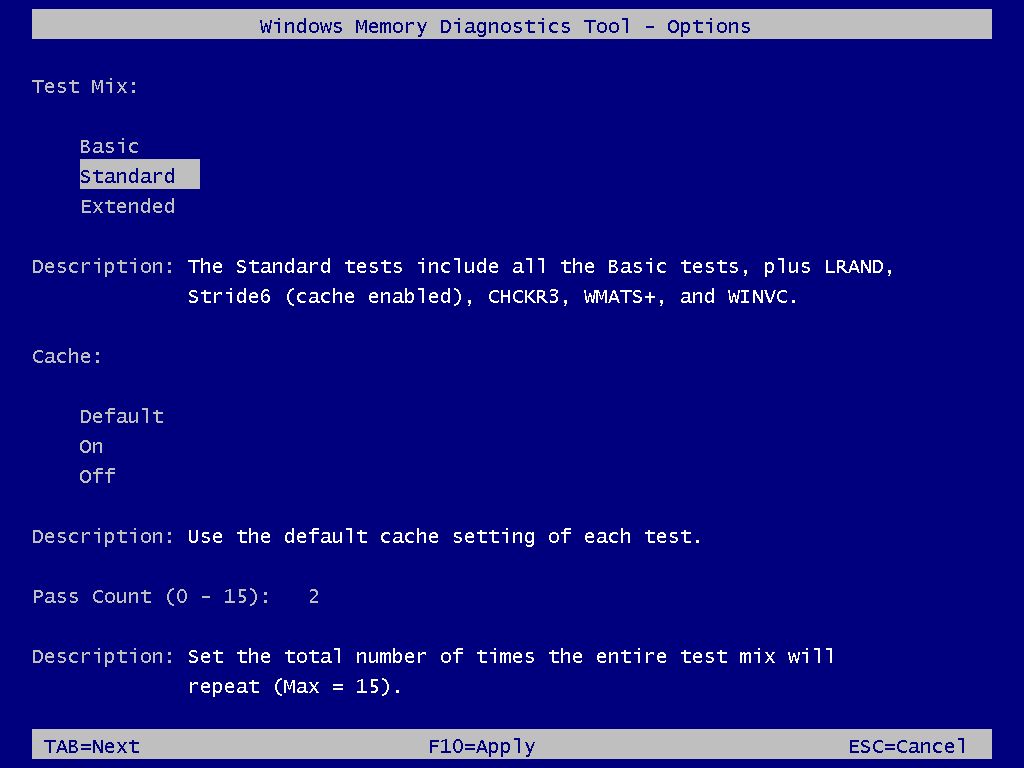
The Standard test mode should be enough to diagnose and find problems with the system memory, but you can also use the «F1» key to open the Windows Memory Diagnostic page to change the scan options.
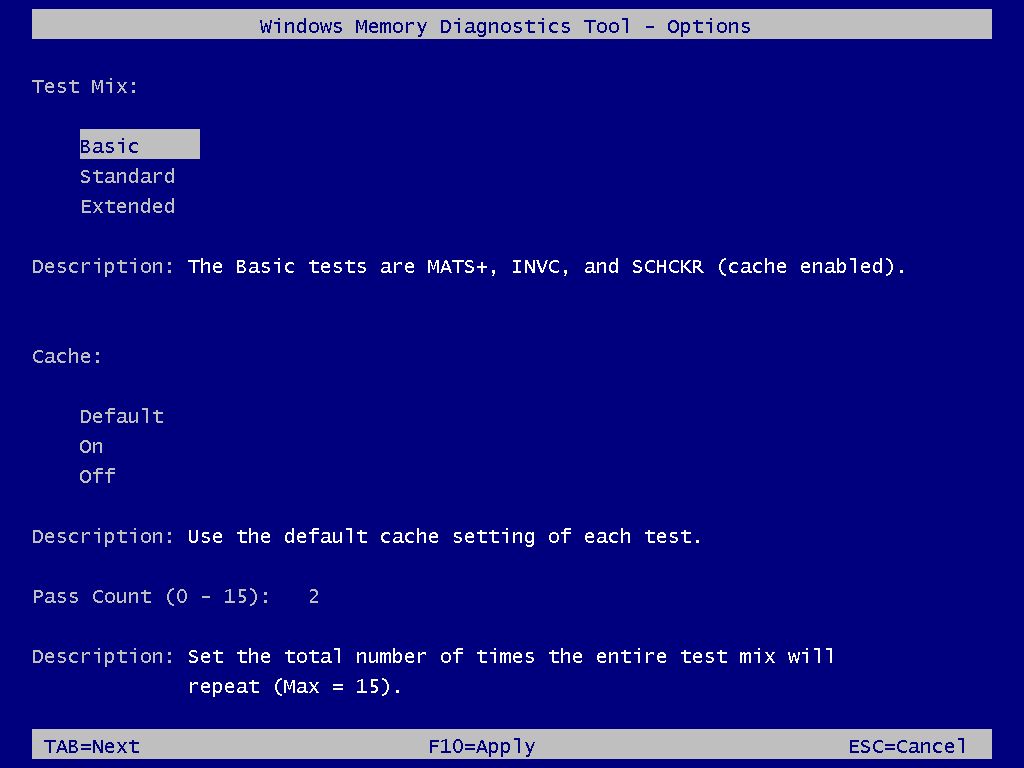
On the settings page, you will find options to change the scan mode to «Basic,» which runs the MATS+, INVC, and SCHCKR (cache enabled) tests.
All the latest news, reviews, and guides for Windows and Xbox diehards.
The «Extended» mode features every test available using «Standard» mode and MATS+ (cache disabled), Stride38, WSCHCKR, WStride-6, CHCKR4, WCHCKR3, ERAND, Stride6 (cache disabled), and CHCKR8.
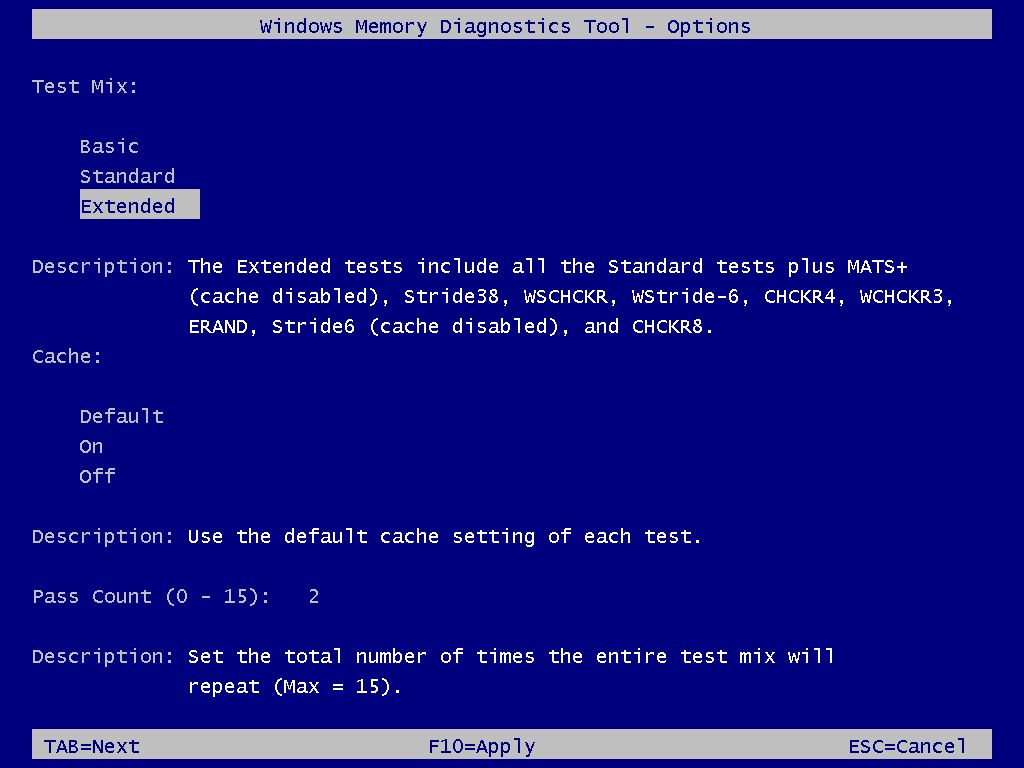
You can also use the «TAB» key to change cache settings in the Windows Memory Diagnostic tool. Disabling the cache allows the tool to access the data in RAM directly for a complete test. You can also specify the times the scan will be repeated to test your system’s memory modules.
Finally, press the «F10» key to return to the main page, and the scan will start automatically on the computer.
Check memory diagnostic results
Once the test completes, the device will restart and load the operating system again. To check the results, you need to use the Event Viewer.
To check the Windows Memory Diagnostic results on Windows 11, use these steps:
- Open Start.
- Search for Event Viewer and click the top result to open the app.
- Expand the Windows Logs category.
- Right-click the System item and choose the Find option.
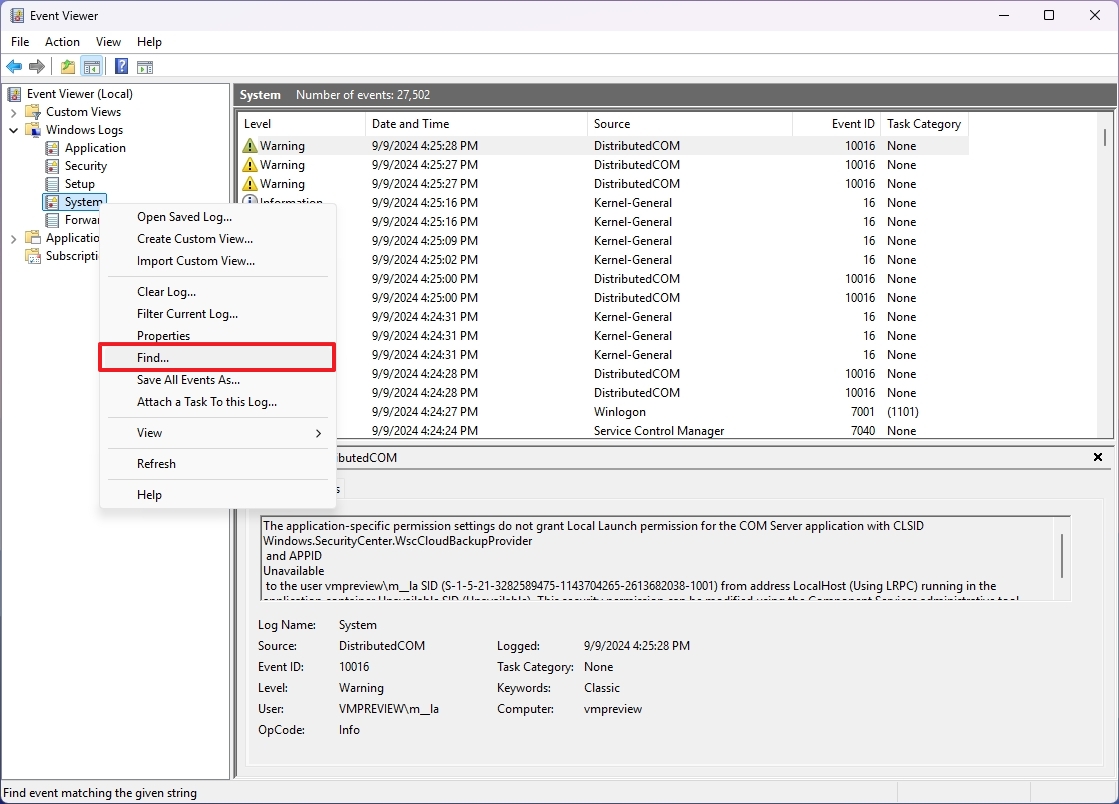
- Confirm the MemoryDiagnostics-Results keyword and click the Find Next button.
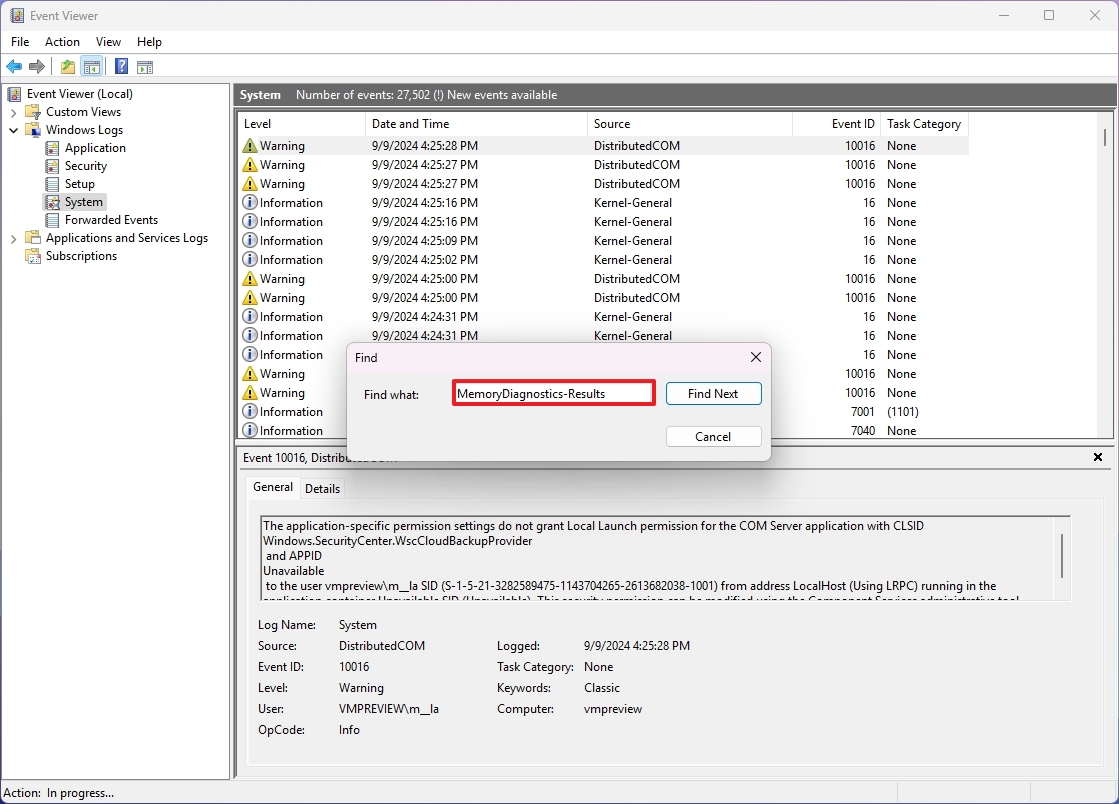
- Click the Cancel button.
- Double-click the MemoryDiagnostics-Results source on the right side.
- Review the diagnostic results.
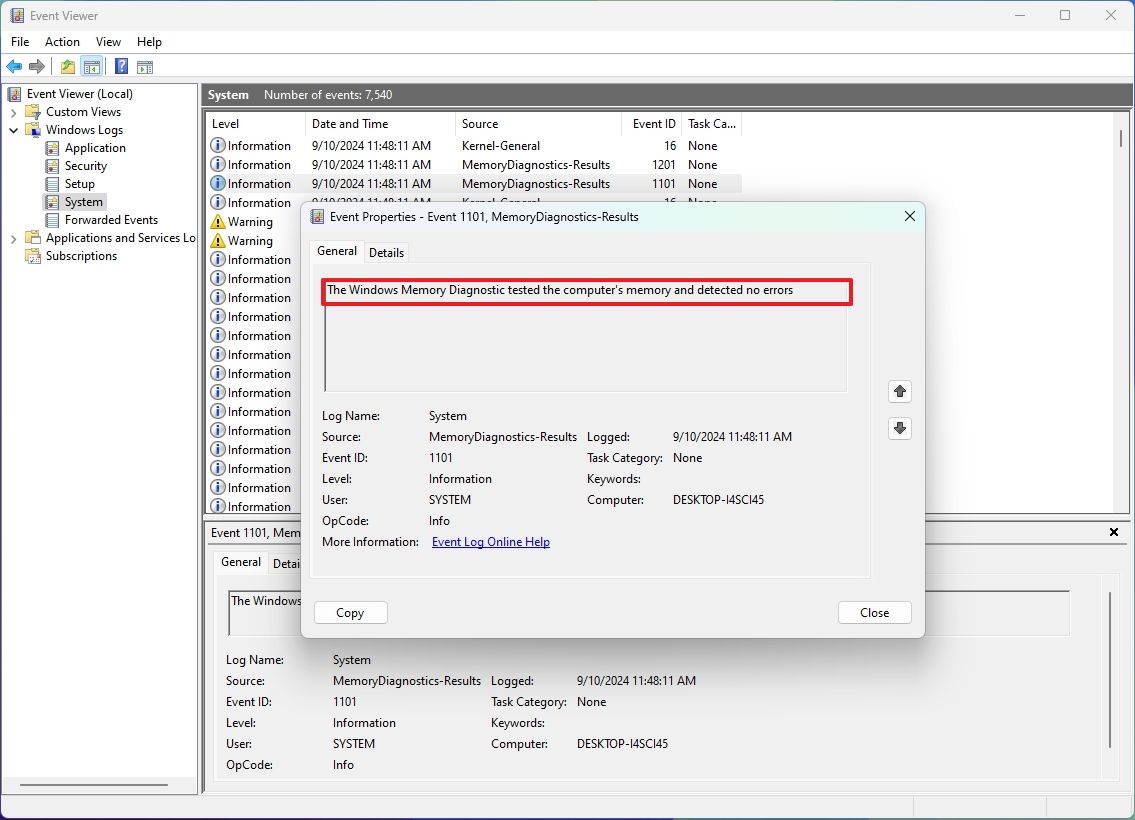
- Quick tip: If the result reads «The Windows Memory Diagnostic tested the computer’s memory and detected no errors,» you can discard memory as the root of the problem.
If you get an error, run the extended memory and check the results again. If errors persist, there might be a physical error with a memory module.
The tool should be able to point out which memory module has a problem. If you can’t determine which module is faulty, you may want to remove and test each module to find the one with the problem.
More resources
For more helpful articles, coverage, and answers to common questions about Windows 10 and Windows 11, visit the following resources:
- Windows 11 on Windows Central — All you need to know
- Windows 10 on Windows Central — All you need to know
Mauro Huculak has been a Windows How-To Expert contributor for WindowsCentral.com for nearly a decade and has over 15 years of experience writing comprehensive guides. He also has an IT background and has achieved different professional certifications from Microsoft, Cisco, VMware, and CompTIA. He has been recognized as a Microsoft MVP for many years.
Как проверить ОЗУ на ошибки? BSOD. Код остановки MEMORY_MANAGEMENT
Появление синего экрана (BSOD) в Windows 11 с ошибкой «MEMORY_MANAGEMENT» чаще всего говорит о том, что имеются аппаратные проблемы — проблемы с ОЗУ. В ОС Windows 11 имеется встроенная утилита для проверки оперативной памяти, давайте рассмотрим, как ей пользоваться.
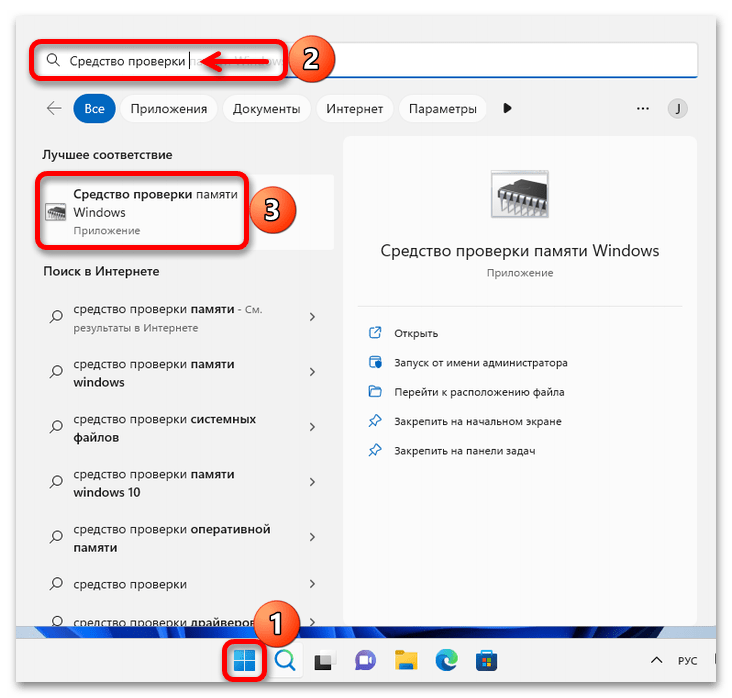
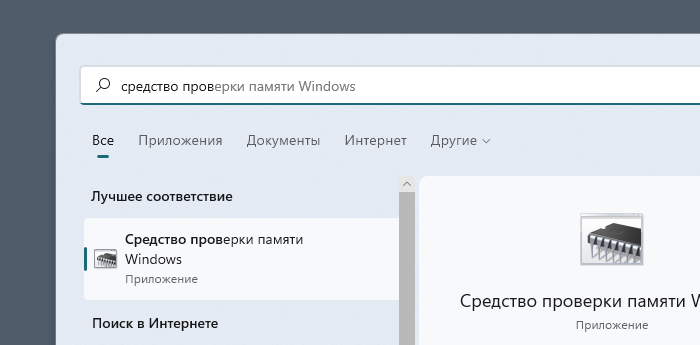
Существует 2 способа для запуска утилиты. Первый — через поиск Windows 11. Нажимаем на клавиатуре горячие клавиши «Win+S» и в поисковом поле набираем запрос «Средство проверки памяти Windows». Выбираем подходящее приложение.
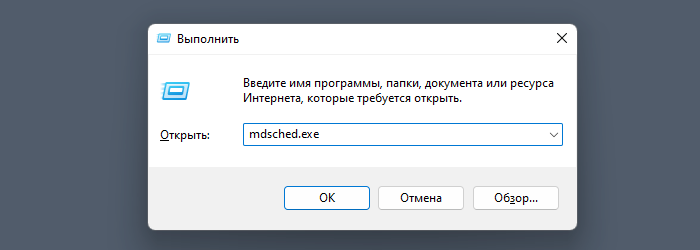
Второй способ — через диалоговое окно «Выполнить». Клавишами быстрого вызова «Win+R» открываем окно, вводим команду «mdsched.exe» и нажимаем кнопку «ОК».
Появится окно проверки памяти, в котором доступно два варианта:
- Выполнить перезагрузку и проверить (рекомендуется)
- Выполнить проверку при следующем включении компьютера
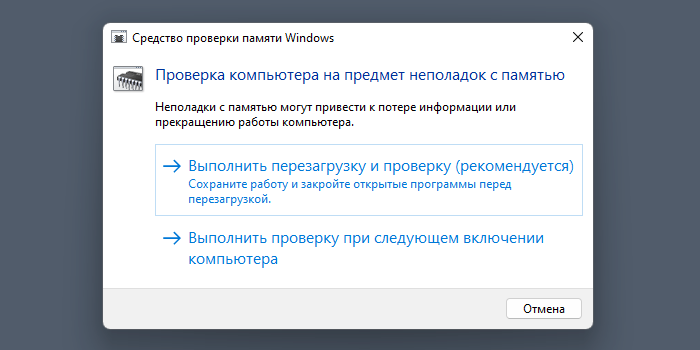
Первый вариант немедленно перезагрузит ПК и начнет проверку памяти, а второй является отложенным вариантом.
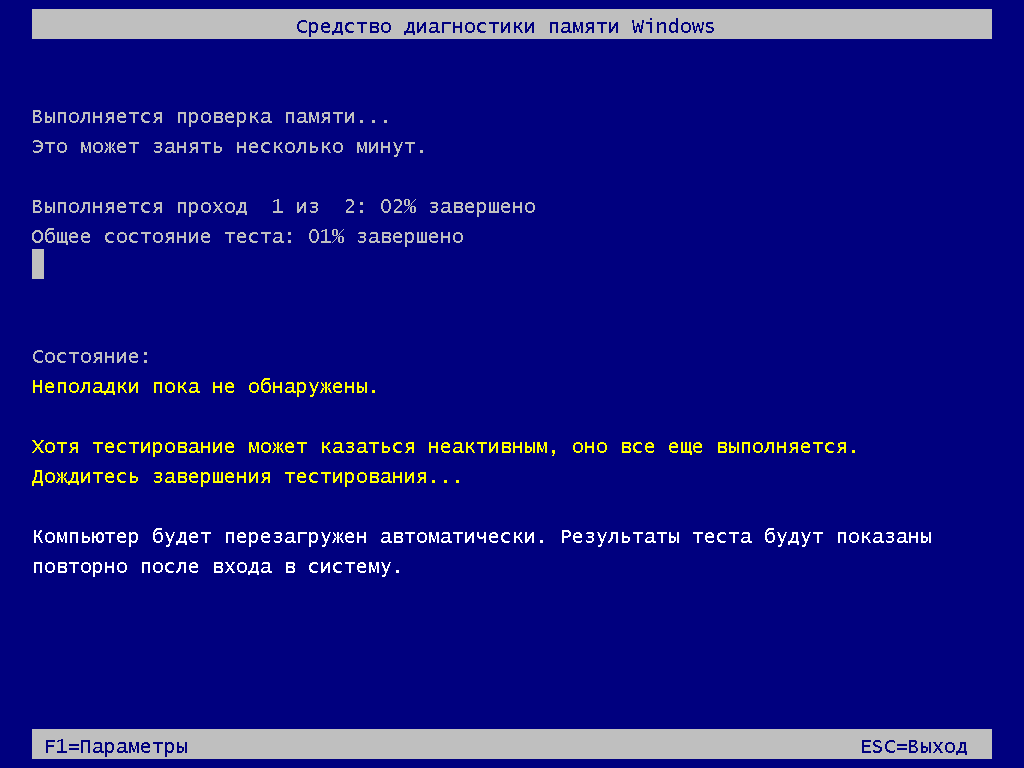
Проверка занимает 2 стадии теста. В разделе «Состояние» будет отображаться статус ОЗУ. Обычно, если проблем с памятью нет, отображается сообщение: «Неполадки по не обнаружены».
После проверки можно посмотреть отчет в приложении «Просмотр событий», которое можно найти через поиск Windows 11. В приложении переходим в раздел «Журналы Windows» — «Система» и находим строку «MemoryDiagnostics-Results».
Вот и все.
After upgrading to the new Windows version, Windows 11, you may find that Windows 11 high memory usage issue bothers you. Do you know why Windows 11 is using a lot of RAM? If high memory usage influences your computer’s performance, do you know how to free up RAM on Windows 11? MiniTool Software will show you the answers you want to know in this article.
Here, we will talk about the causes of Windows high memory usage, the methods to solve this issue, and MiniTool’s secure data recovery services to help you recover lost and deleted files on Windows 11.
Tips:
Experience peak PC performance with MiniTool System Booster — Free up RAM for a smoother computing journey.
MiniTool System Booster TrialClick to Download100%Clean & Safe
What Is Memory Usage on Windows?
Memory, which should be exactly RAM (Random-access memory), is an important component of a computer. A RAM device allows data to be read and written at any time, regardless of the physical location of the data within the memory, and the read and write speed is very fast normally.
The data stored on the RAM device is temporary. After you shut up your computer, the memory usage will be 0 (zero). However, as long as you open your PC, the background services and running apps will begin to use the memory. The percentage of memory usage will influence the performance of your computer. If the percentage is too high, your computer performance will be reduced. So, Windows memory usage is a matter of concern.
Windows 11 Is Using a Lot of RAM
Windows 11 is the new version of Windows, which was released to the public on October 5th, 2021. After the release, many users choose to upgrade to Windows 11 to experience the new features and new UI (user interface). Microsoft is also advocating an upgrade to Windows 11 to provide your PC with more reliable security.
Now, Windows 11 has been released for months. Windows 11 users are more and more. After upgrading to Windows 11, some users post that Windows 11 is using a lot of RAM. This problem largely reduces the users’ goodwill towards Windows 11.
How to Check Memory Usage on Windows 11?
How to know if your Windows 11 is using a lot of RAM or how to check your Windows 11 RAM usage? It is easy to check it. Here is a guide:
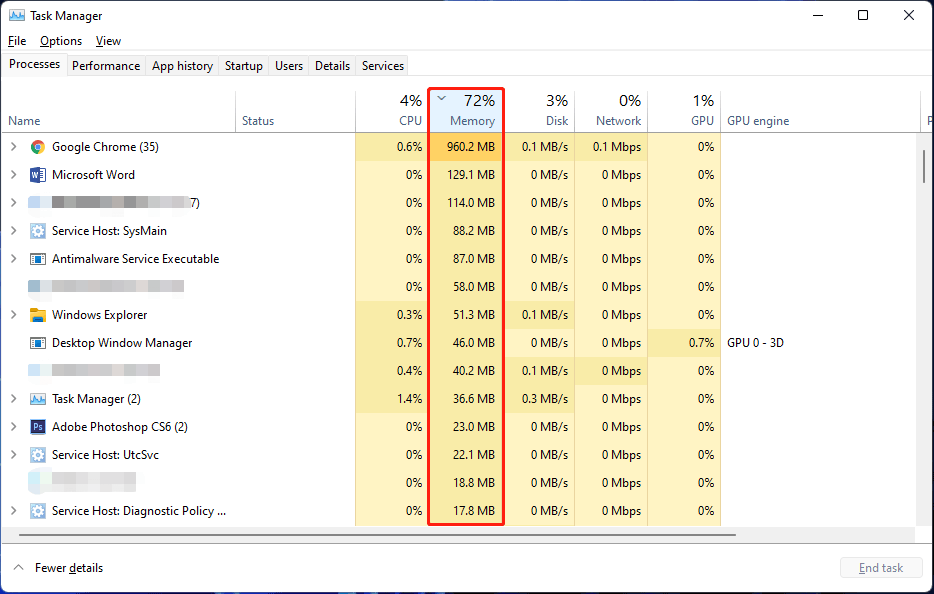
Step 1: Press Win+X to call out the WinX menu, then select Task Manager from the WinX menu open it.
Step 2: Click More details to continue.
Step 3: By default, you see the Processes section. You just need to stay at this section, then check the column of Memory. You can find the memory usage percentage of your Windows 11 computer. Looking further down, you will see how much memory each application or service is using. If the sorting is messed up, you can click Memory to sort in ascending or descending order.
Well then, what is the reason for high memory usage on Windows 11? Here are some main causes.
Top Causes of Windows 11 High Memory Usage
- Too many unnecessary apps and programs are running on your Windows 11 computer.
- There are too many startup programs on your device.
- The virtual memory is not enough.
- Your computer is infected by viruses or malware.
- And more….
Now, you know the reasons for this issue. Then, you can take some relative measures to free up RAM or clear RAM on Windows 11. We show some things you can try in the next part.
How to free up RAM on Windows 11 if the memory usage is too high?
You can close the unnecessary apps and services, disable the unnecessary startup apps, remove viruses or malware, and take some other measures to reduce Windows 11 memory usage. Here are some methods you can try:
Method 1: End the Unnecessary Apps and Services
One of the main reasons for Windows 11 high memory usage is you are opening too many apps or services. If you don’t need to use them for a while, you can just close them. You can use Task Manager to end the unnecessary apps and services.
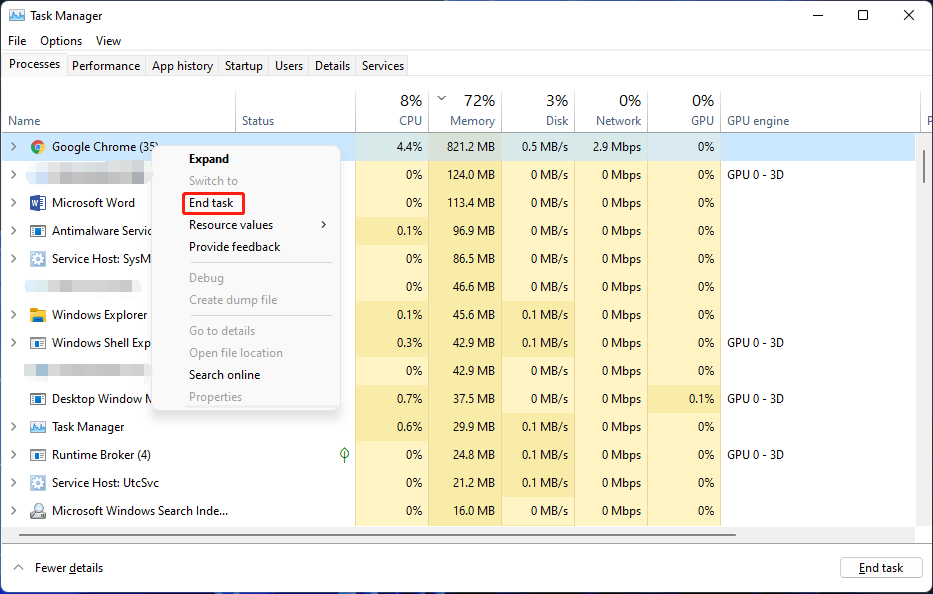
Step 1: Right-click Start and select Task Manager to open it.
Step 2: Click More details if necessary.
Step 3: Find the unnecessary apps or services that are using too much memory. Then, right-click one and select End task. You can also select the app or service and click the End task button on the bottom-right corner to close it. Repeat this step to close all unnecessary apps and services to low down the memory usage on your Windows 11 device.
This method should largely reduce the memory usage on your Windows 11 computer. However, you can continue using the following ways to free up more memory.
Method 2: Disable the Unnecessary Startup Apps
How to clear RAM on Windows 11? You can also consider disabling the unnecessary startup apps.
What are startup apps? They are the apps that can automatically launch when you boot your computer. You can set the programs you need to use after booting up as startup items.
Setting too many applications as startup items not only prolongs the startup time of your computer but also causes high memory usage. To optimize RAM on Windows 11, you can disable the unnecessary startup apps.
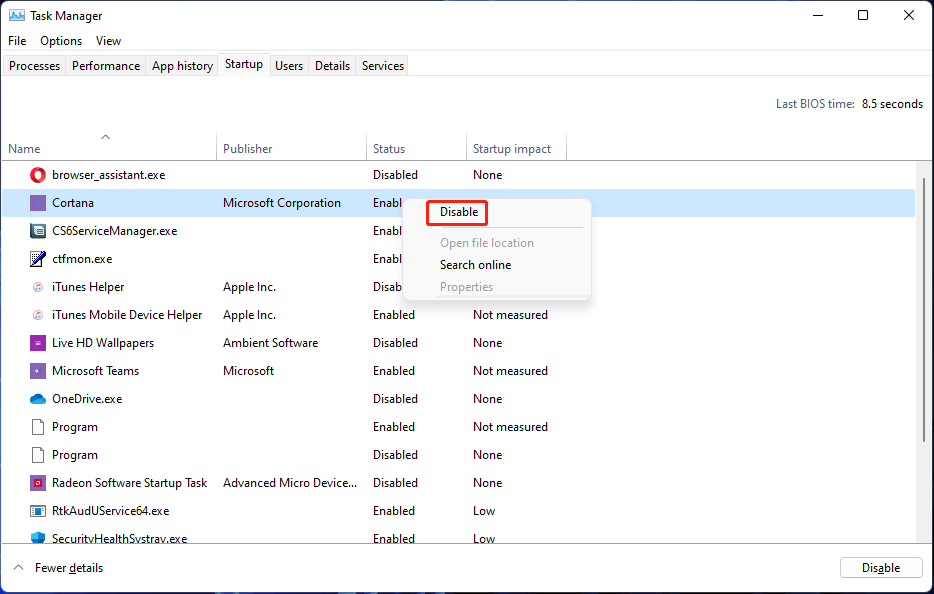
Step 1: Right-click Start and select Task Manager to open it.
Step 2: Click More details to continue.
Step 3: Switch to the Startup section. Here you can see the apps and services which are set as startup items or not. For example, the status for Cortana is Enabled. This means that it is a startup app.
Step 4: Select the app or service you want to disable the startup feature and select Disable. Repeat this step to disable all the unnecessary apps.
After that, you can go to check if the memory usage is reduced.
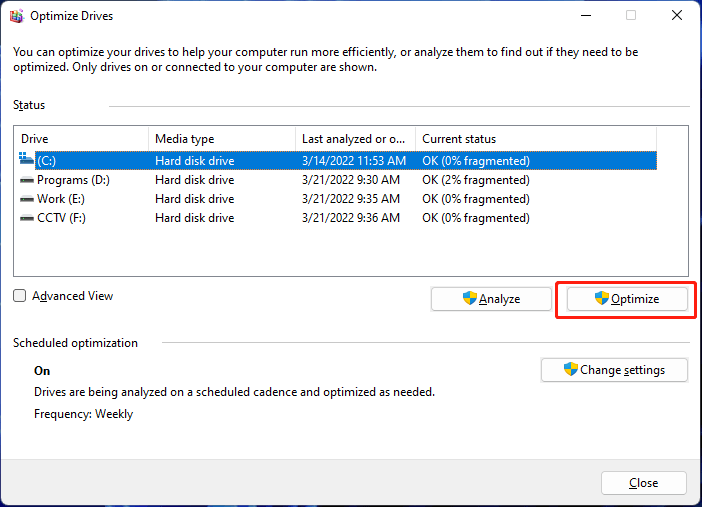
Method 3: Defragment Your Hard Drive
You can also let your Windows 11 reduce RAM usage by defragmenting your hard drive. You can follow this guide to do it.
Step 1: Click the search icon from the taskbar and search for Defragment and Optimize Drives.
Step 2: Select Defragment and Optimize Drives from the search result to open it.
Step 3: Select the drive you want to defragment and click the Optimize button to defragment it.
Step 4: When the process ends, you need to restart your computer and see if more memory is released.
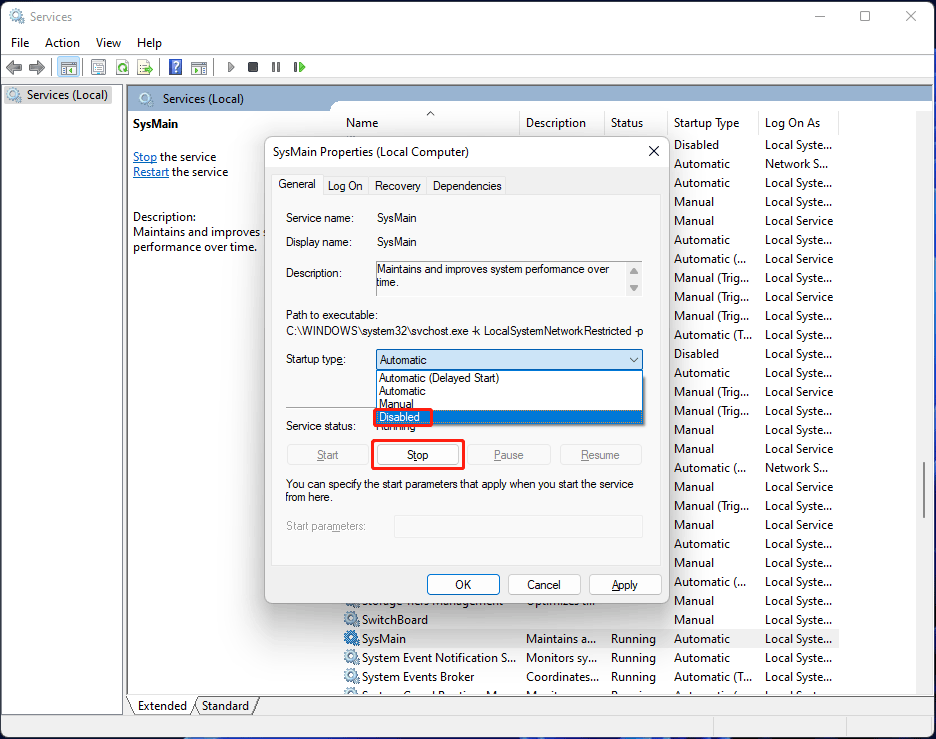
Method 4: Disable SysMain Service
If your Windows 11 performance is largely reduced due to high memory usage, you can disable SysMain Service to fix the issue. SysMain is known as SuperFetch on Windows 10. It is used to identify your frequently used apps and help you start these apps faster.
Step 1: Press Win+R to open Run.
Step 2: Type services.msc into Run and press Enter to open Services.
Step 3: Scroll down to find the SysMain service from the right panel. Then, double-click it to open its Properties interface.
Step 4: Select Disabled for Startup type.
Step 5: Click the Stop button and wait until the process ends.
Step 6: Click Apply.
Step 7: Click OK.
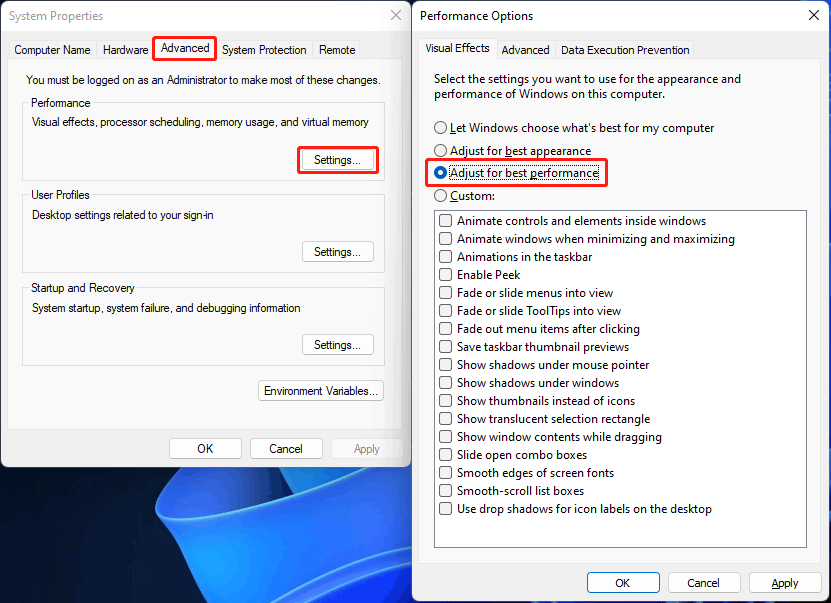
Method 5: Adjust for Best Performance
You can also adjust for best performance to optimize RAM on Windows 11:
Step 1: Click the search icon from the taskbar and search for sysdm.cpl.
Step 2: Select sysdm.cpl from the search result to open System Properties.
Step 3: Switch to the Advanced tab.
Step 4: Click the Settings button under Performance.
Step 5: Under Visual Effects, check Adjust for best performance.
Step 6: Click Apply.
Step 7: Click OK.
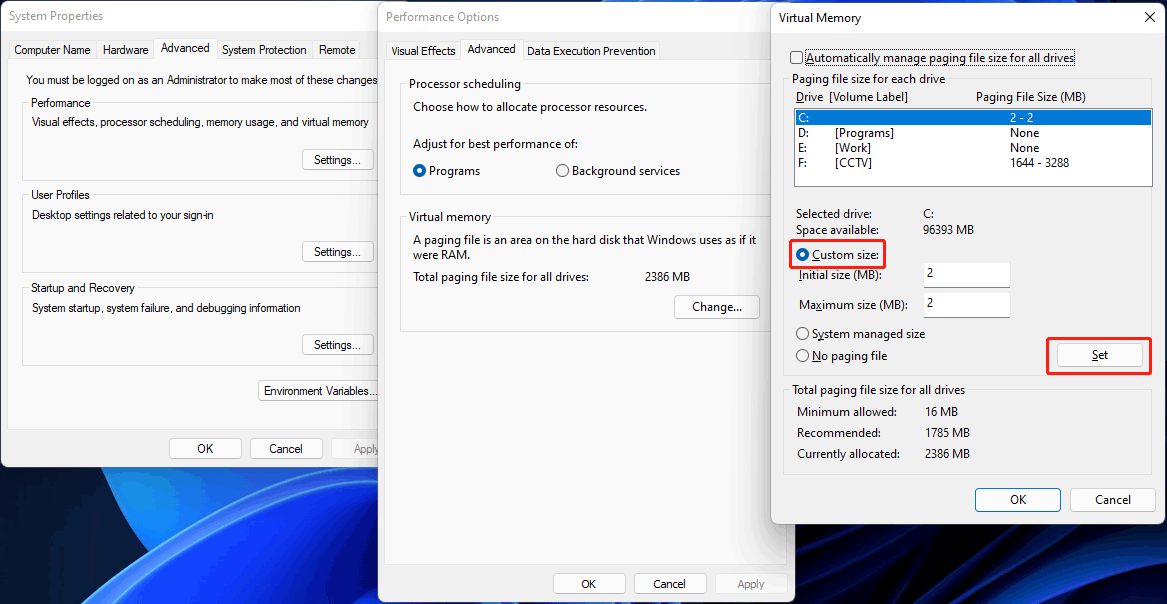
Method 6: Increase Virtual Memory
Some users solve the high memory usage on Windows 11 by increasing virtual memory. You can also do this to have a shot.
Step 1: Use the method mentioned above to open System Properties.
Step 2: Switch to Advanced, then click the Settings button under Performance.
Step 3: Click the Change button under Virtual Memory.
Step 4: Make Automatically manage paging file size for all drives is not selected.
Step 5: Select Custom size.
Step 6: Specify the initial and maximum size for the paging file in megabytes according to your requirements.
Step 7: Click the Set button.
Step 8: Click OK.
Step 9: Click OK again.
Step 10: Restart your computer.
Method 7: Modify the Registry Key
You can also modify the registry key to reduce Windows 11 memory usage. Before doing this, you’d better back up the registry key to protect your system.
Step 1: Press Win+R to open Run.
Step 2: Type regedit and press Enter to open Registry Editor.
Step 3: Go to:
Computer\HKEY_LOCAL_MACHINE\SYSTEM\CurrentControlSet\Control\Session Manager\Memory Management
Step 4: Find ClearPageFileAtShutDown from the right panel and double-click it to open it.
Step 5: Enter 1 for its value data.
Step 6: Click OK to save the change.
Step 7: Restart your computer.
Method 8: Scan & Remove Viruses and Malware from Your PC
If your computer is attacked by viruses or malware, high memory usage can easily happen. This situation is a risk. You need to scan and remove viruses and malware as soon as possible. You can use the Windows built-in Windows Security to scan your computer for viruses and malware.
Step 1: Use Windows search to search for Windows Security and select the first result to open it.
Step 2: Click Virus & threat protection to continue.
Step 3: Click the Quick scan button on the right panel to scan your device for viruses and malware.

Step 4: If nothing is found, you can click Scan options, select Full scan, and click Scan now to perform a full scan on your device.
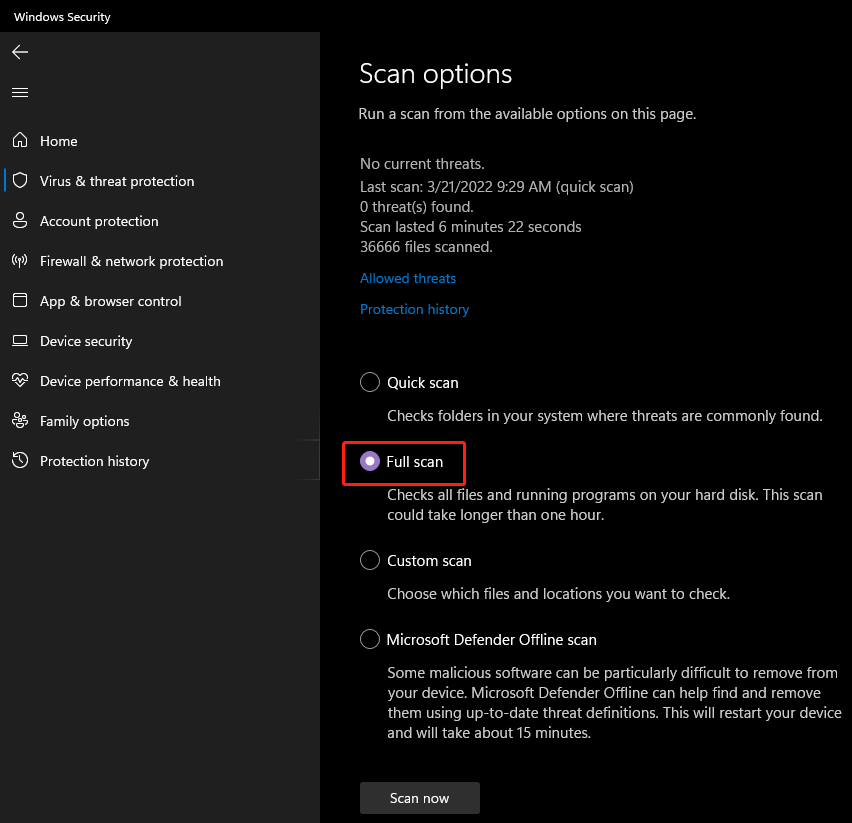
Of course, you can also use third-party anti-virus software like Norton, McAfee, and Bitdefender to do the same job.
Bonus Tips: Back up your PC and recover your data
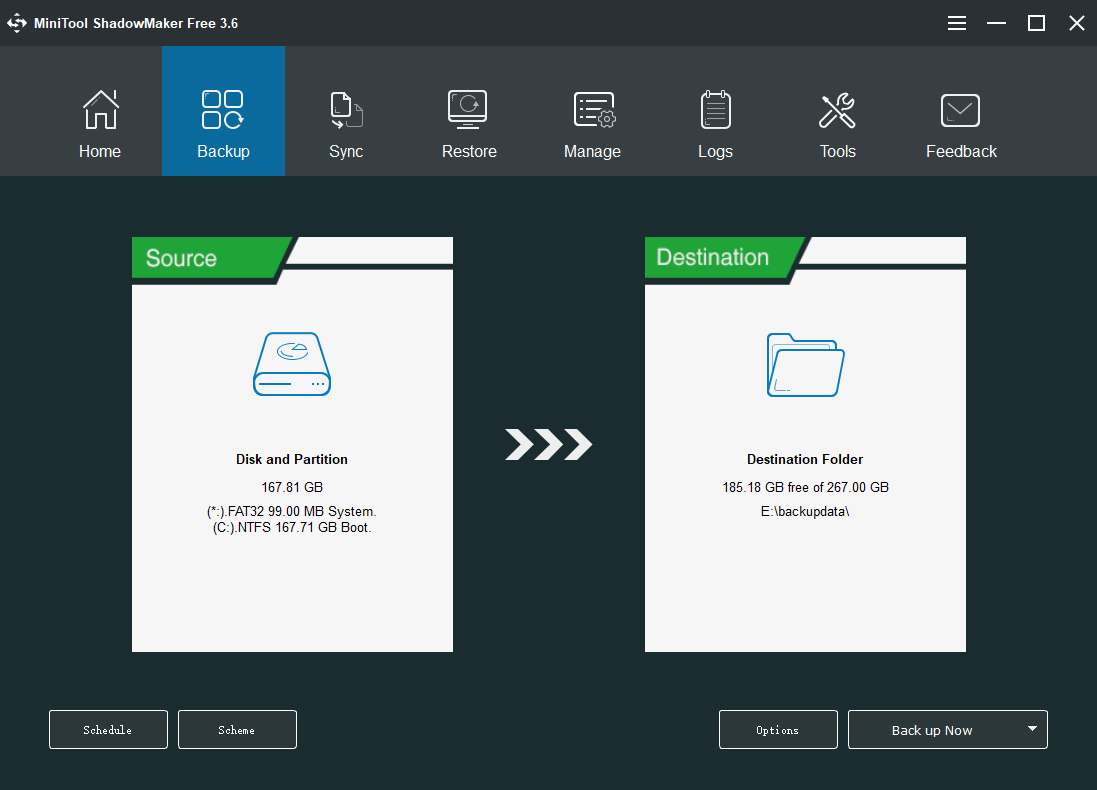
Tip 1: Back up Your Files to Keep Them Safe
We believe that there are many important files on your computer. Improper computer operation may cause data loss issues or system crashing problems. But you can use professional Windows backup software to back up your files and system to keep them safe. MiniTool ShadowMaker is your best bet.
You can use this tool to back up files, folders, partitions, disks, and systems at any time you want. It supports automatic backup, and differential & incremental backup. You can learn more information from the user tutorial.
This software has a trial edition, which allows you to use it for free within 30 days.
MiniTool ShadowMaker TrialClick to Download100%Clean & Safe
Tip 2: Rescue Your Lost and Deleted Files on PC
If your files get lost or deleted by mistake and there is no available backup, you can use MiniTool Power Data Recovery to get them back as long as they are not overwritten.
This is the best free data recovery software can be used to retrieve files and folders from all kinds of data storage devices including hard drives, SSDs, USB flash drives, memory cards, SD cards, pen drives, and more.
It also has a trial edition. You can first use it to scan the drive you want to recover data from and see if it can find your needed files. If yes, you can use a full edition to recover files without limits.
MiniTool Power Data Recovery TrialClick to Download100%Clean & Safe
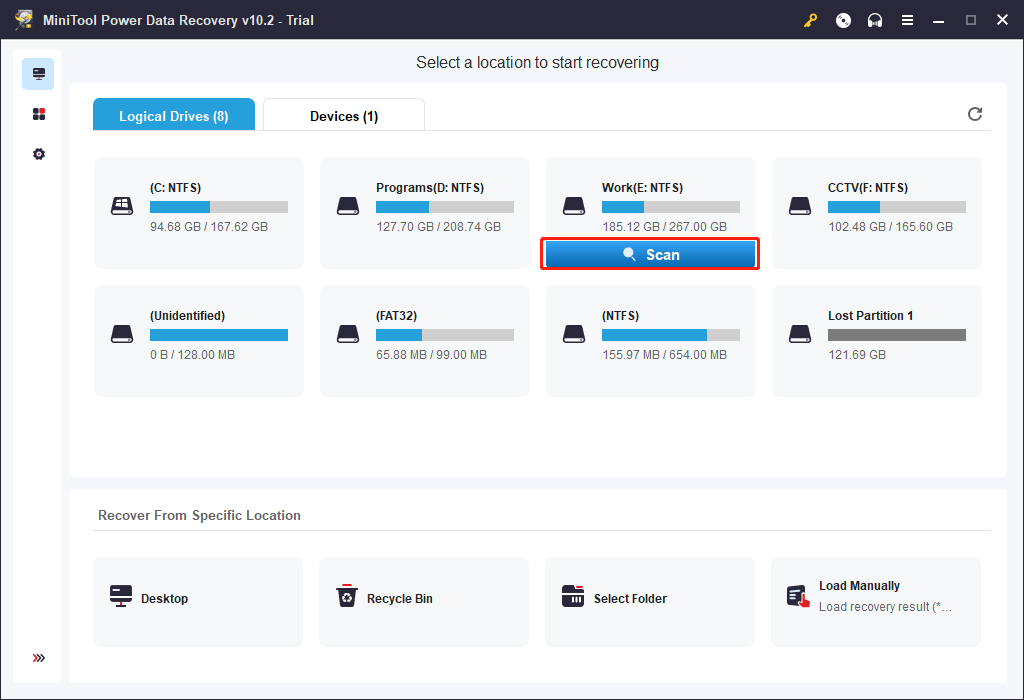
This software works on all versions of Windows. You can feel free to use it to rescue your Windows files.
Bottom Line
If you discover that your Windows 11 is using too much memory usage, you can just use the methods mentioned in this article to reduce RAM usage or optimize RAM on your device. In addition, if you lose your files by mistake, you can use MiniTool Power Data Recovery to get your files back. You can use this software to recover files from SSD, Samsung drive, Seagate drive, and SD card.
If you have other good suggestions, you can let us know in the comments. You can also contact us via [email protected].