
Всем привет! Сегодня разбираем достаточно популярную проблему, когда принтер пишет, что он «Отключен», хотя он включен и работает. По крайней мере об этом написано на экране. В некоторых моделях даже горят какие-то лампочки. Мы попробуем решить эту проблему. Если возникнут дополнительные вопросы, или вы захотите получить персональную помощь от специалистов портала WiFiGiD.RU – пишите в комментариях.
Содержание
- Первые действия
- Проверка подключения
- Средства исправление неполадок
- Включение «Диспетчер печати»
- Проверка портов
- Проверка и повторное подключение принтера
- Видео
- Задать вопрос автору статьи
Первые действия

Итак, у нас есть проблема: операционная система Windows (10, 11, 7 или пишет, что принтер отключен, хотя он включен и работает. Давайте выполним два простых действия, которые чаще всего решают эту ситуацию:
- Перезагрузите операционную систему.
- Пока систем перезагружается – выключите принтер. Подождите примерно 1-2 минуты и включите его повторно.
После перезагрузки обоих устройств, проверьте – решилась ли проблема. Если проблема не решена переходим к следующей главе.
Проверка подключения
Итак, в системе мы видим состояние принтера «Отключено» – как его включить? Если вы уверены, что он работает, то можно попробовать проверить его подключение к ПК.
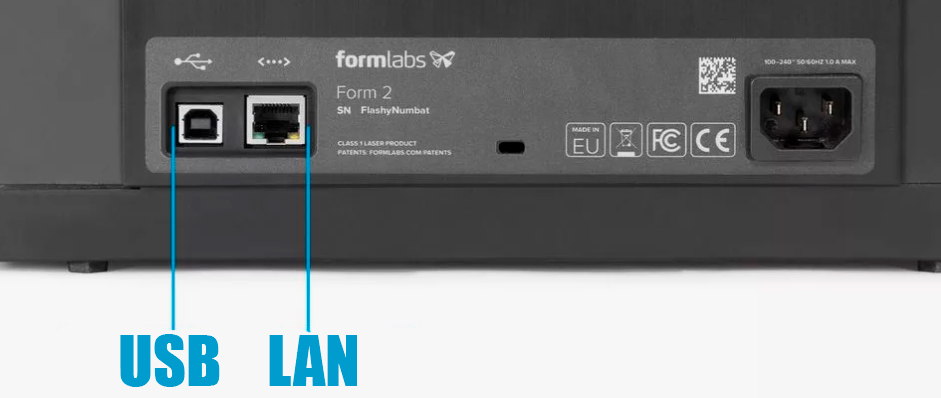
- Если у вас кабель подключен напрямую по USB от принтера до компьютера или ноутбука – проверьте, чтобы штекер плотно сидел внутри. Я бы даже, на всякий случай, отключил провод и подключил повторно (с обеих сторон).
- Если принтер подключен с помощью сетевого кабеля (LAN), то проверьте, чтобы он точно был подключен. Ну и аналогично, как и с USB – попробуйте вытащить, а потом вставить его повторно. Еще один момент – обычно LAN кабель идет до коммутатора или маршрутизатора. Я бы переподключил и проверил провод и там.
- Если принтер подключен по Wi-Fi, то проверьте, чтобы на экране вы точно видели подключение к ПК. Более подробно про настройку и подключение принтера через Wi-Fi – читаем в этой инструкции (ссылка).
Средства исправление неполадок
Возможно, есть какие-то проблемы в самой ОС. Чтобы не гадать, что именно не так – попробуем запустить специальную службу.
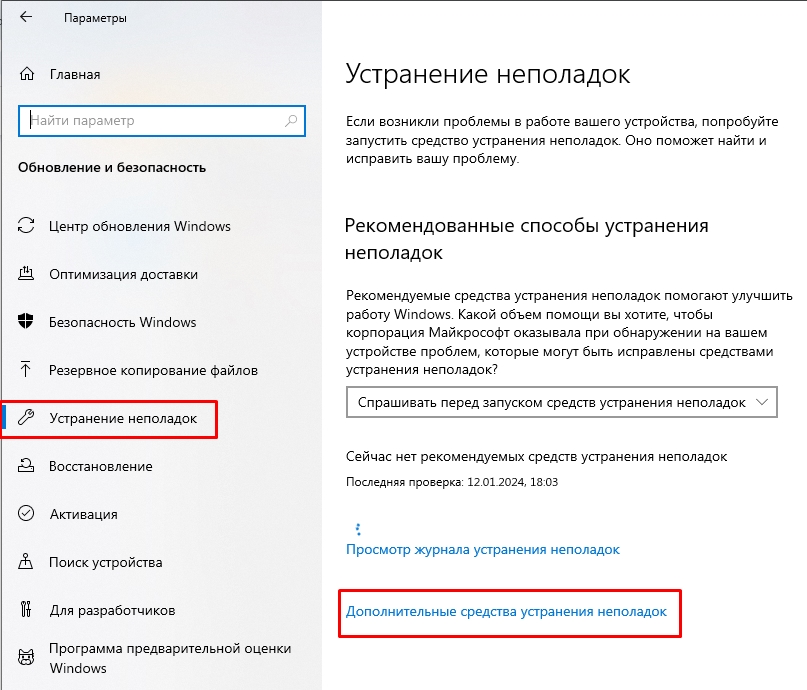
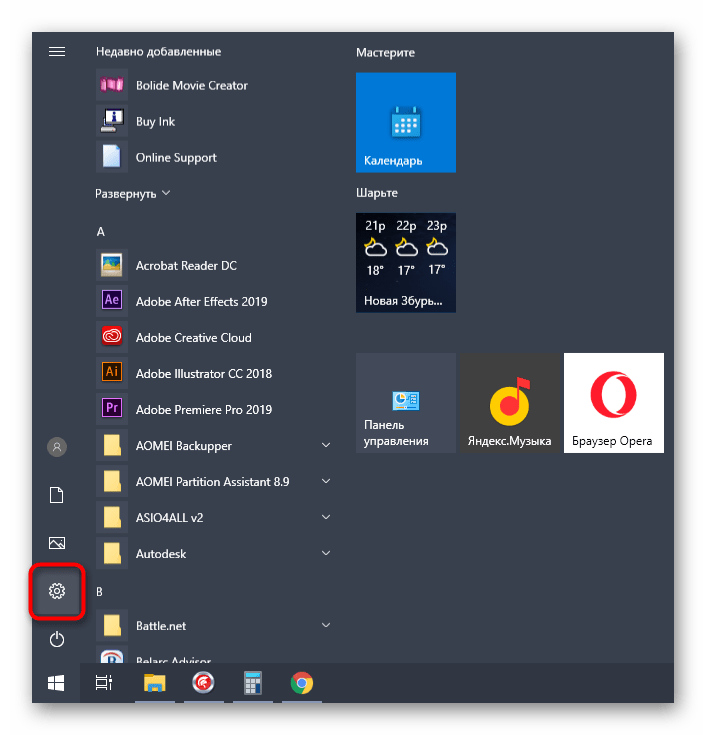
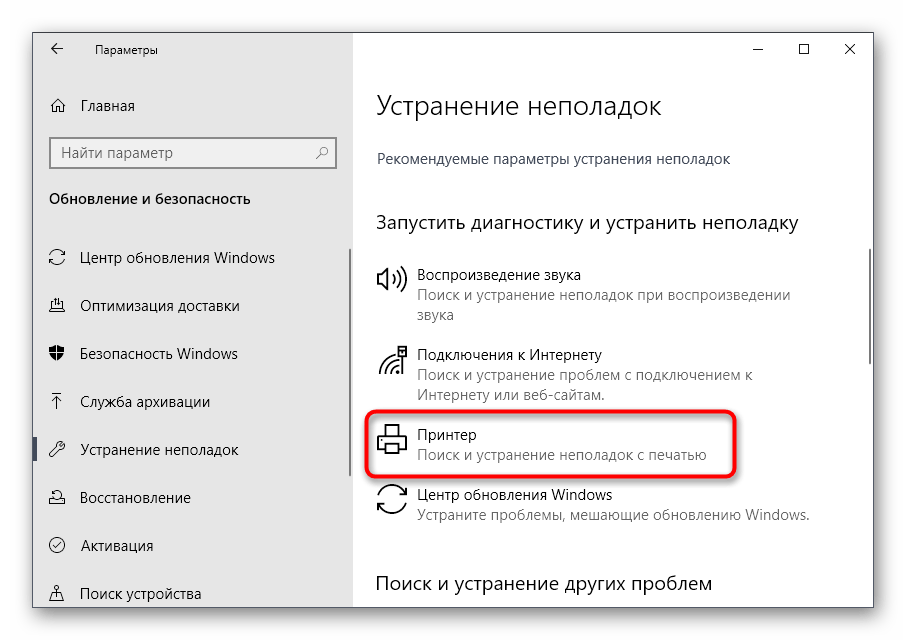
- «Пуск» – «Параметры».
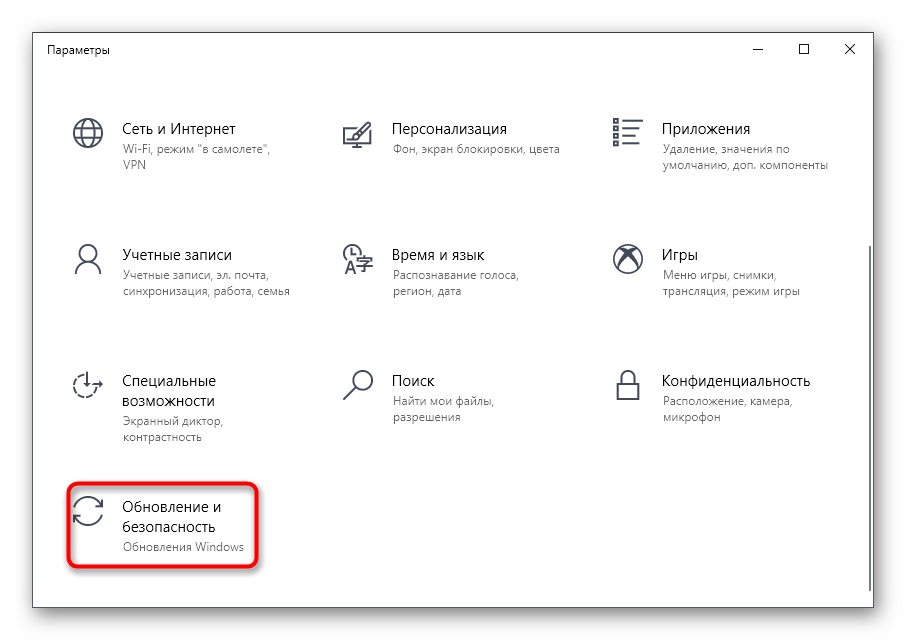
- Переходим в «Обновление и безопасность».
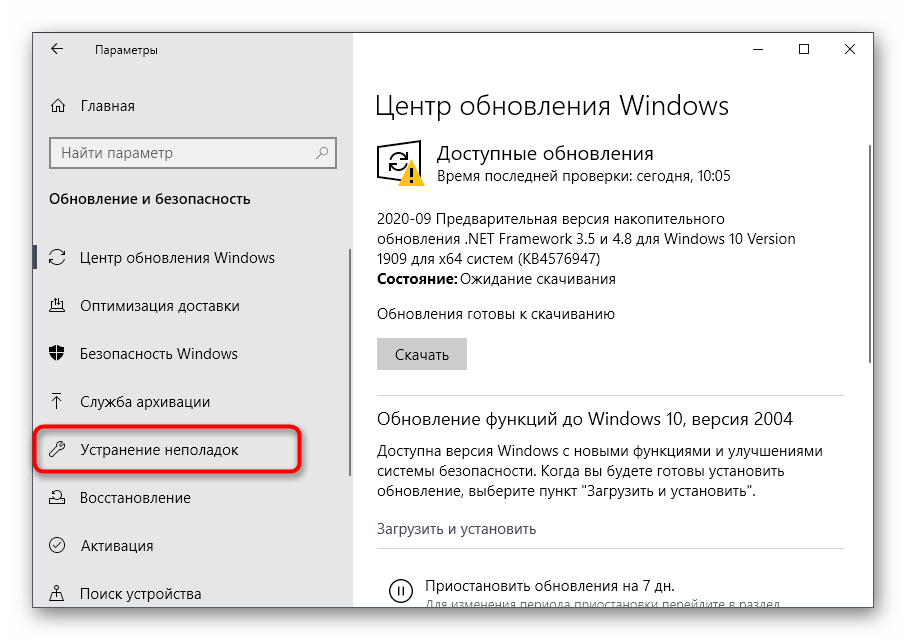
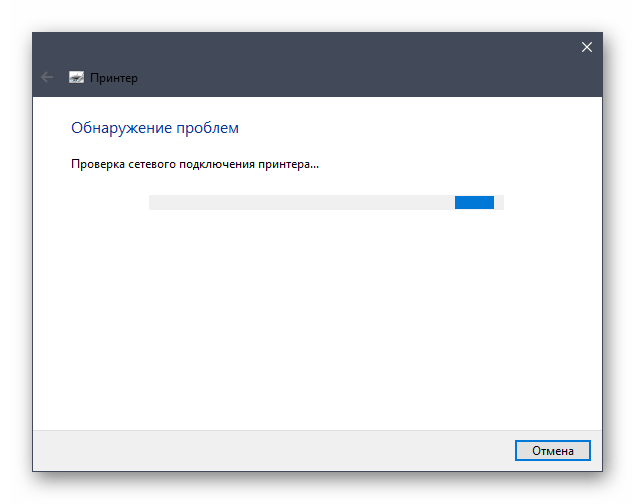
- Слева выбираем «Устранение неполадок». Если тут раздела «Принтера» нет, то переходим по ссылке «Дополнительные средства устранения неполадок».
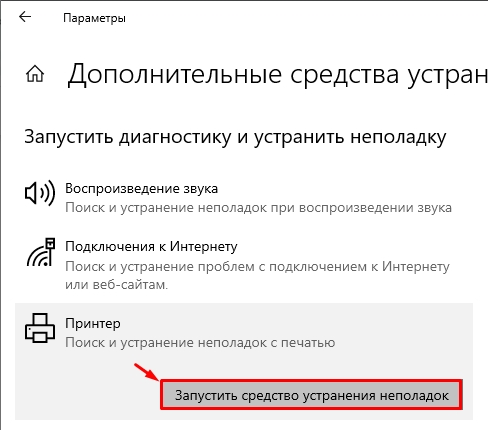
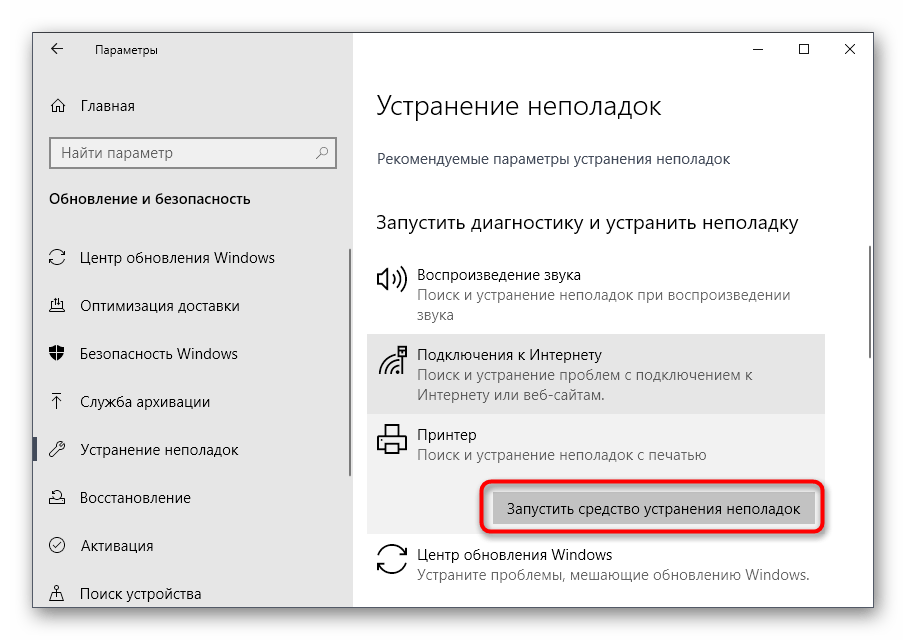
- Жмем по «Принтеру» и кликаем по кнопке. Далее действуем согласно инструкциям на экране.
Включение «Диспетчер печати»
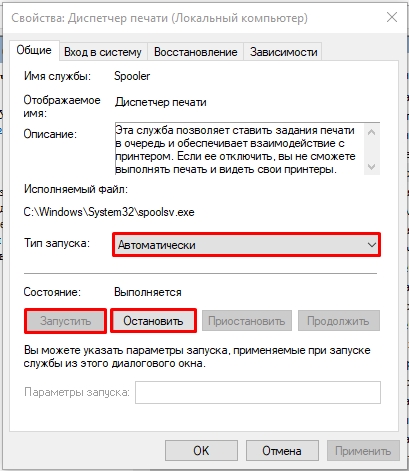
Одна из самых частых проблем в Виндовс – это постоянно ломающаяся служба диспетчера печати. Давайте попробуем её запустить:
- Жмем одновременно по кнопкам:
+ R
- Вводим команду:
services.msc

- В списке находим «Диспетчер печати» и кликаем по нему двойным щелчком ЛКМ.
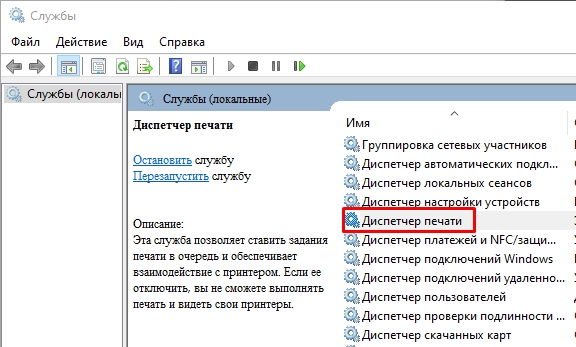
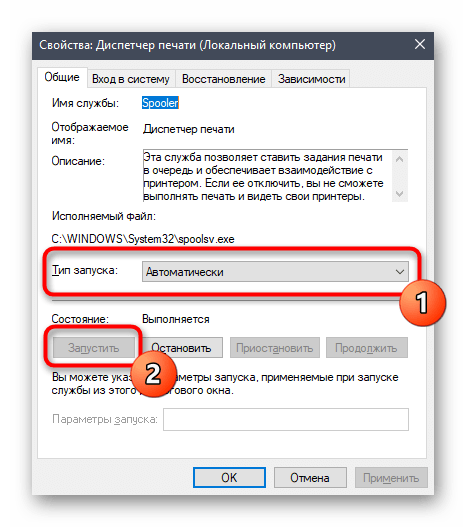
- Сначала убедитесь, что стоит «Тип запуска» – «Автоматически». После этого нажмите по кнопке «Остановить». Подождите чуть-чуть и жмем «Запустить». На всякий случай еще нажмите «Применить».
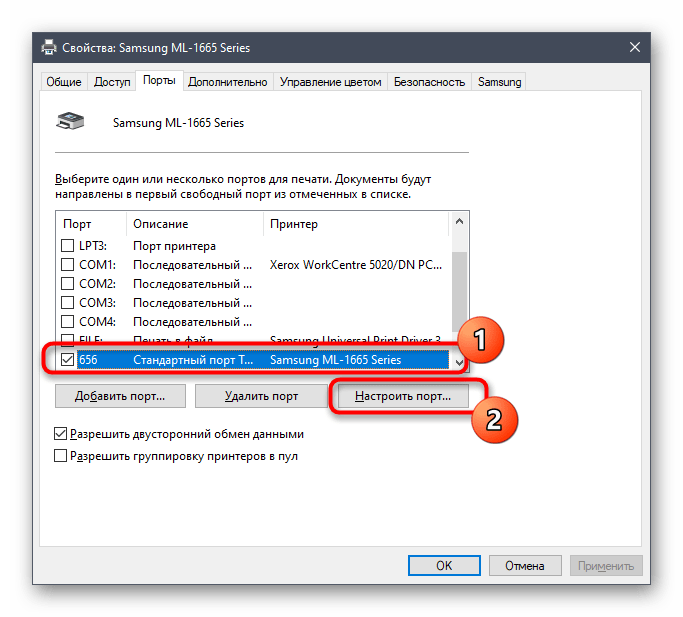
Проверка портов
Данный способ работает с некоторыми моделями устройств. Например, когда по каким-то причинам, в ОС отключен порт для отправки или получения данных. Поэтому это нужно проверить.
- Жмем:
+ R
- Вводим:
control
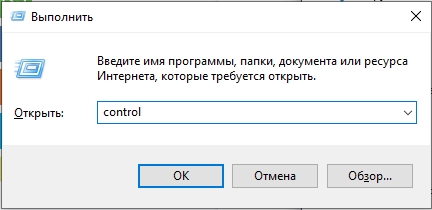
- Заходим в «Администрирование».

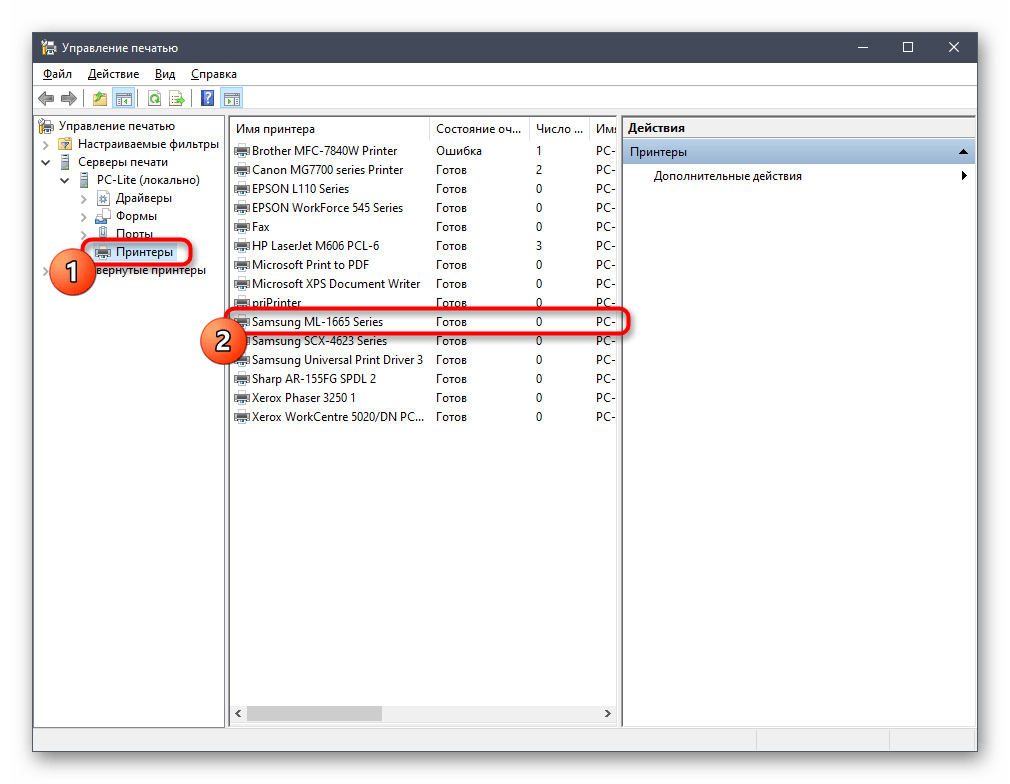
- Находим пункт «Управление печатью» и переходим туда.

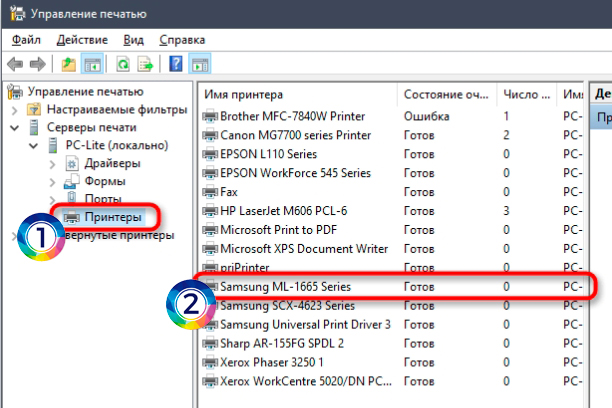
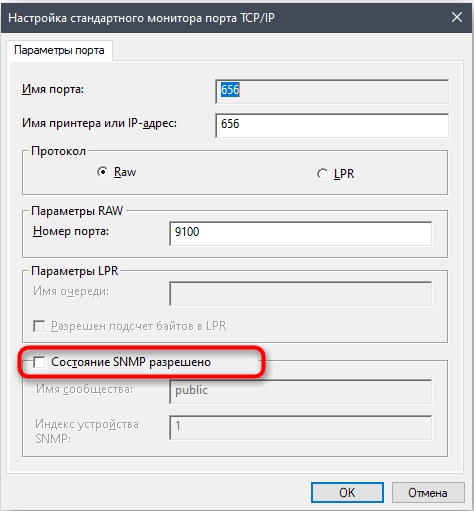
- Раскрываем «Серверы печати» – «PC-Lite» – «Принтеры» – в списке найдите вашу модель и зайдите внутрь, нажав двойным щелчком левой кнопки мыши.
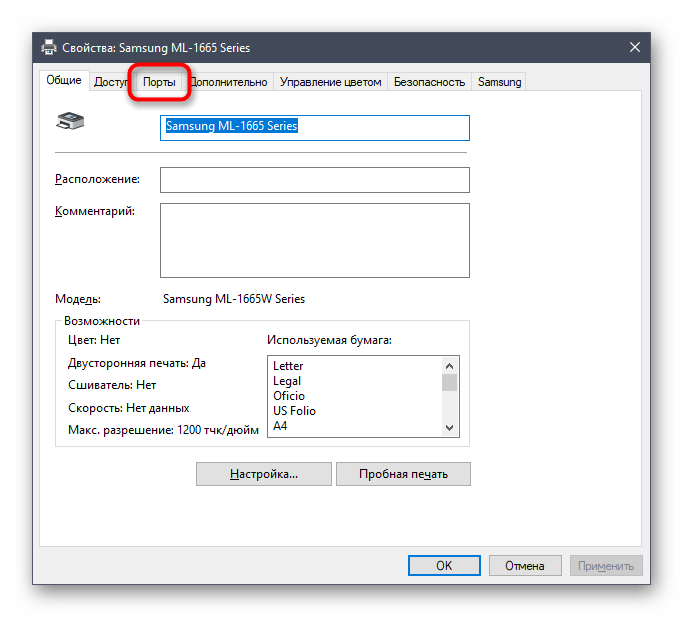
- Переходим во вкладки «Порты». В списке вы найдете только один включенный порт – один раз жмем по нему ЛКМ, а потом по кнопке «Настроить порт».
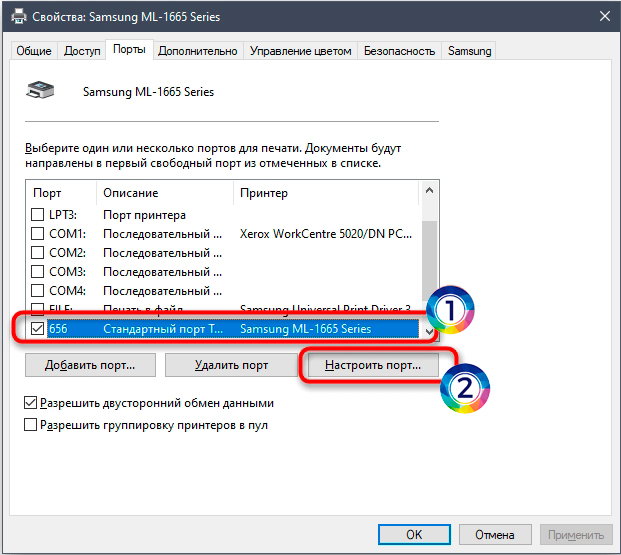
- Включаем галочку «Состояние SNMP» и жмем «ОК». Можно даже перезагрузить систему.
Проверка и повторное подключение принтера
Если ваш принтер подключен по сети, то количество решений увеличивается. Также все зависит от типа коннекта.
- Если принтер подключен к одному компьютеру напрямую, и используется настройка общего доступа, то можно попробовать перезагрузить этот ПК.
- Если принтер подключен к коммутатору или роутеру. То дополнительно попробуйте перезагрузить и это устройство. Можно просто выдернуть его из розетки, если вы не можете найти кнопку «Вкл/Выкл». Сетевое устройство могло просто зависнуть.
- Если принтер подключен по Wi-Fi с помощью роутера – перезагружаем маршрутизатор.
Возможно, устройство изначально неправильно настроено. Поэтому я советую к прочтению отдельных инструкций:
- Подключение принтера по Wi-Fi.
- Подключение принтера по сети.
- Стандартное подключение принтера.
Задавайте свои дополнительные вопросы в комментариях. Всем добра и берегите себя!
Видео
Все способы:
- Способ 1: Запуск средства исправления неполадок
- Способ 2: Проверка службы «Диспетчера печати»
- Способ 3: Проверка состояния устройства
- Способ 4: Проверка портов
- Способ 5: Включение общего доступа
- Способ 6: Проверка компьютера на наличие вирусов
- Вопросы и ответы: 1
Перед началом чтения следующих инструкций убедитесь, что аппаратно принтер включен и индикатор, отвечающий за питание, горит. Это связано с тем, что дальнейшие действия заключаются в решении программных проблем, а не аппаратных. Если оборудование вовсе не включается, проверьте кабель питания и розетку.
Способ 1: Запуск средства исправления неполадок
Самый простой вариант, не требующий от пользователя практически никаких действий, — запуск автоматического средства устранения неполадок, связанных с работой принтера. Это штатный инструмент операционной системы, позволяющий быстро проверить главные причины, по которым устройство распознается как выключенное.
- При помощи меню «Пуск» откройте приложение «Параметры».
- В нем выберите категорию «Обновление и безопасность».
- Через панель слева перейдите к «Устранение неполадок».
- В списке есть несколько инструментов, отвечающих за диагностику разных устройств и функций ОС. Вам нужно выбрать «Принтер».
- Как только кликнете по строке с названием средства, появится кнопка «Запустить средство устранения неполадок».
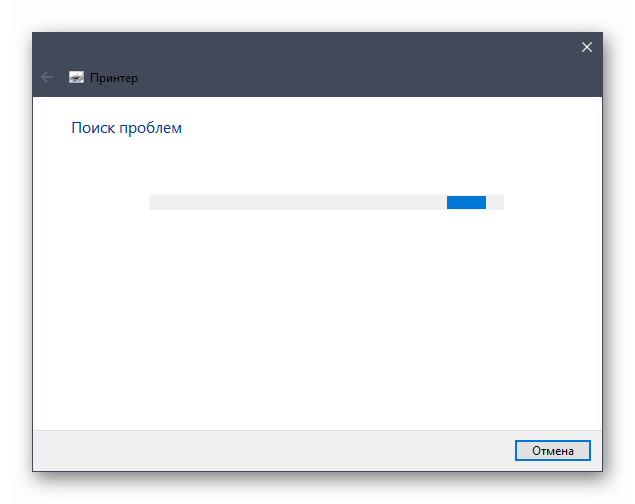
- После нажатия сразу же начинается поиск возможных проблем, что займет буквально несколько секунд.
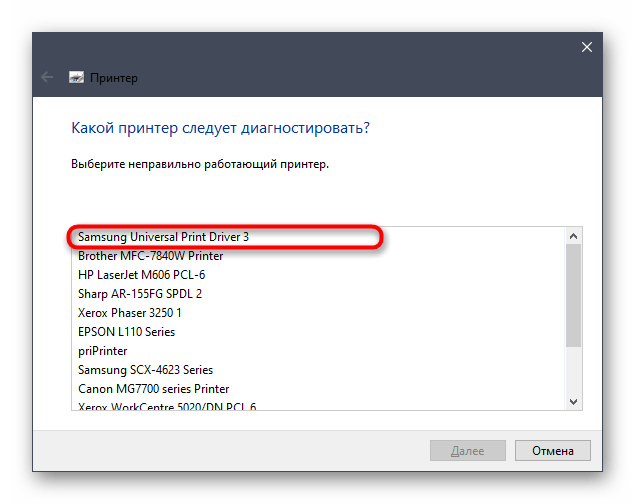
- Если самые распространенные неполадки найдены не были, потребуется вручную указать неправильно работающий принтер, отыскав его в предложенном списке установленного оборудования.
- Сканирование продолжится, а по окончании вы получите уведомление, удалось ли найти и исправить какие-либо проблемы.
Это средство часто не приносит желаемого результата, поскольку у него не всегда удается выявить неполадки, связанные с состоянием принтера. Однако его все же следует запустить, чтобы сэкономить свое время — вдруг проблема кроется на поверхности.
Способ 2: Проверка службы «Диспетчера печати»
Рассмотренное только что средство должно самостоятельно проверить службу «Диспетчера печати», которая и отвечает за работу принтера в ОС. Однако происходит это не всегда, поскольку может быть связано с пользовательскими настройками или системными сбоями. Тогда статус службу потребуется узнать самостоятельно, выполнив такие шаги:
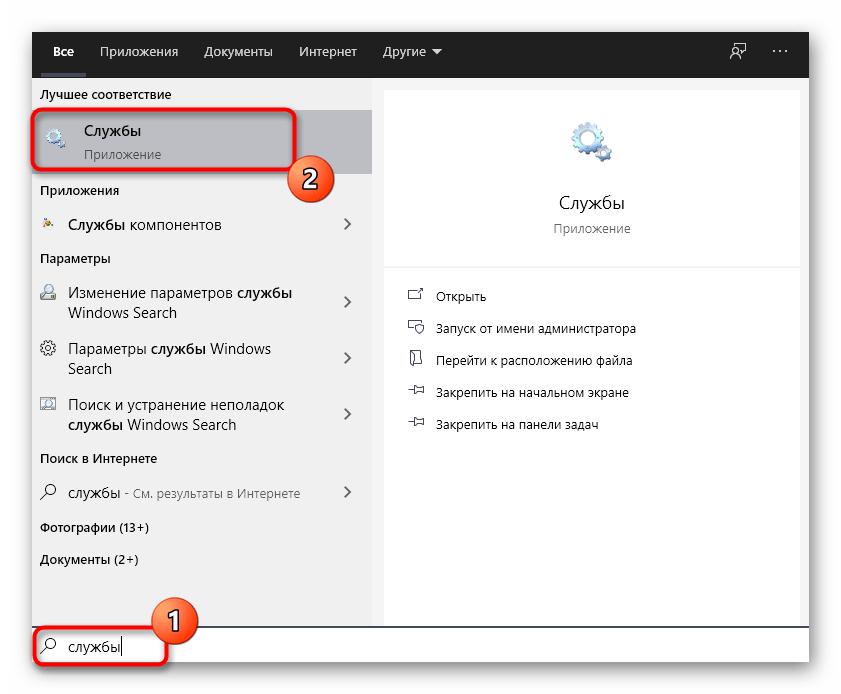
- Откройте «Пуск», с помощью поиска найдите приложение «Службы» и перейдите к нему.
- Из списка имен выберите «Диспетчер печати» и дважды кликните по этой службе.
- В появившемся окне свойств удостоверьтесь, что тип запуска установлен в значение «Автоматически», а текущее состояние — «Выполняется». Если это не так, измените параметры, вручную активируйте службу и сохраните изменения.

Больше никаких действий осуществлять не нужно, пробуйте запустить печать на этот раз. Если «Диспетчер печати» и так активен, используйте следующие методы.
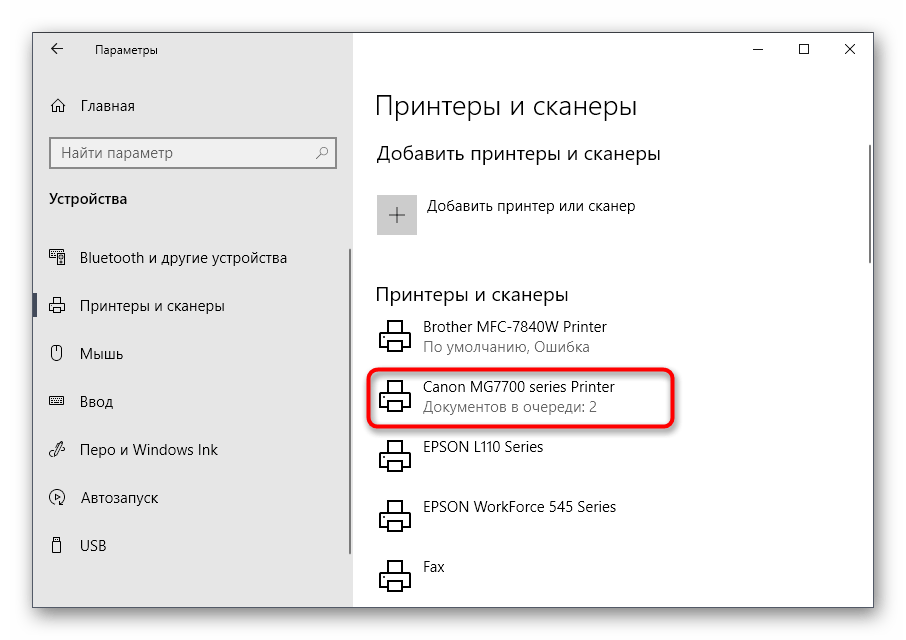
Способ 3: Проверка состояния устройства
Рассмотрим основную причину, по которой чаще всего появляется ошибка с текстом «Принтер отключен». Иногда происходят системные или аппаратные сбои, из-за чего устройство на секунду отключается или завершает свою работу. Такую ситуацию может воссоздать и пользователь, если экстренно отключит питание принтера или квартиру обесточат. В результате при следующем запуске принтер перейдет в режим автономной работы, а печать приостановится. Проверять и исправлять эту ситуацию следует самостоятельно.
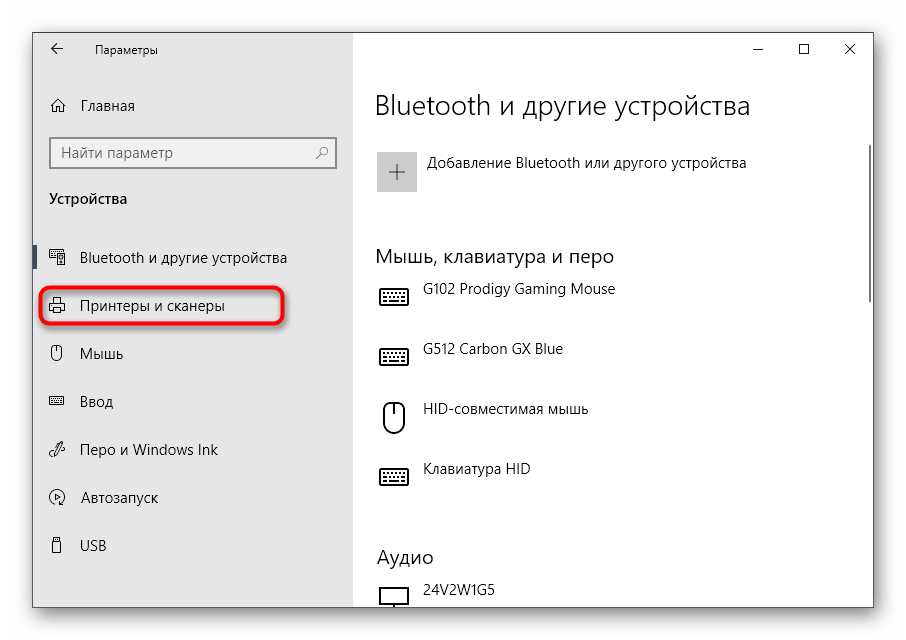
- Через то же приложение «Параметры» откройте меню «Устройства».
- В списке типов устройств отыщите «Принтер и сканеры».
- Нажмите по строчке с принтером, который сейчас не работает.
- Появятся кнопки действия, где щелкните «Открыть очередь».
- В новом окне разверните выпадающее меню «Принтер».
- Убедитесь в том, что возле пунктов «Приостановить печать» и «Работать автономно» нет галочек. Если они установлены, нажмите по этим пунктам, чтобы снять их.

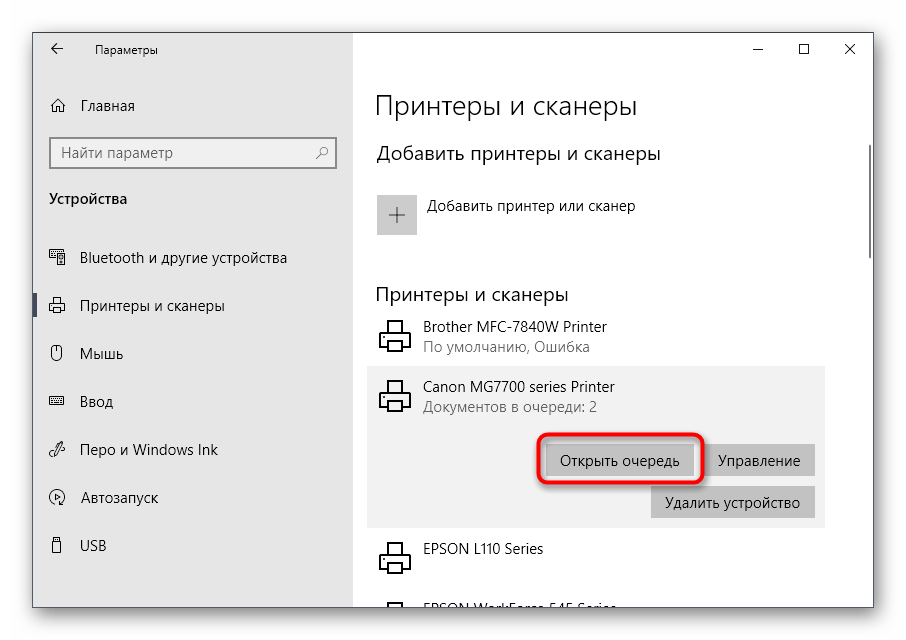

Как только вы переведете принтер в нормальный режим и запустите его работу, находящиеся в очереди документы должны отправиться на печать. Если они там отсутствуют или этого не произошло, попытайтесь запустить печать любого файла повторно.
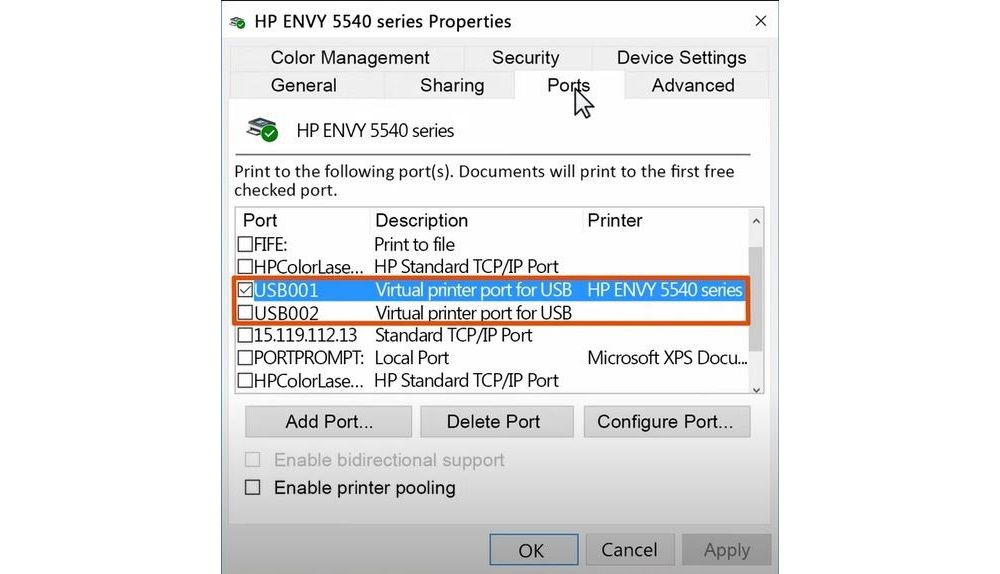
Способ 4: Проверка портов
Метод актуален только для некоторых моделей принтеров, использующих особые порты при двустороннем обмене данными с компьютером. Дело в том, что в настройках ОС необходимая для взаимодействия устройств функция может быть отключена, если речь идет о таких нестандартных портах, что и вызывает ошибку с текстом «Принтер отключен». Для ее устранения потребуется только активировать эту самую функцию.
- Через инструмент поиска в «Пуск» перейдите к приложению «Панель управления».
- Откройте меню «Администрирование».
- Дважды кликните по последнему пункту «Управление печатью».
- Сразу же появится список подключенных принтеров, среди которых и найдите интересующий, а затем точно так же нажмите по нему дважды для открытия нового окна «Свойства».
- Переместитесь на вкладку «Порты».
- Каждый принтер использует только один порт, поэтому найдите тот, который отмечен галочкой, выделите его одинарным кликом левой кнопкой мыши и нажмите «Настроить порт».
- Отметьте галочкой пункт «Состояние SNMP разрешено» и подтвердите изменения.


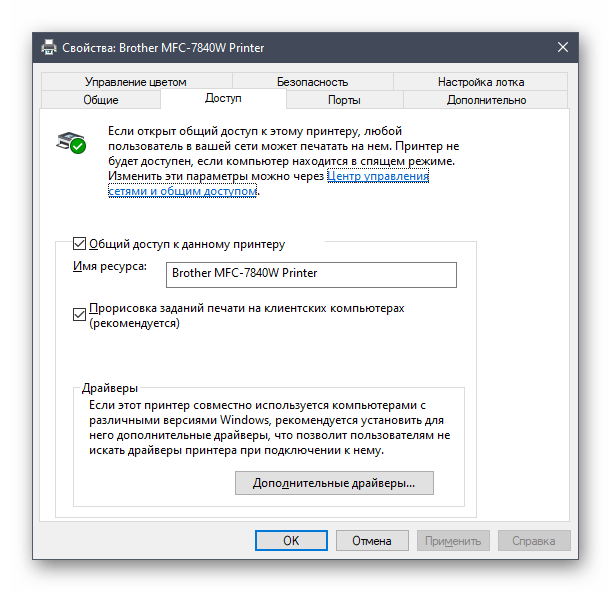
Способ 5: Включение общего доступа
Эта рекомендация подходит только тем, кто испытывает проблемы при взаимодействии с сетевым принтером. Ошибка печати бывает связана с неправильно настроенным общим доступом или его отсутствием. Обладателям такого оборудования и пользователям, распечатывающим документы по локальной сети, советуем ознакомиться со специальными руководствами на нашем сайте, перейдя по следующим ссылкам.
Подробнее:
Настройка сетевого принтера
Подключение и настройка принтера для локальной сети
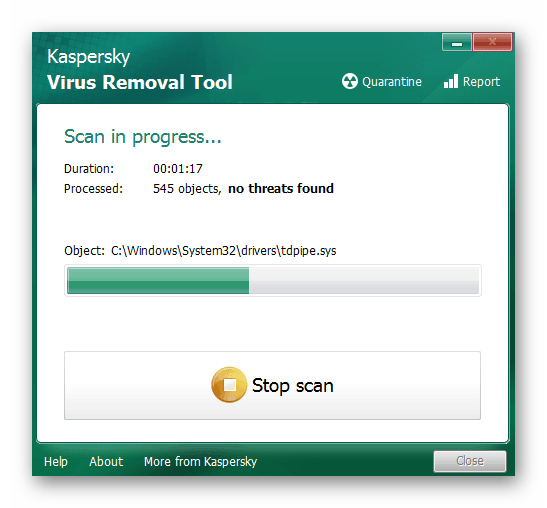
Способ 6: Проверка компьютера на наличие вирусов
Осталось только разобраться с последней причиной, которая может вызывать проблемы с печатью. Возникновение рассматриваемой ошибки возможно, если на компьютере есть вирусы определенной категории, мешающие подключению устройств по USB. Хоть это и происходит крайне редко, просканировать Windows на наличие вредоносного ПО следует, особенно когда ни одна из предыдущих рекомендаций не помогла. Для получения дополнительной информации обратитесь к отдельному материалу от нашего автора.
Подробнее: Борьба с компьютерными вирусами
Наша группа в TelegramПолезные советы и помощь
When Microsoft announced Windows 11 to be revolutionary in terms of seamlessness, you’d expect them to have gotten their [expletive] together. But here we go again with another round of bugs.
If you’re here because your Windows 11 can’t find or connect to your printer, I bet you’d be as frustrated as I when I tried printing my pitch deck only to discover that my Windows 11 had started yet another round of being a tough row to hoe.
Don’t let out all that frustration on your printer; it most certainly isn’t its fault. Many other people have complained about this issue, and one or two of the following workarounds I’ve applied should work for you too.
Read on below to find out:
Check Windows Update Section
Most printer-related issues on Windows 11 sprung up after users updated to the build codenamed KB5006746. For some users, Windows could simply not recognize the printer, while for some, the printer would give an error when trying to establish a connection.
Microsoft itself has confirmed the existence of this issue and has released an update that promises to fix it. Check your Windows Update section to see if you have this update yet.
- Hold Windows + I and then launch Windows 11 settings
- Navigate to the updates section and check if there’s any update
- If there is, click on it to start the download if you had disabled automatic downloads
- Check If the Printer’s Drivers Is Up to Date
This particular fix did the trick for me, and many other users have reported that updating their drivers fixed the issues they’re having with their printers. Knock on wood; you can try the same method if Windows 11 can’t find your printer.
- Launch desktop search bar by pressing Windows + C
- Type device manager in the search box
- Launch the app that comes up in the results
- Inside the device manager is a list of hardware on your PC; expand the printers section by clicking on it
- Click on your printer and open the drivers’ section
- Let it search for drivers update automatically in the next prompt.
Disable Windows Firewall
The in-house windows firewall can alter the communication between the software and your printer due to its security systems. This is a possibility, and you can confirm if your firewall is not the culprit by disabling it, after which you can disconnect and reconnect your printer to see if it gets recognized.
To disable Windows Firewall:
- Go to the desktop search bar again to type Windows Defender Firewall and click on the relevant result
- On the left-pane menu of the firewall, click on Turn Windows Defender Firewall On or Off
- Click on the same option for public and private network settings.
- Click ok to save all changes
Troubleshoot Your Printer
Like its predecessors, Windows 11 also comes with an embedded troubleshooting utility that helps fix subtle glitches and errors. You can harness this app to fix all printer-related issues with the following steps:
- Again, launch the Windows settings with the combination of Windows + I
- Navigate to the system bar and then select troubleshoot
- You’ll find the option for other troubleshooters; click on it to access printer troubleshoot
- Run the troubleshoot by clicking on the panel
Final Notes
The fixes I demonstrated above work for many Windows 11 Users whose systems can’t find or connect to their printer. If the problem persists with one printer, you may want to confirm the root of the problem. Apply the methods for another printer to confirm that the issue is not coming from your printer.

Ganiu Abdurahman
Ganiu is an astute technical writer with a special interest in gaming and Cryptocurrency. He is a PlayStation enthusiast whose passion lies in writing problem-solving articles.
Microsoft may have jumped the barrel with Windows 11, which launched with a slew of faults and flaws. Some of these were resolved in the later versions, but others are still present today–printer errors being one of them.
Even after months of tinkering by the Microsoft team, if this issue is keeping you from printing important documents, you might want to look at this compilation of some tried and tested methods known to fix it.
Perform Basic Checks and Fixes
Apply the following preliminary checks and fixes first, as they may resolve the issue right away:
- Turn off your printer and turn it back on again.
- Unplug the printer from its power source and reconnect it.
- If you have a wired printer, make sure it’s properly connected and that the cable connecting it to your device is in good condition.
- Connect the printer to a different USB port to rule out possible port issues. If a USB port issue turns out to be the root cause of the problem, follow the instructions in our guide on how to diagnose and fix USB port issues.
- If you have a wireless printer, ensure it is properly paired with your device. You can also disconnect it once and repair it again to make sure there are no temporary glitches.
- If you have multiple printers connected to your device, unplug them all except the one you intend to use.
- If your office printer isn’t working correctly, make sure it isn’t already connected to more devices than it’s allowed to.
- Reload the printer tray if it has run out of paper.
- Ensure your printer hasn’t run out of ink or toner.
If none of the aforementioned basic checks and fixes resolves the issue, you can start applying the remaining fixes.
1. Run the Printer Troubleshooter
Start investigating the problem by running the Printer troubleshooter. It’s a built-in utility in Windows that helps users diagnose issues with their printers and provides suggestions for fixing them.
To run the troubleshooter, open Settings > System > Troubleshoot > Other troubleshooters. Here, you will find the Printer troubleshooter among the list of Windows troubleshooters. Click on the Run button next to it to activate it.
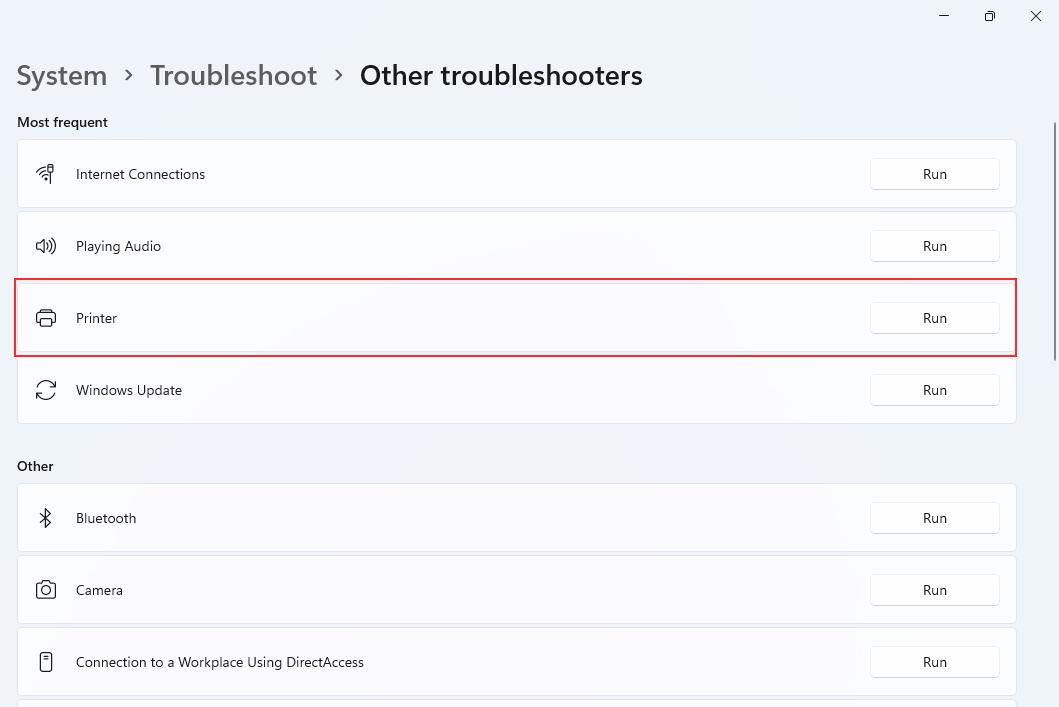
After that, follow the on-screen instructions to assist the troubleshooter in diagnosing the printer’s problem. If there are any software issues impeding your printing process, the troubleshooter will likely show you how to fix them.
2. Update the Relevant Drivers
Running the troubleshooter should be your go-to step whenever an error or issue arises. However, it is highly rare for it to diagnose, let alone solve, the problem. For this reason, your next reasonable step should be to check for driver updates and ensure the drivers are up-to-date. Here’s how to go about it:
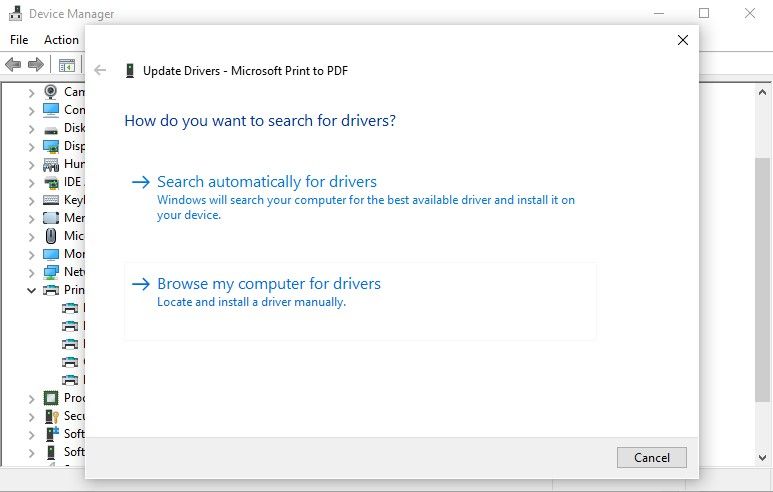
- Right-click the Start Menu button and select Device Manager from the list.
- Scroll down and expand the Print Queues category.
-
Right-click on Microsoft Print to PDF and select Update driver.

-
Selecting Search automatically for updated driver software in Windows 11 runs a check through your PC for updates.


If it shows the best device driver already installed, you can still give the manual option a try. To do this:
- Right-click Microsoft Print to PDF and select Properties from the drop-down menu.
- Go to the Details panel.
- Select Device instance path from the drop-down list under Property and then copy the Value that appears.
- Go to the DriverPack database.
- Paste the copied value in the search box, download a suitable driver and then install it.
3. Restart the Print Spooler Service
If updating the printer drivers does not fix the problem, you should check whether the print spooler service is running. The printer spooler service handles your operating system’s interactions with the printer. If this service is turned off, or its files get corrupted, your device may not even detect the printer.
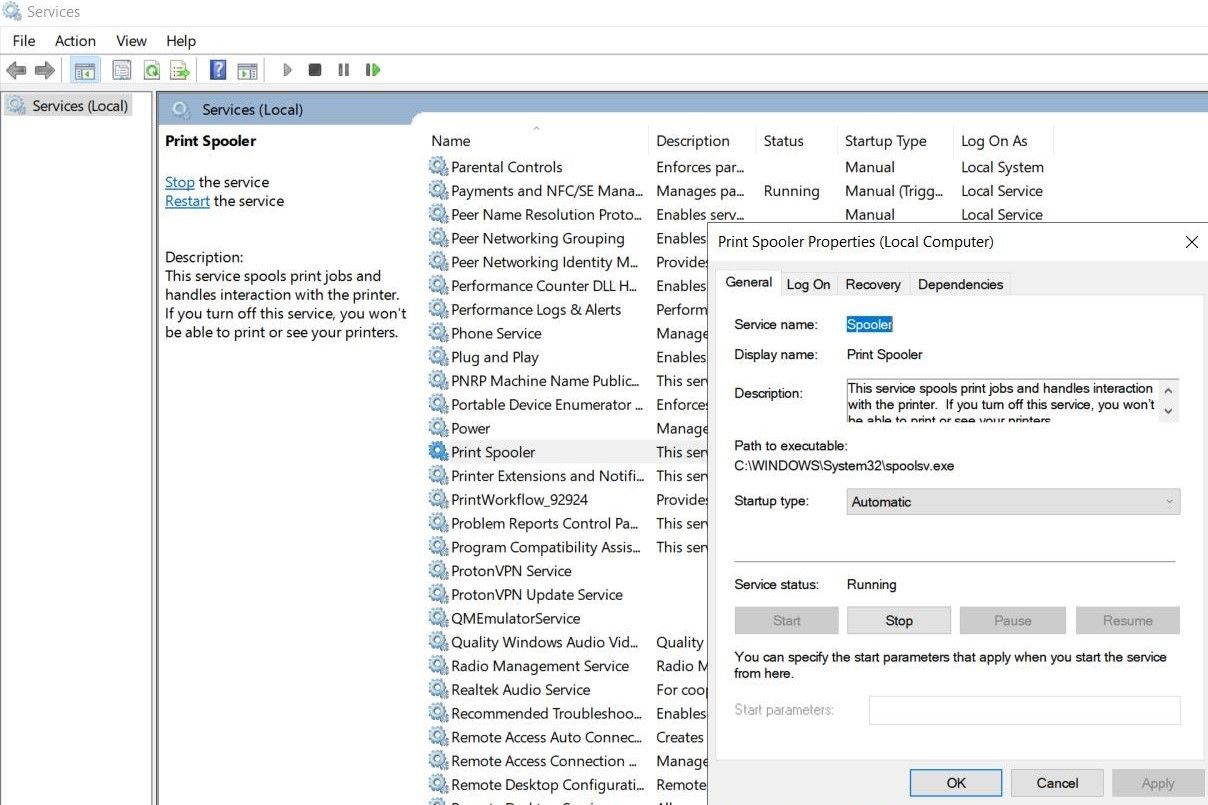
So, you should restart the service and rebuild all of its files. Follow these steps to do that:
- Press Win + R to launch the Run dialogue box.
- Type «services.msc» and press enter.
- In services, find Print spooler and double-click on it.
-
Proceed by clicking on Stop.

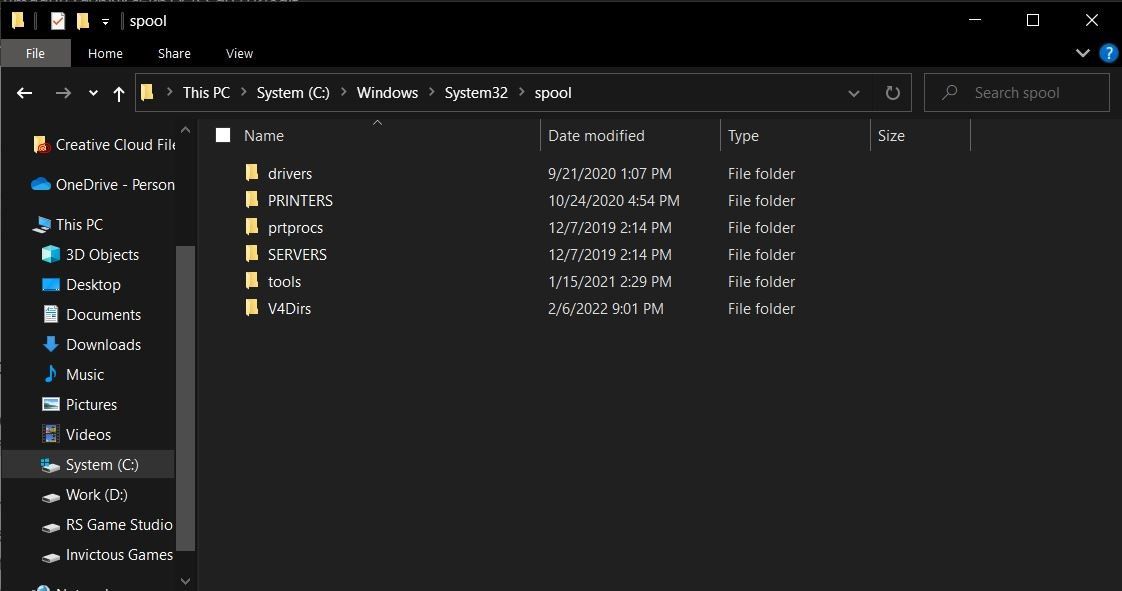
-
Then follow the path C:\Windows\system32\spoolsv.exe and delete all the files present in the folder.

- Now, all you have to do is go back to Services and manually start the print spooler service again.
- Restart your PC.
4. Recheck Your Default Printer
Often, improper printer and scanner setup is the leading cause of printing issues. The most common reason why you face printer issues is that you didn’t choose your PDF printer as your default printing device or that you configured it to the incorrect port. It can simply be solved by:
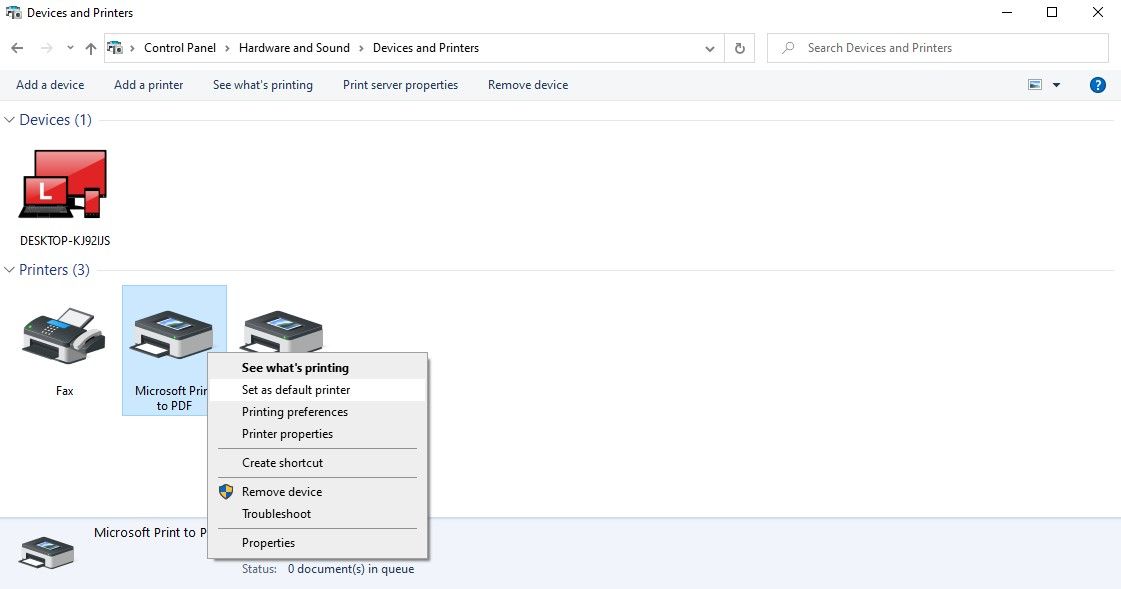
- Open Control Panel through your Windows search menu
- Click View devices and printers under Hardware and Sound.
-
Under the Printers panel, right-click on your PDF printer and select Set as default.

- Then, head over to Properties > Ports.
- Scroll through the list and select the port type that matches your connection.
-
Select Configure Port > Apply > OK.

5. Disable the Windows Defender Firewall
If your problem is still not solved the most probable culprit could be the Windows Defender firewall. It’s possible that your firewall has been configured too strictly, preventing the printer from interacting properly. So, turning off the firewall could fix the probem.
If you have never disabled the firewall before, check out our guide on how to temporarily disable the Microsoft Defender firewall.
6. Check for New Windows Updates
Windows releases updates periodically to fix existing bugs within the operating system. If you keep the updates paused or don’t let them install on time, you’re likely to run into unforeseen issues. To ensure that’s not the case, see if there is a new update available. If there is, you should install it immediately.
Here’s how you can check that:
- Press the Win key and click on the Settings icon.
- Head over to Windows Update
-
Click on Check for Updates.

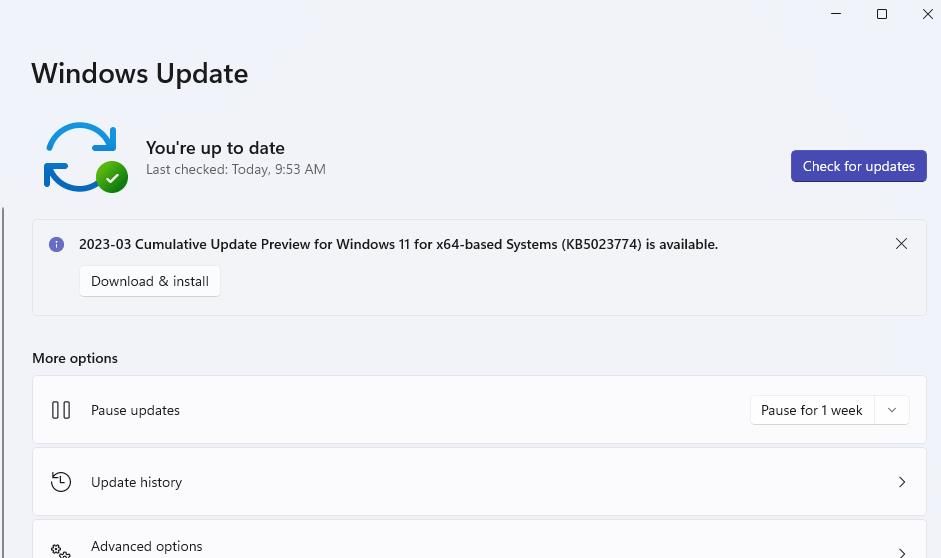
Windows will automatically search for updates, and if any new version is available, it will be installed, thus resolving your printer error.
7. Remove Your Last Windows 11 Update
Ironically, a new Windows update can also invite bugs that render your printer useless. If you noticed your printer stopped working right after a recent Windows update, you will need to delete the update from your computer.
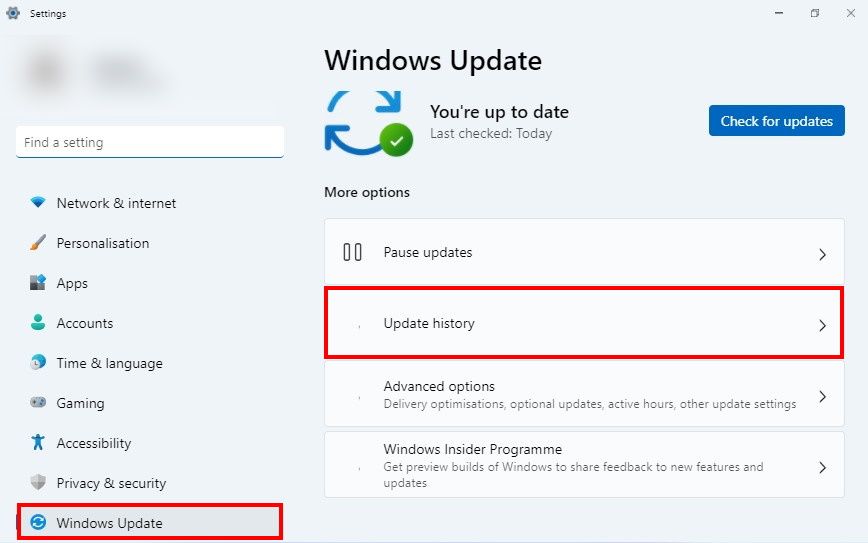
For this, head over to Settings > Windows Update > Update history. Here, scroll down and go to Uninstall updates located under Related settings. This action will prompt open a list of Windows updates where you must select the latest one and click on Uninstall.
If the latest Windows 11 update was the culprit, reversing it should do the trick and kickstart the printer once again.
8. Run System Restore
If the problem began as soon as you upgraded to Windows 11, and you’ve exhausted all other alternatives, there’s one final solution–the Windows System Restore. Using this method restores Windows to a previous restore point where you know your printer was functional without any error.
To go back to a restore point:
- Press the Windows key and type Control Panel.
- Open the Control panel by clicking on its icon.
- Type «Recovery» in the Control Panel’s search box, and go to the Recovery settings.
-
Select Open System Restore.

- The System Restore dialogue box will launch open. Click on Next to proceed forward.
- Select the restore point to restore your computer back to when your printer was functioning without a hitch.
- Again, click on Next and then Finish to confirm your restore point.
- It will confirm one last time if you wish to proceed with the system restore process. Move your cursor to Yes and click.
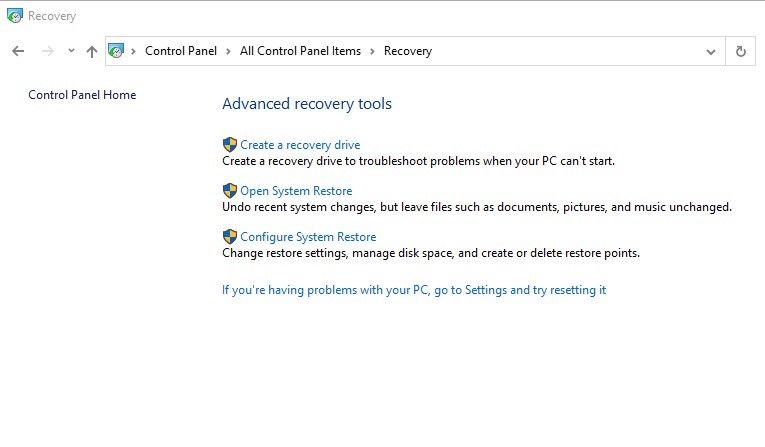
Your PC will restart while it resets your Windows 11 to its last restore point.
Printer’s Fixed and Running—What’s Next?
Whether the printer’s malfunctioning due to troubles with your operating system or general hardware issues, it can be a frustrating experience. But hopefully, now that your printer is up and running smoothly again with the aid of these fixes mentioned above. Feel free to delve into how you can make the most of your home and office printers.
Many Windows 10/11 users complain that the network printer does not show up on the PC. Even after restarting the PC and printer, it still does not work. This is confusing. But do not worry, I will provide you with some valid methods to fix it.
Try these fixes
Here are 5 fixes to solve the printer problem. You can just try until your network printer shows up.
- Check the network connection
- Add your network printer to the Devices and Printers
- Update your printer drivers
- Enable the Print Spooler service
- Run Printer Troubleshooter
Fix 1: Check the network connection
The network connection is necessary but easily neglected. When your printer does not show up on the PC, you should check the network connection first. Once you find the network is disconnected, you need to reconnect it.
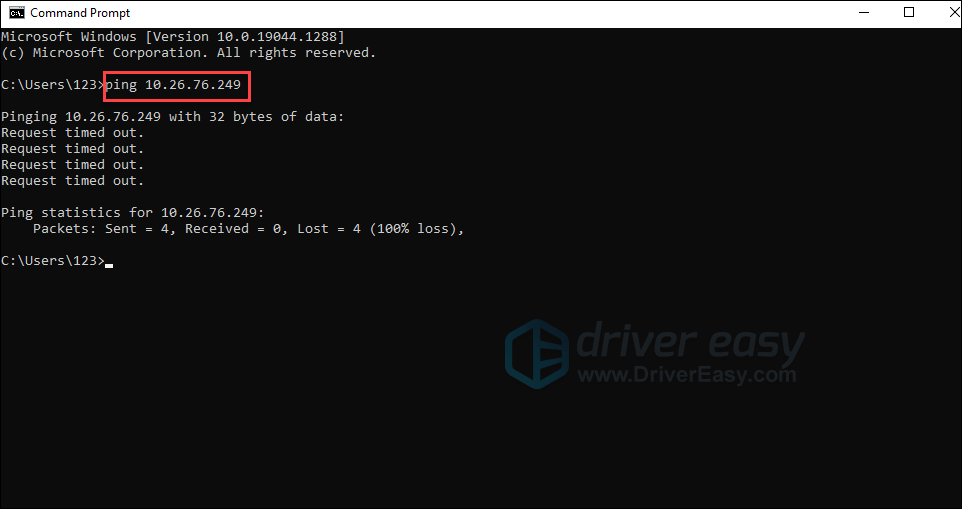
Step 1: Run a ping command
- Click the Search box, and then type cmd. Click Command Prompt.
- Find out the IP address on your printer information tag.
- Type ping and then IP address (eg. ping 10.26.76.249) on the Command Prompt dialog and press Enter. Note that a space is necessary between the ping command and the IP address.

- Your PC will perform the ping command and detect if your printer is connected to the network.
Step 2: Reconnect the printer
If your printer is not connected to the network, you can reconnect the printer. Since this varies from manufacturer to printer, you can refer to your printer manual for instructions or consult the service personnel on the printer website.
If your printer has been connected but it still doesn’t show up on the PC, you can move to the next method.
Fix 2: Add your network printer to the Devices and Printers
Only when your printer is added to the Devices and Printers, can your PC detect and find it. That is, if your network printer is not added to the Devices and Printers, your network printer will not show up. You can add your network printer to fix the problem.
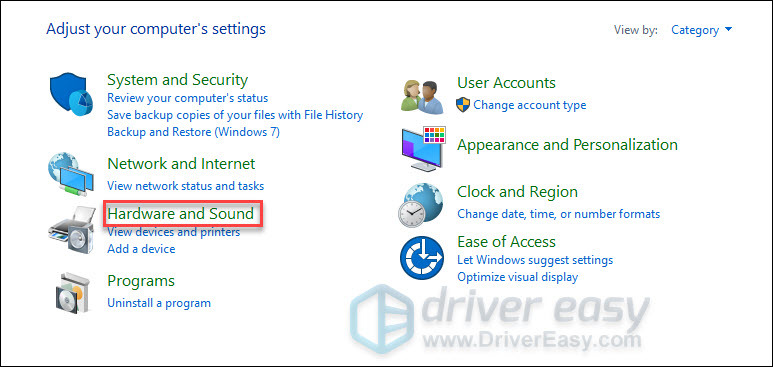
- Click the Search box in the lower left corner of your screen and then type control panel. Click the Control Panel.
- Click Hardware and sound.

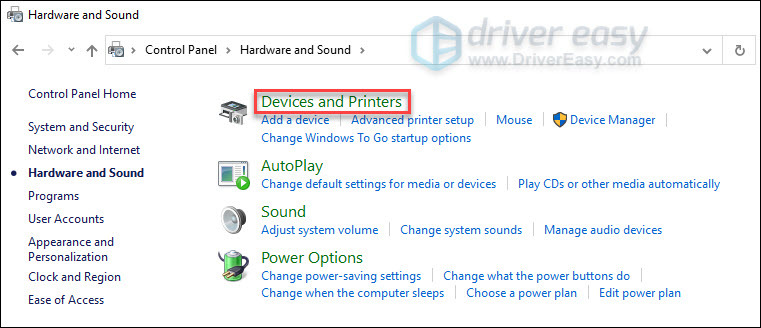
- Click Devices and Printers.

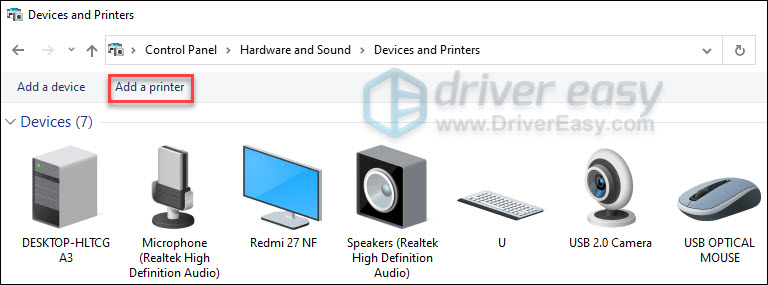
- Click Add a printer.

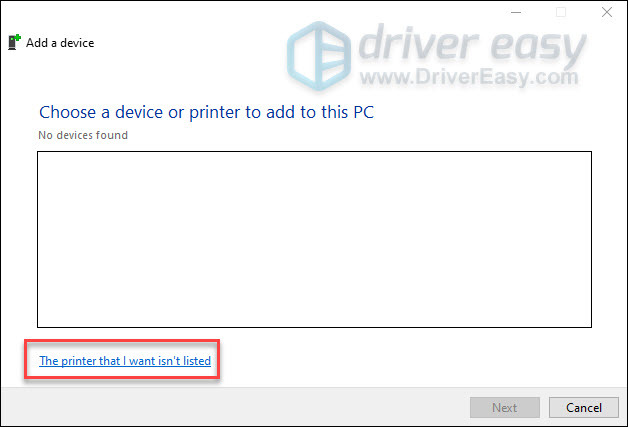
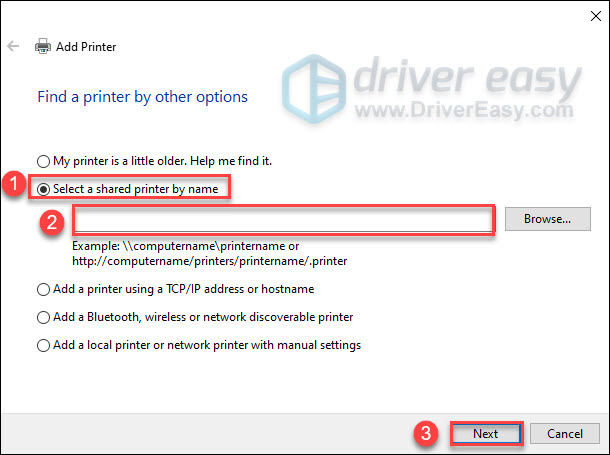
- The windows below will pop up. If your PC doesn’t detect your printer automatically, click The printer that I want isn’t listed.

- Click the option button next to Select a shared printer by name. Type your computer or printer name in the empty text box and then click the Next Button.

- Your PC will connect to the printer you add. Then you can check if your network printer is visible on your PC.
Fix 3: Update your printer drivers
When your Windows updates but your printer driver doesn’t, your printer may be not compatible with your Windows version. It can cause a series of problems, including your printer not showing up on the PC. Therefore, you can try to update your printer drivers in two ways to fix the problem.
Option 1- Manually download and install the driver
You can update your print driver manually by going to the manufacturer’s website, and searching for the most recent correct driver. It will take time and effort.
Option 2- Automatically update the driver
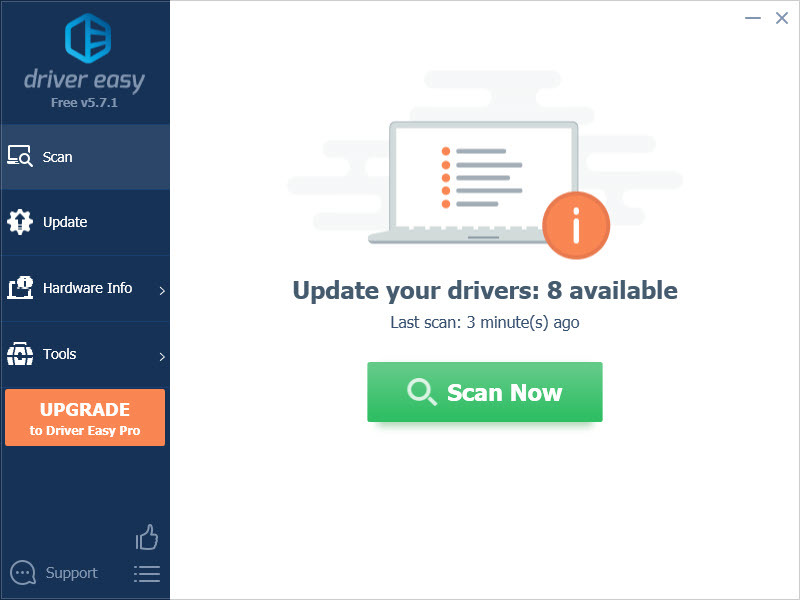
If you don’t have the time, patience or computer skills to update the printer driver manually, you can do it automatically with Driver Easy.
Driver Easy will automatically recognize your system and then find the correct drivers for it. In other words, You don’t need to know exactly what system your computer is running, you don’t need to risk downloading and installing the wrong driver, and you don’t need to worry about making a mistake when installing.
You can update your drivers automatically with either the FREE or the Pro version of Driver Easy. But with the Pro version it takes just 2 clicks:
- Download and install Driver Easy.
- Run Driver Easy and then click the Scan Now button. Driver Easy will then scan your computer and detect any drivers that need to update.

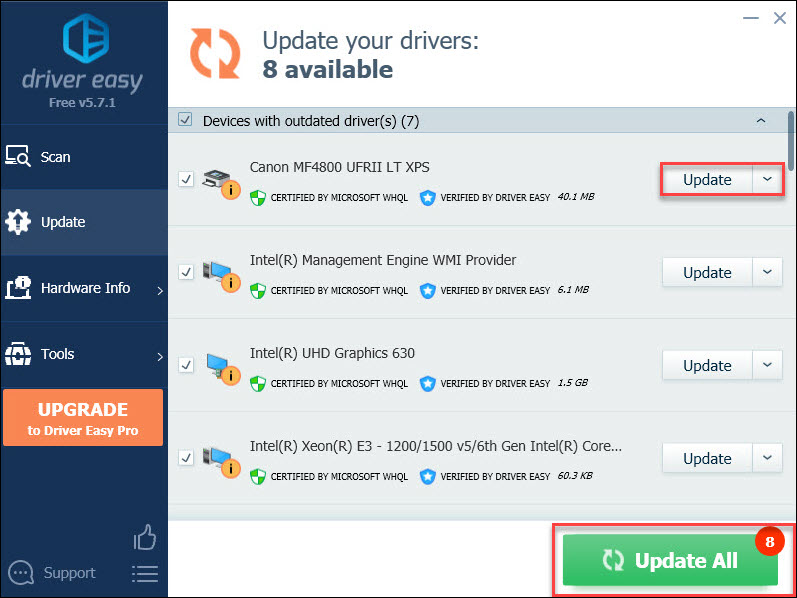
- You can choose to update the driver with a FREE version. Click the Update button next to the flagged driver to automatically download the correct version of that driver, then you can manually install it.
Or you can click Update All to automatically download and install the correct version of all the drivers that are missing or out of date on your system. (This requires the Pro version – you’ll be prompted to upgrade when you click Update All).
After updating your device drivers, see if your network printer shows up. If not, move to the next method.
Fix 4: Enable the Print Spooler service
The Printer Spooler service is responsible for managing all printing jobs. That is, if the service is disabled, it will cause a series of printer problems. So when your network printer is not visible on the PC, you can try to check the print spooler service and enable it.
- Press the Windows logo key and R key on keyboard at the same time to open the Run dialog.
- Type services.msc and then press Enter.
- Slide down your mouse until you find the Printer Spooler. Double click the Printer Spooler.

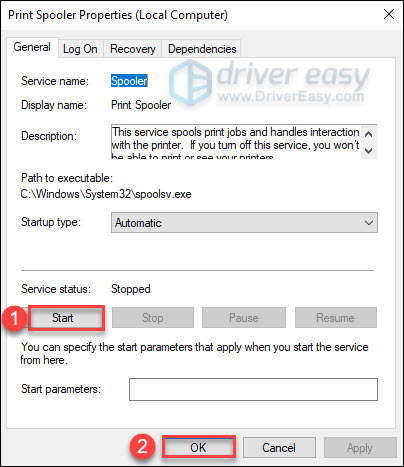
- The Print Spooler Properties dialog will pop up. Click Start and then select the OK button.

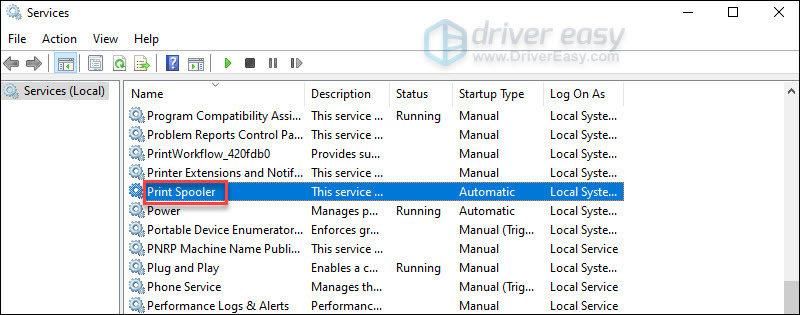
After enabling the Print Spooler service, you can check if your network printer appears on your PC.
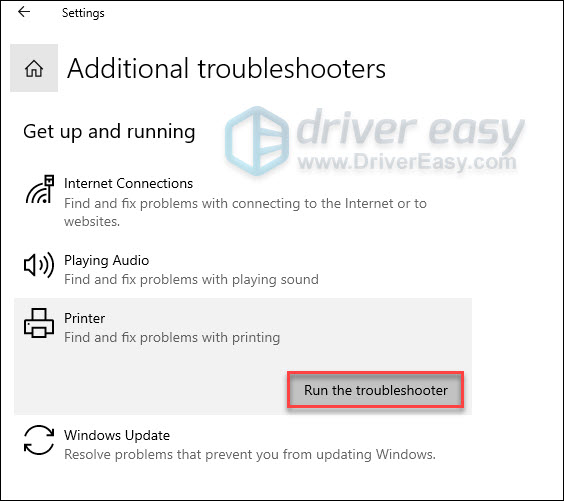
Fix 5: Run Printer Troubleshooter
The Troubleshooter can find and solve any problem of your PC automatically. After you have tried the above method, it still doesn’t work. You can run the Troubleshooter to check if there is an error in the printer.
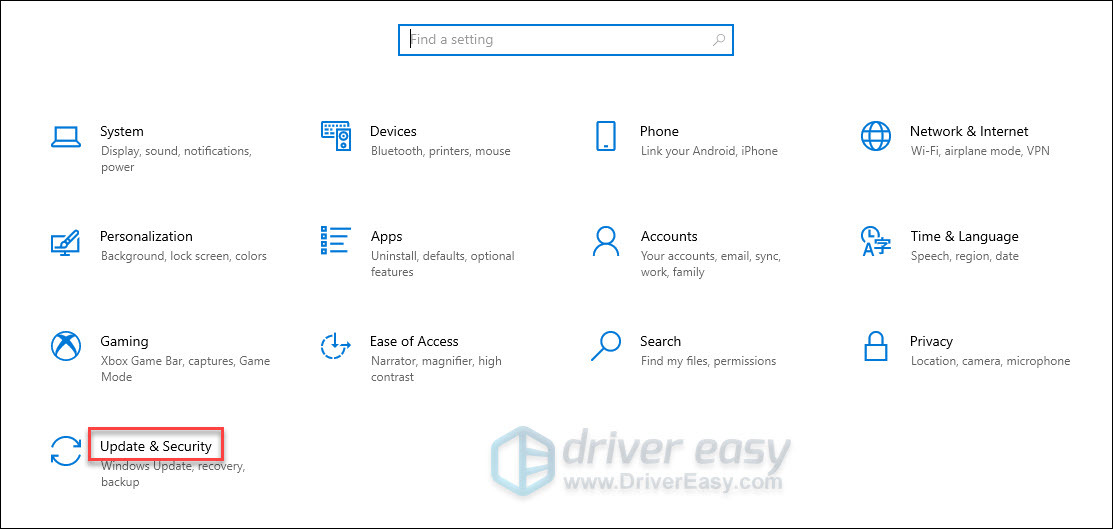
- On the keyboard, press the Windows logo key and I key at the same time to open the Settings.
- Click the Update and Security from the menu options.

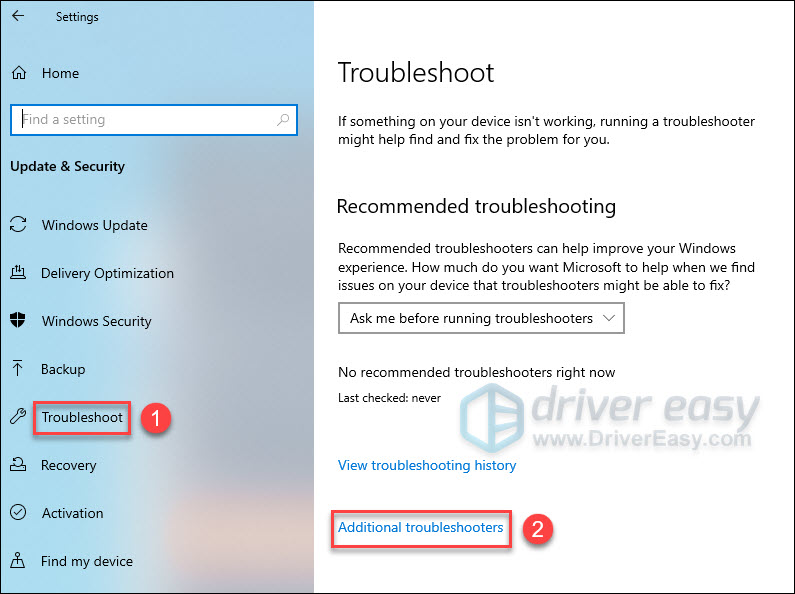
- Select Troubleshoot on the left panel and click Additional troubleshooters (or if Printer appears on the right panel, click Run the troubleshooter below Printer).

- Click Run the troubleshooter below Printer.

- The troubleshooter will fix problems it might find. After the troubleshooter finishes work, see if your printer is visible on your PC.
In short, I hope this article is helpful to you. If you have any questions, please feel free to leave a comment below.
10
10 people found this helpful