
После того, как установлен и настроен Windows server 2019, можно приступить к установке различных служб и компонентов. В данном случае установим службу печати и документов, которая позволяет управлять печатающими устройствами в домене, а также развертывать принтеры с помощью групповой политики.
Установка роли «Служба печати и документов»
Установка принтера в домене
Развертывание принтера (МФУ) в домене с помощью групповой политики
Проверка установки принтера в домене с помощью групповой политики
Установка роли «Служба печати и документов».
1. нажимаем «Пуск» — «Диспетчер серверов«.
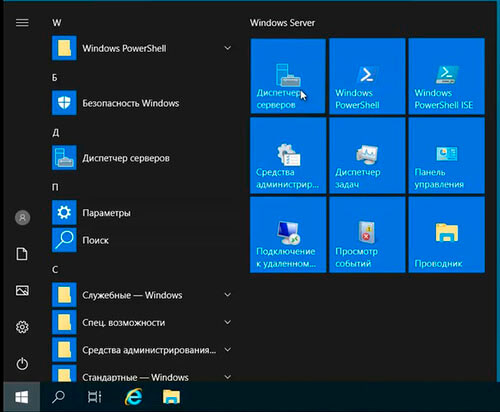
2. Выбираем «Добавить роли и компоненты«.
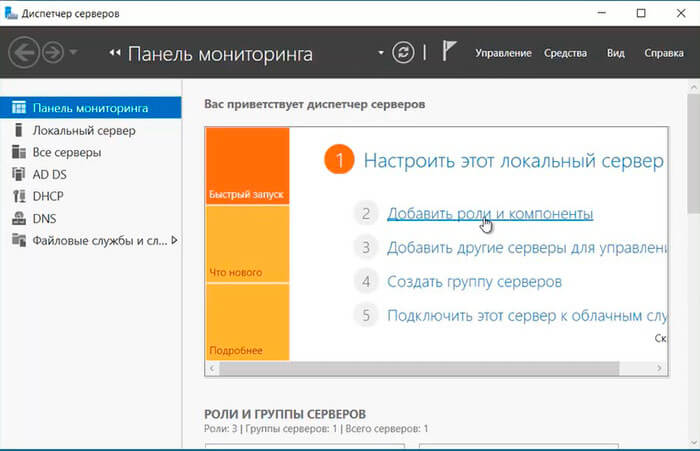
3. В мастере добавления ролей и компонентов читаем условия, которые необходимы для установки ролей и компонентов.
- Учётная запись администратора защищена надежным паролем;
- Настроены сетевые параметры, такие как статические IP-адреса;
- Установлены новейшие обновления безопасности из Центра обновления Windows.
Нажимаем «Далее«.

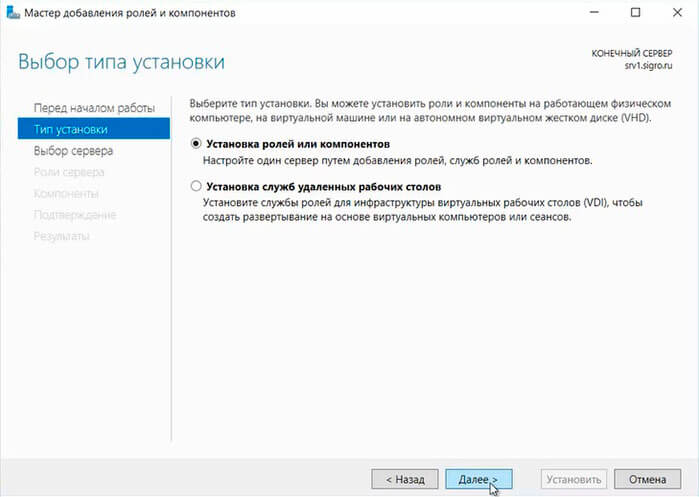
4. В следующем окне выбираем «Установка ролей или компонентов«, нажимаем «Далее«.
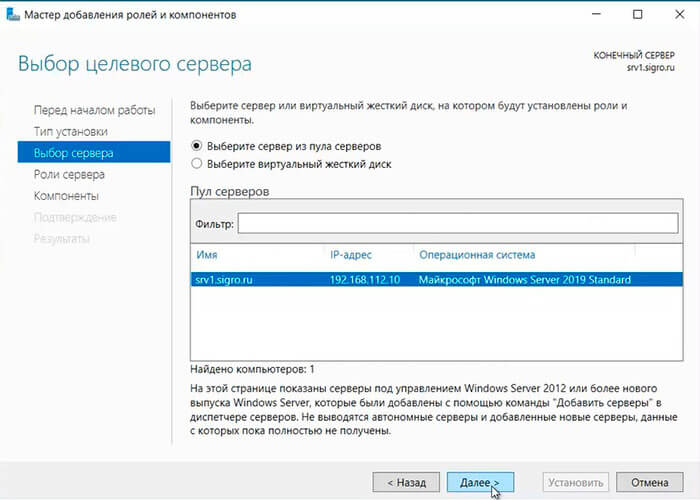
5. Выбираем сервер из пула серверов, затем «Далее«.
6. Выбираем «Службы печати и документов«.
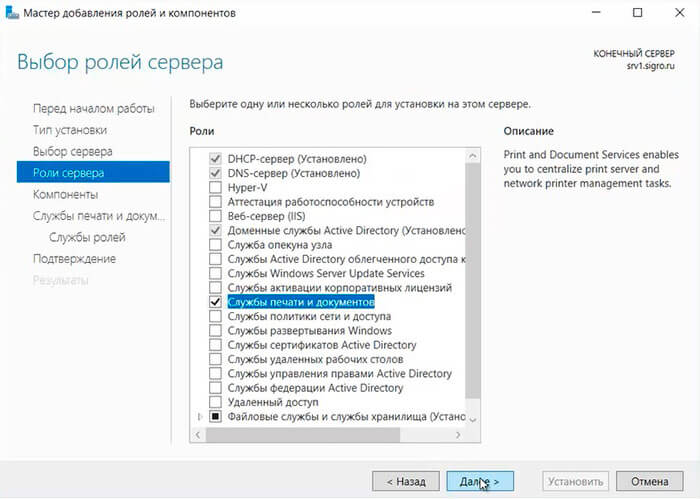
7. В открывшемся окне выбираем «Добавить компоненты«, снова «Далее«.
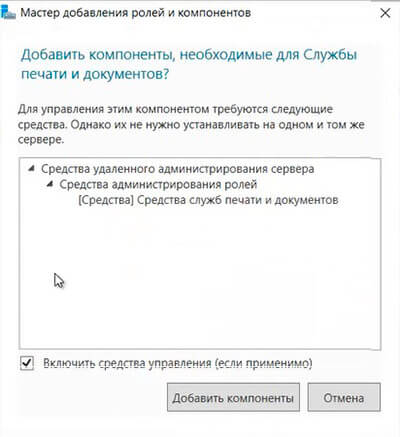
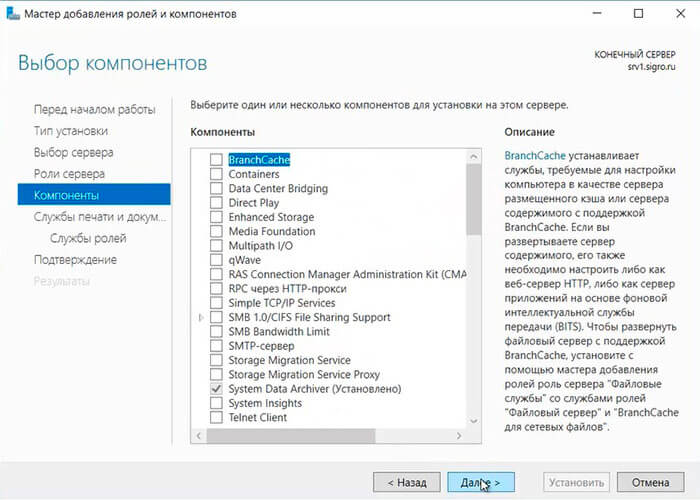
8. Компоненты для установки на этом сервере устанавливать нет необходимости, нажимаем «Далее«.
9. Читаем на что обратить внимание при установке службы печати и документов, нажимаем «Далее«.
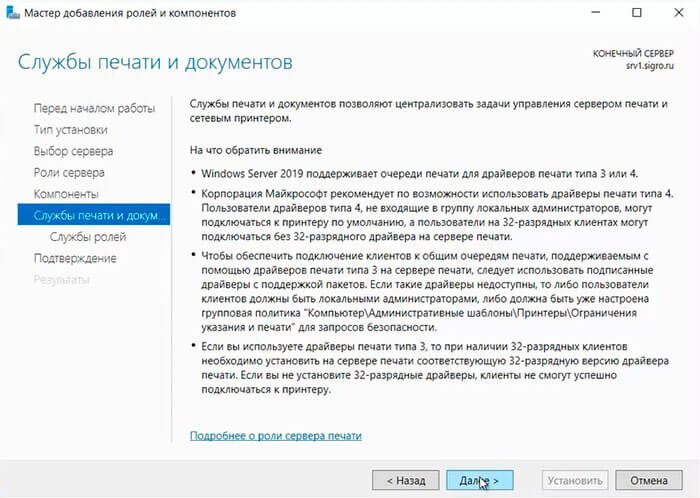
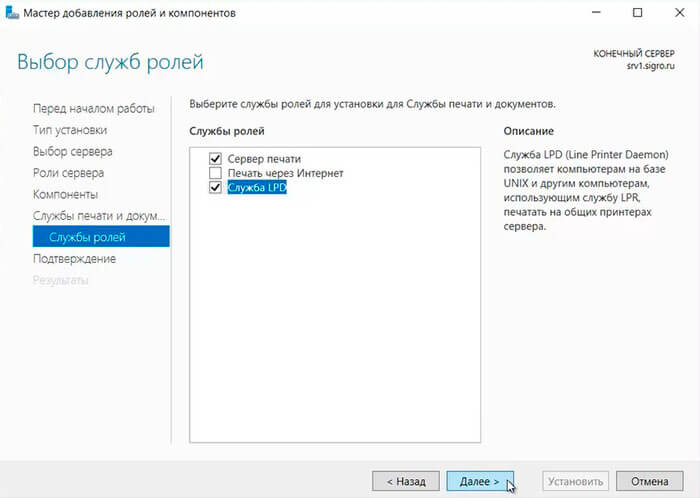
10. В следующем окне оставляем по умолчанию чекбокс на «Сервер печати«. Если в сети имеются компьютеры, работающие на базе UNIX (в том числе Linux), ставим чекбокс на «Службы LPD«. Затем «Далее«.
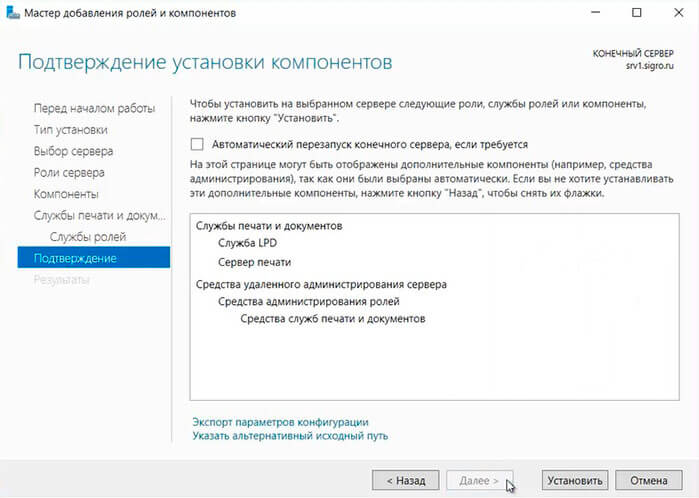
11. В открывшемся окне Нажимаем «Установить«.
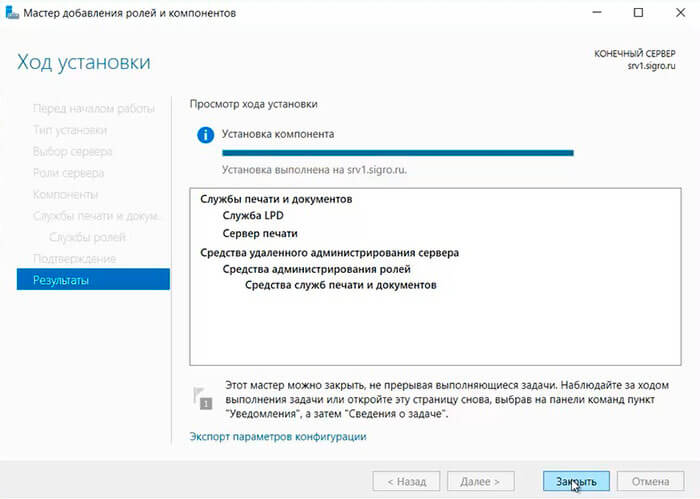
12. По окончании установки нажимаем «Закрыть«. Служба печати и документов после установки не требует перезагрузки сервера.
Установка принтера в домене
Для того, чтобы установить принтер, МФУ в домене, сначала необходимо установить драйвер печатающего устройства на сервере. В данном случае установим драйвер для МФУ Kyocera Ecosys M2835dw.
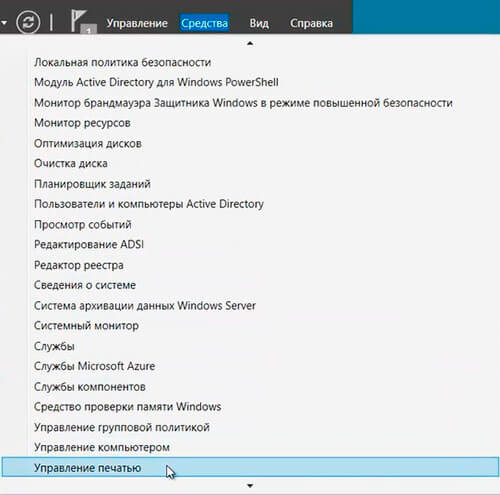
1. Открывает «Диспетчер серверов» (Пуск — Диспетчер серверов), далее «Средства» — «Управление печатью«.
2. В открывшемся окне «Управление печатью» раскрываем «Серверы печати«. Нажимаем правой клавишей мыши на «Принтеры«, далее «Добавить принтер…«.

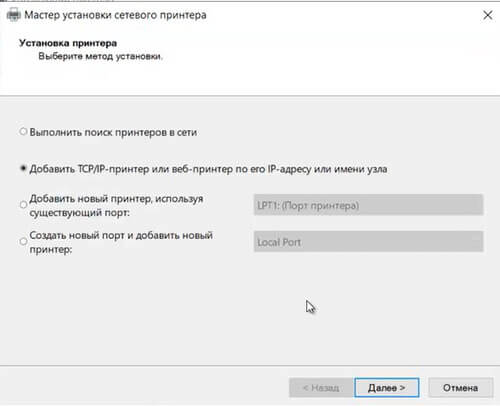
3. В мастере установки сетевого принтера выбираем «Добавить TCP/IP-принтер или веб-принтер по его IP-адресу или имени узла«, затем «Далее«.
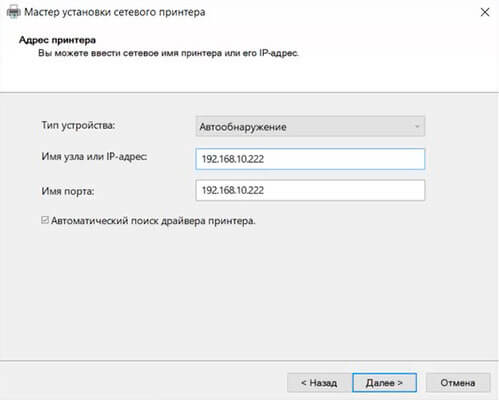
4. Задаём «Имя узла или IP-адрес«, «Имя порта«. Устанавливаем чекбокс «Автоматический поиск драйвера принтера«, если не стоит. Нажимаем «Далее«.
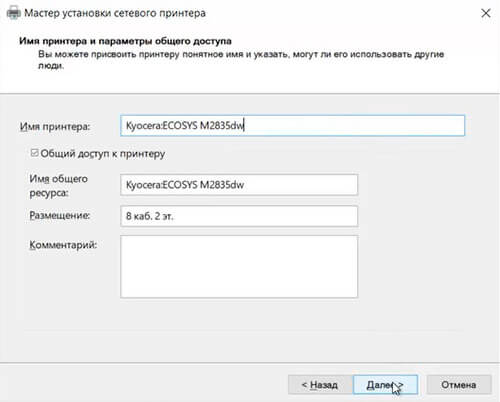
5. После того, как принтер (МФУ) найден, задаём «Имя принтера«, «Имя общего ресурса«, устанавливаем чекбокс «Общий доступ к принтеру«, если не стоит. Для удобства заполняем поле «Размещение» и если есть необходимость, заполняем «Комментарий«. Нажимаем «Далее«.
6. Дожидаемся установки драйвера сетевого принтера (МФУ), затем «Далее«.
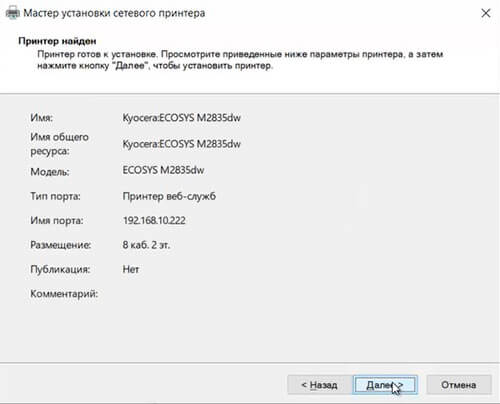
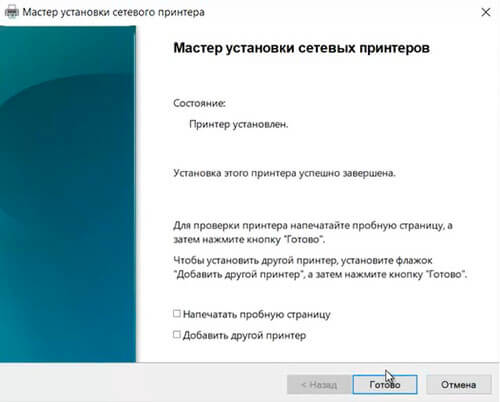
7. После окончания установки устройства, мастер установки сетевых принтеров напишет состояние «Принтер установлен». Можно напечатать пробную страницу, а также установить другой принтер, установив чекбокс в соответствующее поле. Нажимаем «Готово«.
т
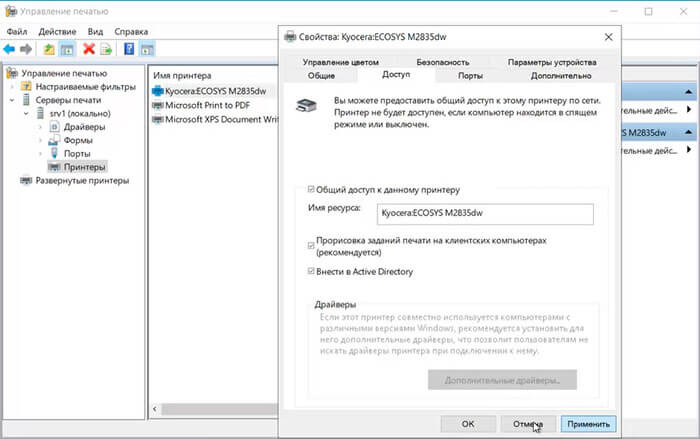
8. Далее в окне «Управление печатью«, нажимаем правой клавишей на установленное устройство, выбираем «Свойства«. В открывшемся окне ставим чекбокс «Внести в Active Directory«. Нажимаем «Применить«, затем «ОК«.
Развертывание принтера (МФУ) в домене с помощью групповой политики
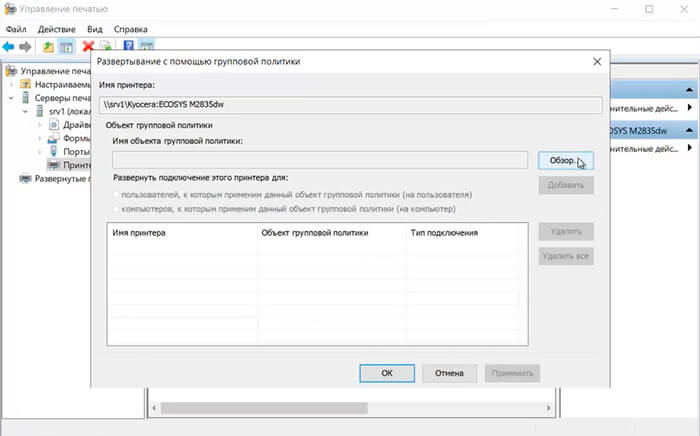
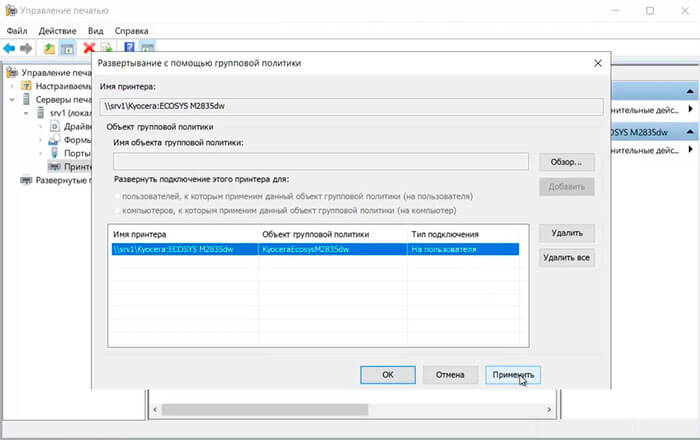
1. Для развертывания принтера (МФУ) в домене с помощью GPO в окне «Управление печатью» переходим к «Принтеры«, далее выбираем необходимый принтер. Нажимаем правой клавишей мыши на выбранный принтер, далее «Развернуть с помощью групповой политики«. В новом окне нажимаем «Обзор«.
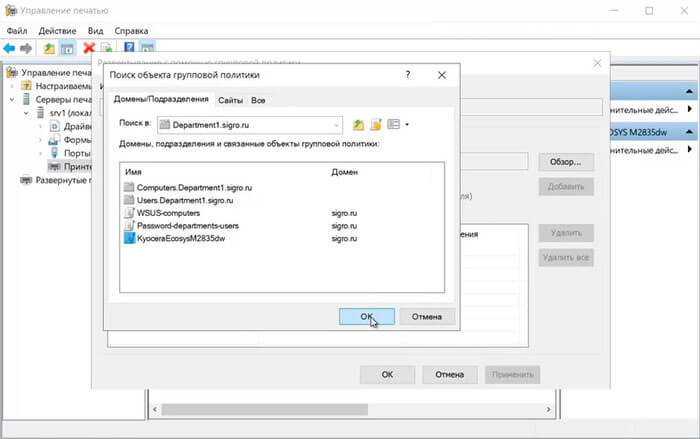
2. В открывшемся окне выбираем подразделение, в котором будет развернуто устройство для печати, затем нажимаем на «+» и задаём имя для новой групповой политики.
3. В зависимости от применения групповой политики (для пользователей, для компьютеров), ставим чекбокс. В данном случае применяем политику для пользователей, к которым применен данный объект групповой политики (на пользователя). Нажимаем «Добавить» — «Применить«.
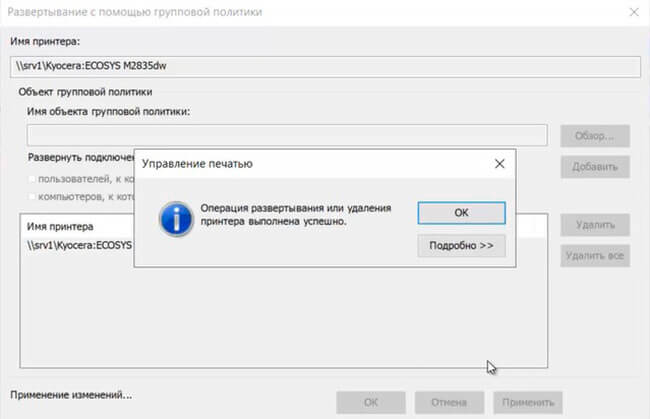
4. Появится сообщение, что операция развертывания или удаления принтера выполнена успешно. Для закрытия сообщения нажимаем «ОК«, затем «ОК«.
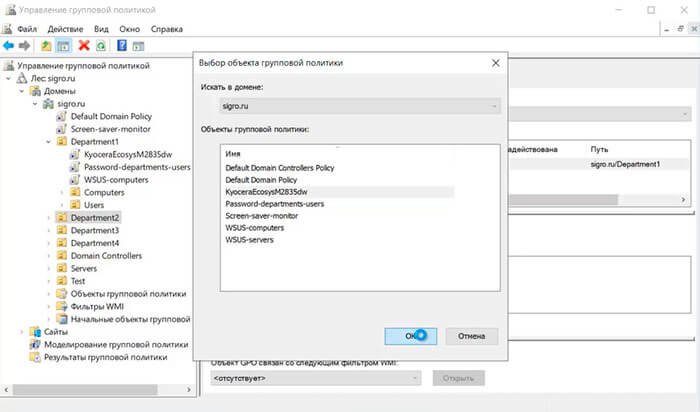
5. Для того, чтобы связать созданную групповую политику с другими подразделениями в домене, открываем оснастку консоли «Управление групповой политикой«. Выбираем нужное подразделение, правой клавишей мыши — «Связать существующий объект групповой политики…«.
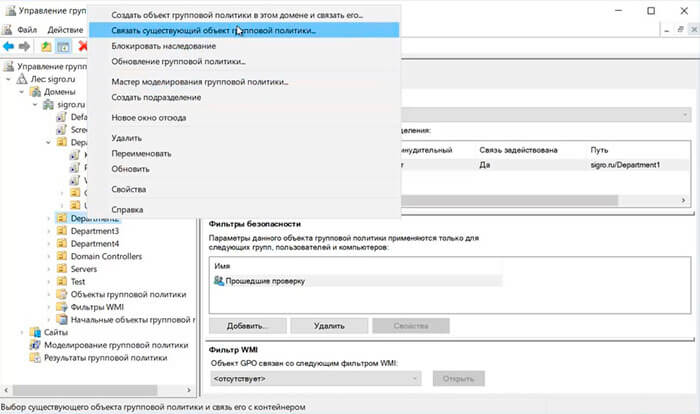
6. Выбираем созданную групповую политику, нажимаем «ОК«. Применяем групповую политику к нужным подразделениям, или можем сразу выбрать весь домен.
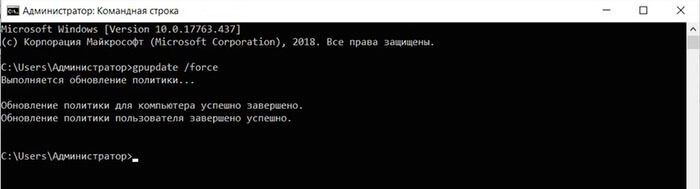
7. Для немедленного применения групповой политики открываем командную строку, набираем gpupdate /force.
Проверка установки принтера в домене с помощью групповой политики
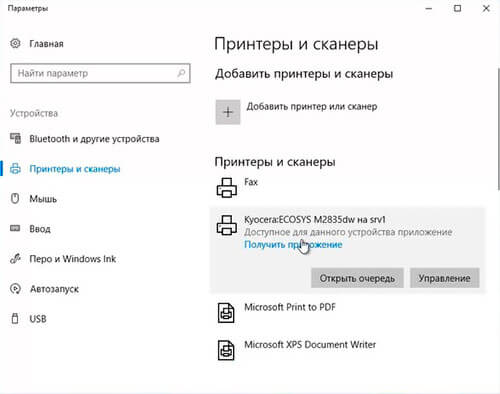
1. Для проверки установки принтера (МФУ) в домене, заходим на компьютере пользователя под учетной записью. В строке поиска пишем «Принтеры«, нажимаем на появившееся «Принтеры и сканеры«.
2. В новом окне проверяем, что появилось устройство печати.
Посмотреть, как установить и настроить службу печати и документов, а также развернуть принтер в домене с помощью групповой политикой можно здесь:
Читайте также:
- Windows server 2019 — установка и настройка WSUS, создание и настройка GPO
- Windows server 2019 — добавление и удаление компьютера в домене
- Windows server 2019 — переименование администратора домена, изменение формата выводимого имени пользователя
- Windows server 2019 — установка и настройка Active Directory, DNS, DHCP
- Windows server 2019 — создание и удаление пользователя, группы, подразделения в домене
- Windows server 2019 — GPO изменение экранной заставки, отключение монитора, изменение политики паролей
Introduction
In this article, we will show you how to set up a Print Server in Windows Server 2022. Print Server is a service that allows you to share printers and print jobs with other computers on your network. Setting up a Print Server is a relatively simple process, and we will walk you through each step of the process.
Step 1: Install the Print Server Role
The first step is to install the Print Server role. To do this, open the Server Manager console and click on “Add Roles and Features”.
On the “Before you begin” page, click “Next”. On the “Select installation type” page, select “Role-based or feature-based installation” and click “Next”. On the “Select destination server” page, select the server on which you want to install the Print Server role and click “Next”.
On the “Select server roles” page, select the “Print Server” role and click “Next”. On the “Confirm installation selections” page, click “Install”.
On the “Results” page, you should see that the Print Server role has been installed successfully.
Step 2: Configuring the Print Server
Now that the Print Server role has been installed, we need to configure it. To do this, open the Print Management console. This can be done by going to Start > Administrative Tools > Print Management.
In the Print Management console, expand the “Print Servers” node and then select the server on which you installed the Print Server role. In the right pane, you should see a list of all the printers that are installed on the server. Right-click on the printer that you want to share and select “Share”.
In the “Share this printer” dialog box, enter a share name for the printer and click “OK”.
Now that the printer has been shared, we need to add it to the list of printers that the Print Server will manage. To do this, right-click on the “Print Servers” node and select “Add/Remove Servers”.
In the “Add or Remove Servers” dialog box, click “Add”. In the “Add Servers” dialog box, enter the name of the server on which you installed the Print Server role and click “OK”.
You should now see the server in the “Print Servers” list. Select the server and click “Add >”. Click “OK”.
The server should now be added to the list of servers that the Print Server manages. You can now close the Print Management console.
Step 3: Adding Printers to the Print Server
Now that the Print Server is configured, we need to add the printers that we want to share. To do this, open the Devices and Printers control panel. This can be done by going to Start > Devices and Printers.
In the Devices and Printers control panel, click “Add a printer”. In the “Add a printer” wizard, select “Add a network, wireless or Bluetooth printer”.
On the “Choose a printer” page, select the printer that you want to add and click “Next”. On the “Install the printer driver” page, select the driver for the printer and click “Next”.
On the “Choose a printer port” page, select the port for the printer and click “Next”. On the “Install the printer driver” page, click “Finish”.
The printer should now be added to the Print Server. You can now close the Devices and Printers control panel.
Step 4: Testing the Print Server
To test the Print Server, we will try to print a document from a client computer. To do this, open the document that you want to print and select the “Print” option. In the “Print” dialog box, select the printer that you want to use and click “Print”.
The document should now be sent to the Print Server and should start printing. If the document does not print, check the printer queue on the Print Server to see if the document is stuck in the queue.
Conclusion
In this article, we showed you how to set up a Print Server in Windows Server 2022. We also showed you how to add printers to the Print Server and how to test the Print Server. If you have any questions or feedback, please feel free to leave a comment.
In order to set up a print server in Windows Server 2022, you will need to perform the following steps:
1. Install the Print and Document Services role.
2. Configure the Print and Document Services role.
3. Add the printers that you want to make available to the server.
4. Configure the printers.
5. Configure the printer permissions.
6. Test the print server.
1. Installing the Print and Document Services role
To install the Print and Document Services role, open the Server Manager console and click on the “Add Roles and Features” link. On the “Before you begin” page, click on the “Next” button. On the “Select installation type” page, select the “Role-based or feature-based installation” option and click on the “Next” button. On the “Select destination server” page, select the server on which you want to install the Print and Document Services role and click on the “Next” button.
On the “Select server roles” page, select the “Print and Document Services” role and click on the “Next” button. On the “Print and Document Services” page, click on the “Next” button. On the “Confirm installation selections” page, click on the “Install” button. On the “Results” page, click on the “Close” button.
2. Configuring the Print and Document Services role
After you have installed the Print and Document Services role, you need to configure it. To do this, open the Server Manager console and click on the “Tools” menu. In the “Tools” menu, select the “Print Management” option.
In the Print Management console, expand the “Print Servers” node and select the server on which you have installed the Print and Document Services role. In the “Actions” pane, click on the “Configure Server” link.
On the “Welcome to the Configuration Wizard for Print and Document Services” page, click on the “Next” button. On the “Select Role Services” page, select the “Print Server” and “Internet Printing” role services and click on the “Next” button. On the “Confirm Selections” page, click on the “Next” button.
On the “Results” page, click on the “Close” button.
3. Adding the printers to the server
After you have installed and configured the Print and Document Services role, you need to add the printers that you want to make available to the server. To do this, open the Print Management console and expand the “Print Servers” node.
In the “Actions” pane, click on the “Add Printer” link. On the “Add Printer” page, select the “Local printer” option and click on the “Next” button. On the “Choose a printer port” page, select the “Create a new port” option and click on the “Next” button.
On the “Type a port name” page, enter the name of the printer port and click on the “Next” button. On the “Configure Port” page, select the “Standard TCP/IP Port” option and click on the “Next” button.
On the “Add Standard TCP/IP Printer Port Wizard” page, enter the IP address of the printer and click on the “Next” button. On the “Completing the Add Standard TCP/IP Printer Port Wizard” page, click on the “Finish” button.
4. Configuring the printers
After you have added the printers to the server, you need to configure them. To do this, open the Print Management console and expand the “Print Servers” node.
In the “Actions” pane, click on the “Manage Printers” link. In the “Printers” list, right-click on the printer that you want to configure and select the “Properties” option.
In the “Printer properties” dialog box, select the “Ports” tab. In the “Ports” list, select the printer port that you have created and click on the “Configure Port” button.
In the “Configure Port” dialog box, select the “Printer pooling” option and click on the “OK” button.
5. Configuring the printer permissions
After you have configured the printers, you need to configure the printer permissions. To do this, open the Print Management console and expand the “Print Servers” node.
In the “Actions” pane, click on the “Manage Printers” link. In the “Printers” list, right-click on the printer for which you want to configure the permissions and select the “Manage sharing” option.
In the “Printer sharing” dialog box, select the “Share this printer” option and click on the “OK” button.
6. Testing the print server
After you have configured the print server, you need to test it. To do this, open the Control Panel and select the “View devices and printers” option.
In the “Devices and Printers” window, double-click on the printer that you have configured. In the “Printing Preferences” dialog box, select the “Print Test Page” option and click on the “OK” button.
If the test page is printed successfully, then the print server is working correctly.
Ultimate Guide to Configuring Network Printing in Windows Server 2025
Printing remains an essential function in many business environments, and Windows Server 2025 offers robust print management capabilities that simplify administration and enhance efficiency. Instead of configuring printers individually on each computer, organizations can set up centralized print management using a Windows print server.
This guide walks you through installing, configuring, and deploying network printers using Windows Server 2025, leveraging Group Policy for automation.
1. Understanding Network Printing
Before setting up a print server, it’s important to understand the two primary ways to print over a network:
- Direct Printing (Client-to-Printer)
- The client computer installs the printer and prints directly to it.
- Best suited for home users or small offices.
- Each computer needs individual printer configuration.
- Print Server-Based Printing (Client-to-Server-to-Printer)
- The printer is installed on a Windows Server 2025 print server.
- The server queues, processes, and manages print jobs for multiple users.
- Administrators can centrally manage drivers, permissions, and settings.
✅ Why Use a Print Server?
- Centralized Management – No need to manually install printers on each PC.
- Easy Deployment – Automatically assign printers to users via Group Policy.
- Efficient Troubleshooting – All print jobs are logged and managed in one place.
- Driver Control – The server ensures that clients always have the correct drivers.
2. Installing the Print and Document Services Role
To use Windows Server 2025 as a print server, you must install the Print and Document Services role.
Step-by-Step Installation
- Open Server Manager on Windows Server 2025.
- Click Manage > Add Roles and Features.
- Choose Role-based or Feature-based Installation.
- Select your server from the list and click Next.
- Under Server Roles, check Print and Document Services.
- Expand the role and select the following features:
- ✅ Print Server – The core printing functionality.
- ✅ Internet Printing (Optional) – Allows remote users to print via a web portal.
- ✅ LPD Service (Optional) – Supports UNIX/Linux devices.
- Click Next > Install and wait for the process to complete.
- Restart the server to apply changes.
Accessing the Print Management Tool
Once installed, go to:
- Server Manager > Tools > Print Management.
3. Configuring the Print Server
After installing the role, you need to configure printers, drivers, and ports.
Step 1: Adding a Network Printer
- Open Print Management from Server Manager.
- Expand Print Servers > Your Server Name > Printers.
- Right-click Printers and select Add Printer.
- Choose one of the following methods:
- Find a Network Printer – The server scans and adds available printers.
- Add by IP Address – Recommended for direct network printer setup.
- Add Using an Existing Port – Use an existing configuration.
Step 2: Configuring the Printer Port
If using TCP/IP printing:
- Choose Create a New Port > Standard TCP/IP Port.
- Enter the printer’s IP address.
- Select Autodetect Printer Type or manually choose TCP/IP Device.
- Click Next to complete the setup.
Step 3: Installing the Printer Driver
- Choose Install a New Driver.
- Select the printer model from the list, or click Have Disk to manually add drivers.
- Assign a Printer Name and optionally specify its Location (e.g., “East Wing Printer”).
- Click Next to install the driver.
Step 4: Configuring Printer Sharing
- Right-click the printer and choose Printer Properties.
- Go to the Sharing tab.
- Check Share this printer and provide a descriptive Share Name.
- Click OK to apply the changes.
✅ Best Practices for Printer Names
- Use clear, consistent names (e.g., HQ-Floor1-HPColor).
- Include location details in the description field.
4. Deploying Printers via Group Policy
Instead of manually installing printers for users, Group Policy allows you to automatically assign printers based on user or computer policies.
Step 1: Deploying a Printer
- Open Print Management.
- Right-click the installed printer and select Deploy with Group Policy.
- Choose a Group Policy Object (GPO) or create a new one (e.g., Printing Policy).
- Choose how to deploy:
- Per User – The printer follows the user, regardless of which computer they log into.
- Per Computer – The printer is assigned to a specific machine.
- Click OK to apply the policy.
Step 2: Linking the Policy in Group Policy Management
- Open Group Policy Management.
- Locate the Printing Policy GPO.
- Right-click and select Edit.
- Navigate to:
- User Configuration > Policies > Printers
- Computer Configuration > Policies > Printers
- Ensure that Point and Print Restrictions is set to Disabled (to allow auto-installation).
- Apply the policy and force an update with:
gpupdate /force
Step 3: Verifying Deployment
- Users should automatically see the printer under Devices and Printers.
- If the printer doesn’t appear, restart the client device or manually add it using:
rundll32 printui.dll,PrintUIEntry /ga /n "\\ServerName\PrinterName"
5. Troubleshooting Network Printing Issues
Common Issues and Fixes
| Issue | Solution |
|---|---|
| Printer not detected | Ensure the printer is online and has a valid IP address. |
| Driver installation fails | Download the latest driver from the printer manufacturer’s website. |
| Print jobs stuck in queue | Restart the Print Spooler service: net stop spooler && net start spooler |
| Users can’t print | Verify Group Policy deployment and Active Directory permissions. |
| Printer settings not applying | Run gpupdate /force and reboot client machines. |
Checking Print Server Logs
Use Event Viewer:
- Navigate to Applications and Services Logs > Microsoft > Windows > PrintService.
- Review Operational Logs for errors.
6. Advanced Print Server Features in Windows Server 2025
- Universal Print Integration – Cloud-based printing with Microsoft 365.
- Print Job Prioritization – Assign priority levels to specific users or departments.
- High-Availability Printing – Redundant print queues for failover protection.
Final Thoughts
Using Windows Server 2025 as a print server provides centralized management, streamlined deployments, and enhanced security. By leveraging Group Policy, you can automate printer assignments, making network printing more efficient.
Принт-сервер — это сервер, который позволяет централизованно собрать принтеры на предприятии в одном месте. Основные возможности – это удобное управление печатью для администратора, а также возможность добавления принтеров через групповые политики, если в организации используется контроллер домена (вот статья об этом) и распределение прав доступа к принтерам (удобнее всего осуществлять это опять же в домене). Разворачивание данной роли — простейшая задача. Если требуется только собрать принтеры на сервере без всяких усложнений, то процесс настройки должен занять не более 10 минут.
Установка роли Print and Document Services
1. Откройте Server Manager (Диспетчер серверов). Возможно он запустится сразу при входе в систему.

2. Нажмите на Manage (Управление) в верхнем правом углу и выберите Add Roles and Features (Добавить роли и компоненты). В мастере добавления ролей и компонентов нажмите Next (Далее), пока не дойдете до страницы Select server roles (Выбор ролей сервера). Найдите и выберите Print and Document Services (Службы печати и документы). После этого нажмите Next.

3. Дополнительные компоненты: На следующем шаге вы можете выбрать дополнительные компоненты, такие как Web Print – для поддержки печати с мобильных устройств (добавление этого компонента потянет за собой веб сервер IIS. Выберите что требуется и нажмите Next.

4. Завершение установки: Нажмите Install (Установить) и дождитесь завершения процесса установки. После завершения нажмите Close (Закрыть).

Добавление принтеров на сервер
1. В Server Manager выберите Tools (Инструменты) и затем Print Management (Управление печатью).

2. Добавление принтера: В левой панели выберите Print Servers, <Имя_сервера>,Printers (Принтеры) и щелкните правой кнопкой мыши на Printers (Принтеры). Выберите Add Printer (Добавить принтер). Следуйте инструкциям мастера добавления принтеров. Вы можете установить локальный принтер, сетевой принтер или выбрать принтер, уже подключенный к сети.

Как правило в компаниях используются принтеры с возможностью работать в стеке TCP/IP (сетевые принтеры). Разберем конкретный пример. У меня есть сетевой принтер HP LaserJet Pro MFP M225rdn с IP адресом 192.168.22.109, а еще я хочу что бы доступ к принтеру имели только пользователи состоящие в группе безопасности printer_access. Давайте добавим и настроим права доступа.
Для начала скачаем драйвер для принтера, после чего добавим его на сервер
3. Установка драйверов принтера: В левой панели выберите Print Servers, <Имя_сервера>,Drivers(Драйеры) и щелкните правой кнопкой мыши на Drivers(Драйеры). Выберите Add Driver (Добавить драйвер)

Следуем инструкциям на экране, ищем драйвер в том месте на диске, где вы его сохранили и добавляем его в список драйверов. В моем случае это HP LaserJet Pro MFP M225-M226 PCL 6

Теперь можно добавлять принтер. И так как было описано выше жмем Add Printer (Добавить принтер), на следующем шаге Add a TCP/IP or Web Services Printer by IP address or hostname (Добавить TCP/IP или Web принтер по IP адресу или имени узла), Type of Device – TCP/IP Device. Host name or IP address – 192.168.22.109, Port name – Заполнится автоматически в соответствии с указанным IP адресом. Далее придумываем имя принтеру, ставим галочку Share this printer, и Share Name обычно указывается такое же как и имя принтера

Отлично! Принтер у нас появился, теперь надо настроить к нему пользовательский доступ для группы printer_access, а так же внести его в Active Directory
4. Установка прав доступа: После добавления принтера щелкните правой кнопкой мыши на принтере и выберите Printer Properties (Свойства принтера). Сначала заходим на вкладку Sharing (Доступ) и ставим галочку напротив List in the directory (Внести в Active Directory), затем перейдите на вкладку Security (Безопасность), чтобы настроить права доступа для групп пользователей или отдельных пользователей в вашей организации. Жмем внизу кнопку Advanced

По умолчанию печатать могут все, надо найти разрешения Print (Печать) для Everyone (Все), зайти внутрь, и вместо Everyone выбрать нашу группу printer_access.


На этом настройка принтера на сервере окончена, Теперь если пользователю понадобится этот принтер, то его нужно добавить в группу printer_access.
Настройка клиентских компьютеров
На клиентских компьютерах перейдите в Devices and Printers (Устройства и принтеры) в Панели управления. Нажмите Add a printer (Добавить принтер) и выберите The printer that I want isn’t listed (Необходимый принтер отсутствует в списке). Выберите Выбрать общий принтер по имени, введите путь к общему принтеру в формате \\имя_сервера\имя_принтера и нажмите Next. Если драйверы принтера не установлены на клиентском компьютере, система предложит их установить.

Заключение
Создание принт-сервера на Windows Server 2019 является простым процессом, который может существенно упростить организацию работы с печатью в вашей организации. Теперь ваши пользователи могут без проблем получать доступ к принтеру, а администраторы – управлять печатью и доступам к принтерам, минимизируя проблемы с документами. Работая с принт-сервером, вы сможете централизовать управление ресурсами и повысить общую эффективность работы.
The print server centralizes printer control and brings efficiency to the whole printing process, making the business operation run more smoothly.
In this article, you learn how to set up Windows Print Server on your Windows Server.
What is a Print Server?

A print server is a server that connects printers to the network. It enables users to share their printers with other computers on the network while also connecting to a single printer or multiple printers.
Print servers are frequently utilized in businesses to streamline their printing resources. It saves money and time.
Print servers provide several benefits over utilizing separate printers for each PC. It saves money on hardware and configuration and provides access control for the organization, leading to better security of the organization’s sensitive information.
Follow this post to learn how to set up Windows Print Server on Windows Server 2016 / 2019 / 2022.
How to Setup Windows Print Server on Windows Server 2016 / 2019 / 2022
Prerequisites
You will require the following:
- A non root user with administrator level access.
- Freshly updated Windows server with the static IP configured.
- IIS web server.
- A printer
Azure Print Server
AWS Print Server
Google Print Server
Install Windows Print Server on Windows Server 2016 / 2019 / 2022
2. Next, click the Manage option in the top right corner and select Add Roles and Features from the drop menu.

3. You see a new window open up; click on Next.
4. In the Select installation type window, select the Role-based or feature-based installation option. Click on Next.

5. Choose the server that will host the print server as the destination server and click on Next.
6. Scroll to Print and Document Services in the Select server roles window and check the box next to it.

7. The next window of the Add Roles and Features Wizard recommends installing dependency features. Click on the Add Features option at the bottom. Then press Next in the Select server role window.

8. Select Next in the Select features window.

9. It takes you to Print and Document Services, explaining the requirements and some service disclaimers. Click on Next to proceed.

10. In the Select role services, make sure that the check box next to the Print Server option is checked and proceed by clicking on Next.

11. Go over the installation details in the Confirm installation selections step, as it decides what role and features are installed in the next step. If you need to change anything, click on Previous to go back and modify. Otherwise, proceed by selecting the Install option.

12. The installation process starts and takes a short while to complete. Once the installation is complete, it shows the Installation succeeded on the server message under the installation progress bar.

13. Finally, click on Close.
Open Print Management
Now that you have installed the print server on your Windows server. Open it through the Server manager. Go to the Tools option in the window’s top right corner. It will open a drop down menu, scroll to the Print Management option and click on it.

You can use this console to add printers to the print servers or do further configuration of the print servers.
Add Printers to the Print Server on Windows Server
To do this, open the Print Management console, as mentioned above. Next, navigate to the Print Servers in the left pane and expand it.
Right click on your server under it and click on the Add Printer option.

As a result, the Network Printer Installation Wizard will pop up. Ensure the Add a TCP/IP or Web Services Printer by IP address or hostname option is selected, and click Next.

In the Printer Address window, change the Type of Device setting to TCP/IP Device. And add the network IP of your printer as both the Host name or IP address and Port name.

Check the Standard option and select Generic Network Card from the drop down in the next window. Click on Next.

The following window prompts to install the printer driver. Select the Install a new driver option and proceed with Next.

In the Printer Installation window, select the Microsoft option in the left pane and then select the Microsoft XPS Class Driver option in the right pane. Click on Next.

Modify the printer name in the Printer Name and Sharing Settings and check the Share this printer option. Click on Next.

Click on Next again after confirming installation details.

Once the printer and driver are installed, click on Finish.

Configure Windows Print Server on Windows Server 2016 / 2019 / 2022
You have deployed the printer server and can use it as is. But a few specific configurations can boost efficiency and reduce performance overhead.
Enable Branch Office Direct Printing
Branch office direct printing directs a printing job to a print device instead of a server print queue, reducing WLAN usage.
To enable branch office direct printing, go to the Print Management console, select Printers in the left pane, and right click on your printer in the right side pane. Select the Enable Branch Office Direct Printing option.

Add Ports
Ports determine how the print server will interact with the rest of the organization. Additionally, they are required for printer pooling.
You can navigate to the Ports option in the left pane and right click on it. Select the Add Port option from the menu.

This will make the Printer Ports dialog box pop up. Click on the Standard TCP/IP Port, and then New Port.

Click Next in the Add Standard TCP/IP Printer Port Wizard.

Next, enter the IP address and name of the printer in the respective fields and proceed.

Click Next in the Additional port information required dialog box.

Close the Add Standard TCP/IP Printer Port Wizard by clicking Finish.

Click Close in the Printer Port dialog.
Enable Printer Pooling
Printer pooling is a practice where multiple printers are linked together so as to appear as a cohesive unit and reduce server configuration.
To enable printer pooling, go to your main printer in the right side pane and right click on it. Select Properties from the menu.

Go to the ports tab in the printer properties dialog box. And check the boxes next to the printers you want to link and pool together. Next, check the Enable printer pooling option at the end of the dialog. Check the box next to it.

It will make all printers seem like one unit, and they will distribute printing jobs among themselves. You can use a client PC to connect directly to the printer using its IP and port numbers.
That’s it for setting up Windows Print Server on Windows Server 2016 / 2019 / 2022.
How to Setup Windows Print Server on Windows Server 2016 / 2019 / 2022 Conclusion
A print server is important in an organization since it helps to manage, regulate, and monitor all users’ printing activity.
It enables several users in your business to share resources and printers. It also provides better overall security due to access control implementation.
This article explains how you can set up your print server and configure it to get the best results.
Follow our Printing section to learn more.