
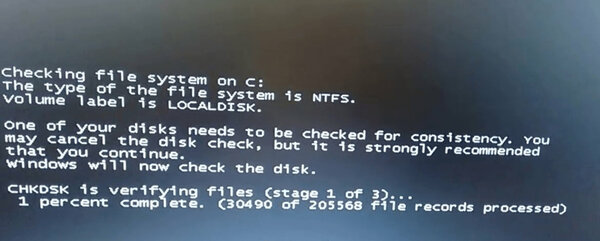
Полагаю, многие сталкивались с ошибкой Checking file system on C (перевод: «Проверка файловой системы на [диске] C») при запуске Windows 7 (или с Checking file system on D). Она обычно случается после сбоя в работе операционной системы. Когда она намертво виснет, многие просто вытягивают из розетки кабель питания или зажимают кнопку включения для принудительного выключения. После повторной загрузки может появиться соответствующий экран с «заветной» надписью (на фото ниже): «Checking file system on C…» — что это и что делать?
«Checking file system on C…» — эта надпись означает, что Microsoft не советует принудительно выключать питание компьютера — это может нанести вред всему ему в целом, а также жестким дискам в частности. Более того, данный процесс может испортить важные файлы, которые используются для нормальной загрузки операционной системы.
Это нормально, если сообщение Checking file system on C при запуске Windows 7 появляется один раз — как раз после описанных выше инцидентов. Тем не менее, некоторые пользователи отмечают, что эта проверка появляется снова и снова — каждый раз при перезагрузке операционной системы. Это отнимает массу времени и просто тратит нервы, но у данной проблемы есть достаточно простое решение.
Что делать при появлении этой ошибки? Для начала нужно проверить диск C на наличие ошибок
Если сообщение Checking file system on C появляется каждый раз при запуске Windows 7, для начала нужно разобраться, если ли ошибки на диске.
Во-первых, нужно проверить ошибки файловой системы
Шаг 1. Откройте «Проводник» и найдите диск C. Запустите контекстное меню нажатием правой кнопки по значку диска и выберите пункт «Свойства».
Шаг 2. Перейдите на вкладку «Инструменты» и нажмите на кнопку «Проверить».
Шаг 3. Переведите в активное положение переключатель «Исправлять ошибки файловой системы автоматически» и нажмите на кнопку «Пуск».
Во-вторых, следует проверить диск C на битые сектора
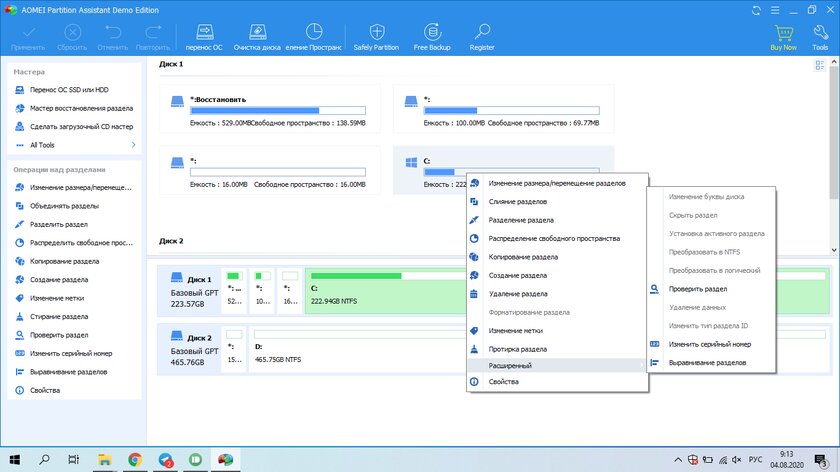
Если на диске C нет ошибок файловой системы, следует проверить поврежденные сектора. В этом, к примеру, я буду использовать приложение AOMEI Partition Assistant Professional — это удобный инструмент для управления жесткими дисками. Но у него есть аналоги: WinDFT, Seagate Seatools, Victoria.
Шаг 1. Установите и запустите приложение AOMEI Partition Assistant. Откройте контекстное меню диска C, перейдите в пункт «Расширенный» и выберите возможность «Проверить раздел».
Шаг 2. Выберите способ проверки ошибок для выполнения «Проверить на наличие плохих секторов на разделе» и нажмите на кнопку OK.
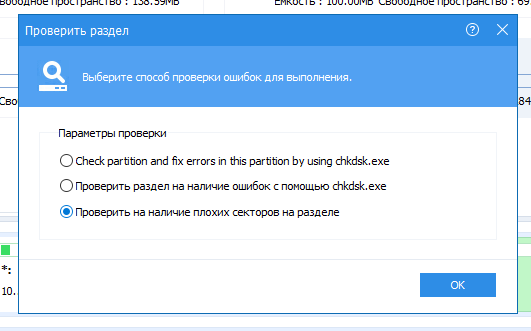
Шаг 3. Нажмите на кнопку «Старт», чтобы начать проверку.
Примечания:
- Если утилита найдет поврежденные сектора, нужно создать резервную копию диска C. Если в поврежденных секторах есть важные данные, отправьте накопитель в профессиональный центр восстановления данных. Браться за этот процесс самостоятельно не стоит — велик риск навсегда лишиться важной информации.
- Учитывайте, что не все поврежденные сектора могут быть восстановлены, поэтому лучше всего приучите себя создавать резервные копии хранилища по расписанию.
Теперь можно безопасно остановить проверку файловой системы
После проверки диска С на ошибки, вы должны задаться вопросом, как остановить этот процесс при каждом запуске операционной системы Windows 7. Вот два эффективных решения, которые для этого можно использовать.
Во-первых, для этого можно использовать редактор реестра
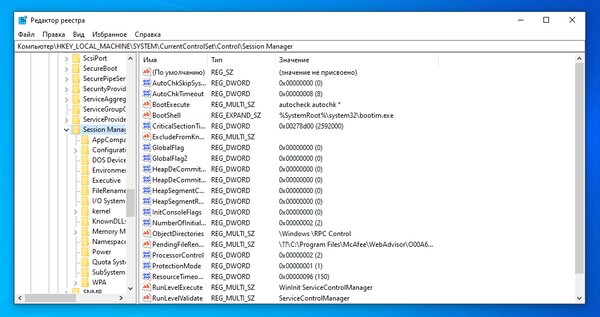
Шаг 1. Воспользуйтесь сочетание клавиш Windows + R, чтобы открыть диалоговое окно «Выполнить». Введите название приложения regedit и нажмите на клавишу Enter или кнопку OK, чтобы открыть редактор реестра.
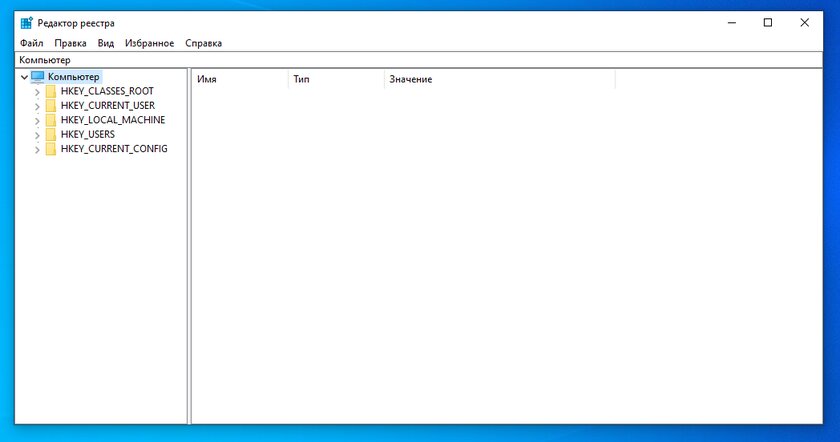
Шаг 2. Используйте левую панель данного приложения, чтобы перейти в следующий каталог:
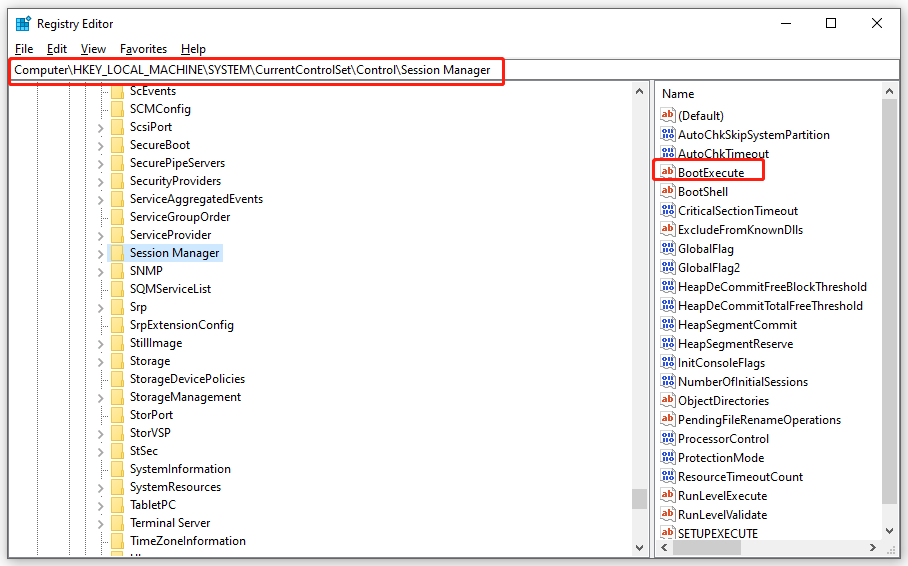
HKEY_LOCAL_MACHINE\SYSTEM\CurrentControlSet\Control\Session Manager
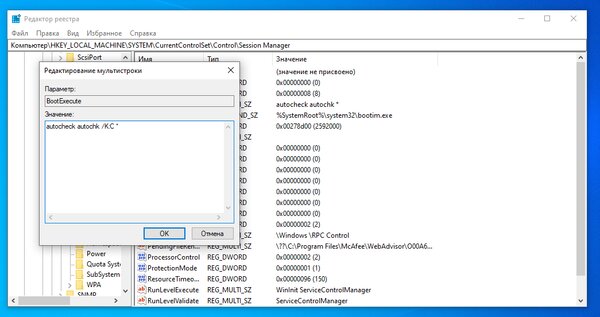
Шаг 3. Откройте файл BootExecute из правой части данного приложения.
Шаг 4. Добавьте значение /K:C в поле ключа перед значком *. Нажмите на кнопку OK, чтобы применить изменение.
Примечания:
- * — этот значок говорит о том, что каждый диск проверяется на согласованность.
- Ключ /K отключает проверку диска при запуске Windows — в данном случае он имеет отношение к диску C.
Шаг 5. Закройте редактор реестра.
Во-вторых, для этого можно использовать «Планировщик заданий»
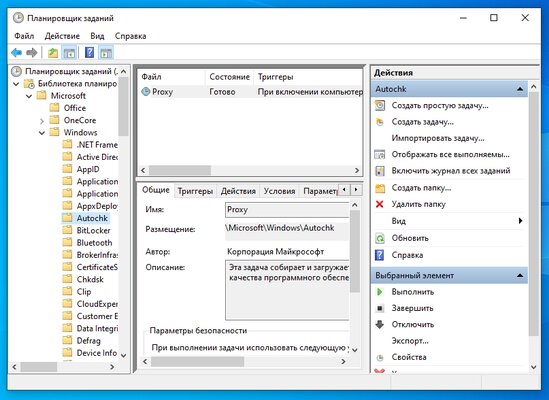
Шаг 1. Нажмите на кнопку «Пуск» и перейдите в «Панель управления», разверните меню «Система и безопасность» и откройте раздел «Администрирование».
Шаг 2. Откройте «Планировщик заданий». Выберите пункт Autochk и нажмите на кнопку «Отключить» в правой панели.
Вывод
В общем, справиться с ошибкой Checking file system on C при запуске Windows 7 достаточно просто. Для начала нужно проверить диск С на ошибки и битые сектора, а после этого можно избавляться от соответствующей проверки с помощью редактора реестра или «Планировщика заданий».
Like many other users, you may also receive the “checking file system on C” error. Then you come to the right place. MiniTool Partition Wizard summarizes possible reasons for the computer checking file system on C issue and tells you how to stop it.
It’s natural that checking file system on C runs only once. However, it would be troublesome if it runs every time when you boot your PC. Sometimes, it even leads to system crashes. The complete information for this error is shown as follows.
“Checking file system on C: the type of the file system is NTFS. Volume label is LOCALDISK. One of your disks needs to be checked for consistency. You may cancel the disk check, but it is strongly recommended that you continue. Windows will now check the disk. To stop disk checking, press any key within xx seconds.”
What causes this issue? The section below will illustrate that. Simply move on!
Causes for Check File System on C
Well, multiple factors can trigger it. When the PC is shut down suddenly or improperly, you will see “checking file system on C” on the screen after you restart the device. Due to unexpected reasons like a power outage and hardware failure, the computer may shut down all of a sudden.
Tips:
According to your needs, refer to the corresponding guide to turn off the device. This post shows you how to shut down or restart your PC without updating Windows, while this tutorial tells you how to shut down a computer using Notepad.
You should turn off the computer in the right way. Don’t press the Power button or unplug the power cable to turn off the PC. Besides, you need to make sure that all the running programs are closed before you power off the device. Actually, you’d better not run too many programs simultaneously, or it will cause an accidental shutdown or system crash.
It’s also not recommended to remove your USB until it finishes the task. Improper PC shutdown will bring a series of consequences. According to Microsoft, it will do harm to PC’s hardware, especially hard drives, if you directly turn on or off power. Moreover, it damages computer data and system, leading to unnormal booting.
The corrupted or damaged file system is also responsible for the “computer checking file system on C” error. If the file system is corrupted, then the file, directory, and disk structure will be corrupted and unreadable. In this case, you can run a file system scan to detect and fix file system corruption and get rid of the issue.
Bad sectors on the hard drive will result in checking file system on C NTFS as well. Fortunately, you can locate bad sectors on the drive and recover any readable information by running CHKDSK commands.
How to Check the C Drive for Errors
Before you perform other operations to solve checking file system on C, manually check the C drive for errors first. Check if the C drive has file system errors or bad sectors by using MiniTool Partition Wizard. As a professional and reliable partition manager, it enables you to check hard drive errors effectively.
Get MiniTool Partition Wizard installed on your computer. To do that, download the software by clicking on the button below and then installing it by following the on-screen instructions. After that, refer to the steps below to check the C drive with the help of MiniTool Partition Wizard.
MiniTool Partition Wizard FreeClick to Download100%Clean & Safe
Step 1: Launch the software to access its main interface.
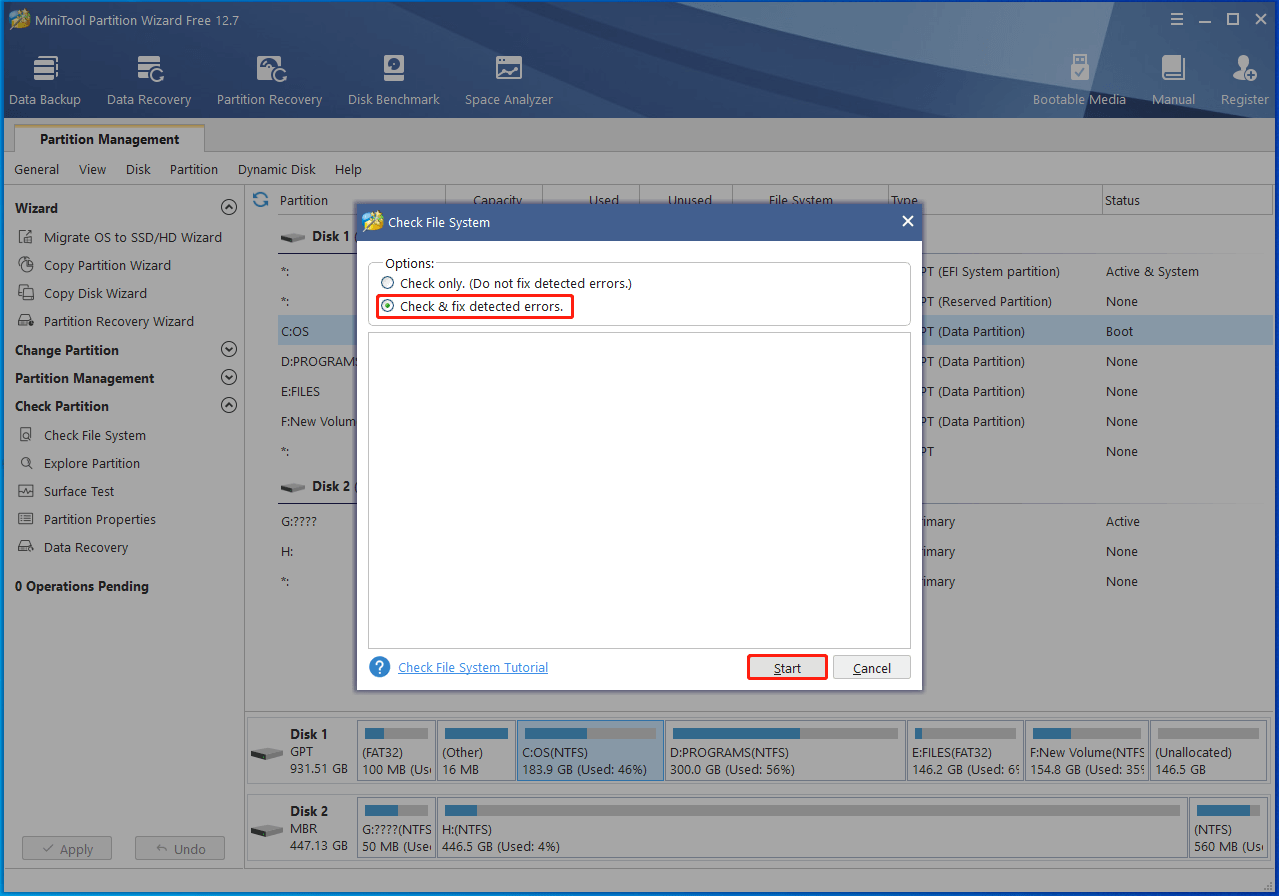
Step 2: Right-click on the C drive and then click Check File System. Alternatively, highlight the C drive and tap Check File System under the Check Partition section in the left panel.
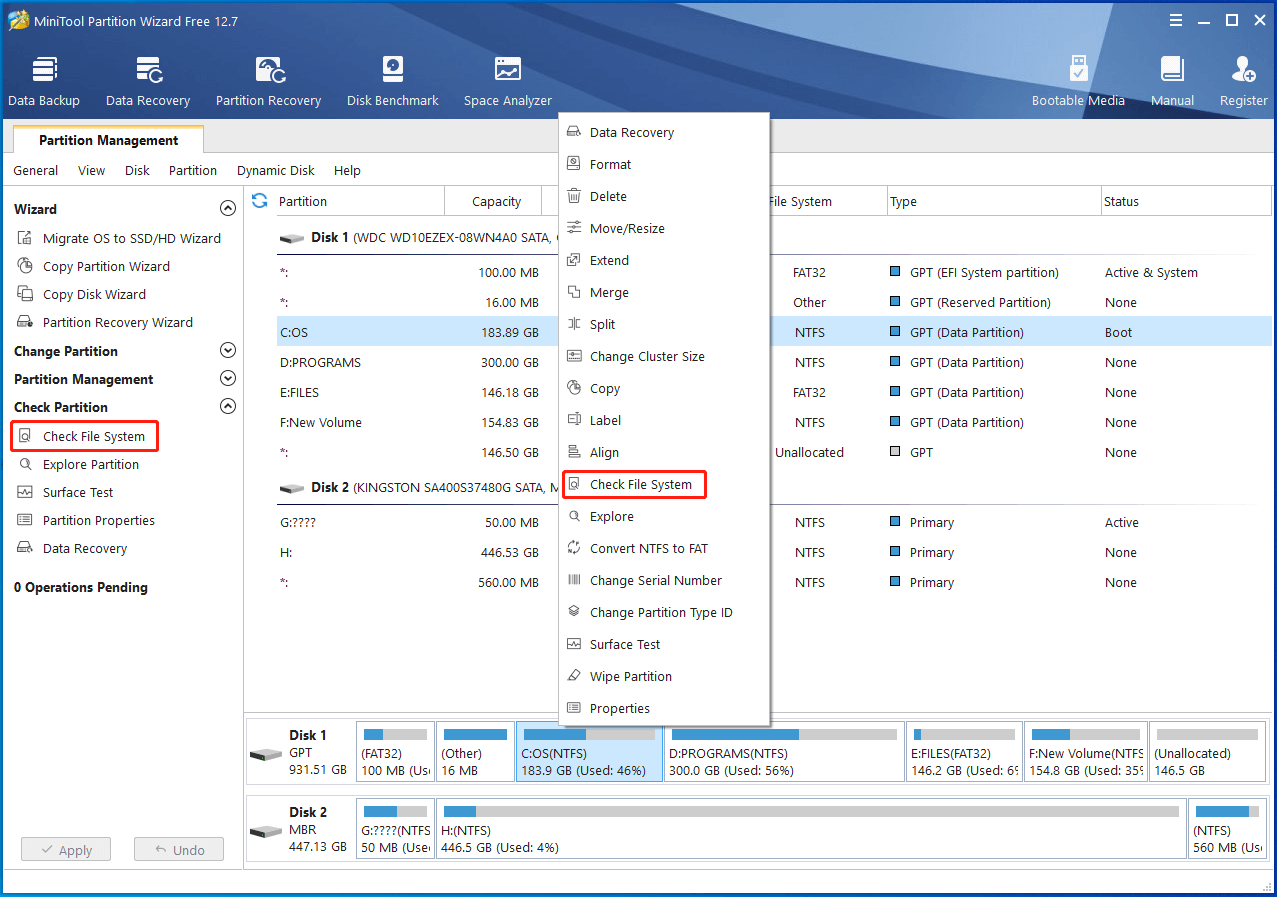
Step 3: In the pop-up window, choose the “Check & fix detected errors” option and click Start to carry out the operation. After the process ends, any detected errors would be fixed.
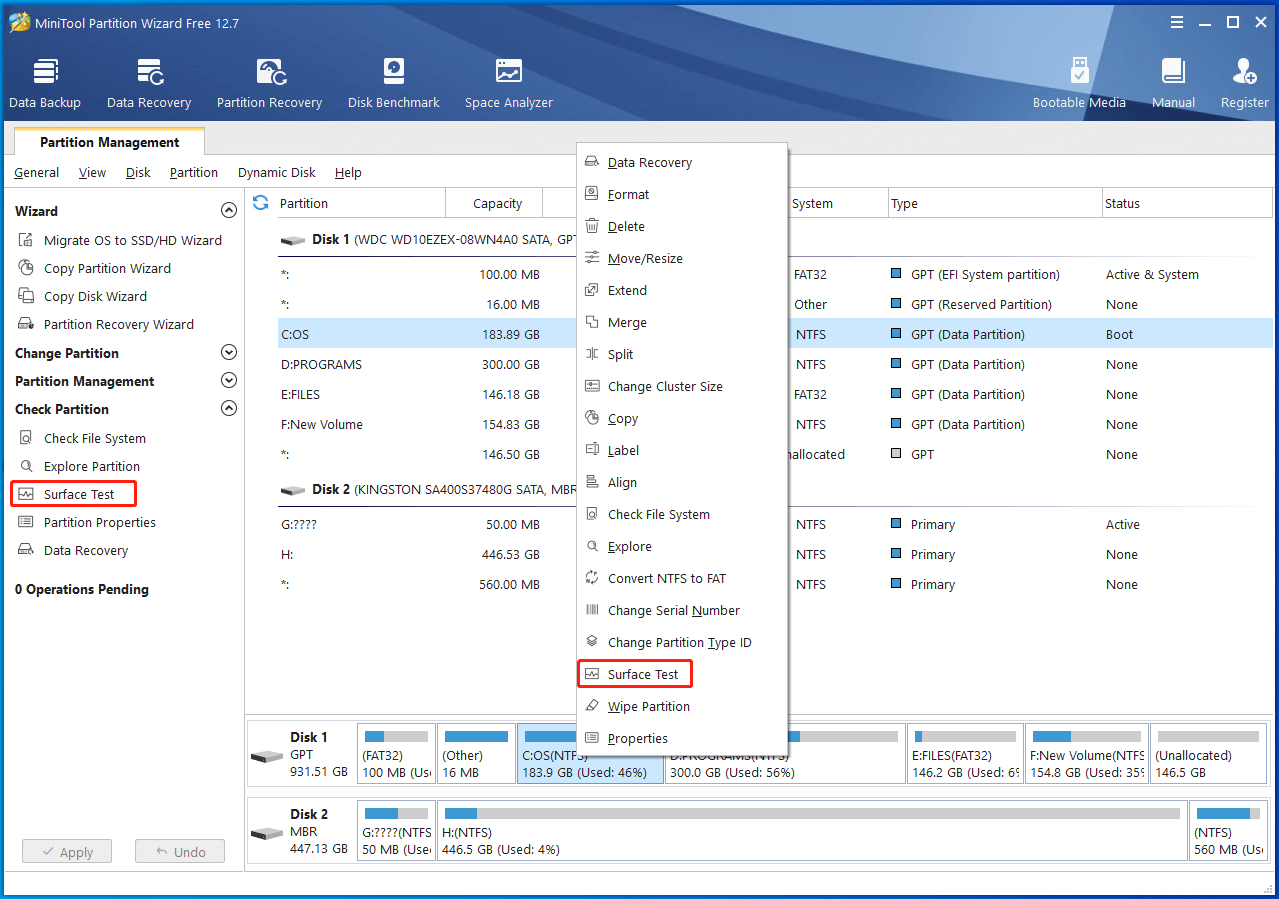
Step 4: Then continue to scan the C drive to see if it includes bad sectors. For doing that, right-click on the C drive and tap on Surface Test.
Step 5: In the elevated window, click the Start Now button to execute the operation. Then MiniTool Partition Wizard will scan the C drive sector by sector to find bad sectors.
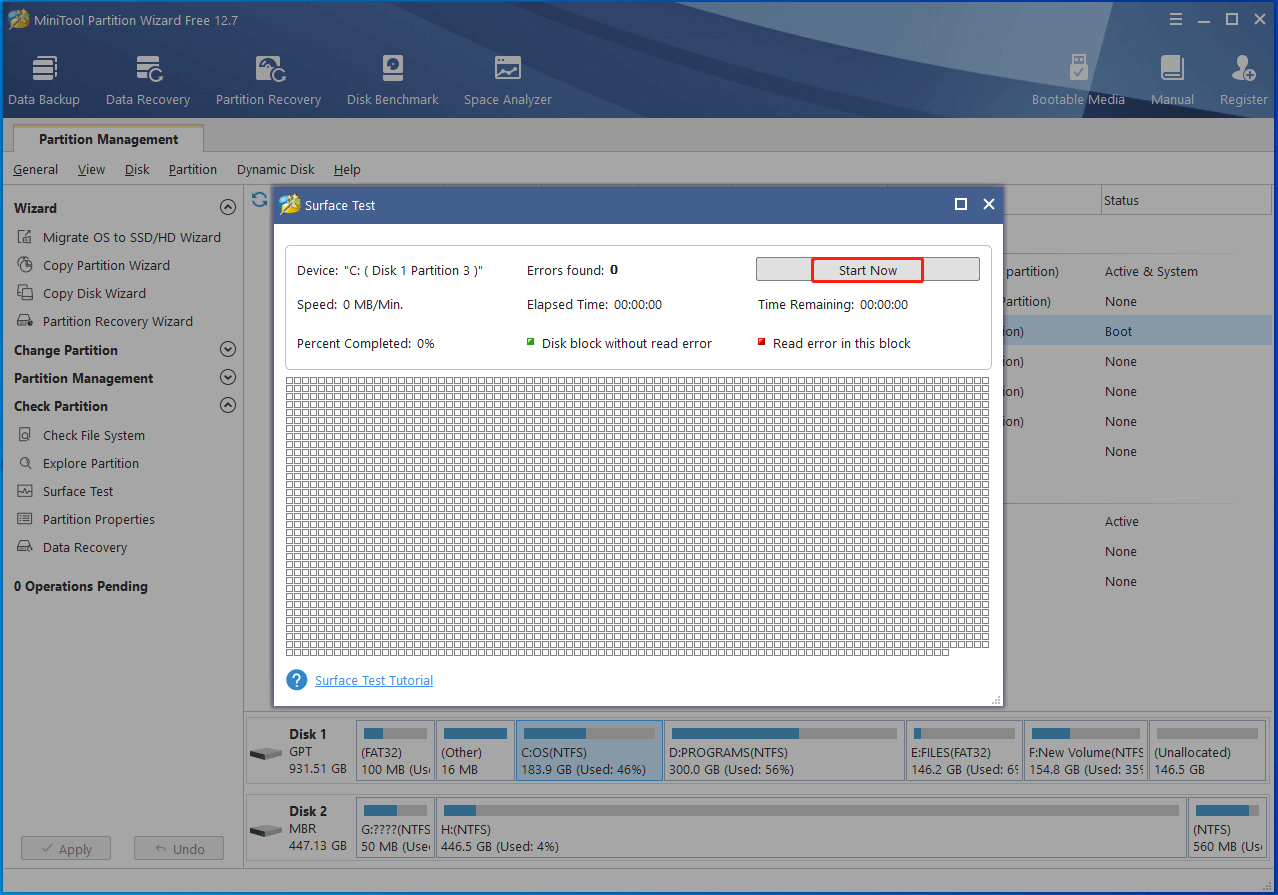
Once the scan process ends, you will see the complete result. If there are any blocks marked with red in the scan area, it means that the C drive contains bad sectors. Then refer to this bad sector repair guide to get them fixed. It is also available to run CHKDSK commands to locate bad sectors on the C drive and recover the readable information from the bad sectors.
To do that, follow these steps.
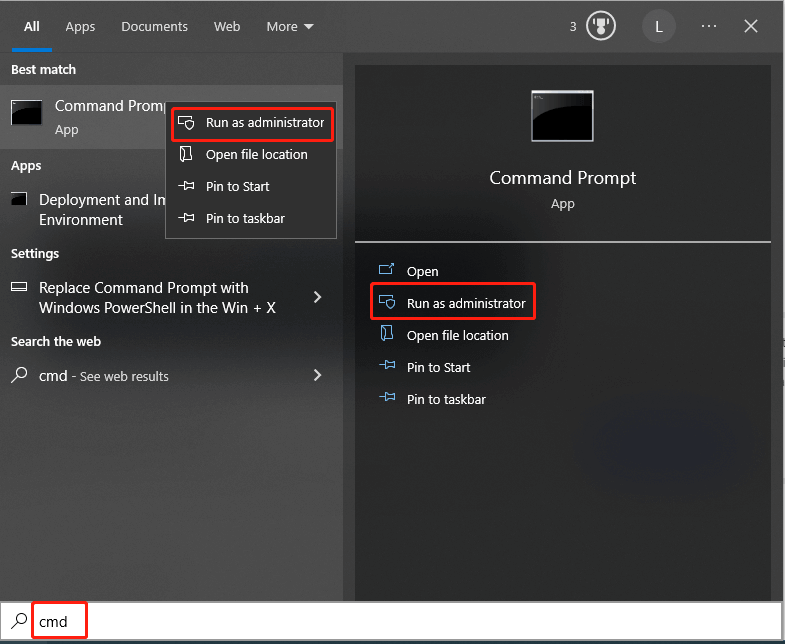
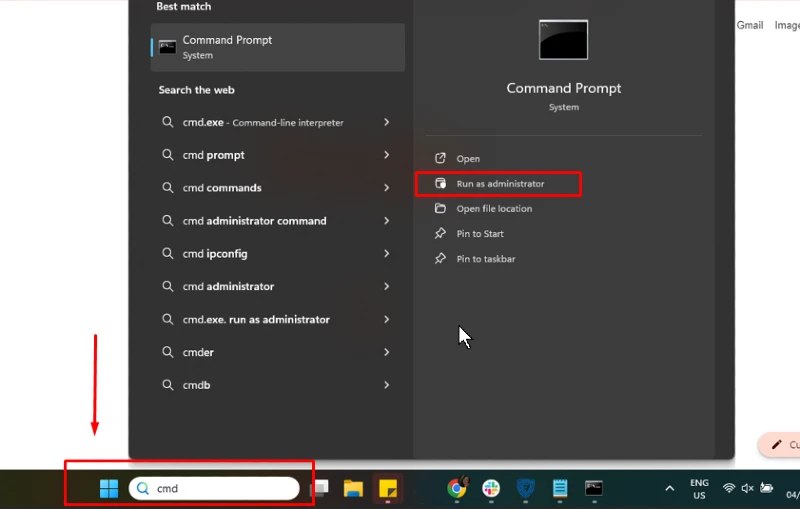
- Type cmd in the search box.
- Click the Run as administrator option on the right side of the window.
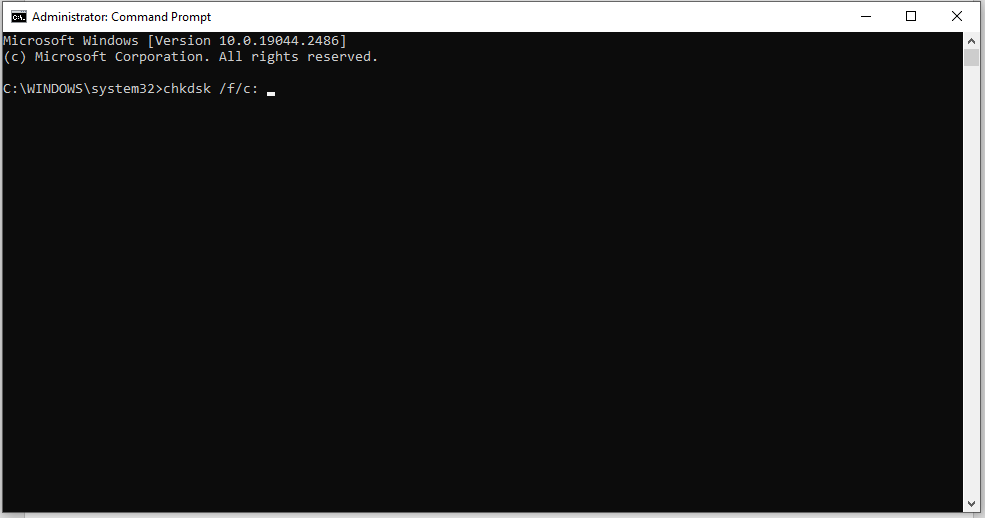
- In the prompted Command Prompt window, type chkdsk /f/c: and press Enter. Then this command will help you find and fix any errors on the hard disk.
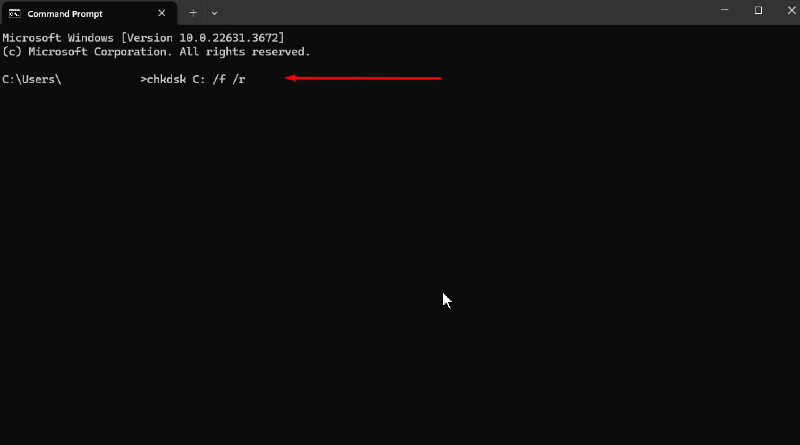
- Type chkdsk C: /r and hit Enter.
- After the process ends, restart your PC to see if checking file system on C NTFS vanishes.
After checking and fixing errors on the C drive, try the following methods to stop checking file system on C NTFS if the issue still occurs.
Method 1: Disable Autochk via Control Panel
An effective way to get rid of checking file system on C is to stop autochk (auto disk check) through Control Panel. After you disable the autochk option, you won’t be stuck on the “computer checking file system on C” screen. Here’s the full tutorial for you.
Step 1: Open the Run dialog window by pressing Windows and R keys.
Step 2: Type control in the Run window and hit Enter.
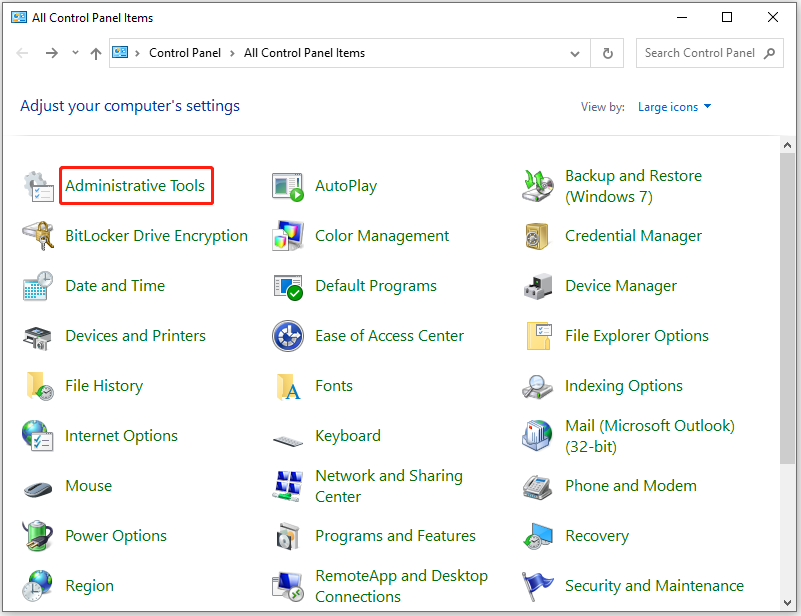
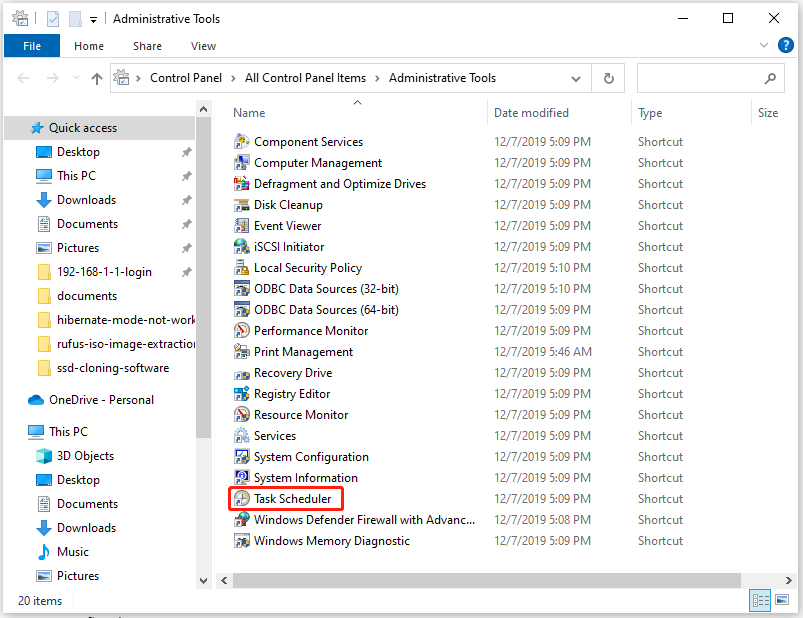
Step 3: In the Control Panel window, click Administrative Tools.
Step 4: Then find and double-click the Task Scheduler option.
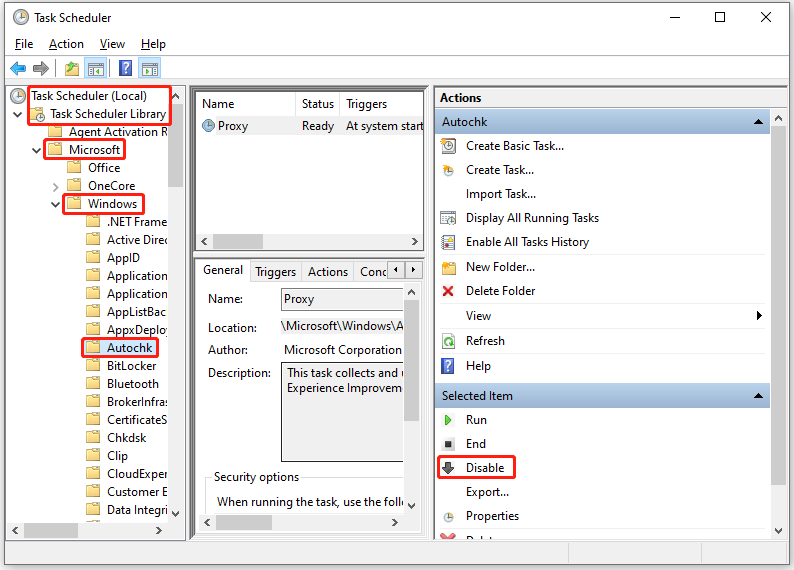
Step 5: Navigate to Autochk by double-clicking Task Scheduler (Local) > Task Scheduler Library > Microsoft > Windows. Then click the Disable option in the right panel.
Method 2: Change the Value of BootExecute in Registry Editor
You can also disable the automatic checking file system on C NTFS by modifying Registry Editor. To be specific, change the value of BootExecute to disable auto disk check.
Note:
You’d better back up Registry Editor before you make any changes to it so that you can restore the Registry if there’s something wrong after the modification.
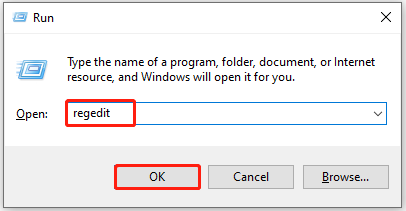
Step 1: After opening the Run window, type regedit and click OK.
Step 2: Navigate to the destination by following the path below.
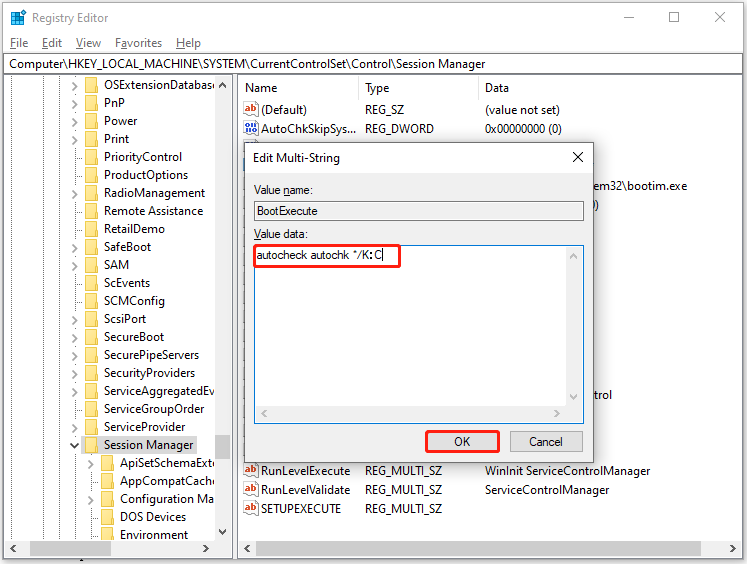
HKEY_LOCAL_MACHINE\SYSTEM\CurrentControlSet\Control\Session Manager
Step 3: Double-click BootExecute in the right panel of the window.

Step 3: Change the default value of the key by adding /K:C at the end of “*”. Then click OK to save changes.
Tips:
The “*” symbol means every drive is checked for consistency, while the “/K” switch will disable autocheck on the C drive at Windows startup.
Step 4: Exit Registry Editor.
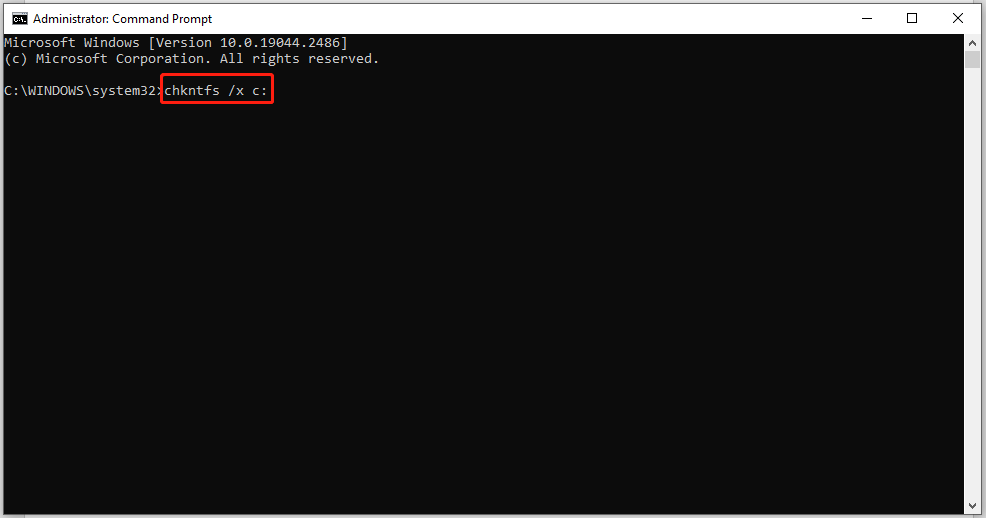
Method 3: Run CHKNTFS Command
CHKNTFS is known as check NTFS, which is a Windows command line displaying or changing automatic disk checking when the PC starts up. You can run it to remove the “checking file system on C: the type of the file system is NTFS” message.
Step 1: Run Command Prompt as administrator from the search box.
Step 2: In the Command Prompt window, type chkntfs /x c: and press Enter.
Tips:
The /x parameter means that one or more partitions will be excluded from checking when your PC loads up.
Further reading:
For the sake of your computer, it is strongly recommended to back up your Windows regularly. To do that, you can create a system image, create a system restore point, or clone the system disk via a piece of hard drive backup software.
As a professional backup tool, MiniTool ShadowMaker enables you to back up the file, folder, partition, disk, and the entire operating system. Its Backup feature allows you to make a Windows image backup, while its Clone Disk feature helps you clone the system disk with ease.
MiniTool ShadowMaker TrialClick to Download100%Clean & Safe
Based on your demands, choose a backup type. If you want, use the automatic backup service, advanced backup parameters, or three different backup schemes offered by MiniTool ShadowMaker. In addition to this program, MiniTool Partition Wizard is also helpful for cloning the system.
MiniTool Partition Wizard DemoClick to Download100%Clean & Safe
Depending on your needs, you can copy the whole system disk or just copy the system-required partitions to another disk via MiniTool Partition Wizard.
How to get rid of checking file system on C? If you are looking for the answer, this post is what you need. It lists possible reasons and available troubleshooting methods for the issue.Click to Tweet
Bottom Line
If the “checking file system on C: the type of the file system is NTFS” message keeps popping up, it is necessary to take some measures to stop it. Otherwise, it will take you more time to boot the device. What’s worse, it may result in system crash, hard drive failure, and data loss, which is troublesome. To get the issue solved successfully, you should know the possible causes of the issue.
Well, this post collects potential reasons for the computer checking file system on C error. Based on that, it provides you with some methods to fix the issue. If you have any better solutions to checking file system on C, you can share them with us by writing them down in the following comment area.
If you encounter any problems while using software made by MiniTool, please feel free to contact us by sending an email to [email protected]. We would appreciate it a lot if you can give us some useful advice.
Do you receive a black screen with such an error message saying that checking file system on C: when trying to boot your computer? If you have no idea what happened, then you have come to the right spot. In this guide on MiniTool Website, we will show you the causes and solutions on it.
Checking Files System on C
It is very common to encounter some problems when booting your computer. Checking your file system on C is one of the troublesome issues you might face and it can even lead to system crashes sometimes. Here is the complete information you might receive:
Checking files system on C:
The type of the file system is NTFS.
Volume label is LOCALDISK.
One of your disks needs to be checked for consistency. You may cancel the disk check, but it is strongly recommended that you continue.
Windows will now check the disk.
To stop disk checking, press any key within xx seconds.
Note:
Note: C: refers to the main hard disk partition that contains the Windows operating system. If the system you are running is installed in D drive, you will receive checking file system on D.
This autodisk check process will be initiated when your computer was not shut down correctly or if something went wrong at the last shutdown. Most of the time, it might be a routine to check the consistency of the hard drive, so you don’t need to worry about it. However, if checking file system on C the type of the file system is NTFS appears whenever the computer boots, you are supposed to figure out the reasons. Here, we have collected several potential reasons for you.
Cause 1: Incorrect Shutdown
If your Windows device shuts down suddenly due to some unexpected factors such as power outage, equipment failure and more, the checking file system on C screen will crop up after restarting it. At the same time, you might also receive this error when removing a USB flash drive improperly, for example, unplugging the USB drive directly while it is saving data without hitting the Safely Remove button.
Cause 2: Corrupted File System
Another possible reason for checking file system on C is file system corruption. If this is the case, the file, directory and disk structure will also be corrupted and unreadable.
Cause 3: Bad Sectors
Maybe there are some bad sectors on the hard disk hence leading to the occurrence of checking file system on C. A bad sector refers to an area of the storage device that is damaged permanently. Once the sector is corrupted, all the data on it may lose and it is unable to store data anymore.
How to Fix Checking Files System on C on Windows 7/8/10/11?
In view of different conditions, we will show you the corresponding solutions to get rid of checking file system on C.
Shut Down Your Computer Properly
Here are some tips on how to shut down your computer properly:
- Don’t press the physical power button directly to turn off your computer.
- Avoid running too many programs at the same time, or else it might arouse an accidental shutdown or system crash.
- Make sure to terminate all the running programs before powering off.
- Remove your USB drive until it completes the task by hitting Safe Remove.
Check File System Errors
Microsoft provides you with an inbuilt disk check utility to help you find and fix the file system errors. Even if some errors are hard to handle, it will show you detailed error information.
Step 1. Press Win + E at the same time to evoke File Explorer.
Step 2. Click on This PC and right-click on Local Disk (C:) to select Properties in the drop-down menu.
Step 3. Under the Tools tab, tap on Check. (In Windows 7, hit Check now.)
Step 4. Click on Scan drive to start the scanning. (In Windows 7, check the Fix the system errors automatically option and press Start.)
Tips:
Tip: Most file system errors can be fixed by this method. For more solutions on file system errors, you can see this guide — File System Error — Solutions to Deal with it Quickly.
Find and Fix Bad Sectors
If there are bad sectors on the hard drive, you may be also stuck in Checking file system on C when the computer boots up. In this condition, CHKDSK will help you out. This is an inbuilt tool in Windows which enables you to check & fix disk for errors such as bad sectors, cross-linked files, lost clusters, and directory problems. Here’s how to get rid of checking file system on C NTFS with it:
Tips:
Tip: Before performing disk checking and repairing, we sincerely advise you to create a backup for your data with MiniTool ShadowMaker to secure the important files and folders.
MiniTool ShadowMaker TrialClick to Download100%Clean & Safe
Step 1. Type cmd in the search bar to locate Command Prompt and right-click on it to choose Run as administrator.
Step 2. Type chkdsk /f/c: and hit Enter. The /f parameter means to find and fix any errors on the hard disk.
Step 3. After the process is complete, type chkdsk C: /r and hit Enter. The /r parameter can help you to detect & locate the bad sectors on the target disk, and even attempt to recover the readable information from the bad sectors.
Step 4. Now, reboot your computer to see if checking file system on C disappears.
Stop Autodisk Check Manaully
After fixing file system errors and bad sectors on your computer, you may not receive checking file system on C again. If you are afraid to get this error message, you can disable autodisk check manually. There are 3 ways for you to choose from: via Registry Editor, Control Panel, and Command Prompt.
# Way 1: Modify the Registry
First, you can stop the autocheck on C drive by modifying the registry on Registry Editor.
Warning:
Warning: You had better create a backup for the registry database before making any changes to Registry Editor. By doing so, you can easily restore the registry from the backup when something goes wrong.
Step 1. Press the Win key + R to launch the Run dialog.
Step 2. Type regedit and hit the Enter key to open Registry Editor. If prompted by User Account Control, click on Yes to grant the permission.
Step 3. Move to the following path and expand the entries on the left-hand pane:
HKEY_LOCAL_MACHINE\SYSTEM\CurrentControlSet\Control\Session Manager
Step 4. Find BootExecute in the right-hand panel and right-click on it to choose Modify in the drop-down menu.
Step 5. Under Value data, type /K:C before * to disable checking file system on C and press OK to confirm this action.
Tips:
Tip:
- * indicates that every drive is checked for consistency.
- The /K:C parameter can help you to disable the automatic file check on C drive when Windows starts.
Step 6. Quit Registry Editor.
# Way 2: Disable Autochk via Administrative Tools
Another option is to disable Autochk from the scheduled tasks list. Here’s how to disable checking file system on C via Task Scheduler.
Step 1. Hit the Start icon and go to Control Panel.
Step 2. Click on System and Security and then scroll down to hit Administrative Tools.
Step 3. Find Task Scheduler and double-click on it. Expand the following folders: Task Scheduler Library > Microsoft > Windows.
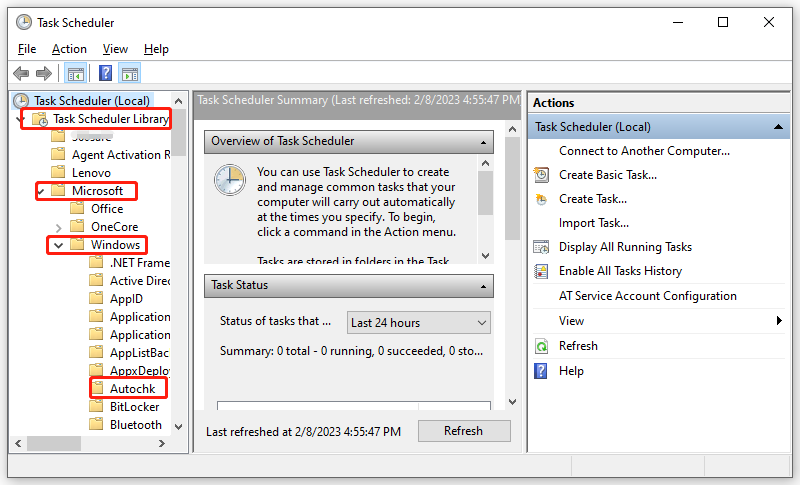
Step 4. Find Autochk and double-click on it to choose Disable from the right-hand pane.
Tips:
Tip: What if your Task Scheduler is not working? Go to this guide — 7 Tips to Fix Task Scheduler Not Running/Working Windows 10 and all your worries will be gone.
# Way 3: Run CHKNTFS in Command Prompt
CHKNTFS, also known as check NTFS, is a windows command line that displays or modifies automatic disk checking when the computer is started. Here’s how to remove checking file system on C via it:
Step 1. Run Command Prompt as an administrator.
Step 2. Type chkntfs /x c: and hit Enter.
Tips:
Tip: The /x parameter means that one or more partitions will be excluded from checking when your computer boots up.
I was stuck on the checking file system on C black screen whenever the computer boots up. Luckily, I manage to fix it and boot my PC without any errors. If you have the same issue as well, try these solutions in this guide!Click to Tweet
Suggestion: Back up Your C Drive Before Proceeding
Now, your computer can boot up without checking files system on C. As you can see, it is hard to find the specific reason why your computer goes wrong most of the time, let alone the corresponding workarounds. Therefore, it is essential to create a backup of your system so that if anything goes wrong during the process, you can use the backup to restore the system back to the work state. Here, we propose to back up your system with a piece of reliable backup software – MiniTool ShadowMaker.
This free tool is designed to provide data protection and disaster recovery solutions for Windows devices. It supports backing up your important files/folders, selected partitions, operating systems, and even the whole disk on Windows 7/8/10/11 and Windows Server 2008/2012/2016/2019/2022. What’s more, MiniTool ShadowMaker is user-friendly and you can just back up your data just within a few steps. Here’s how to back up your C drive with its one-click system backup solution:
Step 1. Download, install and launch this program.
MiniTool ShadowMaker TrialClick to Download100%Clean & Safe
Step 2. Click on Keep Trial and go to the Backup page.
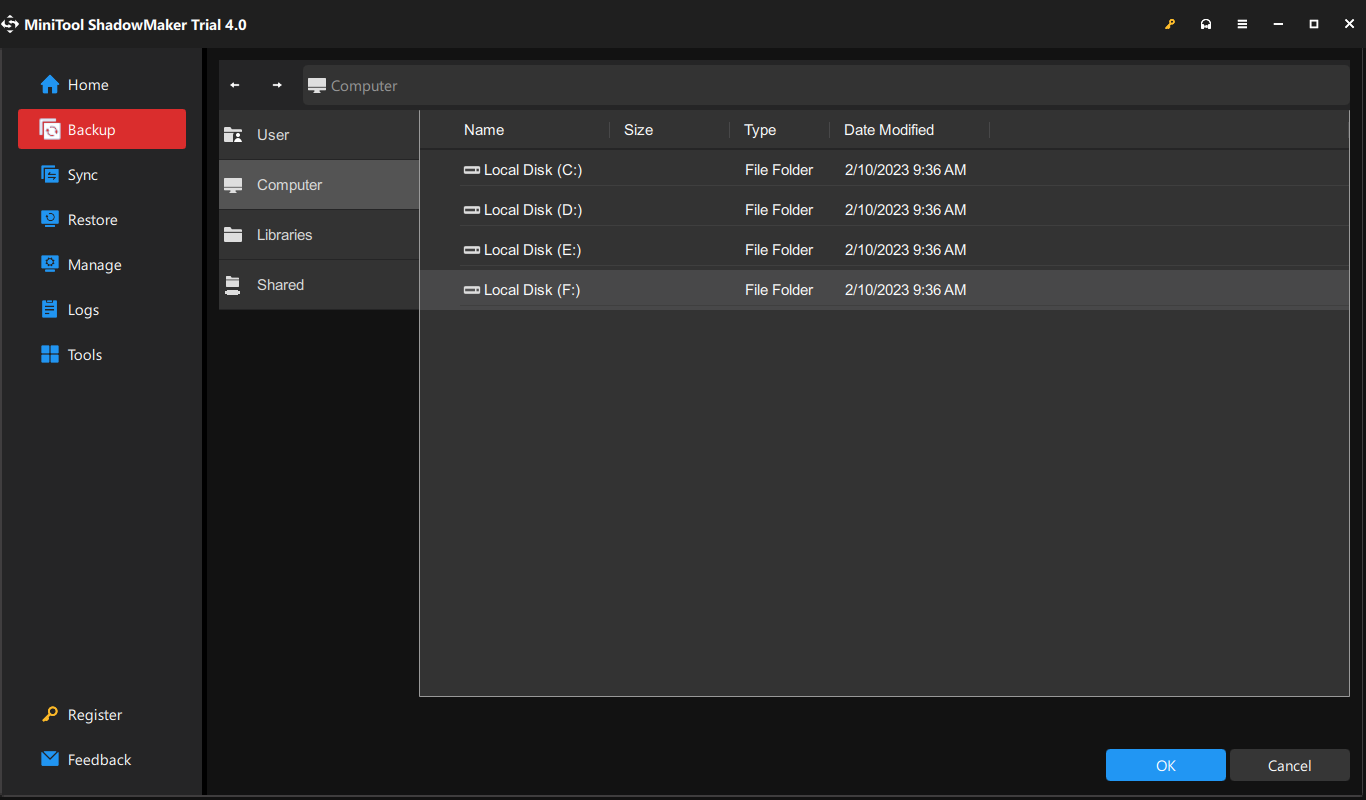
Step 3. In SOURCE, you can see the system required partitions are selected by default. Therefore, you only need to choose a storage path for your backup image in DESTINATION.
Step 4. Either hit Back Up Now to start the backup or press Back Up Later to delay the process. Once you choose Back Up Later, you can start the delayed task in the Manage page.
Then, you need to create a bootable drive with MiniTool ShadowMaker:
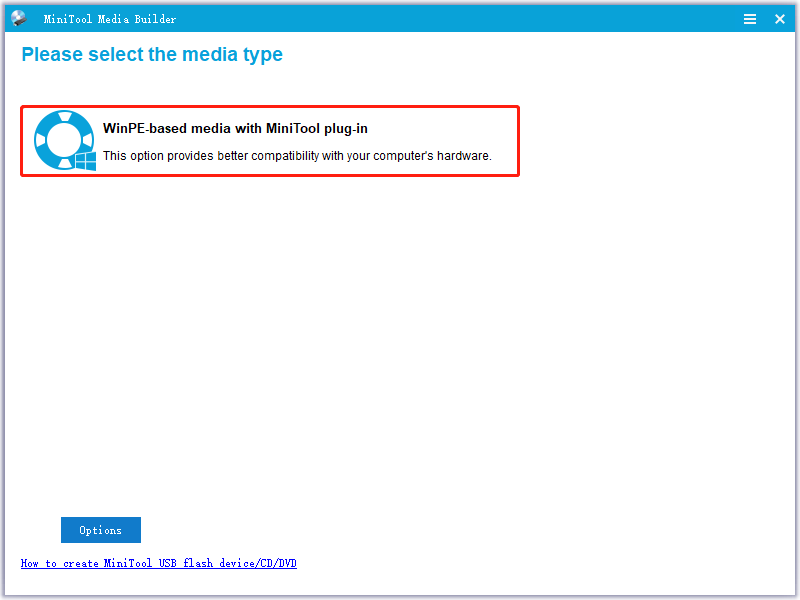
Step 1. Go to the Tools page and hit Media Builder.
Step 2. Click WinPE-based media with MiniTool plug-in and choose USB Flash Disk. When your computer fails to boot, you can boot it from this USB drive and perform a system recovery.
We Need Your Voice
By now, you must stop checking files system on C successfully with the solutions mentioned in this article. More importantly, you still have a risk of encountering the same issue again or making some mistakes during the troubleshooting process, resulting in data loss, hard drive failure or system crash.
In consequence, it is necessary to back up your system with MiniTool ShadowMaker to secure your system. For further queries about our product or the solutions in this article, welcome to leave your ideas in the comment zone or contact us via [email protected].
Checking Files System on C FAQ
How do I check my drive file system?
Launch File Explorer > hit This PC > right-click on the drive you want to check > choose Properties > check the file system under the General tab.
How do I fix file system error?
Fix 1: Check Sectors for Your Hard Drive via MiniTool Partition Wizard.
Fix 2: Run Disk Check
Fix 3: Run SFC
Fix 4: Run A Virus or Malware Scan
Fix 5: Perform System Restore
How do I stop Windows 7 from checking files?
Way 1: Change the Registry
Way 2: Use Control Panel
Way 3: Run CHKNTFS
Checking File System on C message is a warning when Windows detects an issue with the file system on your C drive (typically the primary drive where Windows is installed). This message indicates that there may be corrupted or damaged files, bad sectors, or other issues that need attention to prevent potential data loss or system instability.
What is a Check File System on C Message?

The Check File System on C message is a prompt from Windows that suggests running a disk check utility, such as CHKDSK (Check Disk), to scan and repair any problems with the file system on the C drive. This message can appear during startup, Shutdown, or when attempting to access specific files or folders.
It serves as a precautionary measure to ensure the integrity of your data and prevent potential system crashes or performance issues.
Causes for Check File System on C
Several potential causes can trigger the “Check File System on C” message:
Corrupted File System
A corrupted file system can result from various factors, such as power outages, software conflicts, malware infections, or hardware failures. Corrupted files or system files can lead to inconsistencies in the file system, prompting Windows to recommend a disk check.
Bad Sectors Hard drives
A disk sector hard drive can develop bad sectors over time, which are areas on the Disk that cannot be read or written reliably. Bad sectors can cause data corruption and file system issues, leading to the Check File System on C message.
Incorrect Shutdown
If your computer is not shut down properly (e.g., due to a power outage or forced restart), it can leave the file system in an inconsistent state, triggering the need for a disk check.
How to Fix Checking Files System on C on Windows?
Shut Down Your Computer Properly
Before attempting any repairs, it’s crucial to shut it down properly. An improper shutdown can exacerbate the issue and potentially lead to further data corruption or file system problems.
Follow the standard procedure for shutting down your computer to ensure a clean shutdown.

Start Button > Power Button Icon > Shutdown
Check File System Errors
The primary solution to address the “Check File System on C” message is to run the CHKDSK (Check Disk) utility. This tool scans the file system for errors and attempts to repair any issues.
Here’s how to run CHKDSK:
Open the Command Prompt as an administrator.
Type chkdsk C:/f /r and press Enter. ( Replace C with the appropriate drive letter if your Windows installation is on a different drive.
The /f parameter instructs CHKDSK to fix any errors it finds, and /r locates bad sectors and attempts to recover readable information.
CHKDSK will inform you if a disk check needs to be scheduled for the next restart. If prompted, select “Yes” to schedule the disk check.
Restart your computer, and CHKDSK will run automatically during the boot process, scanning and attempting to repair any issues found on the C drive.
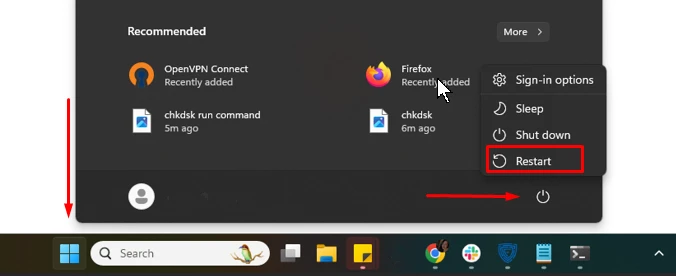
Start button > Power Button > Restart
If you’re looking for a premium solution to repair a corrupted file system with a clean copy and monitor your system for any bad sector hard drives that need repair and replacement, consider using Fortect. It’s an all-one PC solution with Malware real protection, which is also the reason for corrupted file systems or Checking File System on C errors on your Windows PC.

Download and Install Fortect now.
Find and Fix Bad Sectors
Bad sectors on your hard drive can cause file system errors and contribute to the “Check File System on C” message. To find and fix bad sectors, you can use the CHKDSK utility with the /r parameter, as mentioned earlier. Alternatively, you can use third-party disk utility tools specializing in detecting and remapping bad sectors.
Diable Autodisk Check Manually
If you don’t want Windows to automatically check the file system every time you start your computer, you can turn off the Autodisk Check feature manually. However, turning off this feature may prevent Windows from detecting and fixing potential issues with your file system.
To disable Autodisk Check, follow these steps:
- Start Button > Type cmd > Run as Administrator > Black screen
2. Type fsutil dirty query C: and press Enter. (Replace “C:” with the appropriate drive letter if necessary.)
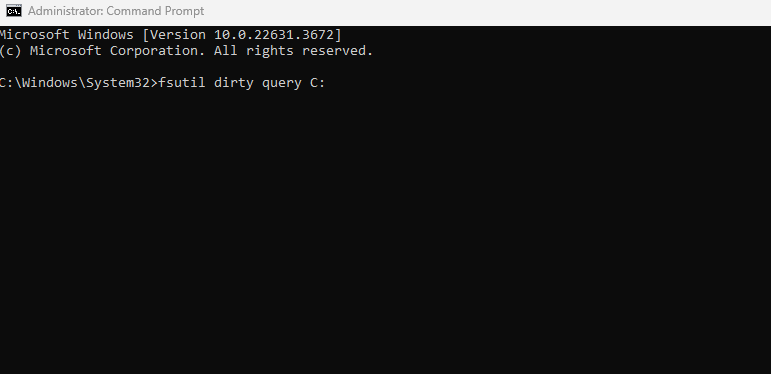
3. If the output shows “The volume is not dirty,” Autodisk Check is disabled. If it shows “The volume is dirty,” proceed to the next step.
4. Type fsutil dirty set C: and press Enter to disable Autodisk Check for the specified drive.

Conclusion
The “Check File System on C” message can be frustrating and potentially concerning, but it’s essential to address it promptly to prevent data loss or system instability. By following the steps outlined above, such as running CHKDSK and CHKNTFS and addressing bad sectors, you can often resolve file system issues and ensure the integrity of your data.
Remember, prevention is always better than cure. Regularly maintaining your computer, keeping your software and drivers up-to-date, and using reliable security solutions can help minimize the chances of encountering file system errors in the first place.
Fortect, with its comprehensive tools for hardware maintenance, security, and performance optimization, can be an invaluable ally in keeping your PC running smoothly and safeguarding your data.
Распознавание голоса и речи на C#
UnmanagedCoder 05.05.2025
Интеграция голосового управления в приложения на C# стала намного доступнее благодаря развитию специализированных библиотек и API. При этом многие разработчики до сих пор считают голосовое управление. . .
Реализация своих итераторов в C++
NullReferenced 05.05.2025
Итераторы в C++ — это абстракция, которая связывает весь экосистему Стандартной Библиотеки Шаблонов (STL) в единое целое, позволяя алгоритмам работать с разнородными структурами данных без знания их. . .
Разработка собственного фреймворка для тестирования в C#
UnmanagedCoder 04.05.2025
C# довольно богат готовыми решениями – NUnit, xUnit, MSTest уже давно стали своеобразными динозаврами индустрии. Однако, как и любой динозавр, они не всегда могут протиснуться в узкие коридоры. . .
Распределенная трассировка в Java с помощью OpenTelemetry
Javaican 04.05.2025
Микросервисная архитектура стала краеугольным камнем современной разработки, но вместе с ней пришла и головная боль, знакомая многим — отслеживание прохождения запросов через лабиринт взаимосвязанных. . .
Шаблоны обнаружения сервисов в Kubernetes
Mr. Docker 04.05.2025
Современные Kubernetes-инфраструктуры сталкиваются с серьёзными вызовами. Развертывание в нескольких регионах и облаках одновременно, необходимость обеспечения низкой задержки для глобально. . .
Создаем SPA на C# и Blazor
stackOverflow 04.05.2025
Мир веб-разработки за последние десять лет претерпел коллосальные изменения. Переход от традиционных многостраничных сайтов к одностраничным приложениям (Single Page Applications, SPA) — это. . .
Реализация шаблонов проектирования GoF на C++
NullReferenced 04.05.2025
«Банда четырёх» (Gang of Four или GoF) — Эрих Гамма, Ричард Хелм, Ральф Джонсон и Джон Влиссидес — в 1994 году сформировали канон шаблонов, который выдержал проверку временем. И хотя C++ претерпел. . .
C# и сети: Сокеты, gRPC и SignalR
UnmanagedCoder 04.05.2025
Сетевые технологии не стоят на месте, а вместе с ними эволюционируют и инструменты разработки. В . NET появилось множество решений — от низкоуровневых сокетов, позволяющих управлять каждым байтом. . .
Создание микросервисов с Domain-Driven Design
ArchitectMsa 04.05.2025
Архитектура микросервисов за последние годы превратилась в мощный архитектурный подход, который позволяет разрабатывать гибкие, масштабируемые и устойчивые системы. А если добавить сюда ещё и. . .
Многопоточность в C++: Современные техники C++26
bytestream 04.05.2025
C++ долго жил по принципу «один поток — одна задача» — как старательный солдатик, выполняющий команды одну за другой. В то время, когда процессоры уже обзавелись несколькими ядрами, этот подход стал. . .