

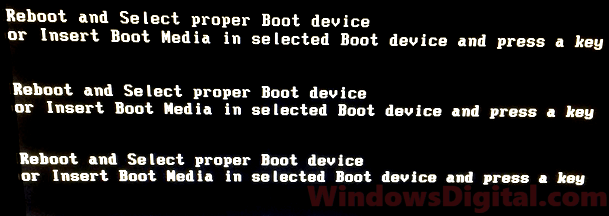
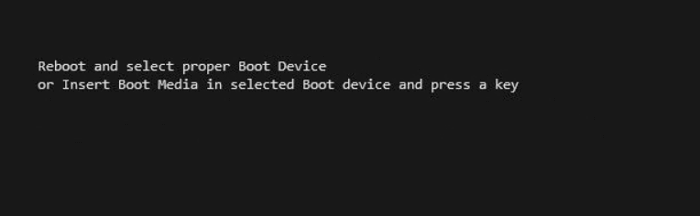
Ошибка “Reboot and select proper Boot device or Insert Boot Media in selected Boot device and press a key” — распространённое сообщение, которое у многих вызывает негодование. Обычно пользователи сразу же пытаются перезагрузить Windows. Однако это не помогает, и ситуация повторяется вновь: сообщение всё также появляется сразу после включения ноутбука или компьютера. Эта инструкция поможет вам избавиться от этой проблемы быстро и без усилий.
Что означает эта ошибка?
Данное сообщение, если буквально перевести на русский язык, просит вас перезагрузиться и выбрать подходящее устройство загрузки. Однако простой “ребут” системы, вряд ли исправит проблему. И дело тут не в переводе.
Эти сообщения появляются на мониторе, потому что ОС не определяет либо определённые файлы загрузки, либо само устройство (бут девайс). Вследствие этого ваш компьютер попадает в цикл и не может загрузиться окончательно.
Основные причины ошибок
- Неправильно настроен BIOS;
- Поврежден загрузочный сектор (бутсектор);
- Неисправен жёсткий диск (HDD) или SSD;
- Проблемы с файловой системой;
- Вредоносная активность.
Что делать?
Общая причина практически всех подобных ошибок — последовательность загрузки в BIOS. Поэтому для начала вам требуется заставить Windows загружать устройства в правильном порядке.
Проверьте настройки BIOS
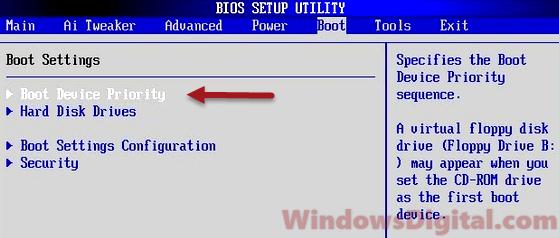
Во время того, как система в очередной раз будет загружаться, вам необходимо нажать определённую функциональную клавишу (function key): F2, F8, F10, F12 или DEL. Так вы попадёте в BIOS
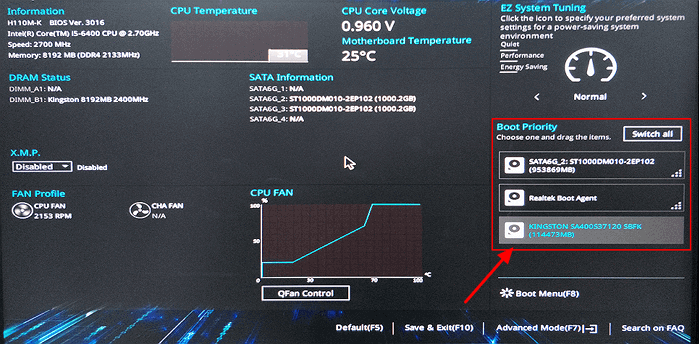
Далее перейдите в Boot: вы увидите надпись “Please select boot device”, а под ней — список устройств. Убедитесь, что HDD/SSD с вашей ОС находится выше всех остальных, на первом месте. Если же нет — выберите его, нажав Enter, и перетащите на первое место с помощью клавиши ↑). Затем сохраните изменения и закройте BIOS.

Если накопитель не указан в списке устройств, добавьте его:
- Вернитесь в BIOS и войдите в меню, отвечающее за настройку загрузки (Boot Order или Boot Options);
- Выберите Add Boot Option;
- Выберите тип устройства (например, USB-накопитель);
- Введите название;
- Далее переходим в список: там уже должно отображаться новое устройство. Ставим его на первое место;
- Не забудьте сохранить изменения.
Далее компьютер автоматически перезагрузится: у многих пользователей проблема уже решается на этом этапе. Однако если при повторном входе снова будет написано “Reboot and select proper Boot device”, значит попробуйте другой метод.
Проверьте HDD или SSD
Правильная настройка БИОСа говорит о том, что источник проблемы — записывающее устройство. Следующий шаг — сделать проверку накопителя на ошибки. Для этого вам понадобится войти в WinRe — среду восстановления Windows.
Если у вас Windows 7: Если у вас Windows 8 и выше:
Выключите устройство, зажав на десять секунд кнопку питания. Затем снова включите его. Повторите эти шаги несколько раз: так вы попадёте в WinRe. Выбираем: Устранение неполадок > Дополнительные параметры > Командная строка. В ней напишите команду: chkdsk c: /r.
Если же диагностика не дала результатов, то вам следует разобрать компьютер и проверить HDD или SSD на предмет физических неисправностей . Если накопитель вышел из строя, то его замена с большой вероятностью решит проблему.

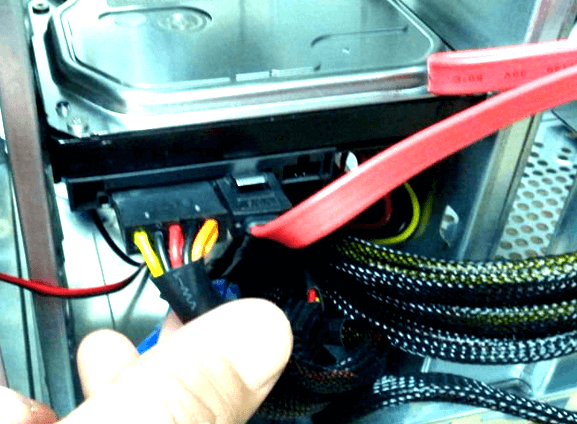
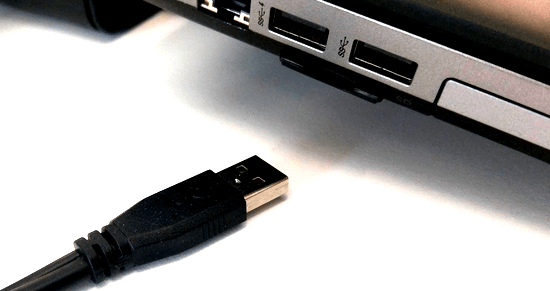
Проверьте соединения и кабели
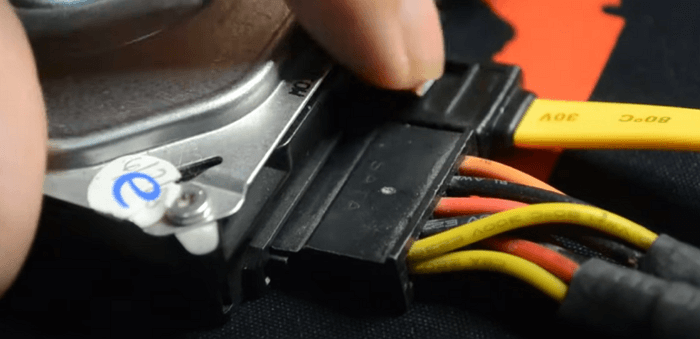
Теперь ваша задача проверить подключенные к ПК кабели: любые их повреждения могут вызывать сбой в системе, приводя к этой ошибке. Особенно внимательно проверьте исправность SATA кабеля. Именно он соединяет накопитель и системную плату.

Проверьте ОС на наличие вирусов и ошибок
Любое вирусное ПО негативно влияет на системные файлы. Это прямым образом влияет на появление разнообразных ошибок, сбоев и неисправной работы. Проведите диагностику вашего компьютера в безопасном режиме с помощью либо заводской антивирусной программы, либо скачанной в Интернете утилиты.
Различные марки и модели компьютеров (особенно такие крупные, как ASUS, LENOVO, HP и т.п.) имеют свои определённые диагностические инструменты для анализа аппаратного обеспечения. Провести такие тесты также можно в безопасном режиме: возможно именно они помогут вам решить эту проблему.
Переустановите операционную систему
Последнее, что вы можете сделать для исправления ошибок устройств загрузки, — это переустановить Windows. Однако перед этим не забудьте перенести все важные файлы на другое устройство.
Заключение
Кратко обозначим ещё раз: какие шаги предпринять, если на дисплее компьютера написано “Reboot and select proper Boot device”.
- Провести правильную настройку БИОСа;
- Провести диагностику HDD/SSD;
- Дополнительно проверить SATA кабель на повреждения;
- Провести диагностику всей ОС;
- Переустановить Windows, если другие способы не помогают.
Если ничего из вышеперечисленного не помогло, то записывайтесь в сервисный центр HYPERPC, мы поможем устранить любую неисправность вашего устройства.
Если при загрузке ПК или ноутбука на черном экране вы видите сообщение «Reboot and Select proper Boot device or Insert Boot Media in selected Boot device and press a key» (перевод — Перезагрузитесь и выберите правильное загрузочное устройство или вставьте загрузочный накопитель в выбранное устройство и нажмите любую клавишу), а не привычный экран загрузки Windows 11, Windows 10 или предыдущих версий ОС, очевидный вывод — загрузку с диска HDD или SSD (или, в некоторых случаях — флешки) выполнить не удалось. Нажатие любой клавиши в такой ситуации как правило не помогает.
В этой инструкции подробно о том, что делать, если вы столкнулись с ошибкой Reboot and Select proper Boot Device, чем может быть вызвана проблема и дополнительная информация, которая может оказаться полезной для решения проблемы.
Простые способы исправить ошибку

Если на компьютере, где возникла ошибка была установлена и исправно работала операционная система — Windows 10, Windows 11 или любая другая, и ошибка «Reboot and Select proper Boot device or Insert Boot Media in selected Boot device and press a key» появилась внезапно, причем никакие действия по изменению параметров БИОС/UEFI или конфигурации оборудования не выполнялись, первое что следует попробовать — отключение лишних накопителей, проверка параметров загрузки и наличия необходимого накопителя в БИОС.
Отключение необязательных для загрузки накопителей
Начать следует с самого простого подхода, в некоторых случаях этого оказывается достаточно для устранения проблемы:
- На экране с ошибкой Reboot and Select proper Boot device выключите ваш ПК или ноутбук долгим удержанием кнопки питания.
- Отключите от компьютера любые необязательные внешние накопители: флешки, карты памяти, внешние HDD или SSD, компакт-диски.
- Включите компьютер снова.
В некоторых случаях эти 3 шага могут помочь и исправить ошибку. Если ошибка исчезает, Windows исправно загружается, но в дальнейшем после завершения работы и повторного включения появляется снова (иногда не сразу, а только при включении на следующий день), отключите быстрый запуск Windows.
Учитывайте (пишу специально для начинающих пользователей): чтобы ошибку в принципе можно было исправить любым из описанных здесь способов, на компьютере должна быть установлена операционная система (или же должна производиться загрузка с загрузочной флешки или диска). Например, если вы только что установили на ПК новый чистый диск, ошибка продолжит появляться, пока вы не установите на него систему.
Порядок загрузки и параметры загрузки в БИОС или UEFI
Если предыдущий вариант не вернул работоспособность системы, следует изучить параметры загрузки: правильность выбора устройства и режима, в котором производится загрузка операционной системы:
- Если ошибка возникает при загрузке с установочной флешки, изучите причины и решения из материала БИОС/UEFI не видит загрузочную флешку — что делать?
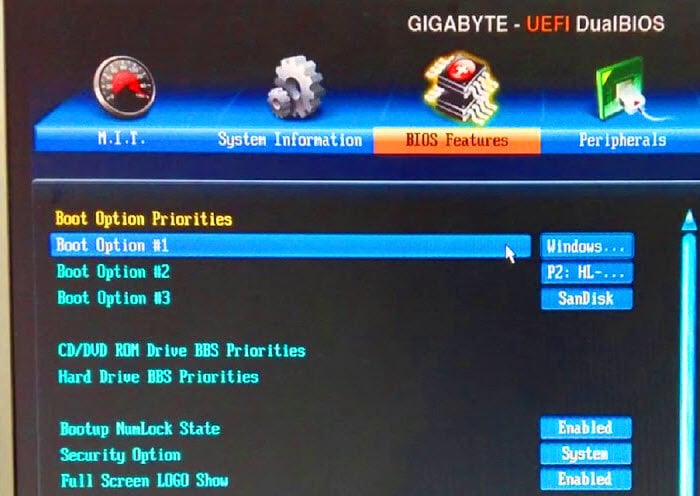
- Зайдите в БИОС/UEFI компьютера и проверьте: виден ли жесткий диск или SSD, с которого должна выполняться загрузка и убедитесь, что загрузка по умолчанию выполняется с него (в качестве первого устройства загрузки может потребоваться выбрать Windows Boot Manager для UEFI-систем при наличии такого пункта). Если это не так, установите правильный порядок загрузки. Как изменить порядок загрузки в разных версиях БИОС, применительно к флешке (но и с HDD/SSD будет то же самое) описано в этой инструкции.

- Попробуйте изменить режим загрузки: включить UEFI вместо Legacy (CSM) или наоборот — полностью отключить поддержку Legacy (CSM) режима, отключить Secure Boot. Эта тема также затрагивается в упомянутой выше инструкции. Этот вариант особенно актуален для случая, когда вы обновляли или сбрасывали БИОС/UEFI, компьютер не использовался долгое время или имеет севшую батарейку, а на ночь выключается из розетки.
- Ещё один нюанс, касающийся появления ошибки после обновления или сброса БИОС (CMOS): иногда при этом включается ранее отключённый контроллер VMD или Intel RST. Может помочь его отключение в БИОСе, обычно опция находится в разделах Advanced, в подразделах System Agent Configuration — VMD Setup Menu, Storage Configuration — VMD Configuration и других. При наличии опций для настройка режима работы SATA-накопителей, убедитесь, что включен режим AHCI (в современных системах обычно используется именно он).

- При наличии опции как Fast Boot (быстрая загрузка) или аналогичных в настройках загрузки в БИОС, попробуйте их отключить: установить в Disabled.


Возможен сценарий, когда один из пунктов, перечисленных выше, помог, но в дальнейшем параметры БИОС сбрасываются, и ошибка появляется снова. Это может говорить о том, что следует поменять батарейку на материнской плате.
Диск HDD или SSD не виден
Если диск, с которого нужно выполнять загрузку не отображается в БИОС/UEFI ни в режиме Legacy (CSM) ни в режиме UEFI, а вы недавно проводили какие-то работы внутри корпуса компьютера, например, очищали его от пыли, а также при возникновении ошибки после перевозки ПК или ноутбука, проверьте подключение HDD или SSD (для ПК — интерфейсные кабели как со стороны самого диска, так и со стороны материнской платы, а также кабели питания). Если загрузочный диск пропал после подключения дополнительного диска, проверьте: исправится ли ситуация, если отключить вновь добавленный диск.
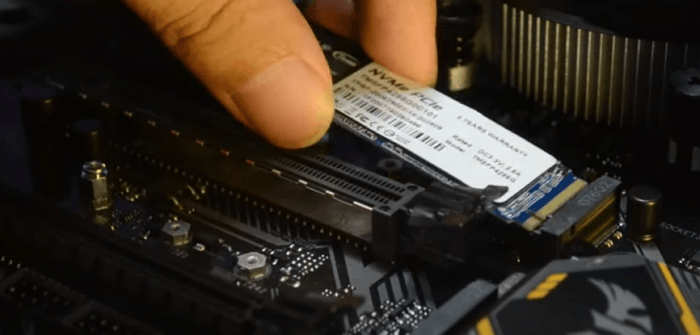
Если речь идёт об M.2 SSD, то помните, что они бывают разными: с интерфейсом SATA или NVMe PCI-e и разъемы на материнской плате могут поддерживать не любые диски M.2 — уточните это в характеристиках конкретной материнской платы. Это может быть применимо, если такой диск с системой был установлен в текущий компьютер с другого компьютера.
Когда после выполненных действий и проверок диск всё так же не виден в БИОС, далее описанные способы не подойдут: попробуйте отключить диск и проверить его работоспособность на другом компьютере, есть вероятность его выхода из строя. При полной работоспособности на другом компьютере, замените кабели подключения на проблемном ПК, а также учитывайте, что иногда такие симптомы (некоторые из дисков не видны) бывают при подключении множества устройств в рамках одного SATA-контроллера, либо при проблемах с блоком питания.
Ошибки файловой системы на диске
Рассматриваемое сообщение при загрузке может быть вызвано ошибками файловой системы на диске: при условии исправного в целом диска чаще всего причиной является экстренное выключение компьютера.
Для проверки разделов диска можно использовать следующие подходы:
- Загрузиться с загрузочной флешки с Windows 11 или Windows 10, нажать клавиши Shift+F10 в программе установки (на некоторых ноутбуках — Shift+Fn+F10) и использовать команду
chkdsk C: /f
для проверки файловой системы на системном разделе диска. Также может иметь смысл проверить файловую систему на разделе с загрузчиком (EFI FAT32 раздел, обычно размером 100 МБ). При использовании этого подхода есть некоторые нюансы, о которых подробно далее в статье.
- Использовать WinPE от Sergei Strelec и контекстные меню системного раздела и раздела с загрузчиком для запуска проверки дисков на ошибки. О том, как создать флешку с WinPE для целей восстановления подробно в этой статье.


При использовании способа с загрузочной флешкой Windows следует учитывать, что буква системного раздела может отличаться от C пока вы находитесь в программе установки, а раздел с загрузчиком и вовсе ни имеет буквы. Процесс проверки с учетом этих нюансов будет состоять из следующих шагов:
- Загрузитесь с загрузочной флешки Windows (Как поставить загрузку с флешки в БИОС/UEFI).
- В программе установки нажмите клавиши Shift+F10 (иногда — Shift+Fn+F10). Откроется командная строка, переключение языка ввода — Alt+Shift
- По порядку введите команды
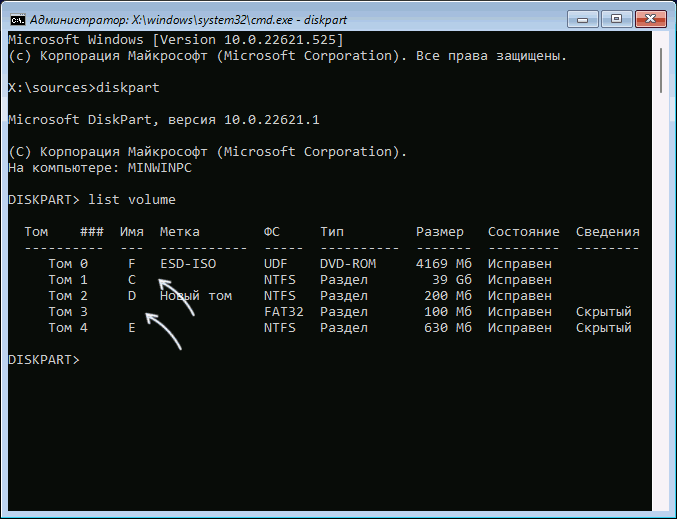
diskpart
list volume
в результате вы увидите список разделов диска. Вам потребуется определить букву системного раздела диска (например, по его метке и размеру), а также номер тома раздела с загрузчиком с файловой системой FAT32 (только для EFI-систем).

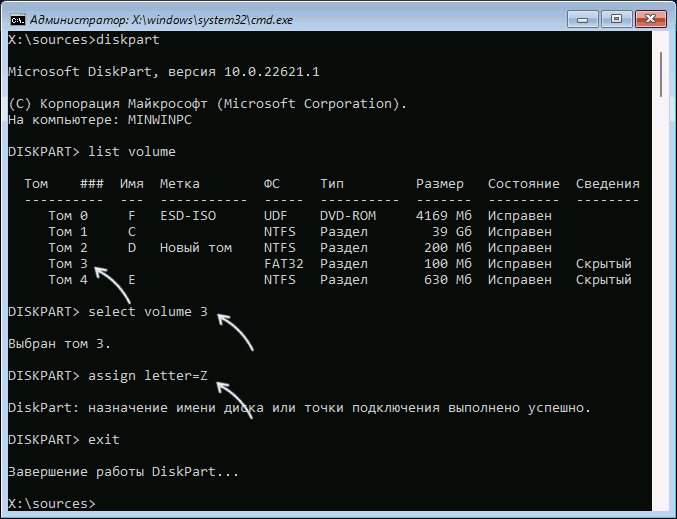
- При наличии раздела с загрузчиком, по порядку используйте следующие команды, заменив N в первой из них на номер тома, а «БУКВА» — на не занятую другими разделами букву диска:
select volume N
assign letter=БУКВА
exit
- В командной строке используйте команды chkdsk C: /f и chkdsk Z: /f (заменив C и Z на соответствующие буквы разделов) для проверки файловой системы на диске.

- При наличии оснований полагать, что диск имеет и аппаратные повреждения, можно использовать следующий синтаксис команды: chkdsk C: /f /r (и аналогично для раздела с загрузчиком) — но в этом случае её выполнение займет значительно больше времени.

Если в ходе проверки будут обнаружены и исправлены ошибки, попробуйте снова загрузиться с локального диска — возможно, ошибка больше не появится.
Восстановление загрузчика
О чем ещё может говорить ошибка, в случае, если простые методы её исправить не подошли? Прежде всего, но не всегда — о повреждении загрузчика или раздела с загрузчиком. Можно попробовать его восстановить:
- Восстановление загрузчика Windows 11
- Восстановление загрузчика Windows 10
- Как восстановить загрузчик Windows 7 и 8 (8.1)
Внимание: при возникновении ошибки после того, как вы заменили или отключили один из дисков компьютера (не системный), это может говорить о том, что загрузчик находился на заменённом диске, хотя сама Windows — на оставшемся. Решение: вручную создать раздел с загрузчиком (рассматривается в статье про загрузчик Windows 11, но подойдет и для 10), либо переустановить систему с нуля. Также здесь может пригодиться инструкция Как перенести раздел с загрузчиком на другой диск.
В случае, если в процессе попыток восстановить загрузчик вы столкнулись с тем, что на разделе присутствуют разделы RAW (это будет видно в процессе), отсутствуют необходимые разделы или наблюдаются иные проблемы с файловой системой, которых не было до этого, выполните проверку жесткого диска или SSD на ошибки в командной строке (вы попадёте в неё, выполняя шаги по исправлению загрузчика из предыдущих инструкций). Как именно это сделать описывается выполнить проверку описывается в статье Как проверить жесткий диск на ошибки в Windows.
Неисправность диска
В завершение о наименее приятных возможных причинах — проблемы с самим «boot device», то есть системным жестким диском или SSD компьютера (ноутбука). Если BIOS не видит жесткого диска (или видит, но операции с ним, в том числе и на другом компьютере выполнить не удаётся), при этом HDD, возможно, издает странные звуки (но необязательно) — не исключены физические повреждения и выход из строя и именно поэтому компьютер не загружается. Это может произойти из-за падения ноутбука или ударов по корпусу компьютера, иногда — в связи с нестабильным электропитанием, и часто единственным возможным решением остается замена накопителя.
Некоторые дополнительные возможные причины ошибки Reboot and Select proper Boot Device при включении ноутбука или компьютера, если предыдущие варианты не решили проблему:
- В ситуации, когда после настроек БИОС/UEFI загрузка успешно выполняется однократно, но затем вы вновь сталкиваетесь с той же ошибкой, попробуйте заменить батарейку CMOS.
- Если ошибка появляется при установке диска с системой, которая устанавливалась на другом компьютере, учитывайте, что могло оказаться так, что загрузчик системы был размещен на другом диске этого компьютера, информация о переносе есть в этой статье.
- При появлении ошибки при загрузке с флешки на ноутбуке или компьютере без установленной ОС, самая вероятная причина ошибки — несовпадение режима загрузки, выбранного в БИОС и поддерживаемого накопителем. Разобраться поможет инструкция: Что делать, если компьютер не видит загрузочную флешку.
- Если проблема появилась после того, как вы установили системный HDD или SSD в кармане на месте привода оптических дисков (Optibay), учитывайте, что причиной может быть тот факт, что не все ноутбуки поддерживают загрузку ОС с установленного таким образом накопителя: выполните перенос системы или установку на локальный (установленный внутри) диск.
- В некоторых случаях ошибка появляется как результат плохого подключения дисков, особенно если для этого используются кабели SATA. Также учитывайте вероятность повреждения кабелей подключения. Решение — проверка подключения как со стороны материнской платы, так и со стороны диска, замена соответствующих кабелей.
- Иногда может помочь обновление БИОС, выполнение которого на некоторых устройствах возможно даже без загрузки ОС (но само обновление потребуется скачать на другом компьютере).
Надеюсь, что-то из этого поможет вам исправить ошибки No bootable device available или Reboot and Select proper Boot device, если же нет — задавайте вопросы в комментариях ниже, подробно описав ситуацию и обстоятельства, которые к ней привели, я постараюсь подсказать решение.
Отдельные инструкции про похожие ошибки при загрузке ПК или ноутбука:
- Default Boot Device Missing or Boot Failed
- Ошибки Boot Failure и An Operating System Wasn’t found
- No Bootable Device при загрузке
- Disk Read Error Occured
- Verifying DMI Pool Data
- Start PXE over IPv4 — что делать?
When you start your computer, you might see this error message: “Reboot and Select proper Boot device or Insert Boot Media in selected Boot device and press a key”. This can be quite a confusing problem related to hardware issues. In this guide, we’ll talk about what this error means and how to fix it on Windows 10 or Windows 11 PC.
What is actually the problem?
If you are trying to start your computer using the main drive where Windows 10 or Windows 11 is installed and you get the “Reboot and Select Proper Boot Device” error, it means the BIOS chip on your motherboard can’t find or read the hard drive. This can happen if no operating system is found on the first boot device in the BIOS settings, or if the installed OS is corrupted to a point that it cannot be booted. This is often the case if the computer is new.
If this error pops up when you are trying to boot from a USB flash drive, it could mean the bootable USB wasn’t created properly or it’s broken. In that case, try making the bootable drive again with different software like Rufus or use another USB drive.
Also see: How to Startup Repair Windows 10/11 using Command Prompt
This issue can happen whether you’re using an SSD or a regular HDD in desktops or laptops from brands like Asus, Acer, Toshiba, and Dell. It’s not limited to any specific operating system and can occur in PCs with new motherboards from brands like Asrock or Gigabyte.
How to fix the “Reboot and select proper boot device” error
Here are some ways to fix the “Reboot and select proper boot device” error for your Windows 10 or Windows 11 PC.
Unplug HDD cables and plug them in again
Often, the error happens because the hard drive’s SATA or power cable is loose or wasn’t plugged in right. Opening your computer and reconnecting these cables usually helps.
Turn off your PC, take off the cover, disconnect and then reconnect the SATA and power cables to your hard drive. Make sure they’re secure at both ends and try starting your computer again.
Remove all USB drives and DVD
To ensure nothing external is messing with your computer’s startup, take out any USB drives, DVDs, or even Floppies. Then restart your PC and see if the error goes away.
Check if you have the correct boot sequence in the BIOS
If your BIOS is set to start with a non-OS drive, you’ll get this error. Make sure your BIOS is set to boot from the correct OS drive. Here’s how to check:
- Press DEL or F2 as soon as your computer starts, to enter the BIOS.
- Look for an option called Boot Priority or Boot Sequence.
- Set the First Boot to your primary OS hard drive.
- Press F10 to save your settings and restart your PC.
HDD hardware failure
If your BIOS settings are correct and you still see the error, it might mean your hard drive is failing. Turn off your computer, let the hard drive cool down for a few hours, and try again.
If that doesn’t help, try connecting the hard drive to another PC to see if you can access the files. If you can, back up your important files quickly.
Related issue: Hard Drive Doesn’t Show Up After Clone in Windows 11
Use diskpart command to set the partition as active
If your primary OS drive isn’t set as active, your computer might give you the “Reboot and Select Proper Boot Device” error. Making the partition active again could fix this.
To use diskpart, access the command prompt tool through Windows recovery. Here’s what to do:
- On the error screen, hold down the power button to force shut down your PC. Start it up again. Do this three times. If Windows enters recovery mode on the third try, go to Troubleshoot > Advanced Option > Command Prompt.
- If you can’t get into recovery mode this way, you’ll need a Windows recovery or installation media. Set your BIOS to boot from it, then go to Troubleshoot > Advanced Option > Command Prompt.
In the command prompt, type these commands, hitting Enter after each:
diskpart
select disk 0
list partition
select partition 1
active

Run startup repair, CHKDSK and bootrec
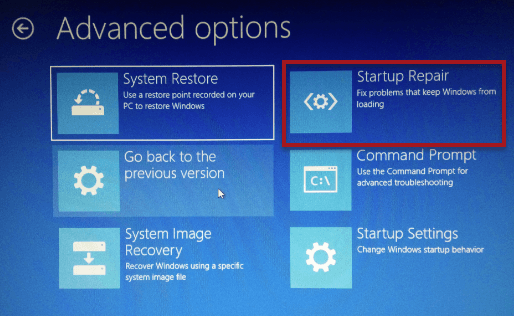
If none of the above fixes work, you might need to run startup repair, CHKDSK, and repair the master boot record.
To do this, boot into Windows Recovery as explained above. For startup repair, go to Troubleshoot > Advanced Option > Startup Repair and follow the on-screen instructions.
To run CHKDSK and bootrec commands, open Command Prompt and enter the following, pressing Enter after each (assuming C: drive is your primary OS drive):
chkdsk c: /f
bootrec /fixmbr
bootrec /fixboot
bootrec /rebuildbcd
bcdboot c:\windows /s c:
One last thing
When your PC has boot issues, it’ll be very helpful to try to recall any changes you made to it lately. Did you install new programs, update the system, or add some new parts? Some of these things, whether intentionally or not, can sometimes affect how your computer starts. If you think any of these changes might be the problem, you can try to undo the changes, like removing the new software or hardware to see if that fixes the issue.
If your computer is showing a black screen with the error “Reboot and Select Proper Boot Device” when starting your device, it means that your computer is unable to locate the boot device that the operating system (OS), Windows, is installed on.
Put more simply, the boot device refers to the piece of hardware that contains or can read the files a computer needs to power on. With a Windows OS, your computer needs to locate the Microsoft Windows boot files to start up. If not, it may be detecting other drives as the boot drive instead of the correct one or your boot drive may be corrupted.
You may feel frustrated when your computer won’t boot up and you need to access data, but don’t worry. We go over some common causes for the “Reboot and Select Proper Boot Device” error as well as some strategies to help you troubleshoot it.
Causes of “Reboot and Select Proper Boot Device” error
This chart lists some of the common causes of the “Reboot and Select Proper Boot Device” error, as well as some potential solutions. Anytime you encounter an error on your computer, especially one that stops you in your tracks, you may be willing to try anything to keep your computer running. Keep in mind, however, that if you have a hard disk drive issue with your computer, your data could be at risk, so you may want to consult with a professional.
| Issue | Potential Solution |
|---|---|
| The boot order is incorrect or you’ve installed a new bootable device that your computer doesn’t recognize. |
Check and adjust the boot order. |
| Legacy Boot mode is enabled on UEFI devices. | Disable legacy mode. |
| Your system partition is inactive. | Mark the system partition back to active by either using Windows 10 installation boot CD and switching it back through the terminal or using a third-party boot tool. This is complicated and may require a professional. |
| There’s a hard drive connection issue. | Contact a professional to diagnose the issue and troubleshoot. |
| There’s a physical issue with your hard drive. | Contact a professional to diagnose the issue and troubleshoot. |
What to Avoid
Before we get into how to troubleshoot a “Reboot and Select Proper Boot Device” error, it’s important to understand what “solutions” to avoid or use with caution. The following put you at risk for data loss:
- Factory reset: A factory reset restores your computer to the default settings, overwriting the data on the drive.
- Windows System Restore: This tool is often used when an install failure or data corruption occurs. System Restore uses a saved “restore point” to revert your system to an earlier version. However, the “restore point” may not have saved recent files, causing you to lose important data.
- Windows Startup Repair tool: This tool is commonly used to help you diagnose and repair startup problems. If you use this tool, it’s essential to understand what options you are selecting so that you don’t make selections that will cause harm.
If the troubleshooting options below don’t work or you suspect that there’s a hardware issue, consult with a professional for the best chance of recovering your data.
Troubleshooting the “Reboot and Select Proper Boot Device” error
First, check the BIOS boot order
The Basic Input/Output System (BIOS) is the processor software that boots up your computer. It’s the first operation that happens when you press your power button, loading your operating system and all of your personal settings.
An error that happens during startup could point to an issue with your BIOS, like a bug in the boot sequence. An incorrect boot order can prevent your BIOS from finding the file or device component that contains your operating system, a crucial first step in making your computer run.
This sometimes happens when, for example, you’re starting up with an external device plugged in, like a USB drive or DVD drive, or if you installed a new boot device. In cases like this, the motherboard may detect these devices as the primary boot drive when they don’t contain the necessary information that your system files do. This causes your computer to attempt to start without having the necessary files, causing the error.
Here are the steps to take to check or change the boot order in BIOS:
- Restart your computer (ctrl + alt + delete) and press the key that makes you enter the BIOS menu. This key is set by your manufacturer but is typically DEL, F1, F2, or F10. See the table below for reference.
- Find and update the boot order. Change the order so that the device containing the operating system, typically the hard drive, is listed first.
- Save the order and restart your computer.
If incorrect boot order was the issue, your computer should now boot up to the drive that has the OS installed.
| Manufacturer | Shortcut to BIOS |
|---|---|
| ASUS | F2 |
| Acer | F2 for Notebook, DEL for Desktop |
| Dell | F2 |
| HP | F10 |
| Lenovo | F1 for Desktop and All-In One, F2 for ideapad |
| Samsung | F2 |
If that doesn’t work you can try resetting your BIOS to factory default and rebooting your computer. However, use this option with caution. If you have a custom-built or upgraded PC, resetting the BIOS will wipe the sub-settings you carefully selected, causing a bigger troubleshooting headache in the long run.
If you have a standard PC, you can reset your BIOS to factory default settings by locating the Load Setup Defaults option in the BIOS menu. It may also be called something like Restore Settings, Load Defaults, or Load Optimized Defaults. This restores your BIOS settings to the way they were set up when you first got the device. Factory settings are optimized for your hardware’s function, so restoring your computer to these settings may correct the startup error or may at least make the specific issue you’re running into clearer.
If your hard drive isn’t appearing in BIOS, there may be a connection issue. If this is the case, skip to the section below.
If that doesn’t work and your computer uses UEFI, try disabling Legacy Boot
Unified Extensible Firmware Interface, or UEFI, is an update to traditional BIOS software. It’s more efficient, supporting larger hard drives, quicker boot times, and more advanced security features. If you have a newer computer, you might notice that it uses UEFI instead of BIOS. If that’s the case, you’ll have to try different troubleshooting strategies than someone with a computer that uses BIOS.
Sometimes, a user might need to switch back to an older operating system or settings to run certain programs. For example, if you’re booting from a network that only supports BIOS, you’d have to run BIOS to boot up. That’s why the Legacy Boot option exists. It allows users to switch their startup settings in order to run programs, access tools, or accomplish tasks that require an older version of the software to work.
If you’ve switched to Legacy Boot Mode and didn’t switch back to your regular startup settings, you might run into an error when trying to use your computer normally. A computer that uses UEFI for its normal functioning usually needs to be in those settings in order to work.
Here are the steps you can take to disable Legacy Boot Mode and enable UEFI:
- Restart your computer and press the key that makes you enter the UEFI menu. This will vary by manufacturer, but common keys are DEL, F1, F2, or F10.
- Navigate to the Boot Options category. You can typically do this by clicking BIOS Setup > System Configuration > Boot Options, though this may vary by computer.
- Navigate to Legacy Support and, if it’s enabled, choose the disable option.
- Save the changes and restart your computer.
If you’re unsure which one you have, you can check if your computer is using UEFI or BIOS by looking at the System Information window found in the Start menu. However, you won’t be able to do this if your computer is already in error mode.
UEFI is more commonly used with certain devices, including:
- 64-bit versions of Windows (Vista SP1 and later)
- Large drives (size of 2TB or larger)
- Newer tablets and smartbooks
Next, try activating your primary partition
This scenario is rare, but if you suspect that you have an inactive partition you should consult a professional. Trying to fix this on your own will be complicated and may cause you to lose data.
Your system partition can become inactive if, for example, you mistakenly mark or switch on another non-system partition as active.
A system partition is the part of your computer that contains the hardware-specific files you need to load Windows. It’s called a partition because it’s treated as a separate unit from your OS and file systems.
It’s important that the system partition functions properly because it manages your computer’s hardware and software resources. If it’s marked inactive, your computer will not boot up. Your operating system is installed on the primary partition, so, when it’s not active, the operating files can’t run.
If your hard drive doesn’t appear in BIOS, get it checked by a professional
If your hard drive isn’t appearing in BIOS, or you have another reason to suspect it’s a hard drive issue, it may be best to take your computer to a professional. Your hard drive may not be appearing for a variety of reasons, and properly diagnosing the issue might require taking your computer apart.
The following sections detail some common causes of hard drive issues.
Connection issues
If your hard drive isn’t connected properly, your computer may not be able to boot from it.
A professional will take your computer apart if necessary, and check that the SATA cable is connected properly and that the hard drive itself isn’t damaged. If you simply have a connectivity issue, you may just need to replace the cable. If the hard drive connection is fine, your drive may be damaged.
Damaged or corrupted drive
If your hard drive is connected properly, but it’s corrupt, your computer may not be able to boot from it. You can try using the HDD (Hard Drive Diagnostics) Scan tool to quickly check for hard drive failure.
Otherwise, here are some of the common symptoms of hard drive damage, including both physical signs and issues with how the computer operates:
- Overheating
- Unusual noises
- Inability to boot up
- Irregular system crashes and disk errors
- Changed file or folder names
- Missing files or folders
- Frequent error messages during normal use
If you’re noticing signs of hard drive failure, you may be able to transfer your data to another device before it’s lost or damaged. Large data transfers, however, may damage your hard drive more. The best assurance against data damage and loss is to power your device off and take it to a professional.
A professional can not only check your hard drive to see if it’s damaged or corrupt but also can recover most of your data, even if the hard drive itself isn’t salvageable.
Conclusion
Dealing with any computer error that stops you from using your computer can be frustrating, but one like “Reboot and Select Proper Boot Device” that prevents you from starting up at all can be especially disheartening.
You may be tempted to install Windows again, reinstall software, or attempt advanced options that you’re unfamiliar with pursuing. Remember that the first recovery of your data is the best recovery. So while it’s tempting to go for what seems like a quick fix, that quick fix could cause you to lose precious data. Even something like Startup Repair or Factory Reset could cause you to lose your personal data and may not actually address the system issue you’re facing.
Instead, for the best chances of data recovery and device repair, our data recovery technicians have you covered. We guarantee our results, so if we don’t recover your lost data, you pay nothing. If you can’t go in person, you can get help from home, too — you can call us at 800-388-1266 for 24/7 assistance, or submit a help request online.
Yevgeniy Reznik is Laboratory Operations Manager at Secure Data Recovery Services in Cleveland, Ohio, and has more than a decade of experience as a data recovery engineer. He graduated from Cleveland State University with a degree in computer science and spent 15 years as an IT entrepreneur and small business owner before joining the company.
Updated on Apr 28, 2025
When you start your computer, you may encounter this error: reboot and select proper boot device. This error indicates that the computer or laptop is unable to find a hard drive with Windows on it. Restarting your computer can’t solve the problem, but how can you fix it then.
PAGE CONTENT:
Fix 1. Select Proper Boot Device by Changing Boot Order
Fix 2. Check If the Boot Device Is Detected
Fix 3. Repair the Windows Boot File
Fix 4. Rebuild MBR (Recommended Solution)
This issue has troubled a huge number of Windows users. Luckily, you can solve this issue with this post. Before you are going to take action, figure out the causes for the «Reboot and Select Proper Boot Device» error.
- Hardware failure
- Improper settings of the BIOS
- The wrong boot order in BIOS
- Set wrong partition active
- Boot files get lost or corrupted
With knowing the exact cause for this error, you could take these measures accordingly. I have listed multiple solutions for this problem. We start with the most common solutions, just follow the post and try the steps.
Fix 1. Select Proper Boot Device by Changing Boot Order
Generally, you don’t need to change anything in your BIOS because your BIOS should be configured automatically. However, if you have replaced the old system disk with a new one, you need to set your boot priority drive. Follow the steps below to select the proper boot device.
Step 1. Restart PC and press F2/F12/Del keys to enter BIOS.
Step 2. Go to the boot option, change the boot priority, setting OS to boot from the bootable drive.
Step 3. Save the changes, exit BIOS, and restart the PC. Wait patiently to let the computer start.
Fix 2. Check If the Boot Device Is Detected
If Windows asks you to insert a boot device and press any key, you should check if the boot disk or installation media is detected by BIOS.
For desktops:
- Make sure the computer is turned off and remove the power cable.
- Locate the hard drive and check if the connectors are connected correctly.
- Plugin the power cable back in and restart the PC.
For laptops:
- Remove the battery if possible
- Open the lid underside of your laptop
- Check if the hard drive is connected properly
- Close the lid and place the battery back
So we have checked everything, it’s time to start your computer and open the BIOS. Then, run Hard Drive self-test. If you don’t have a Hard Drive self-test in the BIOS, you can run a hard drive test with EaseUS by creating a WinPE disk.
Fix 3. Repair the Windows Boot Files
You need to prepare a Windows repair disc and boot the Dell, Acer, ASUS, or Lenovo PC from the disc. Follow the steps below to repair Windows boot files.
Step 1. Boot from the recovery USB or the original installation DVD.
Step 2. Move to the install screen, click Repair your computer.
Then, run Command Prompt and type the following commands.
- For Legacy BIOS users:
- Bootrec /fixmbr
- Bootrec /fixboot
- Bootrec /rebuildBCD
For UEFI users: bcdboot C:\windows
Fix 4. Rebuild MBR (Recommended Solution)
However, if your ASUS, Dell, Acer, Lenovo, etc. computer running Windows 10/8/7 still has the «Reboot and select proper boot device» error, you should try the next attempt. EaseUS Partition Master has the Rebuild MBR feature that can fix the master boot code problem.
Step 1. Create a WinPE bootable disk
- Launch EaseUS Partition Master, and click «Bootable Media» on the toolbar. Select «Create bootable media».
- Click «Next» to finish the process.

Step 2. Boot EaseUS Partition Master Bootable USB
- Connect the bootable USB or CD/DVD to your PC.
- Press F2 or Del when you restart the computer to enter the BIOS screen. Set and boot your computer from «Removable Devices» or «CD-ROM Drive». And then EaseUS Partition Master will run automatically.
Step 3. Rebuild MBR
- Click «Toolkit» and choose «Rebuild MBR».

- Select the disk and the type of MBR. Then, click «Rebuild».

- After that, you can see «MBR has been successfully rebuilt on Disk X».

If you still receive this error — reboot and select proper boot device, you can try to fresh install Windows 10 to your HDD or SSD. Reinstalling Windows will erase all files saved on the boot partition, you’d better back up your data without booting Windows.
Conclusion
Hope you have fixed the reboot and select the proper boot device error with the steps above. Remember, if you don’t see your hard drive in your BIOS, you can check the connection first. Then, check if the hard drive itself is simply damaged or corrupt. You can also repair a corrupted hard drive if you have tried all the solutions above.