This page includes six solutions to help you get rid of Windows 10 stuck at scanning and repairing drive error. Refer to the manual tutorial and check out how to remove scanning and repairing drive stuck on your own:
| Workable Solutions | Step-by-step Troubleshooting |
|---|---|
| Fix 1. Check Disk Connection | Remove the computer case > Check the cable and port to ensure the disk is correctly connected…Full steps |
| Fix 2. Let Scanning Process Finish | If the drive is in a bad condition, the scanning process may take longer and you need to wait for it to finish…Full steps |
| Fix 3. Stop Scanning Process | Shutdown PC by pressing the power button > Restart PC > Enter «Repairing Automatic Repair»…Full steps |
| More Fixes | Press the power button to shutdown PC > Restart PC and hold the power button for 10 seconds …Full steps |
Windows 10 Stuck at Scanning and Repairing Drive
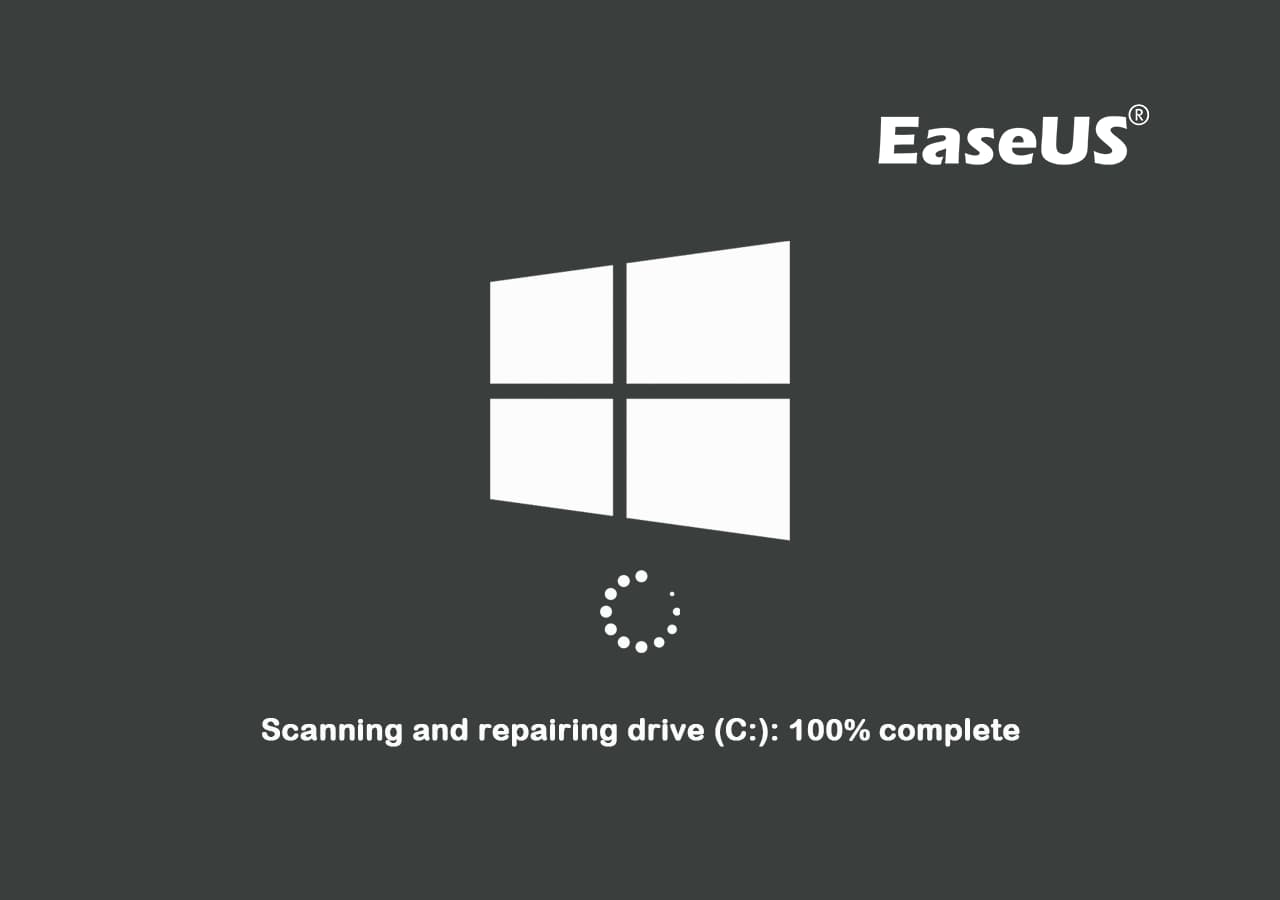
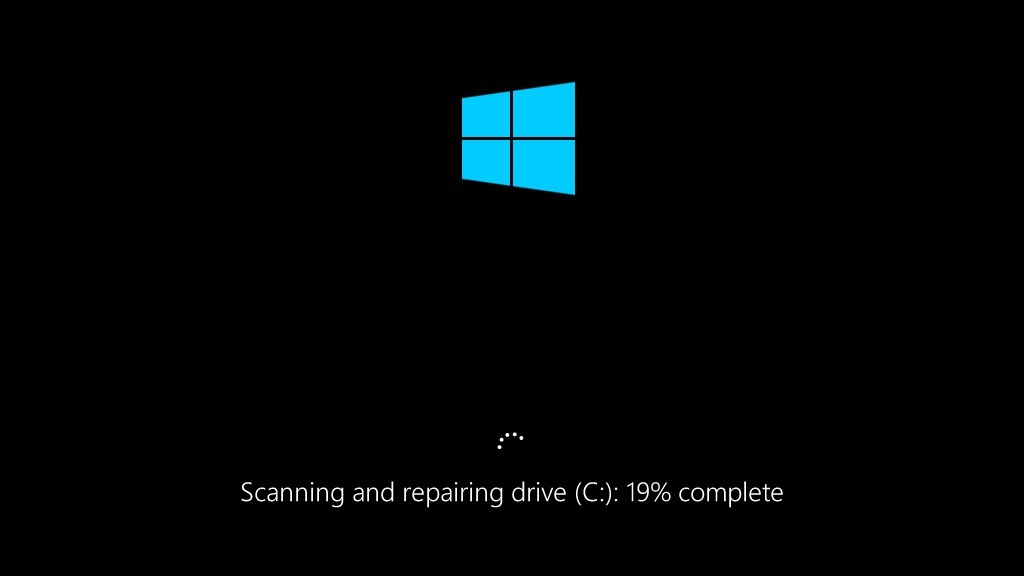
«My Lenovo running Windows 10 is stuck on boot and shows a message ‘Scanning and repairing drive (C:): 11% complete’. It has been hanging there for about half a day now! How can I exit out of scanning and repairing drive?»
Getting stuck at scanning and repairing drive is one of the biggest headaches for Windows 10 computer users. It happens when CHKDSK’s scanning and repairing hard drive seems to never finish, halting at a certain percentage value and not advancing. Generally, you might see Windows 10 get stuck at scanning and repairing the drive C: or D:. The scan will often partially complete, but then get stuck on a particular percent.
Scanning and repairing drive is a disk checking process in Windows Automatic Repair (the same as Startup Repair). When there is a boot issue on the computer, Automatic Repair will start automatically and you will see the computer screen showing Preparing Automatic Repair, Diagnosing your PC, and then Scanning and repairing drive C, D… You may also initiate the Startup Repair by yourself from the Advanced Options in the Windows Recovery Environment (WinRE). If the «Scanning and repairing drive» process gets stuck, it suggests that there is trouble reading the drive, which might result from disk connection issues or disk errors like bad sectors and file system errors.
6 Fixes for Scanning and Repairing Drive C/D Stuck at 0%, 10%, 11%…100%
This guide offers six proven methods to fix the scanning and repairing drive stuck issue and enable you to boot the computer again.
Fix 1. Check the Disk Connection
Have you moved around the PC recently or done something familiar that is likely to displace the computer disks? If you have, the cause of the «Scanning and repairing drive» stuck might be the connection issues between the disk and the computer. If possible, recheck the cable and port to ensure the disks have been connected to the PC correctly.
Fix 2. Turn to Third-Party Boot Repair Software for Help
Note that mostly, when the computer gets stuck in the scanning and repairing process, it’s highly possible that the computer is unable to load the OS file or disk information for booting up the PC. You can either choose to wait or turn to reliable boot repair software for help.
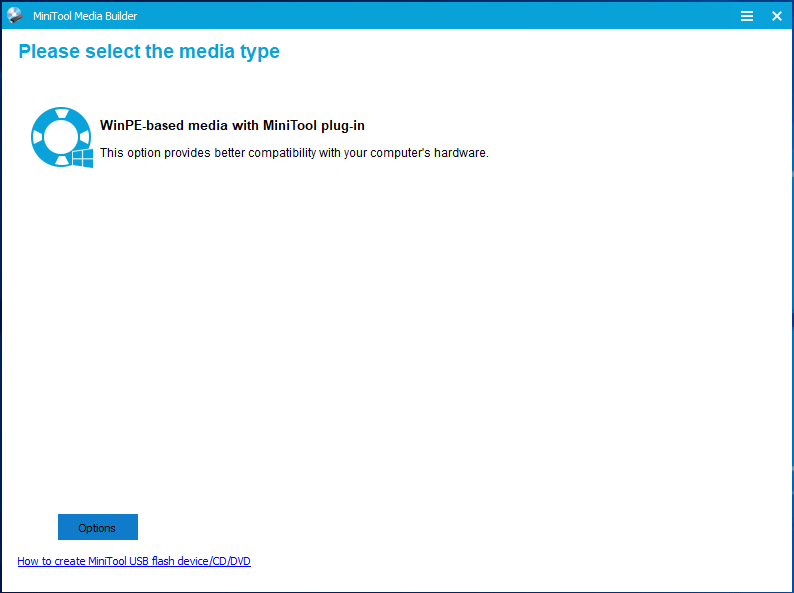
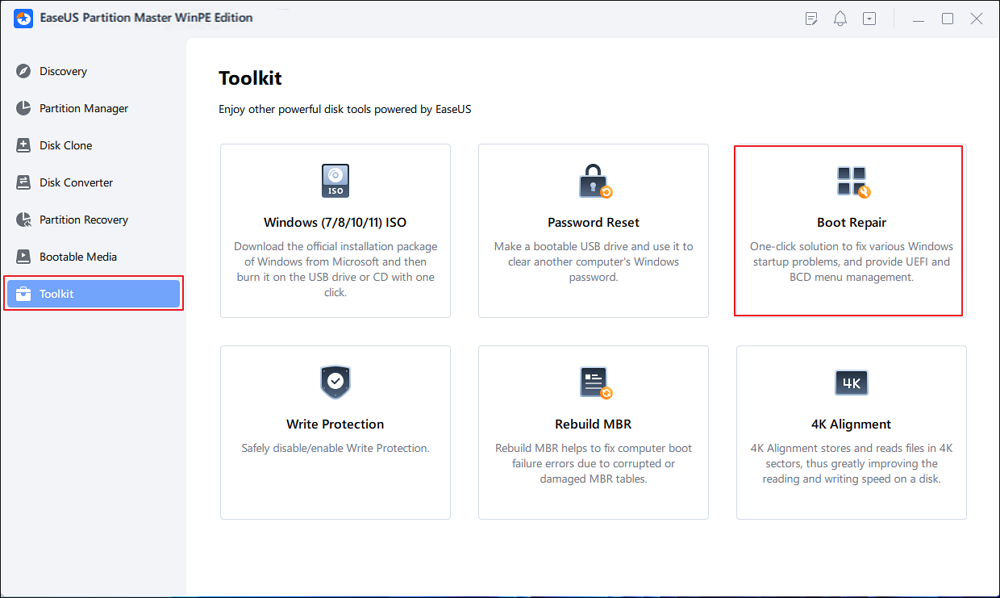
In this case, we suggest you take a second healthy computer and create a bootable media on a USB drive with the help of reliable partition manager software — EaseUS Partition Master. Its newly released feature — Boot Repair allows you to boot up your PC into the EaseUS WinPE desktop and apply the Boot Repair feature to fix all boot errors on the disk and make your system run up with no errors efficiently.
Here is how to do so:
Step 1. Start EaseUS Partition Master after connecting the external drive/USB to your computer, go to «Bootable Media,» and click «Create bootable media.»

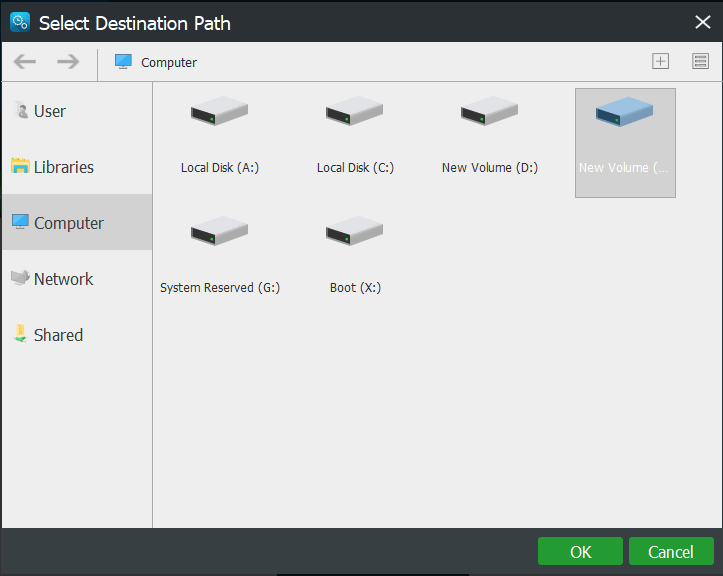
Step 2. Select an available USB Drive or CD/DVD and click «Create.» You can also burn the Windows ISO file to the storage media.

Step 3. Connect the created bootable drive to the new computer and reboot the computer by pressing and holding F2/Del to enter the BIOS. Then, set the WinPE bootable drive as the boot disk and press F10 to exit.
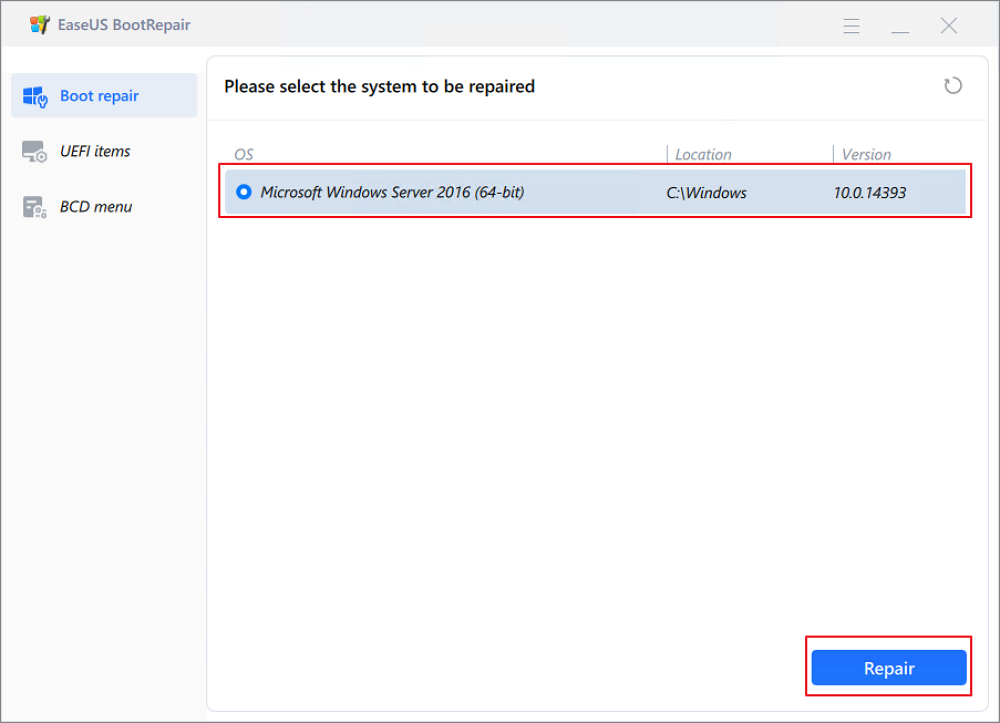
Step 4. Boot the computer again and enter the WinPE interface. Then, open EaseUS Partition Master and click «Boot Repair» under the «Toolkit» option.
Step 5: Select the system you want to repair and click «Repair.»
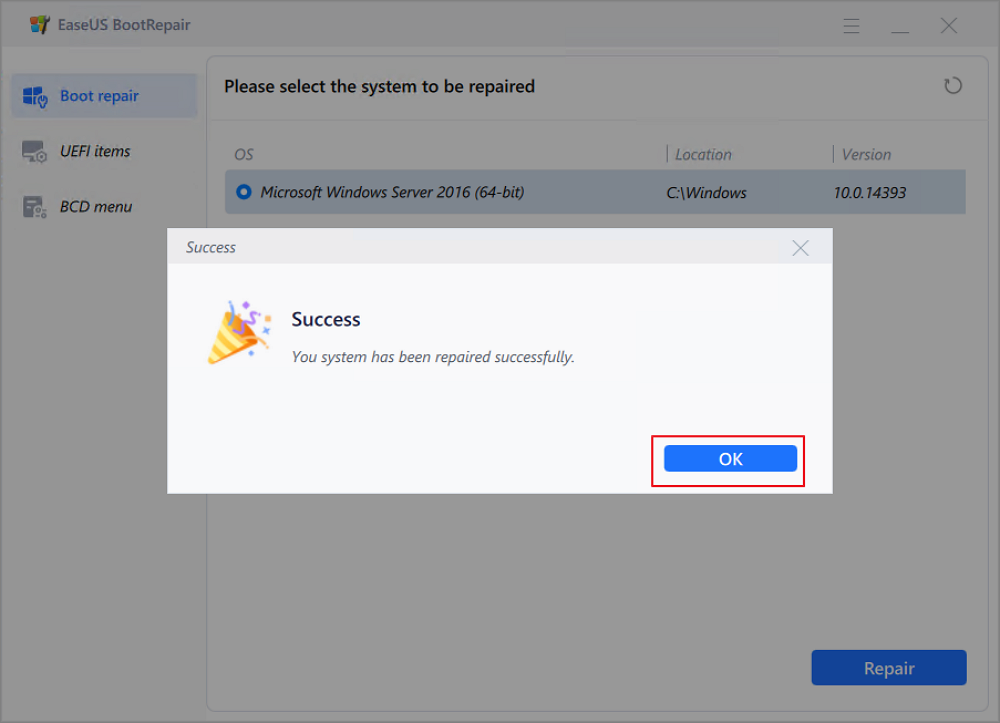
Step 6. Wait a moment, and you will receive an alert that the system has been successfully repaired. Click «OK» to complete the boot repair process.
⭐Professional Advice
Here, we can offer comprehensive information and professional advice if you have additional queries:
EaseUS experts are available to provide you with 1-on-1 manual services (24*7) and help fix Windows boot error, BSOD or computer boot loop issues. Our experts will offer you FREE evaluation services and efficiently diagnose and resolve system boot failure, Windows stop codes and OS lagging issues using their decades of experiences.
- 1. Fix BSOD — blue/black screen of death error due to Windows update or other reasons.
- 2. Get rid of Windows boot error such as no bootable device found, or BCD file corruption.
- 3. Serve to fix 0X000_error codes on Windows system or OS boot loop issues.
Fix 3. Wait for the Scanning and Repairing Process to Finish
How long should scanning and repairing drive take? That depends. If there is a minor issue on the drive, that process won’t take long. However, if the drive is in a bad condition, it may take hours for the «Scanning and repairing drive» process to complete. There are tested and proven cases that indicate being patient and waiting is a workable solution.
Fix 4. Stop Windows from Scanning and Repairing the Drive
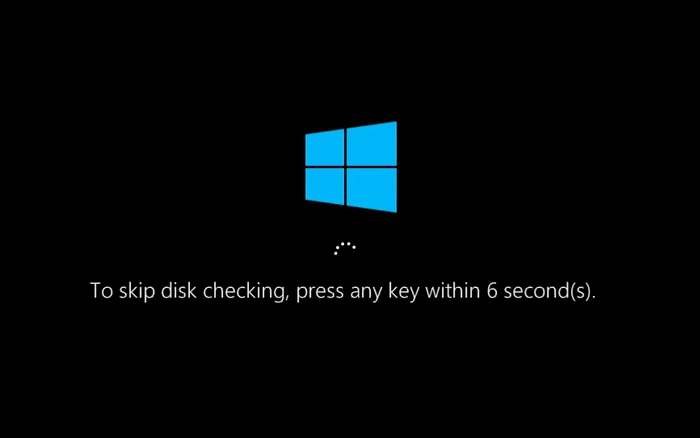
As you may know, you can disable the automatic disk checking process in the Automatic Repair. During Windows startup, you will have the chance to bypass «Scanning and repairing drive» by pressing any key. Here are the detailed steps.
Step 1. Since you are now being stuck at «Scanning and repairing drive», you need to press the power button to shut down the computer.
Step 2. Start the computer and you will see the «Preparing Automatic Repair» screen and then «Diagnosing your PC».
Step 3. Before the disk checking starts, you need to press any key, e.g. the spacebar, continuously, and then you will get the chance to disable the disk checking. (You can also press «Ctrl + C» to have a try.)
If you stuck on the «Diagnosing Your PC», refer to the following article and fix it.
Fix 5. Disable Automatic Repair
Automatic Repair doesn’t always work. It is known to cause troubles like Windows stuck at «Preparing Automatic Repair», Automatic Repair loop, and the one in the discussion, «Scanning and repairing drive» stuck. Therefore, you can disable Automatic Repair to avoid these problems. To get it done, you will need to enter the Windows Recovery Environment or the Windows installation media. Given that most users don’t have the Windows installation media available, here I’d like to show you how to get things done in WinRE.
Step 1. Hold down the power button for 10s to shut down the computer.
Step 2. Press the power button to start the computer. Once you see the first sign of Windows has started, e.g. the logo of the manufacturer, hold down the power button for 10s again to turn off the device.
Step 3. Press the power button to start the computer. Once Windows restarts, hold down the power button for 10s to turn off the computer.
Step 4. Press the power button to start the computer and don’t interrupt it this time. Then you will see your computer in WinRE.
Step 5. On the «Choose an option» screen, choose «Troubleshoot» > «Advanced options» > «Command Prompt».
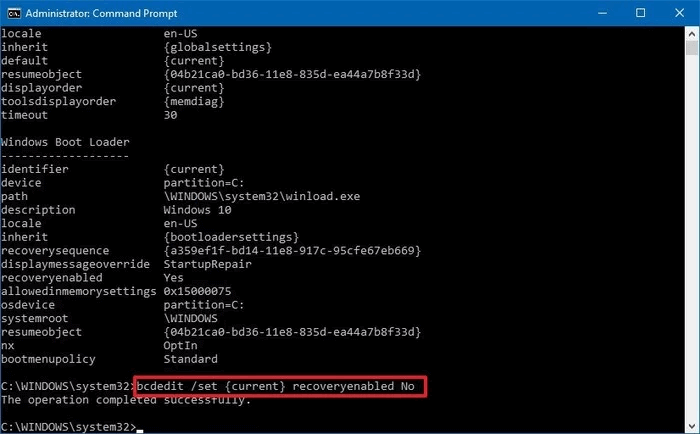
Step 6. Enter bcdedit and remember the values of «identifier» and «recoveryenabled» under Windows Boot Loader, Generally, it’s «{current}» and «Yes».
Step 7. To disable Automatic Repair, enter bcdedit /set {current} recoveryenabled no. («{current}» indicates the current OS and change the value to «no» will abort Automatic Repair.)
Step 8. Restart the computer.
Fix 6. Enter Safe Mode and Run CHKDSK
Since the cause of «Scanning and repairing drive» stuck is highly likely to be disk errors like bad sectors and file system errors, you can choose to enter Safe Mode and run CHKDSK to fix the errors. Safe Mode starts the computer with minimal required services and drivers and thus is a diagnostic mode in which you can perform fixes.
Step 1. Hold down the power button for 10s to shut down the computer.
Step 2. Press the power button to start the computer. Once you see the first sign of Windows has started, e.g. the logo of the manufacturer, hold down the power button for 10s again to turn off the device.
Step 3. Press the power button to start the computer. Once Windows restarts, hold down the power button for 10s to turn off the computer.
Step 4. Press the power button to start the computer and don’t interrupt it this time. Then you will see your computer in WinRE.
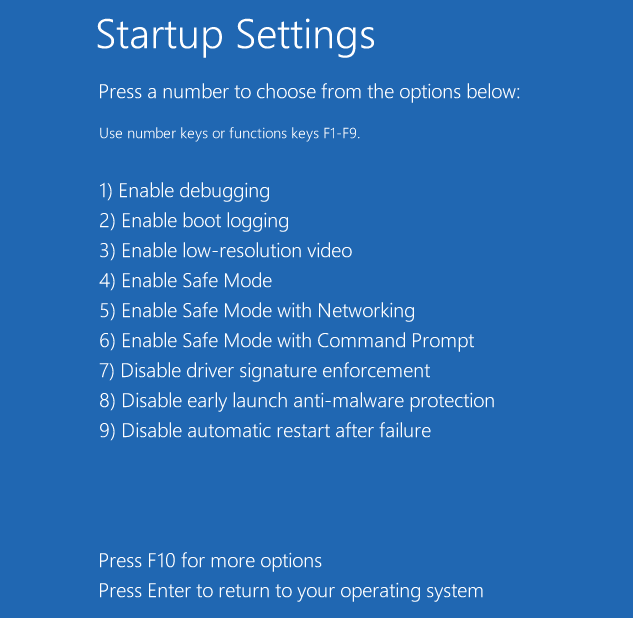
Step 5. On the «Choose an option» screen, choose «Troubleshoot» > «Advanced options» > «Startup Settings» > «Restart».
Step 6. After the restart, you will see a list of options as shown in the image below. Select «5» or press «F5» to enable Safe Mode with Networking.
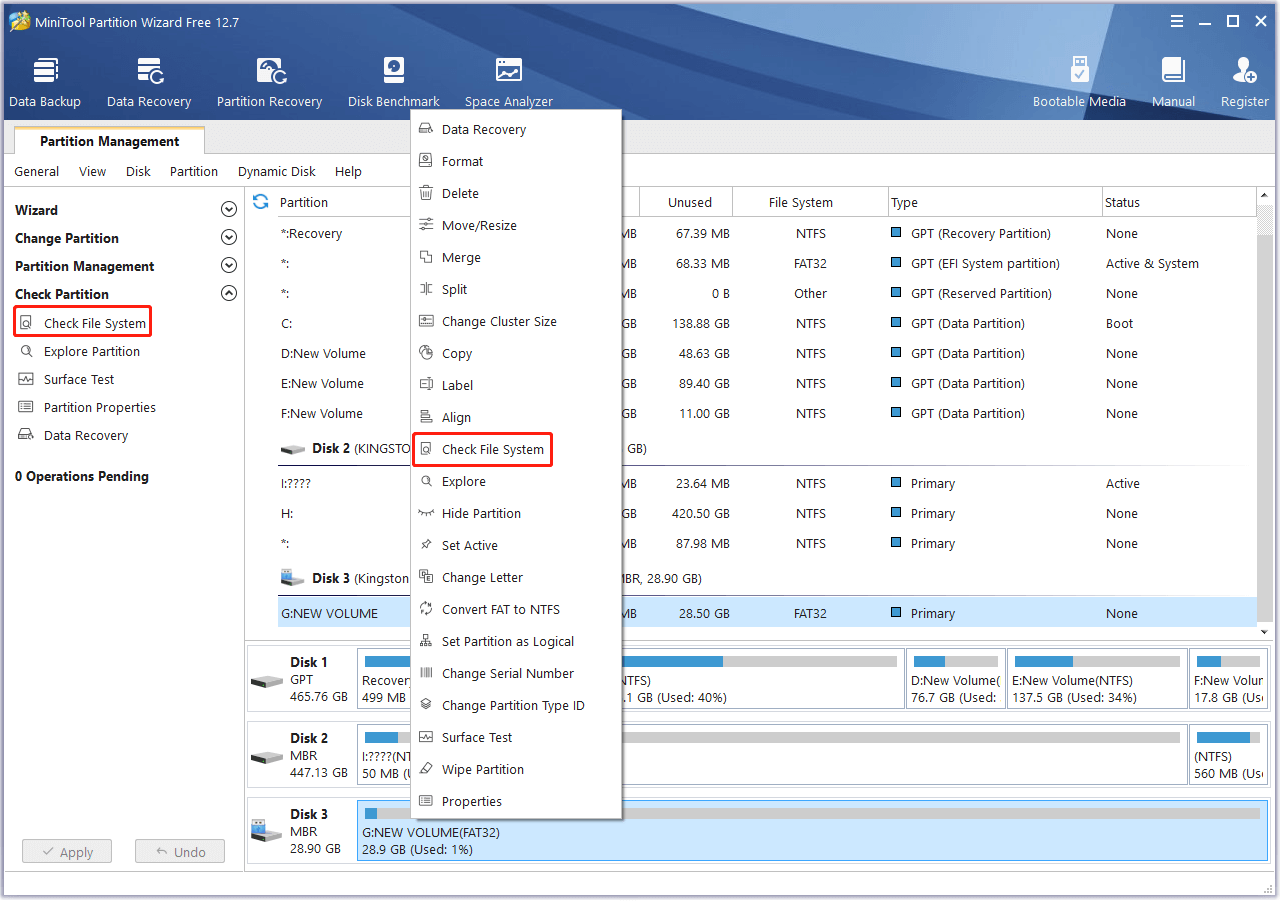
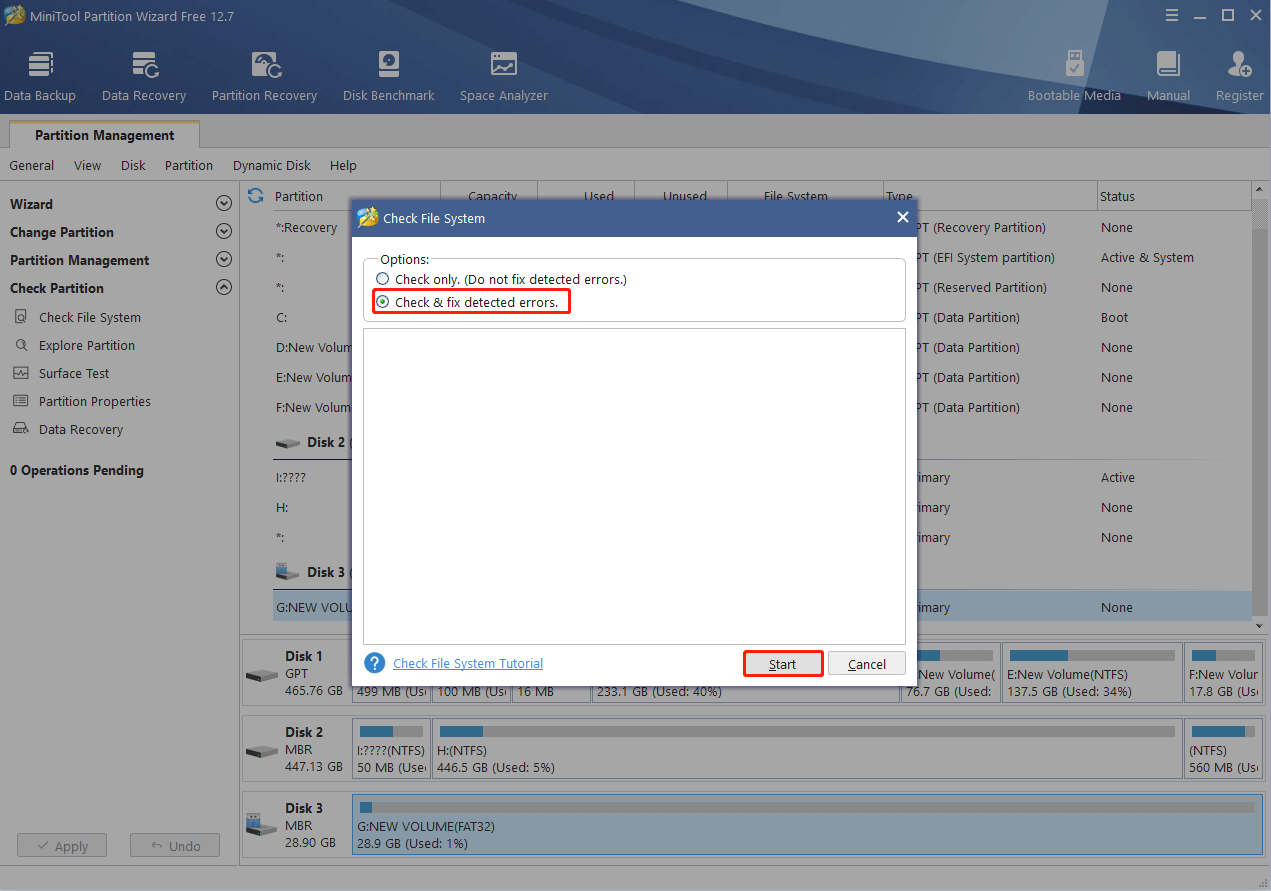
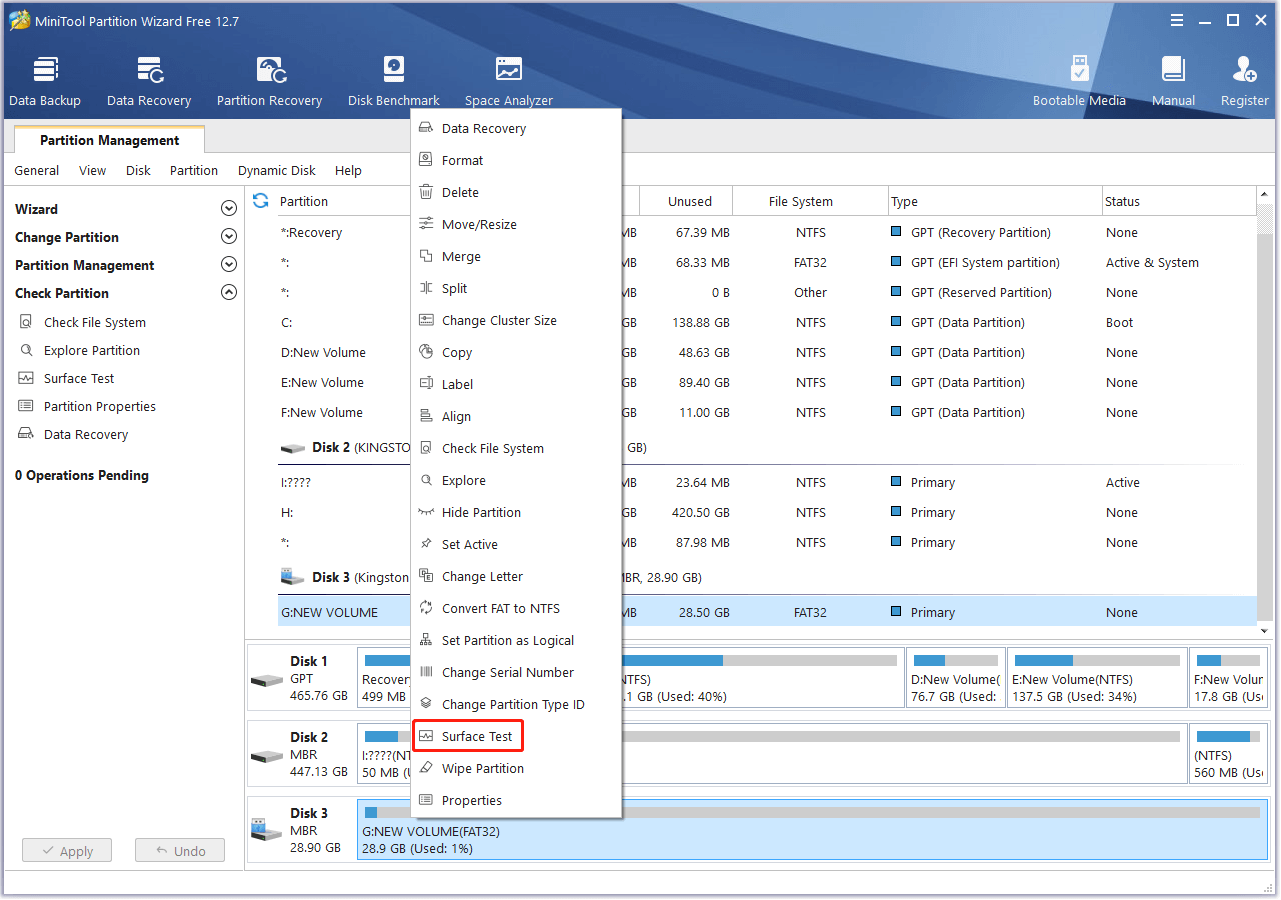
Step 7. Open «This PC», right-click the drive that Windows is stuck at scanning and repairing, then choose «Properties».
Step 8. Go to the «Tools» tab and choose «Check». (This works the same as running CHKDSK in Command Prompt.)
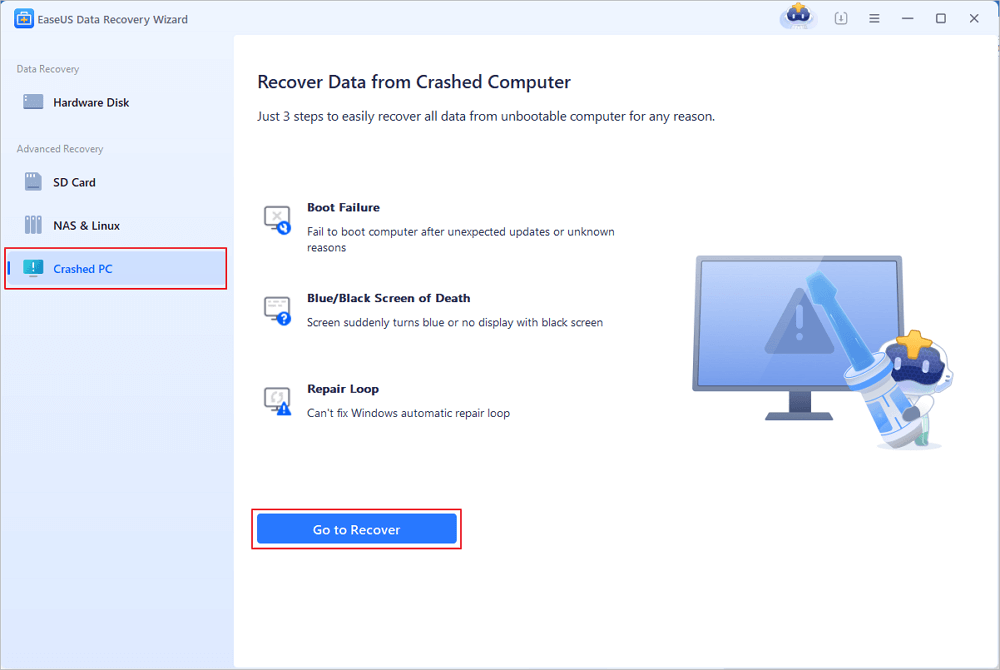
Fix 7. Recover Data
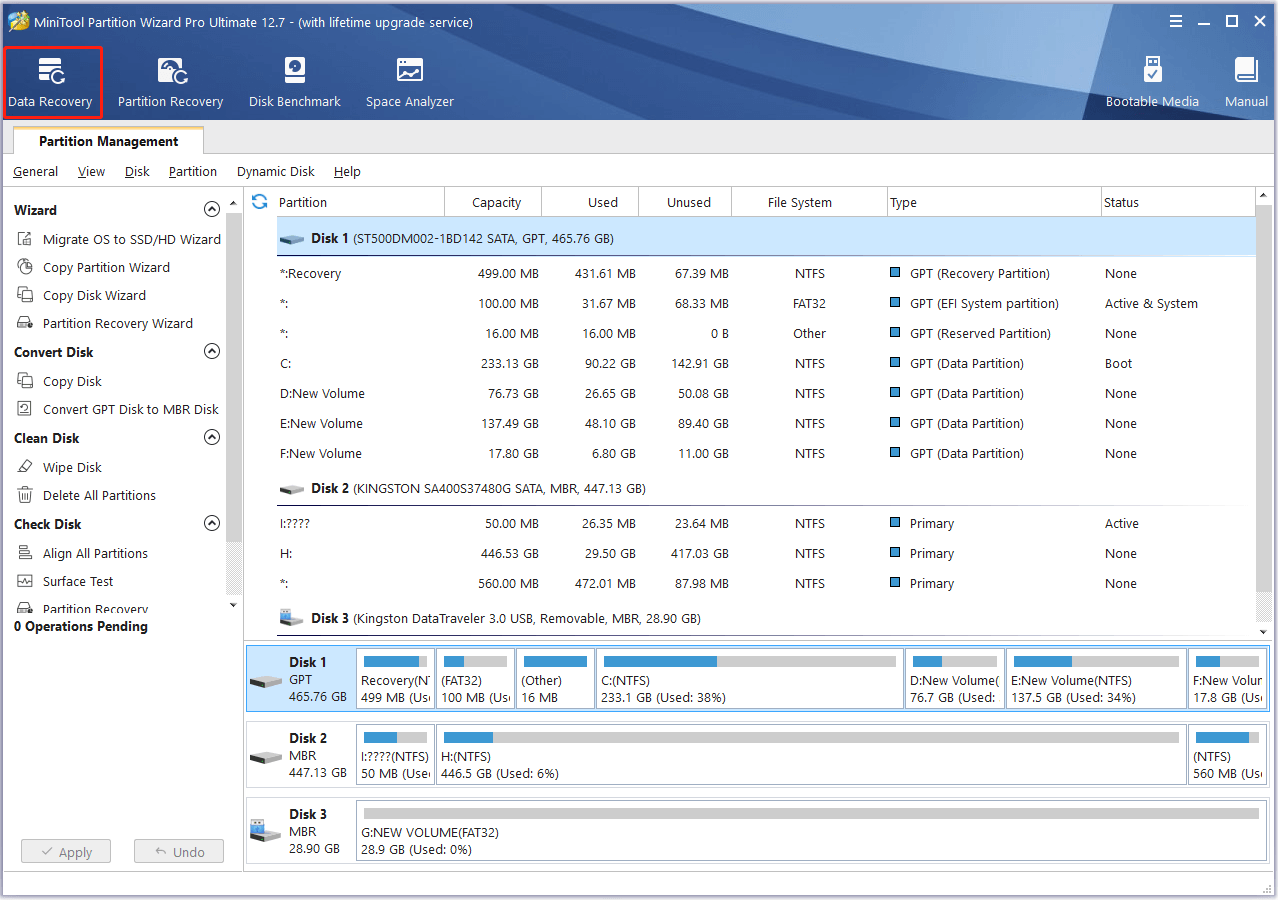
In most cases, one of the solutions above will fix the «Scanning and repairing drive C, D…» stuck issue in Windows 10. But there may be exceptions that the C drive (the system drive) is severely damaged and you can’t boot into Windows even after you try all the fixes. In such a situation, you will need bootable data recovery software like EaseUS Data Recovery Wizard with Bootable Media to rescue all the files from the non-working PC and then reinstall Windows.
To create a bootable USB or CD/DVD:
Step 1. Create a bootable disk
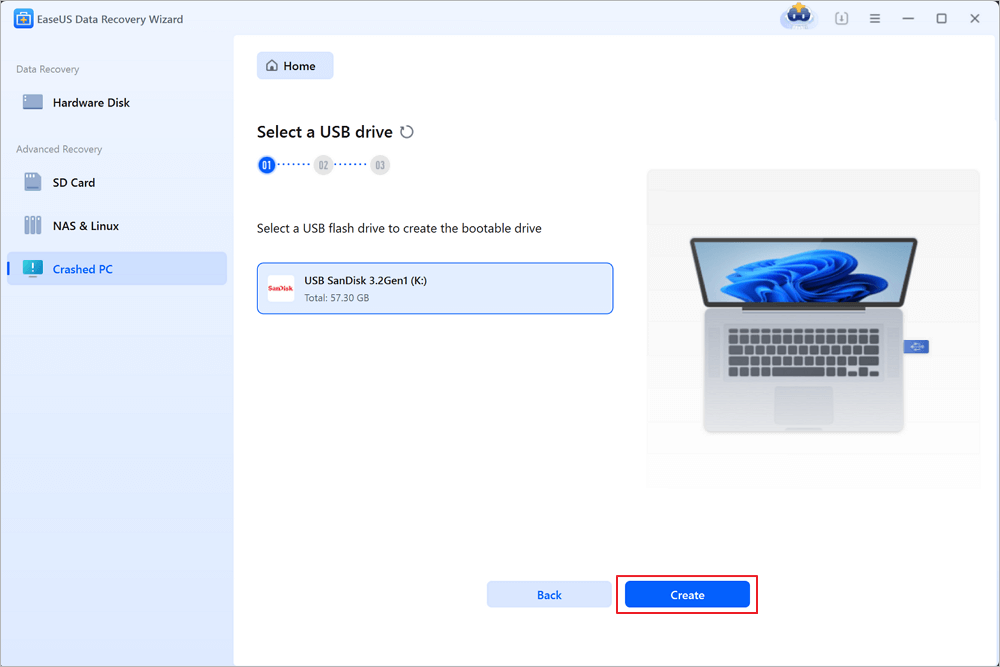
Launch EaseUS Data Recovery Wizard, choose «Crashed PC» and click «Go to Recover».
Select an empty USB to create the bootable drive and click «Create».
⚠️Warning: When you create a bootable disk, EaseUS Data Recovery Wizard will erase all data saved in the USB drive. Back up important data beforehand.
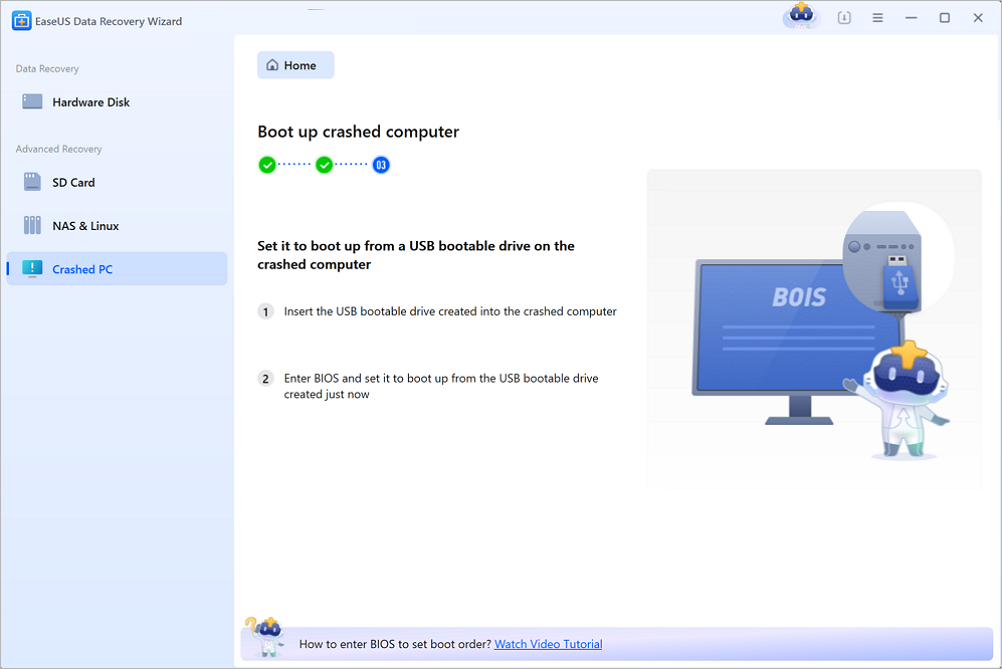
Step 2. Boot your computer from the bootable USB
Connect the bootable disk to the PC that won’t boot and change your computer boot sequence in BIOS. For most users, it works well when they restart their computer and press F2 simultaneously to enter BIOS.
Set to boot the PC from «Removable Devices» (bootable USB disk) beyond Hard Drive. Press «F10» to save and exit.
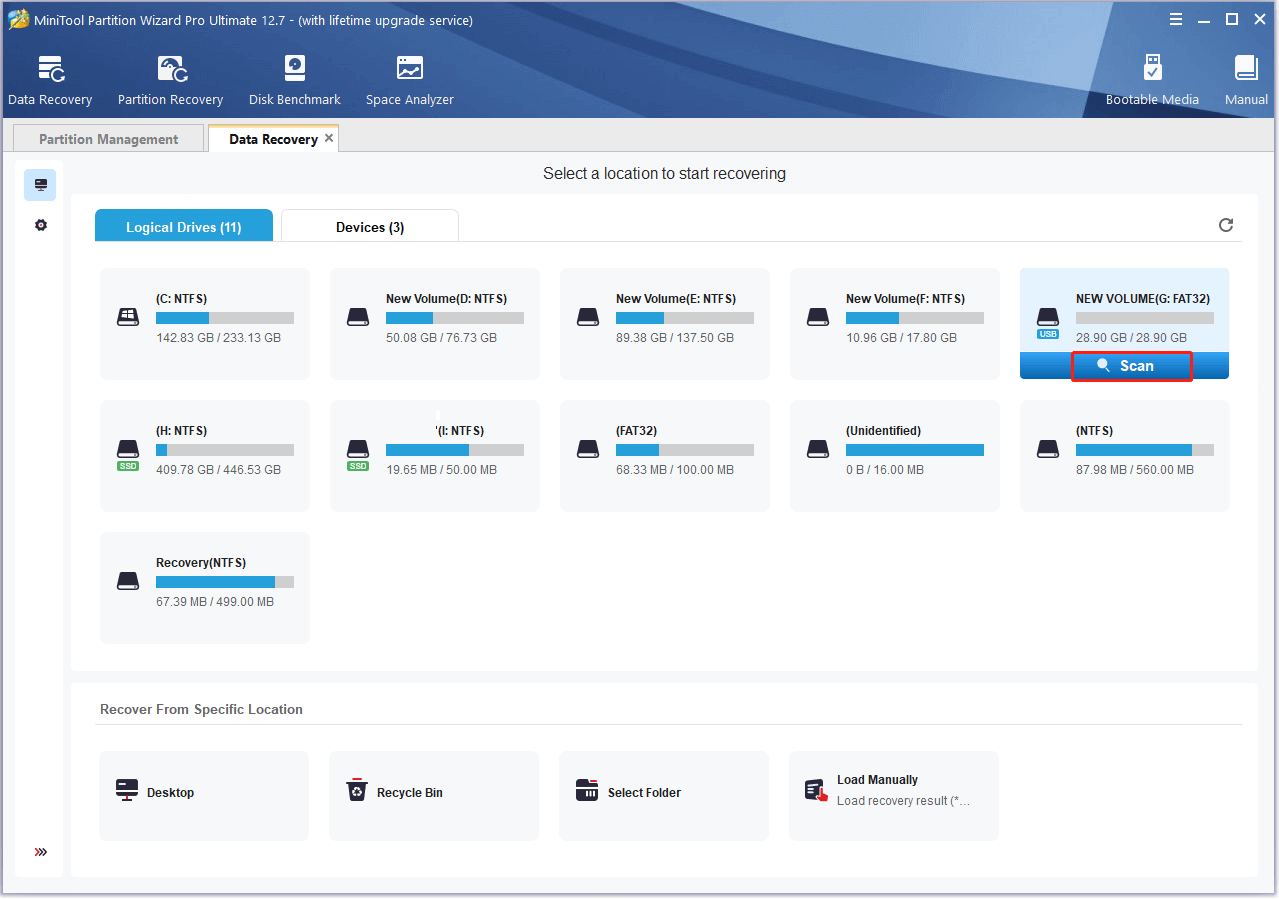
Step 3. Recover data from a crashed system/PC
After booting from EaseUS Data Recovery Wizard bootable disk, select the drive you want to scan to find all your lost files. Preview and recover the files you need to a safe location.
💡Tip: You can restore data on the local disks, external hard drives, and also the cloud storage.

Step 4. Reinstall Windows.
Whenever you encounter a boot issue, you can apply the bootable data recovery software to perform data recovery. However, reinstalling Windows is the last resort to solve the scanning and repairing drive stuck. You can also send the PC for manual repair if possible.
Extra Tip: How to Enable Disk Checking or Automatic Repair
You may want to enable disk checking or Automatic Repair when the computer can boot properly considering the feature might help to solve some boot related issues.
To enable disk checking:
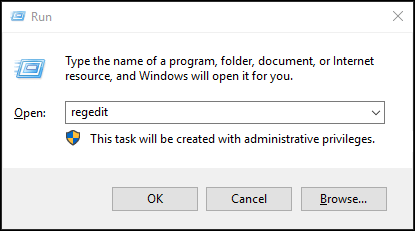
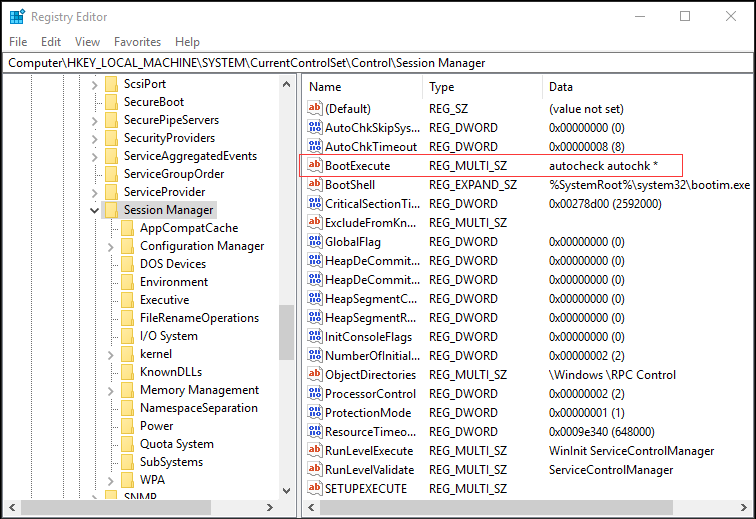
Step 1. Press «Windows + R» and enter regedit.
Step 2. Click «Yes» to allow the app to make changes.
Step 3. Go to HKEY_LOCAL_MACHINE\SYSTEM\CurrentControlSet\Control\Session Manager.
Step 4. Find and double-click «BootExecute».
Step 5. Change the value from autocheck autochk * to autocheck autochk * /r\DosDevice\C: to enable disk checking.
To enable Automatic Repair:
If you have followed fix 4 to disable the feature, it’ll be easy for you to enable it again.
Step 1. Type cmd in the search bar, right-click «Command Prompt» and choose «Run as administrator».
Step 2. Enter bcdedit and remember the values of «identifier» and «recoveryenabled» under Windows Boot Loader, Generally, it’s «{current}» and «No».
Step 3. Enter bcdedit /set {current} recoveryenabled yes to turn on Automatic Repair in Windows.
The Bottom Line
«Scanning and repairing drive C» stuck always suggests disk issues. The solutions are clear: either fix the disk errors or let Windows skip them. Specify your situation and carry out the solution best suited to your needs. Hope one of the methods above could be useful to remove the «Scanning and repairing drive» stuck issue.
Next are some other questions related to scanning and repairing drive stuck. Check the answers if you’re interested.
1. How long should scanning and repairing drive take?
If your computer is in the process of scanning and repairing a hard drive, that process will take in excess of 2 hours depending on the size of your drive and errors found. It typically stops updating around 10 or 11% and suddenly jumps to 100 when done.
2. Can I stop scanning and repairing the drive?
You can disable the automatic disk checking process in Automatic Repair.
Step 1. Press the power button to shut down the computer.
Step 2. Start the computer and you will see the «Preparing Automatic Repair» screen and then «Diagnosing your PC».
Step 3. Before the disk checking starts, you need to press any key to disable the disk checking.
3. What does scanning and repairing drive mean?
Scanning and repairing drive is a disk checking process in Windows Automatic Repair. When there is a boot issue on the computer, Automatic Repair will start automatically and you will see the computer screen showing Preparing Automatic Repair, Diagnosing your PC, and then Scanning and repairing drive C, D…
Some Windows 10 users recently have reported that Windows was scanning and repairing drive on booting, and the process stuck for minutes or even hours. And some users have reported that every time they power on PC, they get this message. If you also get this error on your Windows 10, don’t worry. You can fix it with the methods in this post, as they have helped other users with this problem.
Why Windows is scanning and repairing drive on booting?
If your computer didn’t turn off properly without warning (the reason could be a power failure, a forced shutdown, etc.), when you start the machine next time, you probably get this message.
When Windows is running, the hard disk and the RAM (Random Access Memory) are writing and reading data. Computer shutting down unexpectedly can cause you to loose the data stored in RAM. It even can cause the hard disk damage. So when you boot your computer next time, Windows will scan the drive automatically and try to repair the issues that might occur due to computer shutting down suddenly.
IMPORTANT: It’s always recommended not to force to turn off the computer when it’s being used, as this may cause you to loose the data whatever you’re working on.
How you can stop Windows scanning and repairing drive?
The scanning and repairing process can take a long time. You may see it stuck there longer than you expect. If you don’t need to use Windows urgently, you can wait until the process is done. If you don’t have the patience or time to wait so long, you can bypass the auto-scanning and use other methods to scan and repair the drive manually. And if you get this message during every startup, it’s recommended you follow the instructions too.
There are four methods to get rid of this annoying process. Two methods work on Windows 10 Normal Mode, and two methods work when you can’t boot into Windows successfully. You can choose the method depending on your case.
Methods apply to Normal Mode:
Method 1: Use Windows Error checking tool
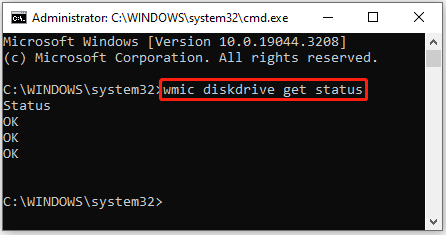
Method 2: Check the drive status
Methods work when Windows doesn’t boot successfully:
Method 3: Run CHKDSK command in Safe Mode
Method 4: Run Repair-Volume -DriveLetter command in Safe Mode
Method 1: Use Windows Error checking tool
You can use the Windows Error checking tool in drive Properties to scan and repair the drive issues.
Follow these steps:
1) Click the File Explore at the task bar.
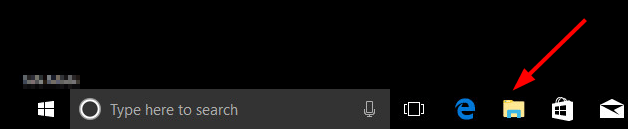
2) Click This PC then expand Devices and drives.

3) Right-click the drive that Windows is scanning and repairing. You can tell it from the scanning screen. For example, if you see “Scanning and repairing drive (C:)” on the screen, right-click (C): drive then click Properties.
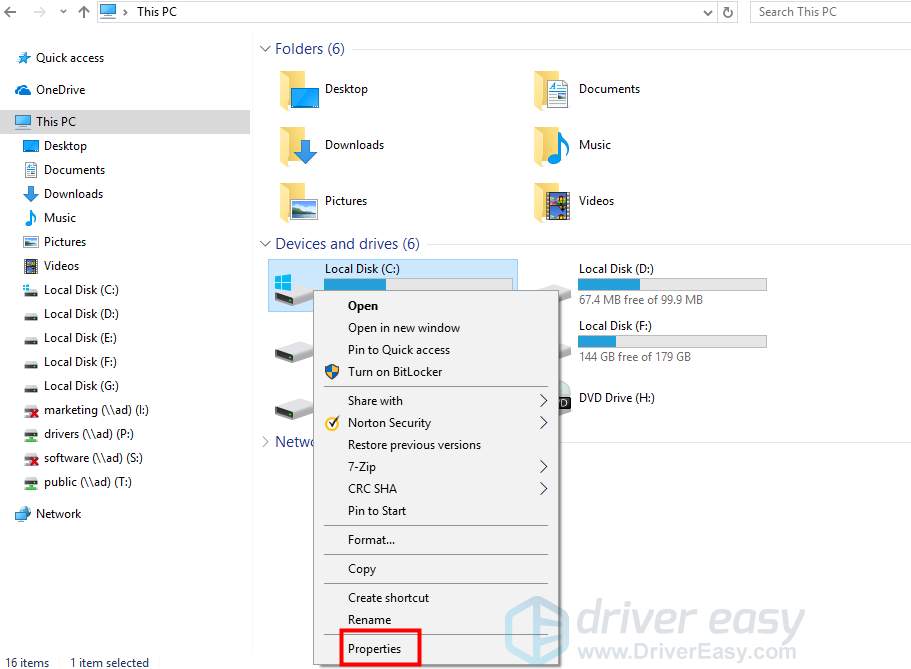
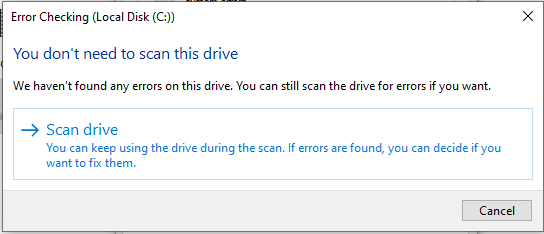
4) Go to Tools tab and click the Check button under Error checking.
5)
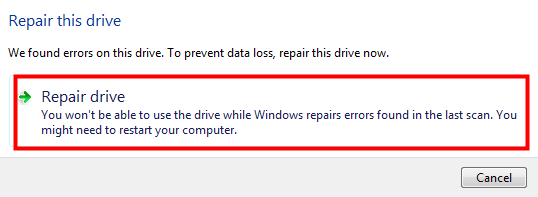
If Windows found errors on this drive, you’ll see the following screen pop up. Click Repair drive to scan the drive.
If no errors are found, the following screen prompts. Click Scan drive anyway. Then Windows will scan and repair the drive.

6) Reboot your PC and check to see if the issue is resolved.
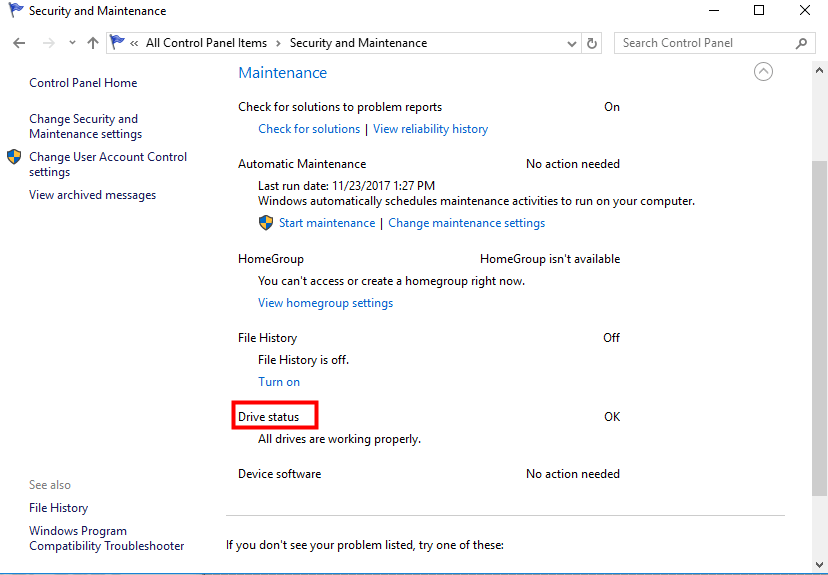
Method 2: Check the drive status
If there are problems with the drive, Windows will detect it and allows you to scan and repair it. You can fix the issue by checking the drive status. To do so:
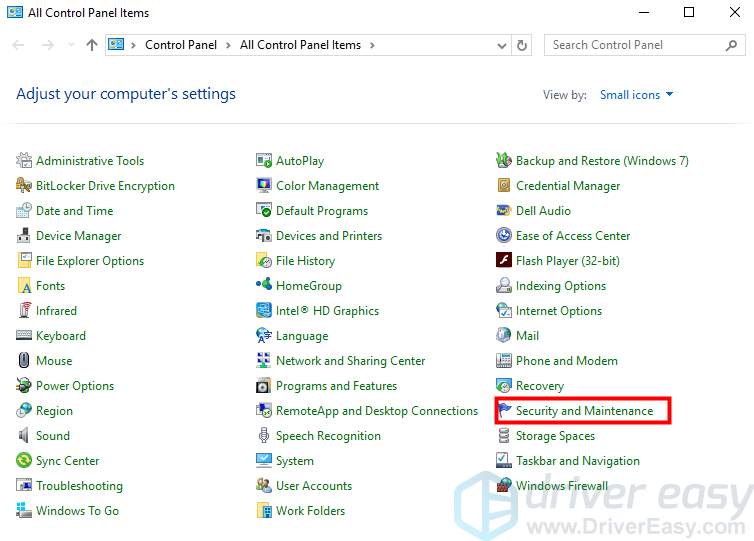
1) Open Control Panel.
2) View by Small icons, click Security and Maintenance.
3) Click Maintenance.
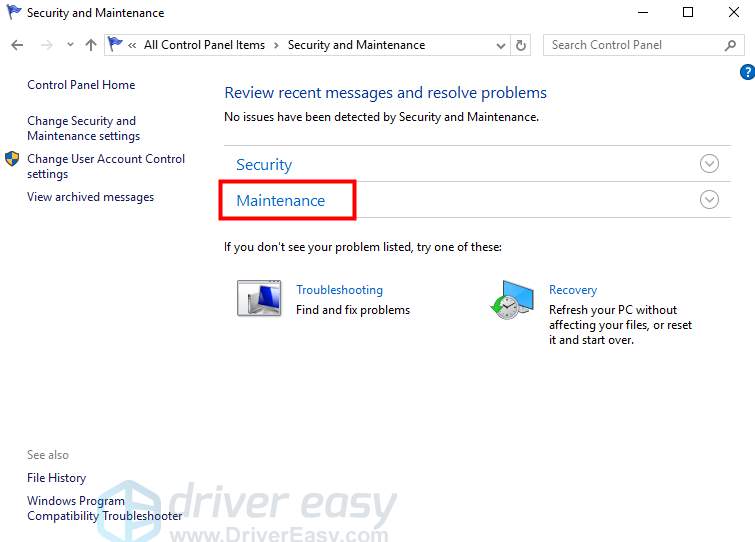
4) Under Drive status, you may see issues listed here and a link that allows you to click to repair the drive. Click the link.
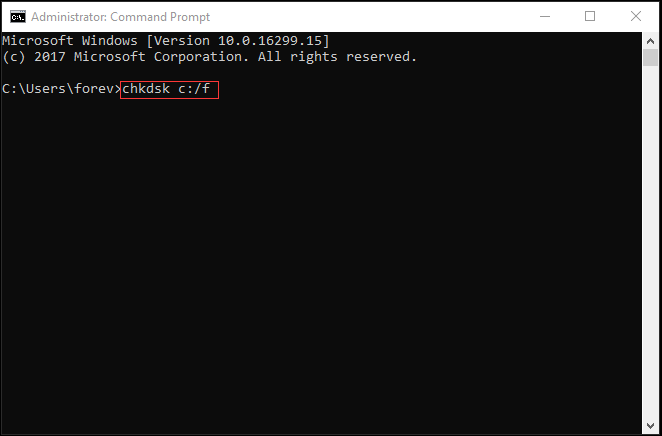
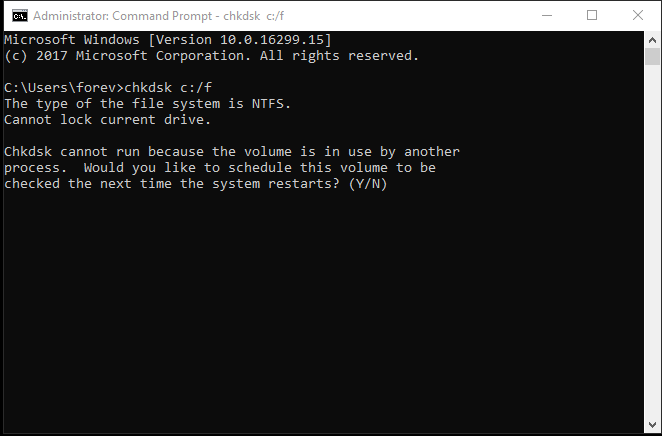
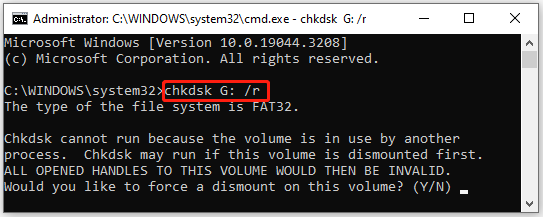
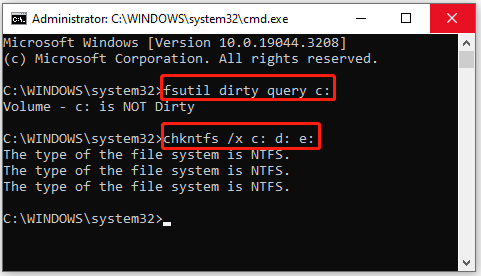
Method 3: Run CHKDSK command in Safe Mode
CHKDSK is a useful command that you can use to check the drive for system file errors and fix the errors. If you can’t boot into Windows successfully, use this command in Safe Mode.
Follow steps below:
1) Start Windows 10 in Safe Mode.
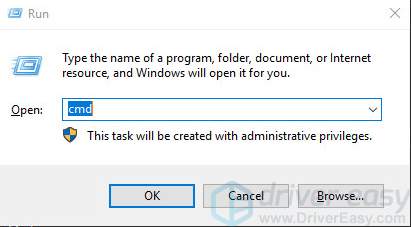
2) On your keyboard, type Windows logo key and R key at the same time to invoke the run command.
3) Type cmd and press Shift+Ctrl+Enter to open command prompt in administrator mode. (Do not click OK or just press Enter key as that won’t allow you to open command prompt in administrator mode.)
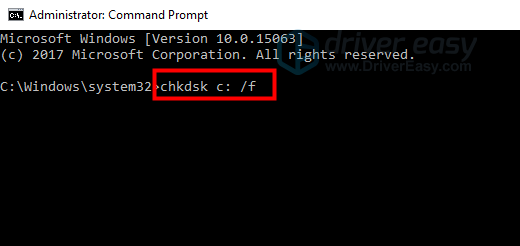
4) Type the following command line and press Enter key on your keyboard.
Note: The letter x means the drive that you want to scan and repair for. If you want to scan and repair C:, replace x with c.
chkdsk x: /f
Screenshot for your reference:
5) After the scanning and repairing process is done, restart your PC and check too see if the problem is resolved.
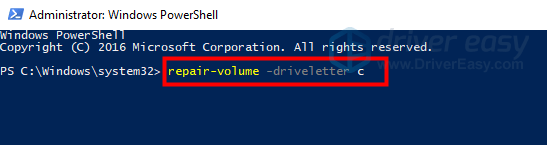
Method 4: Run Repair-Volume -DriveLetter command in Safe Mode
This method is to use PowerShell to run command Repair-Volume -DriveLetter to scan and fix the hard disk errors. Follow steps below:
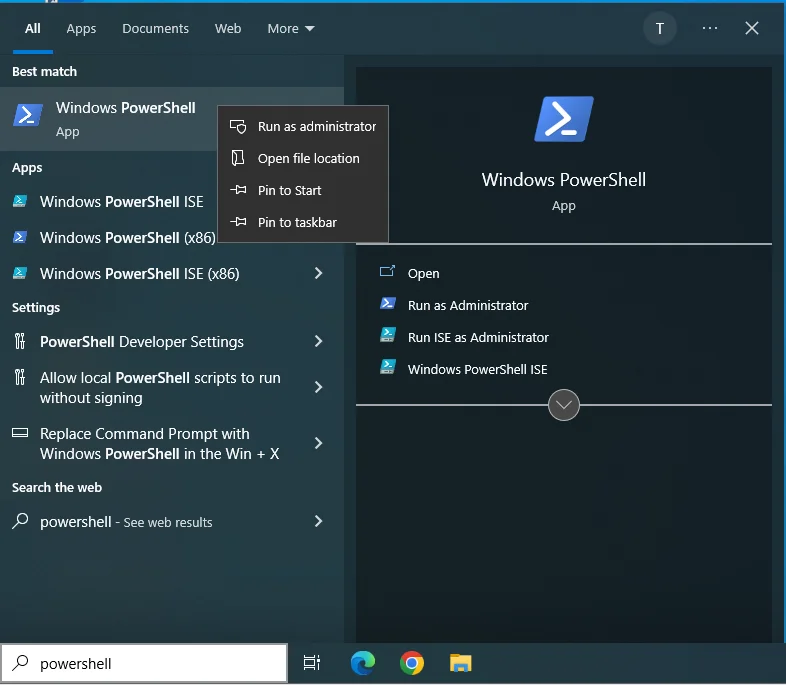
1) Start Windows 10 in Safe Mode.
2) Type powershell in the search box to bring up the menu. Right-click Windows PowerShell and click Run as administrator to open PowerShell in administrator mode.
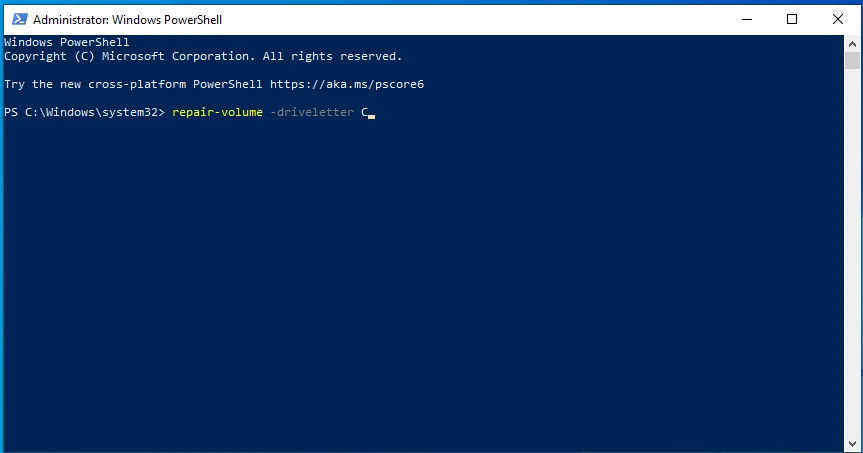
3) Type the following command line and press Enter key on your keyboard.
Note: The letter x means the drive that you wish to scan and repair for. If you’re intend to repair C: drive, replace it with c.
repair-volume -driveletter x
Screenshot for your reference:
4) After the process completes, restart your PC and check to see if the problem is resolved.
How to recover your data
If your files are missing or corrupted due to this issue, you can use a recovery software to recover the data easily. It’s recommended you find a program with good reputation. If you don’t know such software yet, you can use Stellar Phoenix Windows Data Recovery so you don’t need to spend further time on searching.
Stellar Phoenix Windows Data Recovery is a known data recovery software around the world. With the friendly user interface, you can use it to recover any deleted, lost and corrupted data of your drive with just a few clicks.
Hopefully the methods in this post help you fix the problem. If you have any questions, please comment below. We’re happy to hear of any suggestions and ideas.
References:
RAM definition in Wikipedia
Table of contents
- Why is Windows Scanning And Repairing Drive on Booting?
- How to Stop Windows From Scanning And Repairing the Drive?
- Method 1: Using the Windows error checking tool
- Method 2: Checking drive status
- Method 3: Running a CHKDSK scan in safe mode
- Method 4: Running the Repair-Volume-DriveLetter command in safe mode
- How to Avoid “Scanning and Repairing Drive” Issue in the Future
- Conclusion
- FAQ
Among the most frequently reported Windows 10 errors is the error message that appears on startup and says, “Scanning and repairing drive.”
Sometimes, the error message gets stuck on the screen, preventing your PC from booting properly.
Some users have even reported getting this error message every time they turn on their PC. Naturally, this can get quite annoying — but the problem is easily fixed.
From this article, find out why Windows is scanning and repairing your drive on booting and how to stop Windows from scanning and repairing the drive.
Why is Windows Scanning And Repairing Drive on Booting?
You will typically get the “Scanning and repairing drive” message when your computer hasn’t been properly switched off: due to a forced shutdown, a power failure, etc.
Why does it happen? When you work on your PC, your hard disk and RAM write and read data.
If your computer shuts down unexpectedly, you may lose some of the data stored in RAM — in the worst-case scenario, this can even lead to hard disk damage.
Thus, when you turn on your computer after an “improper” shutdown, Windows automatically scans your driver, trying to fix the issues that occurred during the shutdown.
Finally, we remind you that if you have a habit of performing forced shutdowns, it’s better to stop this practice to avoid potential startup errors—like the one described here.
Also Read: Where and How to See the Shutdown and Startup Log in Windows 11 and 10?
How to Stop Windows From Scanning And Repairing the Drive?
If you see the Windows scanning and repairing process is stuck, or if you simply don’t have the time to wait for it to complete, you can bypass the automatic scanning and, instead, repair the drive manually, if needed.
If you are working in Windows Normal Mode, you can try using the Windows Error checking tool or checking the status of your drive.
On the other hand, if you can’t boot Windows, you can try running a CHKDSK scan in Safe Mode or using the Repair-Volume -DriveLetter command in Safe Mode.
Let’s go over the four error-fixing methods in more detail.
Method 1: Using the Windows error checking tool
One of the first things you can try is using the Windows Error Checking tool to scan for and repair any potential issues. Here’s how to do that:
- In the Taskbar, select File Explorer.
- Go to This PC and expand Devices and drives.
- Right-click on the drive you saw in the Windows scan and repair message and select Properties.
- Go to Tools and, under Error checking, select Check.
- If errors are revealed during the scanning process, a new window will pop up suggesting you repair the drive. Click Repair.
- If no errors have been found, you will still have the option to scan and repair the drive — in the new window, choose Scan drive.
- Finally, restart your PC and check if the problem has been resolved.
If this method hasn’t worked, you can try checking the status of your drive.
PRO TIP
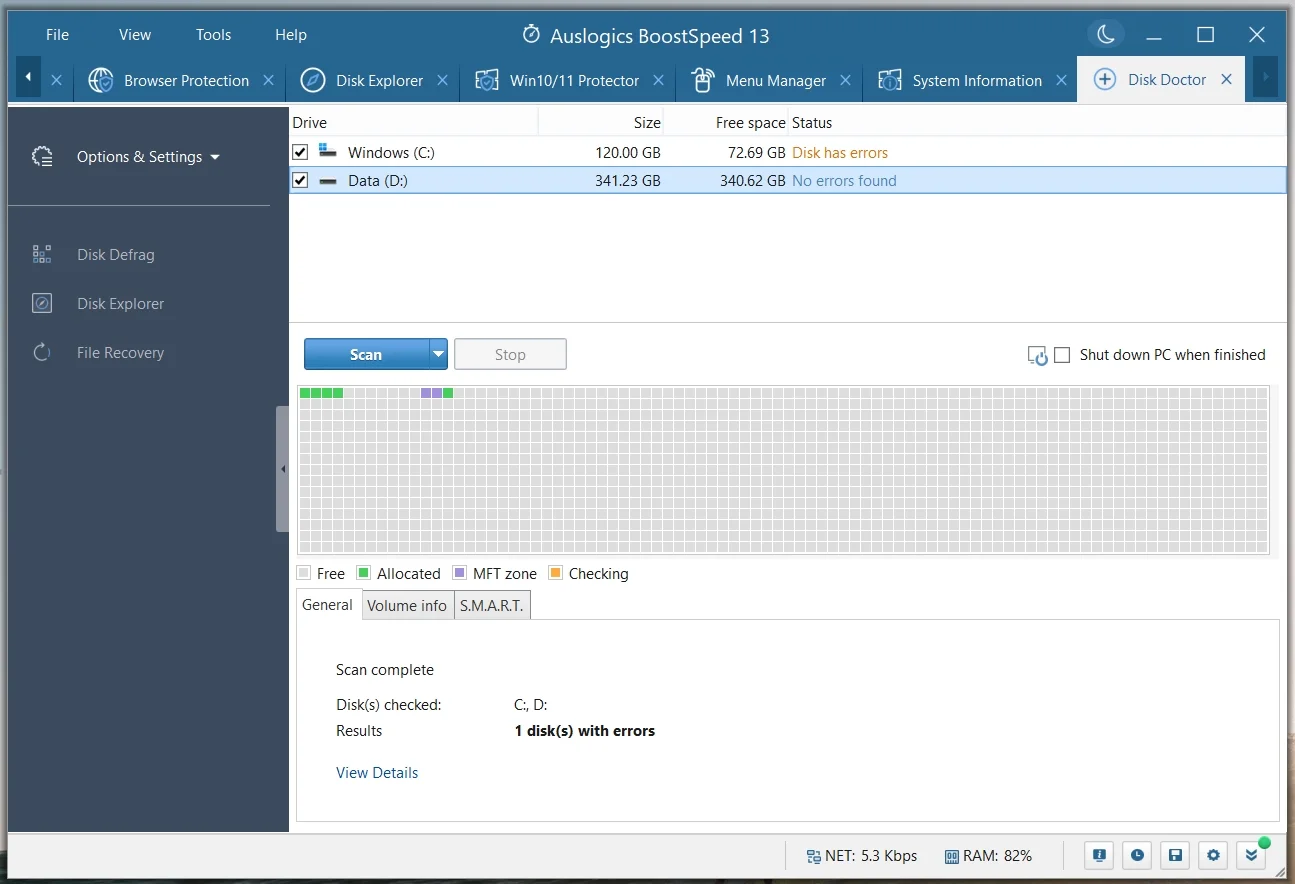
For a more comprehensive system cleanup and optimization, try Auslogics BoostSpeed. It can help resolve disk errors and enhance your PC’s performance. Ensure your system runs smoothly and efficiently with Auslogics BoostSpeed!
Method 2: Checking drive status
You can see if there are any problems with the drive and if it needs repairing by checking its status. Here’s what to do:
- First, open Control Panel by going to the Start menu and typing
Control Panelin the search bar, then select Control Panel. - Select View by Small icons and click Security and Maintenance.
- Select Maintenance.
- In Drive status, you will find a link that will let you repair the drive. Click this link. Windows will tell you not to bother if the drive is okay.