
Время на прочтение1 мин
Количество просмотров7.7K

11 февраля 2021 года Microsoft выпустила срочное исправление проблем для Wi-Fi в Windows 10. Патч чинит ошибку с возникновением BSOD после установки последних обновлений безопасности (вторника патчей). Инцидент затронул сборки Windows 10 версии 1909 и Windows Server версии 1909.
Обновление KB5001028 исправляет возникновение «синего экрана смерти» в системе при использовании Wi-Fi.
Microsoft пояснила, что BSOD появлялся из-за ошибки в ранее распространенных обновлениях KB4598298 и KB4601315. Баг приводил к вылету системы, когда использовалось Wi-Fi-соединение с защищенным доступом по протоколу беспроводного шифрования WPA3 (Wi-Fi Protected Access 3).
Microsoft подтвердила, что у небольшого числа пользователей в этом случае возникал BSOD с ошибкой «0x7E» в nwifi.sys. При использовании протокола WPA2 ошибки в системе не возникало.
Накопительное обновление KB5001028 будет установлено автоматически на подверженных ошибке системах. Microsoft порекомендовала пострадавшим пользователям переключиться на WPA2 или использовать проводное соединение для получения обновления KB5001028. Также компания советует обновиться до Windows 10 версий 2004 или 20H2, чтобы избежать подобных ошибок в будущем.
Хабы:
- IT-компании
- Беспроводные технологии
- Ноутбуки
- Софт
Американская компания Microsoft выпустила срочное внеплановое обновление, которое получило номер KB5001028. Его задача — устранить баг, приводящий к сбою в работе операционной системы (ОС) Windows 10 при подключении к сетям Wi-Fi по WPA3. Эта проблема появилась после выпуска апдейта для Windows 10 1909, пишет Anti-Malware.
Как только пользователь подключается к сети Wi-Fi по протоколу WPA3, ОС падает в «синий экран смерти». Юзеры могут столкнуться с ошибкой 0×7E в драйвере nwifi.sys. Скорее всего, это произойдет при переподключении к сети или при выходе из спящего режима, отметили в Microsoft.
Там добавили, что помимо внепланового апдейта, есть еще несколько способов, которые помогут избежать ошибок при подключении к Wi-Fi по WPA3. По словам разработчиков, необходимо обновить версию Windows 10 до 2004 или 20H2, подключиться к Wi-Fi по WPA2 или через проводное соединение (Ethernet).
В прошлом году компания Microsoft захотела упростить процесс обновления операционной системы (ОС) Windows 10, включив апдейт стека обслуживания (SSU) в пакет накопительных обновлений, которые выходят каждый месяц. Теперь стало известно, что апдейты объединили, и отдельная установка обновлений стека обслуживания в актуальных версиях «десятки» больше не требуется.
Автор
Mutabor
Здравствуйте, моя домашняя сеть подключена к ботсети. Я узнал об этом из Касперского, зайдя в мониторинг умного дома увидел, что к моей домашней сети подключено 250 устройств.
Ранее хакер взломал мой роутер и почту, поменяв пороли. Я все пароли поменял,
на сложные, использовав генератор паролей, на почту смог войти по отпечатку пальца через смарфон, а роутер перезагрузил.
Для того чтобы выйти из этой бот сети я создал в роутере белый список, привезав мак адреса моих устройств, так же создал гостевую сеть и перенаправил в нее устройства которые не поддерживают шифрования WAN 3 personal, это две колонки Алиса и телевизор. Три устройства поддерживающие это шифрование я оставил в основной сети. Это два смартфона и андроид телевизор.
После этого Касперский показал что я вышел из ботсети, однако на следующее утро я снова увидел, что являюсь её участником.
Так же на компьютере Касперский пишет, что у меня открыт 22 SSH порт, как его закрыть на моем роутере TP-Link Archer C80 я не знаю, перерыл всё меню. интернет, задавал вопрос ии, ответа так и не нашёл.
Хотя я заходил на https://www.yougetsignal.com/tools/open-ports/ чтобы проверить открыт ли этот порт у меня, пишет что порт закрыт.
Осталась единственная надежда на вас, может вы сможете помочь, пожалуйста помогите выйти из этой ботсети.
This post features different solutions to fix Wificx.sys failed Blue Screen on Windows 11. It’s a BSOD error that mainly occurs when a driver used by Wi-Fi or Network devices has gone missing, become outdated or has become corrupted. Fortunately, you can follow some methods to eliminate this issue.

What is Wificx.sys driver?
Starting in Windows 11, the Windows Driver Kit (WDK) includes a Wi-Fi WDF class extension (WiFiCx) used in drivers for a Wi-Fi device. WiFiCx drivers are also NetAdapterCx client drivers just like other NIC drivers. WiFiCx drivers run on Windows 11 only.
Why does Wificx.sys failed Blue Screen occurs on Windows 11/10?
Wificx.sys failed BSoD is an uncommon error that appears randomly, making your Windows 11 device shut down or restart automatically. Like any other BSoD error, it can occur due to multiple reasons. However, some of the possible reasons why it may occur are:
- Hardware malfunctioning
- Issues with the Wificx.sys driver
- Overheating Components
Wificx.sys is an architectural component in Windows related directly to program network drivers. As this error can cause frequent crashes within the system, it’s essential to fix it. Go through the suggestions and then decide which one you would like to try first:
- Run System File Checker
- Run a DISM Scan
- Reinstall Wireless and Network Drivers
- Uninstall Recent Windows Update
- Reinstall Vanguard Anti-Cheat.
Before you begin, if you noticed that the problem started after you installed a Windows Update or updated or rolled back a device driver, then it might be a good idea to reverse the changes or use a system restore point to go back.
1] Run System File Checker
One of the reasons why a BSOD can occur is corrupted or damaged Windows system files. Running SFC will scan and repair these files instantly. To run the System File Checker, follow these steps:
Click on the Windows key and search for Command Prompt.
Click on Run as Administrator.
Type the following command and hit Enter:
sfc/scannow
Restart your device once done and check if the Wificx.sys failed Blue Screen error is fixed.
2] Run a DISM Scan
System Image Corruptions can also cause Wificx.sys failed Blue Screen on Windows 11/10. Performing a DISM scan will repair image corruptions on your device. Here is how to run DISM:
Click on the Windows key and search for Command Prompt.
Click on Run as Administrator.
Type the following commands one by one and hit Enter:
DISM /Online /Cleanup-Image /CheckHealth
DISM /Online /Cleanup-Image /ScanHealth
DISM /Online /Cleanup-Image /RestoreHealth
Restart your device once done and check if the Wificx.sys failed Blue Screen error is fixed.
3] Reinstall Wireless and Network Drivers
As we know, Wificx.sys is directly related to network drivers. So the crashes may occur due to some driver-related issues. Reinstalling your Wi-Fi Network Drivers can help fix the error. Here’s how you can do it:
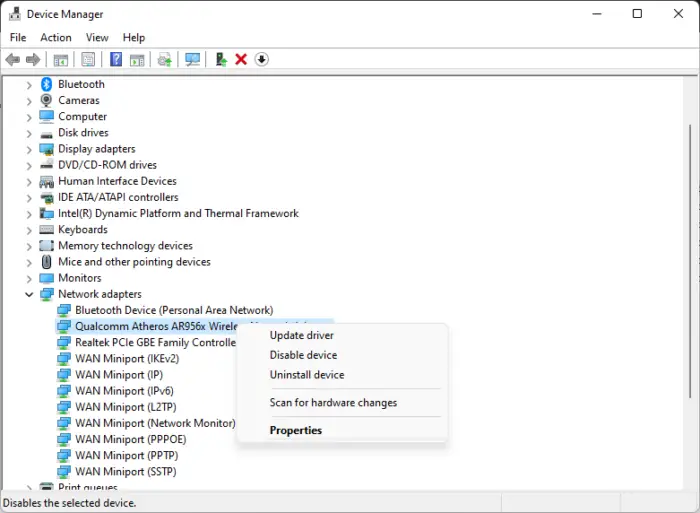
- Press the Windows key + R to open the Run dialog box.
- Type devmgmt.msc and hit Enter.
- Expand Network Adapters, right-click on your Network Adapter and click on Uninstall Device.
- Once done, restart your PC and the drivers will be installed automatically.
These posts may help you:
- How to install WiFi drivers
- How to update Network drivers
Similarly, you might want to remove and reinstall Wireless drivers and maybe also remove the secondary WiFi adapter and see if that helps you.
4] Uninstall Recent Windows Update
A recently installed Windows update can sometimes cause Wificx.sys failed Blue Screen on Windows. If that’s the issue, uninstalling the recently installed update can help fix the error. Follow these steps to do so:
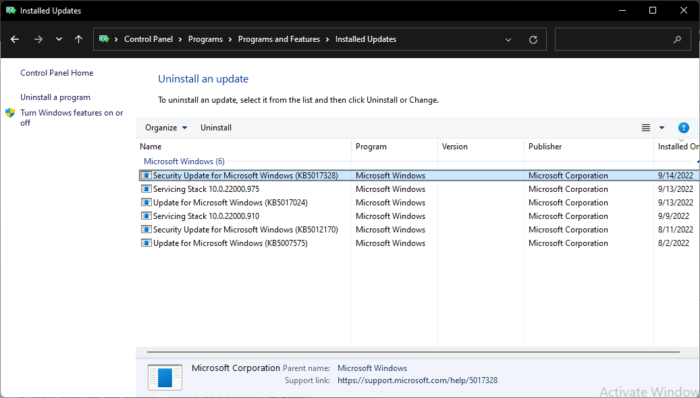
- Press the Windows key + R to open the Run dialog box.
- Type appwiz.cpl and hit Enter.
- In the Programs & Features Tab, click on View Installed Updates.
- Now click on the recent update and select Uninstall.
- Follow the instructions on-screen to complete the process.
Once done, restart your PC and check if the error still occurs.
5] Reinstall Vanguard Anti-Cheat
Some users have reported that Vanguard is responsible for causing the Wificx.sys BSOD error in Windows 11.
We, therefore, suggest that you uninstall Vanguard and then download and install its latest version.
Fix: NDIS.sys failed BSOD error on Windows computer
How do I fix the Blue screen of death on Windows 10 11?
The common troubleshooting steps to fix Blue Screen errors in Windows 11/10 to be followed are:
- See if a System Restore can resolve this issue.
- Run Online Blue Screen Troubleshooter
- Run your anti-virus and anti-spyware and your PC Junk/Registry Cleaner.
- Run the Windows Check Disk Utility.
- Check if you’ve made any software or hardware change or modification.
- In most cases, the software is the victim and not the cause of BSOD’s. So don’t rule out hardware problems. It could be damaged hard disks, defective physical RAM, overheated CPU chips or anything else!
Is Blue screen of death fixable?
Some BSODs are easy to fix using the suggestions made here, while others may require you to debug Blue Screen error logs. In most cases, it is the device driver that causes problems and rolling back or updating the driver can help right away.
Read: DRIVER IRQL NOT LESS OR EQUAL (kbdclass.sys) BSOD error.
-
Home
-
News
- How to Fix Wdiwifi.sys Blue Screen of Death on Windows 10/11?
By Aurelie | Follow |
Last Updated
The WdiWiFi.sys is an important system file that is responsible for managing wireless network connections. Like other system files, any corruption or error in this file might trigger system issues, BSOD errors and more. In this post on MiniTool Website, we will show you how to fix Wdiwifi.sys BSOD in detail.
Wdiwifi.sys BSOD Windows 10
Wdiwifi.sys BSOD is one of the common errors that you might encounter. Since it is a critical Windows error, you should fix this problem immediately. You may receive one of the following error messages:
- sys could not be found.
- sys failed to load.
- The file WdiWiFi.sys is missing or corrupted.
- Windows failed to start WdiWiFi.sys.
- SYSTEM_THREAD_EXCEPTION_NOT_HANDLED.
How to Fix Wdiwifi.sys BSOD Windows 10?
Fix 1: Update Wi-Fi Driver
First, make sure your Wi-Fi drive is up to date. If it is not, follow these steps to update it in time:
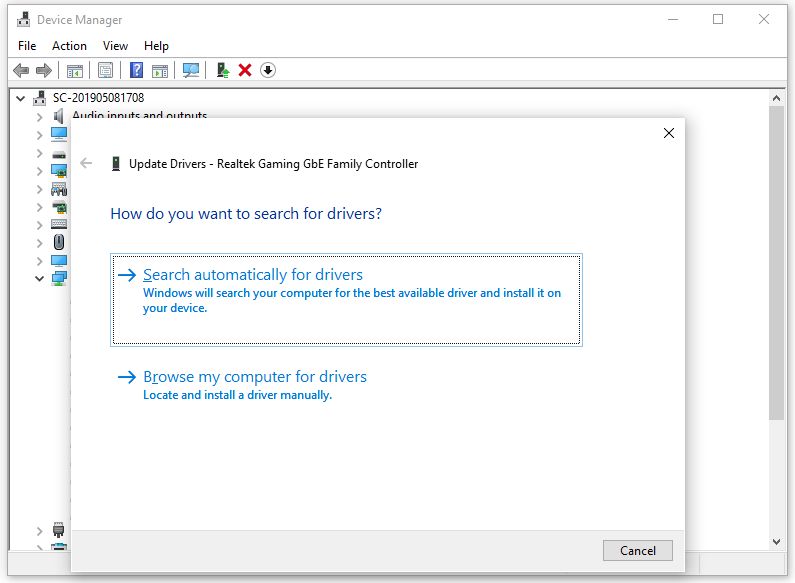
Step 1. Press Win + X to open the quick menu and select Device Manager from the list.
Step 2. Expand Network adapters category and right-click on your Wi-Fi adapter and select Update driver.
Step 3. Choose the Search automatically for drivers option and wait for the process to complete.
Tips:
If WdWiFi.sys appears after updating your Wi-Fi driver, you can try rolling back the driver: right-click on your Wi-Fi adapter > go to the Driver tab > hit Roll Back Driver.
Fix 2: Run Windows Memory Diagnostic Tool
Faulty RAM can also lead to problems like application crashes, system freezes, blue screen of death, data corruption and other problems. In this case, you can run the Windows Memory Diagnostic tool to perform a test.
Step 1. Type run in the search bar and hit Enter to open the Run dialog box.
Step 2. Type mdsched.exe and hit OK to launch Windows Memory Diagnostic.
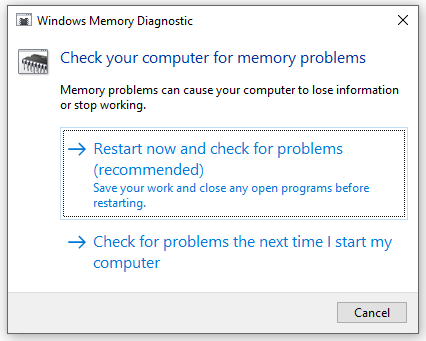
Step 3. Select Restart now and check for problems and wait for the tool to check your memory.
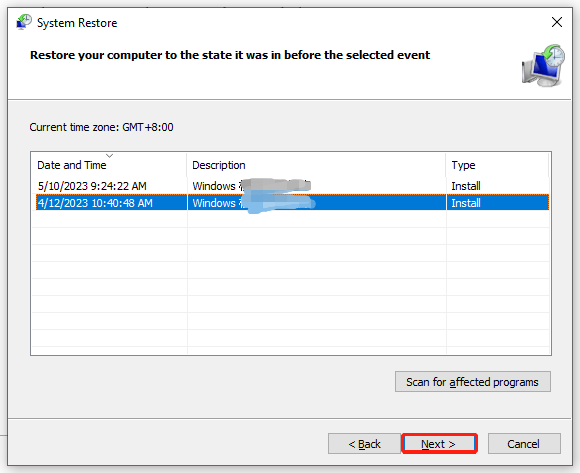
Fix 3: Restore Your Computer to the Latest Restore Point
To fix WdWiFi.sys, you can undo system changes by reverting your computer to a previous restore point. Here’s how to do it:
Step 1. Type create a system point in the search bar and hit Enter.
Step 2. Under the System Protection tab, hit System Restore.
Step 3. Hit Next > select a system restore point > hit Next to start the restoring process.
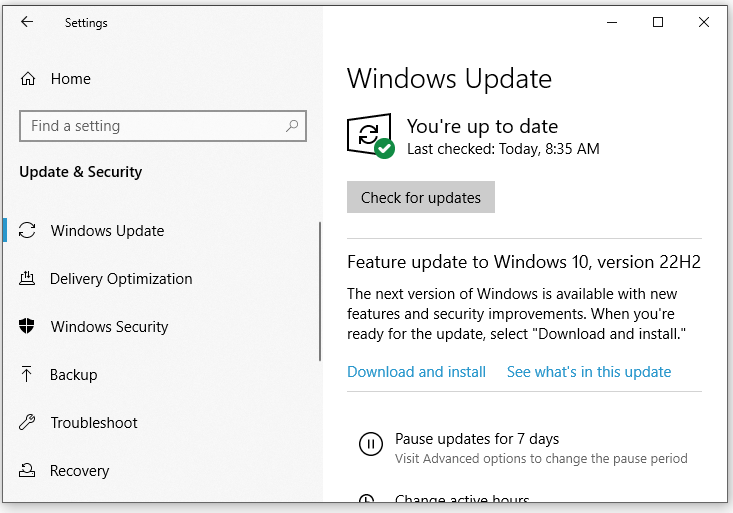
Fix 4: Check for Windows Update
The last resort to address Wdiwifi.sys error is to check your Windows update. To do so:
Step 1. Press Win + I to open Windows Settings.
Step 2. Go to Update & Security > Windows Update > Check for updates.
Now, you must solve Wdiwifi.sys BSOD error. In case to encounter similar system issues, you can back up your system with the free backup software – MiniTool ShadowMaker. By doing so, you can restore your system with the system image you backed up when your system crashes.
Step 1. Launch this tool and go to the Backup page.
MiniTool ShadowMaker TrialClick to Download100%Clean & Safe
Step 2. Since the system is selected in SOURCE by default, you only need to choose a storage path for the system image in DESTINATION.
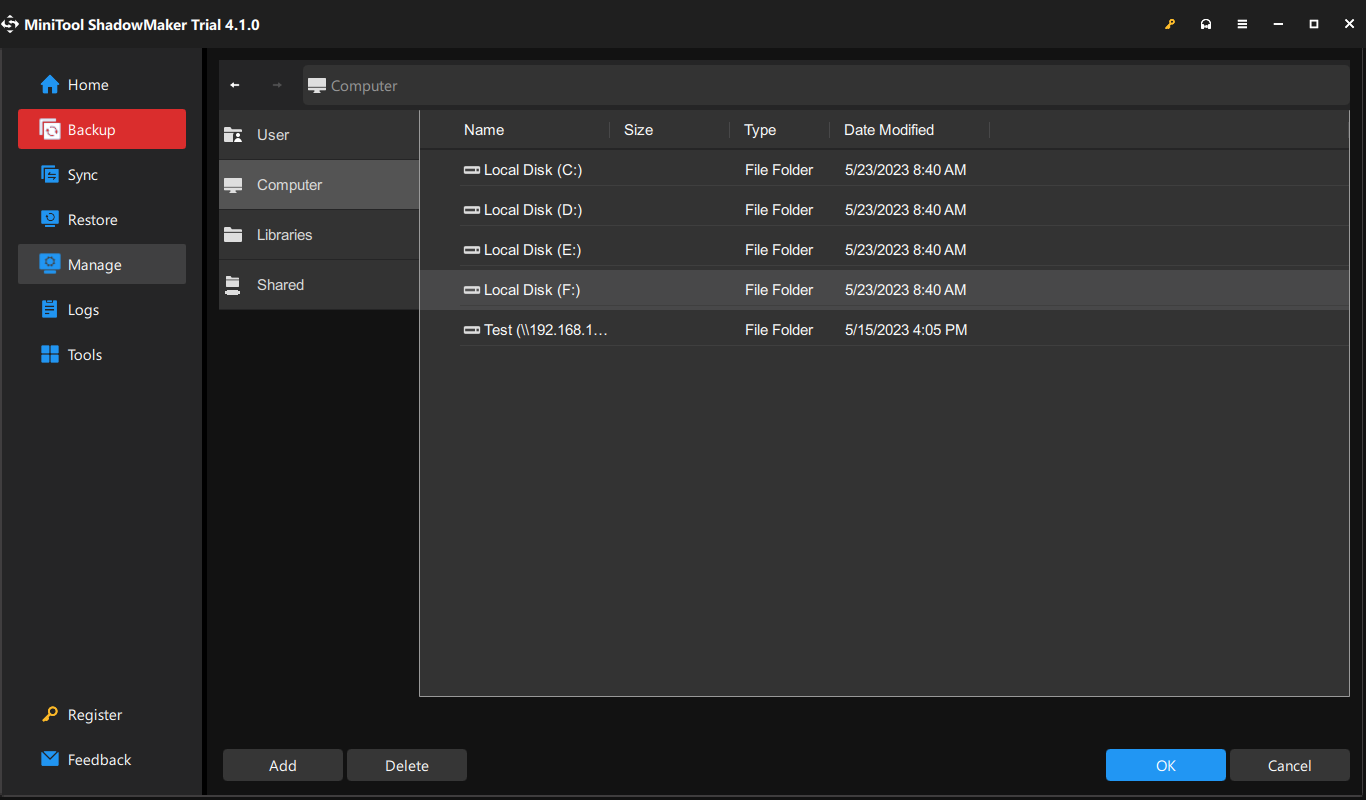
Step 3. Click on Back Up Now to start the process.
Tips:
After backing up your system, you had better create a bootable USB disk with MiniTool ShadowMaker. When your computer has some boot issues, you can boot it from this drive and perform a system recovery. See this guide: Create Bootable CD/DVD/USB Drive with Bootable Media Builder.
About The Author
Position: Columnist
Aurelie is a passionate soul who always enjoys researching & writing articles and solutions to help others. Her posts mainly cover topics related to games, data backup & recovery, file sync and so on. Apart from writing, her primary interests include reading novels and poems, travelling and listening to country music.