
Проводник зависает при нажатии правой кнопки мыши — что делать?
Одна из неприятных проблем, с которой можно столкнуться в Windows 10, 8.1 или Windows 7 — зависание при нажатии правой кнопки мыши в проводнике или на рабочем столе. При этом начинающему пользователю обычно сложно понять, в чем причина и что делать в такой ситуации.
В этой инструкции подробно о том, почему возникает такая проблема и как исправить зависание при правом клике, если вы столкнулись с этим.
Исправление зависания при правом клике мышью в Windows
При установке некоторых программ они добавляют свои собственные расширения проводника, которые вы видите в контекстном меню, вызываемом при нажатии правой кнопки мыши. И часто это не просто пункты меню, которые ничего не делают, пока по ним не нажмешь, а именно модули сторонней программы, которые подгружаются при простом правом клике.

В случае, если они работают со сбоями или не совместимы с вашей версией Windows, это может вызывать зависание в момент открытия контекстного меню. Обычно это сравнительно просто исправить.
Для начала два очень простых способа:
- Если вы знаете, после установки какой программы появилась проблема — удалите её. А затем, если требуется, переустановите, но (если установщик позволяет) отключите интеграцию программы с Проводником.
- Используйте точки восстановления системы на дату, предшествующую появлению проблемы.
Если два этих варианта не применимы в вашей ситуации, вы можете использовать следующий метод, чтобы исправить зависание при нажатии правой кнопкой мыши в проводнике:
- Скачайте бесплатную программу ShellExView с официального сайта https://www.nirsoft.net/utils/shexview.html. На той же странице есть файл перевода программы: скачайте его и распакуйте в папку с ShellExView, чтобы получить русский язык интерфейса. Ссылки на загрузку находятся ближе к концу страницы.
- В настройках программы включите отображение 32-разрядных расширений и скройте все расширения Майкрософт (обычно, причина проблемы не в них, хотя случается, что зависание вызывает пункты, связанные с «Портфелем» Windows).

- Все оставшиеся в списке расширения были установлены сторонними программами и могут, теоретически, вызывать рассматриваемую проблему. Выделите все эти расширения и нажмите по кнопке «Деактивировать» (красный кружок или из контекстного меню), подтвердите деактивацию.

- Откройте «Настройки» и нажмите «Перезапустить проводник».
- Проверьте, сохранилась ли проблема с зависанием. С большой вероятностью, она будет исправлена. Если нет — придется попробовать отключить и расширения от Майкрософт, которые мы скрыли на 2-м шаге.
- Теперь вы можете по одному снова активировать расширения в ShellExView, каждый раз перезапуская проводник. До тех пор, пока не выясните, активация какой из записей приводит к зависанию.


После того, как вы выяснили, какое расширение проводника вызывает зависание при нажатии правой кнопки мыши, вы можете либо оставить его отключенным, либо, если программа не является необходимой, удалить программу, установившую это расширения.
P3aky, похожую проблему обычно вызывают пункты контекстных меню от сторонних программ, например, пункт для открытия программы по настройке параметров видеокарты в контекстном меню рабочего стола и Проводника. Но, поскольку зависание происходит и при правом щелчке в браузере, то причина здесь скорее всего другого свойства. Тем не менее попробуйте отключить пункты меню двумя способами.
Первый – при помощи AutoRuns. Запустите программу, перейдите на вкладку «Explorer» и снимите все отметки в столбце «Autorun Entry». Откройте Диспетчер задач и перезапустите процесс «Проводник». После этого проверяйте нажатие правой кнопки. Если зависания больше нет, то остается выяснить какой пункт его вызывает. Для этого отключайте точки автозапуска в AutoRuns по одно или половину из списка. Пункт, который вызывает зависание, оставьте отключенным.
Второй способ – использование ShellExView. В меню программы выберите «Настройки» и поставьте отметку напротив «Скрыть/показать расширения Microsoft». Далее снимайте отметки и перезапускайте Проводник аналогично первому способу.
Способы не заменяют один другого. Некоторые пункты нельзя отключить в ShellExView, но можно в AutoRuns.
Добавлено через 19 минут
Что касается ShellExView, то немного ошибся, здесь отметок нет, для отключения сторонних расширений их нужно выделять и нажимать на красную кнопку в левом верхнем углу. Зеленая кнопка включает расширения обратно. Отметка напротив «Скрыть/показать все расширения Microsoft» скрывает эти расширения. Расширения от Microsoft отключать не нужно.
The desktop right-click menu, otherwise known as the desktop context menu, provides instant access to numerous useful options ranging from aligning desktop icons to customizing display settings. And if you are a long-time Windows user, the means to obsessively refresh the desktop!
Usually, the context menu shows up within a fraction of a second after right-clicking. On certain PCs, however, there’s a strange bug where the menu in fact takes substantially much longer — around 3-5 seconds — to display on screen.

Needless to say, it’s maddening when that happens, especially if you use the menu a lot.
So Why Does This Happen?
The context menu lags when it has graphics extensions added to it after installing NVIDIA, AMD, or Intel display drivers. If you see Graphics Properties and Graphics Options (Intel), NVIDIA Control Panel, or AMD Catalyst Control Center listed within the context menu, you now know why.
These items are usually present just for the sake of it and are rarely used for everyday purposes. Hence, you can safely remove them from the context menu and get rid of the issue altogether. But how can you do that?

You have two options; use a third-party utility called ShellExView to identify and disable the additional context menu entries, or use the built-in Registry Editor to achieve the same effect.
ShellExView provides a distinct advantage where you can easily re-enable the graphics options should you need them later. But if you want to remove the extensions permanently and aren’t afraid to mess around with some registry keys, then resort to using the Registry Editor. Needless to say, you should have all your important data on the computer backed up online or on an external drive before proceeding with editing Registry.
Using ShellExView
ShellExView is a super-convenient application that lets you disable unnecessary bloat from context menus fast. And don’t worry, it’s completely free to use.
To start off with, simply download ShellExView using the Download button below. Note that the download page lets you select from between an installer, a ZIP file, and a X64 ZIP file.
Download ShellExView
The installer lets you install ShellExView as a normal application, while both ZIP files contain an executable file that you can use to directly launch the program upon unzipping.
Note:
After downloading, launch ShellExView and wait for a few seconds while it detects your context menu extensions. Depending on your graphics card, proceed by following the instructions as listed below.
Intel
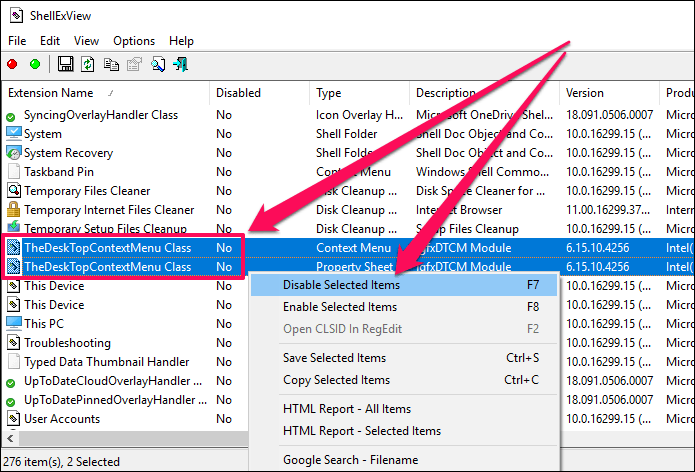
Intel has two extensions on the context menu, namely Graphics Options and Graphics Properties. Therefore, you need to disable the following entries:
TheDeskTopContextMenu Class (Type: Context Menu)
TheDeskTopContextMenu Class (Type: Property Sheet)
NVIDIA
NVIDIA graphics drivers insert the NVIDIA Control Panel extension. Disable the following entry to get rid of it:
NVIDIA CPL Context Menu Extension

AMD
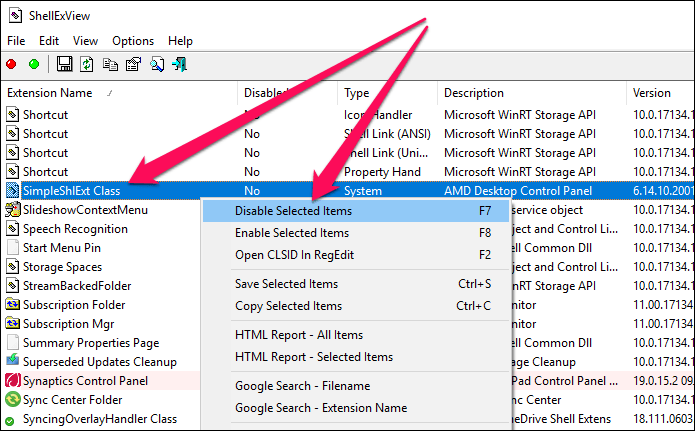
AMD features the AMD Catalyst Control Center extension, and the following entry lets you disable it:
SimpleShlExt Class (Description: AMD Desktop Control Panel)
That’s it! Simply restart your PC for the changes to take effect, and the desktop right-click menu should load with no delays whatsoever.
Note:
If you want to re-enable the extensions later, simply open ShellExView, right-click the disabled item, and then click Enable Selected Items.
Using Registry Editor
If you want to permanently remove the extensions, or if you hate using third-party applications, then you’ve got the trusty old Registry Editor to back you up. But don’t worry. You are also going to find instructions on how to back up whatever registry keys that you are about to delete just in case you regret your decision later.
Step 1: Press Windows-R to open the Run box. Next, type regedit into the search box, and then click OK.

Step 2: Copy and paste the following path into the address bar at the top of the Registry Editor, and then press Enter:
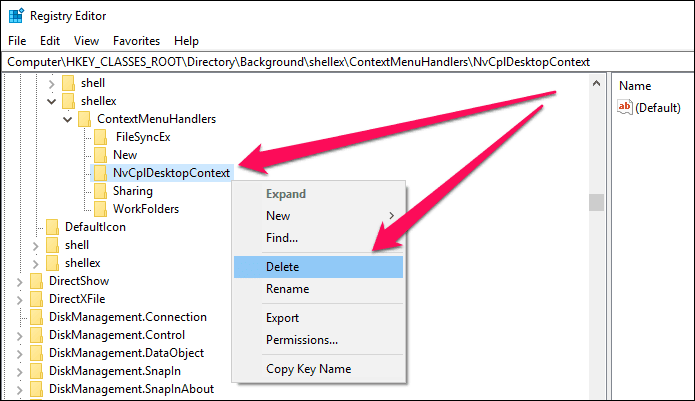
HKEY_CLASSES_ROOT\Directory\Background\shellex\ContextMenuHandlers

Step 3: Depending on your graphics card, right-click and delete the following registry keys listed under ContextMenuHandlers on the left pane.
Important:
Intel
There are two keys that you’ve got to remove.
Start off by deleting the registry key labeled igfxcui.

Next, delete the igfxDTCM key located just below the previous one.

NVIDIA
Delete the registry key labeled NvCplDesktopContext.
AMD
Delete the registry key labeled ACE.

That’s it! The effects are instantaneous, and you should find the context menu loading immediately.
Note:
Should you need to restore the deleted extension, simply double-click the backed-up registry file and click OK.
No More Lag, But …
Finally, you don’t have to suffer annoying delays when right-clicking your desktop. Really, Microsoft needs to resolve this issue ASAP — it’s been going on for far too long and is just plain ridiculous. While fixing the problem is quite easy, it’s not fun if you do use the graphics extensions periodically.
Fortunately, you can still get to the NVIDIA Control Panel or the AMD Catalyst Control Center via the Start menu. However, the Intel Graphics Options and Graphics Properties aren’t accessible this way and require you to re-enable or restore them using ShellExView or your backed up registry keys. Bummer!
So, any thoughts about this whole debacle? The comments section is right below.
Was this helpful?
Thanks for your feedback!
The article above may contain affiliate links which help support Guiding Tech. The content remains unbiased and authentic and will never affect our editorial integrity.
If you have recently upgraded or updated your Windows, you might be facing this issue where the right-click context menu on desktop appears to be slow, in fact, when you right-click on the desktop it takes a lot of time for the context menu to appear. In short, the right-click context menu seems to be delayed because of some reason, and that’s why it appears slow. So to fix the issue, first, you need to find the cause of the delay and then fix it.

This issue is annoying because desktop right-clicks in an important function of windows which let users quickly access settings, display settings etc. The main issue seems to be some 3rd party application which seems to be conflicting with Windows Shell extensions or a corrupt 3rd party shell extension itself. In some cases, faulty or outdated display drivers also seem to cause a right-click context menu to appear slow. So without wasting any time let’s see how to actually Fix Slow Right Click Context Menu in Windows 10 with the help of below-listed troubleshooting steps.
Table of Contents
Make sure to create a restore point just in case something goes wrong.
Method 1: Update Display Drivers
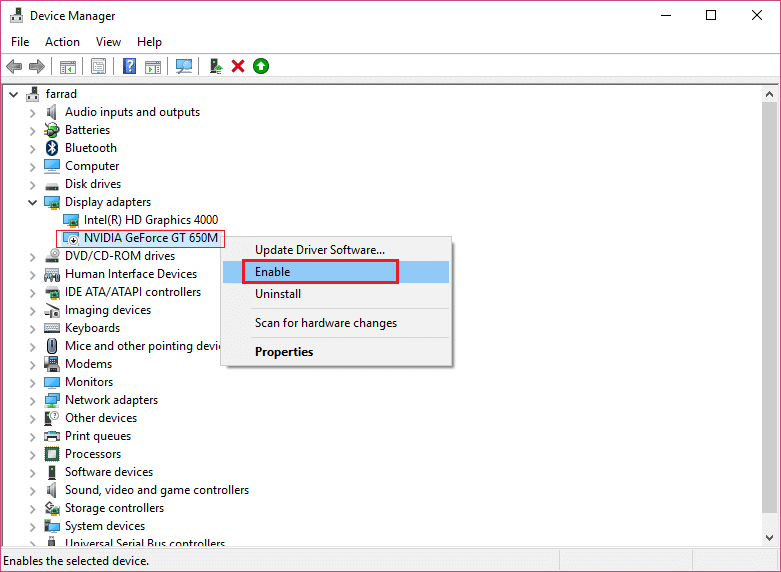
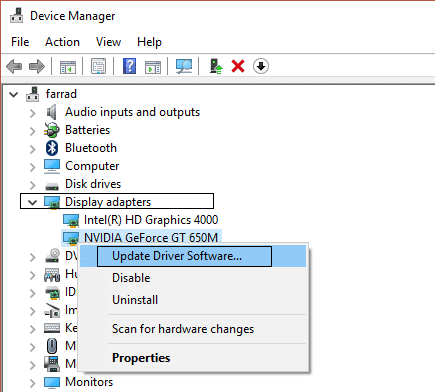
1. Press Windows Key + R then type devmgmt.msc and hit enter to open Device Manager.

2. Next, expand Display adapters and right-click on your Nvidia Graphic Card and select Enable.
3. Once you have done this again, right-click on your graphic card and select “Update Driver Software.”
4. Select “Search automatically for updated driver software” and let it finish the process.

5. If the above step could fix your problem, then excellent, if not then continue.
6. Again select “Update Driver Software“ but this time on the next screen select “Browse my computer for driver software.”

7. Now select “Let me pick from a list of device drivers on my computer.”

8. Finally, select the compatible driver from the list for your Nvidia Graphic Card and click Next.
9. Let the above process finish and restart your PC to save changes. After updating the Graphic card, you may be able to Fix Slow Right Click Context Menu in Windows 10.
Method 2: Disable 3rd party Shell Extensions
If you have a context menu with a lot of 3rd party shell extensions, then one of them may be corrupted, and that’s why it’s causing a delay in the right-click context menu. Also, many shell extensions can cause the delay, so make sure to disable all the unnecessary shell extensions.
1. Download the program from here and then right-click on it and select Run as Administrator (you don’t need to install it).

2. From the menu, click on Options, click on Filter by Extension Type and select Context Menu.

3. On the next screen, you will see a list of entries, under these the entries marked with the pink background will be installed by 3rd parties software.

4. Hold down CTRL key and select all of the above entries marked with the pink background then click on the red button on the top left corner to disable.

5. Reboot your PC to save changes and see if you can Fix Slow Right Click Context Menu in Windows 10.
6. If the issue is resolved, it was definitely caused by one of the shell extension and to find out which one was the culprit you could start enabling the extensions one by one until the issue occurs again.
7. disable that particular extension and then uninstall the software associated with it.
8. Reboot your PC to save changes.
Method 3: Perform a Clean Boot
You may put your computer in a clean boot state and check. There could be a possibility that a third-party application is conflicting and causing the issue to occur.
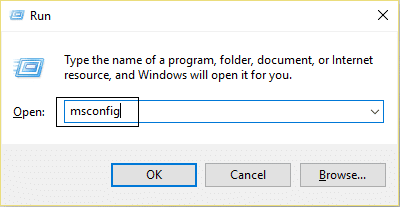
1. Press the Windows Key + R button, then type ‘msconfig’ and click OK.
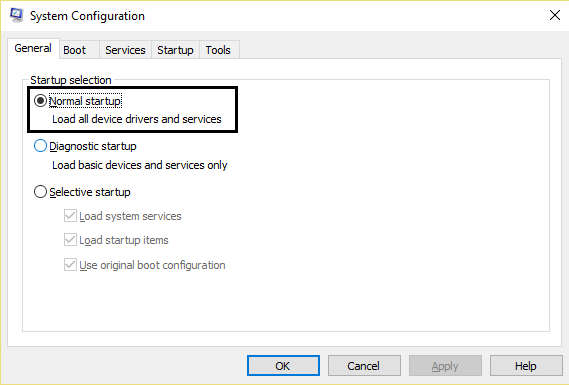
2. Under General tab under, make sure ‘Selective startup’ is checked.
3. Uncheck ‘Load startup items‘ under selective startup.

4. Select the Service tab and check the box ‘Hide all Microsoft services.’
5. Now click ‘Disable all to disable all the unnecessary services which might cause conflict.

6. On the Startup tab, click ‘Open Task Manager.’

7. Now, in the Startup tab (Inside Task Manager) disable all the startup items which are enabled.

8. Click OK and then Restart. If the issue is resolved and you want to investigate then further follow this guide.
9. Again press the Windows key + R button and type ‘msconfig’ and click OK.
10. On the General tab, select the Normal Startup option and then click OK.
11. When you are prompted to restart the computer, click Restart. This would definitely help you Fix Slow Right Click Context Menu in Windows 10.
Method 4: Registry Fix
Note: Make a backup of the registry before continuing.
1. Press Windows Key + R then type regedit and hit Enter to open Registry Editor.
2. Navigate to the following registry key:
HKEY_CLASSES_ROOT\Directory\shellex\ContextMenuHandlers
3.Make sure to highlight ContextMenuHandlers, and under it, several other folders will be there.

4. Right-click on each of them except New and WorkFolders and then select Delete.
Note: If you don’t want to delete all the folders, you could start by deleting until the issue is resolved. But after each folder you delete, you need to restart.
5. Reboot your PC to save changes.
Recommended:
- How to Disable or Uninstall Microsoft Edge
- Fix error 0x80080207 when installing App from Windows Store
- How To Fix This app can’t open in Windows 10
- Fix Volume Control stuck on the top left corner of the screen
That’s it you have successfully Fix Slow Right Click Context Menu in Windows 10 but if you still have any questions regarding the above guide then feel free to ask them in the comment’s section.
Проблема
Когда пользователь правой кнопкой мыши нажимает на область рабочего стола и выбирает Создать, компьютер зависает на несколько секунд и отображает дополнительное меню, или, когда пользователь передвигает курсор на Создать, курсор мышки начинает кружится или экран становится белым.

Причина
Автообновления некоторых патчей или частое выполнение обновлений по умолчанию больших предустановленных программ в фоновом режиме системы Microsoft могут приводить к замиранию работы компьютера и негативно влиять на отображение меню, вызываемого нажатием правой кнопки мыши.
Решение
Способ 1. Используйте Помощник по обновлению Microsoft для обновления системы до последней версии.
Используйте Помощник по обновлению Microsoft для обновления системы до версии 1909 или выше. Загрузите Помощник по обновлению по ссылке https://support.microsoft.com/ru-ru/help/3159635/windows-10-update-assistant. (Примечание. Этот способ недоступен на MateBook E 2019).


Способ 2. Нажмите F10, чтобы восстановить заводские настройки.
Перед началом рекомендуется сделать резервную копию важных данных. Включите компьютер, нажмите клавишу F10 несколько раз или нажмите и удерживайте клавишу F10, чтобы восстановить заводские настройки компьютера.
- Обратите внимание, что операция восстановления заводских настроек приведет к удалению всех данных с диска C, включая личные файлы, загруженные в папки Рабочий стол, Загрузки и Документы. Создайте резервную копию ваших личных данных, хранящихся на диске C.
- После восстановления заводских настроек ваша учетная запись Microsoft будет по-прежнему активна. Введите имя и пароль учетной записи Microsoft, которые использовались при первой активации Microsoft Office, и следуйте инструкциям на экране, чтобы выполнить вход в систему.