
This article will show you how to disable or enable Preview Pane in File Explorer in Windows 11/10.
File Explorer in Windows 11/10 displays several file layouts, e.g., descriptions, tiles, text, and different sizes of icons. When you choose one of the icon size formats, like large icons or extra-large icons, the snapshot of the file gives you a preview of the file. This preview is especially for image files, e.g., PNG or JPG. A common preview thumbnail is not displayed for other file formats.
There are three types of panes in File Explorer:
- Navigation pane,
- Preview pane and
- Details pane.
The preview pane in File Explorer helps you preview a selected image, TXT file, PDF document, etc. There are multiple ways to turn on or show the preview pane for File Explorer to preview supported files on the right section. You can also increase/decrease the preview pane size to fit your needs. However, if you don’t want to use the preview pane and need to disable it, this post is helpful.
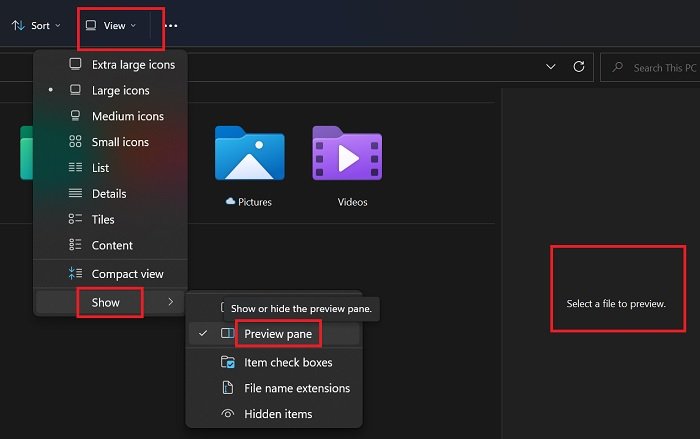
Windows 11 has changed quite a lot compared to Windows 11. This is especially true with the right-click settings and File Explorer. If you wish to show the preview pane for File Explorer in Windows 11, then the procedure is as follows:
- Open the File Explorer window.
- Click on View on the tabs on the top.
- From the drop-down menu, click on Show.
- From the list which comes up, click on Preview Pane and check the box associated with it to enable the Preview Pane for Windows 11.
Show Preview pane for File Explorer in Windows 10
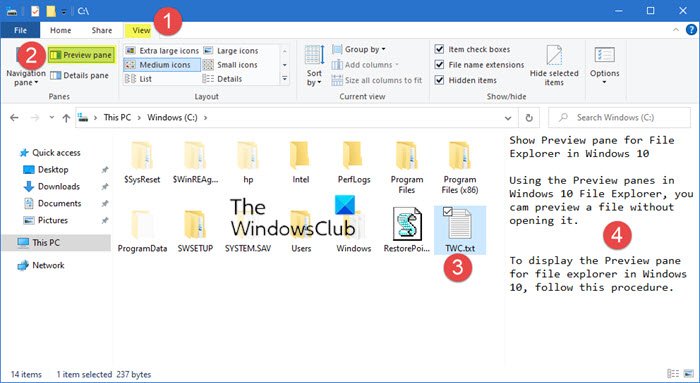
Using the Preview panes in Windows 10 File Explorer, you can preview a file without opening it.
To display the Preview pane for File Explorer in Windows 10, follow this procedure step by step.
- Open File Explorer by clicking the icon on the taskbar.
- When you open File Explorer, you will see four different tabs on top of the screen.
- Click the View tab as highlighted in the above image.
- As soon as you click the View tab, you will see that a ribbon will appear like this.
- Now click the Preview pane from the ribbon as highlighted in the above image.
- As you click the Preview pane option, this pane will be enabled.
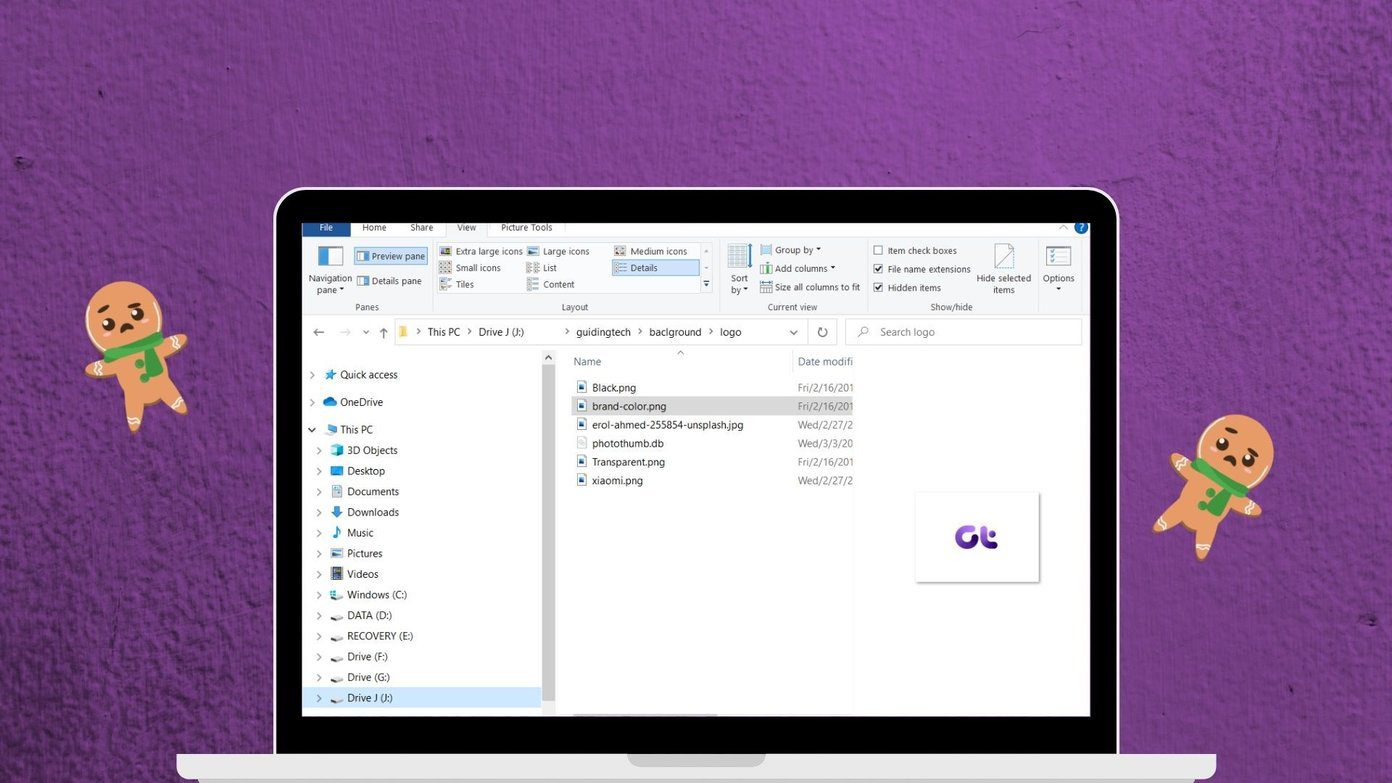
Now, whatever file is selected by you, its contents will appear in the Preview pane and you will be able to view it without opening it.
This is how an image file appears.

By following this procedure, you will be able to display the Preview pane for File Explorer in Windows 10 and see the contents of the file without opening them.
There is another way. Simply press Alt+P to make it appear or disappear.
Enable or Disable Preview Pane in File Explorer of Windows 11/10

To disable the preview pane in File Explorer, you can take the help of two native features of Windows 11/10 OS. These are:
- Group Policy Editor
- Registry Editor.
Let’s have a look at both options.
1] Disable Preview Pane in File Explorer using Group Policy Editor
If you are a home edition user of Windows 11/10 OS, then first, you have to add Group Policy Editor to Home edition of your computer so that you can use this option. Pro and Enterprise edition users don’t need to do this as Group Policy Editor is already present there. Once you have done this, follow these steps to disable the preview pane:
- Open Group Policy Editor
- Access Explorer Frame Pane folder
- Open Turn off Preview Pane setting
- Select the Enabled option
- Press the Apply button
- Press the OK button.
Let’s have a look at these steps in detail.
In the very first step, open Group Policy Editor window. To do this, click on the Search box of your Windows 11/10 computer, type gpedit, and press the Enter key.
Now access the Explorer Frame Pane folder present under the Group Policy Editor window. Here is the path to that folder:
User Configuration > Administrative Templates > Windows Components > File Explorer > Explorer Frame Pane

Double-click on the Turn off Preview Pane setting to open the right-hand section of this folder. It will open in a separate window.
In the newly opened window, select the Enabled option present on the top left part. Once it is done, press the Apply button, and then the OK button.

Now close the File Explorer window if you have already opened it. After that, launch File Explorer and open a folder. You will notice that the preview pane option has vanished from the View menu.
To enable the preview pane again in File Explorer, you need to repeat the above steps, and select the Not Configured option in the Turn off Preview pane setting window. Finally, press Apply button, and then OK button to save the changes.
Related: How to show Details pane in File Explorer.
2] Disable Preview Pane in File Explorer using Registry Editor
This is another option for disabling the preview pane from Windows 11/10 File Explorer. Before using this option, it is recommended to backup Registry so you will be able to restore it if anything wrong happens. After backing up the Registry, use these steps:
- Open Registry Editor
- Access the Explorer Registry key
- Create NoReadingPane DWORD value
- Set Value data of NoReadingPane value to 1
- Press OK button
- Restart File Explorer.
In the very first step, you need to open Registry Editor. To do that, open the Search box, type regedit, and hit the Enter key.
When the Registry Editor window is opened, access the Explorer Registry key. Here is its path:
HKEY_CURRENT_USER\Software\Microsoft\Windows\CurrentVersion\Policies\Explorer

On the right-hand part of the Explorer key, you need to create a NoReadingPane DWORD value. To create this value, right-click on an empty area, expand the New menu, and click on DWORD (32-bit) Value. After creating this new value, rename it with NoReadingPane.
Now set the value data of NoReadingPane value to 1. For doing this, double-click on the NoReadingPane value. A small box will pop up. Enter 1 in the Value data field and press the OK button.

Finally, just restart File Explorer. This will disable the preview pane of File Explorer.
To re-enable the preview pane again in Windows 11/10 File Explorer, you just need to follow the above steps and delete the NoReadingPane DWORD value. After that, restart File Explorer, and you will be able to use the preview pane again.
Once you have disabled the preview pane, its option to turning it on will be removed. Also, the hotkey (Alt+P) to turn on/off the preview pane won’t work. Do not worry as you can also re-enable the preview pane for File Explorer whenever needed.
Why have the File Explorer settings been changed?
Microsoft has its own reasons for changing the options. With Windows 11/10, most lists were smaller in font size, and the contents were larger in number. With Windows 11, the lists have shrunk into sub-menu names, Showing more options. This way, the size of each element remains larger. Perhaps the main reason is to improve the system’s accessibility. As mentioned by Microsoft’s top executives, this has actually been the main focus while designing Windows 11.
How do I get rid of the preview pane in a folder?
If the preview pane is turned on in File Explorer of your Windows 11/10 computer, then you can turn it off using the Alt+P hotkey. The same hotkey can be used to turn on the preview pane again in a folder. You can also turn on/off the preview pane by accessing the View menu available in the Ribbon menu of File Explorer.
If you want to disable the preview pane from Windows 11/10 File Explorer permanently, you can use Registry Editor and Group Policy Editor. This post covers the steps for both options.
TIP: You can also Preview files in Windows using these free apps.
How do I fix the Preview pane?
Many users face this issue when they turn on the preview pane in File Explorer and try to preview a file supported by the preview pane, then they find that the preview pane is not working. In other cases, users find that the preview pane is missing or they cannot preview certain files in File Explorer. If you also face such an issue and want to fix the preview pane in File Explorer of Windows 11/10 computer, then you can try the following fixes:
- Enable preview pane from Folder Options
- Run System File Checker sfc/scannow
- Add more file types to the preview pane.
I hope this will help you.
See this post if Preview Pane is missing or not working.
Microsoft’s Windows Explorer lets you take a peek at a file with the Preview Pane. That way, you get a preview of the file’s content without actually opening it. Explorer offers preview for images, text, PDF files, videos, and documents related to Microsoft Office. However, some Windows 10 users are unable to see a preview of their files in Explorer. For them, the Preview pane option is either grayed out or doesn’t show a preview for specific files.
If the Preview pane isn’t working in the Explorer on your Windows PC, try out the solutions below. Let’s start.
1. Enable Preview Pane
You might have accidentally turned off the Preview pane in File Explorer. You need to check and enable it. For that, open File Explorer using the Windows key + E keyboard shortcut and maximize it to take the full screen.
Click on the View tab at the top. Check if the Preview Pane option appears highlighted to ensure it is enabled. In case it’s not, click on the Preview pane option to enable it. As soon as you turn it on, you should see the Preview pane on the right side of the File Explorer.

To ensure the Preview pane works properly or not, use the Windows Explorer in maximized mode or ensure it’s wide enough to see the options in the View ribbon at the top.
2. Enable Show Preview Handlers
From the Folder Options, you need to enable the ‘Show preview handlers in preview pane’ setting for the proper functioning of the Preview pane. For that, follow these steps:
Step 1: Open File Explorer and click on the View tab. Click on Options.

Step 2: The Folder options window will open. Go to the View tab.
Step 3: Under Advanced settings, check the box next to ‘Show preview handlers in preview pane’.
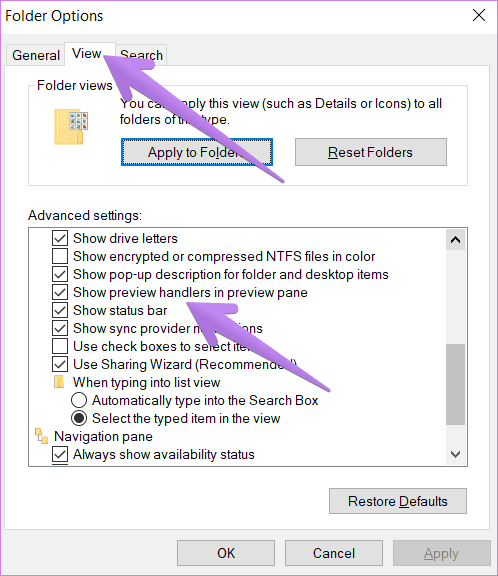
Step 4: Click on Apply followed by Ok.
Step 5: Relaunch File Explorer. The Preview pane should show you a preview of the relevant files.
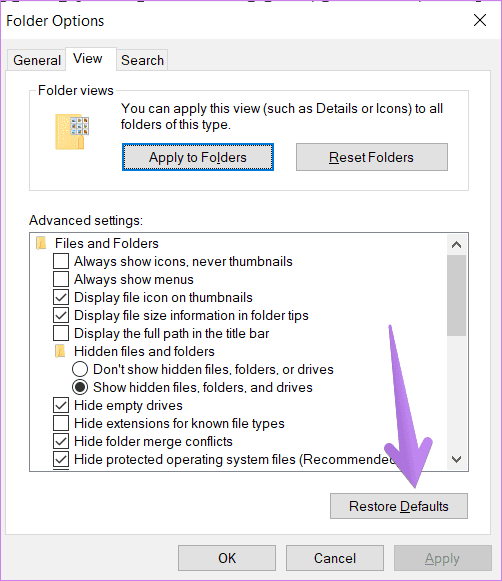
3. Disable Always Show Icons Setting
In the Folder Options, you will find the ‘Always show icons, never thumbnails’ setting. If that is enabled, the Preview pane will not show anything. You need to disable it for the Preview pane to show content. Here’s how to do that:
Step 1: Open File Explorer. Click on the View tab at the top, and then click on the Options icon at the end of the ribbon. Alternatively, search for File Explorer options in Windows search.
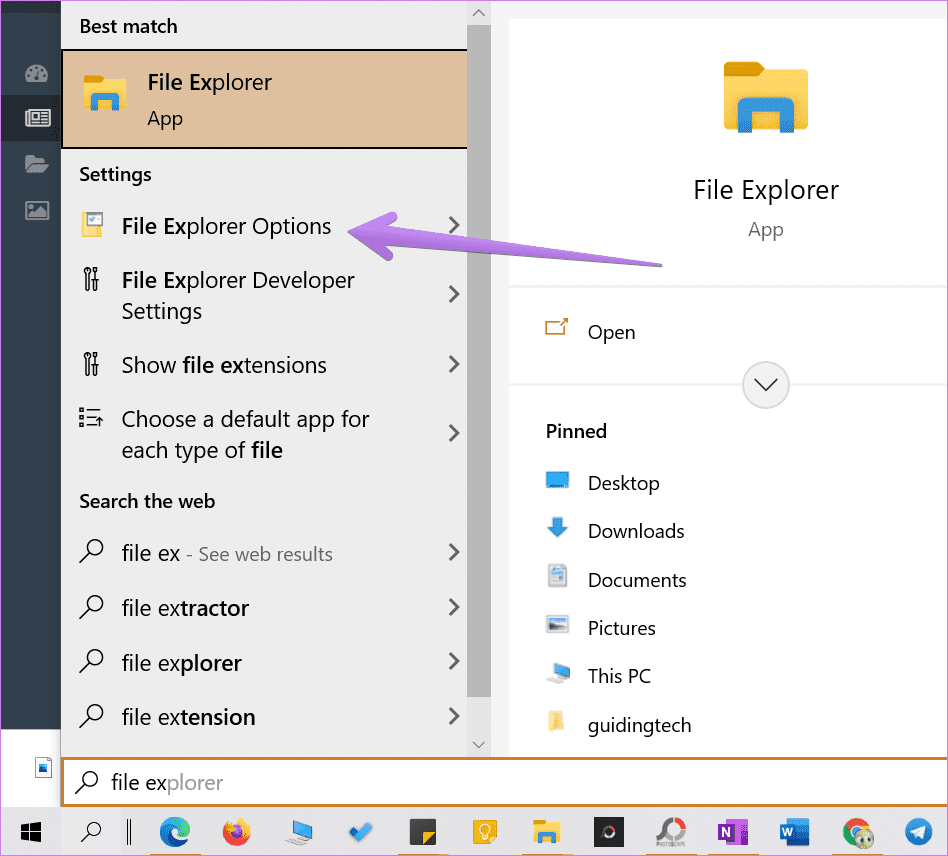
Step 2: When the Folder Options open, click on the View tab.
Step 3: Uncheck the box next to ‘Always show icons, never thumbnails.’
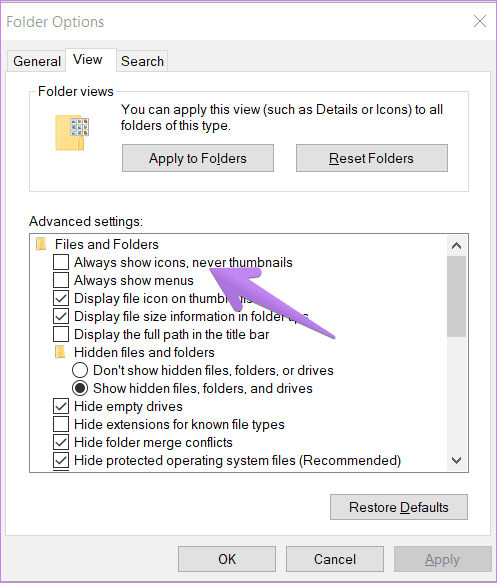
Step 4: Click on Apply to save the changes. Relaunch File Explorer.
The issue should be resolved now.
4. Change File Explorer Startup Mode
One of the solutions at Microsoft Forum suggests that making File Explorer open to This PC instead of Quick Access fixes the issues with the Preview pane.
For that, open the File Explorer Options window either from File Explorer or using search as we did above. When the Folder Options window opens, click on the drop-down box next to ‘Open File Explorer to’ under the General tab.
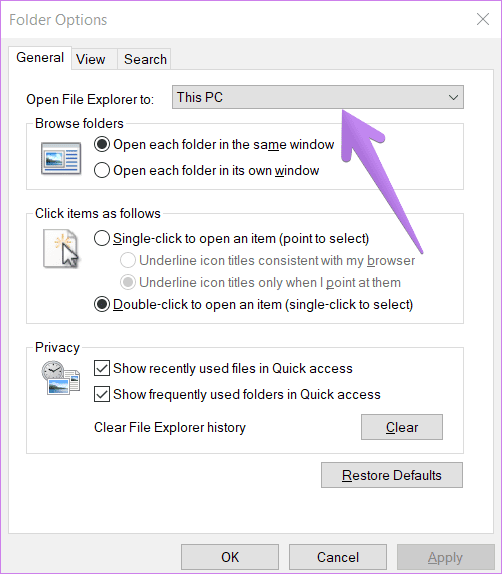
Select This PC. Click on Apply to save the changes.
5. Change Performance Mode
Another solution that has helped users is changing the Performance mode from ‘Let Windows choose what’s best for my computer’ to ‘Adjust for best appearance.’ Here are the steps to achieve that:
Step 1: Open Windows Search on your PC. You can use the Windows key + S keyboard shortcut to open search.
Step 2: Type View Advanced system settings. Click on it.
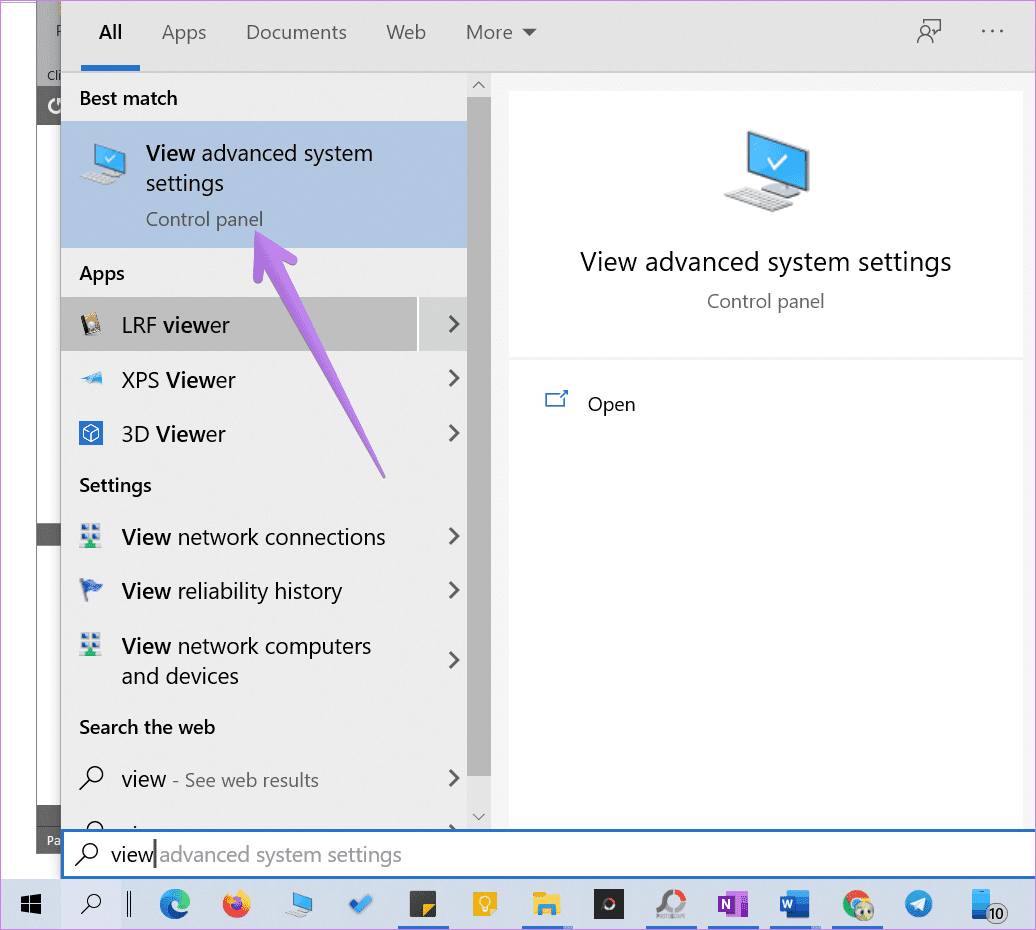
Tip: You can open the Advanced system settings from Settings > System > About. Under Related settings, click on Advanced system settings.
Step 3: Under the Advanced tab, click on Settings next to Performance.
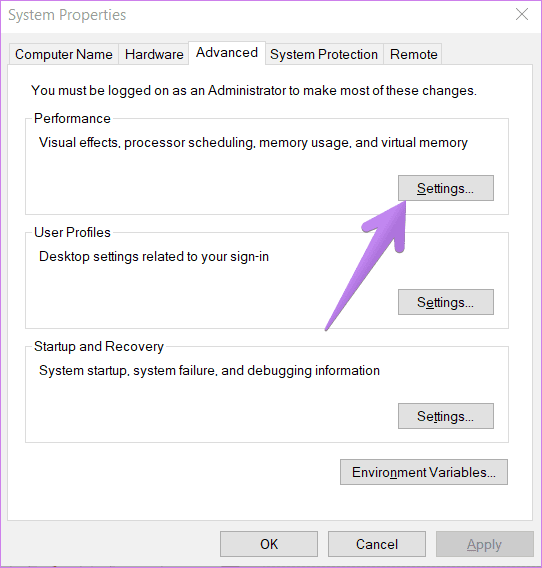
Step 4: Choose ‘Adjust for best appearance.’

Step 5: Click on Apply.
6. Run SFC Scan
Sometimes, problems in Windows 10 can occur if system files are corrupt. You can easily fix them by running an SFC scan. Here are the steps for the same:
Step 1: Open Command Prompt on your computer. For that, type CMD or Command Prompt in Windows search. Right-click on the Command Prompt icon and select Run as administrator.
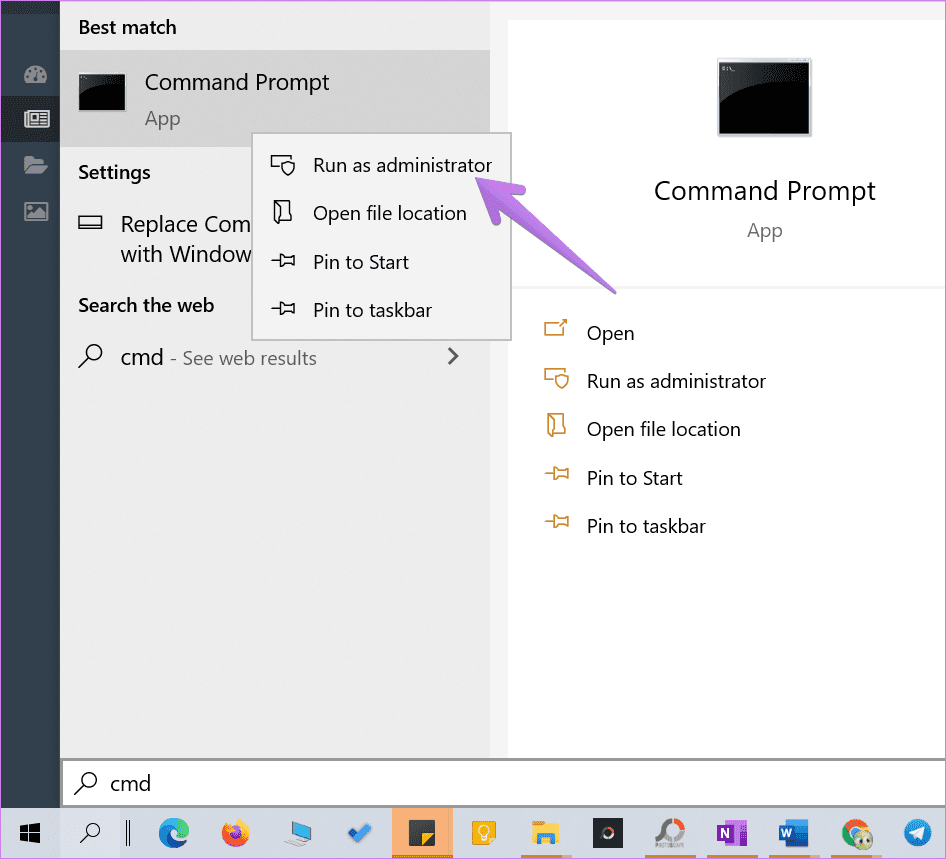
Step 2: Type sfc /scannow in the Command Prompt window and hit the Enter key. Windows will now scan your computer and fix any corrupted files.
Note: The scan may take at least 15 minutes to complete. Kindly be patient and do not close the window.
Step 3: Restart the computer after the scan has finished.
7. Reset File Explorer
If nothing seems to help, you must try to reset File Explorer settings to default. Here’s how to do so:
Step 1: Open File Explorer Options as shown above.
Step 2: Click on the Restore defaults button under the General tab.
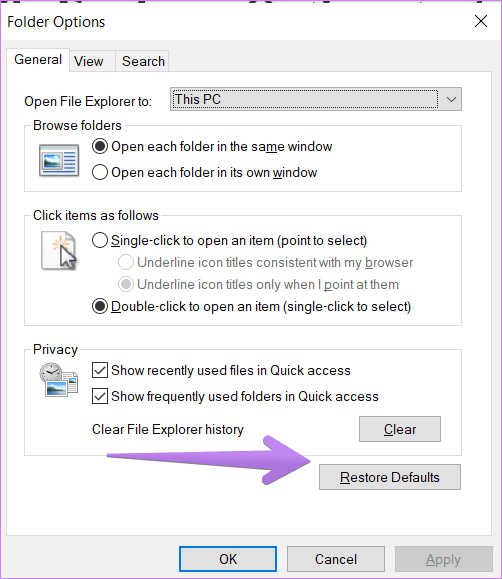
Step 3: Go to the View tab and click on Restore defaults.
Step 4: Hit apply to save the changes.
Tip: Resetting File Explorer also comes in handy if File Explorer is loading slowly.
8. Use Third-Party App
In case resetting File Explorer also doesn’t come to the rescue, you can use the QuickLook app for the same purpose. It’s a third-party app that shows the file’s preview when you hit the spacebar. Interestingly, it supports more file formats as compared to the Preview feature in Windows 10.
Download QuickLook from Microsoft Store
Previews Can Be Helpful
Some files take a bit longer to appear in the Preview pane. You should wait for a few seconds before picking holes in the Preview pane, especially if you are using an old PC.
Was this helpful?
Thanks for your feedback!
The article above may contain affiliate links which help support Guiding Tech. The content remains unbiased and authentic and will never affect our editorial integrity.
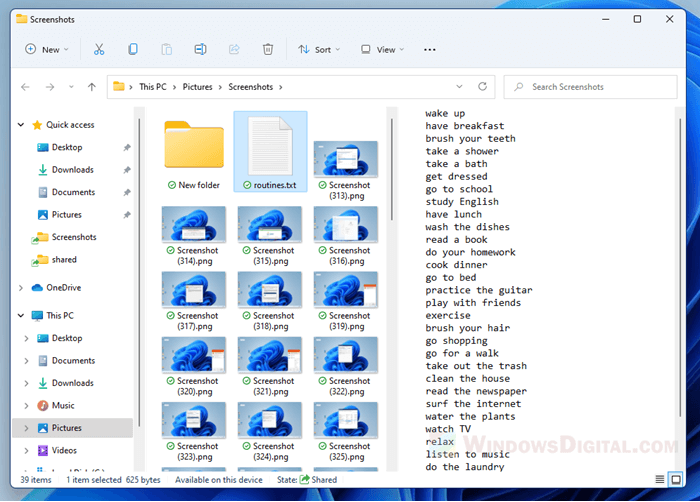
In Windows 11, you can enable the preview pane which will appear as a column on the right in File Explorer. The preview pane is able to show a preview of currently selected photo, video, text file, PDF file, word document, and other supported file type. This short tutorial will show you how to enable the preview pane in File Explorer on Windows 11.
Unlike thumbnail preview which has a fixed size depending on which view mode is selected, the preview pane is a resizable column which allows users to preview media in a much larger size.
Below are a few screenshots that show how it looks like to preview images, videos and text file via preview pane in File Explorer on Windows 11.
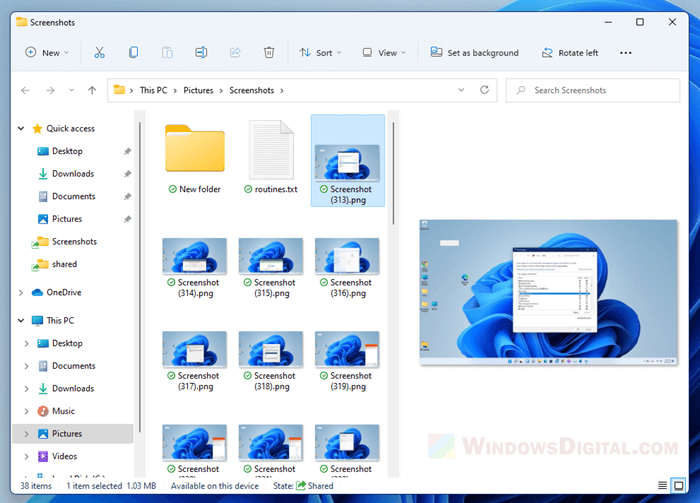
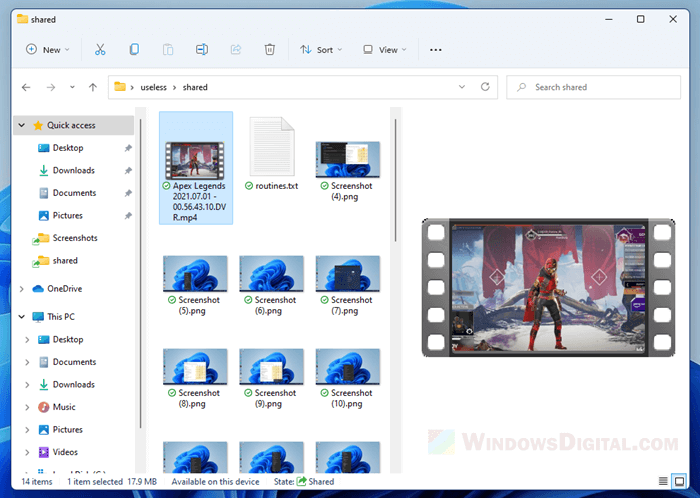
Note that video preview this way will only show a still image randomly taken from around the start of a video. It does not play the video in the preview pane.
How to preview files and medias in folder on Windows 11
To preview files, photos, videos and other supported file type directly in the folder without opening them, you need to first enable the preview pane in Windows 11 File Explorer. Follow the steps below to do so.
- In Windows 11, open File Explorer.
- On the menu bar, click on View.
- Next, hover your mouse over the Show option.
- Then, click on Preview pane.

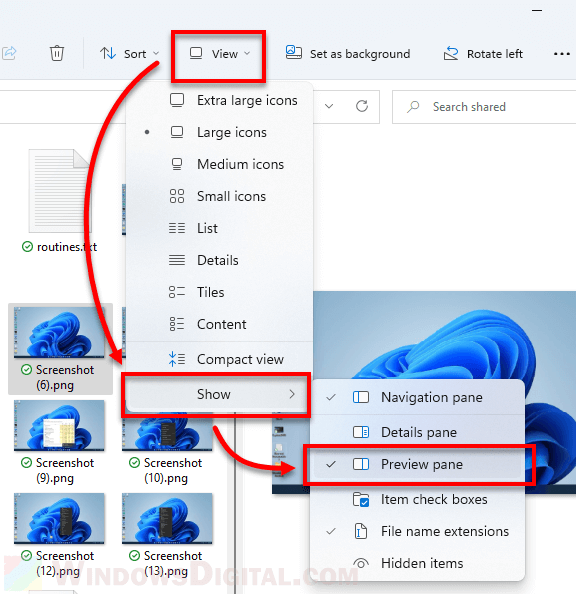
A new pane will appear on the right side in the File Explorer window. When you select a file in the current folder, a preview will be shown in the preview pane. Now try to select/highlight any file in any folder, a preview of the selected item will be shown in the preview pane, provided if the file type is supported.
How to preview photos and videos thumbnails in File Explorer
Another method to preview media files in file explorer is by simply enabling thumbnail viewing and change the view mode to larger icons such as “Large icons” or “Extra large icons” mode.
The view mode is saved separately in each folder/directory. This means that if you change view mode in folder A, it won’t affect the view mode in folder B.
To change the view mode of a folder in File Explorer, browse to the folder, click on View on the menu bar, and then select a view mode you want to change to.
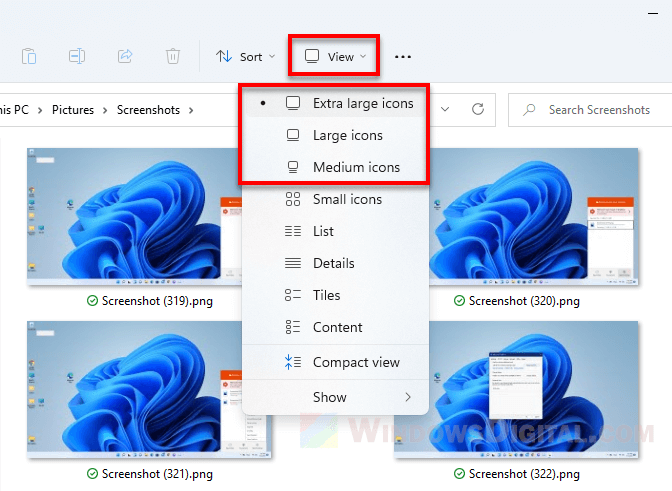
Thumbnails of files are only viewable in “Extra Large icons”, “Large icons” and “Medium icons” mode. Other view modes will only display the icon of the app used to open the file type. The extra large icons mode is the largest view mode you can set for thumbnails in Windows 11 File Explorer.
File Explorer shows app icons instead of thumbnails for images and videos
If you see app icons instead of the actual thumbnails of the image or video files, for example, all image files shows Photos app icon (the default app to open the image file) instead of the actual images as the thumbnails, here’s what you need to do.
In File Explorer, click on the triple dotted icon on the menu bar, then select Options.
In the Folder Options window, click on View tab. Under Advanced settings, uncheck the checkbox for “Always show icons, never thumbnails” option. Click Apply, then OK to save the changes.
The thumbnails of the media files should show the correct images now.
For video files that still fail to show the thumbnails but instead showing the app icon of the video player, it likely indicate that the video file type does not support displaying thumbnail in File Explorer. To solve this, you may need to install video codec packs to add supports for displaying the thumbnail of various video file types. We recommend K-lite Codec Pack by codecguide.com.
The preview pane in Windows 10 can be handy since you can preview your files without having to open them. Along with the Preview Pane feature, you have the Details pane that gives you additional information about your file.
The good news is that both features are easy to enable, and you don’t have to follow different steps to access them. Once you enable the feature, it stays on. You won’t have to turn it on every time you use your computer.
To open File Explorer, right-click on the Windows Start menu and click on File Explorer. When it’s open, click on the View option (it’s the last one to the right).

If you hover the cursor over the option, it’s let you know that it’s the Preview Pane, but it’ll also show you the keyboard shortcut to hide or unhide the Preview Pane.
To enable the Details, you just need to click on the option right below the one indicated in the image above. It’ll be enabled as soon as you click on it without the need to restart the File Explorer.
Once you enable it, it stays on. It’ll show you information such as:
- Tags
- Rating
- Dimensions
- Size
- Title
- Authors
- Comments
- Camera maker
- Camera model
- Subject
The keyboard shortcut for the Details Pane is different since the keyboard shortcut for the Preview Pane is Alt + P, while the shortcut for the Details Pane is Alt + Shift + P.
If you ever want to unable to Preview or Details Pane, just follow the steps to enable them and click on the option. It’ll be disabled as soon as you click on it.
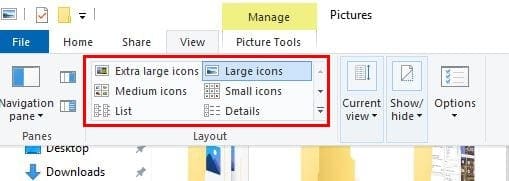
As long as you’re in the View tab if the File Explorer, you can use other preview options. For example, you can choose to preview your files with Extra large icons, Large icons, Medium icons, Small icons, List, and Details.
Conclusion
The Preview Pane is a great way to see your files when the Preview icons are too small. It’s also a comfortable feature since you turn it on once and forget about it. Do you find the Preview Pane Useful? Share your thoughts in the comments below.
In an age where digital files dominate our lives, effective file management is crucial for enhancing productivity and streamlining workflows. Windows File Explorer serves as the primary interface for navigating and managing files and folders on Windows operating systems. One useful feature within File Explorer is the ‘Preview Pane’, which allows users to view file content without opening the file itself. In this comprehensive tutorial, we will delve into how to enable or disable the Preview Pane in File Explorer on both Windows 10 and Windows 11.
Understanding the Preview Pane
The Preview Pane is a horizontal panel located on the right side of the File Explorer window. When activated, it displays a preview of selected files, making it easier for users to quickly ascertain the content of documents, images, videos, and more. This feature is particularly useful for individuals who handle multiple files and require a quick glance at the content without the need to open each file separately.
Benefits of Using the Preview Pane
- Efficiency: Quick access to file previews can significantly reduce the time spent opening and closing files.
- User Experience: Enhanced navigation through files with visual previews improves overall user satisfaction.
- Multi-tasking: Users can efficiently manage multiple files, especially when working on projects that require frequent references to various documents or media.
- Organizational Aid: The Preview Pane can help users gauge file contents, allowing for better organization and decision-making regarding file management.
Enabling the Preview Pane in Windows 10
Step-by-Step Guide
-
Open File Explorer: Launch File Explorer by clicking the folder icon located on the taskbar or pressing
Windows + Eon your keyboard. -
Navigate to the View Tab: Once File Explorer is open, look for the ribbon at the top of the window and click on the View tab to access various viewing options.
-
Enable the Preview Pane: In the ribbon, find the Preview Pane option. Click on it, and you will notice the Preview Pane display appear on the right side of the window. If it is colored, it is activated.
-
Selecting a File: Click on any supported file type (such as a document or image) to view its preview in the pane. The Preview Pane will instantly display the content you selected.
Supported File Types
The Preview Pane supports various file types, including:
- Text files (e.g., .txt, .docx)
- Spreadsheets (e.g., .xlsx)
- PDFs (e.g., .pdf)
- Images (e.g., .jpg, .png, .gif)
- Videos (e.g., .mp4, .avi)
Disabling the Preview Pane in Windows 10
If you prefer a more streamlined view without the Preview Pane, disabling it is just as straightforward:
-
Access File Explorer: Open File Explorer using the method mentioned earlier.
-
View Tab: Click on the View tab in the ribbon at the top of the window.
-
Disable the Preview Pane: Click on the Preview Pane button again (it should now be highlighted). This action will deactivate the Preview Pane, leaving your File Explorer uncluttered.
-
Check Changes: Ensure that the Preview Pane has disappeared from the right side of the File Explorer window.
Enabling the Preview Pane in Windows 11
Windows 11 introduces a fresh user interface design that modifies some components of File Explorer, including the Preview Pane. The steps to enable or disable it are slightly different compared to Windows 10.
Step-by-Step Guide
-
Open File Explorer: Launch File Explorer by clicking the folder icon on the taskbar or pressing
Windows + E. -
Access the View Options: In the upper right corner of the File Explorer window, locate the three horizontal dots (more options icon) and click on it.
-
View Menu: Hover over the View option in the drop-down menu to see additional viewing options.
-
Enable Preview Pane: Select the Show Preview Pane option. The Preview Pane will appear on the right side of the File Explorer window and will be activated for viewing.
-
Selecting a File: Again, click on a supported file type, and the Preview Pane will display the content for quick viewing.
Disabling the Preview Pane in Windows 11
To disable it in Windows 11, follow these steps:
-
Open File Explorer: Access File Explorer in the same way mentioned above.
-
More Options: Click on the three horizontal dots in the upper right corner to open the menu.
-
View Menu: Hover over the View option.
-
Hide Preview Pane: Click on Show Preview Pane to uncheck it. The Preview Pane will no longer be visible in your File Explorer.
Troubleshooting Common Issues with the Preview Pane
While the Preview Pane is generally a helpful feature, users may occasionally encounter issues. Here are some common problems and their solutions:
1. Preview Pane Not Displaying
- Issue: The Preview Pane may not display even when enabled.
- Solution: Ensure that you have selected a file type that is supported by the Preview Pane. If no suitable files are selected, the pane may remain empty.
2. File Associations
- Issue: Some file types may not preview correctly if their default applications are not configured properly.
- Solution: Check your file associations in the settings. Right-click the file, go to Open with, and ensure it is associated with the correct application.
3. Performance Lag
- Issue: If File Explorer is lagging or freezing while using the Preview Pane, it may affect the loading of file previews.
- Solution: Close unnecessary applications to free up system resources or restart File Explorer.
4. Missing Preview for PDFs
- Issue: Sometimes, the Preview Pane may not work with PDF files.
- Solution: Ensure you have a compatible PDF viewer installed (like Adobe Acrobat Reader) and set it as the default program for opening PDF files.
Customizing File Explorer
Alongside enabling or disabling the Preview Pane, you can customize other elements of File Explorer to enhance your file management efficiency.
Changing the Layout
You can change how files are displayed (details, list, icons) through the View tab. Selecting Details provides a more comprehensive overview of your files, while Icons offers a more visual representation.
Sorting Files
Sorting files by name, date modified, type, or size can help in locating files quickly. This can be done in the View menu by selecting Sort by.
Using Quick Access
The Quick Access feature allows you to pin frequently used folders and files for easy access. You can also see recent files here, making it easier to locate documents you’ve been working on.
Grouping Files
Grouping by type or date can also aid in file organization. This option is available in the View menu under Group by.
Advanced Preview Options
For users who engage in heavy file management, consider exploring third-party file management tools that offer advanced preview functionalities or additional customization options for File Explorer.
Third-Party Preview Tools
Several third-party applications extend the functionality of the Windows Preview Pane, allowing users to preview a wider variety of file formats and even integrate cloud storage services for easy access. Some popular options include:
- FileViewer: Supports over 200 file formats and is designed to offer comprehensive previews.
- QuickLook: A lightweight application that enables quick file previews with a hotkey, similar to the Mac’s Quick Look feature.
System Performance Optimization
To ensure that the Preview Pane functions smoothly, keep your operating system updated and perform regular maintenance on your computer. This includes:
- Disk Cleanup: Regularly remove unnecessary files.
- Defragmentation: Run disk defragmentation on traditional hard drives to improve performance.
- Malware Scans: Conduct regular malware scans to keep your system free from malicious software.
Conclusion
The ability to enable or disable the Preview Pane in Windows File Explorer is a valuable feature that enhances file management by offering quick access to file content without the need to open each one individually. By following the outlined steps in this tutorial, users can easily customize their File Explorer experience in both Windows 10 and Windows 11.
Whether you choose to enable the Preview Pane for efficiency or disable it for a cleaner interface, understanding this feature’s functionality and configuration can significantly impact your file management practices. Explore different file types, adjust File Explorer settings to suit your needs, and consider third-party applications for an even more streamlined workflow.
By mastering the Preview Pane, you can elevate your productivity, making your digital experience more organized, efficient, and enjoyable. Whether you are a casual user or a professional who frequently works with files and media, leveraging this feature will undoubtedly enhance your workflow in the vast digital landscape. Happy file managing!