

Бесконечная подготовка автоматического восстановления Windows
Если вы включаете компьютер, а на мониторе вместо привычного экрана загрузки отображается фраза «Готовится автоматическое восстановление», это значит, что операционная система пытается исправить какие-то критические для её работы ошибки. Если так продолжается долго, значит, ей это не удается.
В этой статье мы рассмотрим, почему возникает ошибка подготовки автоматического восстановления Windows 10 и что можно сделать.
Почему так происходит
Причины появления ошибки с циклической подготовкой автовосстановления:
- Некорректное выключение ПК — без использования кнопки «Пуск», нажатием на кнопку выключения на ноутбуке или системном блоке. Сюда же относится сбой питания или сбой в работе операционной системы (ОС). Из-за нештатного выключения могут повредиться файлы, отвечающие за работоспособность ОС, или реестр.
- Повреждение системных файлов или драйверов из-за вирусов, сбоев программ или обновлений. Вредоносный софт изменяет или удаляет важные компоненты Windows 10, блокирует доступ к ним.
- Конфликты между установленными драйверами и обновлениями, приводящие к появлению «черного экрана» или ошибки.
- Мало свободного места в системном разделе диска. Для корректной работы Виндовс 10 требуется не менее трех гигабайт свободного пространства на диске C, где хранятся системные файлы. Если это пространство заканчивается, ОС будет«висеть», работать нестабильно или перестанет загружаться.
В во всех этих случаях операционная система пытается решить проблему самостоятельно, запуская процедуру восстановления в автоматическом режиме. Когда у неё это не получается, необходимо вмешательство пользователя. Расскажем, что можно предпринять.
Загрузка компьютера в безопасном режиме
Когда подготовка автоматического восстановления Windows 10 не завершается благополучно, в первую очередь нужно воспользоваться безопасным режимом.
В этом режиме запускается минимум программ и драйверов: только самые нужные. Это позволяет избежать конфликтов с потенциально проблемными компонентами, проверить и вернуть операционную систему в рабочее состояние даже в случае «чёрного экрана».
Раньше в такой режим можно было зайти, нажав F8 в процессе перезагрузки системы, но в Windows 10 придется использовать более сложный способ, описанный ниже.
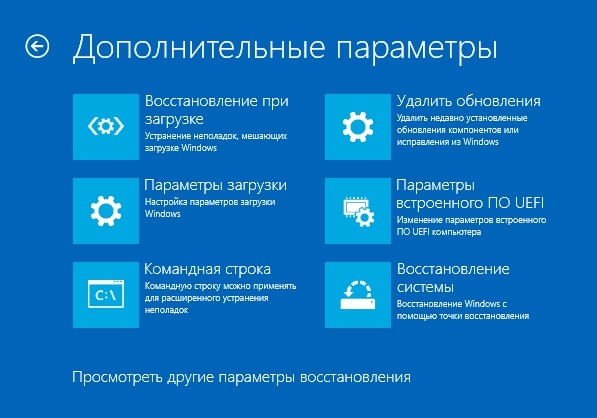
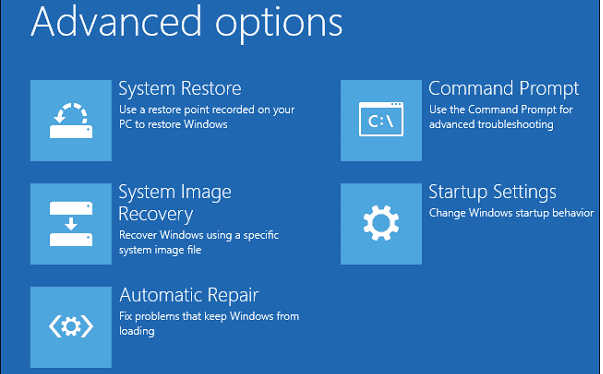
После автоматической диагностики отобразится экран автовосстановления. Нажмите кнопку «Дополнительные параметры»:

Затем перейдите в «Поиск неисправностей» и снова выберите опцию «Дополнительные параметры»:

- Щелкните на «Устранение неполадок»;
- Внутри откройте раздел «Дополнительные параметры»;
- Перейдите в меню «Параметры загрузки»;
- Внутри нажмите «Перезагрузить»;

- После перезагрузки ПК на мониторе отобразятся опции загрузки Windows 10. Чтобы загрузиться в безопасном режиме с поддержкой сети, то есть подключением к интернету, нажмите клавишу F5.
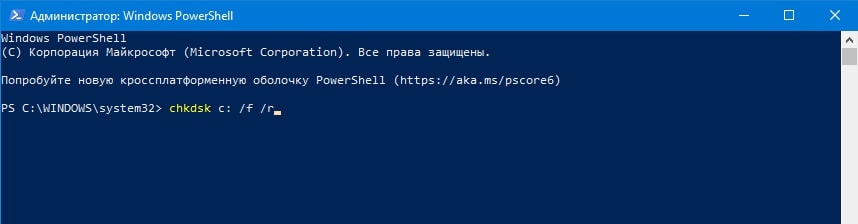
После того, как ваш компьютер включился в этом особом режиме, нужно найти, что пошло не так:
- Запустите утилиту проверки HDD (chkdsk), чтобы проверить, какие ошибки или поврежденные сектора удастся обнаружить. Для этого откройте командную строку (ее можно вызвать просто через поиск на панели управления) и введите в ней команду chkdsk c: /f /r (здесь c: это буква системного раздела, если система установлена на другом диске, то замените букву).
Команда инициирует проверку диска с исправлением ошибок и поиском поврежденных секторов.

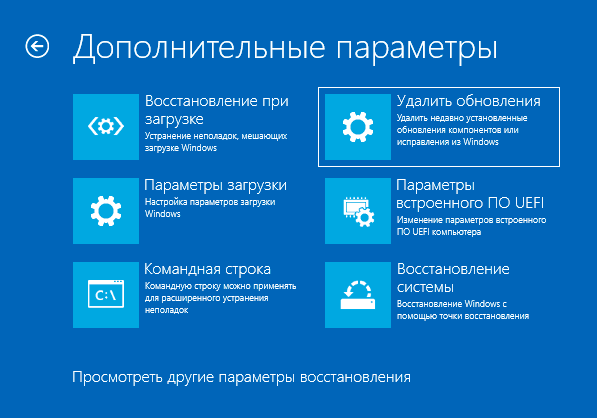
- Удалите недавно установленные обновления ОС, из-за которых могли возникнуть конфликты или ошибки. Нажмите «Удалить обновления» и выберите «Удалить последнее обновление компонентов»;
- Проверьте, сколько места есть на диске с системой. Освободите как минимум три гигабайта;
- Перезагрузите ПК, проверьте, загружается ли Windows 10 без ошибок. Если компьютер все еще не включается корректно, попробуйте следующий способ.
Обновление или переустановка драйверов
Еще одна возможная причина бесконечной подготовки автоматического восстановления Windows 10 — некорректная работа драйверов. Так называются небольшие утилиты, обеспечивающие взаимодействие ОС с аппаратной частью ПК.
Если драйверы не подходят к вашей модели устройства или они не совместимы с установленной версией ОС, они может вызывать проблемы при загрузке Windows. Чтобы исправить это, нужно обновить или переустановить драйверы для некоторых устройств:
- Чипсет — набор микросхем на материнской плате , отвечающий за корректную работу шины данных, контроллеров памяти, жёсткого диска. Именно драйвер чипсета обеспечивает правильное распределение ресурсов и оптимизацию работы системы.
- Управление электропитанием — функция ОС и аппаратного обеспечения компьютера или ноутбука, позволяющая экономить энергию за счет перевода устройств в режимы энергосбережения: сна, гибернации или выключения. Драйвер управления электропитанием координирует работу этой функции и предотвращает возможные конфликты при переключении режимов.
- Другие устройства — все остальные компоненты: GPU, CPU, сетевая карта, клавиатура, мышь. Для корректного распознавания этих устройств тоже нужны драйверы.
Чтобы исправить возможные проблемы с драйверами::
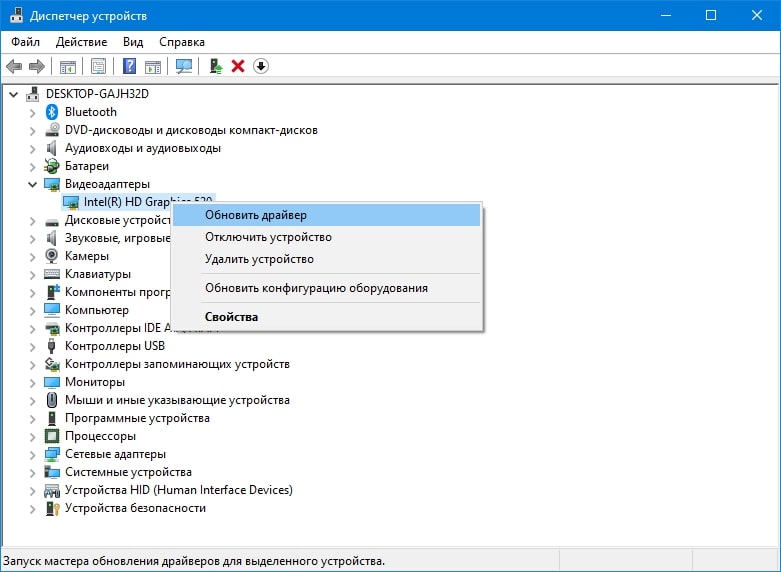
- В панели «Пуск» найдите диспетчер устройств.
- Правой кнопкой мыши кликните по нужному устройству.
- Нажмите «Обновить драйвер», а дальше следуйте подсказкам. Можно доверить ОС найти и скачать его самой или указать путь к скачанному вами драйверу. Рекомендуем не загружать драйвера со сторонних сайтов, лучше скачать их напрямую с официального сайта производителя (например, Леново, Асус, HP).

- Если вы хотите не обновить существующий, а заново установить драйвер, нажмите «Удалить», подтвердите действие и перезагрузите компьютер. После перезагрузки ОС сама найдет и поставит нужный драйвер.
Снова перезагрузите компьютер и проверьте, загружается ли он теперь корректно.
Отключение быстрого запуска
Особенности работы этой функции — еще одна возможная причина, почему висит подготовка автоматического восстановления.
Быстрый запуск в «десятке» включен по умолчанию. Это помогает уменьшить время, за которое загружается система, благодаря тому, что часть системных данных сохраняется в специальном файле, который называется «hiberfil.sys». Когда компьютер включается, эти данные сразу подгружаются в оперативную память и восстанавливают состояние ОС.
Функция может приводить к конфликтам в том случае, когда компьютер выходит из режима гибернации, а в системе или подключенном оборудовании произошли изменения. Так получается потому что в таком случае данные больше не соответствуют тем, что сохранены в специальном файле.
Для решения проблемы нужно отключить быстрый запуск. Это можно сделать двумя способами.
Через настройки питания
- Перейдите в панель управления (нажмите левой клавишей мыши на кнопку «Пуск», а потом на «Панель управления»);
- Выберите «Система и безопасность»;
- Дальше вам нужен пункт «Питание»;
- Потом кликните на опцию «Действия кнопок»;
- Нажмите на «Редактирование параметров, недоступных сейчас»;
- Кликните на отметку «Деактивировать быстрый запуск»;
- Выберите «Сохранить изменения».
Через реестр
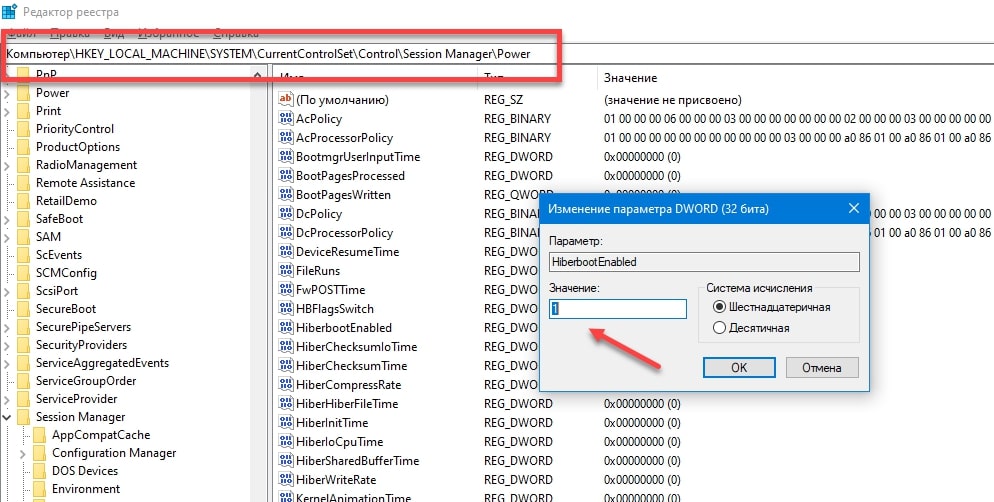
- Нажмите комбинацию «горячих» клавиш «Win + R», введите команду regedit;

- Откройте ветку HKEY_LOCAL_MACHINE\SYSTEM\CurrentControlSet\Control\Session Manager\Power;
- Выберите HiberbootEnabled и дважды кликните по нему;;
- Измените значение параметра на 0 вместо 1, подтвердите, нажав «ОК».

Перезагрузите ПК и проверьте, загружается ли Windows 10 нормально.
Системные средства автоматического восстановления
Эти функции проверяют состояние аппаратной части ПК, помогают восстановить поврежденные или утерянные системные файлы из резервной копии, позволяют сбросить систему до заводских настроек.
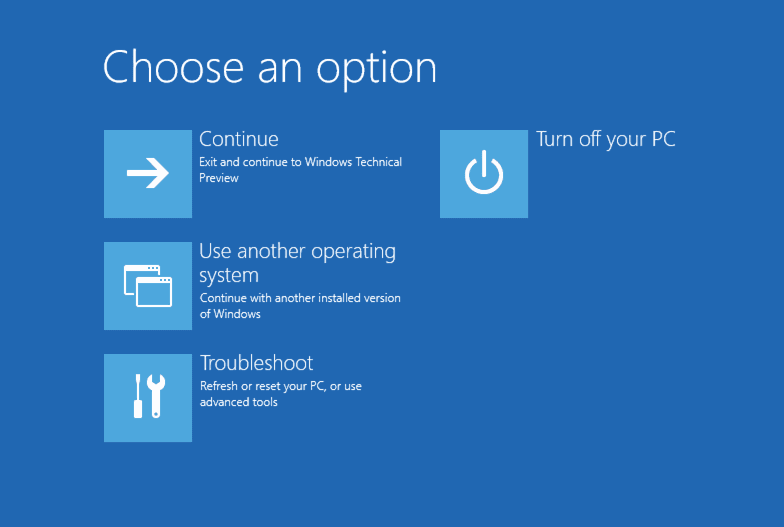
- При появлении экрана «Автоматическое восстановление» выберите опцию «Дополнительные параметры»;
- Затем нажмите на «Устранение неполадок».
Отобразятся варианты действий:
- Точка восстановления — эта функция «откатывает» все изменения в системе к тому состоянию, которое было на определенную дату. Актуально в тех случаях, когда проблемы с загрузкой возникли в результате установки каких-то программ или обновлений, которые повлияли на работу системы.
Для восстановления выберите соответствующий пункт, укажите одну из доступных точек по дате и описанию. Подтвердите начало процесса восстановления, дождитесь его завершения.
- Сброс системы до заводских настроек — функция, которая полностью очистит HDD от всей информации и установит заново операционную систему. Эту опцию можно использовать, если не получается убрать проблему с загрузкой ОС рассмотренными выше способами.
Для сброса нужно выбрать соответствующий пункт. Далее один из двух вариантов: «Сохранить мои файлы» или «Удалить все». Первый способ позволит сохранить личные файлы (документы, фотографии, музыку и т.д.), но удалит программы и настройки. Второй приведет к полной очистке жесткого диска и установке чистой копии операционной системы.
После использования одного из инструментов автоматического восстановления перезагрузите ПК и проверьте работоспособность системы.
Кратко о том, что делать, когда компьютер по кругу пытается восстановить Windows
- Попробуйте загрузить систему в безопасном режиме. Далее: выполните проверку HDD на ошибки, удалите последние установленные обновления, проверьте, достаточно ли места на жёстком диске;;
- Обновите, либо заново переустановите драйверы для CPU, управления электропитанием, GPU;
- Отключите функцию быстрого запуска, приводящую к конфликтам при восстановлении из режима гибернации;
- Используйте средства автоматического восстановления, предлагаемые ОС: сброс системы до заводских настроек или восстановление из образа системы.
Техническое обслуживание HYPERPC
Компания HYPERPC специализируется на профессиональном обслуживании ПК и ноутбуков. Мы делаем ремонт качественно и быстро, так что ваша техника будет находиться в надежных руках. Сервис-центр HYPERPC.
Некоторые пользователи Windows 10 сталкиваются с тем, что после обновлений, а иногда и без четко определяемых причин, при включении компьютера или ноутбука постоянно появляется надпись «Подготовка автоматического восстановления», сменяющаяся «Диагностика компьютера», переводящая в итоге на экран «Автоматическое восстановление» в Windows 10.
В этой инструкции подробно о возможных методах исправить постоянное автоматическое восстановление Windows 10 и вернуть нормальную загрузку компьютера.
- Постоянное автоматическое восстановление после выключения, а при перезагрузке ошибок нет
- Способы вручную исправить проблемы, приводящие к автоматическому восстановлению
- Как отключить автоматическое восстановление Windows 10
- Видео инструкция
Автоматическое восстановление только после завершения работы, после перезагрузки Windows 10 работает

Один из распространенных вариантов — подготовка автоматического восстановления, диагностика компьютера Windows 10 и последующие этапы проявляют себя только после завершения работы при очередном включении компьютера или ноутбука, а нажатие кнопки «Перезагрузить сейчас» или простая перезагрузка решает проблему. Также возможен вариант, когда появление проблемы зависит от того, как долго компьютер пробыл в выключенном состоянии или выключался ли он из розетки.
В описанных выше случаях могут помочь следующие варианты решения проблемы:
- Отключить быстрый запуск Windows 10 (самый быстрый метод и необходимый, если проблема возникает на ПК после выключения из розетки, а не выключать вы его не готовы).
- Вручную установить драйверы чипсета и управления электропитанием, а для Intel — также драйверы Intel ME (Management Engine Interface) с официального сайта производителя ноутбука или материнской платы, даже если на официальном сайте они не самые новые.
- Для ПК при включенной функции «Быстрый запуск» — не отключать компьютер от электросети.
Суть в данном случае сводится к тому, что Windows 10 при включенной по умолчанию функции «Быстрый запуск» и завершении работы не выключается «полностью», а переходит в подобие гибернации. При неправильной работе драйверов чипсета и управления электропитанием (а нередки случаи, когда такую неправильную работу вызывают автоматически устанавливаемые Windows 10 драйверы, несмотря на их совместимость), а также при полной потере питания (например, выключили ПК из розетки), повторное восстановление из этой гибернации может приводить к сбоям и автоматическому восстановлению.
Исправление проблем, вызывающих автоматическое восстановление вручную

После автоматической диагностики компьютера Windows 10 пользователь попадает на экран «Автоматическое восстановление», дающий доступ к различным инструментам восстановления, которые можно использовать, чтобы исправить проблему:
- На экране «Автоматическое восстановление» нажмите «Дополнительные параметры».
- В открывшемся меню среды восстановления перейдите в «Поиск и устранение неисправностей» — «Дополнительные параметры».

- В появившемся меню вы можете использовать сразу многие варианты восстановления, в зависимости от того, после чего возникла проблема. Если вы не знаете это точно, рекомендую использовать варианты по порядку.
- Если проблема появилась после установки каких-либо программ, манипуляций с системным реестром Windows 10, попробуйте пункт «Восстановление системы» для использования точек восстановления. При их наличии на компьютере велика вероятность, что проблему удастся исправить.
- В случае, если «Автоматическое восстановление» стало беспокоить после установки обновлений Windows 10, перейдите в раздел «Удалить обновления» и попробовать сначала пункт «Удалить последнее исправление», а если он не поможет — «Удалить последнее обновление компонентов». При запросе пароля и в случае, если у вас нет никакого пароля учетной записи, оставьте его пустым, также учитывайте, что если вход в систему осуществляется по ПИН-коду, здесь потребуется вводить не его, а именно пароль.

- При появлении постоянной подготовки к автоматическому восстановлению после сбоев питания, установки второй ОС или действий с разделами жесткого диска или SSD, попробуйте использовать пункт «Восстановление при загрузке». Так же тут может быть полезной инструкция Восстановление загрузчика Windows 10.
- Если ни один из вариантов не помогает, проверьте, работает ли безопасный режим, для этого в меню выберите «Параметры загрузки», нажмите кнопку «Перезагрузить», а после появления меню выборов вариантов загрузки нажмите клавишу 4 или F4 для входа в безопасный режим. Если зайти в безопасном режиме удалось, возможно, там вы сможете отменить действия, предшествовавшие появлению проблемы. Подробнее на тему — Безопасный режим Windows 10.


В крайнем случае помните о пункте «Вернуть компьютер в исходное состояние» в меню «Поиск и устранение неисправностей», позволяющий выполнить автоматическую переустановку Windows 10, в том числе с сохранением ваших данных.
Как отключить автоматическое восстановление Windows 10
Существует возможность отключить запуск автоматического восстановления Windows 10 и проверить, как система поведет себя в этом случае — в некоторых случаях это приводит к нормальной загрузке ОС, иногда — позволяет определить, в чем именно заключается проблема. Для отключения автоматического восстановления:
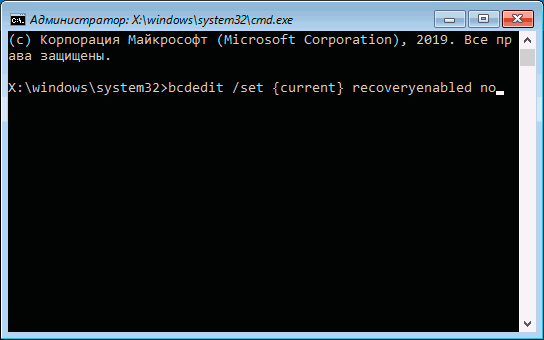
- Как и в предыдущем способе (шаги 1-3) перейдите к средствам восстановления системы.
- Откройте пункт «Командная строка».
- В командной строке введите
bcdedit /set {current} recoveryenabled noи нажмите Enter.

- Закройте командную строку, выберите пункт «Выключить компьютер», а затем снова его включите.
В дальнейшем, чтобы вернуть автоматическое восстановление, которое иногда может быть полезным — используйте командную строку (от имени администратора, если она будет запущена в работающей Windows 10) и команду
bcdedit /set {current} recoveryenabled yes
Бесконечное автоматическое восстановление Windows 10 — видео
Если вам всё ещё требуется помощь, опишите ситуацию и возможные причины появления проблемы в комментариях, постараюсь дать подсказку.
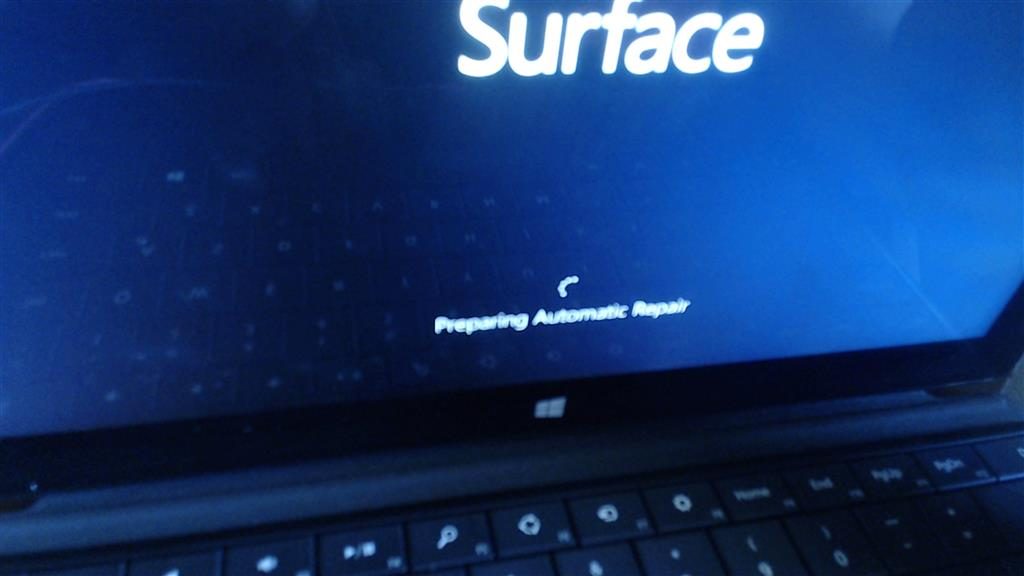
Хотя операционную систему Windows 10 постоянно усовершенствуют и шлифуют, она все еще содержит большее число ошибок, чем в предыдущих версиях. Например, пользователь может столкнуться с проблемой при загрузке операционной системы: на экране загрузки появится надпись “Preparing Automatic Repair”, но никакого восстановления не происходит, а Windows 10 не запускается. Что делать в таком случае, читайте в рамках этой статьи.
Об ошибке
Preparing Automatic Repair (подготовка автоматического восстановления) возникает в том случае, если по каким-то причинам Windows 10 повреждена. По сути, функция “подготовки” должна восстановить поврежденные файлы из сохраненных точек восстановления или установочных файлов Windows на подключенном внешнем носителе. Но за неимением таковых окно просто зависает и через некоторое время, происходит перезагрузка. И цикл повторяется заново, превращаясь в замкнутую петлю. Разорвите петлю, отключив на время питание и ознакомьтесь с инструкцией по исправлению.
Как исправить?
Есть несколько действенных советов устранения этой проблемы.
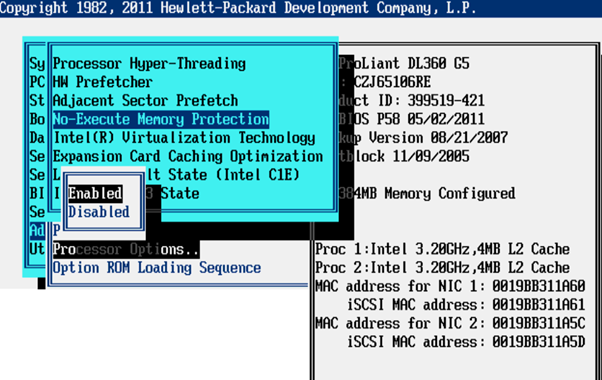
Включение XD-bit в BIOS
До тех пор пока функция XD-bit (также известная как No-Execute Memory Protect) выключена в настройках BIOS (UEFI), пользователь сталкивается с петлей Preparing Automatic Repair.
Интересно знать! Функция No-Execute Memory Protect – обеспечивает дополнительную защиту от хакерских атак, вирусов и подобных угроз на аппаратном уровне (аппаратная поддержка запрета исполнения кода программ из области данных). Впервые подобной функцией обзавелись в процессорах: AMD Athlon 64, Sempron на их базе, Intel Pentium 4 последней модификации и Celeron на их базе.
Включите ваш компьютер и войдите в BIOS (UEFI):
- Ищите во вкладках BIOS функцию XD-bit или No-Execute Memory Protect, затем выберите “Enable” для ее включения.

- Сохраните настройки и перезагрузите компьютер (F10 → Yes).
Увеличение места раздела “Зарезервировано системой”
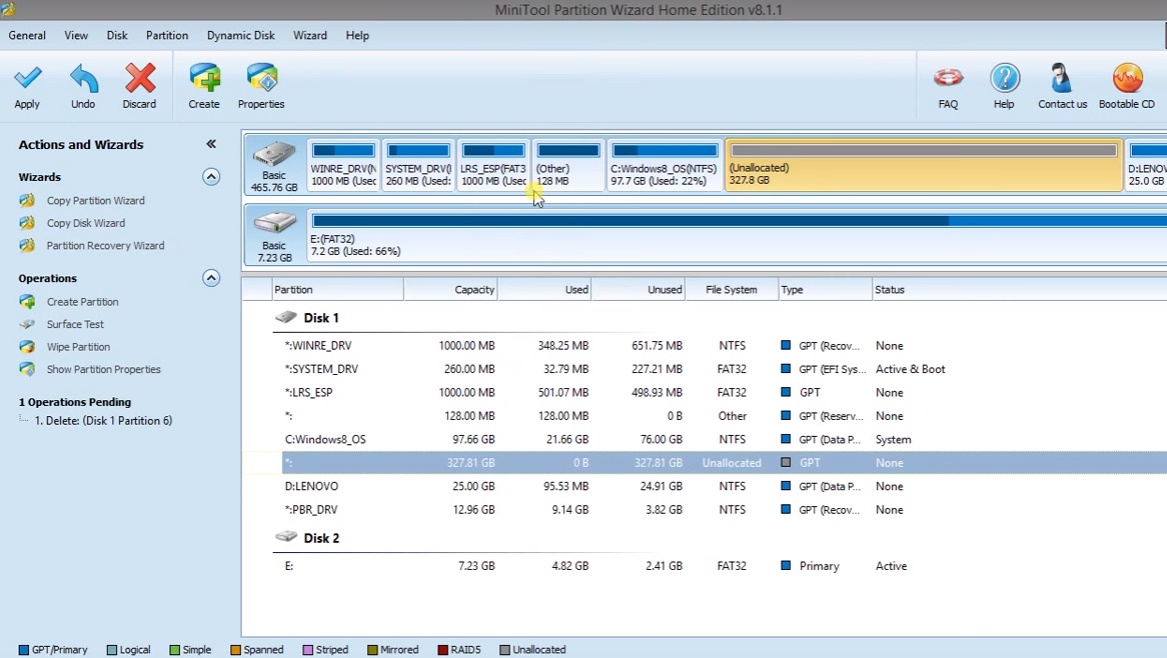
Ошибка может возникать из-за раздела “Зарезервировано системой” у которого меньше места, чем должно быть (нужно не менее 250 Мб). Чтобы увеличить место раздела воспользуйтесь загрузочной утилитой MiniTool Partition Wizard. Возможно, вам понадобится другой компьютер или попробуйте зайти в безопасный режим:
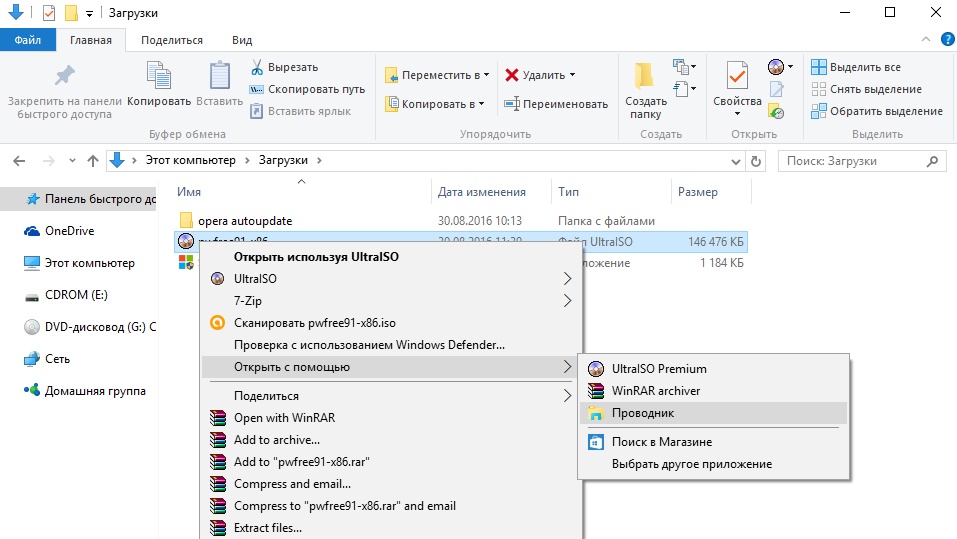
- Скачайте утилиту (ISO-файл).
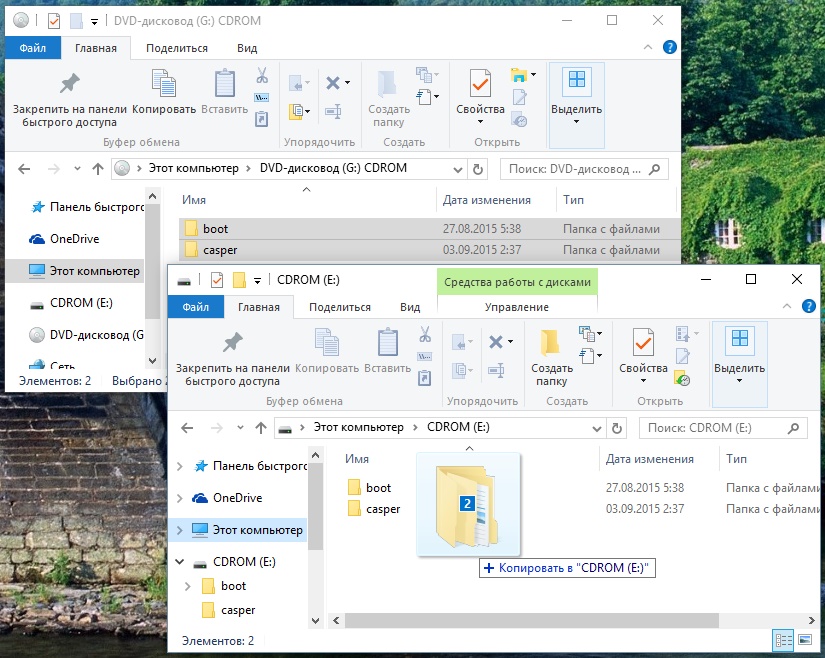
- Смонтируйте ее на виртуальный диск (ПКМ по файлу → открыть с помощью → Проводник).

- Подключите форматированную флешку FAT32, откройте виртуальный диск и перетащите на флешку файлы для записи.

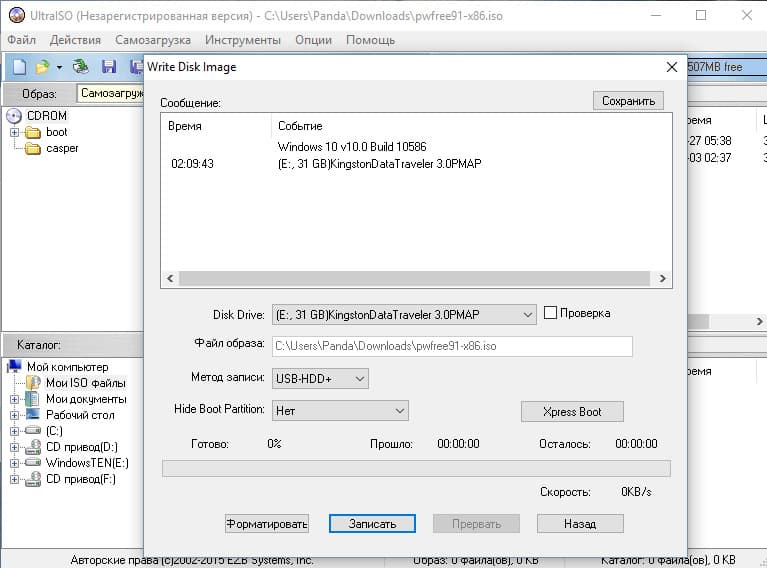
- Также, для записи утилиты на флешку с образа, вы можете воспользоваться любой удобной программой, например UltraISO.

- Перезагрузите компьютер и сделайте загрузку с флешки (с этим поможет статья “как поменять приоритет загрузки BIOS?”).
- Открытая программа позволит работать с жесткими дисками.

Нажмите правой кнопкой мыши по системному диску “С:” и нажмите “Shrink”. Отметьте область в 250 Мб. Создастся 250 МБ не размеченной области.
- Переместите раздел System Reserved рядом с неразделенной областью (unallocated space). Затем нажмите на ПКМ по System Reserved и выполните функцию Extend (Совмещение неразделимой области с томом Зарезервировано системой).
- Перезагрузите компьютер и проверьте работу Windows.
https://www.youtube.com/watch?v=KHuXmwexmFU
Восстановление системы
Можно восстановить Windows 10, используя загрузочный диск или флеш накопитель с дистрибутивом Windows:
- Создайте загрузочную флешку Windows 10 (подробнее об этом читайте в этой статье) и выполните загрузку с нее.
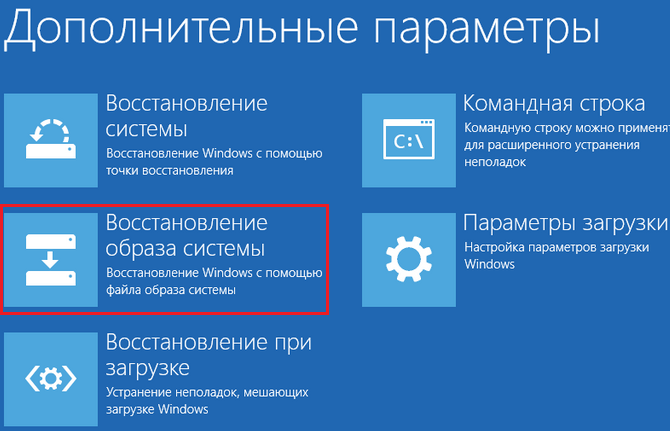
- В появившемся меню нажмите “Восстановление” (Repair your computer).
- В открывшемся меню нажмите “Диагностика” → “Восстановление образа системы”.

Переустановка Windows
Если не один из советов, описанных выше не помог запустить Windows, переустановите его с помощью созданной загрузочной флешки.
Совет! В случае, если вы беспокоитесь о сохранности лицензии Windows 10 после установки чистой ОС, ознакомьтесь с информацией.
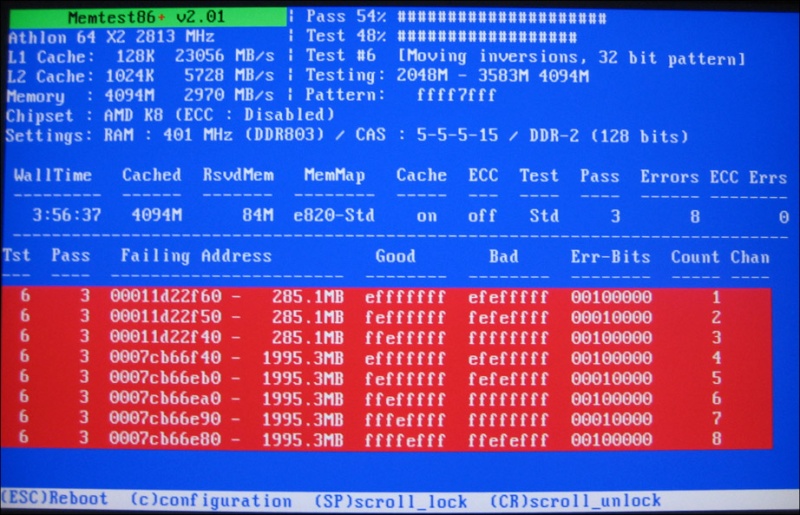
Проверка целостности жесткого диска и ОЗУ
Не исключается тот факт, что Windows не может загрузится из-за того, что системные файлы размещены на поврежденных секторах жесткого диска. Чтобы удостоверится, что с винчестером все в порядке, проверьте его на бэды и битые сектора. В этом может помочь программа Victoria (или ей подобные). Официального сайта у программы нет, поэтому поисковики вам в помощь.

Также проверьте оперативную память на ошибки. В этом вам поможет программа memtest86.
Возникли вопросы после прочтения статьи? Задавайте их в комментариях или воспользуйтесь специальной формой, чтобы связаться с нами.
Several Windows users, on various technology forums, such as Microsoft, Reddit, Dell, etc., have reported encountering the Preparing Automatic Repair error with different case scenarios. It is a problematic error as users cannot access their systems or even encounter blue or black screens. However, you can fix the error and get your system back in its functional state by following some easy-to-follow fixes mentioned in this post. Let’s get started!
What Does ‘Preparing Automatic Repair’ Mean?
Windows 10 offers multiple recovery options to its users to deal with several critical errors. One of those recovery options is Automatic Repair that is designed to automatically troubleshoot common boot-related errors. However, sometimes, this feature fails and results in the Preparing Automatic Repair error. It is a system error that usually occurs while booting the system. However, users have reported multiple other situations when they’ve been troubled by this error, such as:
- While replacing the graphics cards
- Changing the system’s network type from public to private
- Force shutting down the system when it’s not going into sleep mode
- After installing a recent update
What Causes the Preparing Automatic Repair Error?
Hardware failure is usually the primary reason behind this error. However, there are other reasons that may also lead to the problem, such as:
- Missing or damaged system files
- Faulty graphics card drivers
- Problematic Windows update
- Broken system installation files
- Malware attack
Here are some easy-to-use solutions to fix the Automatic Repair Windows 10 error.
Note: Take back up of your data (if possible) or recover data from your system using professional data recovery software before applying the following methods.
Method 1: Perform a Hard Reboot
Firstly, forcefully restart your PC by removing the battery and the AC adapter. After that, hold the power key for about 40 seconds and re-plug the power back. Now, check if the error is solved and your system restarts normally.
If this doesn’t help, proceed with the next solution.
Method 2: Boot your PC in Safe Mode
You can try to boot your system in Safe Mode to bypass the ‘Preparing Automatic Repair’ error in Windows 10. Follow the given steps:
- Reboot your system using the Power button and press F8, F12, or F2 while it reboots.
- When you start seeing the Windows logo on the screen, turn off your system again. Repeat this step thrice, after which you’d reach the Automatic Repair environment.
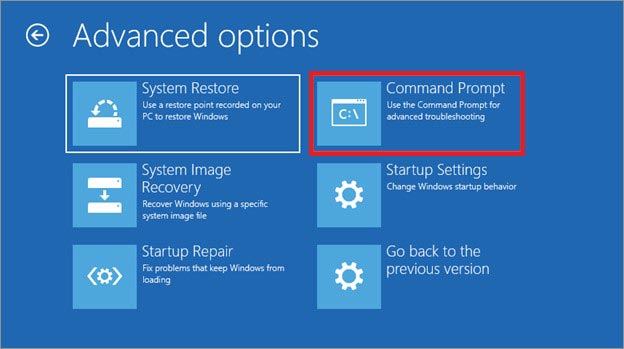
- There, click Advanced options and select Troubleshoot on the next prompt.
- Choose Advanced options again and click Startup Settings > Restart.
- Press F4 to enable Safe Mode. Once done, check if the problem is fixed.
Method 3: Disable Automatic Repair on Startup
You can also try to resolve the Preparing Automatic Repair stuck or loop error by disabling or turning off the Automatic Repair on startup. To do so, follow the given instructions:
- Force reboot your system with the Power button and repeat the steps mentioned above to reach the Automatic Repair environment.
- Next, click Advanced options > Troubleshoot > Advanced options > Command Prompt.
- In the elevated Command Prompt window, type bcdedit / set {current} recoveryenabled No and hit Enter.
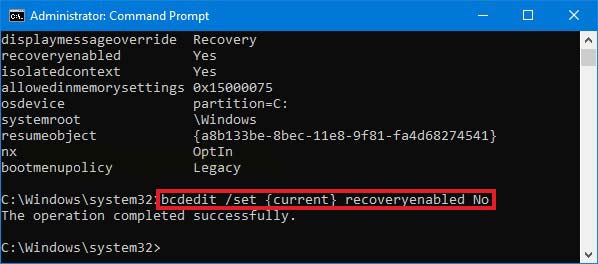
- Wait until the process completes, then type exit and hit Enter.
- Now, reboot your system and check if the error persists.
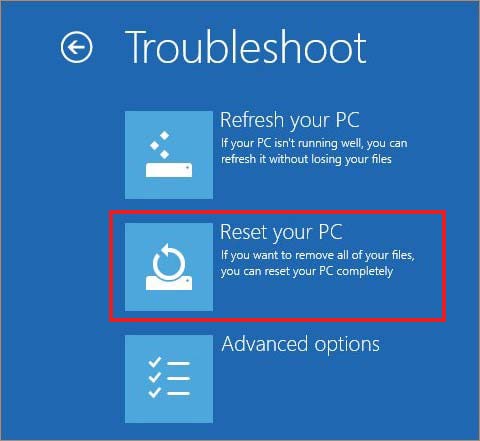
Method 4: Reset your PC
Resetting your PC is the official Windows solution to fix the Preparing Automatic Repair black screen error on Windows 10. You can either update or reset the PC directly. Follow the given steps:
- Reboot your system and when it shows the Windows logo on the screen, turn it off again forcefully with the Power key.
- Repeat the steps until your system reaches the Windows recovery environment.
- There, click Advanced options > Troubleshoot > Reset your PC.
- Next, choose between ‘Keep my files’ and ‘Remove everything’.
Note: It’s recommended to choose ‘Remove everything’ to make the process work. It will remove incorrect or corrupt system settings, drivers, apps, software, etc., causing the error.

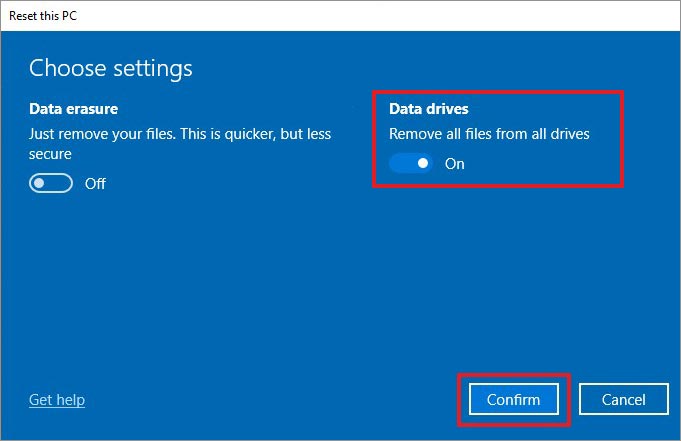
- Now, you’ll get to choose between two options – Just remove your files and Remove all files. You can select one of them by reading the instructions. Additionally, you can click ‘Change Settings.’
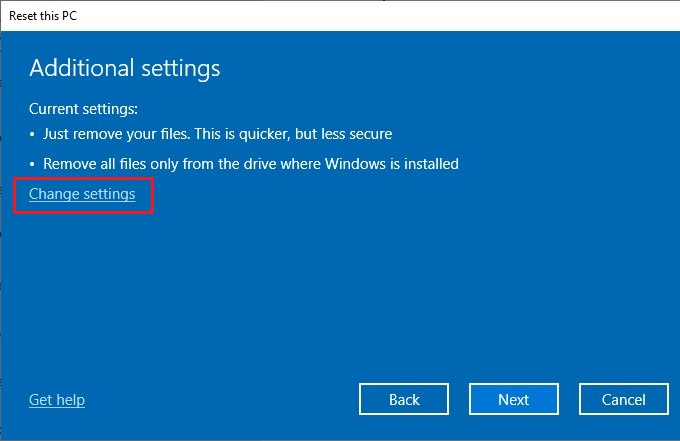
- If you click ‘Change Settings,’ you’ll be prompted with two options again – Data erasure and Data drives.
- We suggest you choose Data drives to run the process efficiently. Finally, click Confirm.
- If any other instruction is there to complete the process, follow it. Once done, restart the system and see if the error is fixed.
Method 5: Reinstall Windows 10
If none of the above methods helps resolve the Preparing Automatic Repair error on Windows 10, you can reinstall the Windows OS. To reinstall Windows 10, you will need a USB installer created with Media Creation Tool. Remember that Windows reinstallation will overwrite the partition data on which the OS is installed.
Additionally, all apps that came preinstalled with your PC or installed later manually will be removed. Some customized settings, such as the Power and Sleep settings, will also change to the default settings, affecting your hardware performance.
Hence, back up anything you want to keep before you begin or recover data using powerful data recovery software.
FAQ
What is Automatic Repair?
Automatic Repair is a primary Windows troubleshooting tool that lets you fix critical system errors. This built-in feature helps you restore Windows even when you can’t boot into it normally or face any boot-up error.
Why is my computer showing an Automatic Repair loop?
Sometimes, your Windows may be stuck in an unusual Preparing Automatic Repair loop because of faulty Windows update, missing or damaged system files, Windows registry, or corrupted hard drives.
How long does automatic repair take on Windows 10?
Usually, Windows take around 15 minutes to complete the Automatic Repair process. So you’re advised not to interrupt the process. But if it keeps showing ‘Preparing Automatic Repair’ on your Windows 10 system for about 1 hour or so, it’s a sign of a problem.
How to recover data when the system doesn’t boot?
If you can’t boot into your system normally or facing a Windows boot-up error, you can use a powerful Windows data recovery software, such as Stellar Data Recovery Professional. It’s a DIY software that helps you restore data from crashed or unbootable Windows PCs and laptops.
I’m getting a black screen with ‘Error Loading Operating System’. How do I fix it?
This startup issue usually occurs after fresh Windows OS installation, sudden power failure, system reboot, or system crash. You can try to fix the Error Loading Operating System by following the given methods:
- Run CHKDSK Command
- Update BIOS to the latest version
- Restore MBR information of hard drive
- Reinstall Windows OS
Was this article helpful?
YES0
NO
Whenever I start my pc I usually have to press F12 to get to the screen so I can click on boot manager but the past 2 days when I click on boot manager to boot to windows I get this and then the troubleshoot menu, I’ve tried resetting my pc but it says I am unable to do that. So as of now, I am unable to login into windows on my pc. I also tried running SFC scan but that did not work either I’ve tried about every advance reset mode and none of them work/ allowed me to do it. So I was wondering if anyone is able to help me with this?» — from Microsoft Community.
Is your computer keep restarting with an error message, telling that Preparing Automatic Repair or «Automatic Repair couldn’t repair your PC»? Calm down and stay here with us.
Page Content — How to Fix Preparing Automatic Repair Windows 10
On this page, we’ll offer you a complete guide to quick fix the Preparing Automatic Repair loop in Windows 11, 10, or Windows 8.1/8 without losing any data:
| Workable Solutions | Step-by-step Troubleshooting |
|---|---|
| Fix 1. Use Windows Repair Services | Use Windows repair services to solve any system startup issues, including system failure, BSOD…Full steps |
| Fix 2. Extend the System Partition | Extend system drive to fix «Preparing Automatic Repair»…Full steps |
| Fix 3. Disable Early Launch Anti-Malware Protection | Disable early launch anti-malware protection is useful to fix Preparing Automatic Repair…Full steps |
| Fix 4. Run System File Checker | Run System File Checker and CHKDSK tool to check and repair missing or corrupted system files…Full steps |
| Fix 5. Rebuild BCD | If Master Boot Record (MBR) and Boot Configuration Data (BCD) are corrupted, Windows won’t start…Full steps |
| More Effective Solutions | Try to restore Windows Registry; perform System Restore and hard reboot, boot into Safe Mode…Full steps |
Your Quick Guide: By following through the guides, you’ll successfully restore your computer from the «Preparing Automatic Repair» loop on your own. If you are not interested in learning the causes of this error, you may start with Guide 2.
Windows 10 Preparing Automatic Repair Error Overview
Automatic Repair is a Windows built-in feature designed to fix boot-related issues when a startup problem arises automatically. Sometimes, when it fails to work, the «Automatic Repair loop» error comes out, making your computer reboot again and again. As a result, you will encounter computer boot failure, and all the programs, services, and files on the computer will become inaccessible.
Symptoms of Windows Preparing Automatic Repair Error
When Automatic Repair fails, your computer will have one of the following symptoms:
- Computer stuck on a black screen with a «Preparing Automatic Repair» or «Diagnosing your PC» error message.
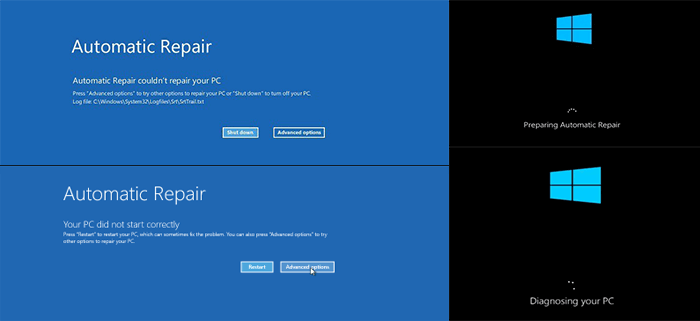
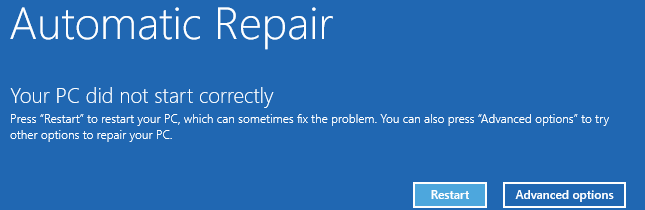
- Windows says «Preparing Automatic Repair» but results in a black screen with nothing on.
- Automatic Repair stuck on a blue screen, saying «Your PC did not start correctly», or «Automatic repair couldn’t repair your PC.» If you click «Restart», your computer will reboot and catch the Automatic Repair loop.
Check for more information about the «Your PC did not start correctly» error in the following post:
Causes of Windows «Preparing Automatic Repair» or «Automatic Repair Loop»
The «Preparing Automatic Repair» issue happens more on Windows 11/10/8.1/8 computers. Usually, the Automatic Repair or startup repair loop issue occurs right after a Windows update or an unexpected Windows shutdown.
But causes this error? Here is a list of common causes:
- Issues with Windows Registry
- BOOTMGR (Windows Boot Manager) file corruption
- Missing or damaged system files
- Issues with the hardware driver (hard drive driver, motherboard driver, graphics driver)
- Other unknown reasons
So how do you solve the «Preparing Automatic Repair» error? Follow Guide 2 and Guide 3 thoroughly, you’ll make the computer work normally again.
Restore Windows Data from Preparing Automatic Repair Loop
No matter what kind of situation you are in, either a blue screen or a black screen of the «Automatic Repair» loop, the most important thing is to get your data out of the «dead» computer first.
Here, you’ll get two methods to rescue your Windows data from this error automatically or manually. If you prefer an easy and efficient way, Method 1 is worth trying.
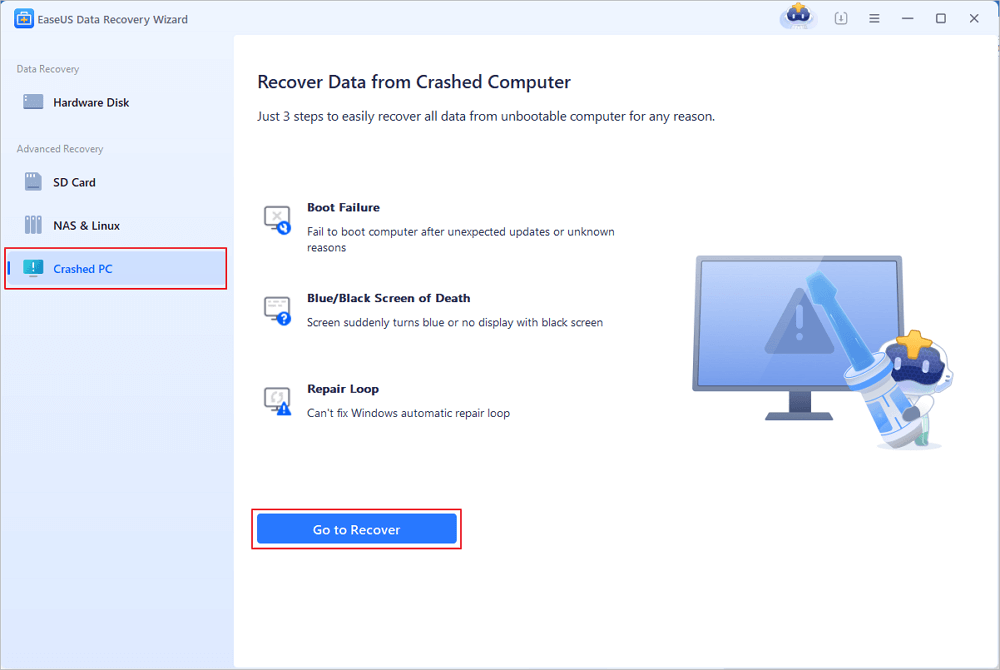
Method 1. Recover Data from Automatic Repair Computer with Bootable Data Recovery Software
Reliable bootable data recovery software — EaseUS Data Recovery Wizard can help you boot up the computer with the «Automatic Repair» loop error from a created bootable disk.
Then you can scan and recover all data from the «unbootable» or «dead» computer.
EaseUS Bootable Data Recovery Tool
- Recover lost or deleted files, documents, photos, audio, music, and emails effectively
- Restore files from HDD, SD card, USB flash drive, memory card, digital camera, and more.
- Recover data after system crash, sudden deletion, formatting, hard drive corruption, and virus attack under different situations.
Step 1. Create a bootable disk
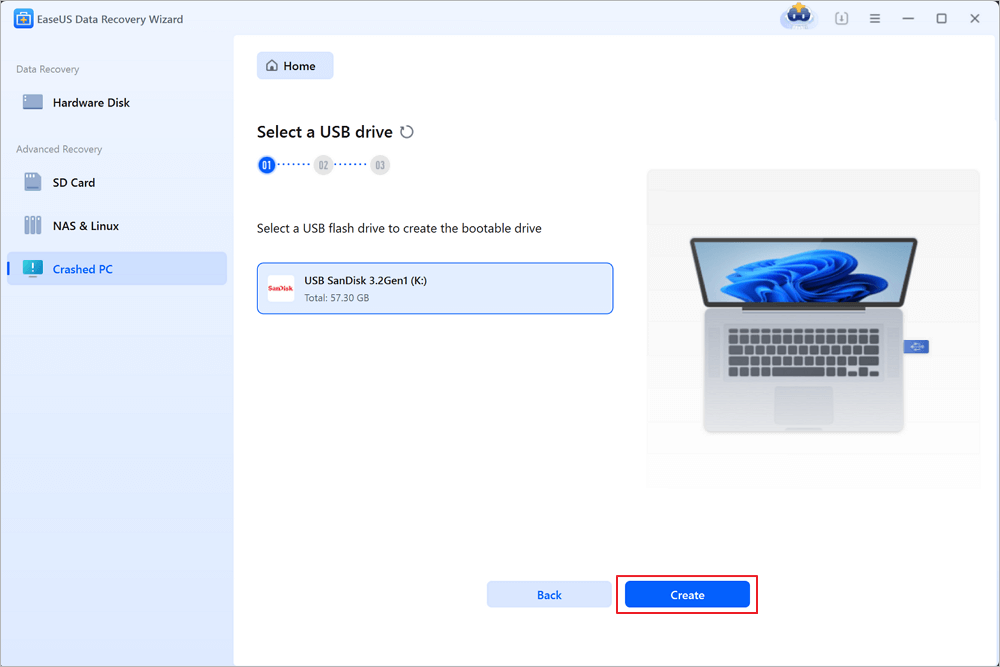
Launch EaseUS Data Recovery Wizard, choose «Crashed PC» and click «Go to Recover».
Select an empty USB to create the bootable drive and click «Create».
⚠️Warning: When you create a bootable disk, EaseUS Data Recovery Wizard will erase all data saved in the USB drive. Back up important data beforehand.
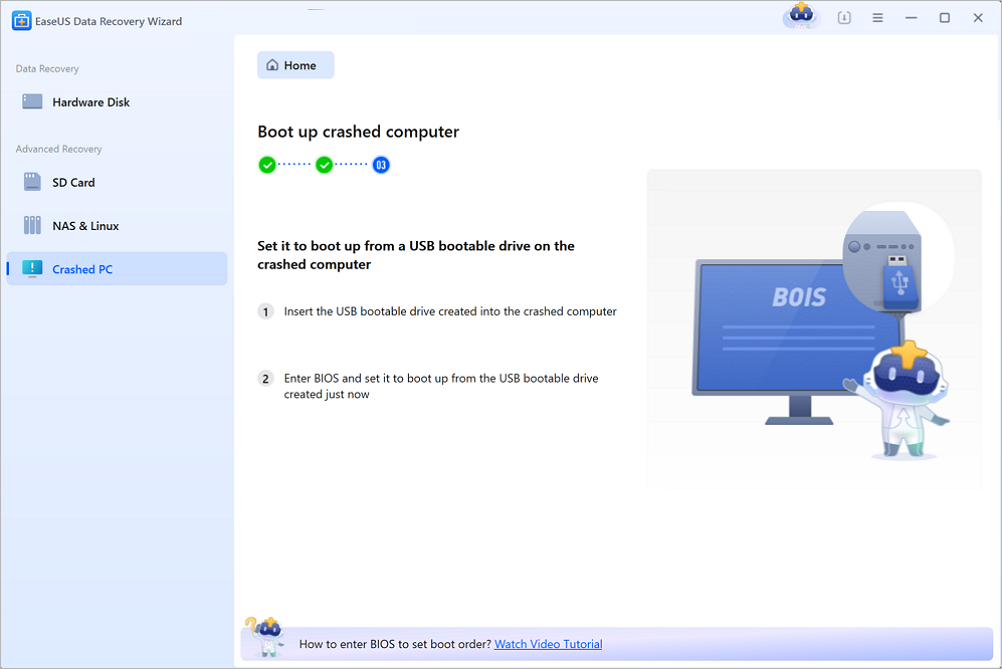
Step 2. Boot your computer from the bootable USB
Connect the bootable disk to the PC that won’t boot and change your computer boot sequence in BIOS. For most users, it works well when they restart their computer and press F2 simultaneously to enter BIOS.
Set to boot the PC from «Removable Devices» (bootable USB disk) beyond Hard Drive. Press «F10» to save and exit.
Step 3. Recover data from a crashed system/PC
After booting from EaseUS Data Recovery Wizard bootable disk, select the drive you want to scan to find all your lost files. Preview and recover the files you need to a safe location.
💡Tip: You can restore data on the local disks, external hard drives, and also the cloud storage.

Method 2. Manually Get Data Off Automatic Repair Computer Drive on Another PC
Step 1. Unlock the computer case from your computer with an «Automatic Repair» error.
Step 2. Remove the hard drive connection cables and unplug them from your computer.
Step 3. Reconnect the hard drive to another healthy computer as an external disk.
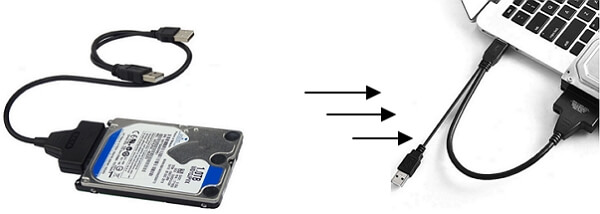
Step 4. Restart the new PC and access the old computer drive data via File Explorer.
Step 5. Copy and save all the hard drive data to another secure external hard drive.
After this, it’s time that you take action to fix the «Windows 10 preparing automatic repair» error. Depending on the specific situation you are in, you will have different solutions. The followings are all workable solutions that can bypass automatic repair on your computer in two cases: black screen or blue screen.
How to Fix Windows Automatic Repair Loop with Blue Screen
When an Automatic Repair fails, your computer will get a blue screen with «Your PC did not start correctly» or «Automatic repair couldn’t repair your PC.» If you click «Restart», the computer will go through the same process, resulting in the Automatic Repair loop.
Follow the methods and check out how to restore your computer from the blue screen of Automatic Repair error on your own.
- Fix 1. Use Windows 10 Repair Services
- Fix 2. Extend the System Partition
- Fix 3. Disable Early Launch Anti-Malware Protection
- Fix 4. Run System File Checker & CHKDSK
- Fix 5. Rebuild BCD
- Fix 6. Restore Windows Registry
- Fix 7. Perform System Restore
Fix 1. Fix Windows Automatic Repair Loop with Windows Repair Services
A secure way to repair Windows 10 without data loss is using manual Windows data recovery services. EaseUS professional technical team can help you solve any system startup errors, including system failure, system blue screen, system black screen, and so on.
Consult with EaseUS data recovery experts for one-on-one manual recovery service. We could offer the following services after FREE diagnosis:
- Fix Windows boot issues, including BSOD
- Fix Windows error and configure Windows environment
- Restore the system when it fails to boot
- Optimize Windows computer to make it run quickly
If you like to try to solve the problem by yourself, move to the following methods.
Fix 2. Extend the System Partition to Fix Windows Automatic Repair Loop
Windows and some applications require enough space to work correctly. If the system drive on your computer is almost full, you may encounter problems like «Your PC ran into a problem» or Windows stuck at «Preparing Automatic Repair».
To make more free space for the system and applications, the professional partition tool — EaseUS Partition Master can extend the system partition from a bootable disk and rescue the computer from a blue screen of Automatic Repair error:
1. Create a Bootable Disk on Another Healthy PC
Step 1. To create a bootable disk of EaseUS Partition Master, you should prepare a storage media, like a USB drive, flash drive or a CD/DVD disc. Then, correctly connect the drive to your computer.
Step 2. Launch EaseUS Partition Master, and find the «Bootable Media» feature on the left. Click on it.
Step 3. You can choose the USB or CD/DVD when the drive is available. However, if you do not have a storage device at hand, you can also save the ISO file to a local drive, and later burn it to a storage media. Once made the option, click the «Create» button to begin.
- Check the Warning message and click «Yes».
Step 4. When the process finishes, you’ll see a pop up window, asking if you want to restart computer from the bootable USB.
- Reboot Now: it means you want to restart the current PC and enter EaseUS Bootable Media to manage your disk partitions without OS.
- Done: it means you don’t want to restart the current PC but to use the bootable USB on a new PC.
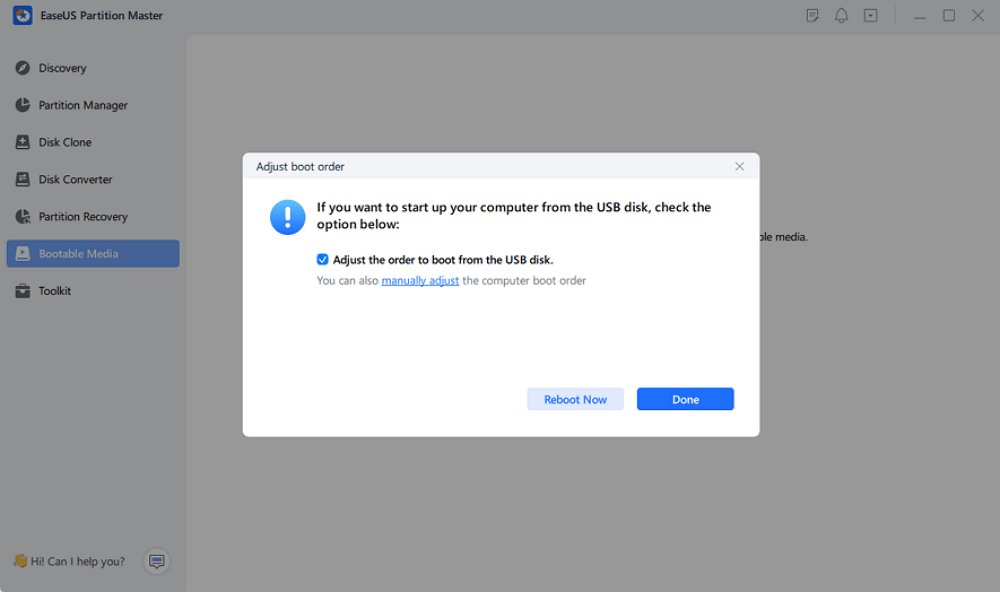
Note: To use the bootable disk on a new PC, you need to resart the target computer and press F2/F8/Del key to enter BIOS, and set the USB bootable disk as the first boot disk.
Wait patitiently and your computer will automatically boot up from the USB bootable media and enter EaseUS WinPE desktop.

2. Extend System Partition from Bootable Disk
Connect the bootable disk USB to your problematic computer and restart the PC. Press F2/F11/Del to enter BIOS. Set PC to boot from the bootable disk.
When the computer boots up from the EaseUS WinPE bootable disk, enter EaseUS Partition Master and extend the system drive with the steps below:
Extend System C drive with unallocated space
- 1. Right-click on the System C: drive and select «Resize/Move».
- 2. Drag the system partition end into the unallocated space so to add it to the C: drive. And click «OK».
- 3. Click «Execute Task» and «Apply» to execute the operations and extend the C drive.
3. Restart PC from Original OS Disk
After extending the system drive, you can now restart the PC from the original system disk:
Step 1. Restart the PC and press the F2/F11/Del key to enter BIOS.
Step 2. On the boot menu, switch and set the original system disk as the boot drive.
Step 3. Save the changes, exit BIOS, and restart the PC.
Wait for the computer to boot up. If you see the login window, congratulations and you’ve successfully solved this issue. If the problem still exists, move to the next fixes for help.
Fix 3. Disable Early Launch Anti-Malware Protection
Another way to get out of the Windows Automatic Repair loop is to disable early launch anti-malware protection. You can do this from Command Prompt with the following steps:
Step 1. Restart the PC and click «Advanced options» on the Automatic Repair blue screen.
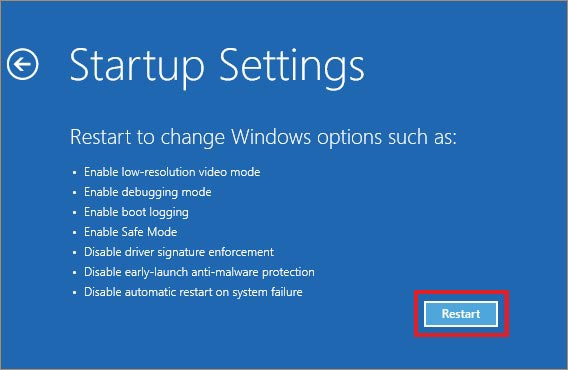
Step 2. Click «Troubleshoot» > «Advanced Options» > «Startup Settings».
Your computer will restart and then present you with a list of options.
Step 3. Choose «Disable early launch anti-malware protection».
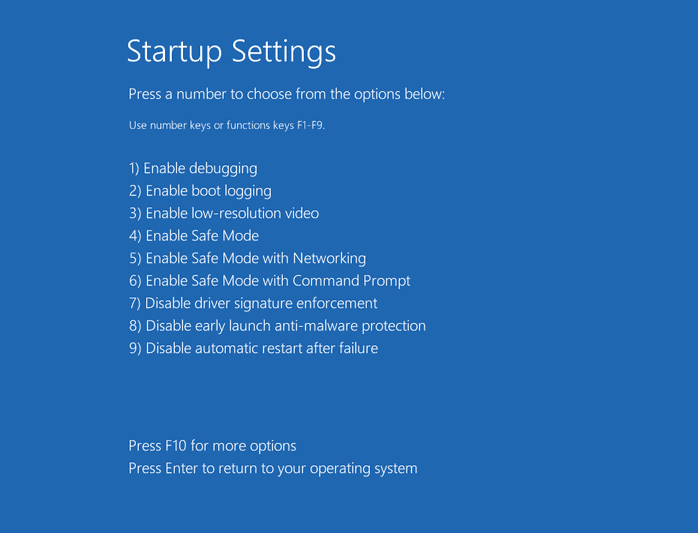
After this, restart your PC and check if you can boot into Windows.
Fix 4. Run System File Checker & CHKDSK Disk Utility
If the computer system files are damaged or missing, that’s probably where the issue originates. Windows provides a built-in System File Checker and CHKDSK Disk Utility for users to check and repair missing or corrupted system files.
- Warning
- Running chkdsk can hopefully fix the system files issue, however, it can also result in total data loss. So, perform data recovery in advance, and then continue with the CMD method.
To use the tool, you need a Windows installation media connected to your computer and fix the blue screen error with the steps below:
Step 1. Reboot your PC from the Windows installation media.
Step 2. On the Windows Setup window, choose «Next».
Step 3. Choose «Repair your computer» > «Troubleshoot» > «Advanced options» > «Command Prompt».
Step 4. Type sfc /scannow and hit Enter.
Step 5. Type chkdsk /f /r /x C: and hit Enter.
Step 6. Type exit to close Command Prompt and restart the computer.
Fix 5. Rebuild BCD to Fix Windows Automatic Repair Error
If the Master Boot Record (MBR) and Boot Configuration Data (BCD) are missing, corrupted, or not properly configured, Windows won’t be able to start. If this is the case, enter Windows and manually repair the MBR and rebuild the BCD.
When your computer fails to start, bootrec.exe can be used to fix the Master Boot Record (MBR), Boot Sector, Boot Configuration (BCD), and boot.ini.
Step 1. Connect the Windows installation media/disc to your PC.
Step 2. Start and boot your PC from Windows installation media or DVD.
Step 3. On the Windows Setup window, choose «Next» > «Repair your computer».
Step 4. Choose «Troubleshoot» > «Advanced Options» > «Command Prompt».
Step 5. When Command Prompt appears, enter the following lines in succession:
- bootrec /fixboot
- bootrec /scanos
- bootrec /fixmbr
- bootrec /rebuildbcd
- exit
Afterward, restart the PC and check if your computer boots up normally.
Fix 6. Restore Windows Registry
The Registry is a database that contains the configuration information of the operating system and most of the applications. When Registry corrupts, it may lead to serious problems like the Automatic Repair loop.
The good news is that the registry makes a backup of configuration data automatically. You can use the backup to restore the Windows registry to a working version.
Step 1. Choose «Advanced options» on the blue screen of the Automatic Repair error.
Step 2. Navigate to «Troubleshoot» > «Advanced Options» > «Command Prompt».
Step 3. Select the account and enter the password.
Step 4. Enter the following commands one by one and hit Enter each time:
- C:
- CD Windows\System32
- CD config
- DIR
- CD regback
- DIR
- CD..
- REN default default1
- ren sam sam1
- ren security security1
- ren software software1
- ren system to system1
- CD regback
- copy * c:\windows\system32\config
Step 5. Type exit and hit Enter.
In the «Choose an option» screen, choose «Turn off your PC» and then start your computer.
Fix 7. Perform System Restore to Fix Windows 10 Automatic Repair Stuck
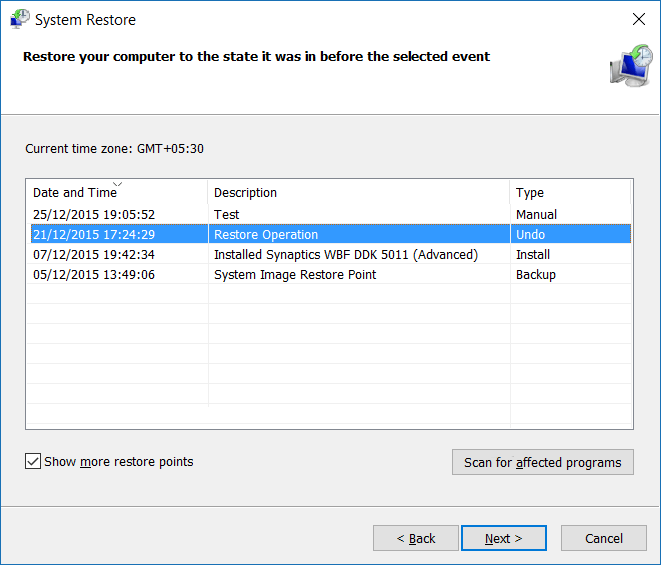
If you have created a Windows restore point before the Automatic Repair loop occurs, you can perform a system restore to cope with the issue.
Note that performing system restore will overwrite your files on the system C drive, remember to get your data out of the computer first. You can revert to restore data in two reliable ways.
Here are the steps:
Step 1. On the Automatic Repair blue screen, choose «Advanced options».
Step 2. Navigate to «Troubleshoot» > «Advanced Options» > «System Restore».
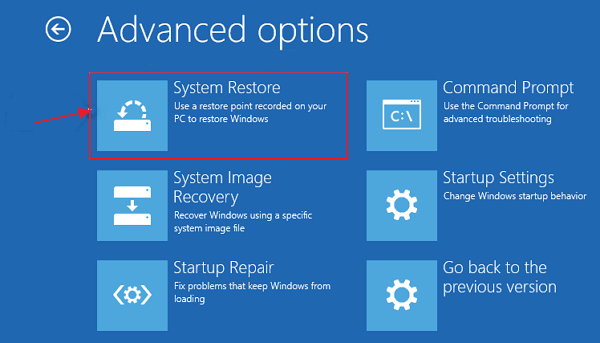
Step 3. Choose a restore point, click «Next» to restore your computer to a healthy state.
Step 4. Wait until the restore process finishes and then restart your computer.
How to Fix Preparing Automatic Repair Loop with Black Screen
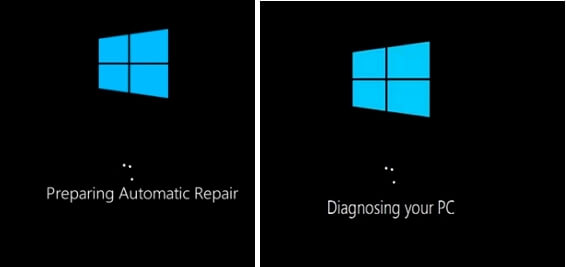
When you are stuck on the «Preparing Automatic Repair/Diagnosing your PC» black screen, the computer screen will stay black after preparing for an Automatic Repair.
Here are some fixes that can help you out:
- Fix 1. Perform a Hard Reboot
- Fix 2. Boot into Safe Mode
- Fix 3. Disable Automatic Repair
- Fix 4. Refresh or Reset PC
- Fix 5. Fresh Install or Reinstall Windows 10
Fix 1. Perform a Hard Reboot
When the computer doesn’t respond with a black screen, warning «Preparing Automatic Repair», perform a hard reboot first. A hard reboot is a way of restarting your computer manually instead of using the operating system controls (soft reboot).
Step 1. Press and hold the power button on the computer until it shuts down.
Step 2. Afterward, repress the power button and start the computer.

Step 3. Check and see whether the issue persists.
Fix 2. Boot into Safe Mode
Safe Mode is a diagnostic mode of Windows. In Safe Mode, you can fix some system-related problems by uninstalling/updating incompatible software/driver, deleting problematic files, removing viruses, and more.
When the computer is stuck on the «Preparing Automatic Repair/Diagnosing your PC» screen or the computer’s screen goes black and stops responding, you can run the PC from Windows installation CD/DVD and boot into Safe Mode to fix this issue.
If you do not have an installation disc, follow the Microsoft guide to creating a Windows Installation Media.
Here are the steps to enter Safe Mode:
Step 1. Connect the Windows Installation Media to the computer.
Step 2. Restart PC and Press F2/F11/Del to enter BIOS.
Step 3. Choose to boot from the installation media from the screen. Wait for the program to be loaded.
Step 4. On the Windows Setup window, choose «Next».
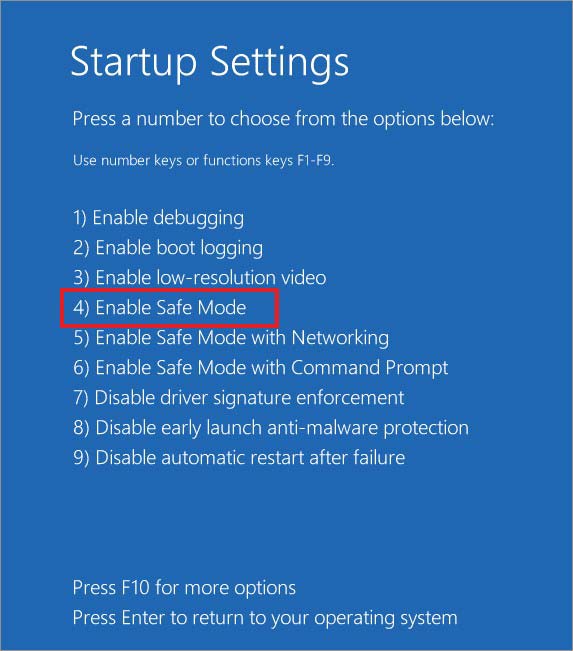
Step 5. Choose «Repair your computer» > «Troubleshoot» > «Advanced options» > «Startup Settings».
Step 6. Choose a Safe Mode — Enable Safe Mode, Enable Safe Mode with Networking, and Enable Safe Mode with Command Prompt.
Step 7. Fix computer issues after entering Safe Mode:
- Run antivirus software to scan for and remove virus
- Delete problematic files that may result in the «Preparing Automatic Repair» stuck
- Uninstall suspicious software or drivers
- Update the hardware driver using a CD/DVD/USB that contains the driver
Fix 3. Disable Automatic Repair
The Automatic Repair itself can also be the reason why your computer can’t boot properly. You can disable Automatic Repair in Windows to fix this issue.
You need to enter Command Prompt like in method 3 to finish the task.
Step 1. Insert or connect a Windows installation disc/media to your PC.
Step 2. Start and boot the computer from Windows installation media.
Step 3. On the Windows Setup window, choose «Next» > «Repair your computer».
Step 4. Choose «Troubleshoot» > «Advanced Options» > «Command Prompt».
Step 5. Type bcdedit /set {current} recoveryenabled No and hit Enter.
You can also delete problematic files with the command line: C: cd Windows\System32\LogFiles\Srt. SrtTrail.txt

If you see something like Critical Boot file c:\windows\system32\drivers\vsock.sys is corrupt, navigate to the specified location using the Command Prompt and enter the del command to delete the problematic file.
Step 6. Type exit to close Command Prompt and restart the computer.
Fix 4. Refresh or Reset PC
The official Microsoft solution to an endless ‘Preparing Automatic Repair’ loop is to refresh or reset the PC directly.
Note that refreshing or resetting the PC will cause serious data loss, remember to get your data off the computer first.
Here are the steps:
Step 1. Upon the ‘Preparing automatic repair’ window, press-and-hold Power button three times.
Force to shut down the machine.
Step 2. The system will enter the boot repair page after 2-3 times reboots.
Step 3. Choose «Troubleshoot», then go on to «Refresh PC or Reset PC.»
Follow the on-screen guidelines to complete resetting your PC. After this, restart your computer and you’ll be able to work on it again.
If this solution fails to bring you the repair page, continue with the following methods.
Fix 5. Fresh Install or Reinstall Windows 10
Issues related to Automatic Repair in Windows could trouble you for hours or days. And the last way that you can try is to reinstall Windows 10 on your computer.
You can either use Windows installation media to Reinstall Windows 10/8.1/8 or Download the Latest Windows 10 Update to fresh install Windows 10 on your PC.
It’s Your Turn, Bring Life Back on Your Computer
On this page, we explained what is Automatic Repair and what causes the Automatic Repair loop error on Windows 11/10/8.1/8 computers.
If you are having this issue, we suggest you follow through with this complete guide. If your data matters a log, remember to use EaseUS bootable data recovery software to get your data out of the unbootable PC first.
You can then try the above fixes based on your situation — whether you are having a blue screen «Automatic Repair» or a black screen «Preparing Automatic Repair» error.
Last but not least, we would also recommend you create a system backup image immediately. It will always save your life and bring your computer back to life anytime when your computer dies.
If you still have problems, read the problems and questions below to get help.
1. How long does preparing automatic repair usually take?
If the Automatic Repair is working, as usual, the repair process can take anywhere from 5 minutes to over an hour, depending on your hard drive specs.
2. How do I fix preparing for automatic repair?
The official solution for Preparing Automatic Repair is to update or reset the PC directly. To reset the PC:
- At the Preparing Automatic Repair window, press the power button three times to force the computer to shut down.
- The system will call for repair after the restart.
3. Why is my Lenovo says preparing automatic repair?
This error happens when your PC cannot boot properly due to missing boot files or a corrupt registry.
4. How to fix Windows Startup Repair infinite loop?
To fix Windows Startup Repair infinite loop:
- Insert the disc and reboot the system.
- Press any key to boot from the DVD.
- Choose your keyboard layout.
- Click Repair your computer at the Install now screen.
- Click Troubleshoot.
- Click Advanced options.
- Click Startup Settings.
- Click Restart…