
Иногда пользователи сталкиваются с проблемой, когда не работает windows media player, начинаются глобальные поиски решения проблемы. Советов много, а реально рабочих всего несколько штук.
Сегодня я покажу вам 3 легких способа , которые позволят заставить media player работать в штатном режиме, как и было изначально. А в качестве бонуса, в конце статьи, Вы сможете посмотреть видео урок, в котором на практическом примере показано выполнение всех необходимых действий.
Содержание
- Вступление
- Перезапуск медиа компонентов
- Перерегистрация системных библиотек
- Автоматическое восстановление Media Playera
- Посмотреть видео: Не работает Windows Media Player, есть решение!
Вступление
Если вы читаете дальше, значит у вас уже не запускается стандартный windows media player, которым вы всегда пользовались, а может быть вы просто любопытный пользователь, который хочет быт вооружен знаниями на всякий случай.
Поэтому прежде чем приступить к решению проблемы, я немного расскажу вам о причинах по которым люди сталкиваются с данной проблемой. Ведь большинство начинает кричать, что мол вот вирус подхватил, да конечно, такое бывает, но очень редко. В основном происходит сбой в операционной системе и у медиа плеера слетают библиотеки данных или ключи запуска в реестре. Ситуация не очень приятная, но легко решаемая.
Дорогие читатели, главное не надо торопиться, делайте все по порядку. Не надо сразу прыгать на последний вариант, ведь проблемы бывают разные и только применив все доступный шаги вы сможете восстановить работу своего windows media playera. Давайте переходить к делу.
Самый простой способ решения проблемы с нерабочим плеером это так скажем его перезагрузка, для этого необходимо выполнить ряд простых действий.
Заходим в меню «Пуск» и выбираем раздел «Панель управления»
Теперь ищем раздел «Программы и компоненты/ Удаление или изменение программ», заходим:

Переходим в раздел «Включение или отключение компонентов Windows»

Ждем несколько секунд загрузку и видим перед собой небольшое окошко в котором надо найти строчку «Компоненты для работы с мультимедиа» наша задача снять галочку с этой строки и применить настройки. Будьте внимательны, вам будет предложено перезагрузить компьютер, это нужно сделать обязательно.
После того, как вы применили новые настройки и перезагрузили компьютер, просто вернитесь еще раз в это меню и поставьте на место галочку, которую сняли, после этого пробуем запустить windows media player. Если проблема осталась, то не отчаивайтесь, просто переходите к следующему методу и все обязательно получится.
Перерегистрация системных библиотек
Достаточно сложный с технической стороны процесс, но в практике очень легко выполняется и тысячи пользователей уже через минуту используют свой плеер в штатном режиме, желаю и вам удачи. Наша задача навести порядок в системных библиотеках, для этого просто нажимаем меню «Пуск» и прямо в строке поиска прописываем команду: regsvr32 jscript.dll
Следом вводим еще две команды:
- regsvr32 vbscript.dll
- regsvr32 wmp.dll
Получилось три команды, которые вы по очереди применили, главное не пропускайте не одну, просто прописали, применили и тоже самое со следующей и со следующей. А когда закончили пробуем включить свой не рабочий windows media player.
Как результат? Проблема решена? Думаю, что после этого уже почти все пользователи радуются плеером без проблем, но если вы все еще мучаетесь, ведь у вас какая-то особенная проблема, то пришло время перейти к «тяжелой артиллерии».
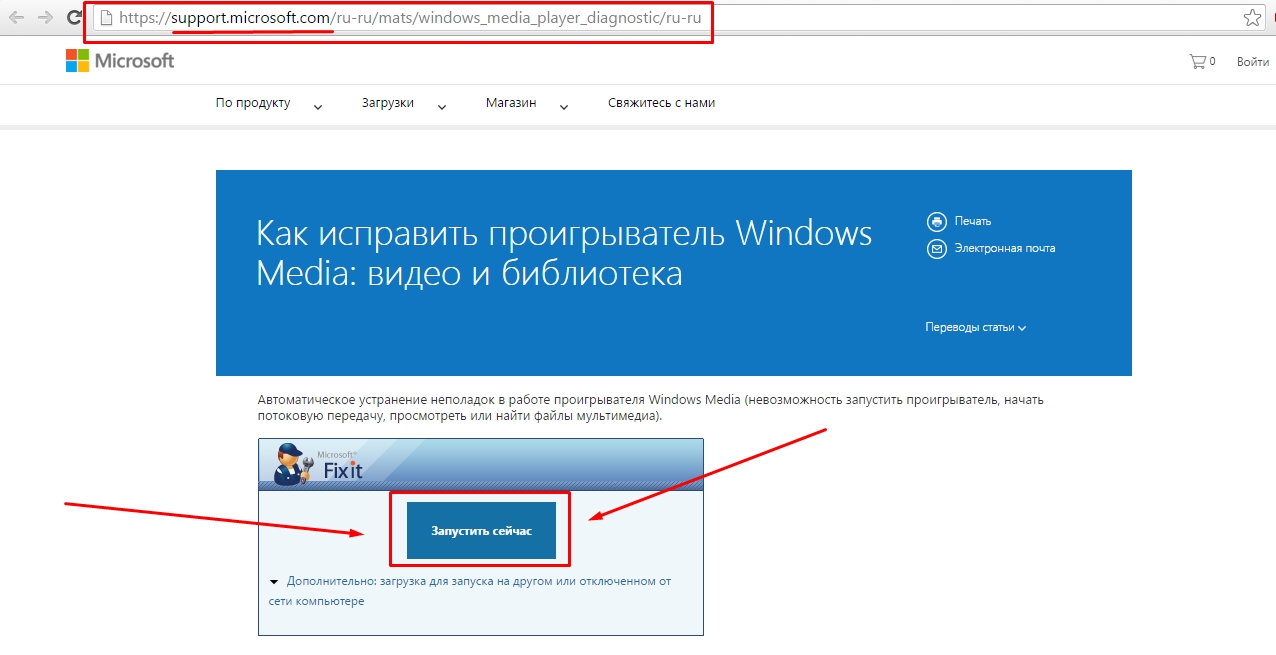
На этом этапе все невероятно просто, наша задача зайти на официальный сайт поддержки Microsoft и найти там бесплатную утилиту, которая должна автоматически протестировать ряд проблемных случаев связанных с плеером windows media и сразу же их устранить.
Согласитесь это очень круто и невероятно просто, главное чтобы помогло. А для этого мы приступаем к действию.
Переходим по ссылке: Официальный сайт Майрософт
И теперь загружаем ту самую программку на свой компьютер:
После того, как вы скачали утилиту, просто запускаем ее и следуем понятным инструкциям:

Для тех кто еще немного сомневается в своих силах или переживает, что допустит ошибку. То я это уже тоже предусмотрел и подготовил для вас подробное видео с практическими примерами, где я сам проделываю каждый шаг на ваших глазах. Осталось только посмотреть и повторить на своем компьютере. Приятного просмотра.
После изучения всего материала, пожалуйста, отпишитесь в комментариях, помогло ли вам мои рекомендации в решение проблемы? Заработал ли теперь плеер или нет? Может быть вы применили какой-то свой метод, не жлобитесь, нас уже около тысячи человек каждый день на данном сайте, поделитесь своими знаниями и вам будут благодарны многие.
(40 оценок, среднее: 4,55 из 5)
Загрузка…
FIX: Windows Media Player has Stopped Working
Windows Media Player (WMP) has been a staple for audio and video playback on Microsoft Windows operating systems since its inception. While it remains a favored application for many users due to its simplicity and reliability, there are often instances when it can stop functioning correctly. If you have encountered the frustrating error «Windows Media Player has stopped working,» you are not alone. This article aims to provide detailed steps and solutions to resolve the issue effectively.
1. Understanding the Problem: Why Does WMP Fail?
Before diving into the fixes, it’s essential to understand why Windows Media Player may experience functionality issues. The reasons could be incredibly varied and might include:
- Corrupted Media Files: Sometimes, trying to play a corrupted file can crash WMP.
- Outdated Software: An outdated version of WMP or the Windows operating system can lead to compatibility issues.
- Conflicting Software: Other software that uses the same codecs or media formats can interfere with WMP.
- Corrupted Codec Packs: Installing third-party codecs may corrupt or affect WMP’s functioning.
- User Account Issues: Problems with your user profile can lead to app malfunctions.
- Registry Errors: Corrupt registry entries can cause multiple problems, including WMP crashes.
2. Basic Fixes: Troubleshooting Steps
Before delving into more technical solutions, it’s advisable to begin with basic troubleshooting. Here are some steps to get you started:
Restart Your Computer
This might seem trivial, but restarting your computer can clear out temporary issues and processes that could be causing the problem.
Update Windows Media Player
To ensure the application is functioning optimally, make sure you have the latest version installed:
- Go to Start > Settings.
- Click on Update & Security.
- Select Windows Update and check for updates. If there are updates available for Windows or WMP, install them.
Check File Integrity
Play different files to see if the issue persists across all media, or if it is isolated to a certain type or single file. If only one file is problematic, it might be corrupted.
3. Repair Windows Media Player
With the basics covered, you can move on to more specific repairs.
Use the Built-in Troubleshooter
Windows includes a built-in troubleshooter for applications:
- Go to Start > Settings > Update & Security.
- Click on Troubleshoot > Additional troubleshooters.
- Look for Windows Store Apps and run its troubleshooter.
Turn Windows Media Player Features On and Off
Sometimes, simply disabling and re-enabling WMP can resolve underlying issues:
- Go to Control Panel > Programs > Turn Windows features on or off.
- Scroll to find Media Features.
- Uncheck Windows Media Player and click OK.
- After a restart, return to the same menu and check Windows Media Player again to enable it.
4. Update Codec Packs
If you’ve installed third-party codec packs, uninstall them. They can often lead to conflicts with WMP. After uninstalling, consider reinstalling only those that are necessary or suitable for your media playback requirements.
5. Re-register Windows Media Player
Re-registering WMP can resolve issues arising from registration problems within the Windows operating system.
- Search for “cmd” in the Start menu, right-click on Command Prompt, and select Run as administrator.
- Type the following commands one by one and press enter after each:
regsvr32 wmp.dll regsvr32 wmpasf.dll regsvr32 wmpegn.dll regsvr32 wmpdx.dll - Once done, restart your computer and check if WMP works.
6. Check for User Account Problems
User account-related issues can also lead to application problems. Create a new user account to check if WMP functions properly there.
- Go to Settings > Accounts > Family & other users.
- Click Add someone else to this PC.
- Follow the prompts to create a new account.
Once done, log in to the new account to see if the issue persists with WMP.
7. Update Drivers
Outdated or corrupted drivers, specifically for your sound and video hardware, may cause problems:
- Right-click the Start button and select Device Manager.
- Expand categories for Sound, video and game controllers and Display adapters.
- Right-click on the individual items and select Update driver.
8. Perform a Clean Boot
A clean boot helps eliminate software conflicts. Here’s how to set it up:
- Type msconfig in the Start menu and press enter.
- In the System Configuration window, select the Services tab.
- Check the box for Hide all Microsoft services, then click Disable all.
- Go to the Startup tab and click Open Task Manager. Disable startup items individually.
- Restart the computer and check WMP again.
9. Repair the Windows Registry
Using a dedicated registry cleaner can help fix corrupted entries that may be contributing to WMP issues. However, it’s vital to back up your registry before making any changes:
- Press Win + R, type “regedit”, and hit enter.
- Before editing, click on File > Export to save a backup.
- Look for entries related to WMP and carefully confirm their integrity.
10. System Restore
If all else fails, consider performing a System Restore to revert your Windows installation to a previous state before the issue arose. Note that this will undo any changes made after the restore point:
- Search for System Restore in the Start menu and select it.
- Follow the prompts to select a restore point that predates the issue.
- Confirm your choice, and after the process is complete, check if WMP operates correctly.
11. Reinstall Windows Media Player
If Windows Media Player continues to misbehave, try a complete uninstallation and reinstallation:
- Go to Control Panel > Programs > Features.
- Uncheck Windows Media Player to uninstall it completely.
- Restart and then re-enable it from the same menu.
12. Advanced Solutions
Should the problem persist after the standard troubleshooting steps, consider delving into more advanced solutions such as:
Windows Repair Tool
Using a Windows Repair Tool can often resolve deeper systemic issues that affect multiple programs, including WMP.
Running DISM and SFC Scans
The Deployment Imaging Service and Management Tool (DISM) and System File Checker (SFC) can help repair corrupted system files:
- Open a Command Prompt as an administrator.
- Run the following commands one by one:
DISM /Online /Cleanup-Image /RestoreHealth sfc /scannow - After both commands have executed, restart your computer.
Conclusion
The frustration of encountering the «Windows Media Player has stopped working» error can certainly impact your media consumption experience. The above guide outlines a variety of methods to troubleshoot and resolve the issues with Windows Media Player. Whether you opt for simple fixes or delve into advanced troubleshooting, these steps provide you with a comprehensive toolkit to restore WMP’s functionality.
Remember, keeping your software updated and being mindful of any newly installed software can help mitigate the chances of such disruptions in the future. Happy media playing!
Sign in to your MUO account
The Windows Media Player has always been a great app for playing music and videos on a Windows PC. This app supports various file formats and is easy to use.
Windows Media Player was once a built-in Windows app, but it doesn’t ship out of the box anymore. Because of this, the app is now prone to a lot of errors. A common issue you may encounter with this app is the “Windows Media Payer has stopped working” error.
If you’re encountering this error, let’s show you how to resolve it.
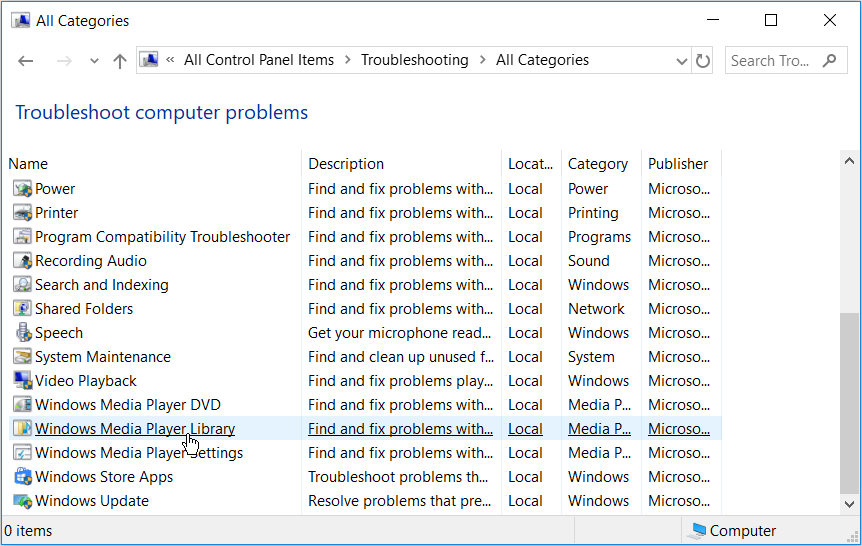
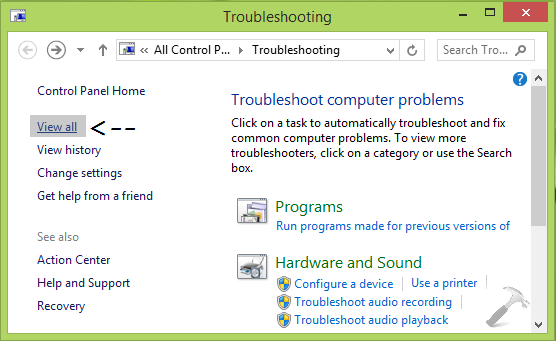
Windows has several built-in troubleshooting tools that can help you fix various system issues. One of these tools helps specifically with fixing issues with the Windows Media Player. Let’s explore how you can use this tool:
- In the Start menu search bar, type Control Panel, and select the Best match.
- Press the View by drop-down menu and select Large icons. From here, select Troubleshooting in the main window.
- In the next window, press the View all option on the left-hand side pane.
- Scroll down and select Windows Media Player Library. Press Next in the pop-up window.
- Press the Apply fix button. From there, follow the on-screen instructions to complete the process.
2. Use the Audio and Video Troubleshooters
In some cases, this error could be caused by system-specific issues. This might end up limiting the Windows Media Player’s functionality. To resolve the problem, you could use the Windows video and audio troubleshooting tools.
Here’s how you can get started with using these tools:
- Type Troubleshoot in the Start menu search bar and select the Best match.
- Scroll down on the right-hand side pane, press Playing Audio, and then press Run the troubleshooter.
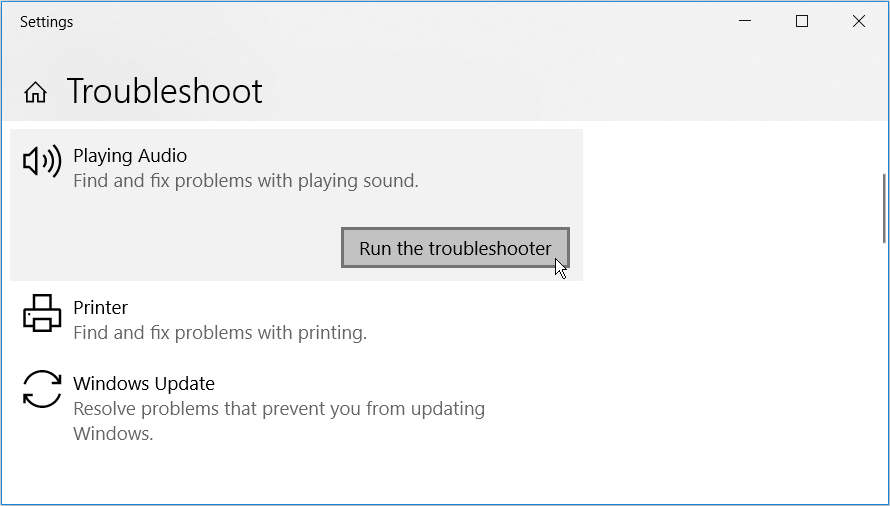
When the process is complete, scroll down and press Video Playback. Finally, press Run the troubleshooter.
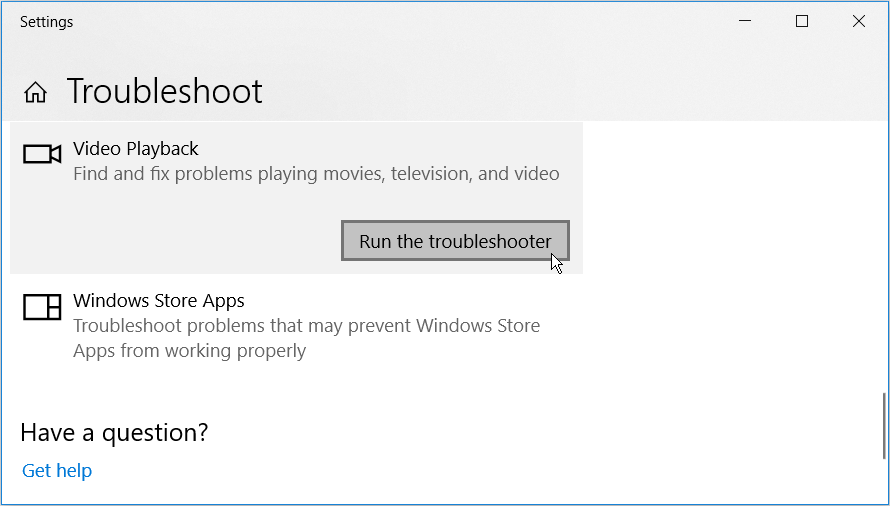
Restart your PC to apply these changes.
If this is a system-specific issue, running the DISM and SFC tools could help. An SFC scan will repair corrupt or missing system files. To ensure that the SFC tool works properly, you’ll need to run the DISM tool first.
Here’s how you can run the DISM tool:
- Press the Windows key + R and type CMD.
- Press Ctrl + Shift + Enter to open an elevated Command Prompt.
- Type the following command and press Enter:
DISM /Online /Cleanup-Image /ScanHealth
When this scan is complete, type the command below and press Enter:
DISM /Online /Cleanup-Image /RestoreHealth
Restart your PC when this scan is complete.
Next, open the Command Prompt as per the previous steps. Finally, run an SFC scan by typing the following command and pressing Enter:
sfc /scannow
When this scan is complete, close the Command Prompt and restart your PC.
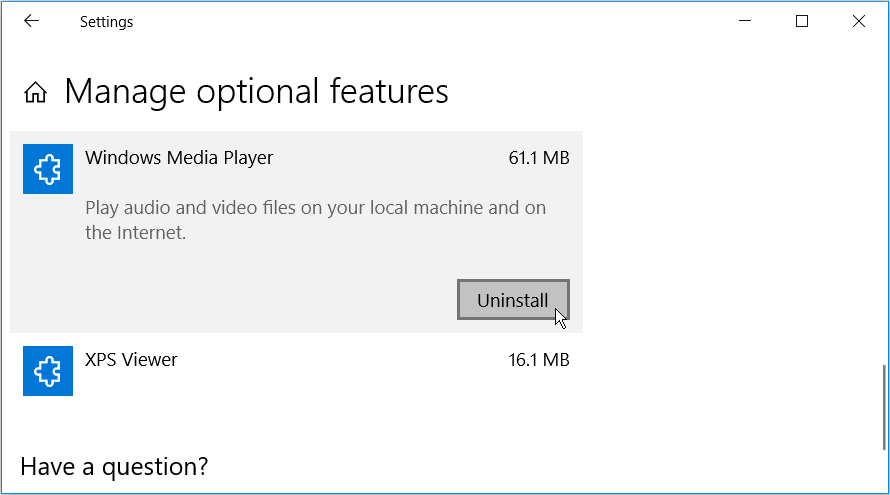
Windows Media Player doesn’t ship with Windows 10, but it’s included as an additional feature. Reinstalling this app could resolve the issue at hand and any other bugs it might have. You can easily reinstall this app via the system settings.
To get started, here’s what you need to do:
- Press Windows Key + X and select Apps and Features in the pop-up window.
- Select Manage optional features.
- Scroll down and press the Windows Media Player option.
- Press Uninstall. Wait for the process to complete and then press Install.
The Windows Media Player is a great app, but it also has its own flaws. The “Windows Media Player Has Stopped Working” error is one prominent issue you might encounter with this app.
Fortunately, you can resolve this error using the tips we’ve provided. Also, you could consider trying other third-party media players if you’re tired of the Windows Media Player.
Windows Media Player has been active part of Windows family since long time. Though there are tons of third-party competitive multimedia players available for Windows, but none of them could take place of this built-in player. The reason why users gives it highest priority is its simplicity and stability. The other players available to you may have lots of options to offer, but they lags when it comes perfect stability.
However, if your system music or video library is not according to what Windows Media Player needs, you may face weird issues with it. Generally in such scenarios, it will crash intermittently with following message:
Page Contents
Windows Media Player has stopped working
A problem caused the program to stop working correctly. Windows will close the program and notify you if a solution is available.
As you can see in the above shown screenshot, there is no clue at all that could help us to solve this problem. Well, you can try to run built-in troubleshooter in such situation and see if it helps you:
FIX : Windows Media Player Has Stopped Working In Windows 10/8/7
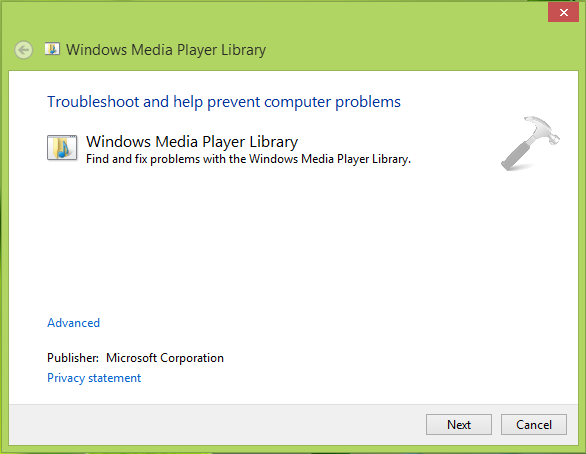
1. Press + Q and type troubleshooting in the search box, pick Troubleshooting from the search results.
2. In the Troubleshooting window, from the left side listed options, pick View all.
3. Moving on, in the following window click Windows Media Player Library in order to launch corresponding troubleshooter.
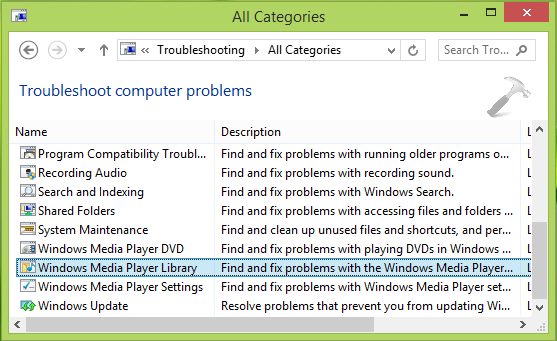
4. Click the Next option here to start the troubleshooting wizard:
5. So the troubleshooter now detects the issues what is causing problem with Windows Media Player to work correctly. In our case it detected that Media library is corrupt. Thus in order to solve the problem, you need to hit Apply this fix option here:
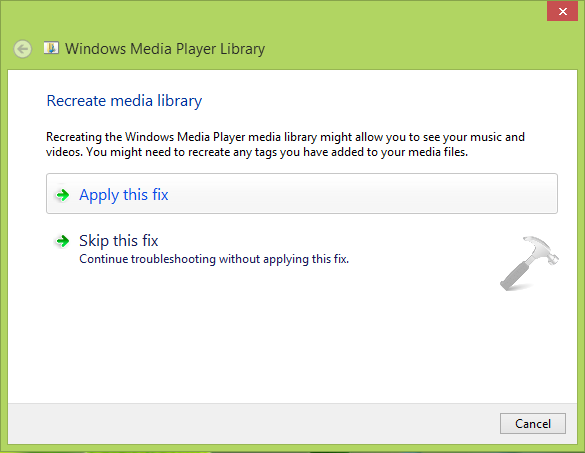
In this way, recreation of library or whatever the root cause detected in your case, the suggested fix by troubleshooter would put an end of this issue.
Hope this helps!
Also check: Fix multiple problems with Windows Media Player in Windows 10.
RELATED ARTICLES
July 24, 2017
Some Windows 10 users have had Windows Media Player and Windows Media Center crashing every time it’s opened. 3rd party apps such as Plex, HDHomeRun, Subtitle Edit and VisualSubSync have also been affected. Some users who also tried opening folder containing media files had Windows Explorer crashing or Windows restarting. Obviously, CompPkgSup.DLL is faulting module.
This error is caused by a bug in Windows Update KB4013429 which caused Windows DVD Player and a lot of other media applications that use Microsoft MPEG-2 handling libraries to crash. This means that update caused a malfunction on any application that used Microsoft DTV-DVD Video Decoder (msmpeg2vdec.dll) that used the inbuilt DVD/MPEG2 decoder.
This issue can be solved by uninstalling Update KB4013429, applying update fix KB4015438, disabling Microsoft DTV-DVD Video Decoder or running the CompPkgSup fixer. This article will provide the various methods to get this fixed.
Method 1: Uninstalling Windows Update KB4013429
This update caused the whole issue. Removing it will fix the issue temporarily. Make sure you disable automatic updates for the mean time to prevent Windows from downloading it again.
- Press WIN + I to open Windows settings.
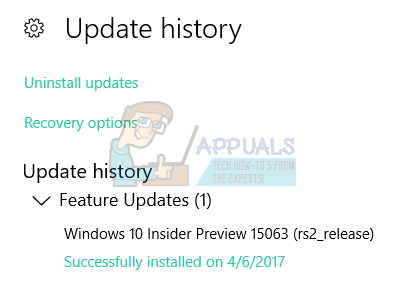
- Select Update & Security and navigate to Update history > Uninstall update

- A Control Panel window will open showing all installed updates. Click on the “Search Installed Updates” search bar at the upper-right and type KB4013429.
- Double-click on KB4013429 in the search result and click OK to confirm the update removal.

- Reboot your PC and try running your media applications again.

Method 2: Applying Windows Update
Microsoft responded promptly to fix this bug with the update KB4015438. You don’t need to uninstall the faulty update in method 1 to fix this.
- Press CTRL + I to open Windows settings.
- Select Update & Security and select Check for Updates. Windows will check for updates and begin downloading pending updates. If automatic updates are disabled, make open the list of pending updates and install update KB4015438.
- Reboot your PC and try running your media applications again.
Alternatively, you can download the standalone cumulative update and install it manually from here
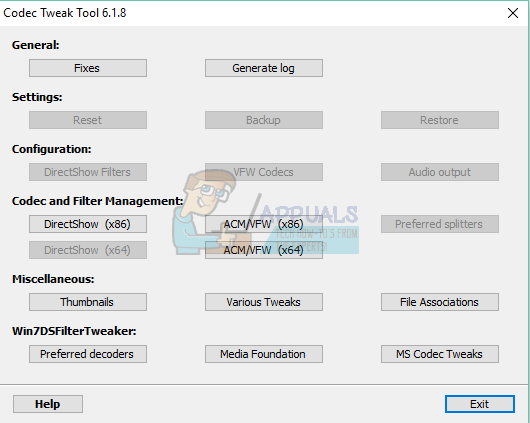
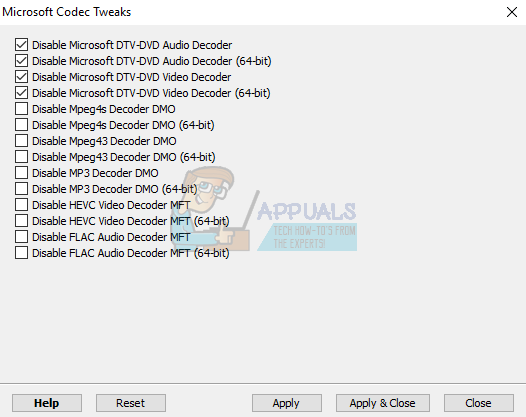
Method 3: Using the Codec Tweak Tool
Using the Codec Tweak Cool from codecguide.com, you can disable Microsoft DTV-DVD Video Decoder and stop it from crushing your applications. Note that doing this may break video playback in certain apps.
- Download the Codec Tweak Tool from here.
- Run the application with admin privileges or grant the UAC prompt when it appears.
- Select MS Codec Tweaks under Win7DFilterTweaker.

- Check the first 4 boxes as shown in the image below to disable.

- Click Apply & Close.
- Try to run your media applications again to confirm if the error has been resolved.
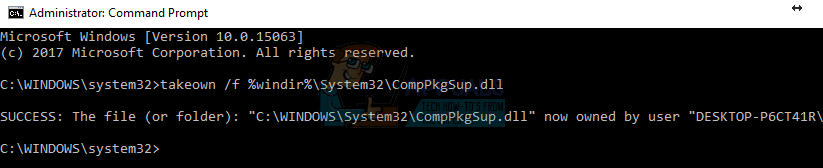
Method 4: Replacing CompPkgSup
You can CompPkgSup.dll with a previous working version of the DLL so it doesn’t cause crashes.
- Download CompPkgSup.dll from here.
- Copy CompPkgSup.dll to C:\Temp. If the Temp folder doesn’t exist on your system, you should create it. You may be asked to grant Admin privileges, which you should grant.
- Press the Start button and type “cmd”. Right-click on “Command Prompt” and click “Run as Administrator”. Accept the UAC prompt when the prompt comes up.
- Enter the following commands in the elevated command prompt:takeown /f %windir%\System32\CompPkgSup.dll

icacls %windir%\System32\CompPkgSup.dll /grant administrators:F

copy C:\temp\CompPkgSup.dll %windir%\system32\CompPkgSup.dll
- After this operation, CompPkgSup.dll will be copied to the system32 folder. Try launching the media applications which were producing the errors and check if they’ve stopped.

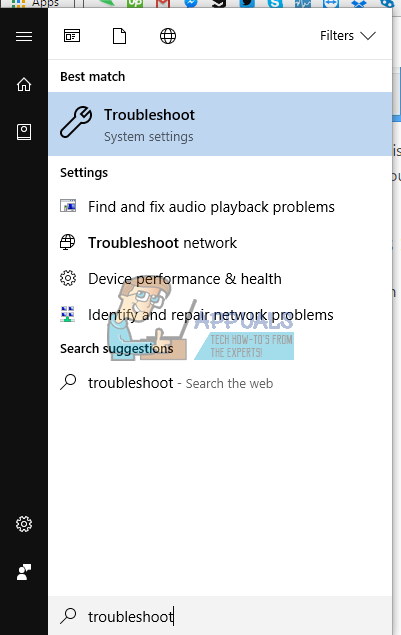
Method 5: Using Windows Troubleshooter
- Open the Start Menu and type troubleshooting

- Scroll down the list of troubleshooting options, select Video Playback and Run the troubleshooter.

- If the Troubleshooter identifies any issues, Apply the fix and then check if you can open any multimedia applications.

Kevin Arrows
Kevin Arrows is a highly experienced and knowledgeable technology specialist with over a decade of industry experience. He holds a Microsoft Certified Technology Specialist (MCTS) certification and has a deep passion for staying up-to-date on the latest tech developments. Kevin has written extensively on a wide range of tech-related topics, showcasing his expertise and knowledge in areas such as software development, cybersecurity, and cloud computing. His contributions to the tech field have been widely recognized and respected by his peers, and he is highly regarded for his ability to explain complex technical concepts in a clear and concise manner.