
Windows Live Mail Stopped Working Error Message – Solved
Approved By Ashwani Tiwari
Published On
December 15th, 2023
Reading Time 4 Minutes Reading
Hi All, Today We are here to talk about a serious issue i.e. Windows live mail stopped working error. It can occur due to multiple reasons. Here in this post, We are going to list some question and their solutions.
Fact: Microsoft discontinued the Windows Live Mail application after Windows 7. In 2018, Microsoft also stopped providing support for Windows 7 OS.
Due to this, If a user upgrades from Windows 7 to Windows 8, 8.1, 10, and 11. Then, there is the chance to get Windows not responding after the Windows upgrade.
I know you are not here to know the history of Windows Live Mail or Windows OS. You are searching for a one-stop solution to deal with windows live mail that has stopped working error messages.
Quick Solution
Nowadays Microsoft paying more attention to MS Outlook. So, it is recommended that you should also move on the same.
Don’t worry, you can easily use your Windows live mail data. Know complete steps for Windows Live Mail to Outlook. This tool also convert WLM mail into pdf.
You can also Directly Use The Application and get it done.
Download Now Buy Now
Read this:-Rescue Windows Live Mail to External Drive and Import WLM Emails to Outlook
Windows Live Mail Not Working Try This Solution
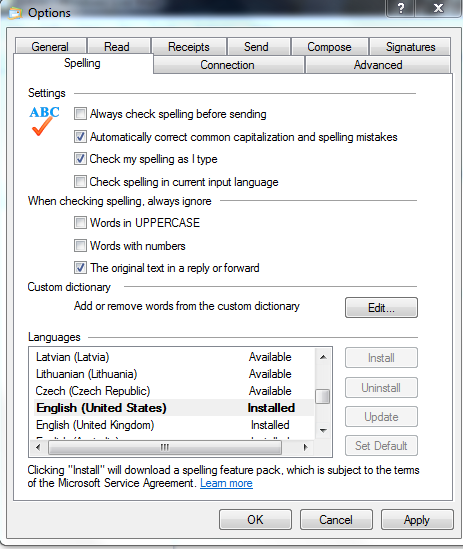
If your Windows Live Mail freezes while replying to a mail. Then, it might be because Spell Checker is not installed.
Real Scenario of Windows Live Mail User
A user his name Alberto, using Windows 7 (64 bit) operating system. Everything working fine, but once I tried to replay to a mail and Windows live mail stopped working. Is it possible to fix this issue?
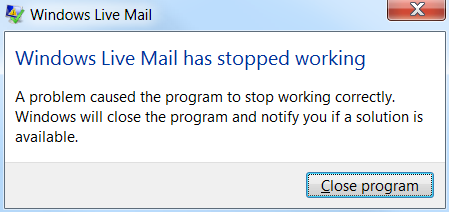
Now let’s talk about the solution to fix this issue. How Windows 7 live mail not working error has been resolved.
Steps to Fix Live Mail Not Working Issue
In this case, you have to install the spell checker (you can also use Debugger), and for this follow the steps listed below:
- Open Windows Live Mail on Your System
- After that, press the ALT key from the keyboard to open the menu toolbar
- Here select Tools from the menu bar and then click on Options
- Now click on the Spelling tab
- Here you will see a language list, select either English (United States) or English (United kingdom), After that click on “Set Default”
This solution will work only in the case of the Spell Checker not being installed. If the spell checker is installed and working fine. Then the reason behind windows lives mail not responding error. Let’s see some questions, asked on the Microsoft forum.
Note:- How to convert WLM to Office 365
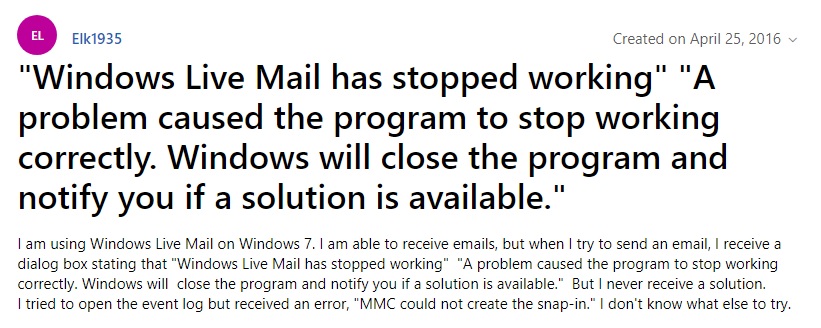
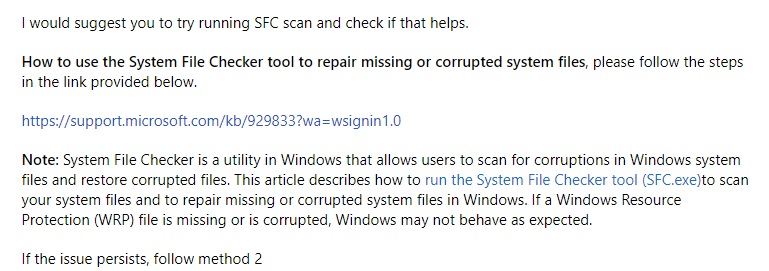
Windows Live Mail Stopped Working Discussion on Microsoft Forum
Here I am going to list some screenshots of user queries and Microsoft experts’ answers. In the end, you will also get a link to the query. Simply read and understand the main reason behind windows live mail not working after the windows 10 upgrade error message.
User Query
Expert Answer
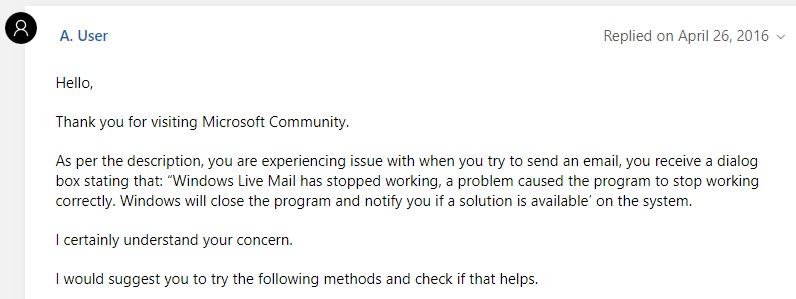
Method 1: – Fix Windows Live Mail Not Working Error
You need to perform the steps, suggested by a Microsoft expert:
Also Read:- WLM Creating Issues in Opening Attachments and WLM 2012 Crashes When Converting to Outlook 2010
Method 2: – Steps to Fix Window Live Mail Stopped Working Error Message
The above-explained solution didn’t work for you. Perform the below-listed steps:
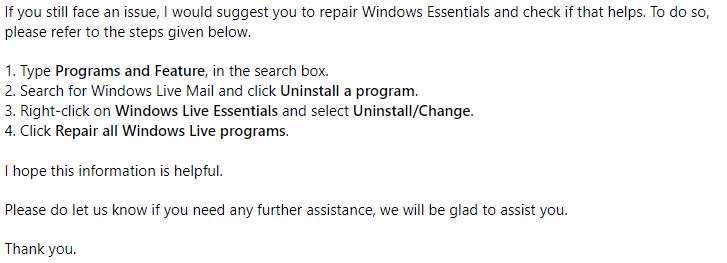
Note: – The screen is taken from the Microsoft community forum. I have tried to explain the reasons behind windows live mail has stopped working with error messages and all possible solutions.
Some Common Questions Which I Have Covered in This Post
You may also look for this, the above-explained solution will work in this situation:
- Microsoft windows live mail has stopped working
- Windows live mail not working windows 7
- WLM has stopped working error message
- Windows live mail not responding
- WLM not working in 2020
- Windows live mail not working in windows 10
- Windows live mail not working after windows 10 upgrade
- WLM not working after windows 10 update
- Windows live mail 2012 not working after the windows 10 update
Conclusion
After reading this blog hopefully, users get the solution to Windows live mail stopped working error message. Because in this write up we have discussed some manual solutions. Also, we have mentioned an instant solution to resolve all issues related to WLM.
Windows Live Mail not working on Windows PC? Don’t worry, try these 100% working tactics to repair Windows Live Mail, easily & quickly.
Almost a year ago, Microsoft decided to stop the support for Windows Live Mail, which is one of the most utilized email clients among Windows PC users. But, numerous users haven’t discontinued using this outdated email client and are still using it.
However, recently, many Windows users who prefer to use the Windows Live Mail client have complained about the unresponsive behavior of the respective email client. They stated that the Windows Live Mail won’t open or launch on their Windows operating system. This can be very frustrating, particularly when Windows Live Mail (WLM) is your preferred choice as an email client. Therefore, today, we have created this guide explaining a few tested and tried tactics to fix problems with Windows Live Mail.
Easy & Quick Ways to Fix Windows Live Mail Not Working on Windows PC
If you are having problems with your best-loved vintage e-mail client i.e., Windows Live Mail, then be sure to try the below-listed resolutions. The suggested hacks will surely help you fix Windows Live Mail not working on Windows 11, 10, or older versions.
Way 1: Launch the Email Client as Administrator and in a Compatibility Mode
Many users somehow managed to fix Windows Live Mail not working issue simply by just running the program as an administrator and in compatibility mode. It may sound like a basic hack, but it can work like magic. If you have no idea, how to make certain changes, follow the steps outlined below:
Step 1: Locate the following paths.
C : Program FilesWindows Live Mail or C : Program Files(x86)Windows LiveMail
Step 2: Click right on the wlmail.exe file and choose Properties.
Step 3: Choose the Compatibility tab to proceed.
Step 4: Tick mark the box shown before the Run this program in compatibility mode for, also choose the correct Windows OS version from the drop-down menu.
Step 5: After that, check the box before Run this program as an administrator.
Step 6: Click on Ok to save the changes.
Step 7: Once done, try to relaunch the Windows Live Mail.
This should surely repair the Windows Live Mail client. But, unfortunately, the issue persists, so try another hack.
Also Read: How to Fix Gmail Temporary Error? Try Best Ways!
Way 2: Create a New Windows Live Mail Account
It’s likely to happen due to the changes that Microsoft made, perhaps your currently existing Windows Live Mail account might lapse in Windows 10. If that is the case, then you can try to remove the old account and create a new one. This might help you fix the issue. To do so, follow the steps below:
Step 1: Launch Windows Live Mail to proceed.
Step 2: After that, make a click on the Account icon and select Sign out of a Windows Live Mail option from the drop-down menu list.
Step 3: Wait for a few seconds and create a new account or sign in with an alternative email address.

Once it’s done, then test the issue and look for changes. If it didn’t help, try another solution.
Also Read: How To Backup Gmail Emails With Attachments
Way 3: Temporarily Disable Antivirus Solution
Your antivirus software can be another cause behind the Windows Live Mail won’t open on Windows 10 PC. Sometimes, the antivirus software blocks specific apps or programs from running properly as expected.
So, just ensure that Microsoft’s email client is included in the list of exceptions in your third-party antivirus solution. If in case, Windows Live Mail is not blocked by your antivirus software, then you can try to disable your antivirus in order to fix the problem. Because particular antivirus programs just are not compatible with the older version of apps. Hence, you should definitely give it a shot, especially when you are running into Windows Live Mail not working problem.
After disabling the antivirus software, check if the problem is solved. If not, then you need to move on to the next solutions to get rid of the problem.
Way 4: Update your PC Drivers
Last but not least, if you are using outdated PC drivers, then you may face numerous issues and errors like Windows Live Mail won’t open and more. Hence to resolve this error, you should try to update the outdated drivers on your PC.
In order to perform this task quickly & easily, you can use any third-party driver updater utility software like Bit Driver Updater. It is the best solution for detecting and fixing all faulty drivers on Windows PC. Bit Driver Updater automatically recognizes your system and finds the correct drivers for it.
To update drivers with Bit Driver Updater, you need to follow the steps shared below:
Step 1: Download Bit Driver Updater from the button below.
Step 2: After that, double click its executable file and follow the on-screen instructions to complete the software installation.
Step 3: Run Bit Driver Updater on your PC and click on the Scan option from the left menu pane.

Step 4: Next, wait and let the scanning be completed.
Step 5: Check the scan results and click on the Update All button to install the latest version of all PC drivers at once.

However, this requires you to upgrade to the pro version of Bit Driver Updater, which also provides a 60-days complete money-back guarantee and 24/7 technical assistance. If you are using the free version, then you can click on the Update Now button shown next to the driver you wish to update. This way you can update drivers one-by-one as its free version is partly manual.
Also Read: How to Delete Gmail Messages in Bulk
Windows Live Mail Not Working on Windows: FIXED
So, the above suggestions were some of the best and proven resolutions to fix Windows Live Mail not working on Windows PC. We hope you find this troubleshooting guide much helpful and useful. Please tell us in the comments below if you have any better suggestions regarding the same. Furthermore, drop your queries also in the comments below. We will try our level best to help you out.
In addition to this, do subscribe to our Newsletter if you want to read more informative articles just like this one. Lastly, follow us on Facebook, Twitter, Instagram, and Pinterest.
Table of Contents
- Introduction
- Reasons Why My Live Email Is Not Working?
- Repair Window Live Mail with These Solutions
- End Wlmail.Exe and Start Windows Live Mail Again
- Consider Better Third-party Options
- Get Rid of the Windows Live Mail.Cache
- Turn Off your Antivirus
- Utilize Compatibility Mode When Using Windows Live Mail
- Set up a New Windows Live Mail Account
- Maintain Windows Essentials
- Put Your Computer Back to An Earlier Working Period
Email is still one of the most widely used methods of communication today, and Windows Live supports a number of email clients, comprising Windows Live Mail, as well as MSN Hotmail, and lets you download mail from a variety of different accounts. Microsoft’s freeware email program, Windows Live Mail, permits users to set up their own email accounts and take advantage of the conveniences of email communication. Outlook Express on Windows XP was replaced by Windows Mail. With Windows 7 and newer versions, Windows Live Mail is compatible.
Sending and receiving messages is made simple, as well as email management. Windows Live Mail is prone to several faults like there might be an update error, though, just like any other piece of software. Users still use Windows Live Mail even though Microsoft no longer supports it since it is still available. In this article, we will see the reasons why Windows live mail stops responding and the solutions to resolve it.
Reasons Why My Live Email Is Not Working?
There are numerous potential reasons why Windows Live Mail isn’t functioning properly on your system. The graphics card driver’s incompatibility with Windows 10, particularly following the upgrade, may be the primary cause of this problem. The graphics card consequently malfunctions as a result.
Furthermore, occasionally it seems like the Windows Live Mail cache is faulty. Windows Live Mail couldn’t be opened either. The Windows Live Mail icon says that it is loading whenever you click on it, but nothing happens even after a while. Windows Live Mail would also be unable to install properly and result in this problem if your computer’s drive is full and you are out of RAM. Incorrect installation of the software could result in these problems. The easiest approach would be to make the repairs described above to address that issue. Additionally, your system can encounter many errors. The main causes of Windows Live Mail not functioning on your PC are as follows:
- Problems With Compatibility.
- Unsuitable Account Settings.
- Limitations in Firewall Configurations.
- Insufficient Assistance for Windows Live Mail.
Repair Window Live Mail with These Solutions
If you experience a similar problem with your computer, don’t worry; we have the best solutions to help you fix Windows Live Mail Won’t Open. You can return Windows Live Mail to its previous state using these techniques.
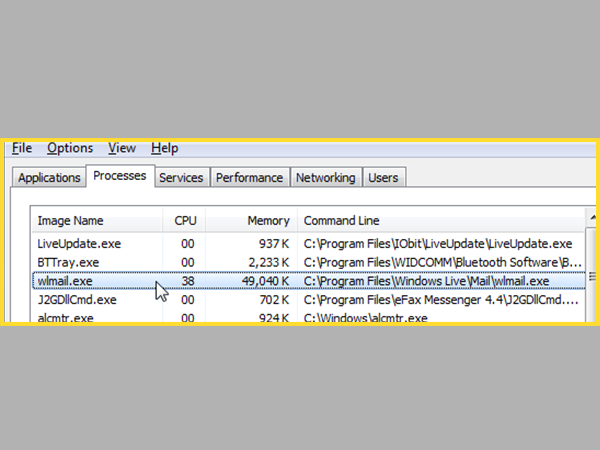
End Wlmail.Exe and Start Windows Live Mail Again
The steps to end Wlmail.Exe and start Windows Live Mail again are given below:
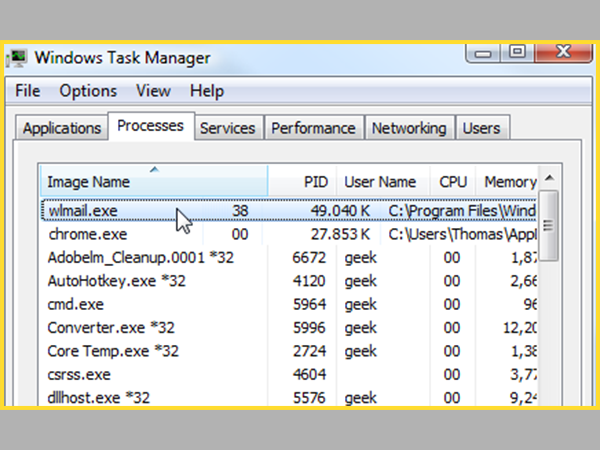
Step 1: To open Windows Task Manager, use Ctrl + Shift + Esc.
Step 2: From the list, locate wlmail.exe, then right-click on it and choose End Task.
Step 3: Next, restart Windows Live Mail once more to see if the problem with Windows Live Mail not opening has been resolved.
Consider Better Third-party Options
If the aforementioned remedy was unable to cure your Windows Live Mail problems, we urge you to forego it and look for other options. You might wish to take into account some of the fantastic email clients that are accessible. The mail client listed below is our top recommendation right now, though. It may satisfy all of your mailing management needs because it is a market leader.
The fact that it collects all accounts in one location has capabilities for Signature Management and has an intelligently designed user experience ought to make a difference. After all, Windows Live Mail has been discontinued, just like several other products from the past. The fact that it still operates for a few users today does not ensure that it will continue to do so.
Get Rid of the Windows Live Mail.Cache
In order to get rid of the Windows Live Mail.Cache, you can follow the steps given below:
Step 1: To begin, use Windows Key + R, type %localappdata %, and then click OK.
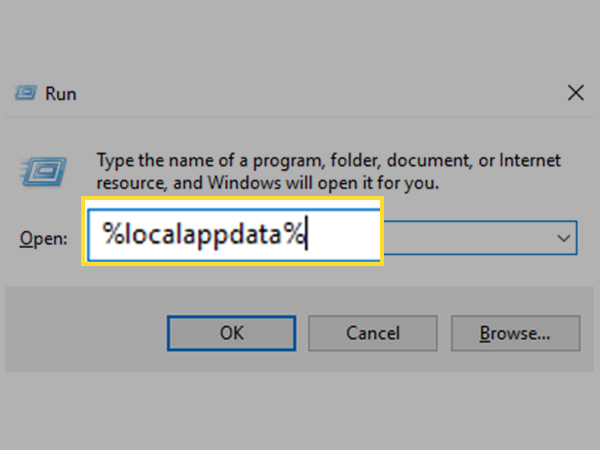
Step 2: Select Microsoft by double clicking it inside the Local Folder.
Step 3: Double-click Windows Live to open it after that.
Step 4: Find the.cache folder, then click and choose Delete from the context menu.
Step 5: Be sure to empty the Recycle Bin after the folder has been erased.
Turn Off your Antivirus
Your antivirus program can be another reason why Windows Live Mail isn’t working properly. Your antivirus program may occasionally prevent you from running a specific program. Therefore, make sure Windows Live Mail is included in your antivirus’s list of exceptions. You might be able to solve the issue by turning off your antivirus program if Windows Live Mail isn’t being blocked by it.
Try uninstalling or disabling your antivirus program if you’re having trouble running Windows Live Mail because some antivirus programs just aren’t compatible with older versions. If uninstalling the antivirus software resolves the issue, now might be the ideal time to think about switching to another antivirus program.
Utilize Compatibility Mode When Using Windows Live Mail.
The steps to utilize the compatibility mode while using windows live mail is given below:
Step 1: Go to the following location to access Windows Live Mail: C: Program Files (x86).
Step 2: Locate the wlmail.exe file, right-click on it, and then choose Properties.
Step 3: Go to the Properties Windows Compatibility tab.
Step 4: Select Windows 7 and check the box next to “Run this program in compatibility mode for.”
Step 5: After selecting Apply, select OK.
Step 6: For the modifications to be saved, restart your computer.
Step 7: Verify whether the Windows Live Mail Won’t Open problem has been fixed.
Set up a New Windows Live Mail Account
Resetting the options for your Windows Live Mail account is another simple fix. Back in the day, using older versions of Windows was simpler; however, Windows 10 came with a host of problems. Specific issues arose as a result of the disagreement between the recently released Mail and Outlook programs and Windows Live Mail. To prevent the conflict, one can reconfigure the Windows Live Mail for Windows 10.
Maintain Windows Essentials
You can easily maintain your window’s essentials by following the given steps:
Step 1: Start by pressing Windows Key + X, then choose the Control Panel.
Step 2: Click Remove a Program.
Step 3: From the list, locate Windows Essential, then right-click on it and choose Uninstall/Change.
Step 4: Select the repair option in the uninstall box that appears.
Step 5: To finish the Windows Essentials Repair Process, adhere to the on-screen instructions.
Step 6: Put everything away, then restart your computer.
Step 7: Verify whether or not the Windows Live Mail Won’t Open issue has been resolved.
Put Your Computer Back to An Earlier Working Period
Step 1: Type “sysdm. Cpl” into the Run box by pressing Windows Key + R, then click OK.
Step 2: Click System Restore under System Protection.
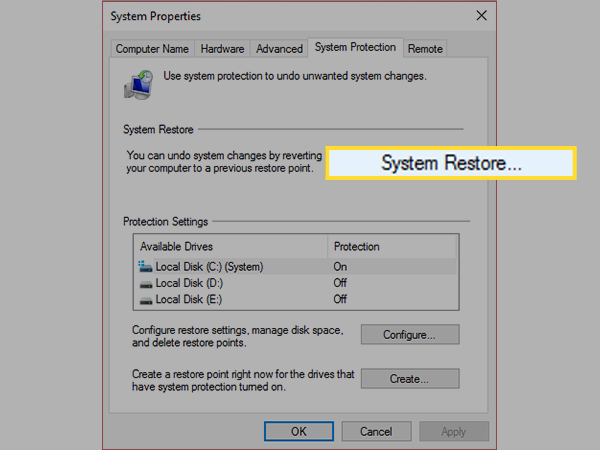
Step 3: After clicking Next, select the appropriate System Restore point.
Step 4: To finish the system restore, adhere to the on-screen instructions.
The Windows Live Mail Won’t Open problem should be resolved after a restart of your computer. Additionally, this will resolve any Windows 10 Random Restart Errors on your computer.
Due to its simplicity, Windows Live Mail is still utilized by many individuals. However, WLM frequently makes it complicated for people to utilize due to some problems. The repairs given above are the best and most effective solutions to your Windows Live Mail Won’t Open issue. There are numerous potential causes for this issue, but these methods almost address every one of them and leave no room for error.
We remind you to carefully follow the steps before attempting any solution, regardless of the action you decide to take to address the problem. Be cautious when carrying out these patches because even the smallest error can harm your machine. In case something goes wrong, we advise you to make a restore point. However, it is doubtful, and using the aforementioned solutions, the issue might be readily remedied. We hope that using these solutions enables you to address the problem.
Share
Do you encounter Windows Live Mail not working after Windows 10 update and problems receiving or seeing emails with “error code 0x800c013e”? The issue occurs while connecting to the mail server and the client app keeps showing up as an annoying notification unless you solve it completely. The code generally appears when the email client fails or crashes during runtime on Windows 10. There might be several reasons for such an error but corrupted store folder which saves messages, calendars, and account settings is found guilty in most cases.
Dissimilar to the other issue Windows live mail error id 0x800c013e commonly doesn’t appear due to the corruption of the app itself. As a result, reinstalling the program or setting up the accounts in the client program doesn’t help in this case. Most of the time, the issue gets resolved by tweaking the Registry or creating a new store folder and populate it.
Windows live mail error id 0x800c013e
Here is how to fix Windows live mail error id 0x800c013e in Windows 10 –
1] Modify Registry Entries
Corrupt or missing store folder is entry is the root cause behind this behavior of live mail. As a result, when you request a task such as Sending or receiving an email the folder couldn’t compete with and it stuck. Fortunately, you can repair and control the behavior using registry modification by recreating indexes. So follow the steps carefully to get rid of the issue –
- Close Windows Live mail if it’s running.
- Press the – Win+R.
- Type in – regedit
- Click the – OK.
- Select the – Yes for the User account control.
- Go to the following string –
Computer => HKEY_CURRENT_USER => SOFTWARE => Microsoft => Windows Live Mail
- Move to the right pane.
- Look for 3 DWORD Values – “RecreateFolderIndex”, “RecreateStreamIndex”, and “RecreateUIDLIndex”.
- If they are not available, right-click on empty space and choose New => DWORD (32-bit) Value.
- Name the key RecreateFolderIndex.
- Double-click the same and put 1 in the Value data box.
- Click OK to save the change.
- Similarly, create RecreateStreamIndex and RecreateUIDLIndex DWORD.
- Change their value to 1.
- Close Registry Editor and launch Windows Live Mail.
- This time, the email-client app should go back to normal and display the messages as usual.
Note – If you check the registry editor again, you will see the value of DWORD keys are reset to 0 automatically. Don’t worry at all and leave them like that if the issue is already resolved.
Hopefully, Windows live mail unable to send or receive messages 0x800c013e will be fixed.
2] Create a new store folder to fix Windows Live Mail Error id 0x800C013E
Addition to repairing the Store folder you can recreate the same manually by renaming. Windows 10, including the older versions of Windows, provides a built-in tool to fix all Windows essential programs from install. Running the troubleshooter will repair all the files and after that, you should configure and populate the client app on your own to solve Windows Live Mail Error id 0x800C013E.
- Launch the – Windows Live Mail.
- Press – Ctrl+Shift+O.
- Select the – Advanced tab.
- Click the button named – Maintainance.
- Next, click the – Store Folder.
- Copy the folder location and click OK.
- Close all wizards associated with Windows Live Mail.
- Thereafter, press Win and R at once.
- Paste the folder location and click OK.
- Right-click on the Storage folder and select Rename. Name it Live Mail Backup.
- Now, you will have to run a repair tool that will check if all program files are present and any corruption exists there. For that, open Run Dialog box by pressing Win+R.
- Type wlarp in the box and click OK.
- Click Yes when a UAC prompts up.
- Opt for the option Repair all Windows Essentials programs.
- After completion of the process, restart Windows 10.
- When the system powers up, open Windows Live Mail app.
- Let the app settle down first and then press Ctrl+Shift+T.
- Add your email accounts and make sure you are inserting credentials correctly.
- Click Working online available in the Home tab.
- Disconnect from the internet to prevent interference from email download.
- Now, click on File from the menu bar and select Import messages.
- Opt for Windows Live Mail and click Next.
- Don’t interrupt while the import is going on.
- Your messages will be under Imported folders in Storage folders.
3] Repair Windows live mail windows 10 by changing compatibility settings
Some programs work well with the older version but they crash at the same time on Windows because of compatibility issues. So with Windows live mail as misconfiguration, bug, or lack of software update may prevent the app from completing request. Follow the guidelines to fix –
- Open File Explorer and navigate to the following directory –
C:\Program Files (x86)\Windows Live\Mail
- Right-click on the wlmail.exe and choose Properties.
- Shift to Compatibility tab.
- Click the checkbox set for Run this program in compatibility mode for.
- Pick Windows 7 from the drop-down list.
- From the below segment of the same wizard, click the checkbox present before Run this program as an administrator.
- Hit Apply followed by OK.
- Start the app and check if Windows live mail error id 0x800c013e still persists.
Methods:
1] Modify Registry Entries
2] Create a new store folder
3] Modify the compatibility settings of Windows Live Mail
That’s all!!
The predecessor of Microsoft Outlook, Windows Live Mail, came with many errors. Microsoft has stopped support for this feature from January 10, 2017, and recommended users move to Outlook. So, naturally, you may have experienced some errors but couldn’t turn to Microsoft support.
Fear not, as you’ll find various possible fixes for the issue in this article. Generally, running the program in Windows 7 compatibility or repairing Windows Essential Suite should resolve this issue. If not, you’ll have to use other email clients, which is still a good solution.
Why Is My Windows Live Mail Not Working
There are several possible errors for Windows Live Mail not working on your system. Your system may also be experiencing more than one error.
Following are some main reasons for Windows Live Mail not working on your computer:
- Incompatibility issues
- Improper account settings
- Restrictions in Firewall settings
- Lack of support for Windows Live Mail
How to Fix Windows Live Mail Not Working
There are a few ways of fixing this issue depending on its cause. Here are some methods that may be of help. Please apply these methods in the corresponding order.
End Process and Restart
Sometimes restarting the program will fix minor errors. You may be able to use Windows Live Mail after restarting it if you haven’t made significant changes to your system.
Follow the steps below to kill and restart this process:
- Press Ctrl + Shift + Esc to launch the Task Manager.
- Go to the Details tab (Or Processes for Windows 7, Vista, XP) and search for
wlmail.exe.
- Right-click on it and select End task or End Process.
- Then, open Windows Live Mail again and check if you still encounter the error.

Run as Admin in Compatibility Mode
The reason your Windows Live Mail is not working might be because it’s not compatible with the newer Windows versions. You can fix this issue by running this program as an administrator in compatibility mode.
Here are the steps to perform this method:
- Go to
C:\Program Files\Windows Live MailorC:\Program Files (x86)\Windows Live Mail. - Right-click on
wlmail.exeand select Properties. - Go to the Compatibility tab.
- Under Compatibility mode, check Run this program in compatibility mode for:
- Choose Windows 7 from the drop-down list.
- Check Run this program as an administrator under Settings.
- Click on Apply and Ok to apply the changes.

- Open Windows Live Mail and check if the issue persists.

Reconfigure Windows Live Mail Account
This issue may also occur due to incorrect server configuration in the Windows Live Mail account.
You might have entered the wrong settings in your account while setting it or changed it by mistake. Some connections may also require SSL or authentication, but those options may be off in your settings.
To fix this issue, please reconfigure your account to the correct settings by following the step below:
- Determine your account settings by contacting your ISP.
- Open your Windows Live Mail.
- Go to the Accounts tab and select Properties.
- Match the settings with those you received from your ISP.

- Also, find out whether the servers require SSL or authentication from your ISP. Check the options if the servers need them.

Remove Current Account and Create New One
This method is more of a workaround than a fix. If there are some issues in your current Live Mail account, you can try creating another one to bypass those issues. Here’s how you can sign in with another account:
- Open your Windows Live Mail.
- Click on the Account icon and select Sign out of Windows Live Mail.
- Then, log in with another email account and check if the program stops working.
Enable Firewall Access
One reason you can’t send or receive emails might be the Windows Firewall restricting connection to a network. Please include Windows Live Mail features in the Firewall exclusion list to solve this issue. The steps you need are as follows:
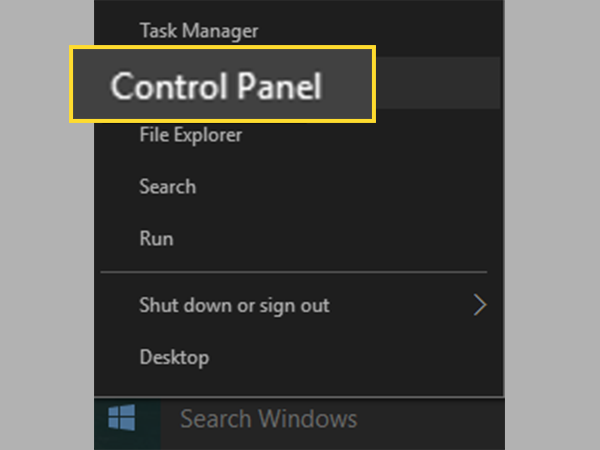
- Open the Run command (Windows + R) and enter
control. It will launch the Control Panel. - Click on System and Security in the category view and select Windows Defender Firewall.
- Click on Allow an app or feature through Windows Defender Firewall.
- Click Change settings and scroll down to find the following:
- Windows Live Communications Platform
- Windows Live Communications Platform (SSDP)
- Windows Live Communications Platform (UPnP)
- Windows Live Messenger
- Check on both Private and Public boxes for all of them. Then hit Ok.


Repair Windows Essentials 2012
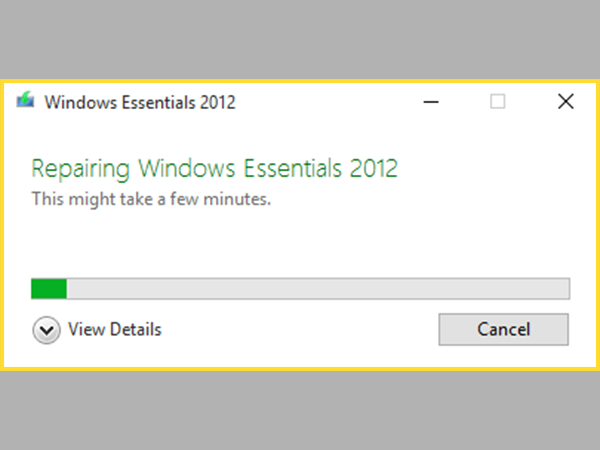
Windows Live Mail is a feature that comes with the Windows Essentials suite. Repairing this program can fix many errors for Windows Live Mail.
Here are the steps to repair Windows Essentials 2012:
- Open Run command and enter
control. - In the category view, locate Programs and click on Uninstall a program under it.

- Search for Windows Essentials 2012.
- Right-click on it and select Repair or Uninstall/Change > Repair.
- Follow the on-screen instructions to repair this program.
- Restart your PC after the process finishes.

Reinstall Windows Essentials 2012
If repairing this program doesn’t fix the issue, reinstalling it may prove successful.
Note: Microsoft no longer provides Windows Essentials 2012. So, you’ll have to download an offline installer from unofficial sites to install it again. Make sure to protect your system against Malware infection before downloading the installer.
Follow the instructions below to uninstall and reinstall Windows Essentials 2012:
- Open the Control Panel and look for Programs in the category view.
- Click on Uninstall a Program under it.
- Search for Windows Essentials 2012.
- Right-click on it and select Uninstall. Then, confirm with Yes.
- Follow the on-screen instructions to uninstall this program.
- Download and run the offline installer for Windows Essentials 2012.
Tweak Registry
Some incorrect registry entries may also prevent you from sending or receiving emails. In this case, your messages will likely display, “Message cannot be displayed.“
Changing those entries will solve this issue. Here’s how you can do so:
- Enter
regeditin the Run command to open the Registry Editor. - Navigate to the location:
Computer\HKEY_CURRENT_USER\SOFTWARE\Microsoft\Windows Live Mail - Double-click on the following entries and change their Value data to 1:
- RecreateFolderIndeex
- RecreateStreamIndex
- RecreateUIDLIndex
- If the entries do not exist, click on Edit from the menu bar and select New > DWORD (32-bit) Value to create new entries. Name them as above and set their value to 1.
Note: We recommending creating a restore point before changing registry entries in case it causes system problems.
Launch System Restore
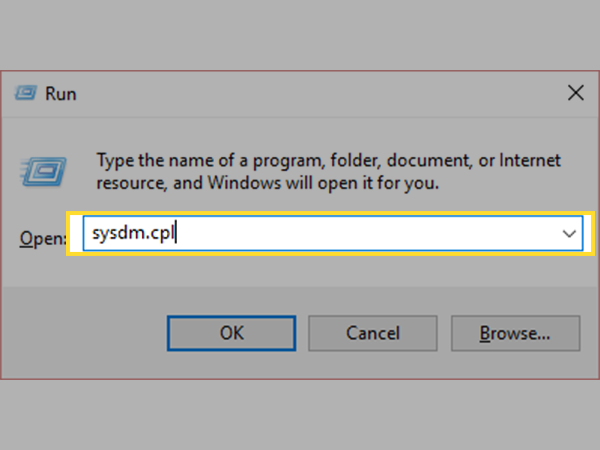
You can try to revert your system to a restore point if all the previous solutions can’t solve this issue. Please follow these directions to do so:
- Open the Run command.
- Here, type
systempropertiesprotectionand press Enter. It will direct you to the System Protection tab of System Properties. - Click on System Restore to initiate the process.

- Follow the on-screen instructions.

Use Alternative Email Clients
Since Windows no longer supports Live Mail, any previously working program would have stopped working. You can still download and use Windows Live Mail from other unofficial sources. However, we recommend using alternative email clients such as Outlook, Thunderbird, etc.
There won’t be any updates for Windows Live Mail, and Microsoft won’t provide any help when users encounter any errors. It is better to migrate to other email clients that receive regular updates and official support.