
Rick Akura
In this guide, you will learn how to fix common host process task errors on Windows 10 using 5 different methods. Let’s get started.
Tasks on Windows 10 can take up a huge amount of memory or CPU usage. They may also cause error pop-ups, and make it hard to use your device. A task that users have problems with particular is “Host Process for Windows Tasks” which appears in your Task Manager.

Many users report that the taskhost.exe process (which also appears as “Host Process for Windows Tasks”) uses high CPU or disk, or comes up with an error such as “Host Process for Windows Tasks has stopped working.” This is bad, as the process is a core part of Windows 10 and should be working precisely at all times.
In this article, you can learn more about these errors, and find solutions to fix them entirely. Simply scroll down to the desired section and take in the information.
How to fix the “Host Process for Windows Tasks has stopped working” error
One of the most common errors related to this process is a message stating that the Host Process for Windows Tasks has stopped working. This leaves a lot of confusion left behind. You won’t immediately know what happened to the process, or what it means for it to stop working.

As the Host Process for Windows Tasks is a crucial process for your system, leaving it to crash is a big mistake. Below are several methods to fix this error and ensure that the process continues to work in the future without crashing.
Method 1: Repair corrupted BITS files

- Press the Windows + R keys on your keyboard. This is going to bring up the Run utility.
- Type in the following line and hit Enter: Programdata\Microsoft\network\downloader
- If prompted, click the “Continue” button to grant permissions for accessing the folder.
- You should see the File Explorer open up with the “Downloader” folder displayed. Here, delete every file that begins with “qmgr” such as qmgr0.dat, qmgr1.dat, etc.
- After deleting these files, update your system from Settings → Update & Security → Windows Update. This should replace the corrupted BITS.
Method 2: Run the System File Checker

- Press the Windows + R keys on your keyboard. This is going to bring up the Run utility.
- Type in “cmd” and press the Ctrl + Shift + Enter keys on your keyboard. Doing so, you’re launching the Command Prompt with administrative permissions.
- If prompted, click Yes to allow the Command Prompt to make changes on your device.
- Once in the Command Prompt, type in the following command and press Enter to execute it: sfc /scannow
- Wait for the SFC scan to finish scanning your computer and repairing corrupt files. This may take a long time; ensure that you don’t close the Command Prompt or shut your computer down.
- Restart your device after the scan is complete.
Method 3: Run the DISM command

- Press the Windows + R keys on your keyboard. This is going to bring up the Run utility.
- Type in “cmd” and press the Ctrl + Shift + Enter keys on your keyboard. Doing so, you’re launching the Command Prompt with administrative permissions.
- If prompted, click Yes to allow the Command Prompt to make changes on your device.
- Once in the Command Prompt, type in the following two commands and press Enter after reach one to execute it: Dism /Online /Cleanup-Image /StartComponentCleanup, Dism /Online /Cleanup-Image /RestoreHealth
- Wait for the commands to finish running and restart your computer.
Method 4: Run the Windows Memory Diagnostic tool

- Press the Windows + R keys on your keyboard to bring up the Run utility. Here, simply type in “mdsched.exe” and press the OK button.
-
Choose “Restart now and check for problems (recommended)” to instantly being a memory scan. Make sure to save any files and close all open applications before clicking on this option.
Otherwise, choose “Check for problems the next time I start my computer” and restart the device at a more convenient time. - During the next boot, you’ll see the Windows Memory Diagnostic tool check for issues. Make sure to read all the information displayed on the screen and wait for the completion.
- Once the memory test is complete, you’ll be able to see if any issues were identified. If there were none, your memory is luckily working fine.
Method 5: Use CCleaner to clean your system and Registry

- Download CCleaner by clicking here. This is the official website, meaning that all downloads are safe from any malware.
- Click on the setup file you just downloaded to launch the installation wizard. Simply follow the on-screen instructions to install CCleaner onto your device.
- Launch CCleaner using a created shortcut or the search bar.
- First, select “Cleaner” from the left-side panel. Simply click the blue “Run Cleaner” icon to begin the process. Optionally, you can uncheck any options that you don’t want to delete before beginning the cleaning.
- Wait until the cleaning is complete, then switch to the “Registry” tab.
- Click the “Scan for Issues” button and wait for CCleaner to identify any Registry errors. If any issues are found, click on “Fix selected issues…”
- Restart your computer.
How to fix the Host Process for Windows Tasks high CPU, RAM or Disk usage

When in the Task Manager, you may notice that the Host Process for Windows Tasks is using up an unusually high amount of resources. This isn’t normal, however, it can be fixed easily. You won’t have to deal with a slow computer because of this error anymore if you follow our simple guides below to fix it.
Method 1: Run a script in PowerShell
- Right-click on any empty space on your desktop and create a new text document using New → Text document. Name it something like “CPU Fix.txt” without the quotes.
- Open the text file you just created and and paste in the following script:
Get-ScheduledJob | ? Name -eq “Kill SettingSyncHost” | Unregister-ScheduledJob
Register-ScheduledJob -Name “Kill SettingSyncHost” -RunNow -RunEvery “00:05:00” -Credential (Get-Credential) -ScheduledJobOption (New-ScheduledJobOption -StartIfOnBattery -ContinueIfGoingOnBattery) -ScriptBlock {
Get-Process | ?{ $_.Name -eq “SettingSyncHost” -and $_.StartTime -lt ([System.DateTime]::Now).AddMinutes(-5) } | Stop-Process -Force
}
- Save the document using File → Save as… in the header menu.
- Change the file type to “All files.”
- Remove the “.txt” extension in the file name and rename the file to “CPU Fix.ps1” without the quotes.
- Right-click on “CPU Fix.ps1” and choose “Run with PowerShell.”
- If this method worked, you may have to repeat Step 6 every time your computer is restarted to ensure the process doesn’t hog your resources again after a reboot.
Method 2: Scan your computer for malware

Below is a short guide on how to use Malwarebytes for scanning and removing viruses and other types of malware from your device. However, you can use just about any antivirus app — it’s up to your preference.
- Launch your antivirus application. Again, we’re using Malwarebytes to demonstrate this process.
- Click on the “Scan” option using the application’s left-side menu.
- Click the “Start Scan” button to start a malware scan on your device.
- Wait for Malwarebytes to finish scanning your PC for malware. If any malicious files are found, you can immediately neutralize them by allowing Malwarebytes to put them in quarantine.
- Optionally, allow Malwarebytes to delete the malicious files from your PC.
Conclusion
We hope that this article was able to help you fix common issues with the Host Process for Windows Tasks process on Windows 10.
Are you interested in learning more about Windows 10? You can browse our dedicated Help Center section and learn more about how to fix Windows power Shell using high CPU.
If you’re looking for a software company you can trust for its integrity and honest business practices, look no further than SoftwareKeep. We are a Microsoft Certified Partner and a BBB Accredited Business that cares about bringing our customers a reliable, satisfying experience on the software products they need. We will be with you before, during, and after all the sales.
Fix Host Process for Windows Services has stopped working: Most of the users are facing this issue where an error message pops up saying “Host Process for Windows Services has stopped working and was closed.” As the error message doesn’t have any information attached to it, so there is no particular cause as to why this error is caused. In order to get more information about this error, you need to open View Reliability History and check the cause of this issue. If you don’t find the proper information then you need to open Even Viewer to get to the root cause of this error message.
After spending a lot of time, researching about this error it seems like it caused because of 3rd party program conflicting with Windows, another possible explanation would be memory corruption or some important Windows services might be corrupted. Most of the users were getting this error message after Windows update which seems to be because of BITS (Background Intelligent Transfer Service) files might be corrupted. In any case, we need to fix the error message, so without wasting any time let’s see how to actually Fix Host Process for Windows Services has stopped working or Process cannot access file error with the below-listed troubleshooting steps.
Table of Contents
Make sure to create a restore point just in case something goes wrong.
Method 1: Open Event Viewer or Reliability History
1.Press Windows Key + R then type eventvwr and hit Enter to open Event Viewer.
2.Now from the left-hand menu double click Windows Logs then check Application and System logs.

3.Look for the events marked with red X next to them and make sure to check the error details which includes error message “Host process for Windows has stopped working.“
4.Once you have zeroed into the issue we can start troubleshooting the problem and fix the issue.
If you didn’t find any valuable information about the error, you could open Reliability history to get a better insight about the error.
1.Type Reliability in the Windows Search and click on View Reliability History in the search result.
2.Search for the event with an error message “Host process for Windows has stopped working.“

3.Note down the process involved and follow the below-listed troubleshooting steps to fix the issue.
4.If the above services are related to the 3rd party then make sure to uninstall the service from Control Panel and see if you’re able to fix the issue.
Method 2: Perform a Clean Boot
Sometimes 3rd party software can conflict with System and therefore the System might not shut down completely. In order Fix Host Process for Windows Services has stopped working error, you need to perform a clean boot in your PC and diagnose the issue step by step.
Method 3: Run System Restore
1.Press Windows Key + R and type”sysdm.cpl” then hit enter.
2.Select System Protection tab and choose System Restore.

3.Click Next and choose the desired System Restore point.

4.Follow on screen instruction to complete system restore.
5.After reboot, you may be able to Fix Host Process for Windows Services has stopped working error.
Method 4: Run DISM Tool
Don’t run SFC as it will replace Microsoft Opencl.dll file with Nvidia which seems to be causing this issue. If you need to check the integrity of the system run DISM Checkhealth command.
1.Press Windows Key + X then select Command Prompt (Admin).
2.Try these command sin sequence:
Dism /Online /Cleanup-Image /StartComponentCleanup
Dism /Online /Cleanup-Image /RestoreHealth

3.If the above command doesn’t work then try on the below:
Dism /Image:C:\offline /Cleanup-Image /RestoreHealth /Source:c:\test\mount\windows
Dism /Online /Cleanup-Image /RestoreHealth /Source:c:\test\mount\windows /LimitAccess
Note: Replace the C:\RepairSource\Windows with the location of your repair source (Windows Installation or Recovery Disc).
4.Don’t run SFC /scannow in order to verify the integrity of system run DISM command:
Dism /Online /Cleanup-Image /CheckHealth
5.Reboot your PC to save changes.
Method 5: Run CCleaner and Malwarebytes
1.Download and install CCleaner & Malwarebytes.
2.Run Malwarebytes and let it scan your system for harmful files.
3.If malware is found it will automatically remove them.
4.Now run CCleaner and in the “Cleaner” section, under the Windows tab, we suggest checking the following selections to be cleaned:
5.Once you’ve made certain the proper points are checked, simply click Run Cleaner, and let CCleaner run its course.
6.To clean your system further select the Registry tab and ensure the following are checked:
7.Select Scan for Issue and allow CCleaner to scan, then click Fix Selected Issues.
8.When CCleaner asks “Do you want backup changes to the registry?” select Yes.
9.Once your backup has completed, select Fix All Selected Issues.
10.Restart your PC to save changes.
Method 6: Repair Corrupted BITS files
1.Press Windows Key + R then type the following and hit Enter:
\Programdata\Microsoft\network\downloader
2.It will ask for permission so click Continue.
3.In the Downloader folder, delete any file that begins with Qmgr, for example, Qmgr0.dat, Qmgr1.dat etc.

4.After successfully able to delete the above files immediately run Windows update.
5.If you are not able to delete the above files then follow the Microsoft KB article on how to repair the corrupt BITS files.
Method 7: Run Memtest86
Note: Before starting, make sure you have access to another computer as you will need to download and burn the software to the disc or USB flash drive. It’s best to leave the computer overnight when running memtest as it sure likely to takes some time.
1.Connect a USB flash drive to your system.
2.Download and install Windows Memtest86 Auto-installer for USB Key.
3.Right-click on the image file which you just downloaded and select “Extract here” option.
4.Once extracted, open the folder and run the Memtest86+ USB Installer.
5.Choose your plugged in USB drive to burn the MemTest86 software (This will format your USB drive).

6.Once the above process is finished, insert the USB to the PC in which Host Process for Windows Services has stopped working error is present.
7.Restart your PC and make sure that boot from the USB flash drive is selected.
8.Memtest86 will begin testing for memory corruption in your system.

9.If you have passed all the test then you can be sure that your memory is working correctly.
10.If some of the steps were unsuccessful then Memtest86 will find memory corruption which means the above error is because of bad/corrupt memory.
11.In order to Fix Host Process for Windows Services has stopped working error, you will need to replace your RAM if bad memory sectors are found.
Recommended for you:
- Fix Black Squares Behind Folder Icons
- Fix Task Scheduler service is not available error
- How to Fix Windows 10 will not shut down completely
- Fix Windows Keyboard Shortcuts Not Working
That’s it you have successfully Fix Host Process for Windows Services has stopped working error but if you still have any questions regarding this guide then feel free to ask them in the comment’s section.
This article looks at what causes and how to fix the “Host Process for Windows Services Has Stopped Working” error in Windows.
The error message isn’t a strange error in Windows, especially since several users have complained about experiencing it. Since the error lacks any code or descriptive information, it is difficult to know what causes it.
Pro Tip: You can clean, speed up and protect your computer with a quality PC repair tool to get your computer running fast and smooth. It will diagnose your Windows operating system to locate junk files, speed-reducing problems, and causes of system crashes. This tool will help you to fix the Host Process for Windows Service Has Stopped Working error on Windows 10.
What Causes the “Host Process for Windows Services Has Stopped Working” Error?
Several users have noted that the “Host Process for Windows Services has Stopped working” is a Windows operating system error. This message usually occurs randomly. When the host process error is occurring, you may also notice a considerable drop in your Internet connection.
Most users report seeing this error after a Windows update. This error might occur when a program is incompatible (usually third party) with your PC and the Windows OS. For instance, this issue could affect various operational setups, such as remote work environments where laptops shipped to employers safely are crucial for seamless productivity.
Other causes of the error include:
- Incomplete Windows update patches
- Incompatible third-party programs (such as printers and AV programs)
- Corrupted registry files
- Malware in your computer
- Corrupted memory
Note: Some Windows users have related the error to printer problems. Check the printer’s registry on the computer.
How to Fix Host Process for Windows Services Has Stopped Working
How to resolve the Host Process for Windows Services Has Stopped Working issue
Preliminary Workarounds
- Reboot and try to print again and see if the problem has been solved.
- Disable any firewall program on your PC. If there is any, then try again to print the document you’re printing.
- Disconnect any printer that is connected to your computer.
If these solutions do not fix the Host Process for Windows Services Has Stopped Working, you may proceed to the following technical solutions.
Note: Before you begin using these solutions, make sure you create a Windows restore point just in case something goes wrong.
Fix #1: Uninstall Third-Party Antivirus Programs
Some sensitive antivirus can give false positives that can stop the program you are running. If, after disabling the antivirus software you still see the error result, uninstalling it may be the solution.
Before you remove the program, conduct a full system scan to make sure that no malware is interfering with your system operations and causing the host process error.
Doing so will help remove the particular malware and other related malware programs. Additionally, you can update drivers that may be causing the host process issue on your PC. You can do it through the Device Manager or using a driver updater tool that will automatically update all the device drivers.
Fix #2: Start the Computer in Safe Mode
This will boot your PC in Safe Mode. Safe mode shuts down every non-essential application during Windows launch and ensures that only the most stable drivers are running. It also ensures that non-essential processes do not start during the Windows Launch and it disables non-core components.
To start your PC on Safe Mode:
- Click the Start button.
- Select the Power icon.
- Press the Shift key down and click Restart.
- On the new menu select Troubleshoot > Advanced Options > Startup Settings.
- Click the Restart.
- Your computer will reboot, presenting you with a menu. Selection option 4 to select Enable Safe Mode (or option 5 to select Safe Mode with Networking).
In Safe Mode, you can either run your anti-malware software to remove the malware that could be causing the problem. You may also uninstall a recent Windows update that may be causing the malfunction.
Launching your PC in Safe Mode can also be helpful if you face such issues like error 0x80070091 or error code 0x8007045d.
Fix #3: Locate and Repair Incompatible Programs Causing the Error
Because the host process error often happens due to incompatibility between an application on your PC and the Windows OS.
You first need to determine the program that is causing the host process problem. To do this you will view the Event Logs on your PC. Here’s how:
- Go to the Control panel (In Windows 10 Press Win + S then type
control panel). - Click Administrative Tools (on Classic view) or System and Maintenance (in normal view).
- Click Event Viewer (in Classic view) or View event logs (in normal view).
- Navigate through the Windows Logs folder and locate the Application and System logs.
- Locate events that have red X’s next to them and with the word Error. Some of the errors may also have the message, “Host process for Windows has stopped working.“
These events should be occurring around the same time or Just before the “Host process for Windows stopped working” error message occurred. - Once you locate the programs causing the issue, you can proceed to the solutions that can help you fix the problem. You can update them or uninstall them.
Fix #4: Perform a Clean System Boot
A clean boot helps to troubleshoot software compatibility issues. If you notice that the host process error is occurring because of third party software, you may need to perform a clean boot to give the system a complete shutdown.
This will allow you to diagnose the problem in a step-by-step manner by removing 3rd party applications that are loaded and launching on startup. Now that we have discussed about the Clean boot let’s see how to perform it.
- Press Win + R.
- Type
msconfigand click OK.
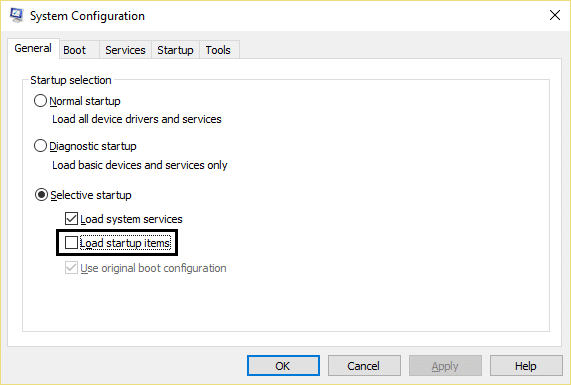
- Under the General tab, ensure ‘Selective startup’ is checked.
- Under the selective startup tab, uncheck ‘Load startup items.’
- Select Service tab and check the box ‘Hide all Microsoft services.’
- Click ‘Disable all’ to disable all the unnecessary services that might be causing the conflict.
- On the Startup tab, click ‘Open Task Manager.’
- In the Task Manager disable all the enabled startup items.
- Click OK, then Restart your PC.
This process should give you a clue of which processes are causing the problem. If no startup process is causing the problem then it could be related to Microsoft services.
Performing a clean boot also helps resolve errors that are not easily resolved by common fixes. For instance, BSOD errors, such as 0x80004003, often result in a boot loop that makes them impossible to resolve. Doing a clean boot interrupts the boot loop and lets your computer load in an environment that allows troubleshooting.
Fix #5: Run System Restore
To run system restore
- Press Win + R.
- In the dialogue box, type
sysdm.cplthen press Enter. - Select System Protection tab.
- In the tab choose System Restore.
- Click Next then choose the desired System Restore point.
- Follow the on-screen instruction to complete the system restore process.
- After system restoration, reboot your computer and see if it has stopped working, if the process fixed the Host Process for Windows Services.
Take a note, system restore is a useful function that can perfectly solve system malfunctions like Windows Shell Experience host error or multiple RuntimeBroker.exe processes in Task Manager.
Fix #6: Repair Corrupted BITS Files
Most users report getting this error message after the Windows update. This can be because of a corrupted BITS (Background Intelligent Transfer Service) file. If this is the case, you will need to repair the BITS files to fix the Host Process for Windows Services has stopped working.
To repair BITS files:
- Press Win + R.
- In the dialog box type (or copy and paste) this:
\Programdata\Microsoft\network\downloader - Press Enter.
- Click Continue to allow the process to run.
- In the Downloader folder, delete any file that begins with Qmgr, for instance, Qmgr0.dat, Qmgr1.dat etc.
- After deleting the files, run Windows update (immediately).
Reboot your system after the Windows update and check if this solution helps to fix the error.
Many people have reported this error: Windows host process (Rundll32) has stopped working. And this error occurs every time the system starts. It’s annoying, but don’t worry. We’ll help you fix your error and get your computer back on track.
Why does the error happen?
Rundll32 is a Windows component that is responsible for 32-bit Dynamic Link Library (DLL) files. This program should be working properly in your computer to maintain other programs function correctly. So if the Rundll32 is missing or corrupted, it stops working and you’ll have the “Windows host process (Rundll32) has stopped working” error.
Try these solutions:
- Change Folder Options settings
- Restore to the previous state
- Update the graphics card driver
- Check for virus and malware
Note: the screenshots below come from Windows 10, and the fixes apply to Windows 8 and Windows 7.
Solution 1: Change Folder Options settings
With Folder Options (or File Explorer Options) in your computer, you can manage the settings for your files and folders, for example, you can change how your files and folders display in File Explorer. This is an effective way to resolve your problem.
To do so:
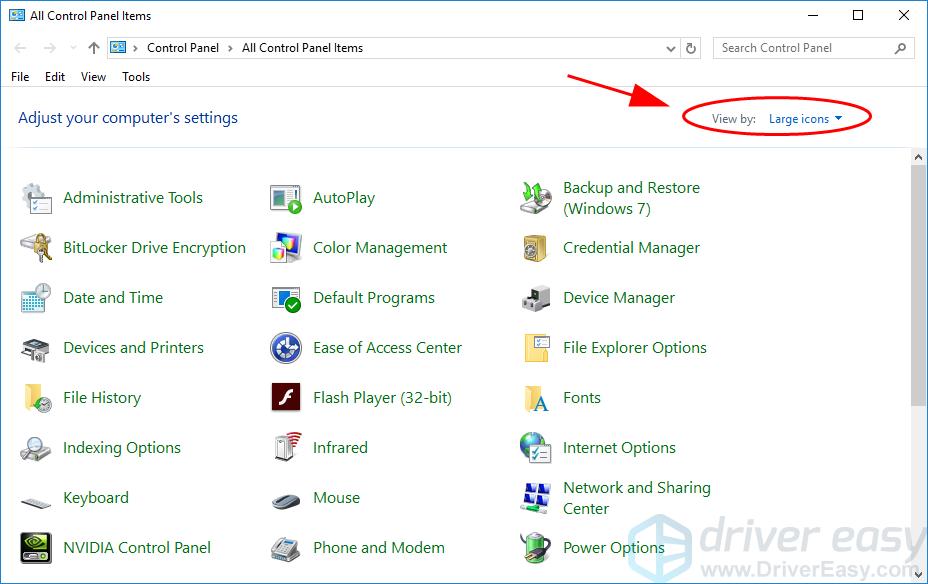
- Open Control Panel on your computer, and make sure to view Control Panel item by small icons or large icons.

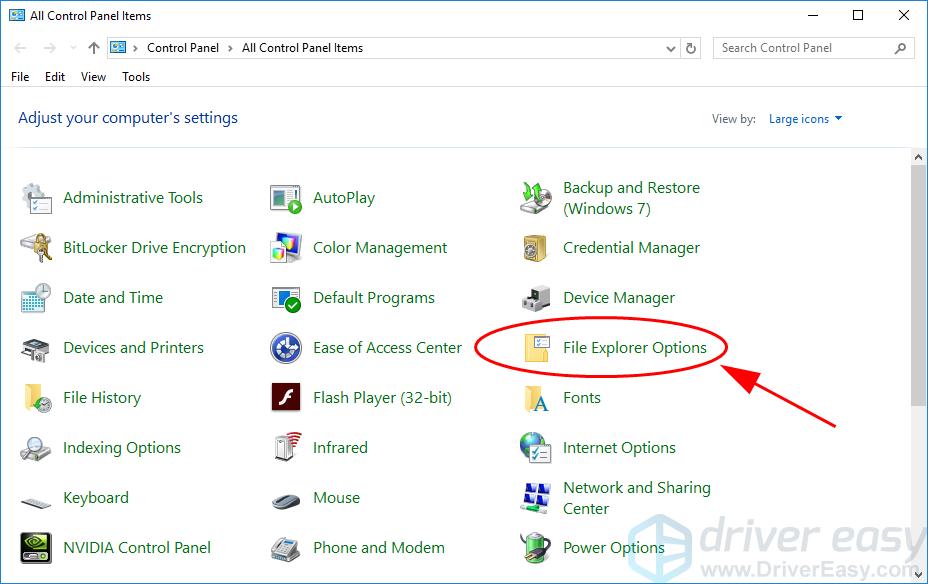
- Click Folder Options. If you can find Folder Options, click File Explorer Options.
- In the new popup pane, click the View tab, and check the box next to Always show icons, never thumbnails.
- Click Apply and OK to save it.
Restart your computer and see if it fixes the error.
If the problem still persists, don’t worry. There are other solutions to try.
Solution 2: Restore to the previous state
It’s likely that you’ve updated your driver, or you’ve installed some programs, and that may cause “Windows host process (Rundll32) has stopped working”. Many people reported that installing software like QuickSet, Realtek audio driver, or Sound Blaster will result in this issue. So you should roll back to the previous state to fix the problem.
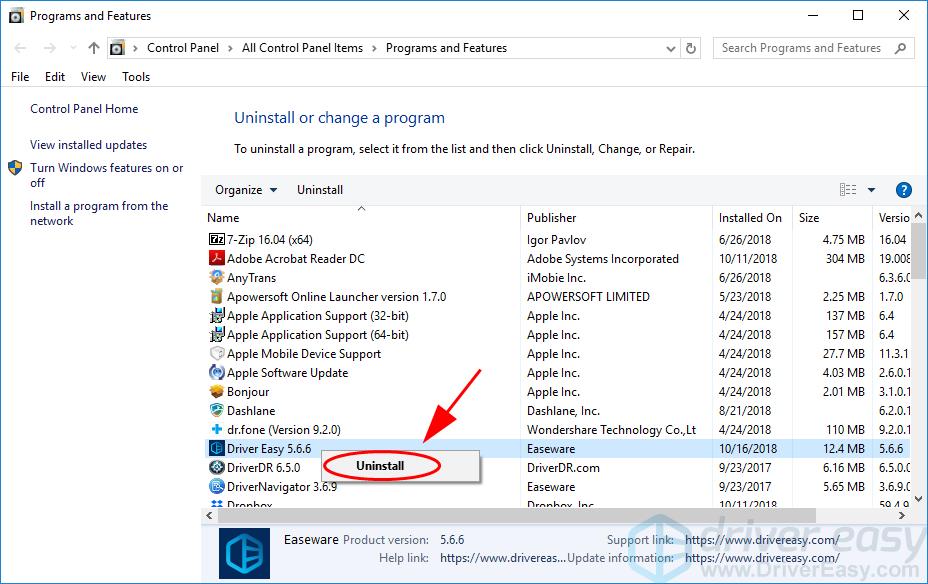
If you’ve installed programs, try uninstalling:
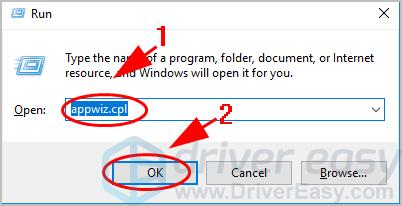
- On your keyboard, press the Windows logo key
and R at the same time to invoke the Run box.
- Type appwiz.cpl and click OK.

- In the program list, select the program that you recently installed, and uninstall it from your computer.
- Restart your computer.
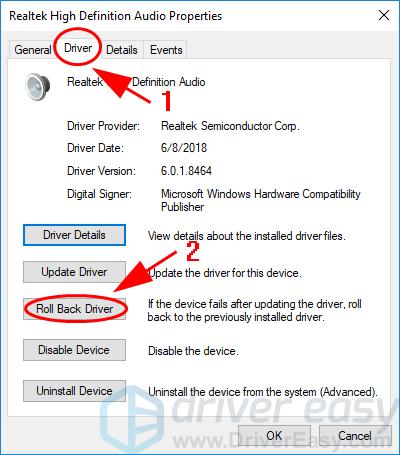
If you’ve updated device drivers, try restoring:
- On your keyboard, press the Windows logo key and R at the same time to invoke the Run box.
- Type devmgmt.msc and click OK.
- Double click on the device that you just updated its driver.
- Click the Driver tab, and click Roll Back Driver.

- Follow the on-screen instructions to finish the process.
Restart your computer and see if it works.
Solution 3: Update the graphics card driver
A missing or outdated graphics card driver can also result in the “Windows host process (Rundll32) has stopped working” error. So you can update the driver for your computer.
There are two ways to update the graphics driver: manually and automatically.
Manually update driver – You can go to the manufacturer’s website for your video card, find the latest correct driver for it, then download and install into your computer. Be sure to download the one that is compatible with Windows OS in your computer.
Automatically update driver – If you don’t have time or patience, you can do it automatically with Driver Easy.
Driver Easy will automatically recognize your system and find the correct drivers for it. You don’t need to know exactly what system your computer is running, you don’t need to risk downloading and installing the wrong driver, and you don’t need to worry about making a mistake when installing.
You can update your drivers automatically with either the FREE or the Pro version of Driver Easy. But with the Pro version it takes just 2 clicks (and you get full support and a 30-day money back guarantee):
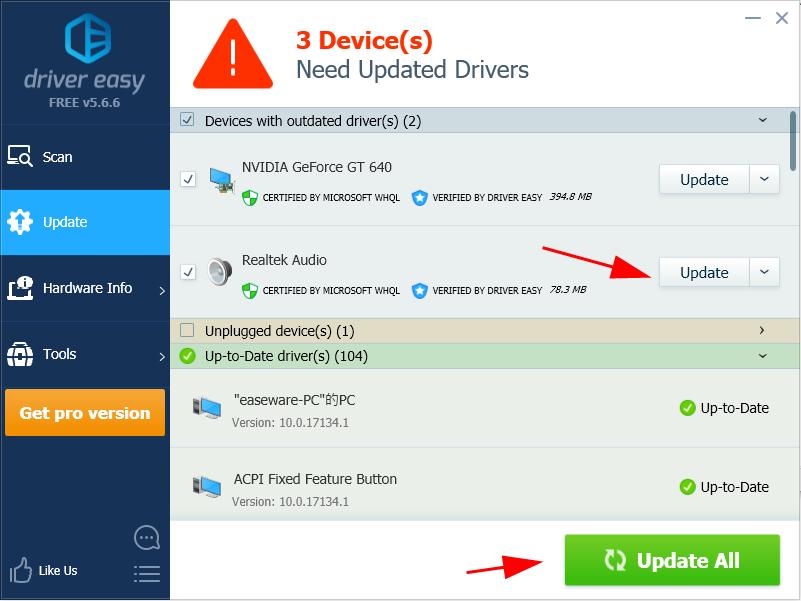
- Download and install Driver Easy.
- Run Driver Easy and click Scan Now. Driver Easy will then scan your computer and detect any problem drivers.

- Click the Update button next to the flagged graphics card to automatically download the correct version of their driver (you can do this with the FREE version), then install it in your computer.
Or click Update All to automatically download and install the correct version of all the drivers that are missing or out of date on your system (this requires the Pro version – you’ll be prompted to upgrade when you click Update All).

- Restart your computer to take effect.

Check if the error has been removed.
Solution 4: Check for virus and malware
The “Windows host process (Rundll32) has stopped working” error message may appear if a virus on your computer is preventing the host process from being detected. The virus may even be generating the error itself.
So run a virus scan across your entire Windows system. Yes, it will take some time to complete, but it’s worth it. Unfortunately, Windows Defender may not detect it, so it’s worth trying another antivirus application such as Avira and Panda.
If any malware has been detected, follow the instructions provided by the antivirus program to fix it.
Then restart your computer and try to launch your program again to see if it works.
So there you have it – four easy and effective methods to fix “Windows host process (Rundll32) has stopped working” error in your Windows computer.
Free free to leave a comment and let us know which method helps. If you have any questions, feel free to list it out and we’ll see what more we can do.
4
4 people found this helpful
How to Fix Task Host Window Preventing Shutdown
The Task Host Window issue that prevents your computer from shutting down can be incredibly frustrating. Users often encounter a message that indicates applications are still running, even if all visible programs are closed. This article will provide a comprehensive guide on how to troubleshoot and resolve the Task Host Window obstacles when attempting to shut down your Windows computer.
Understanding the Task Host Window
Before diving into the fixes, it’s essential to understand what the Task Host Window is. The Task Host Window is a part of the Windows operating system that manages processes running in the background. It ensures that applications are properly closed before the system proceeds with shutdown or restart.
Typically, users may notice a pop-up that states, «The Task Host Window is preventing Windows from shutting down.» This generally means that some background applications or processes need to be closed first. Here are several reasons why the Task Host Window can interfere with shutdown:
- Unfinished application processes: Applications that do not close properly can linger in the background, prompting the Task Host Window.
- Pending Windows updates: Sometimes, system updates require certain applications to close before proceeding with shutdown.
- Background services: Certain services or processes might still be running without user knowledge.
Common Symptoms
The key symptom of the Task Host Window issue is the inability to shut down or restart your computer without seeing the Task Host Window pop-up. Other symptoms may include:
- Slow performance when trying to shut down or restart.
- A particular application that remains stuck in a closing state.
- Unresponsive applications that can’t be forcibly closed through normal methods.
Basic Troubleshooting Steps
Before delving into more advanced solutions, it’s wise to try some basic troubleshooting steps:
1. Wait It Out
Sometimes, simply waiting a few moments allows the operating system to finish its tasks. Certain applications may take longer than anticipated to close. If waiting doesn’t resolve the issue, proceed to further steps.
2. Close Applications Manually
Firstly, ensure all visible applications are closed. This includes minimizing any open applications and using the task manager to close down anything that might be running:
- Press
Ctrl + Shift + Escto open Task Manager. - Look for any applications that are still open and select them.
- Click on «End Task» to close any applications that might be running.
3. Restart Your Computer
If all else fails, restarting your computer can often resolve minor glitches. It refreshes system processes and terminates any residual tasks. After a restart, attempt to shut down once more.
Advanced Solutions to Fix Task Host Window
If the basic troubleshooting didn’t help, several advanced solutions can be employed to address the issue of the Task Host Window preventing shutdown:
1. Identify Stubborn Processes
Using Task Manager
Repeatedly closing applications can be tedious. To identify which process is causing the Task Host Window to appear:
- Open Task Manager with
Ctrl + Shift + Esc. - Click the «Details» tab to see a complete list of running processes.
- Look for any processes that might correspond to applications that are no longer visible or have become unresponsive.
Using Command Prompt
Another way to find lingering processes is via Command Prompt:
- Press
Win + R, typecmd, and hit Enter. - Enter the command
tasklist. - This will display all running processes. Identify any you don’t recognize or that may relate to applications you’ve previously used.
2. Update Windows
Keeping Windows updated can sometimes solve underlying issues that lead to the Task Host Window:
- Press
Win + Ito open Settings. - Navigate to
Update & Security. - Click on
Check for updates. - Install any available updates and restart your device.
3. Disable Background Apps
Some applications are set to run in the background, which can lead to the Task Host Window preventing shutdown. To disable these:
- Go to
Settings>Privacy. - Scroll down to
Background apps. - Toggle off apps that you do not need running in the background.
4. Check for Pending Updates or Restarts
Sometimes Windows updates do not complete fully or require a restart that hasn’t been processed. To ensure everything runs smoothly:
- Check for pending updates by going to
Settings>Update & Security. - Install pending updates and restart your computer.
5. Disable Fast Startup
The Fast Startup feature can lead to unstable shutdowns and startup behavior in Windows. Disabling it can help reduce the chances of encountering the Task Host Window issue:
- Open
Control Panel. - Go to
Hardware and Soundand thenPower Options. - Click on
Choose what the power button does. - Click on
Change settings that are currently unavailable. - Uncheck the box for
Turn on fast startupand save changes.
6. Run System File Checker (SFC)
Corrupted system files can trigger various issues, including those associated with the Task Host Window. The System File Checker scans for and repairs corrupted files:
- Open Command Prompt as an administrator: Press
Win + Xand selectCommand Prompt (Admin). - Type
sfc /scannowand press Enter. - Wait for the process to complete and follow any prompts to fix issues.
7. Perform a Clean Boot
A clean boot allows you to start Windows with minimal drivers and programs, helping to pinpoint issues:
- Press
Win + R, typemsconfig, and hit Enter. - In the
System Configuration, go to theServicestab. - Check the box for
Hide all Microsoft servicesand clickDisable all. - Go to the
Startuptab and clickOpen Task Manager. - Disable all startup items.
- Restart your computer and check if the issue persists.
8. End Task Host Process
As the Task Host Window displays when applications fail to close, directly terminating its process may sometimes help:
- Open Task Manager.
- In the
Processestab, look forTask Host. - Right-click and select
End Task. - Attempt to shut down your computer again.
9. Check for Malware
Malware infection can cause various problems, including interference with normal shutdown processes. Regular scanning can help:
- Install and run trusted antivirus software such as Windows Defender.
- Perform a full scan and deal with any detected threats.
10. Restore or Reset Windows
If all else fails, you might consider restoring to an earlier point or resetting Windows entirely:
System Restore
You can revert your system to a point before the issue occurred:
- Open the Control Panel.
- Go to
Recoveryand thenOpen System Restore. - Follow the prompts to restore your computer to an earlier state.
Reset Windows
If nothing else works, resetting Windows may be your last resort. Remember to back up important files first:
- Go to
Settings>Update & Security>Recovery. - Under
Reset this PC, clickGet startedand follow the onscreen instructions.
Additional Tips for Maintaining System Stability
To avoid encountering the Task Host Window issue in the future, here are some best practices:
- Keep Software Updated: Regularly check for updates for all installed applications.
- Manage Startup Programs: Control which applications are allowed to start on boot-up to reduce the possibility of background process interference.
- Use Trusted Software: Avoid unsupported or poorly-rated programs that may conflict with system processes.
- Regular Maintenance: Regularly clean up your computer, removing any unnecessary files or applications.
- Backup Your System: Ensure you have recent backups to prevent data loss during troubleshooting.
Conclusion
The Task Host Window preventing shutdown can be a vexing issue, reminiscent of the more intricate aspects of Windows systems. By systematically troubleshooting, users can often identify and resolve the underlying causes for this problem. From simple tasks like manually closing applications to more complex actions such as running System File Checker or resetting Windows, various techniques can restore functionality.
By incorporating regular maintenance and being proactive in managing software, users can minimize the chances of such disruptions in their future computing experience. If the problem persists, consulting with a professional technician may be beneficial for deeper system diagnostics.