
Table of Contents:
The Windows 11 and Windows 10 features “Prefetch” and “SuperFetch” provide startup acceleration for frequently used applications.
What is Prefetch and Superfetch in Windows?
Even when you’re not using them, Superfetch loads frequently used programs into memory to speed up startup.
Prefetch is a similar feature which was introduced already with Windows XP that gathers data about programs to also help them start faster.
To achieve this, the prefetch algorithm tries to anticipate when data most probably won´t be available in cache to directly load it from the respective drive. This data in the form of prefetch files is located in the prefetch folder C:\Windows\Prefetch. You can consider the prefetch files as a specific type of cache files.
Contrary to many blog posts, disabling Prefetch and SuperFetch for SSD drives is actually unnecessary. It is true that Prefetch and SuperFetch won´t provide a huge advantage for starting applications from SSD drives, as they are fast anyway. In this respect one could actually switch off the service.
But Windows 11 and Windows 10 already do this automatically for Superfetch if an SSD is installed as system drive. This means you don’t have to worry about the lifetime of older SSD drives because of ongoing SuperFetch-requests.
On older Windows 10 PCs with normal hard disks it may make sense to deactivate SuperFetch in some rare cases. This is because the service causes increased system load and significantly more hard disk requests.
Without SuperFetch, some slower computers even work better, though the startup of certain applications may take a little longer. However, this is more an exception than the rule.
Prefetch actually should be always stay enabled, even on slower HDDs. Whether you perform better with or without SuperFetch, you have to find out for yourself. Below, you find the necessary steps to disable Prefetch and Superfetch.
⚠️ Please note: The process described below is the same in Windows 11 as it is in Windows 10. However, bear in mind that we’ll be using screenshots from Windows 11, so your UI may look a little different. We’ll point out any changes you need to be aware of as they come up.
How to Disable Prefetch on Windows 11 / Windows 10
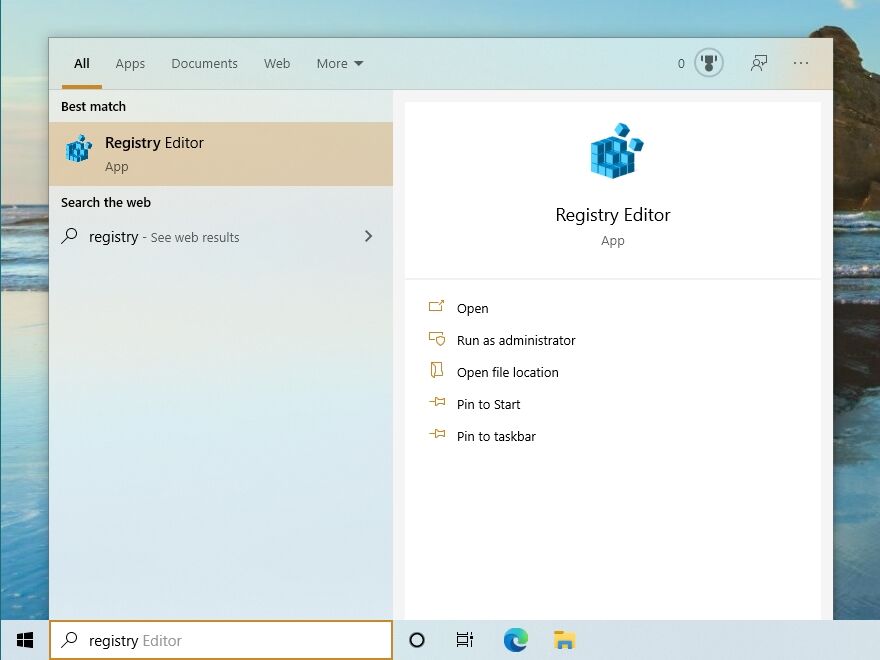
- Open the “Registry Editor” using Windows 10 search

-
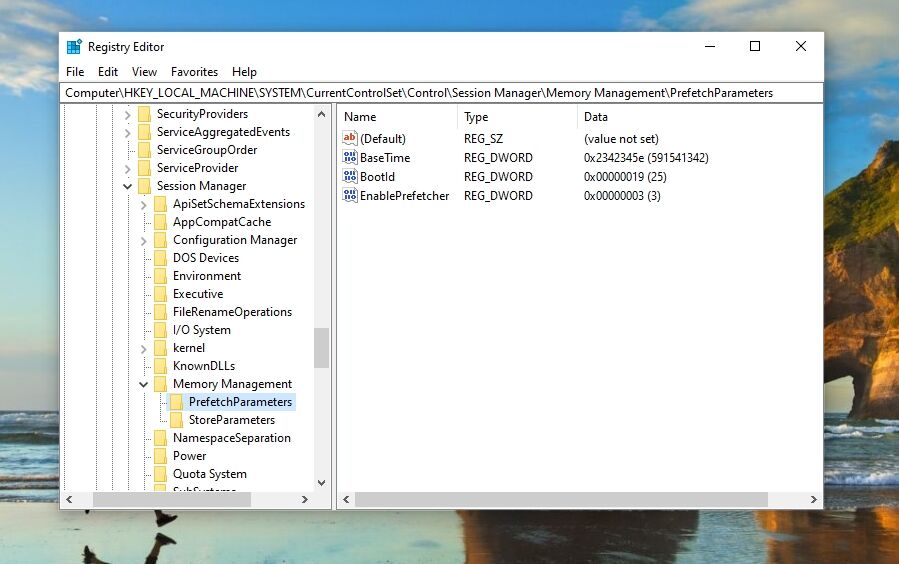
Open the following location:
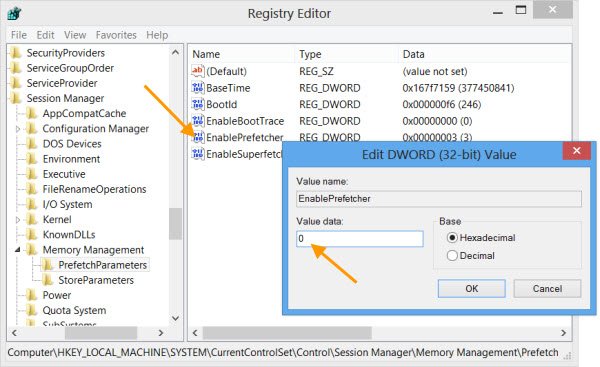
HKEY_LOCAL_MACHINE\SYSTEM\CurrentControlSet\Control\Session Manager\Memory Management\PrefetchParameters
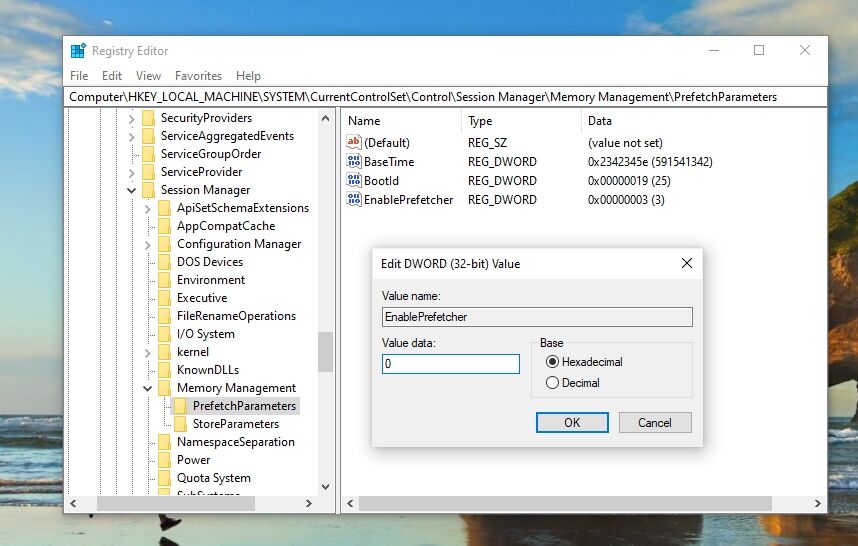
- Set the prefetch modeDouble-click on “EnablePrefetcher” to open this key. In “Value data” put “0” to turn Prefetch off. Here are the other available settings from 1-3:
1 = Application launch prefetching enabled: This mode is specifically focused on speeding up the launch of applications. When enabled, Windows monitors and records which files are used during the initial phase of application startup.
The next time you start the same application, Windows uses this recorded data to pre-load these files into memory, which can reduce the application’s startup time.2 = Boot prefetching enabled: This mode is designed to optimize the system boot process. In this mode, Windows tracks and records the files used during the system boot process. On subsequent system starts, Windows pre-loads these files into memory ahead of time, aiming to reduce the overall boot time.
3 = Applaunch and Boot enabled: This is a combination of both application launch prefetching and boot prefetching, and it’s typically set as the default and optimal setting in Windows. With this mode, Windows optimizes both the application startup times and the system boot process. It provides a balanced performance enhancement by ensuring that both applications and the system itself benefit from prefetching.

How to Disable Superfetch on Windows 11 / Windows 10
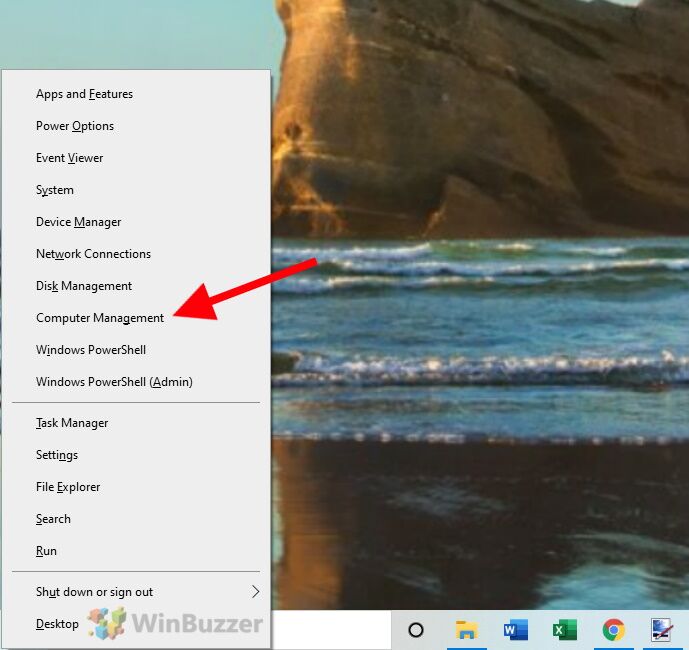
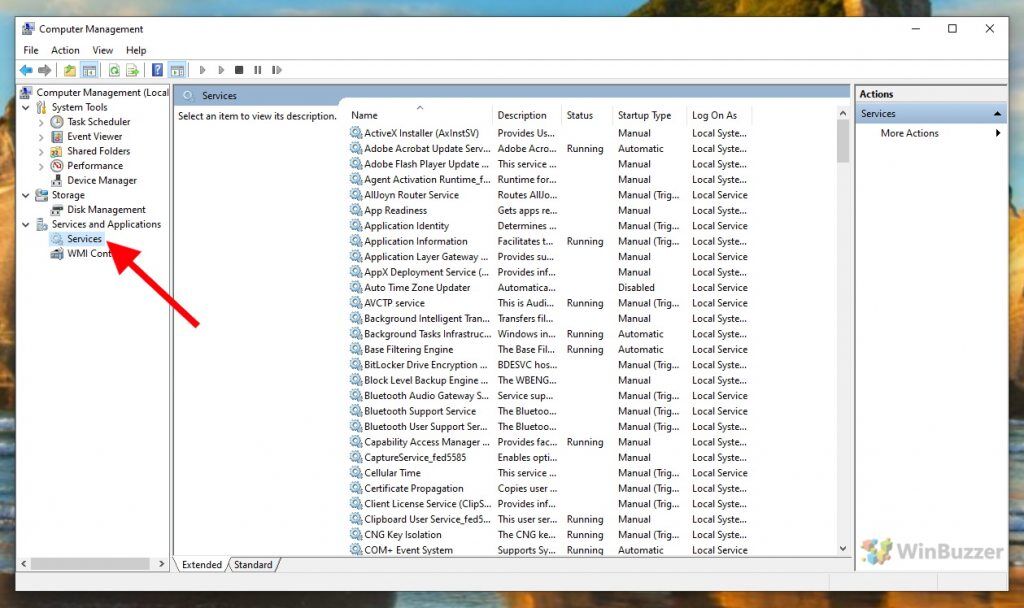
- Open “Computer Management”First, right click on the start icon in the taskbar to open the context menu. There you click on the entry “Computer Management”, which opens the system program of the same name.

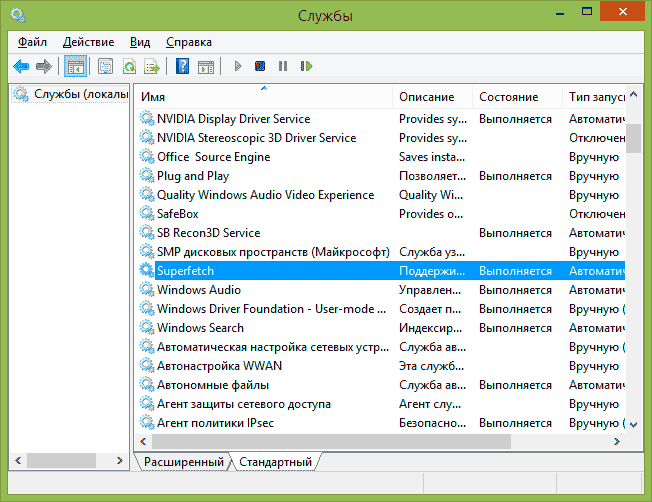
- On the left side open “Services and Applications” and there “Services”

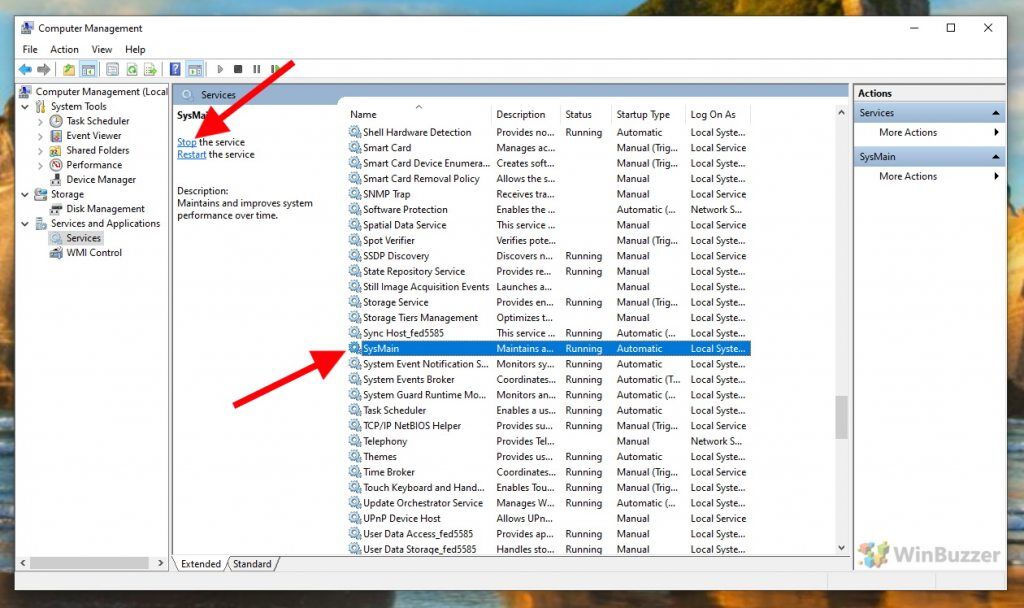
- Select “SysMain” in the services list and click on “Stop the service”.
This will deactivate Superfetch. Afterwards you can evaluate if your system works any better. To re-enable Super Fetch simply click on “Start the service” in the same view where you deactivated it previously.
FAQ – Frequently Asked Questions about Prefetch and Superfetch in Windows
What is Prefetch in Windows?
Prefetch is a feature that gathers data about frequently used programs to help them start faster by pre-loading required data from the drive.
What is Superfetch in Windows?
Superfetch loads frequently used programs into memory even when not in use, to speed up their startup.
How can I disable Prefetch in Windows 10?
Disable Prefetch by editing the “EnablePrefetcher” key in the Registry Editor at “HKEY_LOCAL_MACHINE\SYSTEM\CurrentControlSet\Control\Session Manager\Memory Management\PrefetchParameters” and setting its value to 0.
How do I disable Superfetch (SysMain) in Windows 10?
Disable Superfetch by stopping the “SysMain” service in “Computer Management” under “Services and Applications” > “Services”.
Where is the Prefetch folder located in Windows 10?
The Prefetch folder is located at `C:\Windows\Prefetch`.
Is it OK to delete prefetch files in Windows 10?
Yes, it’s okay to delete prefetch files, but it’s not necessary as Windows manages these files automatically. Deleting them might temporarily slow down application start times until they are regenerated.
Should Prefetch be always enabled?
Yes, Prefetch should generally be enabled, even on slower HDDs, as it helps in faster startup of applications.
Does disabling Prefetch and Superfetch improve performance on SSDs?
Disabling these features on SSDs is unnecessary as Windows 10 and 11 automatically manage Superfetch for SSDs. Prefetch and Superfetch don’t provide a significant advantage on SSDs due to their fast nature.
Can disabling Superfetch improve performance on older PCs?
On older PCs with HDDs, disabling Superfetch might improve performance as it reduces system load and hard disk requests, though it may increase application startup times.
Does cleaning the Prefetch folder speed up the computer?
Cleaning the Prefetch folder does not significantly speed up the computer and is generally not recommended as Windows manages this folder automatically.
Is Superfetch necessary for gaming?
Superfetch is not specifically necessary for gaming, especially on systems with SSDs, as it primarily speeds up application startup rather than in-game performance.
What happens if I delete Prefetch files?
If you delete Prefetch files, Windows will recreate them over time as you use applications. There might be a temporary slowdown in application startup times.
Is it safe to disable SysMain (Superfetch)?
It is safe to disable SysMain (Superfetch), especially to test if it improves system performance on older PCs with HDDs.
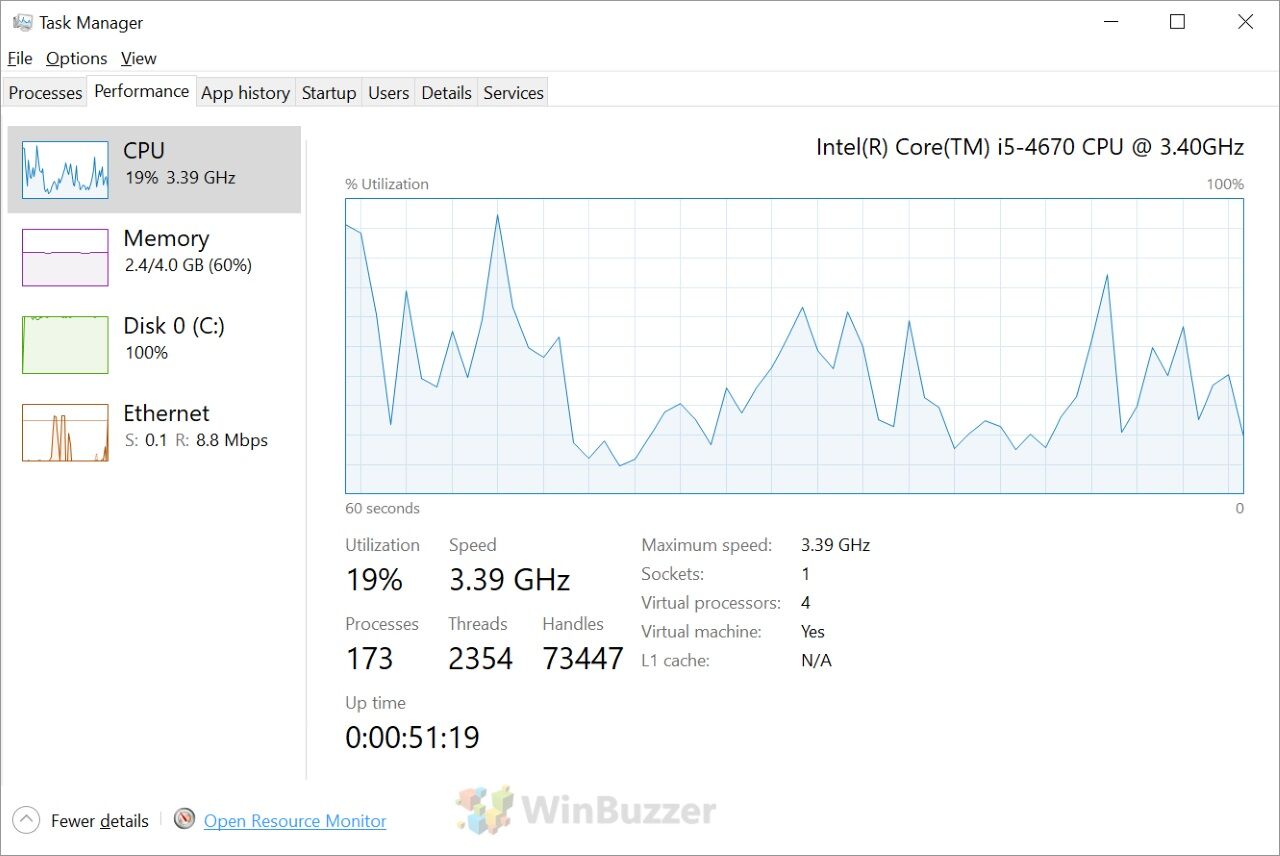
Why is Superfetch using high disk usage?
Superfetch might show high disk usage as it actively loads frequently used applications into memory, which can be noticeable on HDDs.
How to re-enable Superfetch in Windows 10?
Re-enable Superfetch by starting the “SysMain” service in “Computer Management” under “Services and Applications” > “Services”.
Related: How to Set CPU Affinity via Windows Task Manager, System Properties, PowerShell, and CMD
For the most part, Windows 11 and Windows 10 manage system resources very well, but there are certain instances where users are left wondering why their Windows performance is bad. This issue comes up, especially when the computer has a weak processor and an app is particularly intensive. Thankfully, a feature that lets you set CPU affinity so you can claw back some resources from other apps. In our other guide, we show you how to set CPU affinity in Windows to claw back some performance, as well as how to change your CPU scheduling.
Last Updated on November 7, 2024 11:14 pm CET
Markus Kasanmascheff
Markus has been covering the tech industry for more than 15 years. He is holding a Master´s degree in International Economics and is the founder and managing editor of Winbuzzer.com.
Download Windows Speedup Tool to fix errors and make PC run faster
In this article, we will see how Windows 11/10 treats Prefetch and SysMain on Solid-State Drives. We have seen how Windows treats Defragmentation on Solid-State Drives. Before we start, let me make it clear that it t is not a good idea to disable SysMain (Earlier called SuperFetch) or Prefetch as it may degrade system performance. Leaving these services to their default settings is best.
SysMain (Superfetch), Prefetch & SSD in Windows 11/10
Every time you run an application in your PC, a Prefetch file that contains information about the files loaded by the application is created by the Windows operating system. The information in the Prefetch file is used for optimizing the loading time of the application the next time that you run it. SysMain attempts to predict which applications you will launch next and preloads all of the necessary data into memory. Its prediction algorithm is superior and can predict which next 3 applications you will launch by what time in a day.
In short, SysMain and Prefetch are Windows Storage Management technologies that provide fast access to data on traditional hard drives. On Solid State Drives, they result in unnecessary write operations.
The SysMain service is the one that is related to Superfetch. Its job is to maintain and improve system performance over time. It is found in the System32 folder. The Services is the same, but the Display name for it has been changed in Windows 10 from Superfetch to SysMain. Should one for some reason need to manually disable them, this is how one can disable SysMain.
To disable SysMain in Windows 11/10, follow these steps:
- Press Win+R to open the Run prompt.
- Type msc and press the Enter button.
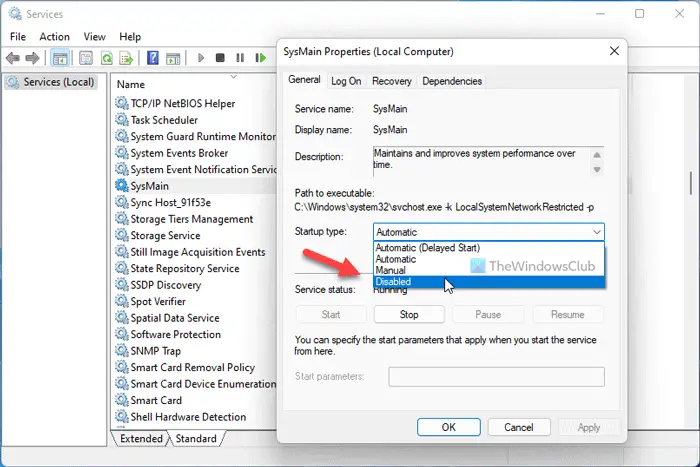
- Double-click on the SysMain service.
- Select Disabled from the Startup type drop-down list.
- Click the OK button.
Run services.msc to open the Services Manager. Scroll down to SysMain (Superfetch) service, which is responsible for maintaining and improving the system performance over time.
Double-click on it to open its Properties box. Click on Stop to stop the process. Make the startup type Disabled and click on Apply.
You will have to restart your computer for the system changes to take effect.
How to Disable Prefetch in Windows 11/10
To disable Prefetch in Windows 11/10, follow these steps:
- Press Win+R to open the Run prompt.
- Type regedit > press the Enter button.
- Click the Yes
- Go to PrefetchParameters in HKLM.
- Double-click on the EnablePrefetcher REG_DWORD value.
- Set the Value data as 0.
- Click the OK button.
To disable Prefetch in Windows, Run regedit to open the Registry Editor. Navigate to the following registry key:
HKLM\SYSTEM\CurrentControlSet\Control\Session Manager\Memory Management\PrefetchParameters
Double-click on EnablePrefetcher on the right side to open its DWORD value box.
The possible values for EnablePrefetcher are:
- 0 – Disable Prefetcher
- 1 – Application launch Prefetching enabled
- 2 – Boot Prefetching enabled
- 3 – Application launch and Boot Prefetching enabled
The default value is 3. To disable Prefetch, set it to 0. Click OK and Exit.
Incidentally, you can also disable or tweak the Suoerfetcher here – you will see the EnableSuperfetcher DWORD just below it.
The possible values for EnableSuperfetch are:
- 0 – Disable SysMain
- 1 – Enable SysMain for boot files only
- 2 – Enable SysMain for applications only
- 3 – Enable SysMain for both boot files and applications
If you are a Solid-State Drive user, you may want to check out freeware SSD Life, which can check the health of your SSD, and SSD Tweaker, which will help you tweak your SSDs.
Does disabling Superfetch increase performance?
Although it doesn’t consume much storage, a malfunction can cause Superfetch or SysMain service high CPU usage. In such a situation, you could disable this service to increase the performance. However, in other cases, you might not find any improvement in performance after disabling this service.
Is it okay to disable Superfetch?
Yes and no. Yes, when you are getting problems due to this service. No, when you need this functionality. Superfetch is an in-built service of the Windows operating system, and it is required to make your PC smoother. That is why it is not recommended to disable It until it causes an issue.
Anand Khanse is the Admin of TheWindowsClub.com, a 10-year Microsoft MVP (2006-16) & a Windows Insider MVP (2016-2022). Please read the entire post & the comments first, create a System Restore Point before making any changes to your system & be careful about any 3rd-party offers while installing freeware.
Sometimes you may notice Laptop running very slow and there is a service called superfetch causing almost 100% CPU or Disk usage. you may be thinking about Disable Superfetch service. Here this post we discuss what is Superfetch, why its running and causing high CPU usage. And How to disable superfetch and prefetch on windows 10, 8.1 and 7. Let’s start.
Quick Links
- 1 What are Superfetch and prefetch on windows?
- 2 Is it safe to disable SuperFetch?
- 3 Disable Superfetch
- 4
- 5 Disable Prefetch
What are Superfetch and prefetch on windows?
Superfetch is a Windows service that helps to speed up application launching by preloading the required data. In easy words Superfetch caches data the programs you frequently use into RAM so that they don’t have to be called from the hard drive every time you run them.
In other hands Prefetch also do the same, that helps to improve application launching. Especially, It stores information and necessary data of frequently used applications in the prefetch folder. As a result, Users notice improve launching time of common applications.
In short, SuperFetch and Prefetch are Windows Storage Management technologies that provide fast access to data on traditional hard drives.
Is it safe to disable SuperFetch?
Yes! There is no risk of side effects if you decide to turn it off, if your system running smoothly leave it on. But if you notice Superfetch high disk usage or 100 CPU usage here follow steps below to Disable superfetch and prefetch on windows 10, 8.1 and 7.
Disable Superfetch
- Press Windows + R, type services.msc and ok
- The Services window displays. scroll down and Find “Superfetch” in the list.
- Right-click “Superfetch“, then select “Properties“.
- Select the “Stop” button if you wish to stop the service
- In the “Startup type” dropdown menu, choose “Disabled“.
- Click apply and ok, that’s all Superfetch service is disabled.
- Restart windows and check if there is no more high Disk or CPU usage.
Disable Prefetch
If you want to stop prefetch, you will have to do it from the registry.
- Press Windows + R, type regedit and ok to open windows registry editor.
- Navigate to the following registry key:
- HKLM \ SYSTEM \ CurrentControlSet \ Control \ Session Manager \ Memory Management \ PrefetchParameters
- Double-click on EnablePrefetcher in the right side to open its DWORD value box.
Note: If this value doesn’t exist, right-click the “PrefetchParameters” folder, then choose “New” > “DWORD Value“ and Give name “EnableSuperfetch”
The possible values for EnablePrefetcher are:
- 0 – Disable Prefetcher
- 1 – Application launch Prefetching enabled
- 2 – Boot Prefetching enabled
- 3 – Application launch and Boot Prefetching enabled
The default value is 3. To disable Prefetch, set it to 0. Click OK and Exit.
You can also disable or tweak the Suoerfetcher here – you will see the EnableSuperfetcher DWORD just below it.
The possible values for EnableSuperfetch are:
- 0 – Disable Superfetch
- 1 – Enable SuperFetch for boot files only
- 2 – Enable SuperFetch for applications only
- 3 – Enable SuperFetch for both boot files and applications
Технология SuperFetch была представлена в Vista и присутствует в Windows 7 и Windows 8 (8.1). При работе, SuperFetch использует кэш в оперативной памяти для программ, с которыми вы часто работаете, тем самым ускоряя их работу. Кроме этого, данная функция должна быть включена для функционирования ReadyBoost (или вы получите сообщение о том, что SuperFetch не выполняется).
Однако, на современных компьютерах данная функция не особо нужна, более того, для твердотельных дисков SSD SuperFetch и PreFetch рекомендуется отключить. И, наконец, при использовании некоторых твиков системы, включенная служба SuperFetch может вызывать появление ошибок. Также может пригодиться: Оптимизация Windows для работы с SSD
В этой инструкции подробно будут рассмотрено, как отключить SuperFetch двумя способами (а также коротко будет сказано об отключении Prefetch, если вы настраиваете Windows 7 или 8 для работы с SSD). Ну а если вам требуется включить эту функцию по причине появления ошибки «Superfetch не выполняется», просто сделайте все наоборот.
Отключение службы SuperFetch
Первый, быстрый и простой способ отключить службу SuperFetch — зайти в Панель управления Windows — Администрирование — Службы (или нажать клавиши Windows + R на клавиатуре и ввести services.msc)
В списке служб находим Superfetch и кликаем по ней мышкой дважды. В открывшемся диалоговом окне следует нажать «Остановить», а в пункте «Тип запуска» выбрать «Отключена», после чего применить сделанные настройки и перезагрузить (необязательно) компьютер.

Отключение SuperFetch и Prefetch с помощью редактора реестра
То же самое вы можете сделать и с помощью редактора реестра Windows. Тут же покажу и как отключить Prefetch для SSD.
- Запустите редактор реестра, для этого нажмите клавиши Win + R и введите regedit, затем нажмите Enter.
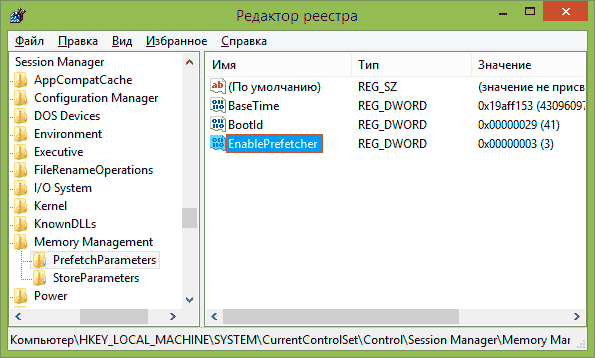
- Откройте раздел реестра HKEY_LOCAL_MACHINE \ SYSTEM \ CurrentControlSet \ Control \ Session Manager \ Memory Management \ PrefetchParameters
- Вы можете увидеть параметр EnableSuperfetch, а можете его и не увидеть в данном разделе. Если его нет, то создайте параметр DWORD с этим именем.
- Для отключения SuperFetch используйте значение параметра 0.
- Для того, чтобы отключить Prefetch, измените значение параметра EnablePrefetcher на 0.
- Перезагрузите компьютер.
Все варианты значения параметра EnablePrefetcher:
- 0 — отключено
- 1 — включено только для программ
- 2 — включено только для загрузки системы
- 3 — включено
В целом, это все на тему выключения данных функций в современных версиях Windows.
Superfetch (also known as Prefetch) is a service in Windows PC which caches data so that it can be immediately available to your application. So, it enhances such software’s performance which use cache but for software like games or video editor and other heavy software don’t use cache so it only hinders down the system & game’s performance if Superfetch service is running and creating cache which is of no use.
Today, I am telling you two ways to enable or disable Superfetch service in Windows 7, Windows 8/8.1 and Windows 10. Calculate why you use the system more and decide accordingly whether you want this Superfetch/Prefetch service to remain active or inactive in your Windows PC.

Before moving ahead with disabling Superfetch service, if you want to check which applications are using Superfetch service to make decision for the service then you can check it at C:/Windows/Prefetch. Here is the cache which is being created of the applications you run on in your system.
Enable or Disable Superfetch Service from Services
- Open Run dialogue box by pressing Windows with R key.
- Type services.msc and hit ENTER. It will open Windows services windows showing all the services available in your Windows OS with their Name, Description, Status, etc.
- By default, services are sorted alphabetically. Scroll down to find Superfetch service.
- Right click the Superfetch and select Properties from the context menu.
- Click the STOP button to stop the Superfetch (Prefetch) service right now. If you wish to stop it permanently, you can choose “Disabled” from the Startup type option.

If you ever wish to enable the service, you can follow the same procedure, click START button in Superfetch properties window and also choose Automatic (Delayed Start) or Automatic option from Startup type.
Enable or Disable Superfetch Service using Registry
- Open Run dialogue box using Win+R key, type Regedit and hit ENTER.
- It will open Windows Registry Editor window. Here, from the left sidebar, navigate to HKEY_LOCAL_MACHINE >> SYSTEM >> CurrentControlSet >> Control >> Session Manager >> MemoryManagement >> PrefetchParameters.
- At this location, on the right side, double-click on EnableSuperfetch. If the value doesn’t exist, right-click on PrefetchParameters folder which is available on the left side and choose New >> DWORD Value

- Now, you can provide EnableSuperfetch any of the following values to change Superfetch service status accoring to your requirement
- 0 – disables Superfetch
- 1 – enables perfetching when program is launched
- 2 – enables boot prefetching
- 3 – enables prefetching for everything
- Select OK to save the value. Close the Registry editor

If you have disabled Superfetch service in your system but you want to enable it for only some specific applications, you can do that by using special switch in the program’s shortcut: /prefetch:1.
- How to active “Hey Cortana” voice command in Windows 10
- Get Windows Photo Viewer Back in Windows 10
- How To Enable/Disable Fast User Switching in Windows
- How To Recover Lost Password in Windows OS
- Best Windows 10 Wallpapers Collection (Free Download)