
In Windows 11, you can enable the preview pane which will appear as a column on the right in File Explorer. The preview pane is able to show a preview of currently selected photo, video, text file, PDF file, word document, and other supported file type. This short tutorial will show you how to enable the preview pane in File Explorer on Windows 11.
Unlike thumbnail preview which has a fixed size depending on which view mode is selected, the preview pane is a resizable column which allows users to preview media in a much larger size.
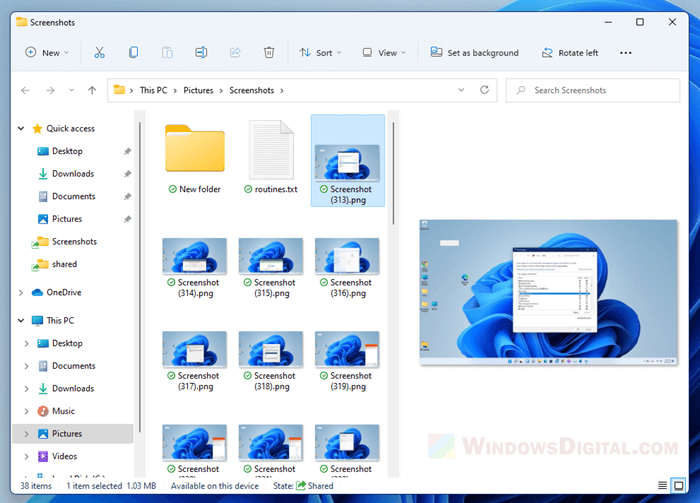
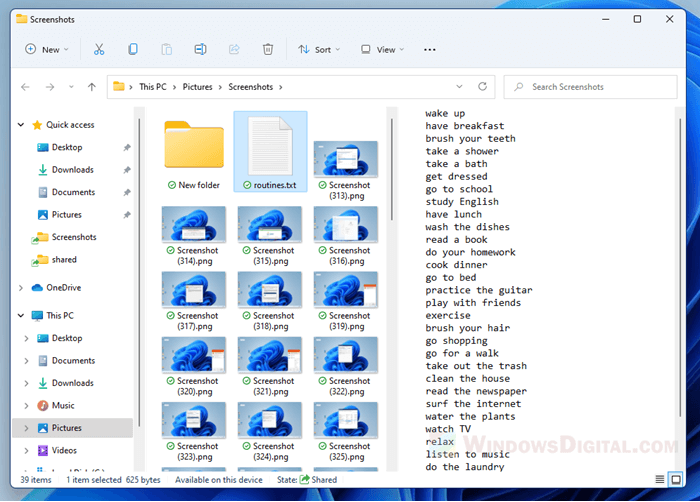
Below are a few screenshots that show how it looks like to preview images, videos and text file via preview pane in File Explorer on Windows 11.
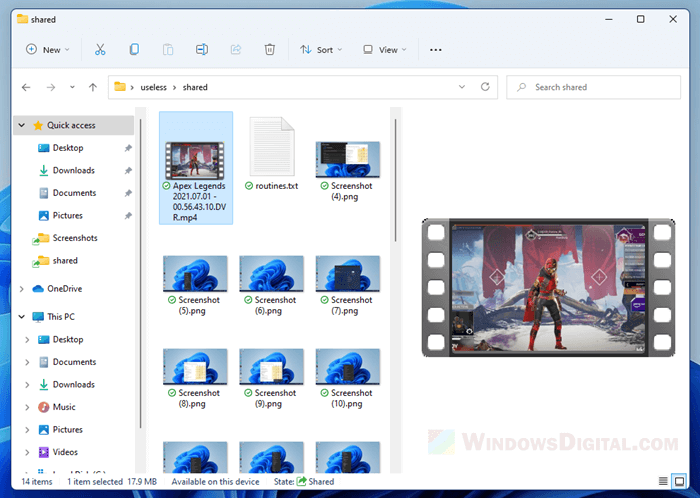
Note that video preview this way will only show a still image randomly taken from around the start of a video. It does not play the video in the preview pane.
How to preview files and medias in folder on Windows 11
To preview files, photos, videos and other supported file type directly in the folder without opening them, you need to first enable the preview pane in Windows 11 File Explorer. Follow the steps below to do so.
- In Windows 11, open File Explorer.
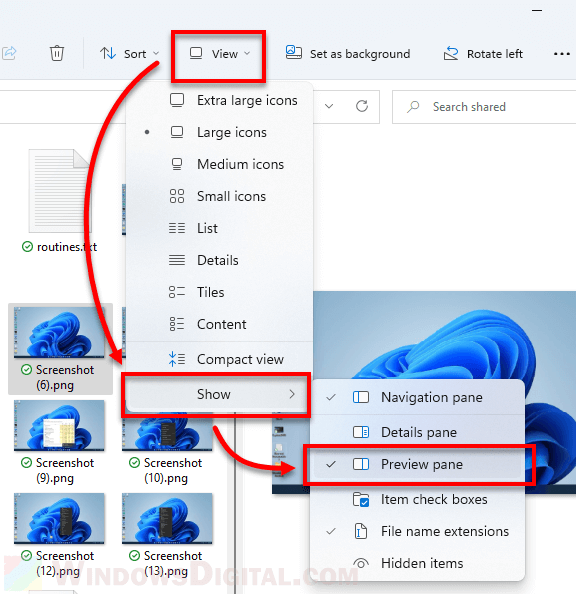
- On the menu bar, click on View.
- Next, hover your mouse over the Show option.
- Then, click on Preview pane.

A new pane will appear on the right side in the File Explorer window. When you select a file in the current folder, a preview will be shown in the preview pane. Now try to select/highlight any file in any folder, a preview of the selected item will be shown in the preview pane, provided if the file type is supported.
How to preview photos and videos thumbnails in File Explorer
Another method to preview media files in file explorer is by simply enabling thumbnail viewing and change the view mode to larger icons such as “Large icons” or “Extra large icons” mode.
The view mode is saved separately in each folder/directory. This means that if you change view mode in folder A, it won’t affect the view mode in folder B.
To change the view mode of a folder in File Explorer, browse to the folder, click on View on the menu bar, and then select a view mode you want to change to.
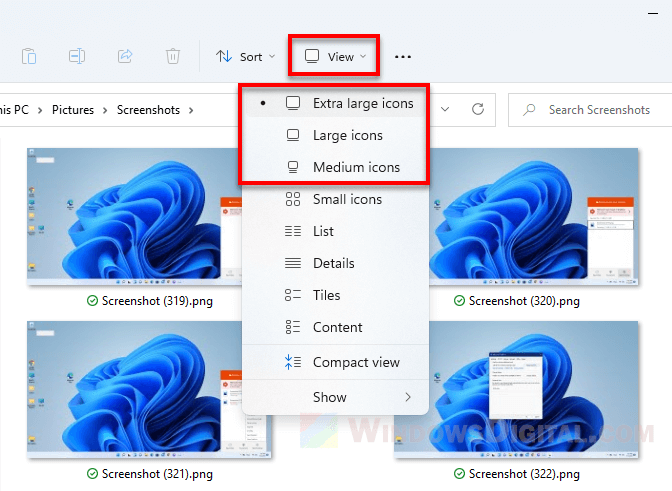
Thumbnails of files are only viewable in “Extra Large icons”, “Large icons” and “Medium icons” mode. Other view modes will only display the icon of the app used to open the file type. The extra large icons mode is the largest view mode you can set for thumbnails in Windows 11 File Explorer.
File Explorer shows app icons instead of thumbnails for images and videos
If you see app icons instead of the actual thumbnails of the image or video files, for example, all image files shows Photos app icon (the default app to open the image file) instead of the actual images as the thumbnails, here’s what you need to do.
In File Explorer, click on the triple dotted icon on the menu bar, then select Options.
In the Folder Options window, click on View tab. Under Advanced settings, uncheck the checkbox for “Always show icons, never thumbnails” option. Click Apply, then OK to save the changes.
The thumbnails of the media files should show the correct images now.
For video files that still fail to show the thumbnails but instead showing the app icon of the video player, it likely indicate that the video file type does not support displaying thumbnail in File Explorer. To solve this, you may need to install video codec packs to add supports for displaying the thumbnail of various video file types. We recommend K-lite Codec Pack by codecguide.com.
In Windows 11, File Explorer show a quick preview of items (pictures and videos) in the form of Thumbnail images or icon available on the system storage. And most of users have habit of browsing entire collection by checking thumbnail preview and I’m one out of them.
Thumbnail Preview for items available on File Explorer is a nifty feature that give a quick idea about content available behind that particular file it could be a image or video before opening them. The feature comes in handy when you have imported huge collection of pictures from your mobile or DSLR.
Thumbnail Preview feature not only make browsing entire collection notably fast, but helps you in differentiate between pictures. It support most of the image and media files, except SVG files & PDF Files. Check out blog post on How to Enable SVG Thumbnail Preview in Windows 11 File.
Check out following screenshot to know difference between how items in File Explorer looks like with or without Thumbnail preview:
When Thumbnail Preview is enabled in Windows 11

When Thumbnail Preview is disabled in Windows 11

Thumbnail Preview feature is enabled out of the box in Windows 11, but you won’t find direct option disable Thumbnail Preview feature in Windows 11.
No matter what take you to this blog post. Here, you will learn nifty methods to enable or disable Thumbnail Preview feature in Windows 11. Let’s start with first method:
Use Folder Options
Open the Start Menu by pressing the Windows key. In the Start Menu search, type File Explorer Options, when it appears in results, click to open it.

In the File Explorer Options, switch to View tab available on the top. After that, head over to Advanced settings section.
Here, locate the option that reads “Always show icons, never thumbnails“, check or uncheck the box for same, click Apply and then click OK.
You need to keep in mind that Unchecking the option will Disable Thumbnail Preview and Checking the option will Enable Thumbnail Preview in Windows 11 File Explorer
Use Visual Effects Settings
Press the Windows + R key combo to open the Run Dialog Box. Type “SystemPropertiesPerformance.exe” and click OK.

Instantly, Performance Options window will open. Here, select Visual Effects tab and under it locate option i.e. Show thumbnails instead of icons, check or uncheck the box for same, click Apply and then click OK.

You need to keep in mind that Unchecking the option will Disable Thumbnail Preview and Checking the option will Enable Thumbnail Preview in Windows 11 File Explorer
So these are two easy ways using which you can quickly enable or disable thumbnails preview for items in File Explorer in Windows 11.
Viney Dhiman, the mind behind GeekerMag, is a seasoned content writer with over 12 years of experience. Specializing in simplifying complex tech concepts, he covers Windows OS, Android, iOS, web apps, and product reviews. His work can be found on popular tech websites like Gizmodo and The Verge, and he has been interviewed by the Microsoft Edge team.
Some users may not be able to see thumbnail previews on a Windows 11 computer.
And, the old method of enabling thumbnail previews may not be working on the Windows 11 computer. In other words, thumbnails may be missing from your Windows 11 computer. But, this issue can be resolved with a quick configuration change on the Windows 11 computer.
(This post has been updated on June 20, 2024, please leave a feedback if the instructions do not work)
To enable image previews or thumbnails on Windows 11 folder, please follow the instructions below:
- Open the folder for which you need image thumbnails
- Right click within the folder to bring up the context menu
- Choose ‘Properties’ from the context menu
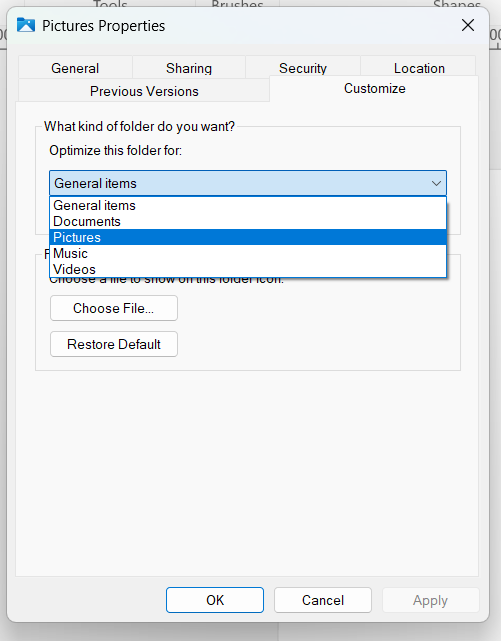
- Choose ‘Customize’ from the tab options
- Choose ‘Optimize this folder for’ and choose ‘Pictures’ from the drop down menu.
For your benefit, all the steps have been performed and displayed in the screenshots below.
We will use the Windows file explorer to bring up the folder and its context menu.
For the purpose of this example, we will enable thumbnails for the default ‘Pictures’ folder.
- Press the Win Key + X + E to launch the file explorer on a Windows 11 computer. An alternate way to open the file explorer would be through the task manager. Open the task manager, and load the file explorer on the Windows 11 computer.
- We want to generate image thumbnails for the ‘Pictures’ folder. So, we choose the ‘Pictures’ folder. Remember, this is the default ‘Pictures’ folder. Double-click on the folder name or icon to open the ‘Pictures’ folder.
- Right click within the folder to bring up the context menu. You will load the context menu popup on the screen. A screenshot of the context menu is given below. Move to the ‘Properties’ tab of the ‘Folder Options’.
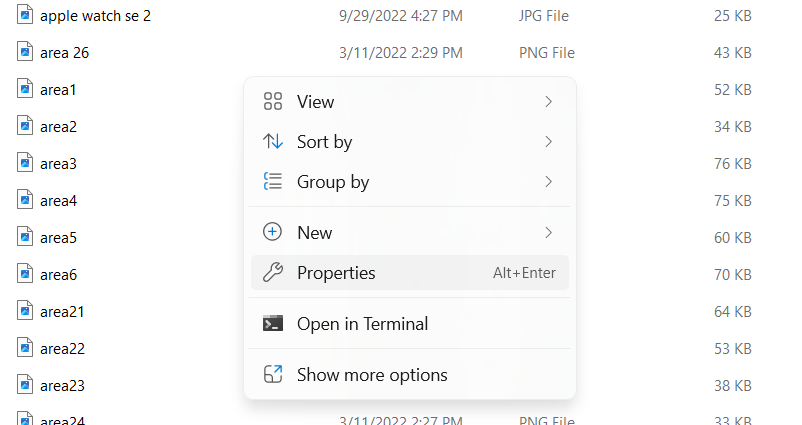
- From the context menu, choose ‘Properties’. It will take you to the screen displayed below.
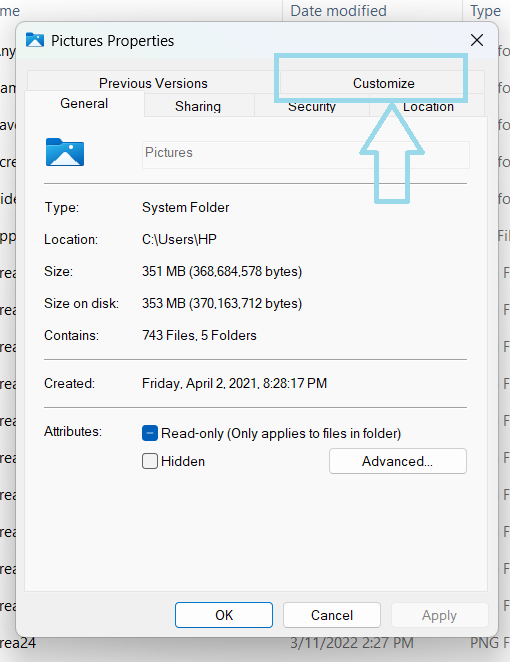
- Now, select the ‘Customize’ option from the available tab options. The same has been highlighted in the screen displayed above.
- Once you are in the Customize tab, you will see a screen displayed below. Choose the option of ‘Pictures’ under the ‘Optimize this folder’ dropdown.
- Click on ‘Apply’ to apply your changes.
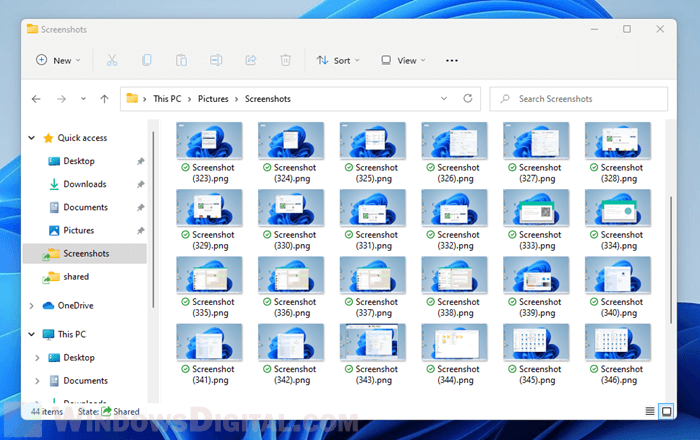
- The ‘Pictures’ folder will show the image thumbnails now.
If you need image thumbnails to be enabled for any folder, repeat the same process in the folder:
- Click the folder name
- Right-click within the folder to bring up the context menu
- From the context menu, choose ‘Properties’.
- Within the ‘Properties’ panel, choose the ‘Customize’ tab.
- Now, choose the option that states – ‘Optimize this folder for’ – ‘Pictures’. The ‘Pictures’ option will be in the drop down menu.
If you do it the first time, the entire exercise may take 5 minutes. The process has been simplified by Microsoft over the past couple of years. And, the revised process is more user-friendly.
Summary
You can enable thumbnails on a Windows 11 computer using the following preferred method:
- You can enable the thumbnails through the folder options.
You could any of these methods to enable thumbnails on a Windows 11 computer for a specific folder or for the entire computer.
You may also like to read the following content related to Windows 11:
- Add Gamebar performance on the Windows 11 taskbar
- Undoing changes made to your computer on Windows 11 computer
- Notepad in Dark mode in Windows 11
- Desktop Window Manager is using a lot of memory on Windows 11
- Ungroup Taskbar icons on Windows 11
- Improve File Explorer speed on Windows 11
Rajesh Dhawan is a technology professional who loves to write about Cyber-security events and stories, Cloud computing and Microsoft technologies. He loves to break complex problems into manageable chunks of meaningful information.
Очень удобно смотреть содержимое фотографии, когда отображаются эскизы, чтобы заранее узнать, что внутри. Но, что делать, когда вместо эскизов отображаются только иконки в проводнике Windows 11? Как решить данную проблему? Предлагаю несколько проверенных способов для восстановления эскизов фото.
Способ 1. Настройка параметров папок
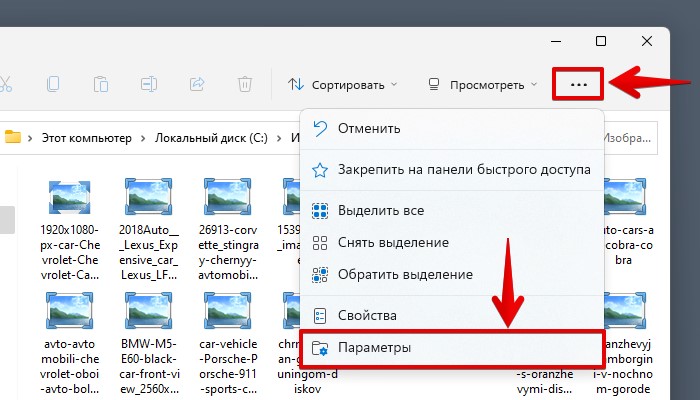
Проблему могут вызывать настройки проводника в Windows 11. В окне проводника щелкаем по кнопке с тремя точками в правой части окна и во всплывающем меню нажимаем на пункт «Параметры».
Когда откроется окно «Параметры папок» переходим во вкладку «Вид». В разделе «Дополнительные параметры» находим настройку «Файлы и папки» и снимаем флажок с настройки «Всегда отображать значки, а не эскизы».
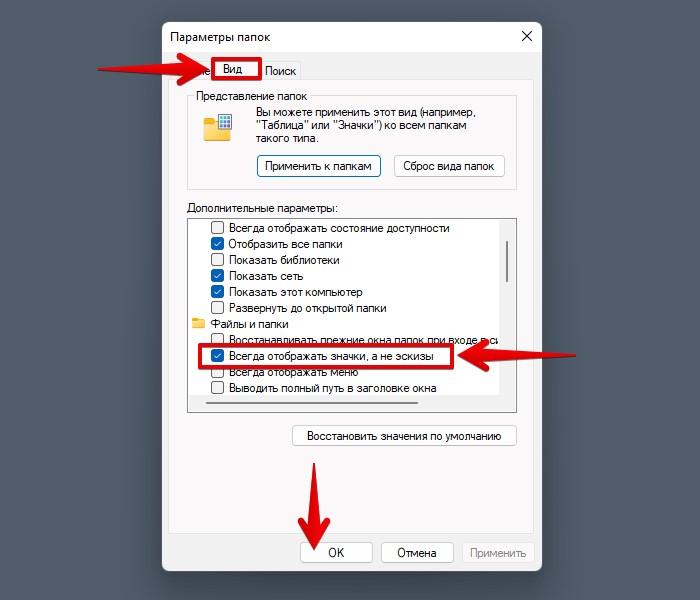
Нажимаем «ОК», чтобы применить настройку и возвращаемся в каталог, где лежат изображения.
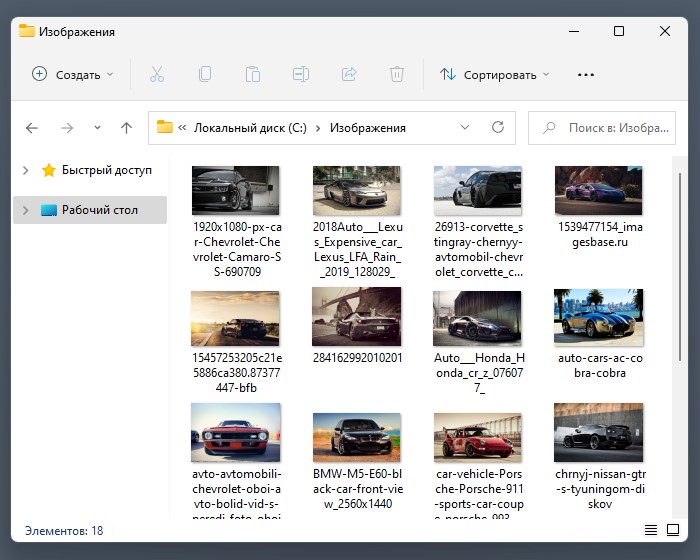
Проверяем, решилась ли проблема.
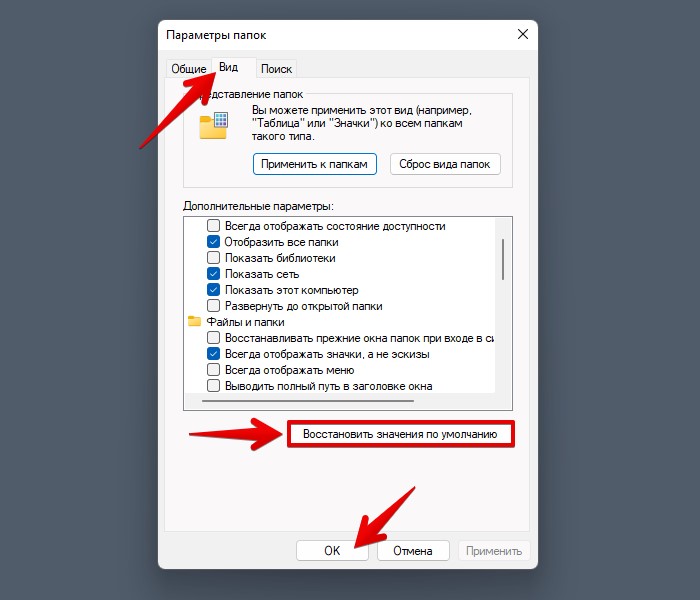
Способ 2. Восстановление параметров папок
Данным способом можно попытаться сбросить настройки проводника. Для этого переходим в окно «Параметры папок» во вкладку «Вид» и нажимаем на кнопку «Восстановить значения по умолчанию».
Если этот способ не помог, переходим к следующему способу.
Способ 3. Очитка диска (эскизов)
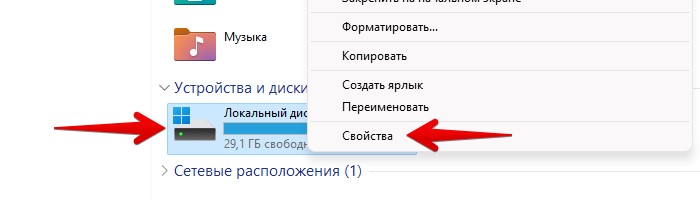
Одна из причин, по которой миниатюры все еще могут не отображаться — забитый или поврежденный кэш. Чтобы удалить кэш, переходим в свойства диска, на котором лежат проблемные фото (щелкаем правой кнопкой мыши по диску и выбираем пункт «Свойства»).
В появившемся окне «Свойства: Локальный диск» щелкаем по кнопке «Очистка диска». Откроется новое окно «Очистка диска», прокручиваем список в разделе «Удалить следующие файлы» и отмечаем флажком пункт «Эскизы».
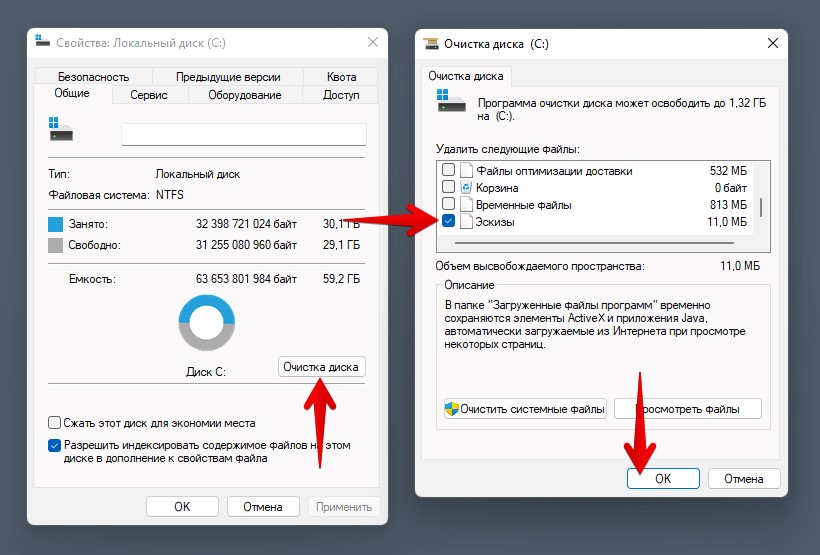
Нажимаем кнопку «ОК», чтобы начать очистку. Перед очисткой система запросит подтверждение на удаление файлов, соглашаемся.
Однако, если по прежнему проблема остается актуальной, тогда переходим к следующему методу.
Способ 4. Настройка визуальных эффектов
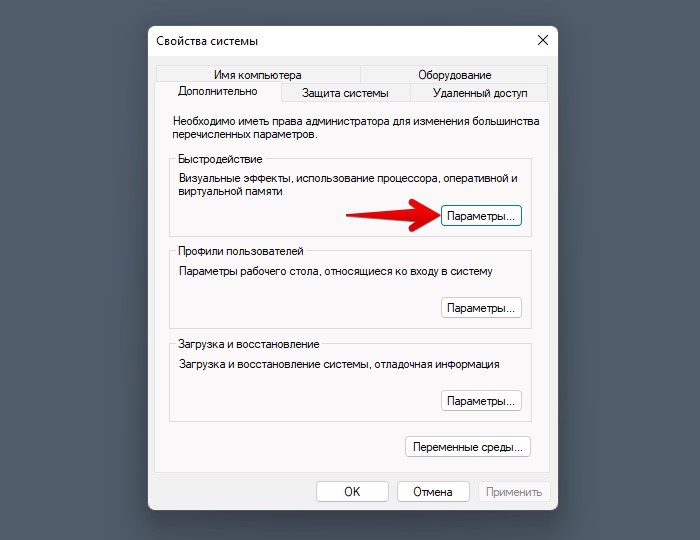
Стоит проверить настройки визуальных эффектов Windows 11. Для начала переходим в «Параметры», для этого нажимаем на клавиатуре клавиши «Win+I». Затем щелкаем по ссылке «Дополнительные параметры системы».
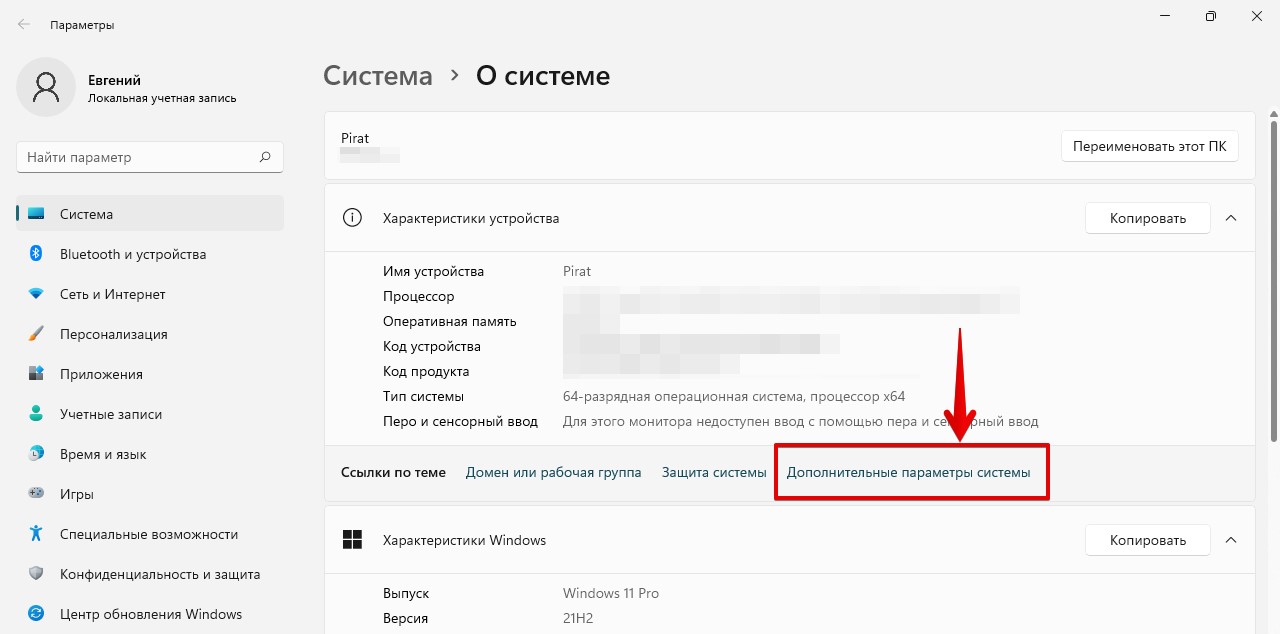
Должно появится окно «Свойства системы». Во вкладке «Дополнительно» и в разделе «Быстродействие» нажимаем на кнопку «Параметры», чтобы продолжить.
Переходим во вкладку «Визуальные эффекты» и проверяем, чтобы были установлены флажки на двух пунктах — «Вывод эскизов вместо значков» и «Сохранение вида эскизов панели задач».
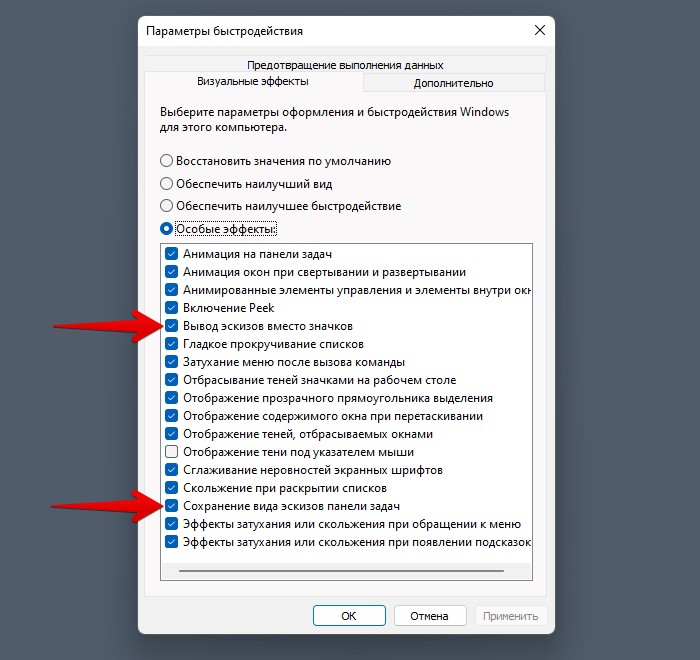
Если флажки не установлены, то устанавливаем и нажимаем на кнопку «ОК», чтобы сохранить изменения.

On Windows 11, you can preview files and images without having to open them with their corresponding app, and in this guide, you will learn how.
If you ever use macOS, you know you can select a file and press the “spacebar” key to preview it, but this is not a feature on Windows 11. However, you can add a similar feature using the Peek tool available with PowerToys.
This guide will teach you the steps to preview files without opening them from File Explorer on Windows 11.
How to preview files using Peek from PowerToys
To preview images and files without opening them on Windows 11, use these steps:
-
Open PowerToys on Windows 11.
Quick note: You can use these instructions to install PowerToys on your computer.
-
Click on Peek.
-
Turn on the Enable Peek toggle switch.

-
(Optional) Under the “Activation” section, click the Edit (pen) button and create a new keyboard shortcut to use Peek.
-
Open File Explorer.
-
Open the location with files and images to preview.
-
Select the file or image and preview the contents using the “Ctrl + Spacebar” keyboard shortcut.


Once you complete the steps, you will be able to preview files without opening them.
While in the preview, you can use the “left” and “right” (or “up” and “down”) arrow keys to keep previewing files in the folder location. On the top-right, you will find an option to open the file with a compatible application. For instance, if you preview an image, you will notice the option to open it with the Photos app. If you preview a text file, the option will offer to open it with Notepad.
If you use the “Pin” button on the top-right, then the tool will remember the size of the window and position on the screen for future previews.
In addition to Peek, PowerToys includes a slew of tools that can make Windows 11 even more useful, such as Hosts File Editor, File locksmith, FancyZones, Color Picker, and more. Microsoft periodically updates the app with more functionalities.
Mauro Huculak is a
Windows How-To Expert and founder of
Pureinfotech
(est. 2010). With over 21 years as a technology writer and IT Specialist,
Mauro specializes in Windows, software, and cross-platform systems such as Linux, Android, and macOS.
Certifications:
Microsoft Certified Solutions Associate (MCSA),
Cisco Certified Network Professional (CCNP),
VMware Certified Professional (VCP),
and
CompTIA A+ and Network+.
Mauro is a recognized Microsoft MVP and has also been a long-time contributor to Windows Central.
You can follow him on
YouTube,
Threads,
BlueSky,
X (Twitter),
LinkedIn and
About.me.
Email him at [email protected].