
Способ 1: «Командная строка»
Самый простой и быстрый способ включить или отключит функцию DEP («Предотвращение выполнения данных») – это использование консольной команды и «Командной строки». Отключать технологию следует только при активном стороннем антивирусе, поскольку она является одним из элементов защиты операционной системы. Но если функция срабатывает ложно и блокирует запуск приложений или игр, а также вызывает синий экран, тогда можно воспользоваться следующей инструкцией:
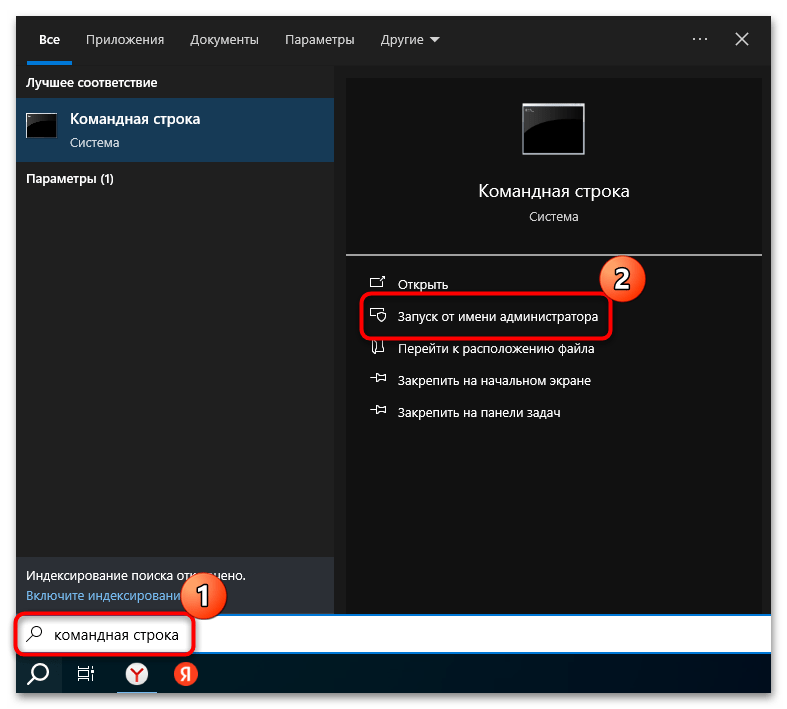
- Запустите консоль «Командная строка» от имени администратора. Для этого используйте строку системного поиска – введите название оснастки, затем выберите нужный тип запуска.
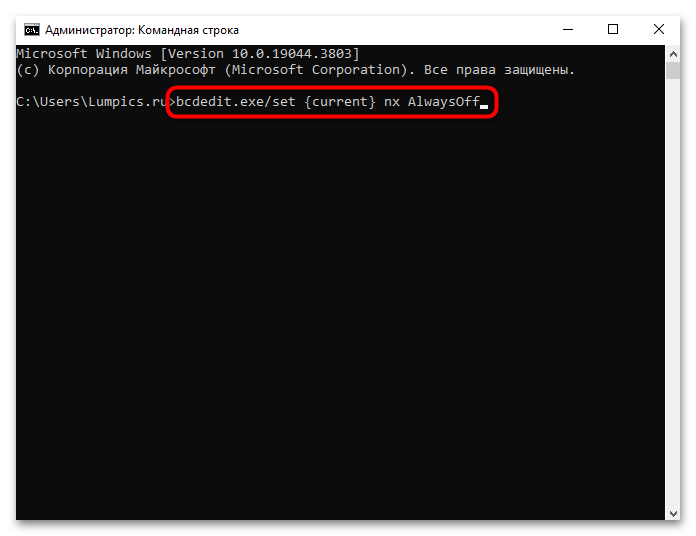
- Чтобы отключить технологию «Предотвращение выполнения данных», введите команду
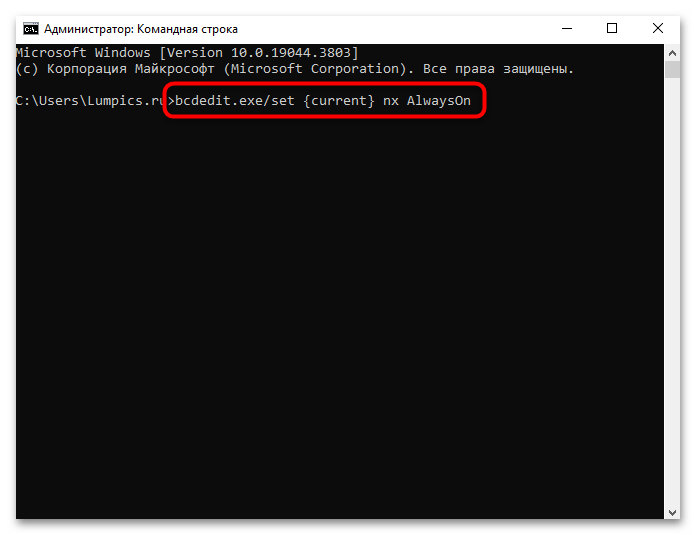
bcdedit.exe/set {current} nx AlwaysOffи нажмите на клавишу «Enter». - Для включения функции DEP выполните запрос
bcdedit.exe/set {current} nx AlwaysOn.
После того как операция будет выполнена, вы увидите соответствующее сообщение об успешном завершении в окне консоли. Перезагрузите компьютер, чтобы новые настройки вступили в силу.
Способ 2: «Панель управления»
Если в предыдущем способе была разобрана инструкция для отключения/включения DEP для всех приложений и средств, то в этом мы рассмотрим, как выполнить это для определенных программ. Случай, когда надо деактивировать технологию для приложения, вызывающую различные ошибки из-за блокировки средством защиты, является наиболее целесообразным и оптимальным, чем руководство в Способе 1.
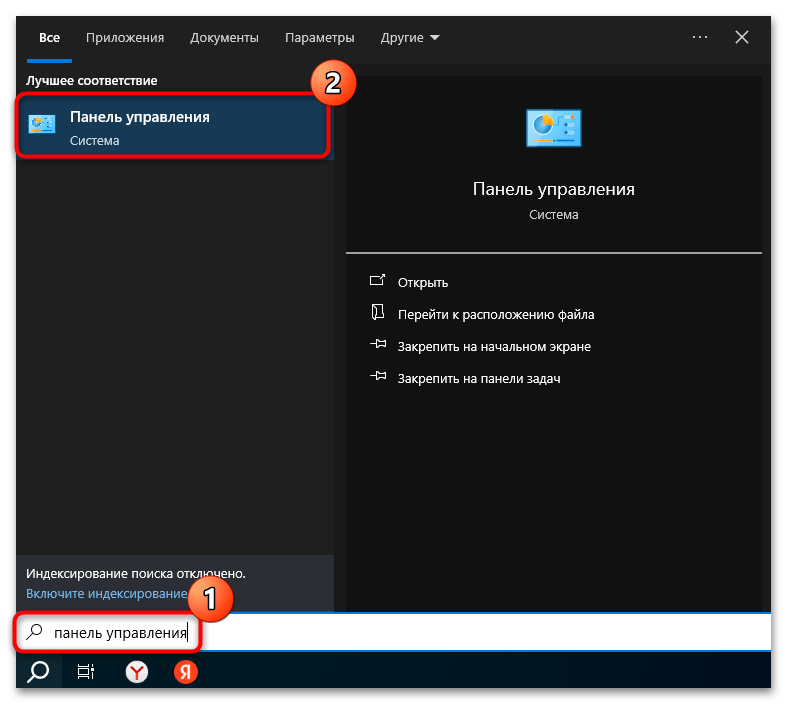
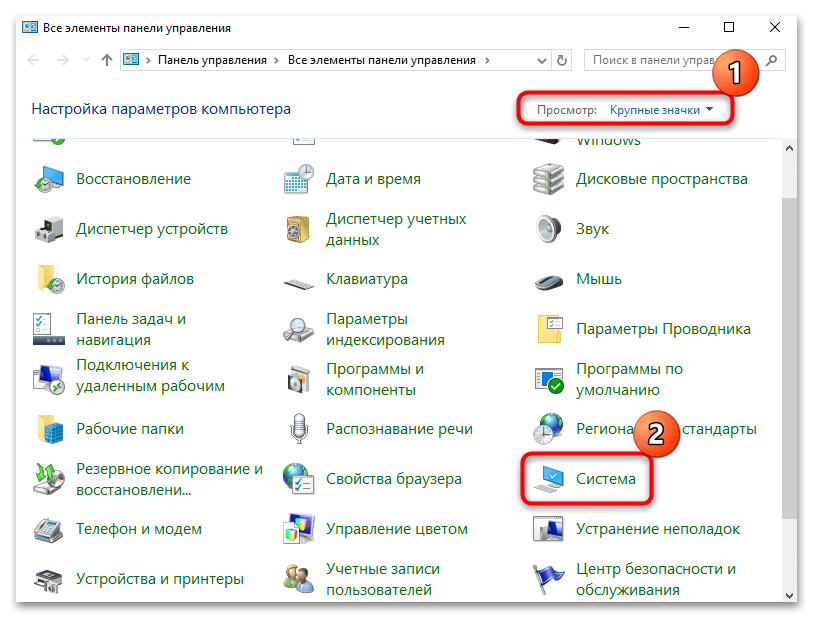
- Откройте классическую «Панель управления», отыскав средство через системный поиск.
- Выберите отображение разделов как крупные или мелкие значки, затем перейдите в «Система».
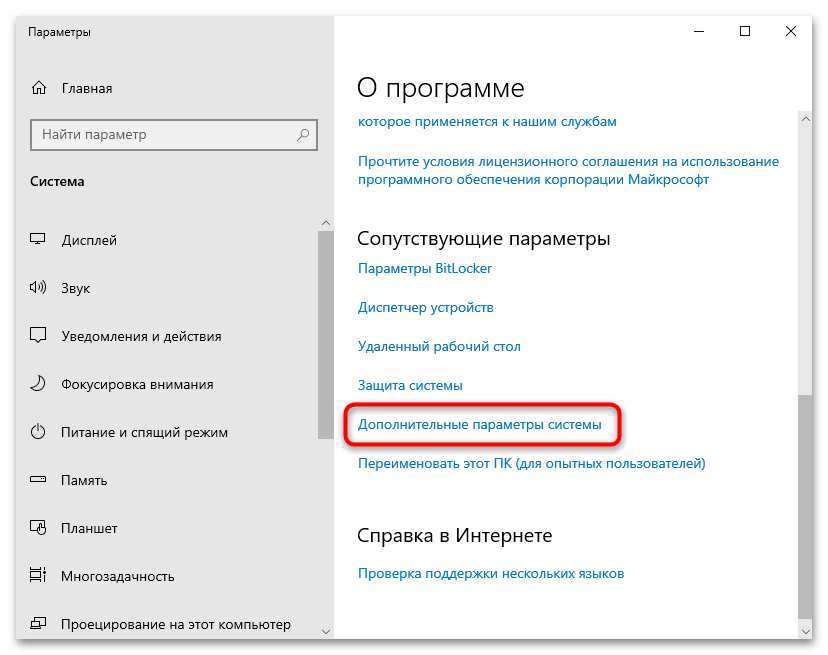
- Далее кликните по строке «Дополнительные параметры системы» на левой панели.
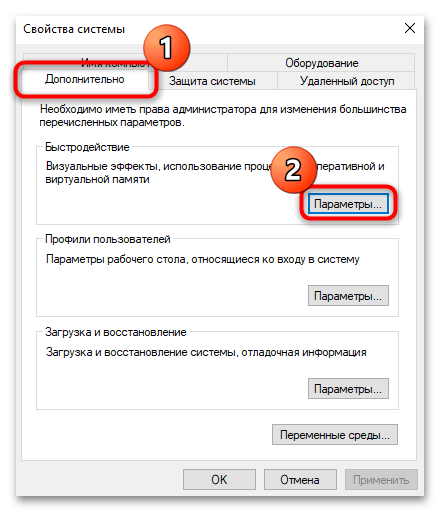
- На вкладке «Дополнительно» выберите кнопку «Параметры» в блоке «Быстродействие».
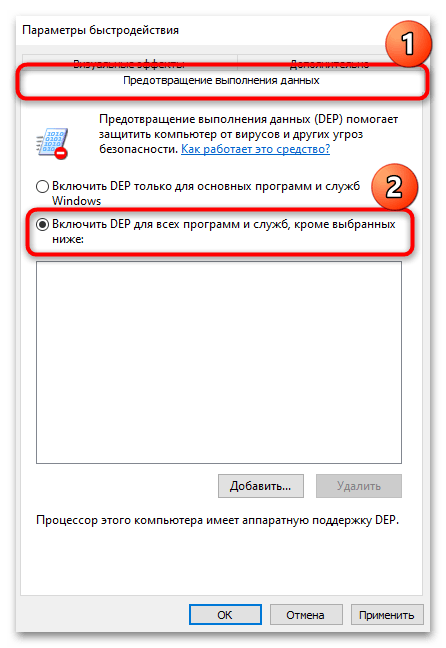
- Перейдите на вкладку «Предотвращение выполнения данных», затем отметьте пункт «Включить DEP для всех программ и служб, кроме выбранных ниже».
- Кнопка «Добавить», расположенная ниже, станет активна – кликните по ней.
- Укажите путь к программе, для которой нужно отключить технологию. Подтвердите действие. В предыдущем окне останется применить и сохранить настройки.

Чтобы включить DEP для конкретной программы, достаточно удалить ее из списка исключений в окне «Параметры быстродействия» — выделите ее, затем нажмите на кнопку «Удалить». Для временного включения «Предотвращения выполнения данных» достаточно снять галочку у софта, затем применить и сохранить настройки.
Следует отметить, что данный алгоритм действий срабатывает не со всеми программами. Если деактивировать функцию невозможно, система об этом оповестит, а вы, в свою очередь, лучше проверьте проблемное приложение на наличие вредоносного кода.
Способ 3: Редактирование реестра
Также отключить DEP для определенных программ можно и через «Редактор реестра». Суть метода заключается в том, что в специальном разделе реестра будет пополняться список программ, которые начнут игнорироваться встроенной технологией.
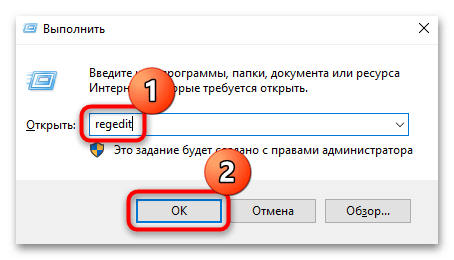
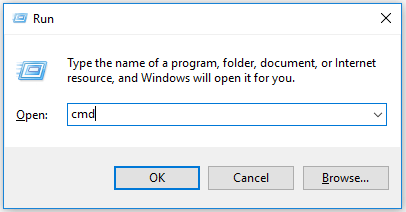
- Запустите «Редактор реестра». Для этого вызовите диалоговое окно «Выполнить», одновременно нажав на клавиши «Win + R», затем введите запрос
regeditи нажмите на кнопку «ОК». - Разверните ветку
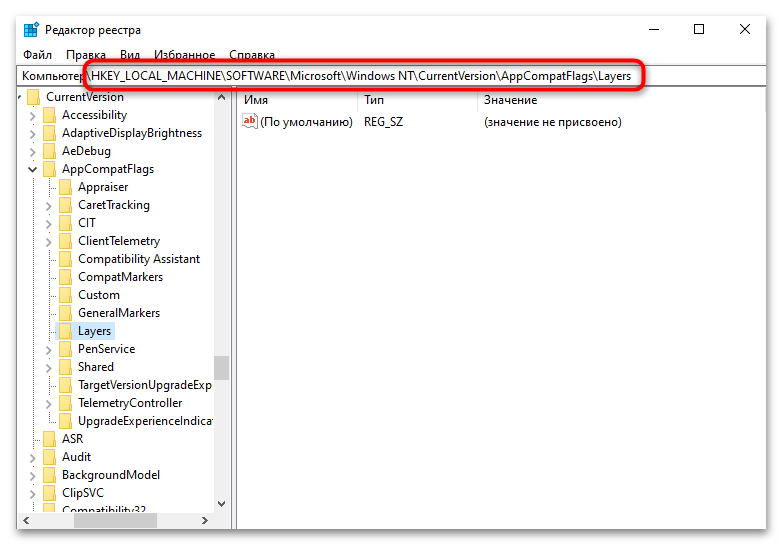
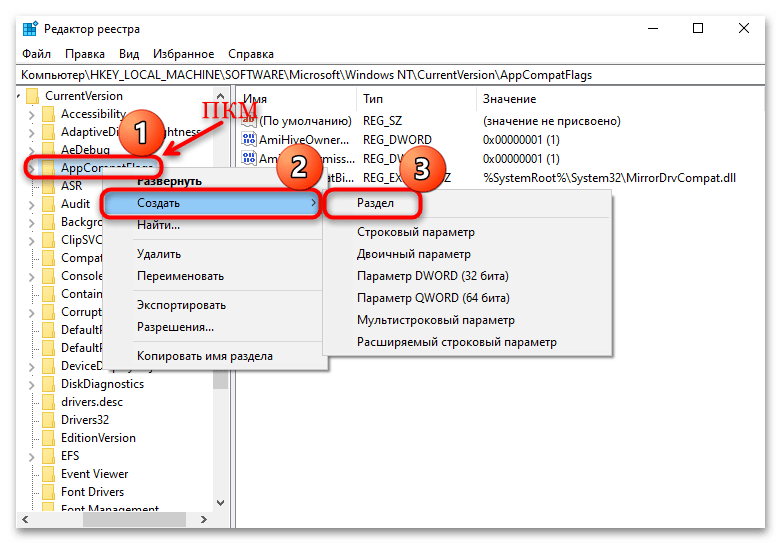
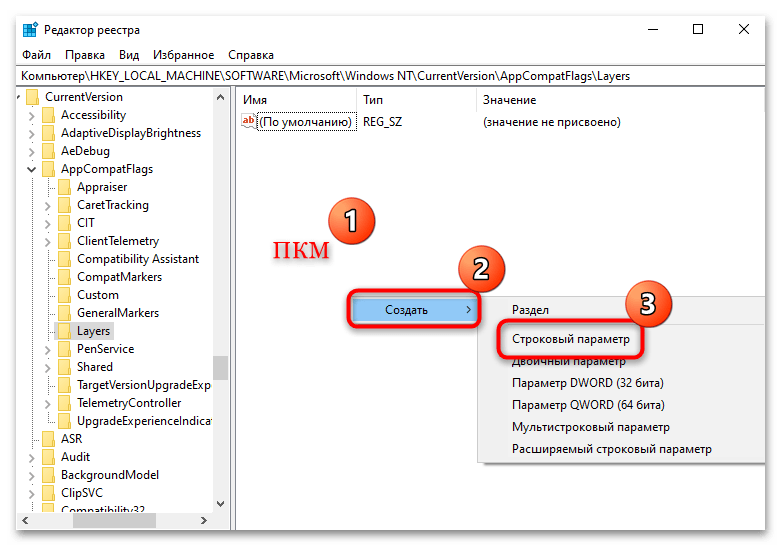
HKEY_LOCAL_MACHINE\SOFTWARE\Microsoft\WindowsNT\CurrentVersion\AppCompatFlags\Layersили вставьте данный путь в адресную строку вверху. - Если раздела «Layers» нет, то его надо создать: кликните правой кнопкой мыши по названию предыдущего каталога «AppCompatFlags», наведите курсор на пункт «Создать» и выберите «Раздел». Присвойте ему имя – «Layers».
- Кликните правой кнопкой мыши по свободной области центральной части окна при выбранном разделе «Layers», затем создайте строковый параметр через контекстное меню.
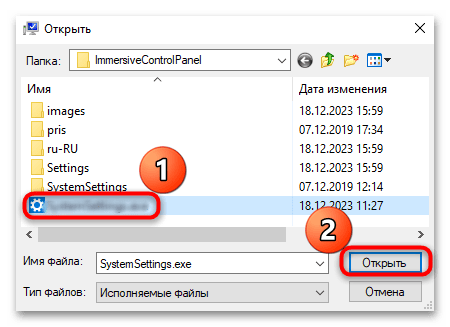
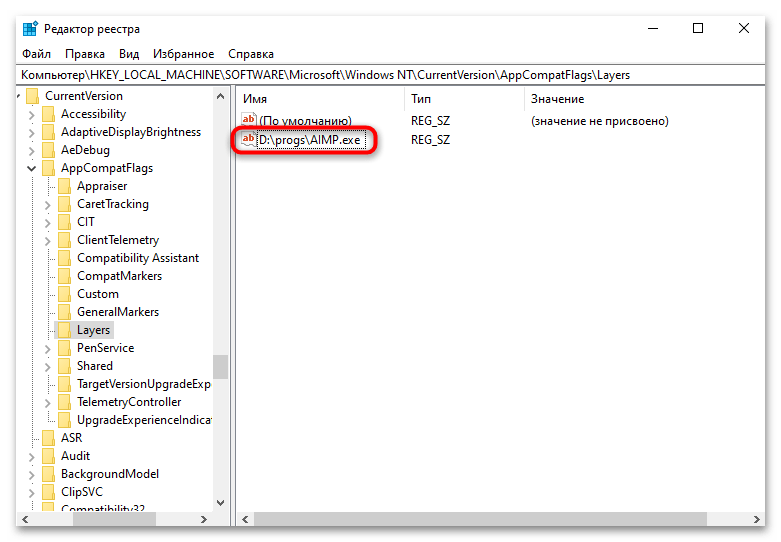
- В качестве имени используйте путь к исполняемому файлу программы, которую нужно добавить в список исключений для DEP. Например, это будет выглядеть так:
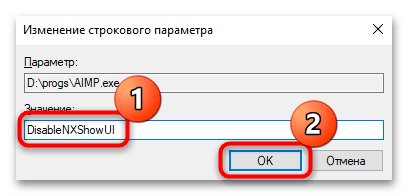
D:\progs\AIMP.exe, если EXE-файл находится на локальном диске «D» в папке «progs». - Дважды кликните левой кнопкой мыши по созданному параметру и в поле «Значение» введите
DisableNXShowUIи сохраните настройку.
То же самое можно проделать с любыми другими программами, которые установлены на компьютер. Добавляйте их в этот список. Для включения DEP достаточно удалить параметр, отвечающий за определенное приложение или утилиту: кликните по нему правой кнопкой мыши, выберите пункт «Удалить» и подтвердите действие.
Когда все желаемые правки будут внесены в системный реестр, перезагрузите Windows 10, чтобы настройки были зафиксированы.
Наша группа в TelegramПолезные советы и помощь
By managing Data Execution Prevention (DEP) in Windows 10 and 11, you can provide an additional layer of protection to your computer from unknown scripts. By default, this Windows’ built-in security tool is enabled which safeguards all programs and services of Windows. Basically, this feature prevents harmful applications from executing unrecognized codes on the reserved locations of system memory.
DEP commonly works in the background but when it is turned on for all programs, you may confront issues with certain applications. In that case, you should add them to the execution list so that DEP will not scan them during the execution. You can also include some device drivers on the list because the OS may consider them as a threat due to digital signature status. So, let us advance to the sequence of steps in order to Disable/Enable Data Execution Prevention (DEP) in Windows 11 or 10.
Disable and Enable Data Execution Prevention (DEP) in Windows 11 and 10
Here is how to Disable/Enable Data Execution Prevention (DEP) in Windows 11 or 10 –
Via System Properties
Step-1: Go to the desktop and make a right-click on This PC icon. From the context menu, select Properties. If needed see – How to Bring This PC icon on Windows 10 Desktop Quickly.
Step-2: From the Settings app that opens up, click Advanced system settings.
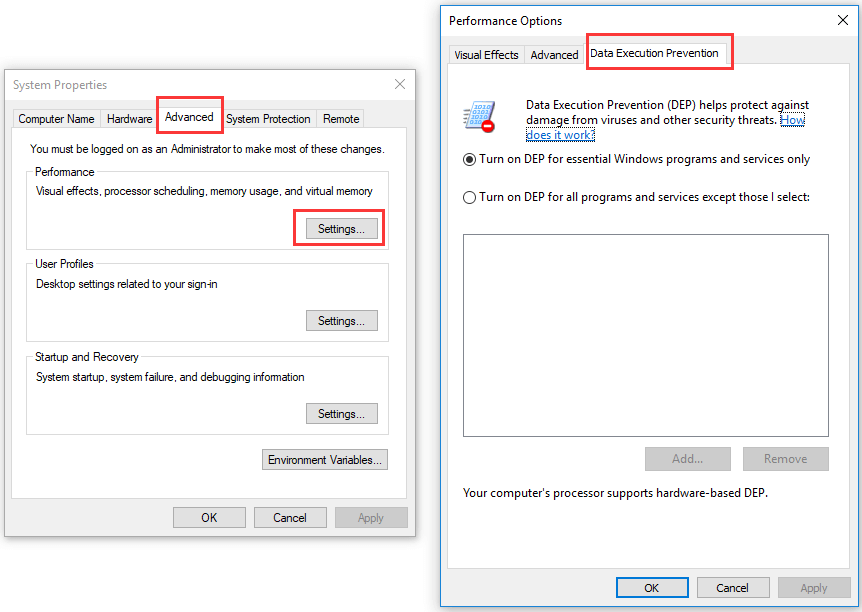
Step-3: On the System Properties dialog, switch to the Advanced tab. Moving further, hit the Settings button underneath the Performance section.
Step-4: This will open Performance Options dialog on the PC screen. Shift to the Data Execution Prevention tab. Here, you will see two options namely:
“Turn on DEP for essential Windows programs and services only“: This is the default setting. It will provide protection against threats and viruses for certain services and applications of Windows only.
“Turn on DEP for all programs and services except those I select“: It is the second option. Not just Windows processes only, this option will also enable the feature for all processes.
Step-5: So, depending on your requirement choose the DEP for services and programs accordingly.
Step-6: If you are having any problem with a specific program, prefer to check the second option. Then, click the Add button and browse to the location of that application’s executable file.
Using Command Prompt
Open Run dialog box by hitting “Win + R” hotkeys altogether. Here, type cmd and hit Ctrl + Shift + Enter.
When UAC prompts up, hit Yes to proceed ahead.
To Disable Data Execution Prevention
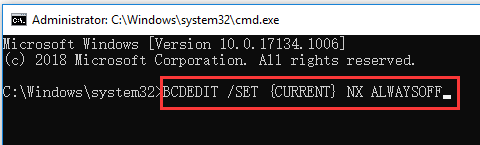
Now, on the Command Prompt window, type or copy/paste this given below command and then hit Enter.
bcdedit.exe /set {current} nx AlwaysOff
After executing the command successfully, close the window and start running a program.
To Enable Data Execution Prevention
Type cmd on Cortana and perform a right-click on Command Prompt Desktop app. From the menu that appears, choose “Run as administrator“. Click Yes when UAC shows up on the PC screen.
For reference, see How to Launch Elevated Command Prompt on Windows 10.
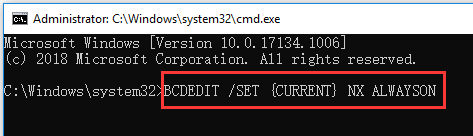
Next, copy and paste the below command and hit Enter to enable the feature.
bcdedit.exe /set {current} nx AlwaysOn
Finally, restart Windows 10 PC after executing the command to make effective changes.
Hopefully, you will be now available to Disable/Enable Data Execution Prevention (DEP) in Windows 10 pretty easily.
Turn Off DEP in Windows 10: Sometime Data Execution prevention causes an error and in that case it important to turn it off and in this article, we are going to see exactly how to turn off DEP.
Data Execution Prevention (DEP) is a security feature that can help prevent damage to your computer from viruses and other security threats. Harmful programs can try to attack Windows by attempting to run (also known as execute) code from system memory locations reserved for Windows and other authorized programs. These types of attacks can harm your programs and files.
DEP can help protect your computer by monitoring your programs to make sure that they use system memory safely. If DEP notices a program on your computer using memory incorrectly, it closes the program and notifies you.

You can easily turn off Data execution prevention for a particular program by the following steps below:
NOTE: DEP can be turned off globally for the entire system but it’s not recommended as it will make your computer less secure.
1. Right-click on My Computer or This PC and choose Properties. Then click on Advanced system settings in the left panel.

2. In Advanced tab click on Settings under Performance.

3. In the Performance Options window, click on the Data Execution Prevention tab.

Now you have two options as you can see, by default DEP is turned on for essential Windows programs and services and if the second one is selected, it will turn on DEP for all programs and services (not just Windows) except those which you select.
4. If you are facing issues with a program then select the second radio button which would Turn on DEP for all programs and services except those you select and then add the program that is having the problem. However, DEP is now turned on for every other program in Windows and you might end up where you started i.e. you may start having the same problem with other Windows programs. In that case, you have to manually add each program that is having a problem to the exception list.
5. Click the Add button and browse to the location of the program’s executable you want to remove from DEP protection.

NOTE: While adding programs to the exception list you might get an error message saying “You can not set DEP attributes on 64-bit executables” when adding a 64-bit executable to the exception list. However, there is nothing to worry about as it means your computer is 64-bit and your processor already supports hardware-based DEP.

Your computer’s processor supports hardware-based DEP means that all the 64-bit processes are always protected and the only way to prevent DEP from protecting a 64-bit application is to turn it off completely. You cannot manually turn off DEP, in order to do so you have to use the command line.
Turn DEP Always On or Always Off using Command Prompt
Turning DEP always on means it will be always on for all processes in Windows and you cannot exempt any process or program from protection and turning DEP always off means it will be completely turned off and no process or program including Windows will be protected. Let’s see how to enable both of them:
1. Right-click on the windows button and select Command Prompt (Admin).
2. In cmd (command prompt) type these following commands and hit enter:
To always turn on DEP:  bcdedit.exe /set {current} nx AlwaysOn
To always turn off DEP: bcdedit.exe /set {current} nx AlwaysOff

3. There is no need to run both of the commands, as shown above, you only need to run one. You will also need to restart your PC after any change you made to DEP. After you have used one of the above commands, you will notice that the windows interface for changing DEP settings has been disabled, so only use command-line options as a last resort.
You may also like:
- How to fix 0xc000007b Application Error
- How to Repair Icon Cache in Windows 10
- How to fix COM Surrogate has stopped working
- How to create system restore point – the easy way
That’s it you have successfully learned How to turn Off DEP (Data Execution Prevention). So this is all we can discuss DEP, how to turn DEP off, and how to always turn DEP on/off and if you still have doubt or question regarding anything feel free to comment.
Roundup of what is Data Execution Prevention, how to disable DEP on Windows 10 with Command Prompt, how to disable DEP for specific program, how to create shortcut of DEP in Windows 10, and how to recover lost data or deleted files on Windows 10 with best data recovery software from MiniTool.
- What is Data Execution Prevention in Windows 10?
- How do I turn off Data Execution Prevention in Windows 10?
- How do I know if Data Execution Prevention is on?
What Is Data Execution Prevention in Windows 10?
Data Execution Prevention
Data Execution Prevention or DEP is a Windows built-in tool that offers an extra layer of security for your Windows computer. It can help prevent your computer from virus attack or other security threats.
In detail, DEP tool utilizes a set of hardware and software technologies to conduct additional checks on Windows computer memory to prevent malicious code from loading on a system, and monitor your computer programs to use system memory safely.
To put it another way, there are some memory areas in Windows computer that don’t allow codes running. If some codes are running there, then they are usually malicious.
Therefore, if Data Execution Prevention finds some programs are using computer RAM in a malicious way, it will shut down them and notify you, thus, to protect the safety of your computer system, as well as the data and files on it.
Tip: MiniTool Power Data Recovery Free is specially designed to help you recover lost or deleted files from Windows 10/8/7 computer, external hard drive, SSD, USB, SD card, etc. 100% clean freeware.
MiniTool Power Data Recovery FreeClick to Download100%Clean & Safe
Also read: If you’ve experienced data loss due to hard drive failure, this article on hdd data recovery offers invaluable insights into the recovery process.
Data Execution Prevention feature is included in Windows 10/8/7/Vista/XP. It is enabled by default for all Windows services and programs.
Generally you don’t need to disable DEP and it’s suggested not to do it since your computer may be at risk if you disable it.
However, some good programs sometimes might wrongly use those memory areas that DEP monitors. DEP will then shut down the program or make the program run abnormally.
What Programs Might Conflict with DEP Windows 10?
What programs might not be compatible with Data Execution Prevention? Programs built with old codebases, old 32-bit programs or games, old device drivers, etc. are likely to conflict with DEP Windows 10.
If some programs on your Windows 10 computer can’t work well or shut down with no notice. How do you know if it is caused by DEP?
You can click Start, type event viewer, and click Event Viewer app to open Windows Event Viewer on Windows 10. Scroll down the log list to check if there is an Event ID 1000 DEP error. If you find one, then a program may have problems with DEP.
How to Disable Data Execution Prevention Windows 10
- Open Data Execution Prevention Window
- Disable DEP for Specific Programs
How to Disable DEP for Specific Programs in Windows 10
By default, Windows turns on DEP for essential Windows programs and services only. So most other programs on your Windows 10 computer will not be monitored by DEP.
But if DEP causes conflict with trusted legitimate programs, you can firstly check if the program manufacturer has provided a DEP compatible version or made some updates to make it compatible with DEP, if so, you can update the program or install the DEP compatible version.
If there isn’t a DEP compatible version of the program yet, you can disable DEP for the specific program on Windows 10 by following the guide below. You can use this program but it may be attacked by malware, virus or other threats, and it may also affect other programs and files on your computer.
Step 1 – Open Data Execution Prevention Window
At first, you can open Control Panel Windows 10. Click Start, type control panel, and click Control Panel to open it.
Next you can click System and Security -> System -> Advanced system settings to open System Properties window.

Then you can tap Advanced tab, and click Settings button under Performance option.
Click Data Execution Prevention tab in Performance Options window to open Data Execution Prevention window.
Step 2. Disable DEP for Specific Programs
Now you can click Turn on DEP for all programs except those that I select option. Click Add button to browse the location of the programs, click the programs, and click Open to add them to the list.
At last, you can tick the programs you want to exclude from DEP, and click Apply button to remove them from DEP protection. Restart your Windows 10 computer to make these changes take effect.
Note: 64-bit programs appears after DEP was well established, so when you try to add a 64-bit program to the exception list, you may receive an error message saying that you can’t set DEP attributes on 64-bit executables. This means your computer’s processor supports hardware-based DEP and all 64-bit programs are always protected by DEP. You can’t disable DEP for these programs manually unless you use command line to turn off DEP completely. You can check below how to disable DEP Windows 10 Command Prompt.
How to Enable/Disable DEP Windows 10 with Command Prompt
You should not disable Data Execution Protection on Windows 10 for computer safety. But if you do need to disable DEP Windows 10, you can easily realize it with Command Prompt.
Step 1. Open an elevated Command Prompt window. You can press Windows + R, type cmd, and press Ctrl + Shift + Enter to open Command Prompt Windows 10 and run it as administrator.
Step 2. Type the following command line in Command Prompt window and hit Enter to turn off DEP on Windows 10.
BCDEDIT /SET {CURRENT} NX ALWAYSOFF
Step 3. Then you can restart your Windows 10 computer, and DEP is completely disabled on Windows 10.
If you want to enable Data Execution Protection in Windows 10 again, you can follow the same way to enter into Command Prompt window, type the command line below and hit Enter, then restart your Windows 10 computer to turn on it.
BCDEDIT /SET {CURRENT} NX ALWAYSON
How to Create a Shortcut of Data Execution Prevention in Windows 10
If you don’t know where Data Execution Prevention (DEP) is and want to easily access it on Windows 10, you can create a shortcut for DEP on desktop screen. Check the detailed guide below to learn how to do it.
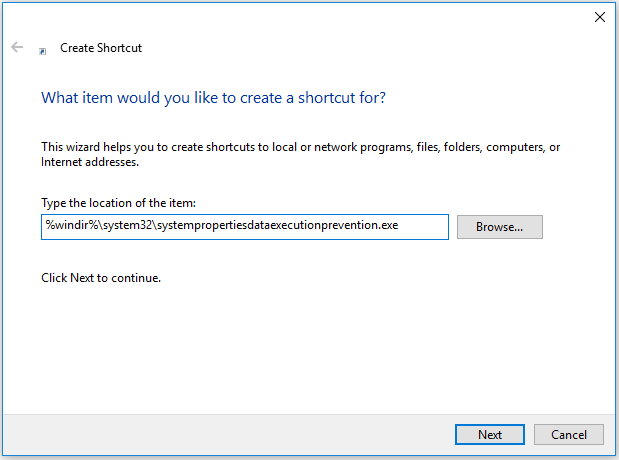
Step 1. You can right-click the blank area on the desktop, and click New -> Shortcut to open Create Shortcut window.
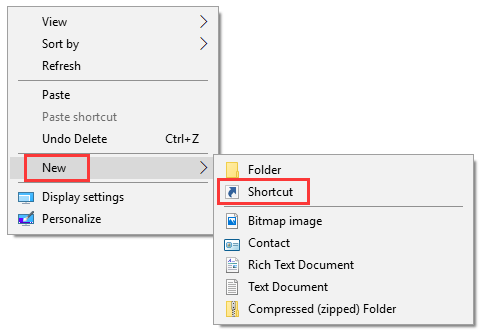
Step 2. Next type %windir%\system32\systempropertiesdataexecutionprevention.exe in the Create Shortcut window, and click Next.
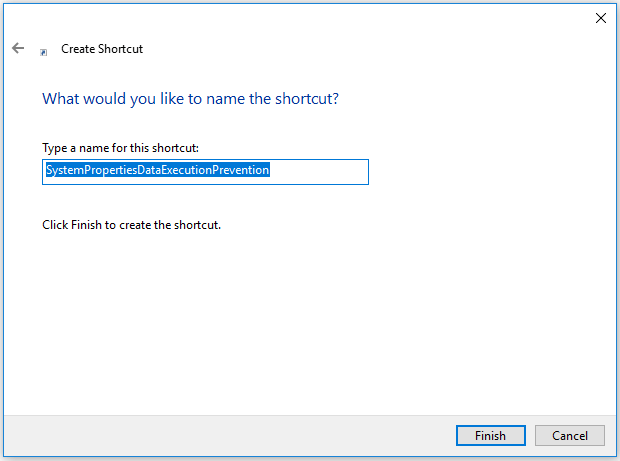
Step 3. Type a name for the DEP shortcut, e.g. SystemPropertiesDataExecutionPrevention, and click Finish to create the shortcut for Data Execution Prevention in Windows 10.
Then when you want to change the settings of Data Execution Prevention Windows 10 like turn off Data Execution Prevention in Windows 10 for specific programs, you can click the shortcut icon to open DEP on Windows 10 with ease.
Click to Tweet
Best Data Recovery Software to Recover Lost/Deleted Files on Windows 10 PC
Disabling Data Execution Prevention Windows 10 might put your programs, files and system at risk since your computer is easily attacked by malware or virus. If you lost some important data on Windows 10 PC, you can use MiniTool Power Data Recovery to recover lost data on PC with ease. It also supports recovering data when PC won’t boot with its built-in Bootable Media Builder function.
MiniTool Power Data Recovery, the best data recovery software for Windows 10/8/7, enables you to easily recover lost data and deleted files from computer local hard drive, external hard drive, SSD, USB drive (pen drive data recovery), SD card and other storage devices in simple steps.
You can use this best free file undelete software for Windows 10/8/7 to restore data after a mistaken deletion, system crash, malware/virus attack, hard drive error, or other data loss situations like turning off DEP on Windows 10.
Free download and install the 100% clean MiniTool Power Data Recovery on Windows 10/8/7 computer, and follow the 3 simple steps below to recover lost data from PC.
MiniTool Power Data Recovery TrialClick to Download100%Clean & Safe
Step 1. Select the Drive/Device to Scan
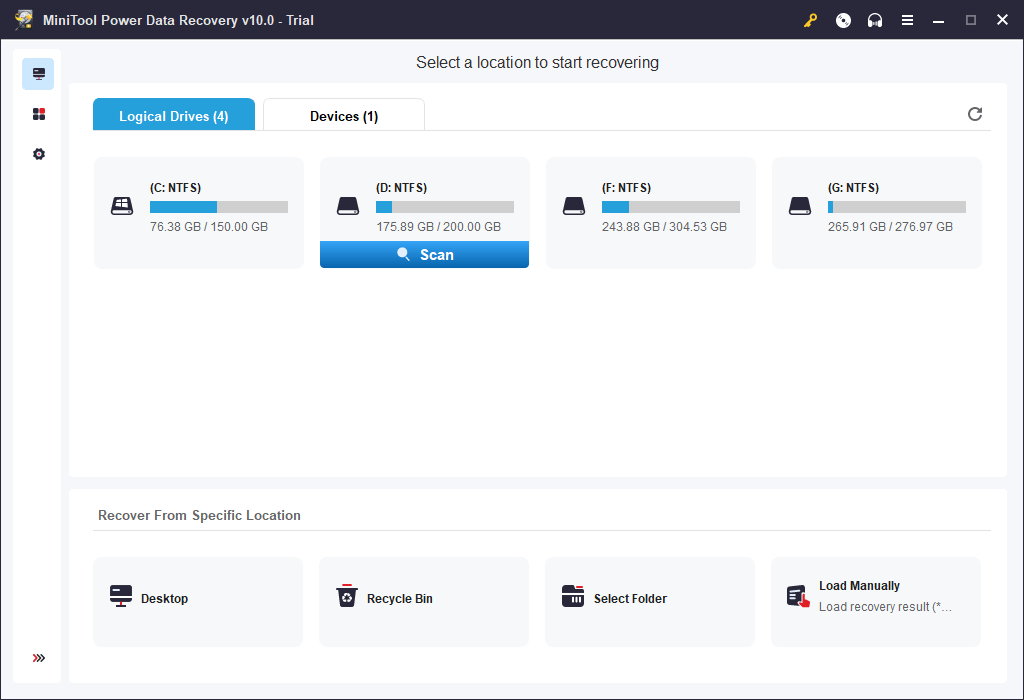
Launch MiniTool Power Data Recovery to enter into its main UI. On its main interface, you can see all detected drives are displayed under Logical Drives.
Select the partition and click Scan and this smart data recovery software will start scanning the chosen drive for all data on it. Or you can click Devices tab and select the whole hard disk to scan. Wait patiently to let the scan process finish.
After it finishes the scan, it will display all detected data on the device in the scan result window, including normal files, lost files, and deleted files.
Step 2. Check and Save the Recovered Files
You can then check the scan result for needed files and click Save button to choose a destination folder to store the files. You can view the files in the scan result window by Path or Type.
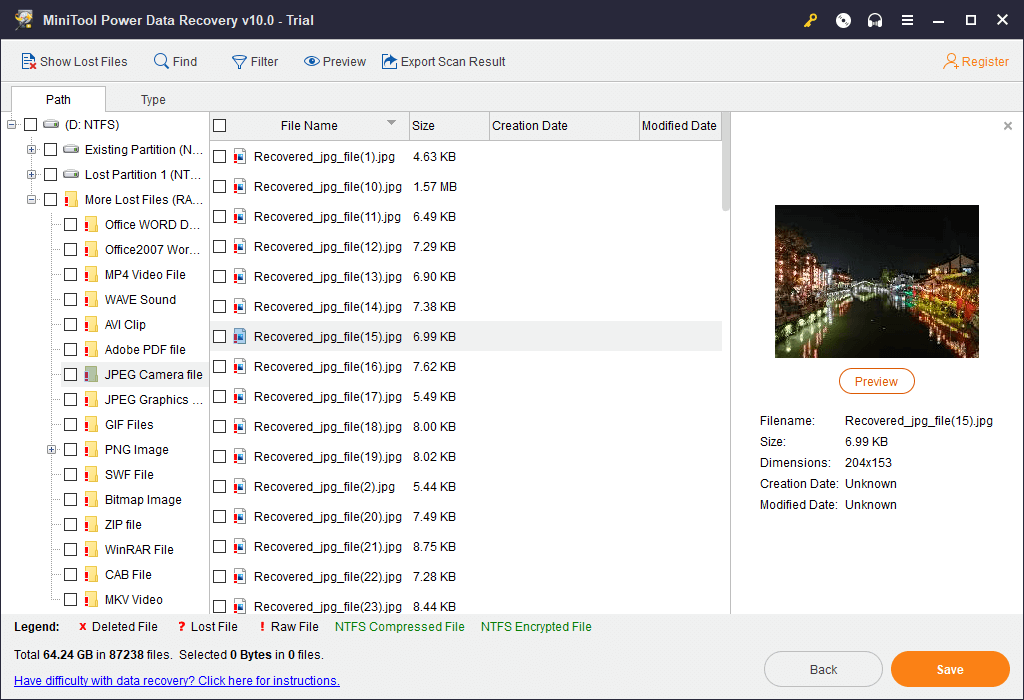
To quickly find lost files, you can click Show Lost Files icon at the toolbar to only display lost files.
To find a specific file, you can click Find icon at the toolbar to search the target file by name on condition that you still remember a part of the name of the file.
You can also click Filter icon on the toolbar and later set the filter parameters to sift the files in the scan result by file extension, file size, file creation/modification date, etc.
You can preview the file by clicking Preview icon or double click the target file. It supports previewing up to 70 types of files now.
It’s advised to store the recovered files to a different location to avoid data overwriting.
MiniTool Power Data Recovery TrialClick to Download100%Clean & Safe
Wrap Things Up
End here, we’ve introduced what is Data Execution Prevention (DEP), how to disable Data Execution Prevention Windows 10 for specific programs, how to turn off DEP Windows 10 with Command Prompt, how to create a shortcut for DEP on Windows 10, as well as how to recover lost data on Windows 10 PC with MiniTool Power Data Recovery.
If you still have problems with recovering data with MiniTool Power Data Recovery, please contact [email protected].
Click to Tweet
More Information about DEP
Hardware-based DEP
Hardware-enforced DEP can mark all memory locations in a process as non-executable unless the location contains executable code. Hardware-based Data Execution Prevention relies on computer processor hardware to do this job. Computer processor architecture that supports hardware-enforced DEP controls how DEP is functioned in hardware and adds an exception to DEP when the code with the appropriate attribute is executed.
AMD and Intel have produced Windows-compatible processor architectures that are compatible with DEP, namely, the NX (no-execute page-protection) processor feature from AMD, the XD (Execute Disable Bit) feature from Intel.
Software-based DEP
Software-based DEP is an additional set of Data Execution Prevention security checks that have been added to Windows XP SP2. These checks are specially designed to stop malicious code which may take advantage of exception-handling mechanisms in Windows. Software-enforced DEP can run on any processor which can run Windows XP SP2, but it only protects limited system files.
Data Execution Prevention Windows 10 FAQ
Should I turn off DEP?
DEP is a data security feature in Windows. It can protect your hardware and monitor the programs to use RAM properly. Normally you should not disable DEP in your Windows 10 computer, but if you have to, you can turn off DEP for particular programs.
How do I check my DEP status?
You can press Windows + R, type cmd, press Enter to open Command Prompt. Then type the command wmic OS Get DataExecutionPrevention_SupportPolicy in Command Prompt window, and hit Enter to check the current DEP support policy on your computer.
Should I turn on DEP for all programs?
You can choose to turn on DEP for all programs or essential programs based on your own need. But totally turning off Data Execution Prevention on Windows 10 is not recommended, since DEP monitors essential Windows programs and services. You can choose to turn on DEP for all programs on Windows 10 to improve the security.
Data Execution Prevention (DEP) is built into Windows 10 and adds an extra layer of security that stops malware from running in memory. It is enabled by default and is designed to recognize and terminate unauthorized scripts from running in reserved areas of computer memory. This is a popular attack vector for malware so Microsoft added DEP to stop it.
Data Execution Prevention was introduced in Windows 7 in a concerted effort by Microsoft to close some of the many security holes that plagued the operating system. It is a great theory but if you have ever seen the message ‘This program has been blocked for your protection’, you know it doesn’t always work as advertised. It is always better to be too paranoid than not paranoid enough but when it gets in the way of computer performance, it becomes a nuisance.

Disable Data Execution Prevention
There are a lot of reasons why you should never disable Data Execution Prevention (DEP). Rather than bury the headline, first I’ll show you how to do it and then talk about why you shouldn’t do it.
- Open a CMD window as an Admin.
- Type ‘bcdedit.exe /set {current} nx AlwaysOff’ and hit Enter.
You should see ‘The operation completed successfully’ underneath once complete. DEP is now off on your computer. If you want to enable DEP again, type ‘bcdedit.exe /set {current} nx AlwaysOn’ and hit Enter. You should see the same successful notification underneath the command if it worked.
If you see an error like in the image above that reads ‘The Value is protected by Secure Boot Policy and cannot be modified or deleted’, it means you have Secure Boot enabled in your BIOS/UEFI. To disable DEP you will need to reboot your computer into the BIOS/UEFI, find the Secure Boot setting and turn it off. Boot into Windows and repeat the above steps to disable DEP.
You can control a little of how DEP works from the Windows GUI.
- Open Control Panel.
- Navigate to System and Security and System.
- Select Advanced system Settings from the left menu.
- Select the Data Execution Prevention tab.
Here you can choose whether to enable DEP just for Windows and its associated apps or for all programs on your computer. You can select a whitelist too where you can select to exclude a particular program from DEP. This window is of limited use outside of a corporate environment but it is there if you want to experiment.

Why you should not disable DEP
While the initial versions of DEP did cause problems, newer versions in Windows 8 and Windows 10 are much, much better. DEP mostly works in the background now and doesn’t interfere in how you use your computer. There are a couple of reasons why you should not disable DEP.
An essential protection against the unseen
The main reason to leave DEP running is that it provides almost invisible protection against invisible attackers. If a virus or malware gets through your security software and DEP is off, there is no way to know something is working on your computer. The malware can run scripts and performs its tasks without interference and that can be devastating.
DEP now recognizes most new games and programs and won’t trouble you with errors or alerts. It is one of those Windows features that does actually provide value for users.
With more viruses and malware than ever floating around the internet, any extra layer of protection is a good thing. If it gives the odd error now and again, that is a small price to pay. Plus, if it doesn’t like a particular program you can always whitelist it using the method I described above. As long as you’re sure the program is safe you should be fine.
It may not be DEP giving the error
Some violation errors are nothing to do with Data Execution Prevention at all. It could be User Account Control, Local Policy, Group Policy, Windows Defender, your antivirus or malware software or something completely different. There is a habit among IT Techs to blame DEP for any access or memory violation but it isn’t always true. It is sometimes, but not always.
You can also experiment by disabling UAC, temporarily pausing your security software or by running the program with Admin privileges. If it works after doing that, it wasn’t DEP at all.
Data Execution Prevention was added to Windows as an extra layer of protection. I may not be a fan of some of Microsoft’s decisions when it comes to ’protecting us’ but DEP is one that works. Unless you really have to disable DEP, I really would leave it running.