
Want to quickly check whether your Windows Firewall is enabled or disabled? This guide shows you how to use PowerShell to get the status of your local Windows Firewall for each profile.
PowerShell cmdlets follow a standard format: verb-noun. The verb describes the action, and the noun specifies what the cmdlet acts on. In this case, we’ll use the Get-NetFirewallProfile cmdlet to show if Windows Firewall is enabled or disabled.
Steps:
1. Open PowerShell with administrative privileges.
2. Run the following command to check the firewall status for all profiles:
# get local firewall status powershell
Get-NetFirewallProfile | Format-Table Name, Enabled
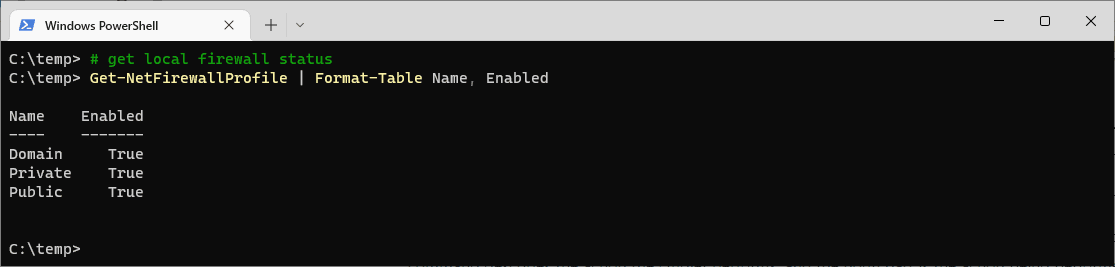
This command retrieves the firewall status and formats it into an easy-to-read table showing the profile name and whether it is enabled (True) or disabled (False).
The Windows Firewall on this demo computer is enabled, for all profiles. If you want more info on Windows Firewall Profiles, check out this Microsoft Docs link.
Эта статья посвящена основам управления настройками и правилами встроенного Windows Defender Firewall из командной строки PowerShell. Мы рассмотрим, как включать/отключать брандмауэр для различных профилей, создавать, редактировать и удалять правила, экспортировать/импортировать правила Windows Firewall с помощью PowerShell.
Содержание:
- Как включить и отключить Windows Defender Firewall через PowerShell?
- Создать новое правило Windows Firewall
- Изменить правило Windows Firewall с помощью PowerShell
- Включить/отключить правило Windows Defender Firewall
- PowerShell: вывести список активных правил Windows Firewall
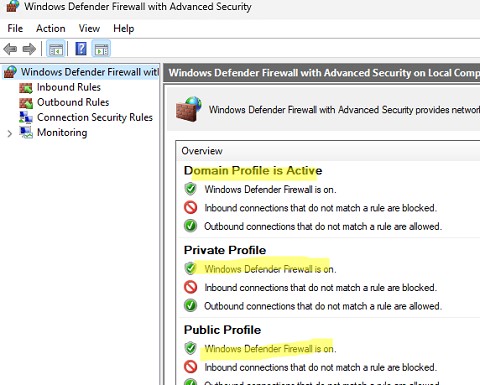
Для управления настройками Windows Firewall обычно используется отдельная графическая MMC оснастка
wf.msc
(Control Panel -> System and Security -> Windows Defender Firewall -> Advanced settings). Большинство операций по настройке и управлению параметрами Windows Firewall можно выполнять из командной строки PowerShell. Для этого, начиная с версии Windows PowerShell 5.1, можно использовать встроенный модуль NetSecurity
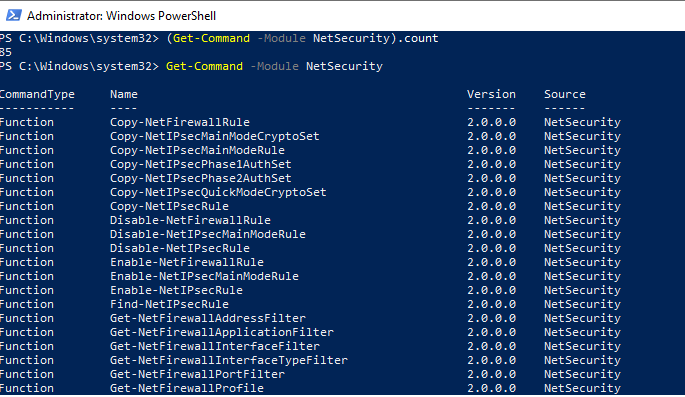
Полный список командетов в модуле NetSecurity можно вывести с помощью команды:
Get-Command -Module NetSecurity
Раньше для управления правилами и настройками Брандмауэра Windows использовалась команда
netsh advfirewall firewall
.
Как включить и отключить Windows Defender Firewall через PowerShell?
По умолчанию Defender Firewall в Windows включен.
Get-NetFirewallProfile | Format-Table Name, Enabled
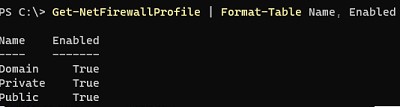
Как вы видите, в Windows Firewall есть три типа сетевых профилей:
- Domain (Доменный) – применяется к компьютерам, включенным в домен Active Directory;
- Private (Частный) – домашние или рабочие сети;
- Public (Общий) – общедоступные сети.
В настройках профилей по-умолчанию разрешены все исходящие подключения и блокируется входящие (кроме разрешенных).
Информация о типах сетей хранится службой Network Location Awareness (NLA) в базе данных. Вы можете изменить профиль сети в Windows, если он определился некорректно.
Каждый профиль может отличаться используемым набором правил файервола. По умолчанию все сетевые интерфейсы компьютера защищены фаейрволом и к ним применяются все три типа профилей.
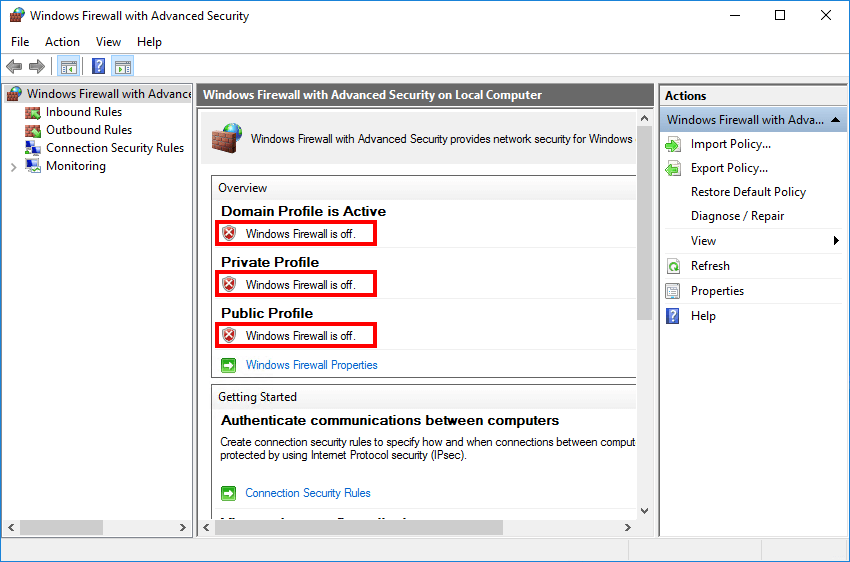
Чтобы полностью отключить Firewall в Windows, выполните команду:
Set-NetFirewallProfile -All -Enabled False
Либо укажите конкретный профиль вместо All:
Set-NetFirewallProfile -Profile Public -Enabled False
Чтобы включить файервол для всех трех сетевых профилей, используется команда:
Set-NetFirewallProfile -All -Enabled True
Вывести тип профиля, который применяется к сетевому подключению:
Get-NetConnectionProfile
В этом примере к сетевому подключению Ethernet0 применяется доменный профиль (DomainAuthenticated).
Вы можете управлять правилами Windows Firewall на удаленных компьютерах, если на них настроен PowerShell Remoting (WinRM). В этом примере с помощью командлета Invoke-Command мы отключим файервол на удаленных компьютерах из списка:
$computers = @('PC01', 'PC02', 'PC03')
Invoke-Command -ComputerName $computers {Set-NetFirewallProfile -All -Enabled False}
Можно изменить действие по-умолчнию для профиля Public и заблокировать все входящие подключения.
Set-NetFirewallProfile –Name Public –DefaultInboundAction Block
Текущие настройки профиля можно вывести так:
Get-NetFirewallProfile -Name Public

Если вы управляете настройками Windows Firewall через GPO, вы можете вывести текущие результирующие настройки профилей так:
Get-NetFirewallProfile -policystore activestore
Проверим, что все параметры брандмауэра применяются ко всем сетевым интерфейса компьютера.
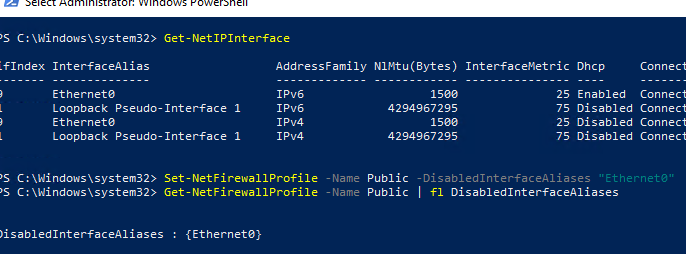
Get-NetFirewallProfile -Name Public | fl DisabledInterfaceAliases
Если все интерфейсы защищены, команда должна вернуть:
DisabledInterfaceAliases : {NotConfigured}

Можно отключить определенный профиль для интерфейса (вывести список имен интерфейсов можно с помощью командлета Get-NetIPInterface).
Set-NetFirewallProfile -Name Public -DisabledInterfaceAliases "Ethernet0"
Как вы видите, теперь профиль Public не применяется к интерфейсу Ethernet0:
DisabledInterfaceAliases : {Ethernet0}
С помощью командлета
Set-NetFirewallProfile
вы можете изменить параметры профиля (действие по-умолчанию, журналирование, путь и размер лог файла, настройки оповещений и т.д.).
Вы можете настроить параметры логирования сетевых подключений на уровне каждого профиля. По умолчанию журналы Windows Firewall хранятся в каталоге
%systemroot%\system32\LogFiles\Firewall
, размер файла – 4 Мб. Вы можете изменить включить журналирование подключений и увеличить максимальный размер файла:
Set-NetFireWallProfile -Profile Domain -LogBlocked True -LogMaxSize 20000 -LogFileName ‘%systemroot%\system32\LogFiles\Firewall\pfirewall.log’
Создать новое правило Windows Firewall
Для управления правилами брандмауэра используются 9 командлетов:
- New-NetFirewallRule
- Copy-NetFirewallRule
- Disable-NetFirewallRule
- Enable-NetFirewallRule
- Get-NetFirewallRule
- Remove-NetFirewallRule
- Rename-NetFirewallRule
- Set-NetFirewallRule
- Show-NetFirewallRule
Рассмотрим несколько простых примеров открытия портов в Windows Firewall.
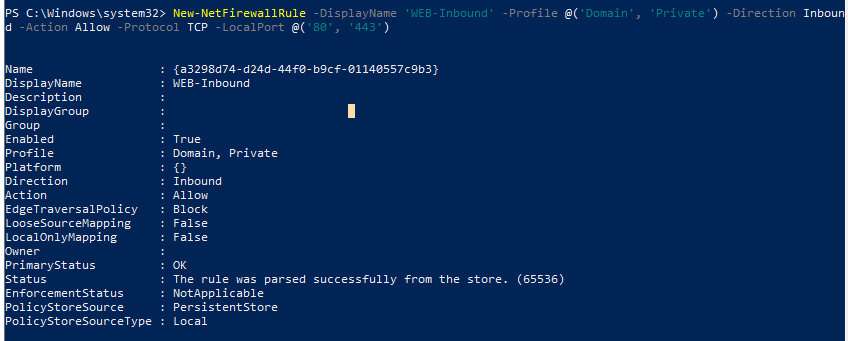
Например, вы хотите разрешить входящие TCP подключения на порты 80 и 443 для профилей Domain и Private. Воспользуйтесь такой командой:
New-NetFirewallRule -DisplayName 'WEB-Inbound' -Profile @('Domain', 'Private') -Direction Inbound -Action Allow -Protocol TCP -LocalPort @('80', '443')
Вы можете разрешить или заблокировать трафик для конкретной программы. Например, вы хотите заблокировать исходящие соединения для FireFox:
New-NetFirewallRule -Program “C:\Program Files (x86)\Mozilla Firefox\firefox.exe” -Action Block -Profile Domain, Private -DisplayName “Block Firefox” -Description “Block Firefox” -Direction Outbound
Разрешим входящее RDP подключение по стандартному порту TCP\3389 только с одного IP адреса:
New-NetFirewallRule -DisplayName "AllowRDP" –RemoteAddress 192.168.1.55 -Direction Inbound -Protocol TCP –LocalPort 3389 -Action Allow
Чтобы разрешить ICMP ping для адресов из указанных диапазонов IP адресов и подсети, используйте команды:
$ips = @("192.168.1.50-192.168.1.60", "192.165.2.22-192.168.2.200", ”10.10.0.0/16”)
New-NetFirewallRule -DisplayName "Allow inbound ICMPv4" -Direction Inbound -Protocol ICMPv4 -IcmpType 8 -RemoteAddress $ips -Action Allow
New-NetFirewallRule -DisplayName "Allow inbound ICMPv6" -Direction Inbound -Protocol ICMPv6 -IcmpType 8 -RemoteAddress $ips -Action Allow
Добавить в правило файервола список IP адресов из текстового файла (по одному IP в строке):
$ips=Get-Content C:\temp\ip.txt
Get-NetFirewallrule -DisplayName 'AllowRDP'|Set-NetFirewallRule -RemoteAddress $ips
В предыдущей статье мы показывали как с помощью PowerShell можно заблокировать доступ к сайтам не только по IP адресу, но и по DNS имени домена/сайта.
Разрешить все входящие подключения с указанного IP адреса (добавить адрес в белый список):
$IP = '192.168.1.20'
New-NetFirewallRule -DisplayName "Allow $IP" -Direction Inbound -Action Allow -RemoteAddress $IP
Изменить правило Windows Firewall с помощью PowerShell
Чтобы отредактировать правило брандмауэра, используется командлет Set-NetFirewallRule. Например, вы хотите разрешить входящие подключения с указанного IP адреса для ранее созданного правила:
Get-NetFirewallrule -DisplayName 'WEB-Inbound' | Get-NetFirewallAddressFilter | Set-NetFirewallAddressFilter -RemoteAddress 192.168.1.20
Если нужно добавить в правило файервола несколько IP адресов, используйте такой скрипт:
$ips = @("192.168.1.50", "192.165.2.22",”192.168.1.21”)
$current_ips = (Get-NetFirewallRule -DisplayName 'WEB-Inbound'| Get-NetFirewallAddressFilter).RemoteAddress
$current_ips += $ips
Get-NetFirewallrule -DisplayName 'WEB-Inbound'|Set-NetFirewallRule -RemoteAddress $current_ips
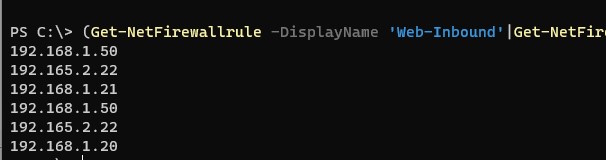
Вывести все IP адреса, которые содержатся в правиле брандмауэра:
(Get-NetFirewallrule -DisplayName 'Web-Inbound'|Get-NetFirewallAddressFilter).remoteaddress
Удалить один IP адрес из правила:
$removeip = "192.168.1.21"
$current_ips = (Get-NetFirewallRule -DisplayName 'WEB-Inbound'| Get-NetFirewallAddressFilter).RemoteAddress
$filterIP = $current_ips | Where-Object{ $_ -notin $removeip }
Get-NetFirewallrule -DisplayName 'WEB-Inbound'|Set-NetFirewallRule -RemoteAddress $filterIP
Включить/отключить правило Windows Defender Firewall
Вы можете включать/отключать правила файервола с помощью командлетов Disable-NetFirewallRule и Enable-NetFirewallRule.
Disable-NetFirewallRule –DisplayName 'WEB-Inbound'
Чтобы разрешить ICMP (ping), выполните команду:
Enable-NetFirewallRule -Name FPS-ICMP4-ERQ-In
Чтобы удалить правило брандмауэре используется командлет Remove-NetFirewallRule.
Remove-NetFirewallRule -DisplayName 'WEB-Inbound'
Чтобы сбросить все правила Microsoft Defender Firewall и восстановить настройки по умолчанию, выполните команду:
netsh advfirewall reset
или
(New-Object -ComObject HNetCfg.FwPolicy2).RestoreLocalFirewallDefaults()
Это очистит все пользовательские настройки и правила Microsoft Defender Firewall. В списке правил останутся только стандартные правила сетевого доступа Windows.
Перед сбросом можно экспортировать текущие настройки в файл.
netsh advfirewall export "C:\Backup\firewall-config.wfw"
В дальнейшем вы можете вернуть старые настройки файервола, импортировав файл с правилами:
netsh advfirewall import "C:\Backup\firewall-config.wfw"
PowerShell: вывести список активных правил Windows Firewall
Список активных правил для входящего трафика можно вывести так:
Get-NetFirewallRule | where {($_.enabled -eq $True) -and ($_.Direction -eq "Inbound")} |ft
Если, например, нам нужно вывести список блокирующих исходящих правил:
Get-NetFirewallRule -Action Block -Enabled True -Direction Outbound
Если нужно отобразить имя программы в правиле:
Get-NetFirewallRule -Action Block -Enabled True -Direction Outbound | %{$_.Name; $_ | Get-NetFirewallApplicationFilter}
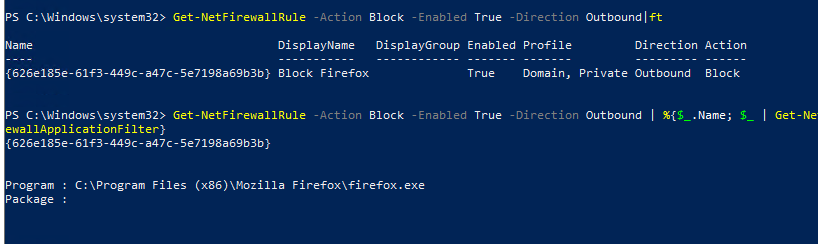
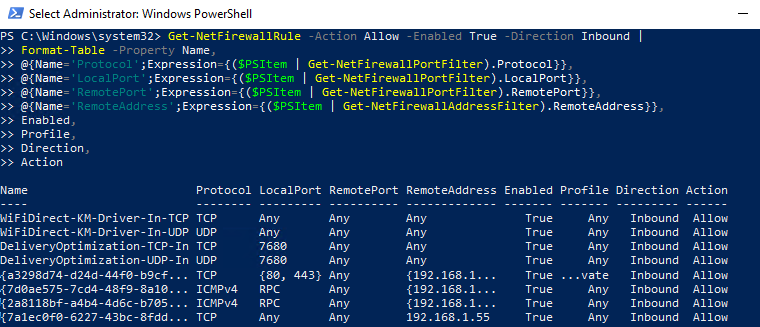
Как вы видите командлет Get-NetFirewallRule не выводит порты сетевые порты и IP адреса для правил брандмауэра. Чтобы вывести всю информацию о разрешенных входящих (исходящих) подключениях в более удобном виде с отображением номеров портов, используйте такой скрипт:
Get-NetFirewallRule -Action Allow -Enabled True -Direction Inbound |
Format-Table -Property Name,
@{Name='Protocol';Expression={($PSItem | Get-NetFirewallPortFilter).Protocol}},
@{Name='LocalPort';Expression={($PSItem | Get-NetFirewallPortFilter).LocalPort}},
@{Name='RemotePort';Expression={($PSItem | Get-NetFirewallPortFilter).RemotePort}},
@{Name='RemoteAddress';Expression={($PSItem | Get-NetFirewallAddressFilter).RemoteAddress}},
Enabled,Profile,Direction,Action
PowerShell предоставляет широкие возможности по управлению правилами Windows Firewall из командной строки. Вы можете автоматически запускать скрипты PowerShell для открытия/закрытия портов при возникновении определенных событий. В следующей статье мы рассмотрим простую систему на базе PowerShell и Windows Firewall для автоматической блокировки IP адресов, с которых выполняется удаленный перебор паролей по RDP на Windows VDS сервере.
- Updated on February 13, 2021
- Powershell, Windows Server
How to enable the Windows Firewall with PowerShell in Windows Server 2012/2016/2019/2022/2025? I recommend turning on the Windows Firewall with PowerShell. But if you have a test lab and you want to keep it disabled for testing, go ahead. Don’t forget to enable the Firewall when you finished testing. In this article, you will learn how to enable the Firewall with PowerShell.
Table of contents
- Windows Firewall profiles information
- Get status of the Windows Firewall with PowerShell
- Enable Windows Firewall in Windows Server 2012/2016/2019/2022/2025
- Check Windows Firewall status
- Conclusion
Windows Firewall profiles information
Windows Firewall offers three firewall profiles:
- Domain profile: applies to networks where the host system can authenticate to a domain controller.
- Private profile: a user-assigned profile and is used to designate private or home networks.
- Public profile: this is the default profile. It is used to designate public networks such as Wi-Fi hotspots at coffee shops, airports, and other locations.
Get status of the Windows Firewall with PowerShell
First, let’s get the current status of the Windows Firewall. We will be using the Get-NetFirewallProfile cmdlet.
Get-NetFirewallProfile | Format-Table Name, EnabledThe output appears.
Name    Enabled
----    -------
Domain    False
Private   False
Public    False
We have three profiles: Domain, Name, and Public. Windows Firewall is enabled on all three profiles.
In the next step, we are going to enable the Windows Firewall.
Enable Windows Firewall in Windows Server 2012/2016/2019/2022/2025
Enable Windows Firewall on all three profiles.
Set-NetFirewallProfile -Profile Domain, Public, Private -Enabled TrueCheck Windows Firewall status
Check the status after you enable the Firewall on all three profiles. Run the Get-NetFirewallProfile cmdlet.
Get-NetFirewallProfile | Format-Table Name, EnabledThe output appears.
Name    Enabled
----    -------
Domain     True
Private    True
Public     True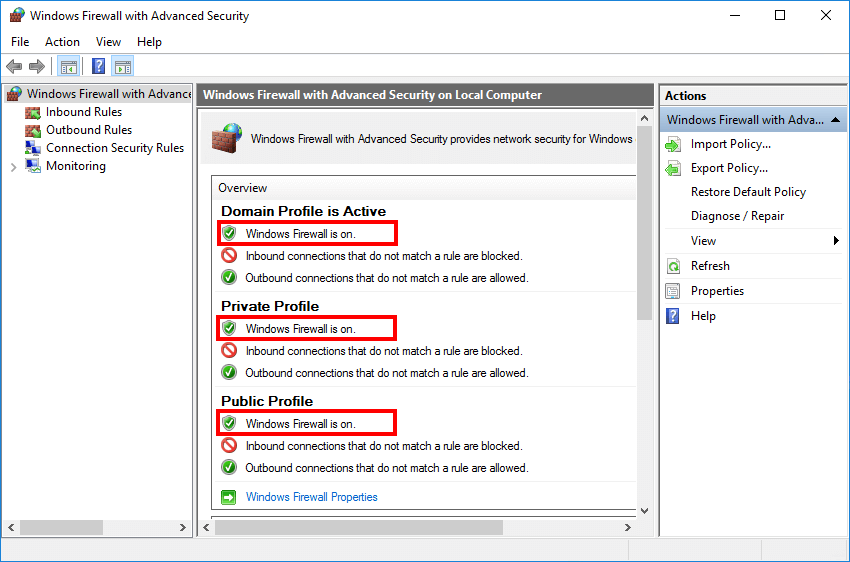
Windows Firewall is enabled on all three profiles in Windows Server. It’s important to keep the Windows Firewall turned on.
Conclusion
In this article, you learned how to enable the Firewall in Windows Server 2012/2016/2019/2022/2025. First, get the current status of the Windows Firewall. After that, enable the Windows Firewall with PowerShell.
Did you enjoy this article? If so, you may like Count mailboxes per database in Exchange with PowerShell. Don’t forget to follow us and share this article.
ALI TAJRAN is a passionate IT Architect, IT Consultant, and Microsoft MVP. He started Information Technology at a very young age, and his goal is to teach and inspire others. Read more »
In today’s digital landscape, cybersecurity is paramount. One of the pivotal elements of safeguarding a Windows operating system is the Windows Firewall, a built-in feature designed to monitor and control incoming and outgoing network traffic based on predetermined security rules. Ensuring that the Windows Firewall is enabled is a critical step in fortifying your system against unauthorized access and various cyber threats. In this article, we will delve into how to check if the Windows Firewall is enabled using PowerShell, along with a deeper exploration of its significance, configuration, and troubleshooting tips.
Understanding Windows Firewall
What is Windows Firewall?
Windows Firewall is a networking security system that regulates traffic based on a set of security rules. It acts as a barrier between a trusted internal network and untrusted external networks, blocking unauthorized access to your system while still allowing outward communication. Windows Firewall can filter both incoming and outgoing connections and is a critical component of the Windows operating system’s approach to security.
Why Is It Important?
-
Protection Against Unauthorized Access: The firewall prevents hackers and malware from gaining unauthorized entry into your computer, making it less susceptible to attacks.
-
Managing Application Access: Through the firewall, you can control which applications are allowed to communicate over the network, offering additional security.
-
Traffic Control: Firewalls can help regulate system performance by managing the amount of inbound and outbound traffic.
-
Promoting Privacy: By blocking unwanted traffic, firewalls help protect personal data by preventing it from being sent to unauthorized parties.
PowerShell: A Tool for System Administration
What is PowerShell?
PowerShell is a task automation framework from Microsoft consisting of a command-line shell and associated scripting language. It is built on the .NET framework and is designed to help system administrators automate tasks and manage configurations efficiently.
Why Use PowerShell?
-
Scripting Capabilities: PowerShell allows for complex scripting, enabling administrators to automate routine maintenance tasks and configuration processes.
-
Access to System Functions: PowerShell provides an easy-to-use interface for accessing system management features and configurations.
-
Improving Efficiency: With PowerShell cmdlets, administrators can execute commands quickly and obtain detailed outputs in a structured format, improving overall efficiency.
-
Remote Management: PowerShell supports managing systems remotely, which is crucial for managing enterprise environments.
Checking Windows Firewall Status Using PowerShell
Prerequisites
To check whether the Windows Firewall is enabled using PowerShell, you need:
- A Windows operating system (Windows 7, 8, 10, or later).
- Administrative privileges to run the required commands.
Opening PowerShell
You can open PowerShell in several ways:
-
Via Start Menu:
- Click on the Start menu.
- Type «PowerShell.»
- Right-click on «Windows PowerShell» and select «Run as administrator.»
-
Using the Run Dialog:
- Press
Windows + Rto open the Run dialog. - Type
powershelland pressEnter.
- Press
-
Task Manager:
- Right-click on the taskbar and select «Task Manager.»
- Click on «File» and then select «Run new task.»
- In the dialog, check «Create this task with administrative privileges,» type
powershell, and click OK.
Checking Firewall Status
To check if the Windows Firewall is enabled, use the following command in PowerShell:
Get-NetFirewallProfile | Select-Object Name, EnabledExplanation:
Get-NetFirewallProfileretrieves the firewall settings from the various profiles such as Domain, Private, and Public.Select-Object Name, Enabledextracts and displays the name and the enabled status of each firewall profile.
Example Output:
Name                  Enabled
----                  -------
Domain                True
Private               True
Public                True
In this output:
- Domain indicates the firewall status when connected to a domain network.
- Private reflects the settings when connected to a trusted private network.
- Public shows the firewall status for connections where the device is not recognized as secure or trusted.
Understanding the Output
- If any of the profiles show
Trueunder the Enabled column, the corresponding Windows Firewall is currently active for that profile. - Conversely, if an entry displays
False, it indicates that the firewall is disabled for that profile.
Enabling/Disabling Windows Firewall using PowerShell
In addition to checking the status, you might need to enable or disable the Windows Firewall for a specific profile. This can easily be accomplished using PowerShell.
Enabling the Firewall
To enable the firewall for a specific profile (e.g., Public), execute the command:
Set-NetFirewallProfile -Profile Public -Enabled TrueDisabling the Firewall
To disable the firewall for a specific profile, use the command:
Set-NetFirewallProfile -Profile Public -Enabled FalseEnabling/Disabling All Profiles
To enable all firewall profiles at once, use:
Set-NetFirewallProfile -Enabled TrueAnd to disable all profiles, use:
Set-NetFirewallProfile -Enabled FalseVerifying the Changes
After making changes to the firewall settings, it’s good practice to verify the new configurations using the earlier command:
Get-NetFirewallProfile | Select-Object Name, EnabledThis ensures that your adjustments have taken effect.
Advanced Firewall Queries with PowerShell
Checking Specific Firewall Rules
PowerShell can also provide more detailed information about specific firewall rules. You can use the command:
Get-NetFirewallRule | Where-Object {$_.Enabled -eq 'True'}This command retrieves all enabled firewall rules, allowing you to analyze which specific traffic is being allowed or blocked.
Filtering by Profile
To see rules specific to a certain firewall profile, combine the commands as shown:
Get-NetFirewallRule -Profile Domain | Where-Object {$_.Enabled -eq 'True'}This command displays only the enabled rules for the Domain profile.
Exporting Firewall Configuration to a File
You may want to document your current firewall configuration. To export the existing firewall configuration to a text file, use:
Get-NetFirewallProfile | Export-Csv -Path "C:FirewallConfig.csv" -NoTypeInformationThis command exports the firewall settings to a CSV file, making it easier to review the configuration.
Troubleshooting the Windows Firewall
Common Issues
-
Firewall Not Responding: In some instances, the firewall might fail to respond or exhibit sluggish behavior.
-
Inability to Change Settings: If you encounter difficulties enabling or modifying firewall configurations, it could be due to insufficient permissions.
-
Firewall Disabled After Updates: Windows updates could inadvertently alter settings, leading to the firewall being disabled.
Troubleshooting Steps
-
Check Permissions: Ensure you’re running PowerShell as an administrator to have the necessary permissions for changes.
-
Network Location Awareness: Verify that Windows is correctly identifying your network. Issues can arise if your system misidentifies the network (e.g., identifying a home network as public).
-
Resetting Windows Firewall: If the firewall behaves unexpectedly, a reset to factory settings may rectify issues:
netsh advfirewall reset -
Review Windows Firewall logs: For deeper analysis, you can review the firewall logs, typically located in
%systemroot%System32LogFilesFirewall. -
Use the Windows Firewall Troubleshooter: Windows includes a built-in troubleshooter specifically for firewall issues, which can automatically detect and fix common problems.
Conclusion
Using PowerShell to check and manage the Windows Firewall is a powerful way to ensure that your system is protected against unwanted intrusion while allowing legitimate traffic. With PowerShell, administrators harness greater control over their systems to enhance security without a steep learning curve.
Regular checks on firewall configurations are crucial for maintaining security postures, especially in environments where system configurations frequently change. Ultimately, understanding how to enable, disable, and configure Windows Firewall is an essential skill for anyone committed to maintaining a secure computing environment.
As threats evolve and become more sophisticated, active vigilance in security practices becomes increasingly important. By incorporating PowerShell into your workflow, you strengthen your ability to manage, monitor and respond to potential threats efficiently.
In a world where cyberattacks are prevalent, taking control of your system’s firewall settings through PowerShell isn’t just advisable—it’s essential. Whether you are a system administrator, security officer, or an individual user, understanding and managing your firewall settings using PowerShell will play a significant role in your overall security strategy.
Securing your computer and network is of utmost importance in today’s digital landscape. One crucial aspect of computer security is ensuring that your Windows Firewall is enabled. But how can you easily check if it’s enabled without going through complex steps? The answer lies in utilizing Powershell, a powerful scripting language that can help you perform various tasks, including checking the status of your Windows Firewall.
Powershell provides a simple and efficient way to check if your Windows Firewall is enabled. By running a few lines of code, you can quickly determine whether your firewall is protecting your computer from potential threats. This saves you valuable time and ensures that your system remains secure. With the rise of cyberattacks and the importance of personal and business data, having a functional firewall is essential for safeguarding your digital assets.
To check if Windows Firewall is enabled using Powershell, follow these steps:
- Open Powershell by right-clicking the Start button and selecting Windows PowerShell (Admin).
- Type the following command and press Enter:
Get-NetFirewallProfile | Select-Object Name, Enabled - If the output displays «True» under the «Enabled» column for the profiles labeled «Domain», «Private», and «Public», then the Windows Firewall is enabled.

Why Checking if Windows Firewall Is Enabled with PowerShell is Important
Windows Firewall is an essential security feature that helps protect your computer from unauthorized network access and potential threats. It acts as a barrier between your computer and external networks, monitoring and controlling incoming and outgoing network traffic. Ensuring that Windows Firewall is enabled is crucial for maintaining the security of your system and preventing unauthorized access to your computer.
PowerShell, the powerful scripting language and automation framework from Microsoft, provides various commands and modules to manage and configure system settings. One useful feature of PowerShell is the ability to check the current status of Windows Firewall and determine whether it is enabled or disabled. This capability allows system administrators and users to ensure that the firewall is functioning correctly and taking the necessary steps to protect their systems.
In this article, we will explore different methods using PowerShell to check if Windows Firewall is enabled. We will cover both local and remote scenarios, providing step-by-step instructions to execute the commands and obtain the desired information. Whether you are a system administrator managing multiple computers or an individual user concerned about the security of your own system, PowerShell can assist you in checking the status of Windows Firewall.
Now, let’s dive into the different approaches and commands you can use to check if Windows Firewall is enabled using PowerShell.
Checking Windows Firewall Status Locally
When working on the local computer, you can easily use PowerShell commands to check the status of Windows Firewall. Follow the steps below to execute the necessary commands and obtain the required information:
Step 1: Open PowerShell
First, you need to open PowerShell on your local computer. You can do this by searching for «PowerShell» in the Windows Start menu and selecting the «Windows PowerShell» or «PowerShell» application.
Step 2: Run the PowerShell Command
Once you have PowerShell open, you can execute the following command to check the status of Windows Firewall:
Get-NetFirewallProfileThis command retrieves the current configuration details of the firewall profile(s) on the local computer. It provides information about the firewall state, such as whether it is on or off, as well as other settings related to the profile.
Step 3: Interpret the Output
After running the command, you will see the output containing information about the firewall profiles. Look for the «Enabled» property to determine the status of each profile. If the value is «False,» it means the corresponding firewall profile is disabled. If the value is «True,» it means the profile is enabled.
Note that there are different firewall profiles for different network types (Domain, Private, and Public). You will typically see the statuses of each profile listed separately in the output.
By following these steps, you can easily check if Windows Firewall is enabled or disabled on your local computer using PowerShell.
Additional Details: Checking Specific Firewall Profiles
If you are interested in checking the status of a specific firewall profile, you can use the following command:
Get-NetFirewallProfile -ProfileName <ProfileName>In this command, replace «<ProfileName>» with the name of the firewall profile you want to check (e.g., «Domain,» «Private,» or «Public»). This command will return the specific profile’s details, including its status.
Using these additional details, you can gain more granular information about the specific firewall profiles you are interested in.
Checking Windows Firewall Status Remotely
In addition to checking Windows Firewall status on the local computer, PowerShell also allows you to check the firewall status on remote computers within your network. This capability is especially useful for system administrators who manage multiple computers. The following steps outline how to check the firewall status remotely using PowerShell:
Step 1: Open PowerShell
Similar to the previous section, you need to open PowerShell on your local computer.
Step 2: Run the PowerShell Command
Once PowerShell is opened, you can execute the following command to check the status of Windows Firewall on a remote computer:
Invoke-Command -ComputerName <ComputerName> -ScriptBlock { Get-NetFirewallProfile }Replace «<ComputerName>» with the name or IP address of the remote computer you want to check. This command uses the «Invoke-Command» cmdlet to run the «Get-NetFirewallProfile» command on the specified remote computer and retrieve the firewall profile details.
Step 3: Interpret the Output
After running the command, you will receive the output containing the firewall profile information from the remote computer. Look for the «Enabled» property to determine the status of each profile, similar to the local scenario.
By following these steps, you can determine the status of Windows Firewall on remote computers using PowerShell.
Additional Details: Checking Specific Firewall Profiles Remotely
If you want to check a specific firewall profile’s status on a remote computer, you can modify the command as follows:
Invoke-Command -ComputerName <ComputerName> -ScriptBlock { Get-NetFirewallProfile -ProfileName <ProfileName> }Replace «<ProfileName>» with the name of the desired firewall profile (e.g., «Domain,» «Private,» or «Public»). This command will retrieve the specific firewall profile’s details from the remote computer.
Using these commands, you can remotely check the status of specific firewall profiles on multiple computers within your network.
Performing Regular Firewall Status Checks Using PowerShell
Now that you understand how to check the status of Windows Firewall using PowerShell, it is crucial to incorporate regular checks into your system administration or maintenance routines. Performing regular checks helps ensure that Windows Firewall is consistently enabled and protecting your system from potential threats.
You can easily schedule PowerShell scripts or commands to run at specific intervals using Task Scheduler or other automation tools. By automating the firewall status checks, you can save time and effort while maintaining the security of your systems.
Consider creating a PowerShell script that contains the necessary commands to check Windows Firewall status, either locally or remotely, and schedule it to run periodically. This way, you can receive notifications or log the results of each check, allowing you to monitor the status of Windows Firewall across your network effectively.
Remember to review the results of the firewall status checks regularly and take appropriate action if any issues or anomalies are detected. Promptly addressing any potential firewall-related concerns can help prevent security breaches and ensure the ongoing protection of your systems.
By following these best practices and incorporating regular checks into your system management routines, you can maintain a secure environment and ensure that Windows Firewall is always enabled and protecting your computer or network from threats.

Check if Windows Firewall is Enabled using PowerShell
Windows Firewall is an important security feature that helps protect your computer from unauthorized access and potential threats. To ensure that your Windows Firewall is enabled, you can use PowerShell, a powerful command-line tool available on Windows operating systems.
To check if the Windows Firewall is enabled using PowerShell, follow these steps:
- Open a PowerShell window by pressing the Windows key + X and selecting «Windows PowerShell».
- Type the following command and press Enter:
«Get-NetFirewallProfile | Select-Object Name, Enabled» - If the output displays «True» under the «Enabled» column for each firewall profile (Domain, Private, Public), it means that the Windows Firewall is enabled. Otherwise, if it displays «False» or shows «Enabled» only for specific profiles, the Windows Firewall may not be fully enabled.
- If your Windows Firewall is not enabled, you can enable it by typing the following command and pressing Enter:
«Set-NetFirewallProfile -Profile Domain,Public,Private -Enabled True»
By using PowerShell, you can easily check and enable the Windows Firewall to ensure the security of your computer and network.
Powershell Check if Windows Firewall Is Enabled — Key Takeaways
- Windows Firewall is a crucial security feature for protecting your computer from unauthorized access.
- Using Powershell, you can easily check if Windows Firewall is enabled on your system.
- Checking the status of Windows Firewall is important to ensure that your computer is protected.
- Executing a simple Powershell command can provide you with the information about the status of Windows Firewall.
- Regularly checking the status of Windows Firewall can help you identify any security vulnerabilities and take prompt action.
Frequently Asked Questions
Here are some common questions about checking if the Windows Firewall is enabled using PowerShell.
1. How do I check if the Windows Firewall is enabled using PowerShell?
To check if the Windows Firewall is enabled using PowerShell, you can use the following command:
Get-NetFirewallProfile | Select-Object Name,EnabledThis command will display the name of each firewall profile (Domain, Private, and Public) and whether they are enabled or not.
Please note that you need administrative privileges to run this command.
2. What do the different firewall profiles mean?
Windows Firewall has three different profiles:
— Domain Profile:
This profile is activated when your computer is connected to a domain network. It applies firewall rules specific to the domain.
— Private Profile:
This profile is activated when your computer is connected to a private network, such as a home or work network. It applies firewall rules specific to the private network.
— Public Profile:
This profile is activated when your computer is connected to a public network, such as a coffee shop or airport Wi-Fi. It applies firewall rules specific to the public network, which are more restrictive for security purposes.
3. How can I enable the Windows Firewall using PowerShell?
To enable the Windows Firewall using PowerShell, you can use the following command:
Set-NetFirewallProfile -Profile Domain,Private,Public -Enabled TrueThis command will enable all three firewall profiles (Domain, Private, and Public).
Please note that you need administrative privileges to run this command.
4. Can I check the Windows Firewall status on remote computers?
Yes, you can check the Windows Firewall status on remote computers using PowerShell.
You need to have administrative privileges on the remote computers and use the following command:
Invoke-Command -ComputerName <computer_name> -ScriptBlock { Get-NetFirewallProfile | Select-Object Name,Enabled }Replace «<computer_name>» with the actual name of the remote computer.
Please note that you need to have PowerShell remoting enabled on the remote computers for this command to work.
5. How can I disable the Windows Firewall using PowerShell?
To disable the Windows Firewall using PowerShell, you can use the following command:
Set-NetFirewallProfile -Profile Domain,Private,Public -Enabled FalseThis command will disable all three firewall profiles (Domain, Private, and Public).
Please note that you need administrative privileges to run this command.
In conclusion, PowerShell provides a simple and efficient way to check if the Windows Firewall is enabled on your system. By using the Get-NetFirewallProfile command, you can retrieve the status of the Domain, Private, and Public firewall profiles. This information is crucial for ensuring the security and protection of your computer.
With PowerShell, you can easily automate the process of checking the Windows Firewall status, allowing you to incorporate it into scripts or scheduled tasks. By regularly monitoring the firewall status, you can promptly take action if it is disabled, ensuring that your computer is safeguarded against unauthorized access and potential security threats.