
PowerShell
Welcome to the PowerShell GitHub Community!
PowerShell is a cross-platform (Windows, Linux, and macOS) automation and configuration tool/framework that works well with your existing tools and is optimized
for dealing with structured data (e.g. JSON, CSV, XML, etc.), REST APIs, and object models.
It includes a command-line shell, an associated scripting language, and a framework for processing cmdlets.
Windows PowerShell vs. PowerShell 7+
Although this repository started as a fork of the Windows PowerShell codebase, changes made in this repository are not ported back to Windows PowerShell 5.1.
This also means that issues tracked here are only for PowerShell 7.x and higher.
Windows PowerShell specific issues should be reported with the Feedback Hub app, by choosing «Apps > PowerShell» in the category.
New to PowerShell?
If you are new to PowerShell and want to learn more, we recommend reviewing the getting started documentation.
Get PowerShell
PowerShell is supported on Windows, macOS, and a variety of Linux platforms. For
more information, see Installing PowerShell.
Upgrading PowerShell
For best results when upgrading, you should use the same install method you used when you first
installed PowerShell. The update method is different for each platform and install method.
Community Dashboard
Dashboard with visualizations for community contributions and project status using PowerShell, Azure, and PowerBI.
For more information on how and why we built this dashboard, check out this blog post.
Discussions
GitHub Discussions is a feature to enable free and open discussions within the community
for topics that are not related to code, unlike issues.
This is an experiment we are trying in our repositories, to see if it helps move discussions out of issues so that issues remain actionable by the team or members of the community.
There should be no expectation that PowerShell team members are regular participants in these discussions.
Individual PowerShell team members may choose to participate in discussions, but the expectation is that community members help drive discussions so that team members
can focus on issues.
Create or join a discussion.
Chat
Want to chat with other members of the PowerShell community?
There are dozens of topic-specific channels on our community-driven PowerShell Virtual User Group, which you can join on:
- Gitter
- Discord
- IRC on Libera.Chat
- Slack
Building the Repository
| Linux | Windows | macOS |
|---|---|---|
| Instructions | Instructions | Instructions |
If you have any problems building, consult the developer FAQ.
Build status of nightly builds
| Azure CI (Windows) | Azure CI (Linux) | Azure CI (macOS) | CodeFactor Grade |
|---|---|---|---|
Downloading the Source Code
You can clone the repository:
git clone https://github.com/PowerShell/PowerShell.git
For more information, see working with the PowerShell repository.
Developing and Contributing
Please look into the Contribution Guide to know how to develop and contribute.
If you are developing .NET Core C# applications targeting PowerShell Core, check out our FAQ to learn more about the PowerShell SDK NuGet package.
Also, make sure to check out our PowerShell-RFC repository for request-for-comments (RFC) documents to submit and give comments on proposed and future designs.
Support
For support, see the Support Section.
Legal and Licensing
PowerShell is licensed under the MIT license.
Windows Docker Files and Images
License: By requesting and using the Container OS Image for Windows containers, you acknowledge, understand, and consent to the Supplemental License Terms available on Microsoft Artifact Registry.
Telemetry
Please visit our about_Telemetry
topic to read details about telemetry gathered by PowerShell.
Governance
The governance policy for the PowerShell project is described the PowerShell Governance document.
Code of Conduct
Please see our Code of Conduct before participating in this project.
Security Policy
For any security issues, please see our Security Policy.
Provide feedback
Saved searches
Use saved searches to filter your results more quickly
Sign up
Git is a popular distributed version control system used by developers around the world to manage code repositories. If you’re new to Git and want to get started, this guide will help you with the initial setup and introduce you to the basics of setting up SSH keys, and cloning your first repository using PowerShell.
This guide will cover:
- Installing Git
- Creating and using SSH Keys
- Cloning your first Git project
- Uploading files to your GitHub Project
Prerequisites
- PowerShell
- GitHub account
- (Preferably Windows 11)
Installing Git
To begin using Git on your Windows 11 or Windows 10 device, the first step is to install it. Luckily, this can be easily done directly in PowerShell using the Windows Package Manager CLI, also known as “winget.” This method is only available on devices running Windows 10 1709 (build 16299) or later, so make sure your device meets this requirement before proceeding. If are not running Windows 11 or Windows 10 1709 (build 16299) or later, Git can be downloaded and installed manually from here.
To install Git with winget, open PowerShell and run the following command:
winget install --id Git.Git -e --source wingetBy using this command your installation will commence as shown:
Found Git [Git.Git] Version 2.39.2
This application is licensed to you by its owner.
Microsoft is not responsible for, nor does it grant any licenses to, third-party packages.
Downloading https://github.com/git-for-windows/git/releases/download/v2.39.2.windows.1/Git-2.39.2-64-bit.exe
  ██████████████████████████████  50.5 MB / 50.5 MB
Successfully verified installer hash
Starting package install...
Successfully installed
After installing Git, you must restart your PowerShell to activate the installation. Next, you’ll need to set up SSH keys to start using Git with GitHub.
Setting up SSH Keys
If you’re new to Git and GitHub, you might be wondering what SSH keys are and why they’re important. Simply put, SSH keys are a way to securely connect to GitHub without having to enter your username and password every time. This is one of the most common ways of interacting with Git and this section will walk you through the setup phase. To learn more about SSH and its function in Git, look here.
Step 1: Check for Existing Keys
Before we begin, we need to check if you already have an SSH key. Open PowerShell and run the following command:
ls ~/.ssh/If you see a file named “id_<encryption>.pub", you already have an SSH key pair and you can move on to step 3. If not, move on to step 2
Step 2: Generate a New SSH Key Pair
To generate a new SSH key pair, run the following command:
ssh-keygen -t ed25519 -C "your_email@example.com"Note: the encryption method chosen is ed25519 for this example, but others exist, for more look here
This will generate a new SSH key pair and prompt you to enter a passphrase. The passphrase is an extra layer of security that protects your private key. You can leave it blank if you prefer, but we recommend adding one.
Generating public/private ed25519 key pair.
Enter file in which to save the key (C:\Users\AmBroke/.ssh/id_ed25519):
Enter passphrase (empty for no passphrase):
Enter same passphrase again:
Your identification has been saved in C:\Users\AmBroke/.ssh/id_ed25519
Your public key has been saved in C:\Users\AmBroke/.ssh/id_ed25519.pub
The key fingerprint is:
SHA256:zWCsZggEKolO0r2HLHmJ3/J6TvZsr9G5QhfPdJOiz20 db@mindcore.dk
The key's randomart image is:
+--[ED25519 256]--+
|...              |
|o+ .   .         |
|*.o .   +      . |
|=  = = o +. o +  |
| .+ B = S o* o . |
|   + =  ..o.o    |
|    o +...oo .   |
|     =.oo. .o E  |
|    .+o.++o  .   |
+----[SHA256]-----+
With this complete, you have just created your first SSH Key-set! Now we can start using it to connect with GitHub.
Step 3: Add Your Public Key to GitHub
Now that you’ve generated an SSH key pair, it’s time to add your public key to GitHub. To do so you must first find and open your public key. Assuming you used the default save file, use the “Get-Content” command as shown below.
Get-Content C:\Users\$env:UserName\.ssh\id_ed25519.pubBy running this command your public key shows up in the terminal, in my case:
ssh-ed25519 AAAAC3NzaC1lZDI1NTE5AAAAIPzcjXIWSUXpi8kFocFDqJNteKKAC0dbGrs3IbRVI5fU db@mindcore.dkNote: Make sure to never share your private key with anyone!
To add this key, go to your GitHub account settings and click on “SSH and GPG keys”. Then, click on “New SSH Key”. If you are already logged in on GitHub, simply click here.

Then give the key a title, in this case “Mindcore Blog”, usually you would name it after your device, to make the key identifiable for you later, and insert your key in the Key field and press “Add SSH key”.

With your Key added, go back into the “SSH and GPG keys” section (here) and you should see your new key added.
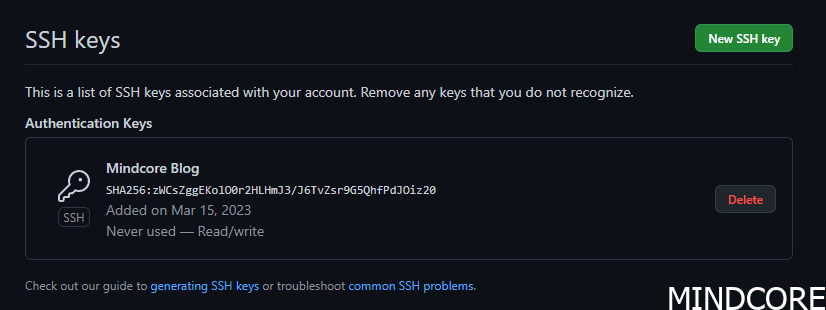
If it looks like this, then you have sucsessfully added your SSH key to GitHub, and you can now start using GitHub in earnest.
Creating & Cloning Your First Repository to Github
With your SSH setup in hand, navigate on GitHub the plus (+) button in the top-right corner of the screen. Select “New repository” from the dropdown menu.

Give your repository a name and a brief description. You can choose to make it either public or private. A public repository is visible to anyone, while a private repository is only visible to you and those you grant access to.
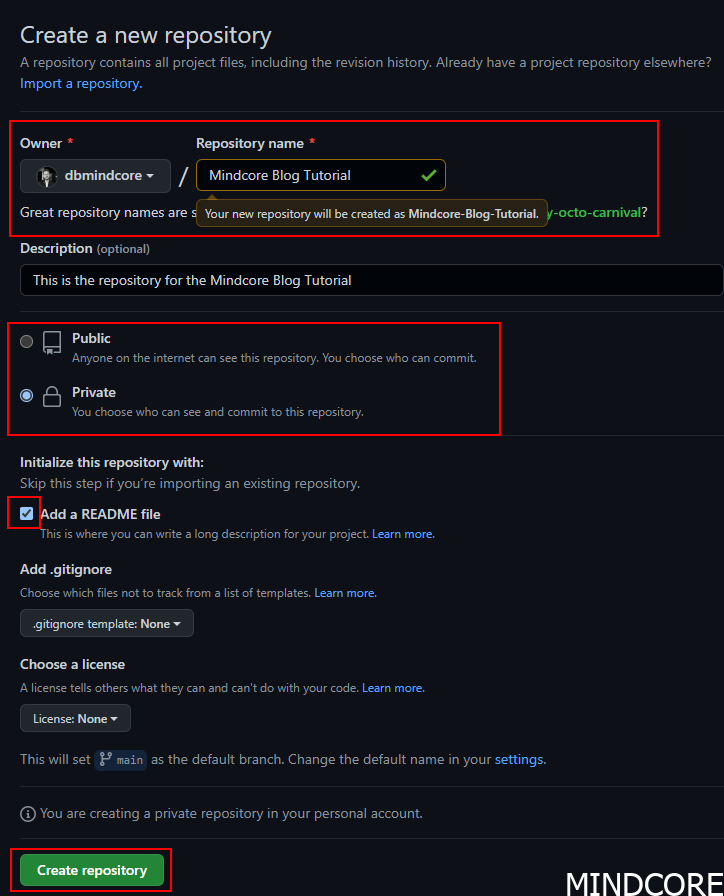
In this example, the name is “Mindcore Blog Tutorial” which is automatically connected with Dashes (-) due to git convention. Secondly, the repository is set to private. Finally a README file is added, which we will use later.
Now that you’ve created a new repository, let’s clone it to your local machine using PowerShell. Navigate to the directory where you want to clone the repository using the “cd” command. For example, if you want to clone it to your “Documents” folder, enter:
cd ~\DocumentsCopy the SSH address of the repository you just created by clicking on the green “Code” button on the repository’s home page and selecting “SSH” from the dropdown menu.

In PowerShell, clone the repository using the following command, replacing the git@github.com part with your reposity:
git clone git@github.com:dbmindcore/Mindcore-Blog-Tutorial.gitThis will promp you to accept the ED25519 key fingerprint from github, simply type “yes” and the repository is cloned to your computer like as shown below:
Cloning into 'Mindcore-Blog-Tutorial'...
The authenticity of host 'github.com (140.82.121.4)' can't be established.
ED25519 key fingerprint is SHA256:+DiY3wvvV6TuJJhbpZisF/zLDA0zPMSvHdkr4UvCOqU.
This key is not known by any other names.
Are you sure you want to continue connecting (yes/no/[fingerprint])? yes
Warning: Permanently added 'github.com' (ED25519) to the list of known hosts.
remote: Enumerating objects: 3, done.
remote: Counting objects: 100% (3/3), done.
remote: Compressing objects: 100% (2/2), done.
remote: Total 3 (delta 0), reused 0 (delta 0), pack-reused 0
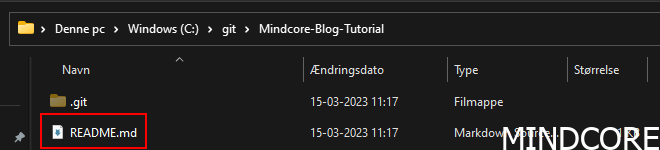
Receiving objects: 100% (3/3), done.To view your newly cloned GitHub repository either cd into it in powershell, or simply open it in File Explorer, where a README.md file is waiting for you as shown below:

Congratulations! You’ve successfully created and cloned your first GitHub repository using PowerShell, now lets start pushing files to it!
Pushing Files to Your GitHub Repository
Now that you have the repository cloned to your local machine, you can make changes to the code. In this example, we will take the README.md file. If you did not make one, simply create a README.md file in your repository folder. If you want to learn the basiscs of Markdown and why we use it in Git, click here.
In this example i use Visual Studio Code to open up the file, but something as simple as notepad would also work inserting the following Markdown:
## Want to Learn More About Markdown?
Check out [This Page](https://blog.mindcore.dk/2023/03/write-smarter-not-harder-a-beginners-guide-to-markdown/)
As shown in Visual Studio Code at line 4/5 the bottom i have added the text:

Before pushing your changes to the repository you’ll need to configure Git with your username and email address so that Git can properly attribute your commits. To do this, open up a terminal window and run the following commands with your own email and name:
git config --global user.email "you@example.com"
git config --global user.name "Your Name"
Once you’ve made your changes and configured your Git, you’ll need to add and commit them to the local repository. To add a specific like the README.md file use the command below:
git add .\README.mdIt is also possible to add all changes using “git add .”, however this can lead to merge conflicts and other complications to be disucssed in future blogposts. For now simply add the README.md file.
Next, commit the changes using the following command:
git commit -m "Commit message here"
Replace “Commit message here” with a brief description of the changes you’ve made.
Finally, you’re ready to push your changes to the remote repository. Use the following command to push your changes:
git pushThis will push your changes to the repository, and look simmilar to the following in your terminal:
git push
Enumerating objects: 5, done.
Counting objects: 100% (5/5), done.
Delta compression using up to 12 threads
Compressing objects: 100% (2/2), done.
Writing objects: 100% (3/3), 441 bytes | 441.00 KiB/s, done.
Total 3 (delta 0), reused 0 (delta 0), pack-reused 0
To github.com:dbmindcore/Mindcore-Blog-Tutorial.git
   08c86f7..7df74be  main -> main
Now look on your Github repository and you will see the changes you have made pushed as shown below:

Congratulations! You’ve successfully pushed your changes to a Git repository using PowerShell and SSH.
Conclusion
In conclusion, Git and GitHub can be powerful tools for managing your code and collaborating with others. By installing Git, creating and using SSH keys, cloning your first Git project, and uploading / update files to your GitHub project, you now have a solid foundation for using Git and GitHub to manage your code. Whether you are working on a small personal project or a large team project, Git and GitHub provide a streamlined and efficient way to manage your code changes and collaborate with others. With the knowledge and skills you have gained from this tutorial, you are now ready to start using Git and GitHub to manage your code and take your projects to the next level. So get out there, start collaborating, and happy coding!
Время на прочтение6 мин
Количество просмотров84K

Если ваш проект хранится только у вас на диске, то с поломкой диска вас ожидают неприятности. Даже регулярный бэкап не всегда сможет вас спасти.
Некоторые разработчики могут наворотить в проекте столько всего, что сами в шоке. А вспомнить, что и где делалось, затруднительно. Та еще неприятность.
Система контроля версий поможет вам избежать этих проблем. В случае необходимости можно совершить восстановление или откат изменений. Просмотреть и подтвердить или отменить правки. Ну а командная работа без системы контроля версий просто немыслима.
Если вы вдруг не знакомы, то я хочу немного познакомить вас с системой управления версиями по имени Git. Под катом вас ожидает описание того, как использовать GitHub вместе с Visual Studio.
Актуальное расширение называется GitHub Extension for Visual Studio. Оно подходит для Visual Studio 2015 и выше. Скачать vsix можно с github странички или с Visual Studio gallery.
Установить расширение можно и при установке Visual Studio:
Перед тем как продолжить, нужно выучить немного терминов. Если вы их знаете, то проматывайте вниз.
Push – отправка изменений из локального репозитория в удаленный репозиторий (в нашем случае он будет расположен на GitHub).
Fetch – получение изменений из удаленного репозитория для сравнения и возможного последующего слияния.
Merge – слияние. Применение изменений совершенных в другом репозитории текущим репозиторием. Что-то вроде объединения двух репозиториев.
Pull – комбинация fetching и merging. Сперва из удаленного репозитория получается список изменений, а затем изменения применяются к текущему репозиторию.
То есть, если кто-то кроме вас поработал и совершил изменения в репозитории GitHub, то вы можете последовательно совершить 2 действия: Fetch, а затем Merge. Или же вы можете сразу выполнить Pull. После этого в вашем локальном репозитории отобразятся совершенные изменения.
После установки GitHub Extension for Visual Studio, панель Team Explorer будет выглядеть так:
Если панель Team Explorer скрыта, то отобразить ее можно через меню «View» / «Вид». Подключившись к GitHub (нажав Connect… и введя логин с паролем) получим возможность склонировать репозиторий GitHub или создать новый (кнопочки Clone и Create):
При клонировании будут выведен список репозиториев к которым у вас есть доступ:
При создании репозитория, вы сможете ввести его название, описание и выбрать лицензию, в соответствии с которой разрешено использование кода:
В данном случае Git ignore содержит предустановки для проектов различного типа. А так этот файлик формата .gitignore предназначен для того, чтобы указать в нем какие директории и файлы требуется исключить из системы управления версиями.
На случай, если вы хотите очень хорошо спрятать от посторонних глаз
котлету
репозиторий, то вы можете пометить его как Private. Но для этого нужна платная подписка.
Для студентов GitHub предлагает специальное предложение — Student Developer Pack, которое в частности включает в себя бесплатное неограниченное количество приватных репозиториев.
После создания репозитория необходимо создать проект. Лично я предпочитаю наоборот, сначала создать проект и только затем его добавить в Git. Можно при создании проекта создать и репозиторий Git. Для этого достаточно поставить галочку.

Если эту галочку при создании проекта не поставить, а просто открыть проект в VS, то в меню Файл станет доступен пункт «Add to Source Control» / «Добавить в систему управления версиями»
После его нажатия, проект будет добавлен в систему управления версиями Git, и внутри папки с проектом будет создана локальная папка .git. В Team Explorer это будет выглядеть так:
Переключившись между Team Explorer и Solution Explorer можем совершить какие-то изменения в проекте. После любых изменений можно совершить коммит — своеобразную точку восстановления. Для этого вернемся в Team Explorer, в меню которого имеется кнопка с нарисованным на ней домиком. Нажатие на нее приведет вас в главное меню:
Кнопка «Changes» / «Изменения» позволит зафиксировать изменения (при этом обязательно необходимо указать комментарий с описанием изменений). Но все действия пока что будут совершены только с локальным репозиторием git.
При создании проекта иногда создается так называемый «Initial commit», в котором пишется что-то вроде «Проект был создан за три дня». Если вы только что создали проект, то изменений в нем пока что еще нет. А если изменений нет, то коммит создать не получится. Я добавлял строку с текстом, поэтому в комментарии постарался описать это коротко, но понятно:
Можно просмотреть совершенные изменения. Для этого на интересующем нас файле нужно вызвать контекстное меню и выбрать «Compare with Unmodified…» / «Сравнить с неизмененной…»
Получим примерно такое вот сравнение:

В данном случае было добавлено всего 2 строки кода. Через то же самое контекстное меню все изменения, произошедшие со времени последнего коммита можно отменить. Очень удобная фича.
Теперь, давайте, опять перейдем в главное меню, нажав домик. Для того чтобы отправить изменения на GitHub необходимо нажать кнопку «Sync» / «Синхронизация».
Так как наш проект еще не был опубликован на GitHub, то нам предложат это сделать:
Кстати, .git вполне можно опубликовать не только на GitHub, но и на Visual Studio Team Services.
Если мы публиковали проект ранее, то в списке исходящих фиксаций будет расположен наш коммит:
Нажатие Push приведет к отправке изменений в репозиторий, расположенный на сервере GitHub.
Совершив для пробы некоторые изменения прямо через браузер в репозитории, расположенном на GitHub (да, так тоже можно), я снова зашел в синхронизацию и нажал Fetch:
Здесь двойным кликом можно открыть информацию о коммите:
И кликнув уже на файл просмотреть изменения:

В том же самом окне синхронизации можно просмотреть историю:
Историю можно просматривать в простом представлении и в подробном:


Теперь, давайте представим, что мы работаем в команде и кто-то другой уже совершил какие-то изменения в своем локальном репозитории и отправил из в GitHub. И вы тоже совершили изменения в том же самом файле и в той же самой строке. В таком случае при синхронизации с GitHub у вас возникнет конфликт:
Кликнув на Conflicts получим такое вот окошко в котором после клика на файле откроется меню с кнопкой Merge:
Теперь мы может ставя галочки выбрать изменения, которые мы хотим оставить в окончательной версии. Окончательная версия на следующем скриншоте отображена внизу. Код в ней тоже можно править:

После внесения изменения нужно нажать Accept Merge (в верхнем левом углу), после чего сделать коммит:
Страничка самого расширения на GitHub: github.com/github/visualstudio
Github Desktop и PowerShell environment for Git
Github Desktop — утилита совершенно независимая и с Visual Studio никак не связанная. Скачать можно здесь.

Утилита доступна для пользователей Mac и Windows. Вместе с ней устанавливается и командная строка Git Shell. Фактически это PowerShell с набором скриптов для интеграции с Git. Называется PowerShell environment for Git. Сокращенно posh-git.
На GitHub страничке проекта posh-git можно найти краткую инструкцию о том, как установить командную строку posh для git вручную.
Интерфейс самой утилиты и работу с ней я рассматривать не буду. Думаю, что он не сложный и с ним вы сможете разобраться сами. Давайте лучше немного поиграем с командной строкой. В отличие от GUI командная строка, как правило, предоставляет гораздо больше возможностей. Но мы рассмотрим только основные команды.
Чтобы просмотреть текущую конфигурацию и убедится, что Git присутствует, можно выполнить команду:
git config –list
Для того чтобы склонировать репозиторий достаточно выполнить команду git clone. Например:
git clone https://github.com/programmersommer/Barcode_Scanner_UWP.git BarcodeScanner
После выполнения этой команды, в текущей директории появится папка с проектом. Кроме http:// и https:// поддерживаются и протоколы SSH и git://. Если перейти в папку с проектом с помощью команды cd (в случае примера cd BarcodeScanner), то командная строка преобразится:

Строка статуса PowerShell отобразит текст posh~git, что обозначает, что вы попали в среду PowerShell для Git. Можно выполнить команду git status, чтобы узнать, не требуется ли синхронизировать локальный репозиторий. Ответ может быть таким:

Самые популярные команды это те, которые мы уже рассматривали в рамках интерфейса расширения VS: git fetch, git merge, git push. Если вы зайдете в директорию (наименование PortableGit_xxx директории, я так полагаю, может быть несколько иным):
C:\Users\{user_name}\AppData\Local\GitHub\PortableGit_284a859b0e6deba86edc624fef1e4db2aa8241a9\usr\binто вы обнаружите в ней множество исполняемых файлов, которые эмулируют команды. Как уже было сказано, справкой git можно пользоваться, но, давайте опробуем несколько команд для примера.
Например, если в директории проекта появится новый файл, то команда git status выдаст:

А значит добавить файл нужно командой git add index.html. Теперь изменения нужно подтвердить с помощью git commit. Эта команда откроет текстовый редактор, который установлен по умолчанию. В нем необходимо в первую строку ввести текст, описывающий совершенные изменения. Если начать строку с символа #, то это будет комментарий. Комментарии можно оставить в строках ниже. Если не оставить никакого текста с описанием коммита, то коммит не произойдет. Можно указать текст коммита сразу в коммандной строке с помощью параметра –m. Например: git commit –m «File index.html added»

Теперь можно с помощью git push отправить изменения в GitHub репозиторий. Если это ваш репозиторий. Чужой репозиторий вы можете скопировать к себе, создав развилку/копию репозитория — Fork. Сделав какие-то изменения, вы сможете предложить их автору оригинального репозитория создав pull request.
На этом позвольте завершить описание возможностей работы с GitHub для пользователей Windows. Если хотите продолжить изучение, то на MVA вы можете посмотреть курс GitHub for Windows Users
Are you fed up with repeatedly performing the same GitHub tasks through the web interface? Or eyeing to kick your workflow a notch with automation? Lucky for you, the PowerShellForGitHub module is just around the corner to unlock PowerShell GitHub abilities!
In this tutorial, you’ll learn how to use PowerShell, the PowerShellForGitHub module for common GitHub operations, and more.
Level up your workflow effectively with automation today!
Prerequisites
This tutorial will be a hands-on demonstration. If you’d like to follow along, be sure you have the following:
- A GitHub account with a public repository.
- A GitHub personal access token (PAT).
- A computer with at least Windows PowerShell 5.1 or PowerShell 7.x installed – This tutorial uses PowerShell version 7.2.3.
Installing the PowerShellForGitHub Module
The PowerShellForGitHub module embraces the benefits of PowerShell to provide command-line interactions and automation for the GitHub API. The quickest way to install the PowerShellForGitHub module is to use the PowerShell Gallery within a PowerShell console.
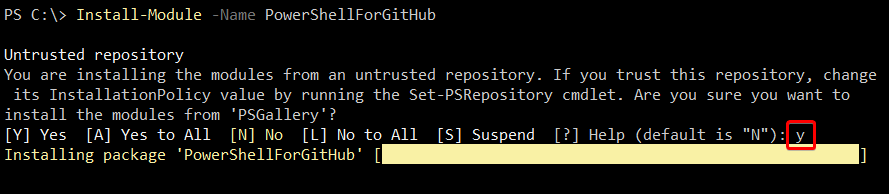
1. Open PowerShell as administrator, and run the Install-Module command below to install the PowerShellForGitHub module from the PowerShell Gallery.
Install-Module -Name PowerShellForGitHubType y and press Enter to continue the installation, as shown below.
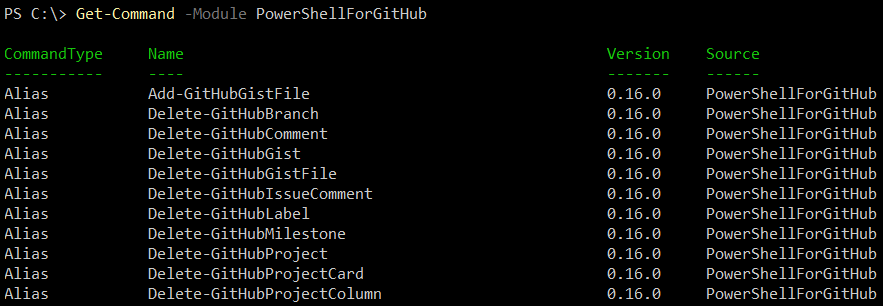
2. Now run the following Get-Command to verify if the module (-Module) is installed successfully. This command lists all cmdlets available for the PowerShellForGitHub module.
Get-Command -Module PowerShellForGitHubYou run Get-Command since Get-Module doesn’t provide an output for the PowerShellForGitHub module.
If you’ve installed the PowerShellForGitHub module successfully, you’ll get a long list of available cmdlets for the module, as shown below.
3. Lastly, run the following Set-GitHubAuthentication command to connect to your GitHub account.
You can enter anything as the username, which is required but will be ignored anyway. But be sure to enter your personal access token as the password.
After connecting successfully to GitHub, you can start using the cmdlets of the PowerShell GitHub module.

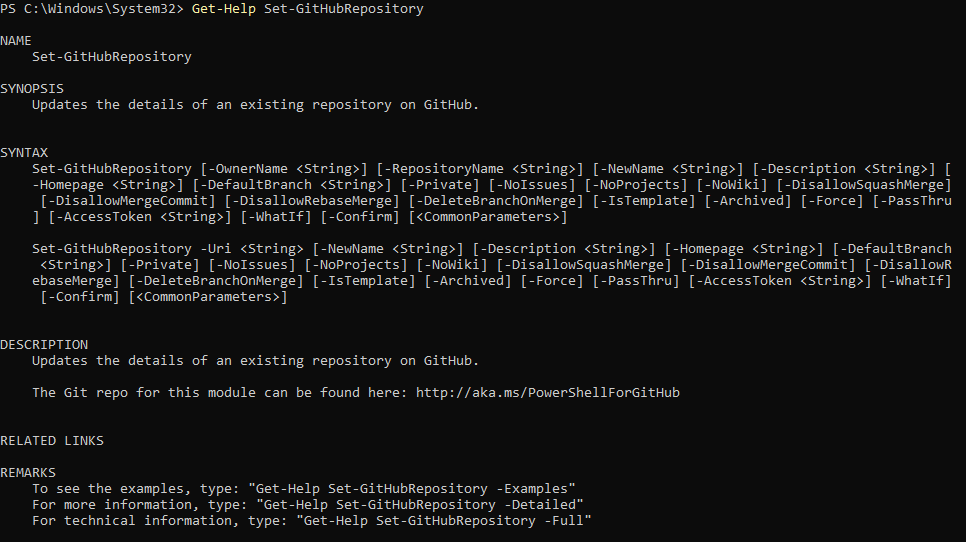
If you’re unsure how a PowerShellForGitHub module cmdlet works, run the Get-Help command followed by the cmdlet in question, as shown below: Get-Help Set-GitHubRepository
Creating GitHub Repositories with PowerShell Function
Now that the PowerShellForGitHub module is installed kick off this tutorial with one of the best things PowerShell GitHub can offer, creating your own tools! How? By creating PowerShell functions.
PowerShell functions allow you to organize scripts and promote the re-use of code, dramatically increasing the usability and readability of your code.
1. Create a PowerShell script file, add the code below to the file, change the values accordingly, and save the file as myscript.ps1.
The code below is a PowerShell function that performs the following:
- Create a repository (
New-GitHubRepository).
- Add a (help) file (
Set-GitHubContent), and create a commit (-CommitMessage).
- And optionally create a branch (New-GitHubRepositoryBranch).
Function CreateRepo {
    param ($Owner,$RepoName,$Branch,$HelpFilePath,$HelpFileContent,$FirstCommitMessage)
        # Creating a new repository
        New-GitHubRepository -RepositoryName $RepoName
        # Add a file and perform first commit
        Set-GitHubContent -OwnerName $Owner -RepositoryName $RepoName -Path $HelpFilePath -CommitMessage $FirstCommitMessage -Content $HelpFileContent -BranchName main
        # Add a branch if the 'Branch' parameter is specified
        If ($Branches) {
            New-GitHubRepositoryBranch -OwnerName $Owner -RepositoryName $RepoName -TargetBranchName $Branch
        }
}
# Call the CreateRepo function - Be sure to replace the values below accordingly
CreateRepo -Owner BTA1981 -RepoName Repo0007 -Branch develop -HelpFilePath README.md -HelpFileContent '# README' -FirstCommitMessage 'Adding README.md'
2. Now, run the script (myscript.ps1) and see how the function works.
After running the script, you’ll get an output of the name and visibility of the repository created by the script.
3. Lastly, open your favorite web browser, navigate to GitHub, and see the newly-created repository, as shown below.

Performing Queries and Creating Custom Reporting
Creating a GitHub repository by running a script is cool and all. But another cool use-case for combining PowerShell with GitHub is performing queries and creating custom reporting. How? By using the PowerShell GitHub pipeline.
With PowerShell pipeline, you can create powerful queries with just a little code and chaining commands together with the pipeline operator ‘|.’
Housekeeping within the GitHub repositories is crucial. And perhaps, you need more insight into repositories that haven’t been updated within a certain period.
1. Run the following command to get an overview of the GitHub repositories from the PowerShell team that haven’t been updated within the last year.
# - < WHAT DOES THIS COMMAND DO? >
# Get-GitHubRepository - Get all repositories from the owner PowerShell team.
# Where-Object - Where the repository isn't updated in the last year (Get-Date).
# Sort-Object - Sort results based on the last updated date/time.
# Select-Object - Show the full name and date/time when each repository was last updated
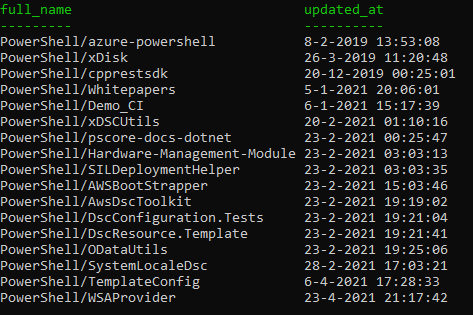
Get-GitHubRepository -OwnerName PowerShell |
Where-Object {$_.updated_at -lt (Get-Date).AddMonths(-12)} |
Sort-Object updated_at | Select-Object full_name,updated_atNotice how much the pipeline operator is used. Without the pipeline operator, you’ll need to create several variables to store data before you can use that data for another cmdlet.
Below, you can see the list of each repository that hasn’t been updated within the last year.
Your output isn’t limited to the PowerShell console only. You can also create a report of the output in a text or CSV file.
2. Now, run either of the commands below to fetch the list of GitHub repositories. But this time, no output is displayed on the console since the output is exported either to a text file (Out-File) or CSV file (Export-CSV).
Note that you can replace the file’s path and name (C:\Outdated.txt and C:\Outdated.csv) as you like.
# Export the output to the C:\Outdated.txt file
Get-GitHubRepository -OwnerName PowerShell |
Where-Object {$_.updated_at -lt (Get-Date).AddMonths(-12)} |
Sort-Object updated_at | Select-Object full_name,updated_at |
Out-File -FilePath C:\Outdated.txt

# Export the output to the C:\Outdated.csv file
Get-GitHubRepository -OwnerName PowerShell |
Where-Object {$_.updated_at -lt (Get-Date).AddMonths(-12)} |
Sort-Object updated_at | Select-Object full_name,updated_at |
Export-Csv -Path C:\Outdated.csv
3. Finally, run either of the Get-Content commands below to view the content of your report file, depending on which file type you used for creating the report.
Get-Content C:\Outdated.txt
Get-Content C:\Outdated.csv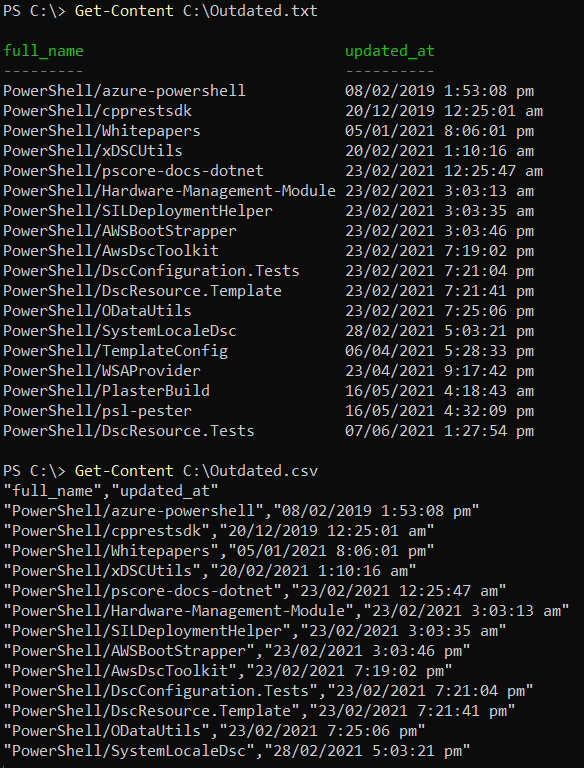
Performing Configuration Changes in Bulk
Typically, you must perform configuration changes in bulk, like changing multiple repository visibilities. Fortunately, the PowerShellForGithub module supports these kinds of changes.
Imagine you have a lot of GitHub repositories to manage, and you need to change all repositories starting with the name “REPO00” from public to private visibility.
Run the below command to perform the following:
- Lookup a user’s (
BTA1981) repositories with names starting withREPO00. - Change each matched repositories’ visibility to
-Private.
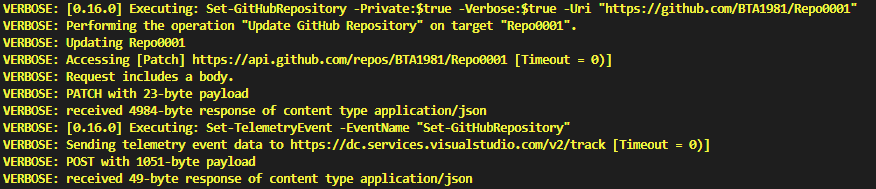
Get-GitHubRepository -OwnerName BTA1981 | Where-Object { $_.name -like "REPO00*" } |
Set-GitHubRepository -Private:$True -Verbose
As you can see below, adding the -Verbose parameter outputs detailed information about the operation done by the command.
Dealing with Repository Issues Automatically
Who doesn’t have repetitive and tedious tasks to perform when you spot a new issue or pull request? Why struggle? Let the PowerShellForGitHub module save the day.
1. Open your myscript.ps1 file, and replace the code with the one below, but be sure to change the values with your own.
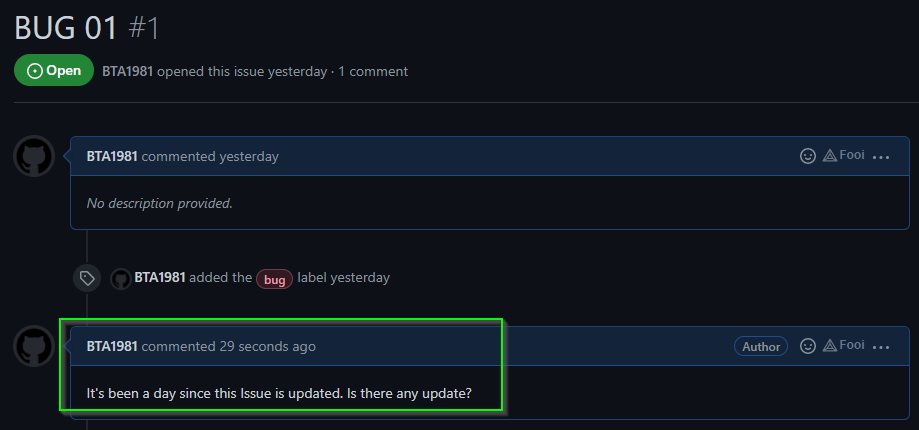
The code below comments on the most recent issue within a repository that hasn’t been recently updated.
# - < WHAT DOES THIS CODE DO? >
# Get-GitHubRepository - Get all the GitHub issues
# labeled (Get-GitHubIssue) as a bug from the specified repository.
# Where-Object - Where there hasn't been an update for a day (Get-Date).
# New-GitHubIssueComment - Add a custom GitHub issue comment
Get-GitHubRepository -OwnerName BTA1981 -RepositoryName Repo0001 | Get-GitHubIssue -label 'bug' |
Where-Object { $_.updated_at -lt (Get-Date).AddDays(-1)} |
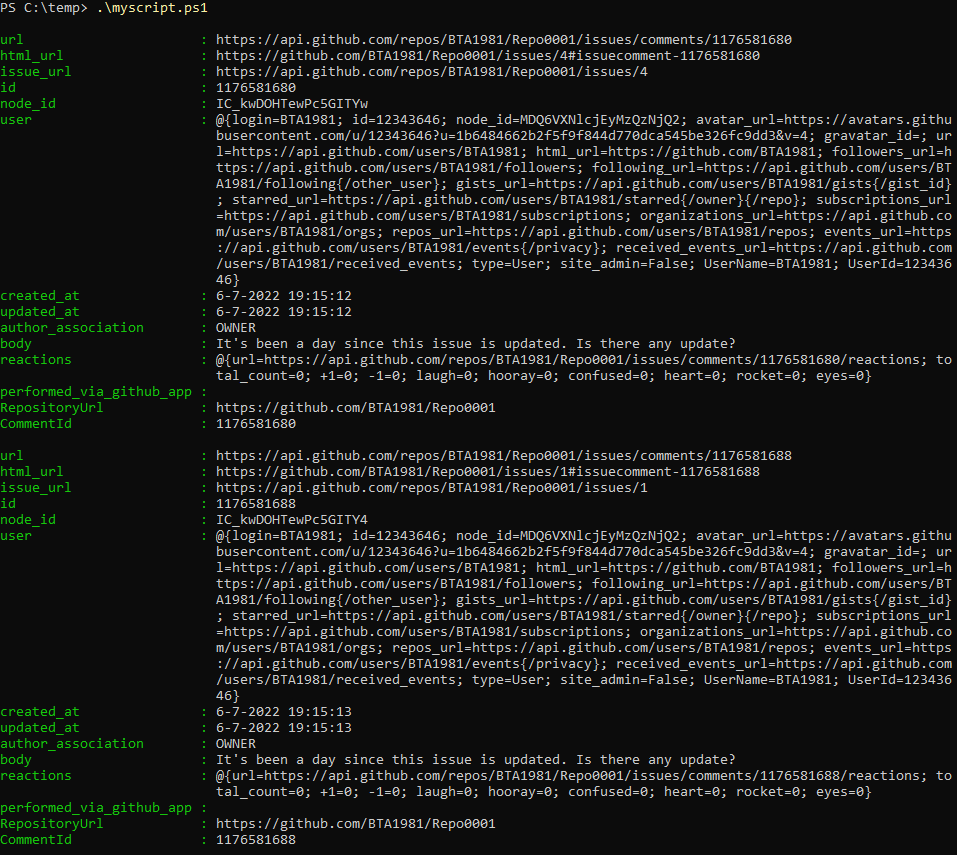
New-GitHubIssueComment -Body "It's been a day since this issue is updated. Is there any update?"2. After replacing the code, save the file, and run the script.
The output of the script will show details about each comment that’s being updated with a new comment with our script.
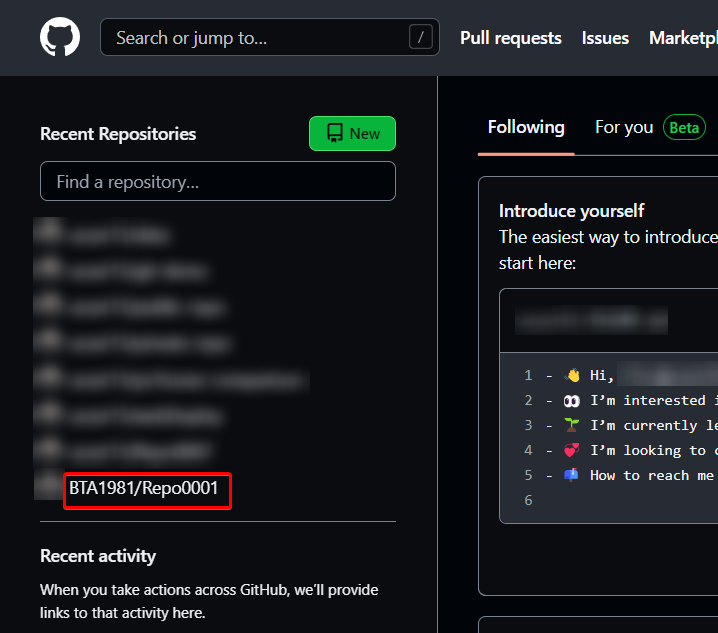
3. Navigate to GitHub on your browser, and click on the repository you specified (Repo0001) within the code.
4. Now, click on the Issues tab (top-left), and you’ll see an overview of the issues for the repository, as shown below.
Click on the Sort dropdown menu, choose the Recently updated option, and click on a BUG that hasn’t been updated in a day.
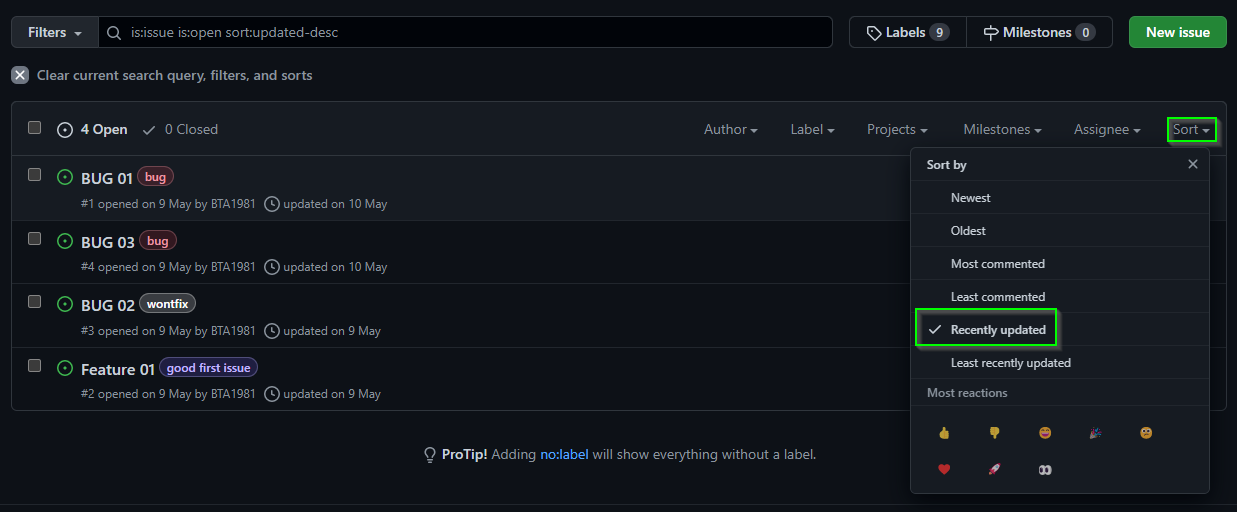
Below, you can see a new comment saying the issue hasn’t been updated.
5. Replace the content of your myscript.ps1 file with the code below, another example of eliminating repetitive tasks.
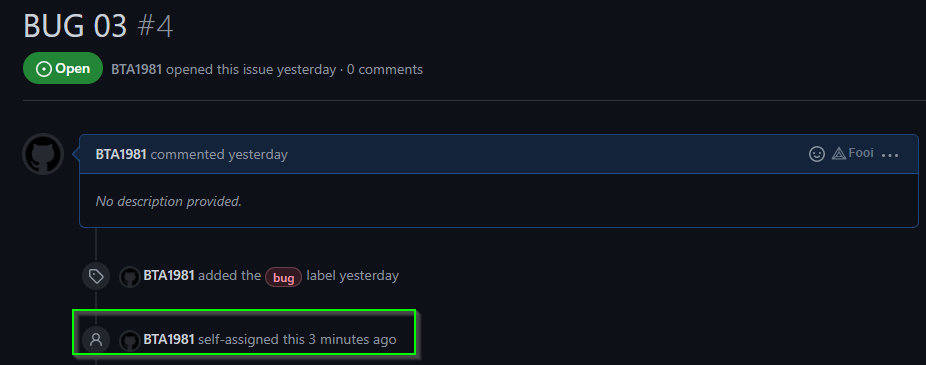
The code below automatically assigns a new GitHub issue to a user whenever there is a new issue for a specified repository.
# The GitHub username you want to assign the issue to.
$Assignee = 'bta1981'
# The account owner of the repository you want to assign an issue for.
$Owner = "BTA1981"
# The name of the repository that has the issue you want to assign.
$Repository = "Repo0001"

# - < WHAT DOES THIS COMMAND DO? >
# Get-GitHubRepository - Get the most recent GitHub issue (Get-GitHubIssue)
	# for the specified repository ($Repository)
# Add-GitHubAssignee - Assign a user to the most recent issue

$MostRecentIssue = Get-GitHubRepository -OwnerName $Owner -RepositoryName $Repository |
Get-GitHubIssue | Sort-Object -Descending -Property created_at | Select-Object -First 1 |
Add-GitHubAssignee -OwnerName $Owner -RepositoryName $Repository -Assignee $Assignee -Issue $MostRecentIssue.IssueNumber -Verbose
6. After replacing the code in your myscript.ps1 file, run the script.
The script immediately changes the assignment of the GitHub issue to the assignee (BTA1981) you’ve specified.
Because of the -Verbose parameter in the script, there’s detailed input being shown about the GitHub issue that’s being assigned by the script.

7. Finally, navigate to the most recent issue within the GitHub repository you specified (Repo0001) to verify that the script assigns the issue.
Creating Pull Requests for Multiple Repositories
Managing pull requests, especially if you have many repositories, can be a pain. But the good news is that managing pull requests is another feature of the PowerShellForGitHub module.
Note that you’ll be using PowerShell splatting on your code for better readability, bundling up the parameters you want to supply to command, and passing them in a table. PowerShell splatting is much better than writing one long line of code.
Open your myscript.ps1 file and replace the code with the one below. Be sure to change the values with your own, and save the changes.
The code below sends pull requests in repositories (repo0001, and repo0002), and merges the changes from the feature01 branch to the main branch.
# Create a hashtable with some variables
$prParams = @{
    OwnerName = 'bta1981'
    RepositoryName = "$repo"
    Title = 'Add simple file to root'
    # Head branch (containing the changes to be merged)
    Head = 'feature01'
    # Target branch of the pull request where the head changes will be merged.
    Base = 'main'
    Body = "Adds a simple text file to the repository root.`n`nThis is an automated PR!"
}

# Create a variable with an array that contains the repositories we want to target
$Repos = @('repo0001', 'repo0002')
# Go through all repositories and create the new pull requests
ForEach ($Repo in $Repos) {
    New-GitHubPullRequest @prParams
}
After changing the values in the script, save the changes and run the script.
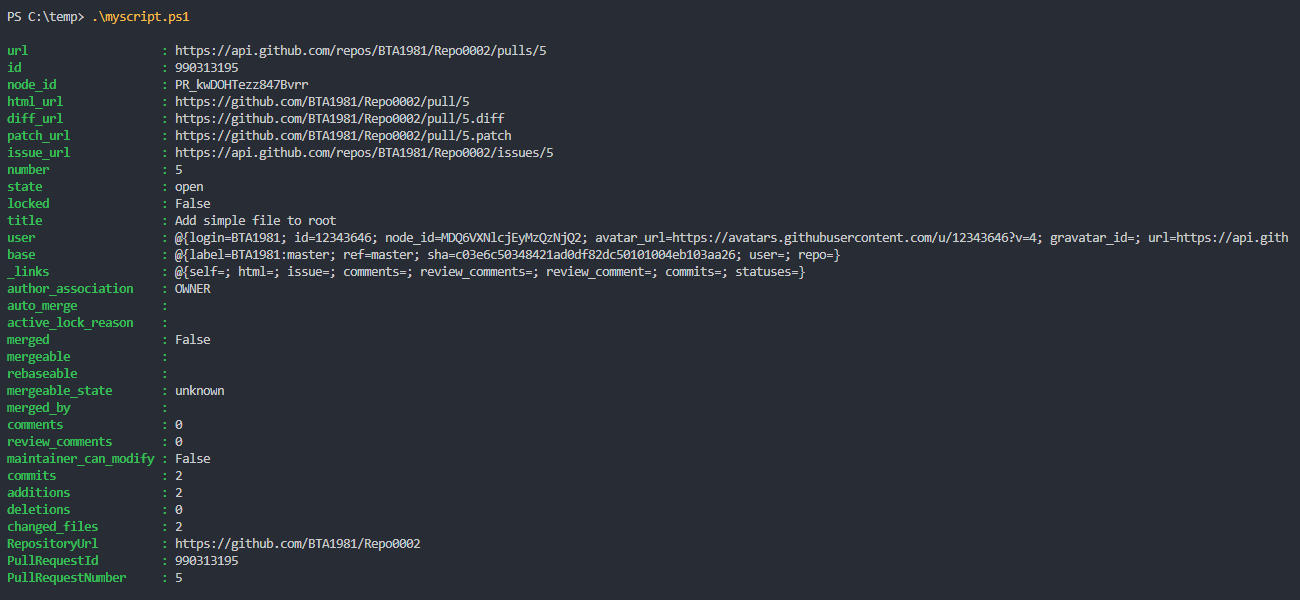
Now, navigate to the pull requests on GitHub. You’ll see a new pull request for the repositories you specified on your myscript.ps1 script.

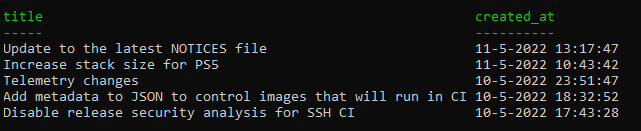
Alternatively, run the below command to get a better/plain insight into your pull requests sorted by age in -Descending order. The code below finds the five most recent (-first 5) pull requests within all repositories of the owner PowerShell that start with the name Power.
Get-GitHubRepository -OwnerName PowerShell | Where-Object { $_.name -like "Power*" } |
Get-GitHubPullRequest | Sort-Object created_at -Descending | Select-Object title,created_at -first 5
Conclusion
This tutorial aims to get you started using the PowerShellForGitHub module for automating common PowerShell GitHub operations. Did it go well?
You’ve learned about installing and making a connection with the PowerShellForGitHub module. And at this point, you can confidently manage your GitHub repositories locally and remotely so long as you have PowerShell and the PowerShellForGitHub module.
Now, look at your day-to-day GitHub workflow and try to incorporate and modify pieces of the examples you’ve learned in this tutorial. It’s time to take your PowerShell GitHub productivity to the next level!