
Для управления обновлениями Windows можно использовать PowerShell модуль PSWindowsUpdate. Модуль PSWindowsUpdate доступен для загрузки из PowerShell Gallery и позволяет администратору просканировать, скачать, установить, удалить или скрыть обновления на локальном или удаленных рабочих станциях и серверах Windows.
Содержание:
- Установка модуля управления обновлениями PSWindowsUpdate
- Сканировать и загрузить обновления Windows с помощью PowerShell
- Установка обновлений Windows с помощью команды Install-WindowsUpdate
- >Просмотр истории установленных обновлений в Windows
- Удаление обновлений в Windows с помощью PowerShell
- Скрыть ненужные обновления Windows с помощью PowerShell
- Управление обновлениями Windows на удаленных компьютерах через PowerShell
Установка модуля управления обновлениями PSWindowsUpdate
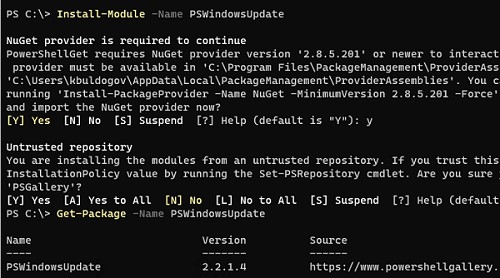
В современных версиях Windows 10/11 и Windows Server 2022/2019/2016 модуль PSWindowsUpdate можно установить из онлайн репозитория PowerShell Gallery с помощью команды:
Install-Module -Name PSWindowsUpdate
Подтвердите добавление репозитариев, нажав Y. Проверьте, что модуль управлениям обновлениями установлен в Windows:
Get-Package -Name PSWindowsUpdate
- В изолированной среде модуль PSWindowsUpdate можно установить в офлайн режиме;
- В старых версиях Windows для использования модуля нужно предварительно обновить версию PowerShell.
Можно удаленно установить PSWindowsUpdate на другие компьютеры в сети. Следующая команда скопирует файлы модуля на указанные компьютеры (для доступа к удаленным компьютерам используется WinRM).
$Targets = "srv1.winitpro.loc", "srv2.winitpro.loc"
Update-WUModule -ComputerName $Targets -local
Политика выполнения PowerShell скриптов в Windows по умолчанию блокирует запуск командлетов из сторонних модулей, в том числе PSWindowsUpdate. Чтобы разрешить запуск любых локальных скриптов, выполните команду:
Set-ExecutionPolicy –ExecutionPolicy RemoteSigned -force
Либо вы можете разрешить запускать команды модуля в текущей сессии PowerShell:
Set-ExecutionPolicy -ExecutionPolicy RemoteSigned -Scope Process
Импортируйте модуль в сессию PowerShell:
Import-Module PSWindowsUpdate
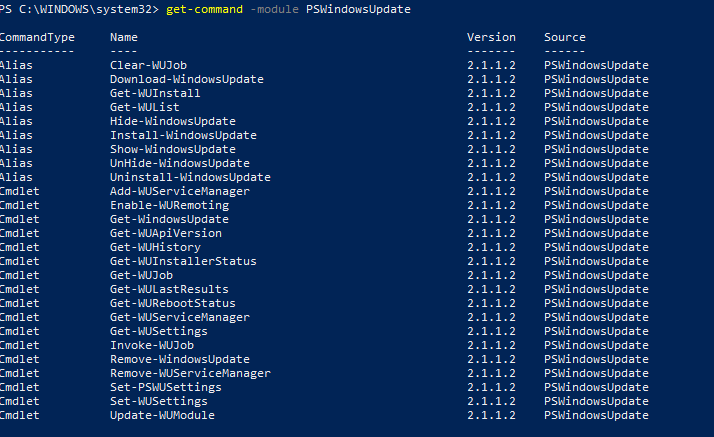
Выведите список доступных командлетов:
Get-command -module PSWindowsUpdate
Проверить текущие настройки клиента Windows Update:
Get-WUSettings
ComputerName : WKS22122 WUServer : http://MS-WSUS:8530 WUStatusServer : http://MS-WSUS:8530 AcceptTrustedPublisherCerts : 1 ElevateNonAdmins : 1 DoNotConnectToWindowsUpdateInternetLocations : 1 TargetGroupEnabled : 1 TargetGroup : WorkstationsProd NoAutoUpdate : 0 AUOptions : 3 - Notify before installation ScheduledInstallDay : 0 - Every Day ScheduledInstallTime : 3 UseWUServer : 1 AutoInstallMinorUpdates : 0 AlwaysAutoRebootAtScheduledTime : 0 DetectionFrequencyEnabled : 1 DetectionFrequency : 4
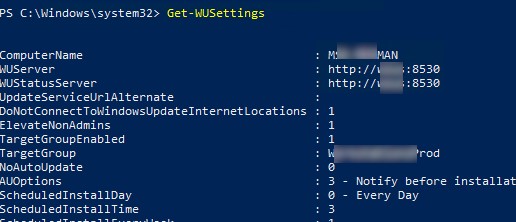
В данном примере клиент Windows Update на компьютере настроен с помощью GPO на получение обновлений с локального сервера обновлений WSUS.
Сканировать и загрузить обновления Windows с помощью PowerShell
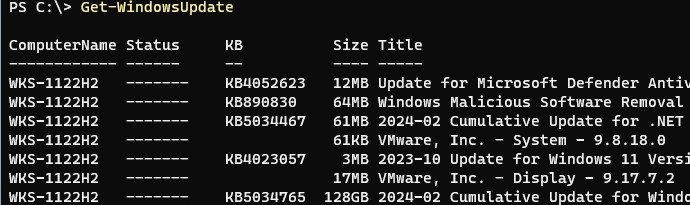
Чтобы просканировать компьютер на сервере обновлений и вывести список обновлений, которые ему требуется, выполните команду:
Get-WindowsUpdate
или
Get-WUList
Команда должна вывести список обновлений, которые нужно установить на вашем компьютере.
Команда Get-WindowsUpdate при первом запуске может вернуть ошибку:
Value does not fall within the expected range.

Для исправления ошибки нужно сбросить настройки агента Windows Update, перерегистрировать библиотеки и восстановить исходное состояние службы wususerv с помощью команды:
Reset-WUComponents -Verbose
Чтобы проверить, откуда получает ли Windows обновлений с серверов Windows Update в Интернете или локального WSUS, выполните команду:
Get-WUServiceManager

В этом примере вы видите, компьютер настроен на получение обновлений с локального сервера WSUS (Windows Server Update Service = True). В этом случае вы должны увидеть список обновлений, одобренных для вашего компьютера на WSUS.
Если вы хотите просканировать ваш компьютер на серверах Microsoft Update в Интернете (кроме обновлений Windows на этих серверах содержатся обновления Office и других продуктов), выполните команду:
Get-WUlist -MicrosoftUpdate
Вы получаете предупреждение:
Get-WUlist : Service Windows Update was not found on computer
Чтобы разрешить сканирование на Microsoft Update, выполните команду:
Add-WUServiceManager -ServiceID "7971f918-a847-4430-9279-4a52d1efe18d" -AddServiceFlag 7
Чтобы убрать определенные продукты или конкретные KB из списка обновлений, которые получает ваш компьютер, вы их можете исключить по:
- Категории (-NotCategory);
- Названию (-NotTitle);
- Номеру обновления (-NotKBArticleID).
Например, чтобы исключить из списка обновления драйверов, OneDrive, и одну конкретную KB:
Get-WUlist -NotCategory "Drivers" -NotTitle OneDrive -NotKBArticleID KB4533002
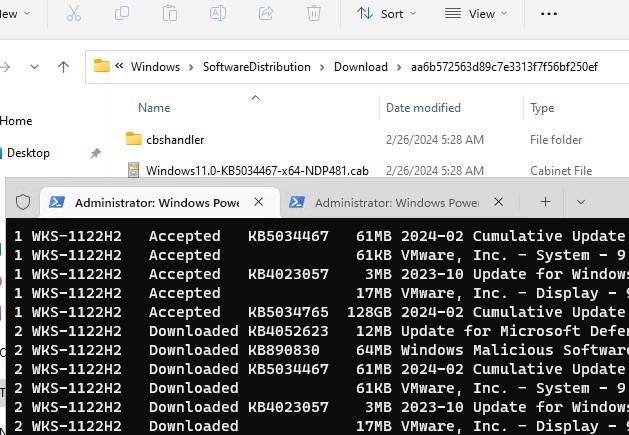
Скачать все доступные обновления на компьютер (обновления загружаются в локальный кэш обновлений в каталоге
C:\Windows\SoftwareDistribution\Download
).
Get-WindowsUpdate -Download -AcceptAll
Windows загрузит все доступные патчи сервера обновлений (MSU и CAB файлы) в локальный каталог обновлений, но не запустит их автоматическую установку.
Установка обновлений Windows с помощью команды Install-WindowsUpdate
Чтобы автоматически скачать и установить все доступные обновления для вашей версии Windows с серверов Windows Update (вместо локального WSUS), выполните:
Install-WindowsUpdate -MicrosoftUpdate -AcceptAll -AutoReboot
Ключ AcceptAll включает одобрение установки для всех пакетов, а AutoReboot разрешает автоматическую перезагрузку Windows после завершения установки обновлений.
Также можно использовать следующе параметры:
- IgnoreReboot – запретить автоматическую перезагрузку;
- ScheduleReboot – задать точное время перезагрузки компьютера.
Можете сохранить историю установки обновлений в лог файл (можно использовать вместо WindowsUpdate.log).
Install-WindowsUpdate -AcceptAll -Install -AutoReboot | Out-File "c:\$(get-date -f yyyy-MM-dd)-WindowsUpdate.log" -force
Можно установить только конкретные обновления по номерам KB:
Get-WindowsUpdate -KBArticleID KB2267602, KB4533002 -Install

Если вы хотите пропустить некоторые обновления при установке, выполните:
Install-WindowsUpdate -NotCategory "Drivers" -NotTitle OneDrive -NotKBArticleID KB4011670 -AcceptAll -IgnoreReboot
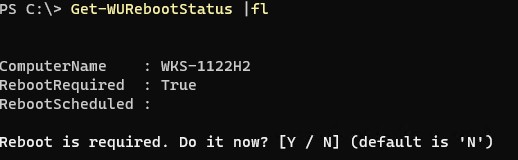
Проверить, нужна ли перезагрузка компьютеру после установки обновления (атрибуты RebootRequired и RebootScheduled):
Get-WURebootStatus
>Просмотр истории установленных обновлений в Windows
С помощью команды Get-WUHistory вы можете получить список обновлений, установленных на компьютере ранее автоматически или вручную.

Можно получить информацию о дате установки конкретного обновления:
Get-WUHistory| Where-Object {$_.Title -match "KB4517389"} | Select-Object *|ft

Вывести даты последнего сканирования и установки обновлении на компьютере:
Get-WULastResults |select LastSearchSuccessDate, LastInstallationSuccessDate

Удаление обновлений в Windows с помощью PowerShell
Для корректного удаления обновления Windows используется командлет Remove-WindowsUpdate. Вам достаточно указать номер KB в качестве аргумента параметра KBArticleID.
Remove-WindowsUpdate -KBArticleID KB4011634
Скрыть ненужные обновления Windows с помощью PowerShell
Вы можете скрыть определенные обновления, чтобы они никогда не устанавливались службой обновлений Windows Update на вашем компьютер (чаще всего скрывают обновления драйверов). Например, чтобы скрыть обновления KB2538243 и KB4524570, выполните такие команды:
$HideList = "KB2538243", "KB4524570"
Get-WindowsUpdate -KBArticleID $HideList -Hide
или используйте alias:
Hide-WindowsUpdate -KBArticleID $HideList -Verbose
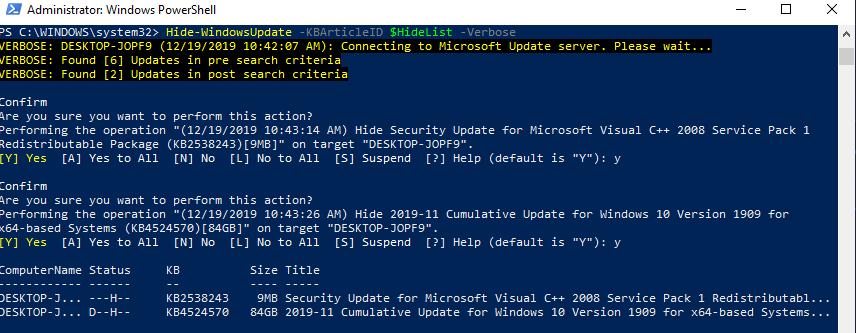
Теперь при следующем сканировании обновлений с помощью команды Get-WindowsUpdate скрытые обновления не будут отображаться в списке доступных для установки.
Вывести список скрытых обновлений:
Get-WindowsUpdate –IsHidden
Обратите внимание, что в колонке Status у скрытых обновлений появился атрибут H (Hidden).

Отменить скрытие обновлений можно так:
Get-WindowsUpdate -KBArticleID $HideList -WithHidden -Hide:$false
или так:
Show-WindowsUpdate -KBArticleID $HideList
Управление обновлениями Windows на удаленных компьютерах через PowerShell
Практически все командлеты модуля PSWindowsUpdate позволяют управлять обновлеями на удаленных компьютерах. Для этого используется атрибут
-Computername Host1, Host2, Host3
. На удаленных компьютерах должен быть включен и настроен WinRM (вручную или через GPO). Модуль PSWindowsUpdate можно использовать для удаленного управлений обновлениями Windows как на компьютерах в домене AD, так и в рабочей группе (потребует определенной настройки PowerShell Remoting).
Для удаленного управления обновлениями компьютерах, нужно добавить имена компьютеров доверенных хостов winrm, или настроить удаленное управление PSRemoting через WinRM HTTPS:
winrm set winrm/config/client ‘@{TrustedHosts="HOST1,HOST2,…"}’
Или с помощью PowerShell:
Set-Item wsman:\localhost\client\TrustedHosts -Value wsk-w10BO1 -Force
С помощью Invoke-Command можно разрешить использовать модуль PSWindowsUpdate на удаленных компьютерах и открыть необходимые порты в Windows Defender Firewall (команда
Enable-WURemoting
):
Invoke-Command -ComputerName $computer -ScriptBlock {Set-ExecutionPolicy RemoteSigned -force }
Invoke-Command -ComputerName $computer -ScriptBlock {Import-Module PSWindowsUpdate; Enable-WURemoting}
Проверить список доступных обновлений на удаленном компьютере:
Get-WUList –ComputerName server2
Скачать и установить все доступные обновлений на нескольких удаленных серверах:
$ServerNames = “server1, server2, server3”
Invoke-WUJob -ComputerName $ServerNames -Script {ipmo PSWindowsUpdate; Install-WindowsUpdate -AcceptAll | Out-File C:\Windows\PSWindowsUpdate.log } -RunNow -Confirm:$false -Verbose -ErrorAction Ignore
Командлет Invoke-WUJob (ранее командлет назывался Invoke-WUInstall) создаст на удаленном компьютере задание планировщика, запускаемое от SYSTEM. Можно указать точное время для установки обновлений Windows:
Invoke-WUJob -ComputerName $ServerNames -Script {ipmo PSWindowsUpdate; Install-WindowsUpdate –AcceptAll -AutoReboot | Out-File C:\Windows\PSWindowsUpdate.log } -Confirm:$false -TriggerDate (Get-Date -Hour 20 -Minute 0 -Second 0)
Проверить статус задания установки обновлений:
Get-WUJob -ComputerName $ServerNames
Если команда вернет пустой список, значит задача установки на всех компьютерах выполнена.
Проверьте наличие обновления на нескольких удаленных компьютерах:
"server1","server2" | Get-WUHistory| Where-Object {$_.Title -match "KB4011634"} | Select-Object *|ft
Получить дату последней установки обновлений на всех компьютерах в домене можно с помощью командлета Get-ADComputer из модуля AD PowerShell:
$Computers=Get-ADComputer -Filter {enabled -eq "true" -and OperatingSystem -Like '*Windows*' }
Foreach ($Computer in $Computers)
{
Get-WULastResults -ComputerName $Computer.Name|select ComputerName, LastSearchSuccessDate, LastInstallationSuccessDate
}
PowerShell модуль PSWindowsUpdate удобно использовать для загрузки и установки обновлений Windows из командной строки (единственный доступны вариант в случае установки обновлений на хосты без графического интерфейса: Windows Server Core и Hyper-V Server). Также этот модуль незаменим, когда нужно одновременно запустить и проконтролировать установку обновлений сразу на множестве серверов/рабочих станциях Windows.
,
If you want to run Windows Update from Command Prompt or PowerShell in Windows 10/11, continue reading below.
Microsoft releases updates regularly to enhance security, fix bugs, and introduce new features that improve the functionality of Windows devices.
Windows updates are divided into 2 categories: Quality updates, which are constantly released for security reasons and to fix glitches, and Feature updates, which offer improved versions and additional features.
The usual way to update Windows 10/11 is by going to Settings > Update & Security and to check and install updates, but in some cases may needed to install updates from the command line or PowerShell if the usual way doesn’t work.

This tutorial contains instructions on how run Windows Update and install or uninstall Updates with commands in Command Prompt & PowerShell.
How to Check and Install Updates from PowerShell or Command Prompt in Windows 10/11 & Server 2016/2019.
- Part 1. Install Updates from Command Line.
- Part 2. Install Updates from PowerShell.
- Part 3. Uninstall Updates from PowerShell.
Part 1. How to Run Windows Update from Command Prompt.
In previous versions of Windows you could update Windows using the command «wuauclt /detectnow /updatenow».
In latest Windows 10 versions the command ‘WUAUCLT.EXE’ does not work anymore and has been replaced by the command ‘USOCLIENT.EXE’.
Info: The ‘USOCLIENT.EXE’ is the Update Session Orchestrator client that used to download and install Windows Updates. *
* Notes:
1. According to reports, not all Windows 10 and 11 versions support the USOCLIENT. If the same is true for your device, update your system using the PowerShell method.
2. Since USOCLIENT commands do not display anything on the screen at the time they are executed, the only way to determine if the command is working is to look at the events in the following destinations.
- C:\Windows\SoftwareDistribution\ReportingEvents.log
- Task Scheduler -> Microsoft -> Windows -> Update Orchestrator
To install updates with ‘USOCLIENT.EXE’, follow these steps:
1. Launch Command Prompt or PowerShell as an Administrator and ask Yes at the UAC prompt.
2. Force Windows to Check for Updates with one of the following commands: *
-
- UsoClient StartScan
- USOClient.exe StartInteractiveScan
* Note: Some users reported that in their case one command worked and not the other. To see which of the 2 commands works in your case open Windows Update at the same time as running the command to make sure that Windows is checking for updates.

3. After finding Updates, download them with one of the following commands:
-
- UsoClient StartDownload
- ScanInstallWait
4. Proceed to install downloaded updates with this command:
- UsoClient StartInstall
5. When the updates installed, reboot your pc with this command: *
- UsoClient RestartDevice
* Note: I suggest to wait at least 30 minutes before restarting your PC.

Part 2. How to Run Windows Update from PowerShell in Windows 10/11.
If you want to download and install Windows or Drivers updates using PowerShell commands, use the instructions below.
To Install Windows Updates from PowerShell:
1. Open PowerShell as Administrator.
2. Proceed and install the ‘PowerShell Windows Update module’ with this command and ask Yes (press ‘y’), when prompted to install any other provider needed: *
- Install-Module PSWindowsUpdate
* Notes:
1. The ‘PSWindowsUpdate’ is a necessary module to install updates from PowerShell. To see all the commands available in the module, give this command:
- Get-Command -module PSWindowsUpdate
2. By default the module only look for Windows and driver updates. If you have other Microsoft Products installed (e.g. Office), and you want to get updates for them too, give also this command:
- Add-WUServiceManager -MicrosoftUpdate

3. Then give the following command to allow the execution of scripts on your machine and ask Yes at the warning when prompted.
- Set-ExecutionPolicy -ExecutionPolicy RemoteSigned

4. Now force Windows to download and list all available updates in PowerShell. *
- Get-WindowsUpdate
5. Now proceed according to what you want:
A. To install all available Windows Updates from PowerShell give this command:
- Install-WindowsUpdate

B. To install all available Windows Updates and the updates for all other Microsoft Products, give this command:
- Install-WindowsUpdate -MicrosoftUpdate
C. To install a specific Windows Update from PowerShell, give this command and ask Yes (y) when prompted: *
- Get-WindowsUpdate -KBArticleID «KB-Number” -Install
e.g. to install the KB5005463 in this example:
- Get-WindowsUpdate -KBArticleID «KB5005463» -Install

D. To prevent a Windows Update from being installed, give this command in PowerShell:
- Get-WindowsUpdate -NotKBArticle “KB-Number” -AcceptAll
e.g. to prevent the installation of the KB5005463 in this example:
- Get-WindowsUpdate -NotKBArticle “KB5005463” -AcceptAll

E. To exclude specific categories from updating, (e.g. the «Driver updates or the Feature updates, give this command:
- Install-WindowsUpdate -NotCategory «Drivers»,»FeaturePacks» -AcceptAll
Part 3. How to Uninstall Windows Updates from PowerShell.
To remove Updates using PowerShell:
1. Open PowerShell as Administrator.
2. In the PowerShell window, give the following command to get a list of all installed updates.
- wmic qfe list brief /format:table

2. Take note of the KB number associated with the Windows Update you wish to remove.

3. Now execute the following command to remove the desired update in PowerShell:
- wusa /uninstall /kb:Number
Note: Replace ‘Number’ with the KB number of the update you want to remove. For example: to remove the KB5005635 give this command:
- wusa /uninstall /kb:5005635

That’s it! Which method worked for you?
Let me know if this guide has helped you by leaving your comment about your experience. Please like and share this guide to help others.
If this article was useful for you, please consider supporting us by making a donation. Even $1 can a make a huge difference for us in our effort to continue to help others while keeping this site free:
- Author
- Recent Posts
Konstantinos is the founder and administrator of Wintips.org. Since 1995 he works and provides IT support as a computer and network expert to individuals and large companies. He is specialized in solving problems related to Windows or other Microsoft products (Windows Server, Office, Microsoft 365, etc.).
8/7/2020: there’s a more updated version available here.
# Update-Remote-Windows-2016-Servers.ps1$servers="SERVER1","SERVER2"
function applyWindowsUpdates{
[CmdletBinding()]
param (
[parameter(Mandatory=$true,Position=1)]
[string[]]$computer
)#starts up a remote powershell session to the computer
do{
$session = New-PSSession -ComputerName $computer
"connecting remotely to $computer"
sleep -seconds 10
} until ($session.state -match "Opened")function checkPSVersion{
$version=$PSVersionTable.PSVersion.Major;
if ($version -ge 5){return $True;} else {return $False;}
}function installPrerequisites{
# Set PowerShell Gallery as Trusted to bypass prompts
If(!("NuGet" -in (get-packageprovider).Name)){Install-PackageProvider -Name Nuget -Force -Confirm:$False -InformationAction SilentlyContinue}
#If(!("PSGallery" -in (get-psrepository).Name)){Set-PSRepository -Name 'PSGallery' -InstallationPolicy Trusted -InformationAction SilentlyContinue -WarningAction SilentlyContinue}# Include the PowerShell Windows Update module
$checkModule=Get-Module -ListAvailable -Name PSWindowsUpdate
if(!($checkModule)){
Install-Module PSWindowsUpdate -Force -Confirm:$false;
Import-Module PSWindowsUpdate -Force;
}# Register the user of Windows Update Service if it has not been registered
$MicrosoftUpdateID="7971f918-a847-4430-9279-4a52d1efe18d"
$registered=(Get-WUServiceManager).ServiceID | Where-Object {$MicrosoftUpdateID -contains $_}
if (!($registered)){
Add-WUServiceManager -ServiceID $MicrosoftUpdateID -Confirm:$false
}
}function triggerUpdateJob{
# Only update Microsoft products with no reboots
$Script = {Get-WindowsUpdate -AcceptAll -MicrosoftUpdate -Install -IgnoreReboot}
Invoke-WUjob -ComputerName $computer -Script $Script -Confirm:$false -RunNow
}function triggerWindowsUpdate{
Get-WindowsUpdate -AcceptAll -MicrosoftUpdate -Install -IgnoreReboot;
#Get-WUInstall -IgnoreUserInput -Acceptall -Download -Install -Verbose;
#$Script = {import-module PSWindowsUpdate; Get-WindowsUpdate -AcceptAll -Install | Out-File C:\PSWindowsUpdate.log}
#Invoke-WUjob -ComputerName $_ -Script $Script -Confirm:$false -RunNow
}function listPendingUpdates{
[DateTime]$last24Hours=(Get-Date).AddHours(-24)
$Computername = $env:COMPUTERNAME
$updatesession = [activator]::CreateInstance([type]::GetTypeFromProgID("Microsoft.Update.Session",$Computername))
$UpdateSearcher = $updatesession.CreateUpdateSearcher()
$searchresult = $updatesearcher.Search("IsInstalled=0") # 0 = NotInstalled | 1 = Installed
$searchresult.Updates.Count$updates = If ($searchresult.Updates.Count -gt 0) {
#Updates are waiting to be installed
$count = $searchresult.Updates.Count#Cache the count to make the For loop run faster
For ($i=0; $i -lt $Count; $i++) {$item = $searchresult.Updates.Item($i)
[DateTime]$timeStamp=$item.LastDeploymentChangeTimeif ($timeStamp -ge $last24Hours){
#Create new custom object
[pscustomobject]@{
Title = $item.Title
KB = $($item.KBArticleIDs)
SecurityBulletin = $($item.SecurityBulletinIDs)
Severity = $item.MsrcSeverity
IsDownloaded = $item.IsDownloaded
Url = $item.MoreInfoUrls
Categories = ($item.Categories | Select-Object -ExpandProperty Name)
BundledUpdates = @($item.BundledUpdates)|ForEach{
[pscustomobject]@{
Title = $_.Title
DownloadUrl = @($_.DownloadContents).DownloadUrl
}
}
}#bundledUpdates
}#pscustomObject
}#forloop
}#if-condition
$updates |ft kb,title,severity -autosize
}#removes schedule task from computer
#invoke-command -computername $computer -ScriptBlock {Unregister-ScheduledTask -TaskName PSWindowsUpdate -Confirm:$false}<# another workaround to WinRM limitation on Windows Updates
$pass = ConvertTo-SecureString "PA$$W0RD" -AsPlainText -Force
$creds = New-Object System.Management.Automation.PSCredential "User", $pass
Start-Process -Credential $creds powershell -ArgumentList "-Command & { ... whatever you want to do ... }"
#>if (checkPSVersion){
installPrerequisites;# Check if this machine has WSUS settings configured
$wuPath="Registry::HKLM\Software\Policies\Microsoft\Windows\WindowsUpdate\AU"
$wuKey="UseWUServer"
$wuIsOn=(Get-ItemProperty -path $wuPath -name $wuKey -ErrorAction SilentlyContinue).$wuKeyif($wuIsOn){
# Perform updates by manipulating WSUS keys
"Turn WSUS settings OFF temporarily..."
setRegKey -path $wuPath -name $wuKey -value 0
restart-service wuauserv# Perform Updates
triggerWindowsUpdate;
listPendingUpdates;"Turning WSUS settings back to ON status"
setRegKey -path $wuPath -name $wuKey -value 1
restart-service wuauserv
}else{
# Perform Updates without manipulating WSUS keys
triggerWindowsUpdate;
listPendingUpdates;
}
}else{
"PowerShell version required is 5.0.`nHere is the link to download PS 5.1: if this fails."
}}
$servers|%{applyWindowsUpdates $_}
<# this snippet has bugs
# Start jobs on muliple targets simultaneously
ForEach ($server in $servers) {
"Starting process on $server..."
$running = @(Get-Job | Where-Object { $_.State -eq 'Running' })
if ($running.Count -le 8) {
Start-Job {
applyWindowsUpdates $server
}
}else{
$running | Wait-Job
}
Get-Job | Receive-Job
}
#><# invoke command on a list of servers
Invoke-Command -computername $servers -ScriptBlock {
param($updateWindows)
[ScriptBlock]::Create($updateWindows).Invoke()
} -Args ${function:applyWindowsUpdates} -ThrottleLimit 1
#><#
New-PSSession : [NODE007] Connecting to remote server NODE007failed with the following error message : WinRM cannot process the request. The following
error with errorcode 0x80090324 occurred while using Kerberos authentication: There is a time and/or date difference between the client and server.
Possible causes are:
-The user name or password specified are invalid.
-Kerberos is used when no authentication method and no user name are specified.
-Kerberos accepts domain user names, but not local user names.
-The Service Principal Name (SPN) for the remote computer name and port does not exist.
-The client and remote computers are in different domains and there is no trust between the two domains.
After checking for the above issues, try the following:
-Check the Event Viewer for events related to authentication.
-Change the authentication method; add the destination computer to the WinRM TrustedHosts configuration setting or use HTTPS transport.
Note that computers in the TrustedHosts list might not be authenticated.
-For more information about WinRM configuration, run the following command: winrm help config. For more information, see the about_Remote_Troubleshooting Help
topic.
At line:10 char:20
+ $session = New-PSSession -ComputerName $computer
+ ~~~~~~~~~~~~~~~~~~~~~~~~~~~~~~~~~~~~~
+ CategoryInfo : OpenError: (System.Manageme....RemoteRunspace:RemoteRunspace) [New-PSSession], PSRemotingTransportException
+ FullyQualifiedErrorId : 1398,PSSessionOpenFailed#>
Older Version
# This script works on any Windows version with PowerShell 5.0 or higher installed. Get that from here:
function checkPSVersion{
$version=$PSVersionTable.PSVersion.Major;
if ($version -ge 5){return $True;} else {return $False;}
}
function installPrerequisites{
# Set PowerShell Gallery as Trusted to bypass prompts
If(!("NuGet" -in (get-packageprovider).Name)){Install-PackageProvider -Name Nuget -Force}
If(!("PSGallery" -in (get-psrepository).Name)){Set-PSRepository -Name 'PSGallery' -InstallationPolicy Trusted -WarningAction SilentlyContinue}# Include the PowerShell Windows Update module
$checkModule=Get-Module -ListAvailable -Name PSWindowsUpdate
if(!($checkModule)){Install-Module PSWindowsUpdate -Confirm:$false;}
# Register the user of Windows Update Service if it has not been registered
$MicrosoftUpdateID="7971f918-a847-4430-9279-4a52d1efe18d"
$registered=(Get-WUServiceManager).ServiceID | Where-Object {$MicrosoftUpdateID -contains $_}
if (!($registered)){
Add-WUServiceManager -ServiceID $MicrosoftUpdateID -Confirm:$false
}
}
function applyWindowsUpdates{
if (checkPSVersion){
installPrerequisites;
# Check if this machine has WSUS settings configured
$wuPath="Registry::HKLM\Software\Policies\Microsoft\Windows\WindowsUpdate\AU"
$wuKey="UseWUServer"
$wuIsOn=(Get-ItemProperty -path $wuPath -name $wuKey -ErrorAction SilentlyContinue).$wuKey
if($wuIsOn){
# Turn WU Server OFF temporarily
setRegKey -path $wuPath -name $wuKey -value 0
restart-service wuauserv
# Perform Updates
Get-WindowsUpdate -AcceptAll -MicrosoftUpdate -Install -IgnoreReboot;
# Turn Windows Update Server back to ON
setRegKey -path $wuPath -name $wuKey -value 1
restart-service wuauserv
"Windows Update sequence is completed.";
}else{
# Perform Updates
Get-WindowsUpdate -AcceptAll -MicrosoftUpdate -Install -IgnoreReboot;
"Windows Update sequence is completed.";
}
} else {
"Please update PowerShell version before retrying this script.`nHere is the link to download PS 5.1: "
}
}
applyWindowsUpdates;
In Windows Server 2016 there are no GUI options available to change the update behavior.
In this blog I was outline the different ways to change the Windows Server 2016 Update settings.
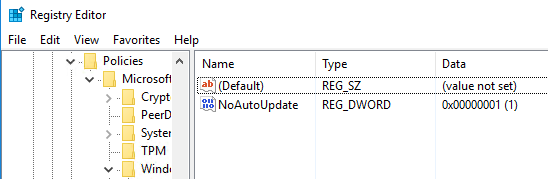
Windows always looks at registry keys located in the following hive:
HKEY_LOCAL_MACHINE\SOFTWARE\Policies\Microsoft\Windows\WindowsUpdate\AU
Typically there is a key named ‘AUOptions’ with a value in the range 2-5, and have the following meaning:
– 2 = Notify before download.
– 3 = Automatically download and notify of installation.
– 4 = Automatically download and schedule installation. Only valid if values exist for ScheduledInstallDay and ScheduledInstallTime.
– 5 = Automatic Updates is required and users can configure it.
But if there is a ‘NoAutoUpdate’ key with the value of ‘1’, no updates will be processed by Windows.
Powershell
You can change the registry key with the help of Powershell directly:
Set-ItemProperty -Path HKLM:\SOFTWARE\Policies\Microsoft\Windows\WindowsUpdate\AU -Name AUOptions -Value 3
In Windows Server 2012 I used to change the setting using the .NET object as below, this doesnt work anymore in 2016 as the API only allows “GET” statements.
$WUSettings = (New-Object —com «Microsoft.Update.AutoUpdate»).Settings
$WUSettings.NotificationLevel=3
$WUSettings.save()
SCONFIG
Sconfig is basically a simple batch script, which is sufficient for configuration tasks such as update settings.
In the sconfig prompt you can select options ‘5’ to enter the update settings configuration and then choose:
A – Automatically scan, download and install updates. After installation perform a reboot.
D – Automatically scan, download updates
M – Never check for updates, trigger manually.
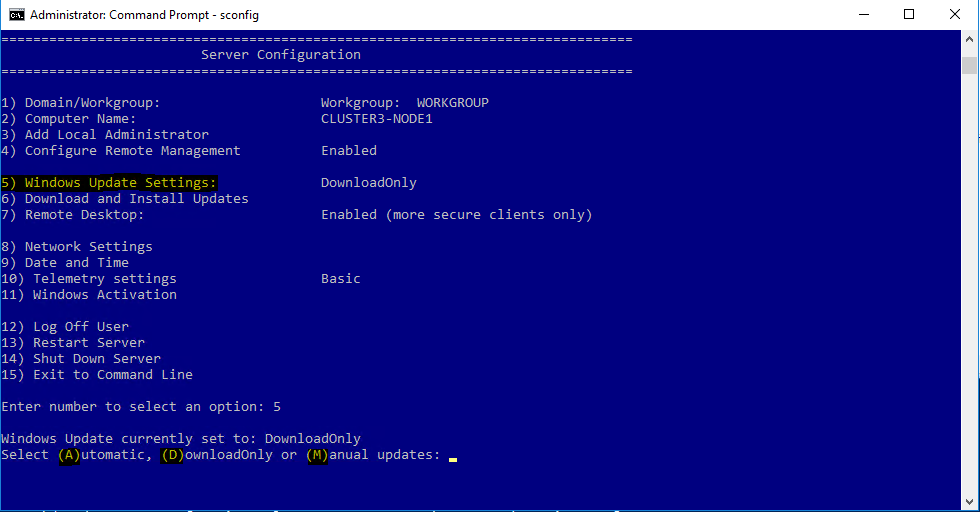
Open a command prompt with administrative permissions and run SCONFIG from there.
Group Policy
You can always use the trusted GPO’s in an Active Directory domain environment. The settings are located under ‘Local Computer Policy > Computer Configuration > Administrative Templates > Windows Components > Windows Update’.
You can configure the same range of numbers here.
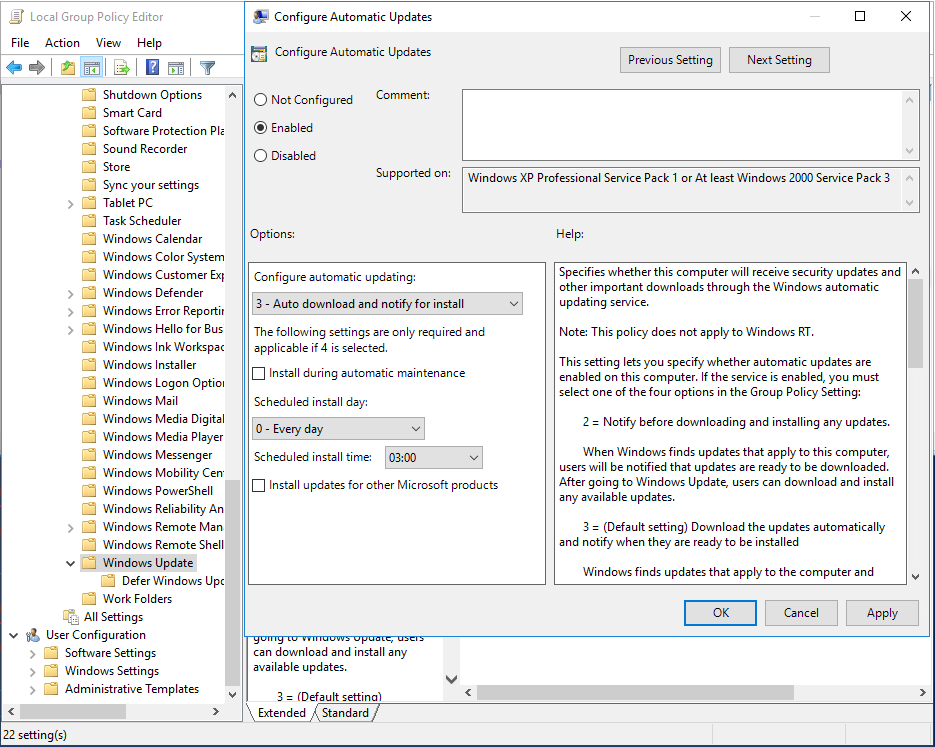
More info on managing update polices with GPO’s here:
https://technet.microsoft.com/nl-nl/library/cc720539(v=ws.10).aspx
Scheduling Day / Time
When you set the update settings to “Automatically download and schedule installation” it could be that you also want to decide yourself which day/time it should update. This can be done using the ScheduledInstallDay and ScheduledInstallTime keys in the registry.
ScheduledInstallDay
| Value | |
| 0 | Install every day |
| 1-7 | Specific day of the week where Sunday =1 and Saturday = 7 |
ScheduledInstallTime
| Value | |
| 0-23 | Time of the day in 24-hour format |
Setting the Scheduled Install Day to Tuesday:
Set-ItemProperty -Path HKLM:\SOFTWARE\Policies\Microsoft\Windows\WindowsUpdate\AU -Name ScheduledInstallDay -Value 3
Setting the Scheduled Install time to 6 AM:
Set-ItemProperty -Path HKLM:\SOFTWARE\Policies\Microsoft\Windows\WindowsUpdate\AU -Name ScheduledInstallTime -Value 6
The changes take effect after logoff
More info on this Windows Update settings here: https://msdn.microsoft.com/en-us/library/dd939844(v=ws.10).aspx
—
Thank you for reading my blog.
If you have any questions or feedback, leave a comment or drop me an email.
Darryl van der Peijl
http://www.twitter.com/DarrylvdPeijl
PowerShell script that will download and install all Microsoft (Windows) Updates on Windows 10 / Windows Server 2016
This file contains hidden or bidirectional Unicode text that may be interpreted or compiled differently than what appears below. To review, open the file in an editor that reveals hidden Unicode characters.
Learn more about bidirectional Unicode characters
| ############################################################################### | |
| ############################################################################### | |
| ##### PowerShell Windows Update Script. | |
| ##### Leverages Microsoft Update provider to install all missing updates | |
| ############################################################################### | |
| ############################################################################### | |
| Set-ExecutionPolicy —ExecutionPolicy Bypass —Scope Process —Force | |
| Install-PackageProvider —Name NuGet —Force | |
| Import-PackageProvider —Name NuGet | |
| # Update the PSGallery (the Default) PSRepository | |
| Set-PSRepository —Name PSGallery —InstallationPolicy Trusted | |
| Get-PSRepository —Name PSGallery | Format-List * —Force | |
| # List all modules installed | |
| Write-Output «Running: Get-InstalledModule« | |
| Get-InstalledModule | |
| # Install the module we need | |
| Write-Output «Running: Install-Module -Name PSWindowsUpdate -Force« | |
| Install-Module —Name PSWindowsUpdate —Force | |
| # Import the module | |
| Import-Module —Name PSWindowsUpdate | |
| # List support commands from the module: | |
| Get-Command —Module PSWindowsUpdate | |
| # Now, check if the Microsoft Update service is available. | |
| # If not, we need to add it. | |
| $MicrosoftUpdateServiceId = «7971f918-a847-4430-9279-4a52d1efe18d« | |
| If ((Get-WUServiceManager —ServiceID $MicrosoftUpdateServiceId).ServiceID -eq $MicrosoftUpdateServiceId) { Write-Output «Confirmed that Microsoft Update Service is registered…« } | |
| Else { Add-WUServiceManager —ServiceID $MicrosoftUpdateServiceId —Confirm:$true } | |
| # Now, check again to ensure it is available. If not — fail the script: | |
| If (!((Get-WUServiceManager —ServiceID $MicrosoftUpdateServiceId).ServiceID -eq $MicrosoftUpdateServiceId)) { Throw «ERROR: Microsoft Update Service is not registered.« } | |
| # Force the installation of updates and reboot of server (if required) | |
| Get-WUInstall —MicrosoftUpdate —AcceptAll —AutoReboot | |
| Get-WUInstall —MicrosoftUpdate —AcceptAll —Download —Install —AutoReboot |