
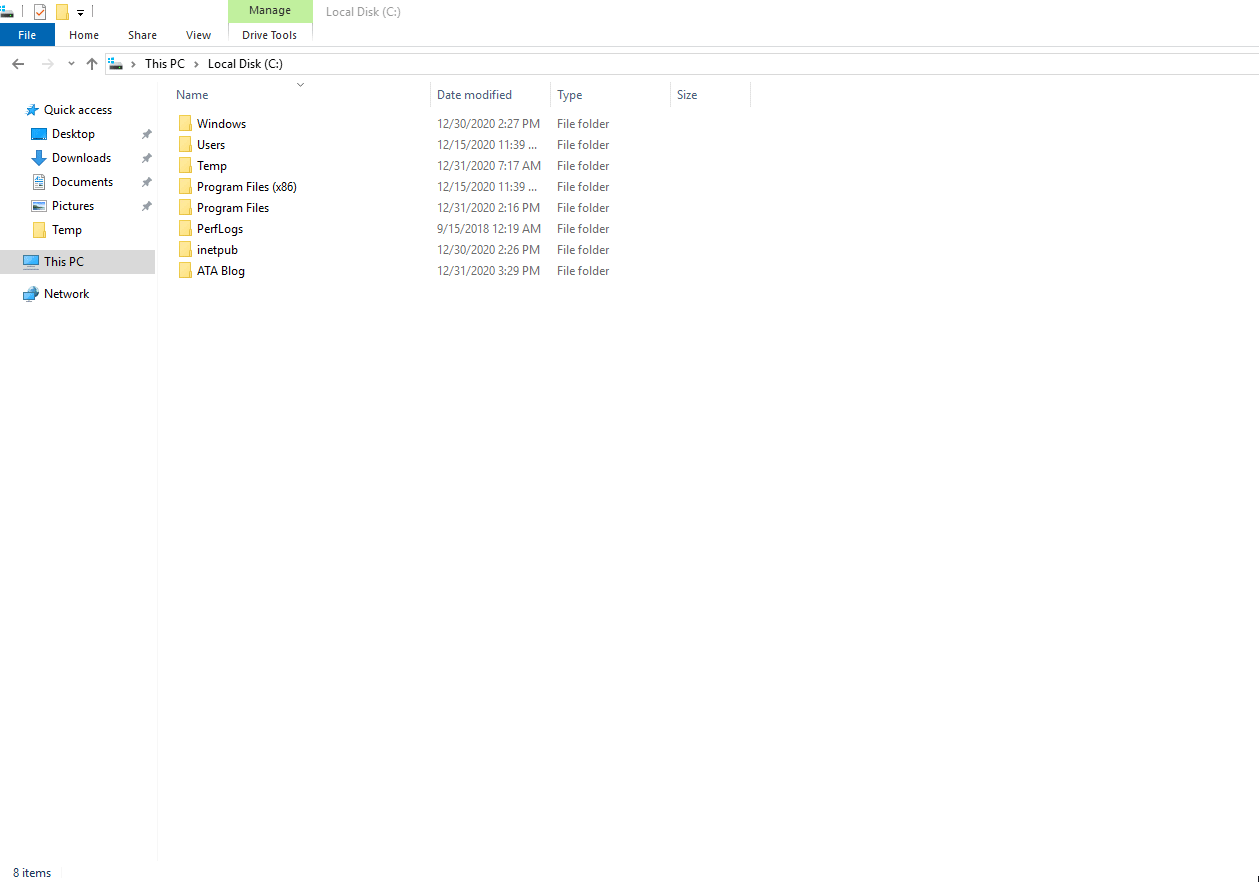
Have you ever been in Windows File Explorer and just need to quickly open a PowerShell prompt in a folder? Do you want a open powershell window here option or open command window here option? If so, you’re in luck. In this tutorial, you’re going to learn how to open PowerShell in a specific folder when using Windows file explorer.
Prerequisites
If you intend to follow along, be sure you have the following:
- A Windows 10, Windows Server 2016, or Windows Server 2019 host. This tutorial will use Windows 10.
- Logged in with a local account in the Administrators group or at least with rights to elevate to administrator, if necessary.
Opening PowerShell via the Address Bar
File Explorer has an element at the top of the window that allows you to run programs just like if you were at a command line. You can invoke PowerShell from this address bar by pressing CTRL. From within File Explorer:
- Press and hold the ALT or CTRL key.
- Press the D or L key. This places the cursor in the address bar.
- Type
powershelland press Enter. PowerShell will be opened in the current directory.
If you are logged in as the Administrator, then you will be in an administrative prompt for both PowerShell and Command Prompt.
The animated gif below is what you should see on your screen:
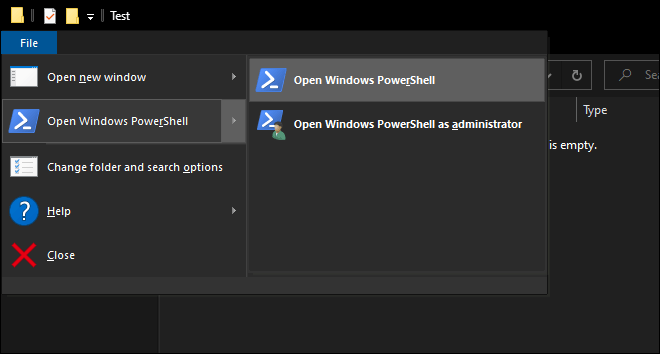
Another handy way to open PowerShell in File Explorer is to use the file menu. Using the file menu, you could use the mouse or keyboard shortcut. Pressing ALT allows you to open the file menu. Within File Explorer:
- Press and hold the ALT key.
- Press the F key. This will open the file menu.
- Press the S key. This option will select Open Windows PowerShell and will expand another sub-menu.
- Lastly, press the R key. PowerShell will open in the current directory.
If you need to open PowerShell as an administrator, use hit A instead of R.
Related: How to Run PowerShell as Administrator
The animated gif below shows what the process should look like:
Holding the
ALTkey while navigating the context menu will display keys to use to jump through menus. The shortcut keys work in Windows 10, Windows Server 2016, and Windows Server 2019.
Now that you have all the shortcut keys in your toolbox, it’s time to dive a little deeper and build a context menu within File Explorer.
A context menu is the menu that you see when you right-click on an item in Windows.
Using a specially placed Windows registry key, you can create a custom context menu item to quickly open a PowerShell window when you right click inside of a folder. Let’s change that.
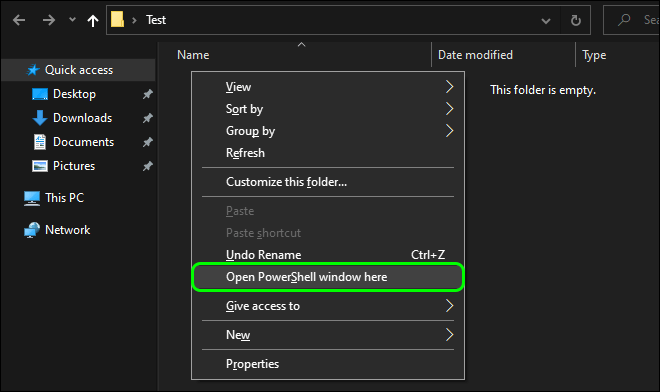
If you right click within a folder in File Explorer, you’ll see below that there is no context menu entry for opening PowerShell.
However, if hold SHIFT key and then right click in a folder, you’ll then see the context menu item below.
Let’s build a custom context menu item that’ll allow you to open a PowerShell window without holding Shift key.
To create a custom context menu item, you must create a few different Windows registry keys and values. These values, when created, will instantly create a custom context menu item.
Below are the following Windows registry keys and values necessary:
| Path | Name | Value | Notes |
| HKCR:\Directory\shell\powershellmenu | (Default) | Open PowerShell Here | |
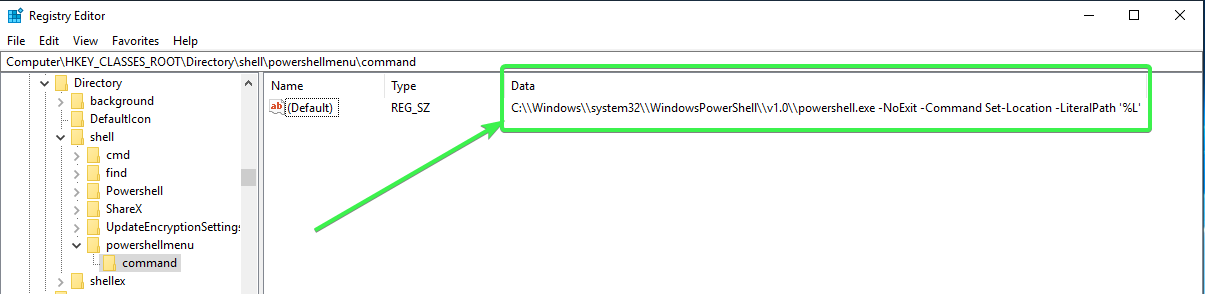
| HKCR:\Directory\shell\powershellmenu\command | (Default) | C:\Windows\system32\WindowsPowerShell\v1.0\powershell.exe -NoExit -Command Set-Location -LiteralPath ‘%L’ | |
| HKCR:\Directory\shell\runas | (Default) | Open PowerShell Here as Administrator | |
| HKCR:\Directory\shell\runas | HasLUAShield | This adds a built-in icon for elevated prompts |
To add the custom context menu, you can create the above keys and values manually or you can use a PowerShell script to do the dirty work for you.
Below is a script you can use to quickly create all of the necessary keys and values in one shot.
$Menu = 'Open PowerShell Here'
 $Command = "C:\Windows\system32\WindowsPowerShell\v1.0\powershell.exe -NoExit -Command Set-Location -LiteralPath '%L'"
 $RunAsMenu = 'Open PowerShell Here as Administrator'
 HKCR doesn't exist by defualt in PSDrives, so you need to create it.
 New-PSDrive -PSProvider Registry -Root HKEY_CLASSES_ROOT -Name HKCR
 Now create the keys and values (non-admin)
 New-Item -Path HKCR:\Directory\shell -Name 'powershellmenu' -Force |
     Set-ItemProperty -Name '(Default)' -Value $Menu
 New-Item -Path HKCR:\Directory\shell\powershellmenu\command -Force |
     Set-ItemProperty -Name '(Default)' -Value $Command
 Now create the keys and values (admin)
 New-Item -Path HKCR:\Directory\shell -Name 'runas' -Force |
     Set-ItemProperty -Name '(Default)' -Value $RunAsMenu
     # This adds a built-in icon for elevated prompts
     New-ItemProperty -Path HKCR:\Directory\shell\runas\ -Name HasLUAShield -Value ''
 New-Item -Path HKCR:\Directory\shell\runas\command -Force |
     Set-ItemProperty -Name '(Default)' -Value $Command
When you’ve finished creating the registry keys and values, you should see a value that looks like below:
Once complete, close the Windows registry editor if you have it open and right click on any folder within File Explorer. You should now see the new Open PowerShell Here context menu entry you created!
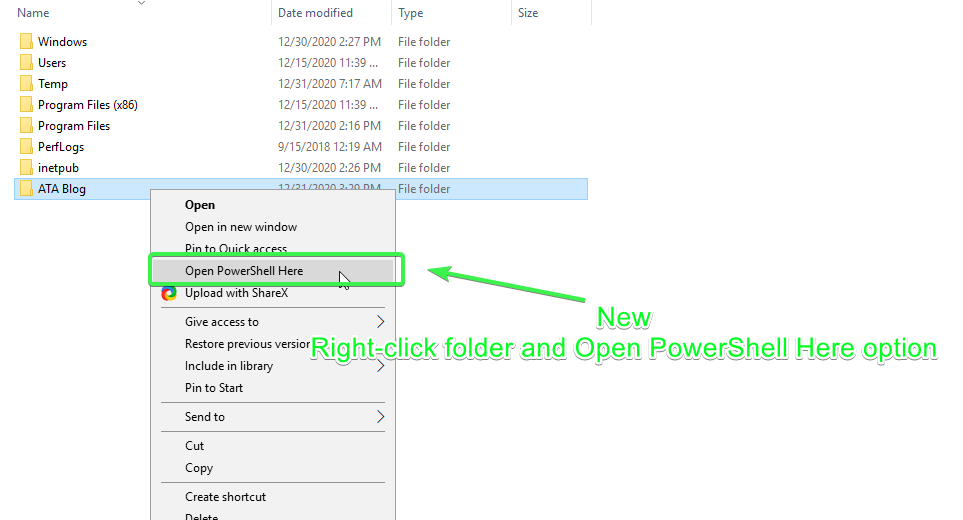
Below is the new context menu Open PowerShell Here option in action:
Next Steps
Now that you know all the ways to open a PowerShell window within File Explorer, what else can you add to your context menus to increase your file explorer productivity? Maybe you can add a Open Command Prompt Here or experiment with opening different PowerShell profiles using context menus. Try adding an icon to the context menu even!
-
Home
-
Clone Disk
- How to Open PowerShell in a Folder on Windows 10 [Full Guides]
How to Open PowerShell in a Folder on Windows 10 [Full Guides]
By Ariel | Follow |
Last Updated
A great many people are unclear about the windows open PowerShell in a folder. If you are trying to find the way to open PowerShell in a folder, you come to the right place. In this post of MiniTool, you will get detailed steps to do that.
As you might know, PowerShell is an open-source project that’s pre-installed in Windows 10. You can open it from the Power User menu or search for it in Cortana.
Unlike Command Prompt, you can open it anywhere by holding down the Shift key and right-clicking the folder, and then you will find the Open Command window here option from the context menu. However, there is no Open PowerShell window here option. At this time, you need to add the option to the context menu manually.
Now, let’s see how to open PowerShell in a folder.
Method 1. Open PowerShell Window Here in File Explorer
The first and simplest method for Windows open PowerShell in a folder is to utilize the File Explorer. Don’t worry. This operation will make no changes to anything. Here’s how to open PowerShell here.
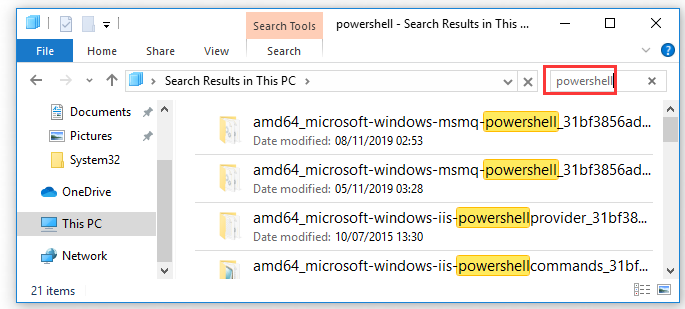
Step 1. Press Win plus E keys to open your File Explorer, and then go to the folder or location that you want to find the open PowerShell window here option.
Step 2. Type PowerShell in the search bar and hit Enter.
Step 3. Wait a moment and you can open a PowerShell window at that folder.
Alternatively, you can add the “Windows open PowerShell in a folder” feature to the context menu by editing the registry manually. To do so, you need to make some changes to Windows Registry. Here’s how:
Warning: Registry Editor is a built-in Windows tool. Misusing it can lead to your system unstable or even unbootable. So, it’s highly recommended that you back up your system in advance and follow the instruction carefully.
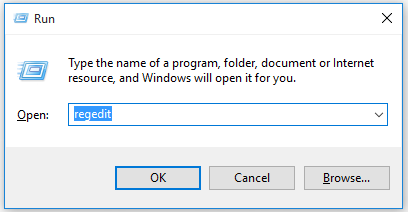
Step 1. Press Win + R keys to open the Run dialog box, and then type regedit in it and hit Enter.
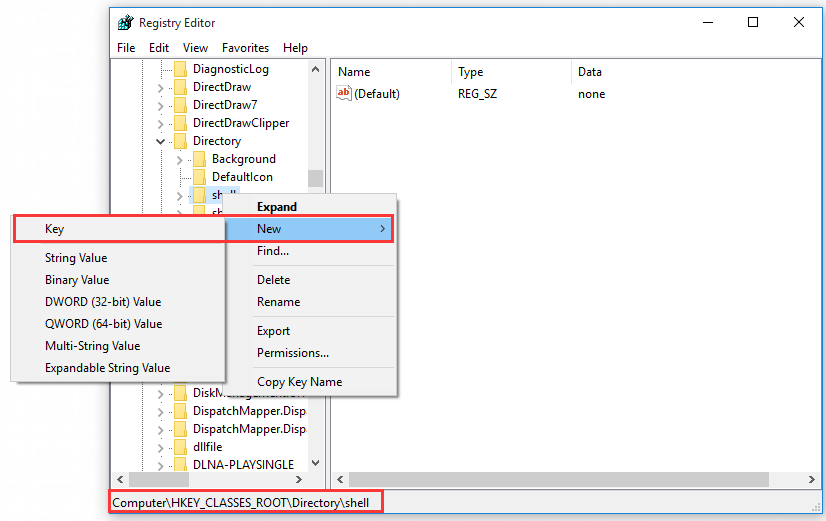
Step 2. Navigate to the following path through the left sidebar:
HKEY_CLASSES_ROOTDirectoryshell
Step 3. Right-click the shell key and choose New > Key from the context menu. Then name the new key to the powershellmenu.
Step 4. Now, double click the default value inside the new PowerShell key to open its Properties window.
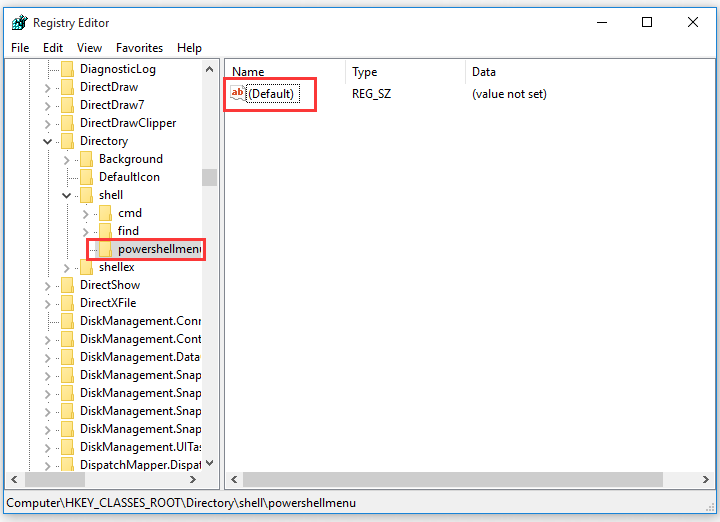
Step 5. In the Properties window, change the Value data to Open PowerShell Here, and then click on the OK button to save this change
Step 6. To set the same way to the Open Command Prompt here option by holding the Shift key and right-clicking the folder. Here you can set the same way for the Windows open PowerShell in a folder option. Right-click the powershellmenu key and choose New > String Value.
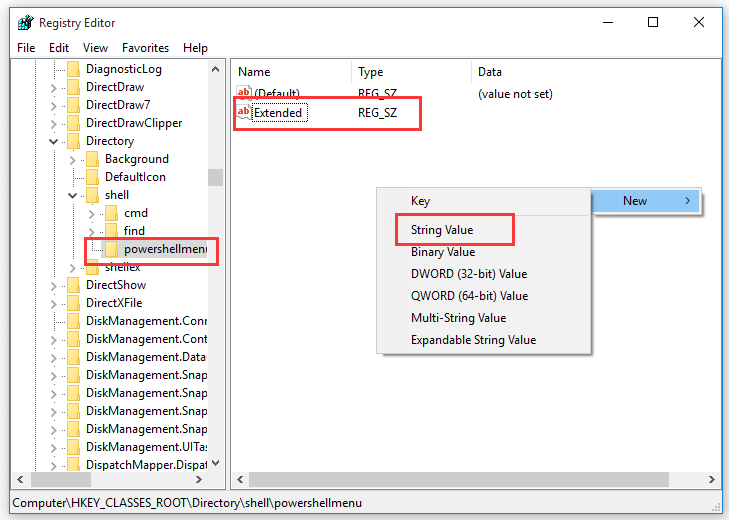
Step 7. Name the default value to Extended. And then the rest process is the same as the above, you need to create a new key inside the powershellmenu key and choose New > Key, and name the key to command.
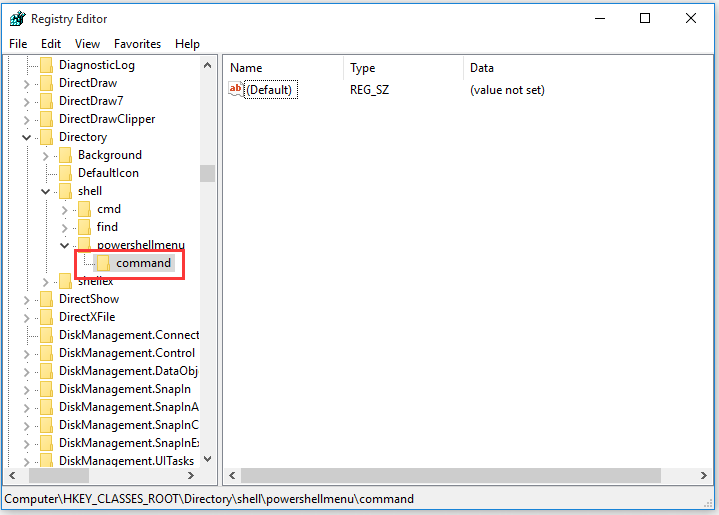
Step 8. Double click the Default value inside the command key to open its properties.
Step 9. Then type the following text into the Value data and click on OK.
C:\Windows\system32\WindowsPowerShell\v1.0\powershell.exe -NoExit -Command Set-Location -LiteralPath ‘%L’
Step 10. Close the Registry Editor. After that, these changes will take place at one and you can choose the Open with PowerShell option by holding down Shift key and right-clicking the folder.
About The Author
Position: Columnist
Ariel has been working as a highly professional computer-relevant technology editor at MiniTool for many years. She has a strong passion for researching all knowledge related to the computer’s disk, partition, and Windows OS. Up till now, she has finished thousands of articles covering a broad range of topics and helped lots of users fix various problems. She focuses on the fields of disk management, OS backup, and PDF editing and provides her readers with insightful and informative content.
PowerShell is among the most handy tools for task automation and configuration management. It is especially useful for administrators who use this command-line shell and scripts to automate tasks and manage configurations quickly without the need for an interface.
Opening PowerShell directly in a specific folder can significantly improve efficiency, and productivity and streamline workflow by eliminating the time taken by navigation. It simplifies operations and is specifically useful for IT admins who use an MDM solution like AirDroid Business to manage device configuration. It helps them execute scripts directly in a folder for troubleshooting and support.
This comprehensive guide will walk you through different methods you can use to open PowerShell in a folder across different Windows versions including Windows 10, 11, and 7.
1 How to Open PowerShell in A Folder in Windows 7/10/11
Let’s explore step-by-step what are the 9 different methods to open PowerShell directly into a folder.
1 Method 1: Using Windows File Explorer
One of the easiest and quickest methods to open PowerShell in a folder is through Windows File Explorer. Here is how to do it:
Windows 10/11
- Step 1: Press the keys Win+E simultaneously to open the File Explorer.
- Step 2: Navigate to the folder where you want to open PowerShell.
- Step 3: Hold down on the ‘shift’ key and right-click in the folder.
- Step 4: Select ‘open PowerShell window here’.
-


Windows 7
- Step 1: Navigate to the folder where you want to open PowerShell directly.
- Step 2: Hold the ‘shift’ key and right-click within the folder.
- Step 3: Select the option ‘open command window here’ and type ‘PowerShell’.
2 Method 2: Using the Address Bar
- Step 1: Press the keys Win+E simultaneously to open the File Explorer.
- Step 2: Navigate to the folder where you want to open PowerShell.
- Step 3: In the address bar on the top, type ‘powerShell’.
- Step 4: Wait a moment and the PowerShell window will open.
-


3 Method 3: Open as Administrator
Windows 10
You can also open PowerShell as an administrator in any specific folder by following just a few simple steps. Here is how:
- Step 1: Navigate to the folder where you want to open PowerShell as an admin.
- Step 2: On the top right corner of your screen, click the ‘file’ tab.
- Step 3: Now hover on ‘open Windows PowerShell here’ and select the option ‘Open Windows PowerShell as administrator’.
-


Tip: If you are someone fond of hotkeys, simply use this combination of hotkeys inside the folder and you will be able to open Windows PowerShell as an admin: Alt+f/s/a. This is how simple it is.
Windows 11
Although it is much easier to open PowerShell as an admin in a specific folder with Windows 10, it takes a few more steps to do the same in Windows 11 as the hotkeys Alt+f/s/a inside a folder do not work with Windows 11. Here is the workaround for Windows 11.
4 Method 4: Using the Command Line
You can open PowerShell in a specific folder by navigating to that folder through Command Prompt first and then switching to PowerShell. This is how you do it:
5 Method 5: Using Windows Terminal
This method of opening PowerShell in a folder is for Windows 11 users. They can access PowerShell in any folder by opening it in the terminal and choosing PowerShell. Here are the precise steps involved:
- Step 1: Open Windows File Explorer.
- Step 2: Right-click on the name of the folder where you want to open PowerShell.
- Step 3: Click ‘open in terminal’.
- Step 4: It will open a PowerShell window.
-


6 Method 6: Creating a Shortcut
Opening PowerShell in a folder can be as easy as a single click. You can create a shortcut on the desktop that opens PowerShell in your specified folder every time, sparing you the hassle of navigation. Let’s have a look at the steps involved:
7 Method 7: Using Task Manager
You can use task manager as well to open PowerShell quickly at any location. Here are the steps to do so:
8 Method 8: Using Run Dialogue
This is another quick way to access PowerShell at any location and you can even use it to open an elevated PowerShell Window instead of a regular one if you want. It involves just a couple of steps as described below.
- Step 1: Press the keys Win+R to open a Run Dialogue.
- Step 2: In the provided space, type PowerShell.
-

- Step 3: Now you have two options; you can either press ‘ok’ to open the PowerShell window or press a combination of these keys ‘ctrl+shift+Enter’ and this will take you to an elevated PowerShell window instead of a regular one.

9 Method 9: Using Context Menu Registry Edit
There is even a way to add the option ‘Open PowerShell window here’ to the right-click context menu so that you can easily and quickly open a PowerShell window in any location by simply right-clicking and selecting ‘open PowerShell here’. This is done by editing the registry manually and adding the said option to the right-click context menu, and here is a step-by-step guide on how you can do that:
With these methods in mind, let’s delve into some advanced tips for maximizing your PowerShell usage in folders.
10 Advanced Tips for PowerShell in Folders
Here are a few handy tips to help make your PowerShell experience more productive and get the best out of this powerful tool.
1 Running Scripts from a Folder
You can run scripts you have stored in a specific folder with PowerShell by following these steps:
- Step 1: Open PowerShell as an administrator by clicking the start button, typing ‘powershell’ and then selecting ‘run as administrator’.
-

- Step 2: In the PowerShell window, type the path to the directory that contains scripts. For example, if your scripts are named ‘newscripts’ and located in C. Your path will look like this:
cd "C:\newscripts"
- Step 3: Now execute your scripts by using this syntax
.\as it tells PowerShell to look for the scripts in the current folder. So, here is how it should look like:.\newscripts.ps1
- Step 4: You can execute the script with a single command by using the complete path. For example, in the above case, the command would look like this:
& "C:\newscripts\newscripts.ps1"

Note: Don’t forget to put quotation marks around the path if it has a space or spaces.
2 Pointing PowerShell to a Folder
When your PowerShell prompt is pointed to a certain drive (in most cases it’s a C drive) and you want to change the directory, you can do it using Set-Location cmdlet. Here are the steps in detail:
- Step 1: Let’s say your PowerShell prompt is currently directed to C drive and you want to change it to a folder named ‘new folder’ in D drive.
- Step 2: You should use the Set-Location cmdlet as follows:
PS C:\> Set-Location -Path D:\new folder
- Step 3: The prompt will then be changed like this:
PS D:\new folder>
11 Understanding PowerShell and its Uses
PowerShell, as its name implies, is a powerful command line tool, specifically useful for administrators looking for quick and easy configuration.
Let’s explore a bit in detail what it is, how it works, and what are the benefits of using PowerShell in a folder.
1 What Is PowerShell?
PowerShell is a powerful command-line shell and scripting language designed for system administration. It lets them manage configuration and automate tasks without relying on a user interface.
Importance: Used for task automation and configuration management, making it essential for IT professionals and those using an MDM solution in an enterprise for remote device configuration.
2 Why Open PowerShell In A Specific Folder?
Efficiency: Quickly execute scripts and commands in the desired directory without navigating through folders and hence save time by avoiding tedious, repetitive, and petty tasks.
Use Cases: Ideal for running scripts, managing files, and automating tasks in a specific path, especially while using an MDM solution in an enterprise for remotely configuring devices, troubleshooting, and providing support.
While leveraging PowerShell with MDM offers many advantages, users may still encounter common issues. Here’s how to troubleshoot them effectively.
12 Troubleshooting Common Issues
Let’s have a look at some of the common issues faced by the users during PowerShell usage for various tasks.
1 Why Can’t I Run Scripts in PowerShell?
Possible Causes:
- Execution policy restrictions preventing script execution.
Solutions:
- Set Execution Policy: Use
Set-ExecutionPolicyto allow script execution. For example,Set-ExecutionPolicy RemoteSignedallows scripts to run if they are signed by a trusted publisher.
2 Why Does PowerShell Open in the Wrong Directory?
Possible Causes:
- Incorrect navigation or command input.
Solutions:
- Use Set-Location: Ensure you’re using
Set-Locationorcdto navigate to the correct directory before opening PowerShell. - Address Bar Check: If using the address bar, ensure the path is correct before typing PowerShell.
3 How to Fix PowerShell Opening as a Regular User Instead of Admin?
Possible Causes:
- Incorrect method used to open PowerShell with elevated permissions.
Solutions:
- Open as Administrator: Right-click the folder and select «Open PowerShell window here as administrator» or use keyboard shortcuts (e.g., Shift + Right-click).
AirDroid Business is a Windows and Android device management solution that can be used to enroll, manage, and monitor large fleet devices. With the centralized platform, organizations are able to deploy smartphones, tablets, rugged devices and others dedicated devices like kiosks and digital signage.
It’s available for Cloud Deployment & On-Premises Deployment.
Key features include: remote access & control, Google Play apps & enterprise’s apps management, policy, single & multi-apps kiosk mode, alerts & automated workflows, geofencing & location tracking, file transfer, notification, user management, reports, etc.
14-days Free Trial
Sometimes, we need to open CMD or PowerShell in the current folder. Usually, people open Command Prompt or PowerShell from the Start menu. Then, browse to the desired location using cd (change directory) command. But this is a lengthy process and nobody wants to do this every time.
In earlier builds of Windows 10, you could easily start Command Prompt in a specific location directly from the File menu in Windows Explorer. But in newer builds, PowerShell has replaced the Command Prompt in the File menu, context menu, and alternate Start menu.
In Windows 11, there is no ‘File Menu’. So, you can’t open CMD or PowerShell from there. However, you can easily use the right-click context menu to open Windows Terminal in the current folder.
SEE ALSO: How to Set up Windows Terminal to open Command Prompt by Default?
Besides Windows 10, you can also open the command prompt in Windows 7 and XP using a simple trick. So, in this tutorial, we will explain the process for Windows 7 along with Windows 10. Let’s see the process for Windows 10 first. We will show you simple tricks to achieve the task.
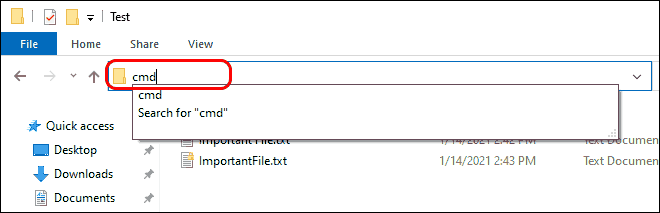
Method 1: Start CMD or PowerShell in the Current Folder from the Address Bar (Windows 10 and 11)
In Windows 10 or 11, go to the folder where you want to open Command Prompt. Then, type cmd in the address bar and press Enter. The command prompt will open in the current folder path.
NOTE: You can also open PowerShell in the current folder using this trick. Simply type powershell in the address bar and press Enter.
SEE ALSO: How to Uninstall Programs using Command Prompt in Windows 10?
The second trick uses Windows Explorer’s menu. Click on File from the menu bar and hover over Open Windows PowerShell. Then select Open Windows PowerShell or Open Windows PowerShell as administrator. This will open PowerShell in the current folder.
After opening PowerShell, you can type cmd and press Enter to start the Command Prompt in the current location. Since Windows 11 doesn’t have the File menu, so, you can’t use this method in Windows 11.
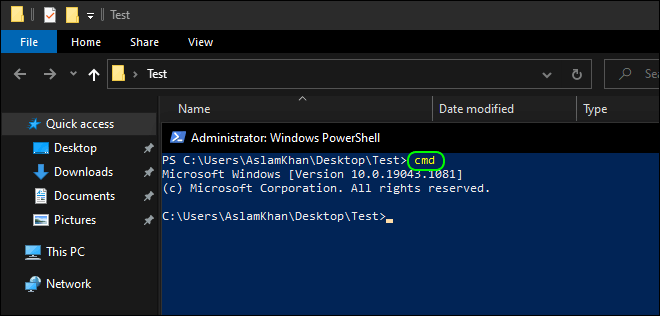
cmd command in PowerShell to start the Command Prompt in the Current folderSEE ALSO: 10 Cool Command Prompt Tricks for You.
Method 3: Start PowerShell and CMD from Right-click Context Menu (Windows 10 and 11)
You can also open PowerShell in the current directory from the right-click context menu in Windows 10 and 11.
Windows 10
Simply press & hold the Shift key and right-click in the blank space. Then select “Open PowerShell window here” from the context menu. This will open PowerShell at the current path.
After that, you can type cmd and press Enter to start CMD in the same path/location.
Windows 11
In Windows 11, simply right-click in the blank space and select “Open in the Windows Terminal“. This will open Windows Terminal at the current folder’s path.

By default, Windows Terminal opens with PowerShell. However, you can set it up to open Command Prompt by default or type cmd and press Enter.

SEE ALSO: Try the New Alt+TAB Switcher in Windows 11.
Start Command Prompt in the Current folder in Windows 7 or XP
In Windows XP and 7, there is no option to start CMD in the current folder from the File menu. So, you can use the address bar and right-click context menu tricks to start CMD in the current folder. Here we are explaining the context menu trick only.
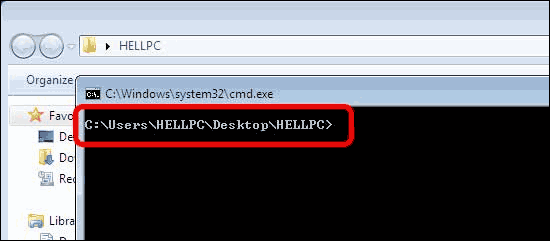
Press & hold Shift-Key and right-click anywhere in the blank space. Right-click context menu will pop up and you will see the “Open Command window here” option in this context menu. Click “Open command window here” to open the Command Prompt in that folder.

You can check the path in the command window.
SEE ALSO: How to Create Bulk Users in Active Directory using PowerShell?
Launch CMD or PowerShell in the Current Directory with Ease
Now you see, it’s quite easy to open the command prompt window in the current folder. These tricks come in handy when you must launch CMD or PowerShell in the current directory multiple times. The Shift-Key trick works for all versions of Windows while the Explorer menu option is available in Windows 8 and Windows 10 only. As mentioned earlier, in newer builds of Windows 10, PowerShell has replaced the Command Prompt. So, you will have to type cmd in the PowerShell window to start the Command prompt. Similarly, Windows 11 has also changed the process a bit but it is still very easy.
Well, hope you liked this quick trick. Feel free to share your thoughts on this in the comment section below. If you wish to get such tricks directly into your inbox, don’t forget to subscribe.
Hi there, we are the editorial staff at WINDOSPC (former HELLPC). We are a team of funny and technical people. Feel free to get in touch with us via Contact-Us page.
Windows PowerShell is a powerful command-line tool that allows users to perform a variety of tasks, from system management to automation of routine tasks. With the introduction of Windows 11, Microsoft has made several improvements to the user interface and command-line experience. One of the frequently used features of PowerShell is its ability to run in specific folders or directories, making it easier to navigate, manage files, and execute scripts.
In this article, we will explore multiple methods to open Windows PowerShell in a folder on Windows 11. Whether you are a beginner or an experienced user, these methods will help you maximize your productivity and streamline your workflows.
Understanding PowerShell
PowerShell is a task automation and configuration management framework from Microsoft, consisting of a command-line shell and associated scripting language. It is built on the .NET framework and provides an interactive environment for executing commands and scripts.
PowerShell is particularly useful for:
- Managing System Configuration: You can modify system settings, install updates, and configure services.
- Automating Tasks: Automating repetitive tasks can save time, especially in administrative and IT roles.
- File Management: Browsing and managing files and directories can be performed swiftly using command-line commands.
- Administering Processes: Monitoring and managing system processes, services, and resources is made easier via scripting.
Method 1: Using the Context Menu
One of the simplest ways to open PowerShell in any directory is through the context menu. Windows 11 has made access to PowerShell convenient. Follow these steps:
-
Navigate to the Folder:
- Open File Explorer (you can do this by pressing
Windows + E). - Use the left pane or the main area to navigate to the folder where you want to open PowerShell.
- Open File Explorer (you can do this by pressing
-
Open the Context Menu:
- Right-click on an empty space within the folder. This avoids accidentally selecting files or subfolders.
- You should see a context menu populated with various options.
-
Select PowerShell:
- In Windows 11, you will see an option that indicates opening PowerShell directly. This may be labeled as «Open with Windows Terminal» if your settings are configured accordingly.
- If you are using an older version of Windows or have specific configurations, you might see “Open PowerShell window here.”
- Click on that option. This will launch PowerShell in the selected directory.
This method is highly effective for quick access and is preferred by many users for its simplicity.
Method 2: Using the Address Bar in File Explorer
Another straightforward way to launch PowerShell from any folder in Windows 11 is by using the address bar in File Explorer.
-
Open File Explorer: Press
Windows + Eto launch File Explorer. -
Navigate to Your Desired Folder: Use the left sidebar or the main interface to locate and open the folder where you want PowerShell.
-
Use the Address Bar:
- Click once on the address bar at the top of the File Explorer window, which will highlight the current directory path.
- Delete the highlighted path and type
powershell, then hitEnter. - This command directly opens PowerShell in the current directory.
This method is fast and efficient, especially if you prefer keyboard interaction over mouse clicks.
Method 3: Using the Run Dialog
The Run dialog is another versatile tool where you can launch applications and perform a variety of commands, including starting PowerShell in a designated folder.
-
Open the Run Dialog:
- Press
Windows + Ron your keyboard. This will bring up the Run dialog.
- Press
-
Type the Command:
- Use the command:
powershell -noexit -command "cd 'C:PathToYourFolder'" - Replace
C:PathToYourFolderwith the actual path to the folder where you want to open PowerShell.
- Use the command:
-
Execute the Command:
- Press
Enteror click “OK.” This will open PowerShell in the specified directory.
- Press
Using the Run dialog is particularly useful when you want to open a PowerShell session directly without navigating through folders.
Method 4: Creating a Desktop Shortcut
For users who frequently access PowerShell in specific directories, creating a desktop shortcut can significantly increase convenience.
-
Right-click on the Desktop: From the desktop, right-click in an empty space.
-
Select New > Shortcut:
- In the context menu, hover over “New” and then click “Shortcut.”
-
Enter the Location:
- In the dialog box that appears, type the following command:
powershell -noexit -command "cd 'C:PathToYourFolder'" - Click “Next.”
- In the dialog box that appears, type the following command:
-
Name Your Shortcut:
- Give your shortcut a name, such as “Open PowerShell in My Folder.”
- Click on “Finish” to create the shortcut.
-
Utilize the Shortcut:
- Double-click the shortcut whenever you need to open PowerShell in that specific folder.
This method is particularly beneficial if you have specific folders that you manage frequently or work within.
Method 5: Using Windows Terminal
Windows Terminal, introduced with Windows 10 and improved in Windows 11, allows users to run various command-line applications in tabs, including PowerShell and Command Prompt.
-
Open Windows Terminal:
- Press
Windows + Xor right-click on the Start button. - Click on “Windows Terminal.”
- Press
-
Navigate to the Desired Folder:
- In the Windows Terminal, you can use the
cdcommand to change directories. For example:cd C:PathToYourFolder
- In the Windows Terminal, you can use the
-
Open PowerShell Tab:
- If you want the PowerShell tab specifically, ensure you start Powershell when opening the Terminal, or you can open a new tab in PowerShell by clicking the down arrow (▾) at the top of the window and selecting “Windows PowerShell.”
This approach benefits users who work with multiple command-line tools and prefer a unified interface.
Method 6: Using File Explorer’s Ribbon Menu
Windows 11 has a modernized Ribbon menu integrated into File Explorer, which provides quick access to various features, including launching PowerShell.
-
Open File Explorer: Use
Windows + Eto bring up File Explorer. -
Navigate to Your Folder: Go to the folder where you intend to open PowerShell.
-
Click on the “View” Button:
- In the top Ribbon, click on the “View” option.
-
Select “Show” and then “Windows PowerShell”:
- Hover over “Show” and you should find the option to open PowerShell in the context of the currently active directory.
- Click “Windows PowerShell.” This action will open PowerShell in the selected folder.
This method utilizes the modern interface improvements in Windows 11 and is another effective way to open PowerShell.
Method 7: Adding “Open PowerShell” to File Explorer’s Right-Click Menu via Registry (Advanced Users)
For those who need to customize their experience further, it is possible to add an «Open PowerShell Here» option to the right-click menu using the Windows Registry. Please note that modifying the registry can have unintended consequences, so proceed with caution and consider backing up your registry settings.
-
Open the Registry Editor:
- Press
Windows + R, typeregedit, and pressEnter.
- Press
-
Navigate to the Following Key:
HKEY_CLASSES_ROOTDirectoryBackgroundshell -
Create a New Key:
- Right-click on the “shell” key, select “New,” then “Key.” Name it “PowerShell”.
-
Modify Default Value:
- Click on the new «PowerShell» key, double-click the (Default) value on the right, and enter the text you want to display, e.g., «Open PowerShell Here».
-
Create Another Key:
- Still in the PowerShell key, right-click, select “New,” then “Key” and name it
command.
- Still in the PowerShell key, right-click, select “New,” then “Key” and name it
-
Set Command Path:
- Click on the
commandkey. Double-click the (Default) value and enter the command:powershell.exe -noexit -command "Set-Location -LiteralPath '%V'"
- Click on the
-
Saving Changes and Exiting:
- Close the Registry Editor, and the changes should take effect immediately.
Now, you will see “Open PowerShell Here” when you right-click in an empty space within any folder or on the desktop.
Conclusion
Opening Windows PowerShell in a folder on Windows 11 is easier than ever, thanks to various methods available to users. Whether you prefer using right-click context menus, the address bar, creating shortcuts, or utilizing the Windows Terminal, there are several approaches tailored to enhance your experience.
As you explore these methods, you’ll find that PowerShell not only increases efficiency in handling tasks but also serves as an essential tool for those looking to automate processes and manage their systems effectively. Whether you are a novice or a seasoned user, integrating PowerShell into your regular workflow can undoubtedly boost your productivity and streamline everyday tasks.