
When you login to a server it creates a profile, the trouble is there is no maintenance for this in Windows, so long after you have left your profile will still be on the server, this article addresses this by removing the profile and all the associated registry keys as well.
I wonder can this be script, well, obviously this can be scripted, however, we have to make sure we do it correctly, but lets get the checks for validity and then the process for deletion mapped out first.
If you wish to run the script normally then it will apply to add profiles on the device, so the customisation is done with the command you run for example:
<#
.SYNOPSIS
User Profile Cleanup Script with Registry Cleanup and Email Reporting
.DESCRIPTION
Automatically removes inactive user profiles and their registry entries on machines based on 30-day inactivity.
.PARAMETER ExcludedUsers
Array of usernames to exclude from cleanup
.PARAMETER WhatIf
Run in simulation mode without making changes
.PARAMETER SendEmail
Enable email reporting
.PARAMETER EmailTo
Recipient email address
.PARAMETER EmailFrom
Sender email address
.PARAMETER SmtpServer
SMTP server address
#>
param(
[string[]]$ExcludedUsers = @(«Administrator», «Public»),
[switch]$WhatIf = $false,
[switch]$SendEmail = $false,
[string]$EmailTo = «»,
[string]$EmailFrom = «»,
[string]$SmtpServer = «»
)
# Email parameter validation
if ($SendEmail) {
if ([string]::IsNullOrEmpty($EmailTo) -or [string]::IsNullOrEmpty($EmailFrom) -or [string]::IsNullOrEmpty($SmtpServer)) {
Write-Error «Email parameters required when using -SendEmail. Please provide -EmailTo, -EmailFrom, and -SmtpServer»
exit
}
}
# Check OS Version — Modified for Server 2016 compatibility
$OSInfo = Get-WmiObject -Class Win32_OperatingSystem
$OSVersion = [System.Version]$OSInfo.Version
$MinVersion = [System.Version]»10.0.14393″ # Server 2016 base version
if ($OSVersion -lt $MinVersion) {
Write-Warning «This script requires Windows Server 2016 or later. Current OS: $($OSInfo.Caption)»
exit
}
# Initialize variables
$ComputerName = $env:COMPUTERNAME
$Date = Get-Date -Format «yyyy-MM-dd HH:mm:ss»
$CutoffDate = (Get-Date).AddDays(-30)
$LogPath = «$env:TEMP\ProfileCleanup.log»
$ReportPath = «$env:TEMP\ProfileCleanup_$($ComputerName)_$(Get-Date -Format ‘yyyyMMdd_HHmmss’).csv»
$DetailedReportPath = «$env:TEMP\ProfileCleanup_Detailed_$($ComputerName)_$(Get-Date -Format ‘yyyyMMdd_HHmmss’).txt»
function Write-Log {
param($Message)
$LogMessage = «$(Get-Date -Format ‘yyyy-MM-dd HH:mm:ss’): $Message»
Add-Content -Path $LogPath -Value $LogMessage
Add-Content -Path $DetailedReportPath -Value $LogMessage
Write-Host $Message
}
function Get-UserSID {
param (
[string]$Username,
[string]$ProfilePath
)
Write-Log «Attempting to get SID for user: $Username»
try {
# Method 1: Try getting SID from profile path
$profileList = Get-WmiObject -Class Win32_UserProfile |
Where-Object { $_.LocalPath -eq $ProfilePath }
if ($profileList.SID) {
Write-Log «Found SID using WMI: $($profileList.SID)»
return $profileList.SID
}
# Method 2: Try getting SID from ProfileList registry
$profileListPath = «HKLM:\SOFTWARE\Microsoft\Windows NT\CurrentVersion\ProfileList»
Get-ChildItem $profileListPath | ForEach-Object {
$profileItem = Get-ItemProperty $_.PSPath
if ($profileItem.ProfileImagePath -eq $ProfilePath) {
Write-Log «Found SID using Registry: $($_.PSChildName)»
return $_.PSChildName
}
}
# Method 3: Try using Windows API
Add-Type -AssemblyName System.DirectoryServices.AccountManagement
$ctx = New-Object System.DirectoryServices.AccountManagement.PrincipalContext(‘Machine’)
$user = [System.DirectoryServices.AccountManagement.UserPrincipal]::FindByIdentity($ctx, $Username)
if ($user -and $user.Sid) {
Write-Log «Found SID using Windows API: $($user.Sid.Value)»
return $user.Sid.Value
}
}
catch {
Write-Log «Error getting SID for $Username : $_»
}
Write-Log «Could not find SID for $Username»
return $null
}
function Get-ProfileLastActivity {
param (
[string]$ProfilePath,
[string]$Username
)
$activityDates = @()
Write-Log «Checking activity for profile: $Username»
try {
# Method 1: Check Event Log for user logons (most reliable)
try {
$startTime = (Get-Date).AddDays(-30)
$logonEvents = Get-EventLog -LogName Security -After $startTime -InstanceId 4624 -ErrorAction Stop |
Where-Object { $_.ReplacementStrings[5] -eq $Username }
if ($logonEvents) {
$lastLogon = ($logonEvents | Measure-Object TimeGenerated -Maximum).Maximum
$activityDates += $lastLogon
Write-Log «Last logon event: $lastLogon»
}
}
catch {
Write-Log «No logon events found for $Username»
}
# Method 2: Check Recent Items folder
$recentPath = Join-Path -Path $ProfilePath -ChildPath «AppData\Roaming\Microsoft\Windows\Recent»
if (Test-Path $recentPath) {
$recentFiles = Get-ChildItem -Path $recentPath -File -Recurse -ErrorAction SilentlyContinue
if ($recentFiles) {
$lastRecent = ($recentFiles | Measure-Object LastWriteTime -Maximum).Maximum
$activityDates += $lastRecent
Write-Log «Recent items last activity: $lastRecent»
}
}
# Method 3: Check high-activity folders
$activityPaths = @(
«AppData\Local\Microsoft\Windows\Explorer»,
«AppData\Local\Microsoft\Windows\INetCache»,
«Downloads»,
«Desktop»
)
foreach ($path in $activityPaths) {
$fullPath = Join-Path -Path $ProfilePath -ChildPath $path
if (Test-Path $fullPath) {
$items = Get-ChildItem -Path $fullPath -Recurse -File -ErrorAction SilentlyContinue
if ($items) {
$lastActivity = ($items | Measure-Object LastWriteTime -Maximum).Maximum
$activityDates += $lastActivity
Write-Log «$path last activity: $lastActivity»
}
}
}
if ($activityDates.Count -gt 0) {
$mostRecent = ($activityDates | Measure-Object -Maximum).Maximum
Write-Log «Most recent activity for $Username : $mostRecent»
return $mostRecent
}
}
catch {
Write-Log «Error checking profile activity for $Username : $_»
}
Write-Log «No activity dates found for $Username»
return $null
}
function Remove-ProfileRegistry {
param (
[string]$Username,
[string]$SID
)
Write-Log «Starting registry cleanup for user: $Username (SID: $SID)»
$removedKeys = @()
try {
# Registry paths to check
$registryPaths = @(
«HKLM:\SOFTWARE\Microsoft\Windows NT\CurrentVersion\ProfileList\$SID»,
«HKLM:\SOFTWARE\Microsoft\Windows NT\CurrentVersion\ProfileGuid\$SID»,
«HKLM:\SOFTWARE\Microsoft\Windows NT\CurrentVersion\NetworkList\Profiles\$SID»,
«HKLM:\SOFTWARE\Microsoft\Windows\CurrentVersion\Explorer\UserAssist\$SID»,
«HKLM:\SYSTEM\CurrentControlSet\Control\Terminal Server\WinStations\RDP-Tcp\UserProfiles\$SID»,
«HKLM:\SOFTWARE\Microsoft\Windows NT\CurrentVersion\AppCompatFlags\Layers\$SID»,
«HKLM:\SOFTWARE\Microsoft\Windows\CurrentVersion\Explorer\User Shell Folders\$SID»,
«HKLM:\SOFTWARE\Microsoft\Windows\CurrentVersion\Explorer\KnownFolders\$SID»
)
foreach ($path in $registryPaths) {
if (Test-Path $path) {
Write-Log «Removing registry key: $path»
Remove-Item -Path $path -Force -Recurse
$removedKeys += $path
}
}
# Additional parent paths to check
$parentPaths = @(
«HKLM:\SOFTWARE\Microsoft\Windows NT\CurrentVersion\ProfileList»,
«HKLM:\SOFTWARE\Microsoft\Windows NT\CurrentVersion\ProfileGuid»
)
foreach ($parentPath in $parentPaths) {
if (Test-Path $parentPath) {
Get-ChildItem -Path $parentPath -ErrorAction SilentlyContinue | ForEach-Object {
if ($_.PSChildName -eq $SID) {
Write-Log «Removing registry key: $($_.PSPath)»
Remove-Item -Path $_.PSPath -Force -Recurse
$removedKeys += $_.PSPath
}
}
}
}
Write-Log «Registry cleanup completed for user: $Username»
Write-Log «Removed keys: $($removedKeys -join ‘, ‘)»
return $true
}
catch {
Write-Log «Error during registry cleanup for $Username : $_»
return $false
}
}
function Send-ProfileReport {
param (
[array]$DeletedProfiles
)
if ($DeletedProfiles.Count -eq 0) {
Write-Log «No profiles were deleted — skipping email report»
return
}
$EmailBody = @»
<html>
<body style=»font-family: Arial, sans-serif;»>
<h2>Profile Cleanup Report — $ComputerName</h2>
<p>Date: $Date</p>
<table style=»border-collapse: collapse; width: 100%;»>
<tr style=»background-color: #f2f2f2;»>
<th style=»border: 1px solid #ddd; padding: 8px; text-align: left;»>Username</th>
<th style=»border: 1px solid #ddd; padding: 8px; text-align: left;»>Last Activity</th>
<th style=»border: 1px solid #ddd; padding: 8px; text-align: left;»>Profile Path</th>
<th style=»border: 1px solid #ddd; padding: 8px; text-align: left;»>Action</th>
</tr>
«@
foreach ($profile in $DeletedProfiles) {
$EmailBody += @»
<tr>
<td style=»border: 1px solid #ddd; padding: 8px;»>{0}</td>
<td style=»border: 1px solid #ddd; padding: 8px;»>{1}</td>
<td style=»border: 1px solid #ddd; padding: 8px;»>{2}</td>
<td style=»border: 1px solid #ddd; padding: 8px;»>{3}</td>
</tr>
«@ -f $profile.Username, $profile.LastActivity, $profile.ProfilePath, $profile.Action
}
$EmailBody += @»
</table>
<p style=»color: #666;»>Generated by Profile Cleanup Script on $ComputerName</p>
<p style=»color: #666;»>Complete report saved to: $ReportPath</p>
<p style=»color: #666;»>Detailed log saved to: $DetailedReportPath</p>
</body>
</html>
«@
$EmailParams = @{
From = $EmailFrom
To = $EmailTo
Subject = «Profile Cleanup Report — $ComputerName — $Date»
Body = $EmailBody
SmtpServer = $SmtpServer
BodyAsHtml = $true
}
try {
Send-MailMessage @EmailParams
Write-Log «Email report sent successfully»
}
catch {
Write-Log «Failed to send email report: $_»
}
}
# Main script execution
Write-Log «Starting profile cleanup on $ComputerName»
Write-Log «Excluded users: $($ExcludedUsers -join ‘, ‘)»
# Get all user profiles
$userProfiles = Get-WmiObject -Class Win32_UserProfile | Where-Object {
-not $_.Special -and $_.LocalPath -match ‘C:\\Users\\’
}
# Initialize report arrays
$Report = @()
$deletedProfiles = @()
# Process each profile
foreach ($profile in $userProfiles) {
try {
$username = Split-Path $profile.LocalPath -Leaf
# Skip excluded users
if ($ExcludedUsers -contains $username) {
Write-Log «Skipping excluded user: $username»
continue
}
Write-Log «Processing profile: $username»
# Get last activity
$lastActivity = Get-ProfileLastActivity -ProfilePath $profile.LocalPath -Username $username
Write-Log «Last detected activity: $lastActivity»
# Check if profile should be kept
if ($lastActivity -and $lastActivity -gt $CutoffDate) {
Write-Log «Profile is active — keeping: $username»
continue
}
# Create report entry
$reportEntry = [PSCustomObject]@{
ComputerName = $ComputerName
Username = $username
LastActivity = $lastActivity
ProfilePath = $profile.LocalPath
DateProcessed = $Date
Action = if ($WhatIf) { «Would be deleted (WhatIf)» } else { «Deleted» }
}
# Process deletion
if (-not $WhatIf) {
Write-Log «Deleting profile: $username»
# Get user SID before deletion
$userSID = Get-UserSID -Username $username -ProfilePath $profile.LocalPath
if ($userSID) {
Write-Log «Found SID for $username : $userSID»
# Delete profile
$profile.Delete()
Write-Log «Profile deleted successfully»
# Clean up registry
$registryCleanup = Remove-ProfileRegistry -Username $username -SID $userSID
if ($registryCleanup) {
Write-Log «Registry cleanup completed successfully for $username»
$reportEntry.Action = «Deleted (with registry cleanup)»
}
else {
Write-Log «Registry cleanup failed for $username»
$reportEntry.Action = «Deleted (registry cleanup failed)»
}
}
else {
Write-Log «Could not find SID for $username — proceeding with profile deletion only»
$profile.Delete()
$reportEntry.Action = «Deleted (no registry cleanup)»
}
}
else {
Write-Log «WhatIf: Would delete profile and registry entries for: $username»
$reportEntry.Action = «Would be deleted with registry cleanup (WhatIf)»
}
$Report += $reportEntry
$deletedProfiles += $reportEntry
}
catch {
Write-Log «Error processing profile $username : $_»
}
Write-Host («-» * 50)
}
# Export full report to CSV
$Report | Export-Csv -Path $ReportPath -NoTypeInformation
Write-Log «Full report exported to: $ReportPath»
# Send email report if requested
if ($SendEmail) {
Send-ProfileReport -DeletedProfiles $deletedProfiles
}
Write-Log «Profile cleanup completed on $ComputerName»
Summary: Learn how to use Windows PowerShell to find all user profiles on a computer, and to display the date when each profile was last used.
Hey, Scripting Guy! I would like to find a good way to see which profiles exist on my laptop. I found a Hey, Scripting Guy! post to do this, but it uses VBScript. Can this be done using Windows PowerShell?
—CW
Hello CW,
Microsoft Scripting Guy Ed Wilson here. A few years ago (actually more like six years ago), there was a Hey, Scripting Guy! Blog post entitled Hey, Scripting Guy! How Can I List All the User Profiles on a Computer? That post talks about enumerating a registry key to find the profile information. The registry location did not change in Windows 7, so the VBScript would still work. Here is the registry location:
HKEY_LOCAL_MACHINE\SOFTWARE\Microsoft\Windows NT\CurrentVersion\ProfileList
The registry location viewed in the Registry Editor appears in the following figure.

Using Windows PowerShell, it is really easy to get and to display registry keys. I can enumerate the profile keys in a single command. However, due to the length of registry keys, I am going to do it in two lines. In the code that follows, I first store the path to the registry (using the HKLM Windows PowerShell drive) in a variable. Next, I use the Get-ChildItem cmdlet (dir is an alias) to list the registry profile keys:
$profileList = ‘HKLM:\SOFTWARE\Microsoft\Windows NT\CurrentVersion\ProfileList’
dir $profilelist
The following illustrates using these two commands, as well as shows the results on my Windows 7 laptop:
PS C:\> $profileList = ‘HKLM:\SOFTWARE\Microsoft\Windows NT\CurrentVersion\ProfileList’
PS C:\> dir $profilelist
Hive: HKEY_LOCAL_MACHINE\SOFTWARE\Microsoft\Windows NT\CurrentVersion\ProfileList
SKC VC Name Property
0 5 S-1-5-18 {Flags, State, RefCount, Sid…}
0 3 S-1-5-19 {ProfileImagePath, Flags, State}
0 3 S-1-5-20 {ProfileImagePath, Flags, State}
0 10 S-1-5-21-124525095-70825963 {ProfileImagePath, Flags, State, Sid…}
0 7 S-1-5-21-1266540227-3509270 {ProfileImagePath, Flags, State, Sid…}
0 8 S-1-5-21-1266540227-3509270 {ProfileImagePath, Flags, State, Sid…}
Now that I have a listing of the profiles on the machine, I need to expand a couple of properties, such as ProfileImagePath and Sid. This should be a simple matter of using the Get-ItemProperty cmdlet to retrieve the name property from the list above. When I do this, however, an error arises. The command and associated error are shown here.

There are actually two problems going on here. The first is that what is displayed under the Name column in the default output from the Get-Childitem cmdlet is not the actual value stored in the actual name property. The second problem is that even if that were fixed, the value HKEY_LOCAL_MACHINE that the name property contains as part of the value is not the name of the Windows PowerShell drive used by the Get-ItemProperty cmdlet. I discovered this by piping the results of the Get-ChildItem command to the Format-List cmdlet (fl is an alias for Format-List) and analyzing the output. The following figure illustrates this process.

From the results discovered via Format-List, I ascertain I need to use the pspath property because it includes the registry provider. I can then pipe the results to the Select-Object cmdlet, and choose the ProfileImagePath property and the Sid property. This code and associated output are shown here (the % character is an alias for the Foreach-Object cmdlet and Select is an alias for the Select-Object cmdlet):
PS C:\> $profileList = ‘HKLM:\SOFTWARE\Microsoft\Windows NT\CurrentVersion\ProfileList’
PS C:\> Get-childItem ‘HKLM:\SOFTWARE\Microsoft\Windows NT\CurrentVersion\ProfileList’ | % {Get-ItemProperty $_.pspath } | Select profileImagePath, sid
ProfileImagePath Sid
C:\windows\system32\config\systemprofile {1, 1, 0, 0…}
C:\Windows\ServiceProfiles\LocalService
C:\Windows\ServiceProfiles\NetworkService
C:\Users\edwils {1, 5, 0, 0…}
C:\Users\UpdatusUser {1, 5, 0, 0…}
C:\Users\Administrator {1, 5, 0, 0…}
CW, that is an interesting excursion into working with the registry to retrieve user profile information. However, if it were me, I would just use Windows Management Instrumentation (WMI) instead. In fact, it returns even more information that is obtainable via the registry. Here is a simple command to return exactly the same information we just got from the registry (gwmi is an alias for the Get-WmiObject cmdlet):
gwmi win32_userprofile | select localpath, sid
The command and associated output are shown here:
PS C:\> gwmi win32_userprofile | select localpath, sid
localpath sid
——— —
C:\Users\Administrator S-1-5-21-1266540227-3509270964-2815946151-500
C:\Users\UpdatusUser S-1-5-21-1266540227-3509270964-2815946151-1001
C:\Users\edwils S-1-5-21-124525095-708259637-1543119021-179756
C:\Windows\ServiceProfiles\NetworkService S-1-5-20
C:\Windows\ServiceProfiles\LocalService S-1-5-19
C:\windows\system32\config\systemprofile S-1-5-18
If I run the WMI command with administrator rights, I can find the last time each profile was used. This information might be useful from a cleanup perspective. Here is the command to do that. Here are the aliases the following command uses:
PS C:\> Get-Alias gwmi, select, ft
CommandType Name Definition
Alias gwmi Get-WmiObject
Alias select Select-Object
Alias ft Format-Table
Here is the code to get the user profiles, convert the time from WMI format to a regular date time value, and display the path and SID:
gwmi win32_userprofile |
select @{LABEL=”last used”;EXPRESSION={$_.ConvertToDateTime($_.lastusetime)}},
LocalPath, SID | ft -a
CW, that is all there is to finding profiles on a computer. Join me tomorrow for more cool Windows PowerShell stuff.
I invite you to follow me on Twitter and Facebook. If you have any questions, send email to me at scripter@microsoft.com, or post your questions on the Official Scripting Guys Forum. See you tomorrow. Until then, peace.
Ed Wilson, Microsoft Scripting Guy
Author
The «Scripting Guys» is a historical title passed from scripter to scripter. The current revision has morphed into our good friend Doctor Scripto who has been with us since the very beginning.

When trying to list all profiles, you need a script that can account for a variety of scenarios.
An everyday task that many admins must perform when working with both Windows server and client operating systems is listing all user profiles. A user’s profile is the usual place that every installed application, as well as Windows itself, places files
and folders specific to a particular user. If an admin needs to remove, add or modify individual files for all users via a script, the usual reaction is to enumerate all of the folders in C:\Users. Since C:\Users is the folder location for most users, simply identifying each of these folders is sufficient. But what if we need to listall profiles, including those owned by SYSTEM, Network Service and other operating system-specific profiles? Or, what happens if we’re working with Windows XP, and the profiles are stored in C:\Documents and Settings instead? We need a script that can account for all of these
scenarios.
To create a more robust script to list user profiles, we can’t simply list all of the folders in C:\Users. We need to query a location that will always point to all user profiles on a system, and for that, we need
to head to the registry.
Read: Working With Windows Services In PowerShell
The registry contains a key called ProfileList located in HKEY_LOCAL_MACHINE\Software\Microsoft\Windows NT\CurrentVersion. This registry key contains one subkey for each user profile on a Windows machine. Inside of each
of these subkeys is a registry value called ProfileImagePath that includes the profile path for all users.
Once we know this location, it is then a matter of figuring out how to get PowerShell to enumerate all of these values. Since PowerShell
has a registry provider already built-in, we can use Get-ChildItem to enumerate all of these subkeys. You can see below that besides the standard system profiles, I just have a single Adam user on my system.
PS> Get-ChildItem 'HKLM:\Software\Microsoft\Windows NT\CurrentVersion\ProfileList'Hive: HKEY_LOCAL_MACHINE\Software\Microsoft\Windows NT\CurrentVersion\ProfileList
Name Property
---- --------
S-1-5-18 Flags : 12
ProfileImagePath : C:\Windows\system32\config\systemprofile
RefCount : 1
Sid : {1, 1, 0, 0...}
State : 0
S-1-5-19 ProfileImagePath : C:\Windows\ServiceProfiles\LocalService
Flags : 0
State : 0
S-1-5-20 ProfileImagePath : C:\Windows\ServiceProfiles\NetworkService
Flags : 0
State : 0
S-1-5-21-3385963305-808838737- ProfileImagePath : C:\Users\defaultuser0
1911667508-1000 Flags : 0
State : 0
Sid : {1, 5, 0, 0...}
ProfileAttemptedProfileDownloadTimeLow : 0
ProfileAttemptedProfileDownloadTimeHigh : 0
ProfileLoadTimeLow : 0
ProfileLoadTimeHigh : 0
RefCount : 0
RunLogonScriptSync : 0
S-1-5-21-3385963305-808838737- ProfileImagePath : C:\Users\Adam
1911667508-1002 Flags : 0
State : 0
Sid : {1, 5, 0, 0...}
ProfileAttemptedProfileDownloadTimeLow : 0
ProfileAttemptedProfileDownloadTimeHigh : 0
ProfileLoadTimeLow : 0
ProfileLoadTimeHigh : 0
RefCount : 15
RunLogonScriptSync : 0
Being able to see these profiles is a start, but we will need to use the specific folder paths in our script somewhere. For that, we only have to see the values of ProfileImagePath for each user. To return the registry value for each
of the user’s subkeys, we will invoke the GetValue() method on each of the registry keys to just see the user profile path.
PS> Get-ChildItem 'HKLM:\Software\Microsoft\Windows NT\CurrentVersion\ProfileList' | ForEach-Object { $_.GetValue('ProfileImagePath') }
 C:\Windows\system32\config\systemprofile
 C:\Windows\ServiceProfiles\LocalService
 C:\Windows\ServiceProfiles\NetworkService
 C:\Users\defaultuser0
 C:\Users\Adam
By looping over each registry key with ForEach-Object and then calling the GetValue() method on each ProfileImagePath value, it will now return only the paths we’re after. Once you’ve got the paths to
each user profile, additional checks or codes can be performed on each folder. For example, each user’s temp folder path is located in the AppData\Local\Temp folder. To enumerate every user’s temp folder, you could add a command inside
of your loop to list those files.
PowerShell PS> Get-ChildItem 'HKLM:\Software\Microsoft\Windows
NT\CurrentVersion\ProfileList' | ForEach-Object {      $profilePath =
$_.GetValue('ProfileImagePath')     Get-ChildItem -Path
"$profilePath\AppData\Local\Temp" }
Once you’ve got a loop that includes every user profile path, you’re open to doing anything you’d like to files or folders inside of each of those paths!
Администраторы время от времени должны удалять старые профили пользователей (уволенные пользователи, неактивные пользователи, и т.д.) в каталоге C:\Users на рабочих станциях и серверах Windows. Чаще всего с задачей очисткой профилей пользователей Windows сталкиваются на терминальных серверах RDS (Remote Desktop Services).
Основная проблема терминальных серверов – постоянный рост размеров каталогов профилей пользователей на диске. Частично эта проблема решается политиками квотирования размера профиля пользователя с помощью FSRM или NTFS квот, использованием профилей типа FSLogix или User Profile Disk, перемещаемыми папками и т.д. Но при большом количестве RDS пользователей в папке C:\Users со временем накапливается огромное количество каталогов с неиспользуемыми профилями пользователей.
Содержание:
- Как вручную удалить профиль пользователя в Windows?
- Групповая политика для автоматической очистки старых профилей
- PowerShell скрипт для удаления старых профилей пользователей в Windows
Как вручную удалить профиль пользователя в Windows?
В Windows вы можете вручную удалить профиль пользователя через панель управления.
- Откройте Advanced System Settings (команда
SystemPropertiesAdvanced
) -> User Profiles -> Settings; - В этом окне перечислен список всех профилей пользователей (локальных и доменных), которые хранятся на этом компьютере. Размер каждого профиля пользователя на диске указан в столбце Size.
- Выберите пользователя, чей профиль нужно удалить и нажмите кнопку Delete.


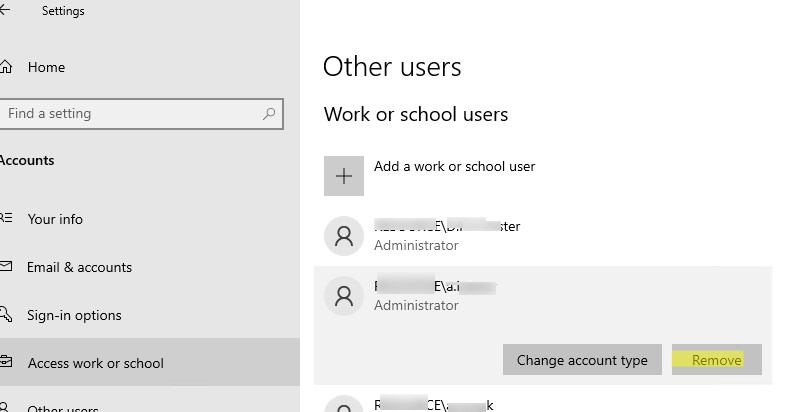
В Windows 11/10 и Windows Server 2022/2019 вы можете удалить профили пользователей с диска через приложение Settings. Перейдите в раздел Accounts -> Access work and school (или выполните команду быстрого доступа
ms-settings:otherusers
). Выберите пользователя и нажмите Remove чтобы удалить его данные с компьютера.
При корректном удалении профиля пользователя с диска будет удален каталог профиля в C:\Users и запись о пользователе в реестре.
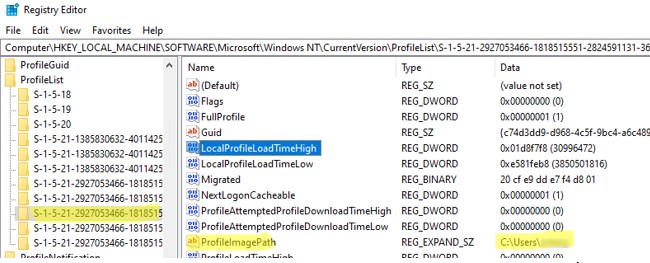
Многие начинающиеся администраторы пытаются вручную удалить каталог с профилем пользователя из папки C:\Users. В этом случае нужно обязательно вручную удалить информацию о профиле из реестра Windows:
- Откройте редактор реестра
regedit.exe
; - Перейдите в ветку HKEY_LOCAL_MACHINE\SOFTWARE\Microsoft\Windows NT\CurrentVersion\ProfileList
- Для каждого пользователя, выполнившего локальный вход в систему (этот метод входа должен быть разрешен пользователю настройками параметра Allow log on locally в GPO), создается отдельная ветка с SID пользователя в качестве имени;
- Вы можете найти раздел реестра, соответствующий пользователю по SID, или можете вручную просмотреть содержимое всех вложенных разделв, пока не найдете раздел, в котором значение ProfileImagePath указывает на каталог с профилем пользователя на диске (например,
C:\Users\kbuldogov
);
- Удалите данный раздел реестра, чтобы завершить корректное удаление профиля.
Также вы можете удалить профиль конкретного пользователя с помощью PowerShell:
Get-CimInstance -Class Win32_UserProfile | Where-Object { $_.LocalPath.split(‘\’)[-1] -eq 'kbuldogov' } | Remove-CimInstance
Эта команда удалит как каталог на диске, так и ссылку на профиль пользователя kbuldogov в реестре HKEY_LOCAL_MACHINE\SOFTWARE\Microsoft\Windows NT\CurrentVersion\ProfileList.
Эта команда будет работать как в Windows PowerShell, так и в новых версиях PowerShell Core 6.x,7.x
Можно удалить профиль пользователя на удаленном компьютере с помощью PowerShell Remoting и командлета Invoke-Command:
$compname="wks21s32"
$user = "kbuldogov"
Invoke-Command -ComputerName $compname -ScriptBlock {
param($user)
Get-CimInstance -Class Win32_UserProfile | Where-Object { $_.LocalPath.split(‘\’)[-1] -eq $user } | Remove-CimInstance
} -ArgumentList $user
Групповая политика для автоматической очистки старых профилей
В Windows есть специальный параметр групповой политики для автоматического удаления старых профилей пользователей старше xx дней. Вы можете включить этот параметр с помощью локального редактора GPO (
gpedit.msc
) или с помощью консоли управления доменными GPO (
gpmc.msc
). В этом примере на назначим политику автоматической очистки профилей на хосты в ферме RDS, которые вынесены в отдельный контейнер (Organizational Unit) Active Directory.
Прежде чем применять политику удаления старых профилей ко всем хостам, настоятельно рекомендуем проверить ее на тестовом сервере. Выведите один из серверов RDSH в режим обслуживания и протестируйте политику на нем.
- Найдите OU с компьютерами/серверами, на который вы хотите применить политику очистки старых профилей пользователей. Щелкните по OU и выберите Create a GPO in this domain and Link it here;
- Укажите имя политики и отредактируйте GPO;
- Перейдите в раздел Конфигурация компьютера -> Административные шаблоны -> Система -> Профили пользователей (Computer Configuration -> Administrative Templates -> System -> User Profiles);
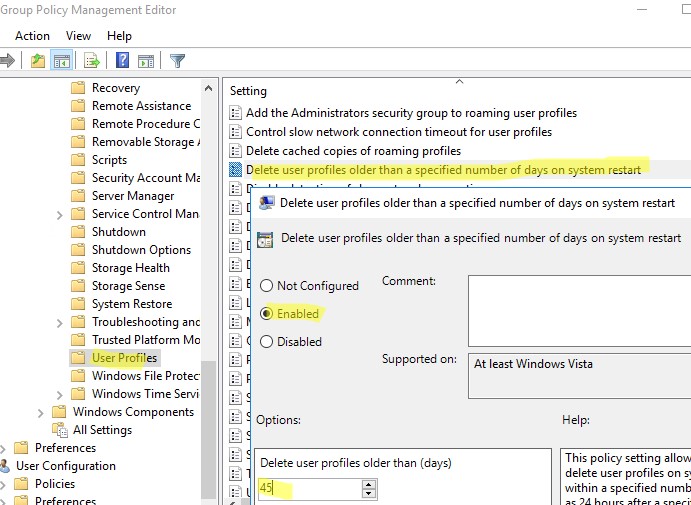
- Откройте параметр “Удалять при перезагрузке системы профили пользователей по истечении указанного числа дней” (Delete user profiles older than a specified number days on system restart);
- Включите политику и укажите через сколько дней профиль пользователя считается неактивным и “Служба профилей пользователей Windows” можно автоматически удалить такой профиль при следующей перезагрузке. Обычно тут стоит указать не менее 45-90 дней;

- После применения новых настроек групповых политк, служба User Profile Services на ваших серверах Windows будет автоматически удалять старые профили пользователей. Удаление выполняется при перезагрузке сервера.
При использовании этой политики нужно быть уверенным, что при выключении/перезагрузке сервера нет проблем с системным временем (время не сбивается), иначе могут быть удалены профили активных пользователей.
Другой недостаток — вы не можете запретить удаление определенных профилей, например, локальных учетных записей, администраторов и т.д.
В версиях до Windows 11/10 и Windows Server 2022/2019 эта политика работала некорректно. Дело в том, что неактивноть профиля пользователя ранее определялась по дате именения файла NTUSER.dat. При установке обновлений Windows, служба Trusted Installer может менять дату изменения файла NTUSER.dat в профиле каждого пользователя. В результате служба Win32_UserProfile считает, что профиль использовался недавно.
В современных версиях Windows эта политика проверяет активность профиля пользователей по параметрам LocalProfileUnloadTimeLow и LocalProfileUnloadTimeHigh в ветке
HKEY_LOCAL_MACHINE\SOFTWARE\Microsoft\Windows NT\CurrentVersion\ProfileList\<User Sid>
.
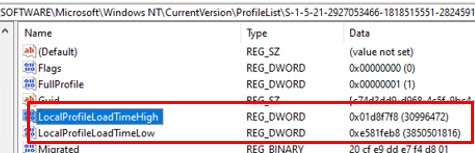
Вы можете получить значения параметров реестра LocalProfileLoadTimeLow и LocalProfileUnloadTimeHigh в привычном формате времени с помощью скрипта:
$profilelist = Get-ChildItem "HKLM:\SOFTWARE\Microsoft\Windows NT\CurrentVersion\ProfileList"
foreach ($p in $profilelist) {
    try {
        $objUser = (New-Object System.Security.Principal.SecurityIdentifier($p.PSChildName)).Translate([System.Security.Principal.NTAccount]).value
    } catch {
        $objUser = "[UNKNOWN]"
  }
    Remove-Variable -Force LTH,LTL,UTH,UTL -ErrorAction SilentlyContinue
    $LTH = '{0:X8}' -f (Get-ItemProperty -Path $p.PSPath -Name LocalProfileLoadTimeHigh -ErrorAction SilentlyContinue).LocalProfileLoadTimeHigh
    $LTL = '{0:X8}' -f (Get-ItemProperty -Path $p.PSPath -Name LocalProfileLoadTimeLow -ErrorAction SilentlyContinue).LocalProfileLoadTimeLow
    $UTH = '{0:X8}' -f (Get-ItemProperty -Path $p.PSPath -Name LocalProfileUnloadTimeHigh -ErrorAction SilentlyContinue).LocalProfileUnloadTimeHigh
    $UTL = '{0:X8}' -f (Get-ItemProperty -Path $p.PSPath -Name LocalProfileUnloadTimeLow -ErrorAction SilentlyContinue).LocalProfileUnloadTimeLow
    $LoadTime = if ($LTH -and $LTL) {
        [datetime]::FromFileTime("0x$LTH$LTL")
    } else {
        $null
    }
    $UnloadTime = if ($UTH -and $UTL) {
        [datetime]::FromFileTime("0x$UTH$UTL")
    } else {
        $null
    }
    [pscustomobject][ordered]@{
        User = $objUser
        SID = $p.PSChildName
        Loadtime = $LoadTime
        UnloadTime = $UnloadTime
    }
}

PowerShell скрипт для удаления старых профилей пользователей в Windows
Вы можете удалять профили неактивных или заблокированных пользователей с помощью скрипта PowerShell.
Сначала попробуем подсчитать размер профиля каждого пользователя в папке C:\Users c помощью простого скрипта из статьи “Вывести размер папок с помощью PowerShell”:
gci -force ‘C:\Users\’-ErrorAction SilentlyContinue | Where { !($_.Attributes -match " ReparsePoint") }| ? { $_ -is [io.directoryinfo] } | % {
$len = 0
gci -recurse -force $_.fullname -ErrorAction SilentlyContinue | % { $len += $_.length }
$_.fullname, ‘{0:N2} GB’ -f ($len / 1Gb)
$sum = $sum + $len
}
“Общий размер профилей”,'{0:N2} GB’ -f ($sum / 1Gb)
Итого суммарный размер всех профилей пользователей в каталоге C:\Users около 22 Гб.
Теперь выведем список пользователей, профиль которых не использовался более 60 дней. Для поиска можно использовать значение атрибута профиля LastUseTime.
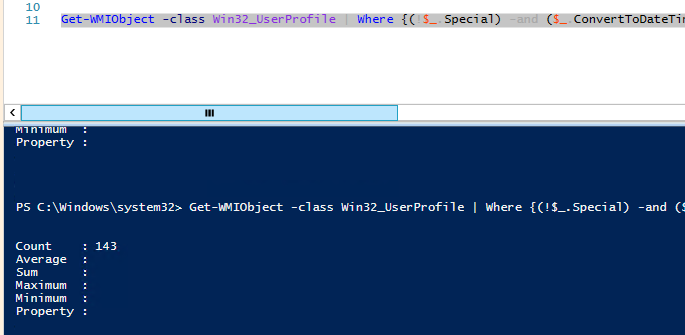
Get-WMIObject -class Win32_UserProfile | Where {(!$_.Special) -and ($_.ConvertToDateTime($_.LastUseTime) -lt (Get-Date).AddDays(-60))}| Measure-Object
У меня на терминальном сервере оказалось 143 профиля неактивных пользователей (общим размером около 10 Гб).
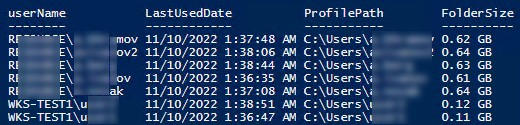
Следующий PowerShell скрипт выведет список подробную информацию о профилях пользователей, которые не обновлялись более 60 дней. Скрипт сконвертирует SID пользователя в имя, посчитает размер профиля каждого пользователя и выведет все в таблице:
$allprofilesinfo = @()
$OldProfiles=Get-WMIObject -class Win32_UserProfile | Where {(!$_.Special) -and ($_.ConvertToDateTime($_.LastUseTime) -lt (Get-Date).AddDays(-60))}
Foreach ($OldProfile in $OldProfiles)
   {$objSID = New-Object System.Security.Principal.SecurityIdentifier ($OldProfile.SID)
    $objUser = $objSID.Translate( [System.Security.Principal.NTAccount])
        $userinfo = New-Object PSObject -Property @{
            userName = $objUser.Value
            ProfilePath = $OldProfile.localpath
            LastUsedDate = $OldProfile.ConvertToDateTime($OldProfile.LastUseTime)
            FolderSize =  "{0:N2} GB" -f ((gci –force $OldProfile.localpath –Recurse -ErrorAction SilentlyContinue| measure Length -s).sum / 1Gb)
        }
    $allprofilesinfo += $userinfo
   }
$allprofilesinfo
Чтобы удалить все эти профили достаточно добавить перенаправить список на команду Remove-WmiObject (перед использование скрипта удаления желательно несколько раз перепроверить его вывод с помощью параметра –WhatIf ):
Get-WMIObject -class Win32_UserProfile | Where {(!$_.Special) -and (!$_.Loaded) -and ($_.ConvertToDateTime($_.LastUseTime) -lt (Get-Date).AddDays(-30))} | Remove-WmiObject –WhatIf
Как мы уже упомянули выше, при установке некоторых обновлений Windows, служба Trusted installer может менять дату изменения файла NTUSER.dat в профиле каждого пользователя.
На скриншоте выше видно, что все профили были изменены примерно в одно и тоже время. Проверьте дату последней установки обновлений в Windows:
gwmi win32_quickfixengineering |sort installedon |select InstalledOn -Last 1
Или с помощью модуля PSWindowsUpdate:
Get-WUHistory | Select-Object -First 20
Скорее всего она совпадет с датой изменения профилей. Поэтому в старых версиях Windows можно получить список неактивных профилей с помощью другого скрипта, который проверяет атрибуту lastwritetime каталога пользователя:
$USERS= (Get-ChildItem -directory -force 'C:\Users' | Where { ((Get-Date) — $_.lastwritetime).days -ge 60 } | % {'c:\users\' + $_.Name})
foreach ($User in $USERS) {
Get-WMIObject -class Win32_UserProfile | Where {(!$_.Special) -and (!$_.Loaded) -and ($_.LocalPath -eq $User)} | Remove-WmiObject WhatIf }
Чтобы не удалять профили некоторых пользователей, например, специальные аккаунты System и Network Service, учетную запись локального администратора, пользователей с активными сессиями, список аккаунтов-исключений), нужно модифицировать скрипт следующим образом:
#Список аккаунтов, чьи профили нельзя удалять
$ExcludedUsers ="Public","zenoss","svc",”user_1”,”user_2”
$LocalProfiles=Get-WMIObject -class Win32_UserProfile | Where {(!$_.Special) -and (!$_.Loaded) -and ($_.ConvertToDateTime($_.LastUseTime) -lt (Get-Date).AddDays(-60))}
foreach ($LocalProfile in $LocalProfiles)
{
if (!($ExcludedUsers -like $LocalProfile.LocalPath.Replace("C:\Users\","")))
{
$LocalProfile | Remove-WmiObject
Write-host $LocalProfile.LocalPath, "профиль удален” -ForegroundColor Magenta
}
}
Вы можете настроить запуск этого скрипта через shutdown скрипт групповой политики или по расписанию заданием планировщика. (перед настройкой автоматического удаления профилей внимательно протестируйте скрипт в своей среде!).
Можно модифицировать скрипт, чтобы автоматически удалять пользователи всех пользователей, которые добавлены в определенную группу AD. Например, вы хотите автоматически удалять профили уволившихся пользователей. Просто добавьте такие учетные записи в группу DisabledUsers и выполните на сервере скрипт:
$users = Get-ADGroupMember -Identity DisabledUsers | Foreach {$_.Sid.Value}
$profiles = Get-WmiObject Win32_UserProfile
$profiles | Where {$users -eq $_.Sid} | Foreach {$_.Delete()}
The Windows Registry is a hierarchical database that stores configuration settings for the operating system and applications. It’s a critical part of Windows, and it’s important to know how to check if a registry key exists. This can be done using the PowerShell command `Get-ItemProperty`.
In this article, we’ll show you how to use the `Get-ItemProperty` command to check if a registry key exists. We’ll also provide some examples of how you can use this command to troubleshoot problems with your Windows system.
What is the Windows Registry?
The Windows Registry is a database that stores configuration settings for the operating system and applications. It’s a hierarchical database, which means that it’s organized into a tree-like structure. The root of the registry is called `HKLM`, which stands for “HKEY_LOCAL_MACHINE”. This key contains settings for the local computer.
The registry also contains other keys, such as `HKCU`, which stands for “HKEY_CURRENT_USER”. This key contains settings for the current user. Other keys include `HKCR`, which stores information about file types and extensions, and `HKLM`, which stores settings for the operating system.
How to check if a registry key exists using PowerShell
To check if a registry key exists, you can use the `Get-ItemProperty` command. This command takes the following syntax:
Get-ItemProperty -Path -Name
For example, to check if the `HKEY_CURRENT_USER\Software\Microsoft\Windows\CurrentVersion\Run` key exists, you would use the following command:
Get-ItemProperty -Path HKCU:\Software\Microsoft\Windows\CurrentVersion\Run
This command would return a list of values for the `Run` key. If the key doesn’t exist, the command will return an empty list.
Examples
Here are some examples of how you can use the `Get-ItemProperty` command to check if a registry key exists:
- To check if the `HKEY_CURRENT_USER\Software\Microsoft\Windows\CurrentVersion\Run` key exists, you would use the following command:
Get-ItemProperty -Path HKCU:\Software\Microsoft\Windows\CurrentVersion\Run
- To check if the `HKEY_LOCAL_MACHINE\SOFTWARE\Microsoft\Windows NT\CurrentVersion\Windows` key exists, you would use the following command:
Get-ItemProperty -Path HKLM:\SOFTWARE\Microsoft\Windows NT\CurrentVersion\Windows
- To check if the `HKEY_CLASSES_ROOT\*\shell\open\command` key exists, you would use the following command:
Get-ItemProperty -Path HKCR:\*\shell\open\command
The `Get-ItemProperty` command is a powerful tool that you can use to check if a registry key exists. It’s a simple command to use, and it can be used to troubleshoot problems with your Windows system.
| Header 1 | Header 2 | Header 3 |
|---|---|---|
| Data 1 | Data 2 | Data 3 |
| Data 4 | Data 5 | Data 6 |
| Command | Description | Example |
|---|---|---|
| Get-ChildItem -Path HKLM:\SOFTWARE\Wow6432Node\Microsoft\Windows\CurrentVersion\Run | Where-Object { $_.Name -eq ‘mykey’ } | Gets the value of a registry key. | This command will get the value of the registry key `mykey` under the path `HKLM:\SOFTWARE\Wow6432Node\Microsoft\Windows\CurrentVersion\Run`. |
| Test-Path -Path HKLM:\SOFTWARE\Wow6432Node\Microsoft\Windows\CurrentVersion\Run\mykey | Checks if a registry key exists. | This command will check if the registry key `mykey` under the path `HKLM:\SOFTWARE\Wow6432Node\Microsoft\Windows\CurrentVersion\Run` exists. |
The Windows registry is a hierarchical database that stores configuration settings for the Windows operating system. Registry keys are used to organize the registry into a tree-like structure. Each registry key can contain subkeys and values.
You can use PowerShell to check if a registry key exists. This can be useful for troubleshooting problems or for scripting tasks.
How to check if a registry key exists using PowerShell
To check if a registry key exists using PowerShell, you can use the following steps:
1. Get the path to the registry key.
2. Use the `Get-ItemProperty` cmdlet to get the value of the `IsPresent` property.
3. If the `IsPresent` property is `True`, the registry key exists.
Here is an example of how to check if the `HKLM:\Software\Microsoft\Windows\CurrentVersion\Run` registry key exists:
Get-ItemProperty HKLM:\Software\Microsoft\Windows\CurrentVersion\Run | Select-Object IsPresent
This command will return the following output:
IsPresent : True
This output indicates that the `HKLM:\Software\Microsoft\Windows\CurrentVersion\Run` registry key exists.
Examples of checking if a registry key exists using PowerShell
Here are some examples of checking if a registry key exists using PowerShell:
- Check if the `HKLM:\Software\Microsoft\Windows\CurrentVersion\Run` registry key exists:
Get-ItemProperty HKLM:\Software\Microsoft\Windows\CurrentVersion\Run | Select-Object IsPresent
- Check if the `HKCU:\Software\MyCompany\MyApp` registry key exists:
Get-ItemProperty HKCU:\Software\MyCompany\MyApp | Select-Object IsPresent
- Check if the `HKLM:\Software\Wow6432Node\Microsoft\Windows\CurrentVersion\Run` registry key exists:
Get-ItemProperty HKLM:\Software\Wow6432Node\Microsoft\Windows\CurrentVersion\Run | Select-Object IsPresent
In this article, you learned how to check if a registry key exists using PowerShell. You can use this information to troubleshoot problems or for scripting tasks.
3. Limitations of checking if a registry key exists using PowerShell
The `Get-ItemProperty` cmdlet only returns the value of the `IsPresent` property for registry keys that are of type `DWORD`. This means that if you try to use the `Get-ItemProperty` cmdlet to check if a registry key exists that is not of type `DWORD`, the cmdlet will return an error.
For example, the following command will return an error because the `HKLM:\SOFTWARE\Microsoft\Windows NT\CurrentVersion\ProfileList` registry key is not of type `DWORD`:
Get-ItemProperty -Path HKLM:\SOFTWARE\Microsoft\Windows NT\CurrentVersion\ProfileList -Name IsPresent
The following error will be returned:
Get-ItemProperty : Cannot get property IsPresent of object ‘Microsoft.Win32.RegistryKey’ because the property does not exist.
At line:1 char:1
+ Get-ItemProperty -Path HKLM:\SOFTWARE\Microsoft\Windows NT\CurrentVersion\ProfileList …
+ ~~~~~~~~~~~~~~~~~~~~~~~~~~~~~~~~~~~~~~~~~~~~~~~~~~~~~~~~~~~~~~~~~~~~
+ CategoryInfo : InvalidOperation: (:) [Get-ItemProperty], InvalidOperationException
+ FullyQualifiedErrorId : System.InvalidOperationException,Microsoft.PowerShell.Commands.GetItemPropertyCommand
If you need to check if a registry key exists that is not of type `DWORD`, you can use the following method:
1. Use the `Get-ChildItem` cmdlet to get a list of all the subkeys of the registry key that you want to check.
2. For each subkey, check if the `IsPresent` property is set to `True`.
3. If any of the subkeys have the `IsPresent` property set to `True`, the registry key exists.
For example, the following command will check if the `HKLM:\SOFTWARE\Microsoft\Windows NT\CurrentVersion\ProfileList` registry key exists:
Get-ChildItem -Path HKLM:\SOFTWARE\Microsoft\Windows NT\CurrentVersion\ProfileList | Where-Object { $_.IsPresent -eq $true }
This command will return a list of all the subkeys of the `HKLM:\SOFTWARE\Microsoft\Windows NT\CurrentVersion\ProfileList` registry key that have the `IsPresent` property set to `True`. If the list is not empty, the registry key exists.
4. Best practices for checking if a registry key exists using PowerShell
The following are some best practices for checking if a registry key exists using PowerShell:
1. Use the `Get-ItemProperty` cmdlet to get the value of the `IsPresent` property.
2. If the `IsPresent` property is `True`, the registry key exists.
3. If the `IsPresent` property is `False`, the registry key does not exist.
4. If you need to check if a registry key exists that is not of type `DWORD`, use the following method:
1. Use the `Get-ChildItem` cmdlet to get a list of all the subkeys of the registry key that you want to check.
2. For each subkey, check if the `IsPresent` property is set to `True`.
3. If any of the subkeys have the `IsPresent` property set to `True`, the registry key exists.
5. Avoid using the `Test-Path` cmdlet to check if a registry key exists. The `Test-Path` cmdlet does not return the correct results for registry keys that are not of type `DWORD`.
In this blog post, we discussed how to check if a registry key exists using PowerShell. We covered the following topics:
- How to use the `Get-ItemProperty` cmdlet to check if a registry key exists.
- How to use the `Test-Path` cmdlet to check if a registry key exists.
- The limitations of using the `Get-ItemProperty` cmdlet to check if a registry key exists.
- The best practices for checking if a registry key exists using PowerShell.
We hope that this blog post has been helpful. If you have any questions, please feel free to leave a comment below.
Q: How do I check if a registry key exists in PowerShell?
A: To check if a registry key exists in PowerShell, you can use the following command:
Get-ChildItem -Path HKLM:\Software\ -Name “MyKey” -ErrorAction SilentlyContinue
This command will return a list of all the subkeys under the HKLM:\Software\ hive. If the `MyKey` subkey exists, it will be listed in the output.
Q: What if I want to check if a registry key exists with a specific value?
A: To check if a registry key exists with a specific value, you can use the following command:
Get-ChildItem -Path HKLM:\Software\ -Name “MyKey” -Value “MyValue” -ErrorAction SilentlyContinue
This command will return a list of all the subkeys under the HKLM:\Software\ hive that have the `MyValue` value. If the `MyKey` subkey exists with the `MyValue` value, it will be listed in the output.
Q: What if I want to check if a registry key exists on a remote computer?
A: To check if a registry key exists on a remote computer, you can use the following command:
Get-ChildItem -Path \\RemoteComputer\HKLM:\Software\ -Name “MyKey” -ErrorAction SilentlyContinue
This command will return a list of all the subkeys under the HKLM:\Software\ hive on the remote computer `RemoteComputer`. If the `MyKey` subkey exists, it will be listed in the output.
Q: What if I want to check if a registry key exists in a specific hive?
A: To check if a registry key exists in a specific hive, you can use the following command:
Get-ChildItem -Path HKLM:\System\CurrentControlSet\Services\ -Name “MyService” -ErrorAction SilentlyContinue
This command will return a list of all the subkeys under the HKLM:\System\CurrentControlSet\Services\ hive. If the `MyService` subkey exists, it will be listed in the output.
Q: What if I want to check if a registry key exists and is not empty?
A: To check if a registry key exists and is not empty, you can use the following command:
Get-ChildItem -Path HKLM:\Software\ -Name “MyKey” -ErrorAction SilentlyContinue | Select-Object -ExpandProperty Value
This command will return the value of the `MyKey` subkey. If the subkey exists and is not empty, the value will be returned. Otherwise, the command will return an empty string.
In this blog post, we discussed how to check if a registry key exists in PowerShell. We covered the following topics:
- Using the `Get-ItemProperty` cmdlet
- Using the `Test-Path` cmdlet
- Using the `Registry` module
We also provided some tips for troubleshooting common problems.
We hope this blog post was helpful. If you have any questions, please feel free to leave a comment below.
Author Profile
-
Hatch, established in 2011 by Marcus Greenwood, has evolved significantly over the years. Marcus, a seasoned developer, brought a rich background in developing both B2B and consumer software for a diverse range of organizations, including hedge funds and web agencies.
Originally, Hatch was designed to seamlessly merge content management with social networking. We observed that social functionalities were often an afterthought in CMS-driven websites and set out to change that. Hatch was built to be inherently social, ensuring a fully integrated experience for users.
Now, Hatch embarks on a new chapter. While our past was rooted in bridging technical gaps and fostering open-source collaboration, our present and future are focused on unraveling mysteries and answering a myriad of questions. We have expanded our horizons to cover an extensive array of topics and inquiries, delving into the unknown and the unexplored.